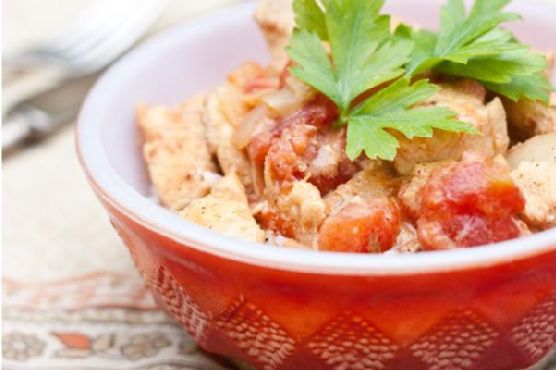
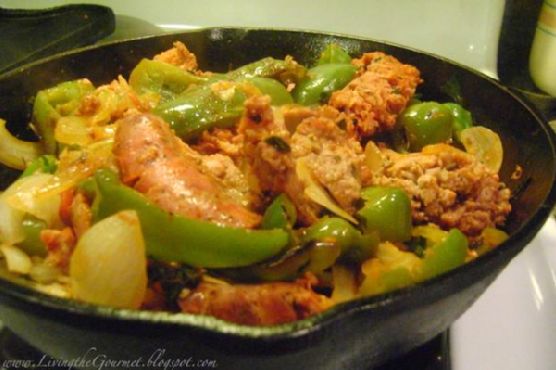
Tag: Easy

  • Authentic Kentucky Bourbon Balls | Made by Meaghan Moineau

    Authentic Kentucky Bourbon Balls | Made by Meaghan Moineau

    Authentic Kentucky Bourbon Balls Recipe

    Welcome to my kitchen! Today, we’re diving into a classic Southern treat that holds a special place in my heart: Authentic Kentucky Bourbon Balls. These delightful confections are not only bursting with rich, nutty flavors but also carry a hint of nostalgia for me. I remember as a child, sneaking into my grandmother’s kitchen during the holidays. The air was thick with the aroma of bourbon and chocolate, and I was always eager to steal a taste from her stash of bourbon balls. Now, I’m excited to share this cherished recipe with you.

    Why You’ll Love It

    There are countless reasons to fall in love with these Authentic Kentucky Bourbon Balls:

    • Rich Flavor: The combination of bourbon and cocoa creates a depth of flavor that’s both indulgent and satisfying.
    • Simple to Make: With just a few ingredients, these treats are incredibly easy to prepare.
    • Perfect for Gifting: These make thoughtful, homemade gifts, perfect for the holiday season.
    • Make-Ahead Friendly: They actually taste better when made in advance, allowing the flavors to meld beautifully.

    Ingredients

    • 1 cup crushed vanilla wafer crumbs
    • 1 cup chopped pecans
    • 1 cup powdered sugar, plus more for rolling
    • 2 tablespoons unsweetened cocoa powder
    • 1/4 cup bourbon
    • 2 tablespoons light corn syrup

    Instructions

    1. In a deep bowl, combine crushed vanilla wafer crumbs, chopped pecans, powdered sugar, and the cocoa.
    2. In a separate bowl, blend the bourbon and corn syrup.
    3. Pour the bourbon mixture into the dry mixture; blend well.
    4. Cover and chill for 3 hours.
    5. Shape small bits of the dough into balls and roll them in the powdered sugar.
    6. Store in the refrigerator overnight in tightly covered containers. You can also make these a few days in advance for the best flavor.

    Tips

    • Use Quality Bourbon: The bourbon you choose will greatly affect the flavor, so opt for a quality brand you enjoy sipping.
    • Chilling is Key: Don’t skip the chilling step. It makes the mixture easier to handle and enhances the flavor.
    • Consistent Size: Use a small cookie scoop to ensure uniform ball sizes for even chilling and a professional look.

    Variations & Substitutions

    While the classic recipe is divine, there are a few tweaks you can make:

    • Nut Swap: Walnuts or almonds can be used instead of pecans for a different twist.
    • Flavored Liqueur: Replace bourbon with a flavored liqueur like amaretto or hazelnut for a unique taste.
    • Dark Chocolate: Substitute cocoa powder with dark chocolate cocoa for a richer chocolate flavor.

    Storage

    Store your bourbon balls in an airtight container in the refrigerator. They can last for up to two weeks, making them ideal for holiday prep. For longer storage, place them in the freezer for up to two months. Just let them thaw in the refrigerator before serving.

    FAQ

    Can I make bourbon balls without alcohol?

    Absolutely! You can substitute the bourbon with apple juice or a non-alcoholic vanilla extract. While the flavor will be different, they’ll still be delicious!

    Is it possible to use dark syrup instead of light corn syrup?

    Yes, but keep in mind that dark syrup will impart a stronger flavor, and it might slightly alter the color of the finished product. If you enjoy a deeper molasses flavor, feel free to experiment.

    Nutrition

    While I don’t have precise nutritional data, these treats are definitely a special indulgence. They are rich and dense, with a good amount of sugar and fat from the pecans and bourbon. Enjoy them in moderation as part of a balanced diet.

    Final Thoughts

    Authentic Kentucky Bourbon Balls are a delightful treat that combines the warmth of bourbon with the sweet richness of cocoa and pecans. Whether you’re making them for a holiday gathering, a special gift, or simply to indulge yourself, these bourbon balls are sure to impress. I hope this recipe brings as much joy to your kitchen as it has to mine. Remember to enjoy the process, savor each bite, and perhaps share a little nostalgia with your loved ones as you make them together. Happy baking!

    Related update: Authentic Kentucky Bourbon Balls

    Related update: Bacon Brownie Cupcakes

  • Indian Butter Chicken | Made by Meaghan Moineau

    Indian Butter Chicken | Made by Meaghan Moineau

    Indian Butter Chicken

    There’s something about the rich, creamy flavors of Indian Butter Chicken that transports me back to my childhood. I remember the sweet aroma that would fill our kitchen as my mother prepared this delightful dish. It was a staple for our family dinners, and its warmth and comforting flavors always brought us together. Now, I’m thrilled to share this cherished recipe with you, hoping it becomes a part of your family gatherings too.

    Why You’ll Love It

    Indian Butter Chicken is a dish that’s sure to win over even the pickiest eaters. Its luscious, creamy sauce envelops tender pieces of chicken, creating a harmonious blend of spices that’s both bold and soothing. Whether you’re a fan of spicy food or prefer something milder, this recipe can be adapted to suit your taste. It’s perfect for a cozy night in, a family dinner, or even a special occasion. Plus, it’s surprisingly easy to make, allowing you to enjoy the taste of a restaurant-quality meal right at home.

    Ingredients

    • 2 tablespoons oil
    • 1 pound chicken breasts, chopped
    • 3 cloves garlic, minced
    • 2 tablespoons garam masala
    • 1 onion, chopped
    • 1 tablespoon ginger, grated
    • Juice of 1 lemon
    • 2 tablespoons butter
    • 1 cup diced tomatoes
    • 1 cup chicken broth
    • 1/2 cup plain yogurt
    • 1/2 cup sour cream
    • Salt and pepper to taste

    Instructions

    1. Start out by adding the oil to your pan and heating it up on medium-high heat.
    2. Add in your chopped chicken, garlic, and garam masala. Swirl it together and cook for about two to three minutes.
    3. Next, add in your onion and ginger. Continue cooking until the chicken is cooked through.
    4. Turn your heat down to medium and add in your lemon juice and butter.
    5. Let the butter melt completely, then add in the tomatoes and broth.
    6. Give the dish a minute or two to heat back up, then stir in the yogurt and sour cream.
    7. Mix it all together and add salt and pepper to taste.
    8. Serve over rice.

    Tips

    For the best results, marinate your chicken in yogurt and spices overnight. This will enhance the flavors and make the chicken even more tender. Additionally, if you prefer a spicier dish, consider adding a pinch of cayenne pepper or a small chopped chili to the recipe.

    Variations & Substitutions

    If you’re looking to switch things up, try using chicken thighs instead of breasts for a richer flavor. You can also substitute coconut milk for sour cream if you prefer a dairy-free version. For a vegetarian option, replace the chicken with paneer or tofu, and use vegetable broth instead of chicken broth.

    Storage

    Leftovers can be stored in an airtight container in the refrigerator for up to 3 days. To reheat, simply warm it on the stove over low heat, stirring occasionally. You can also freeze the dish for up to 2 months. Just make sure to thaw it in the refrigerator overnight before reheating.

    FAQ

    Can I use pre-cooked chicken?

    Yes, you can use pre-cooked chicken. Simply add it to the pan when you add the lemon juice and butter. This will save you some time and still give you the delicious flavor you’re looking for.

    Is this dish very spicy?

    Indian Butter Chicken is typically mild, but you can adjust the heat level to your preference. If you want it spicier, add more garam masala or a pinch of cayenne pepper. For a milder taste, reduce the amount of spices used.

    Nutrition

    This dish is rich in protein, thanks to the chicken and yogurt, and offers a good balance of carbohydrates when served with rice. It’s a hearty meal that provides essential nutrients, but keep in mind that it can be high in calories due to the butter and sour cream. For a lighter version, consider using reduced-fat yogurt and sour cream.

    Final Thoughts

    Indian Butter Chicken is more than just a meal; it’s an experience. It’s a dish that embodies warmth, flavor, and tradition, making it perfect for creating lasting memories with your loved ones. I hope this recipe brings as much joy to your home as it has to mine. So, gather your ingredients, embrace the aromas, and indulge in the delightful taste of Indian Butter Chicken.

    Related update: Indian Butter Chicken

  • Masala-Tofu Burger | Made by Meaghan Moineau

    Masala-Tofu Burger | Made by Meaghan Moineau

    Masala-Tofu Burger

    Introduction

    Imagine a family gathering on a warm summer evening, the aroma of spices wafting through the air as laughter echoes in the backyard. This memory always takes me back to the first time I tasted a Masala-Tofu Burger, a delightful fusion of Indian spices and a beloved Western classic. Growing up in a multicultural family, food was always a bridge that connected us, blending flavors and traditions into something special. Today, I’m excited to share this delicious recipe with you, hoping it brings warmth and joy to your own family gatherings.

    Why You’ll Love It

    This Masala-Tofu Burger is a game-changer for anyone looking to add a flavorful twist to their burger repertoire. The combination of aromatic spices, crunchy veggies, and creamy tofu creates a mouthwatering experience that’s both satisfying and healthy. Whether you’re a vegetarian or simply exploring new flavors, this burger is a fantastic option. It’s easy to make, customizable, and perfect for any occasion.

    Ingredients

    • 1 white onion, diced
    • 1 red, orange, or green bell pepper, diced
    • 1 cup frozen peas-carrots mix
    • 2 green chillies, chopped
    • 1 block of tofu, cubed
    • 1 potato, boiled and diced
    • 3 cloves garlic, minced
    • 1 teaspoon black mustard seeds
    • 1 sprig curry leaves
    • A pinch of hing (asafoetida)
    • 1 teaspoon cumin powder
    • 1/2 teaspoon turmeric
    • 1 lemon, juiced
    • Salt to taste
    • 1/4 cup cilantro, finely chopped
    • 1/2 cup Indian breadcrumbs
    • Vegetable oil
    • PAM Original Flavor Spray
    • 1 red or white onion, thickly sliced
    • 2 beefsteak tomatoes, sliced
    • Mint-cilantro chutney spread
    • 4 Portuguese rolls

    Instructions

    1. In a large skillet over medium-high heat, spray a generous amount of PAM and add some oil. Add mustard seeds and saute for 30 seconds until you hear popping noises.
    2. Add the curry leaves carefully as they may pop in hot oil. Then add the onions and peppers, and sweat for about 30 seconds.
    3. Stir in the minced garlic, chopped chilies, and turmeric. Saute for 5-7 minutes until the onions and peppers are soft.
    4. Add the peas-carrots mix, cumin powder, and salt. Continue to saute for 7-10 minutes until all the veggies are cooked through.
    5. In a small bowl, mix cubed tofu with a pinch of turmeric, cumin powder, coarse black pepper, and optional cayenne pepper. Set aside to marinate briefly.
    6. Add the marinated tofu to the skillet and saute until it is slightly browned and crumbly.
    7. Add juice from half a lemon and half of the chopped cilantro. Mix well, then add the diced, boiled potato and toss until everything is coated. Adjust salt and spices to taste.
    8. Mash the mixture with a masher until mushy and the veggies are small. Set aside to cool.
    9. Once cooled, mix in some breadcrumbs with your hands. Form the mixture into four thick patties. Add more breadcrumbs if needed.
    10. Place the patties on a plate, cover with plastic wrap, and refrigerate until ready to cook.
    11. In a small skillet sprayed with PAM over medium-high heat, cook each patty for about 2 minutes on each side until browned and crispy.
    12. Simultaneously, saute the thick onion slices until charred and slightly soft.
    13. Spread a generous amount of mint-cilantro chutney on each side of the Portuguese rolls, then assemble the burger with the patty, onions, tomatoes, and cilantro leaves.
    14. Serve with a slice of lemon and reduced-fat chips on the side.

    Tips

    • Make sure to press the tofu well before marinating to remove excess moisture for a better texture.
    • If you like it spicy, feel free to add more green chilies or cayenne pepper to the mix.
    • For a gluten-free option, use gluten-free breadcrumbs or crushed cornflakes.

    Variations & Substitutions

    Feel free to get creative with this recipe by adding your favorite veggies to the mix, such as mushrooms or spinach. You can also swap tofu for paneer or chickpeas for a different protein source. If you prefer a different type of bread, whole-grain buns or lettuce wraps are excellent alternatives.

    Storage

    These Masala-Tofu Patties can be made ahead of time and stored in the refrigerator for up to 3 days. Alternatively, you can freeze them for up to a month. When ready to enjoy, simply thaw and reheat them in a skillet or oven.

    FAQ

    Can I make these burgers vegan?

    Absolutely! This recipe is already vegan as it uses tofu as the main protein source and skips any dairy or eggs. Just ensure your chutney spread is also vegan-friendly.

    Can I grill these patties instead of pan-frying?

    Yes, you can grill the patties for a smokier flavor. Just make sure to brush them with some oil to prevent sticking and handle them carefully as they can be more delicate than regular meat patties.

    What can I serve with these burgers?

    A fresh green salad, sweet potato fries, or roasted vegetables make excellent sides. You can also pair it with a refreshing yogurt dip or mango chutney for an extra burst of flavor.

    Nutrition

    While I don’t have exact nutritional information for this recipe, it’s packed with healthy ingredients. Tofu provides protein, while the variety of vegetables offers vitamins and minerals. Using a whole-grain bun can increase the fiber content, making this meal as nutritious as it is delicious.

    Final Thoughts

    The Masala-Tofu Burger is a wonderful way to explore new flavors while enjoying a comforting classic. It’s a tribute to the fusion of cultures and the joy of shared meals. I hope this recipe becomes a favorite in your home, bringing smiles and satisfaction to your table. Happy cooking!

    Related update: Masala-Tofu Burger

    Related update: Indian Butter Chicken

  • Flax, Quinoa, and Almond Meal Bread | Made by Meaghan Moineau

    Flax, Quinoa, and Almond Meal Bread | Made by Meaghan Moineau

    Flax, Quinoa, and Almond Meal Bread

    Why You’ll Love It

    There’s something incredibly heartwarming about the aroma of freshly baked bread wafting through your home. This Flax, Quinoa, and Almond Meal Bread is a perfect blend of wholesome ingredients that not only fills your kitchen with a delightful scent but also fills your heart with nostalgia. I remember my grandmother’s kitchen, where baking was a weekend ritual. The sound of her soft humming and the flour dust that seemed to settle everywhere in the room bring back memories each time I bake this bread. Not only is this recipe gluten-free and nutritious, but it also captures the essence of family traditions and warmth.

    You’ll love this bread because it’s incredibly versatile and can be paired with both sweet and savory toppings. Its nutty flavor and slightly crumbly texture make it a delightful companion for your morning coffee or your evening tea. Plus, with its simple preparation, you don’t need to be a seasoned baker to pull this off beautifully.

    Ingredients

    • 1 cup milled flax seed
    • 1 cup blanched almond meal
    • 1 cup quinoa flour
    • 2 teaspoons baking powder
    • 1/2 teaspoon salt
    • 1/2 teaspoon baking soda
    • 1/4 cup olive oil
    • 3 large eggs
    • Water, as needed for desired texture

    Instructions

    1. Preheat your oven to 375°F (190°C).
    2. In a large mixing bowl, combine the milled flax seed, almond meal, quinoa flour, baking powder, salt, and baking soda.
    3. In a separate bowl, gently beat the eggs together. This will make it easier to incorporate them into the dry mixture.
    4. Gradually add the beaten eggs to the dry ingredients, stirring continuously to form a cohesive mixture.
    5. Add the olive oil to the mixture. Be cautious if your eggs are cold, as it may cause the oil to solidify. If this happens, gently warm the mixture until the oil liquefies.
    6. Slowly add water to the mixture, a little at a time, until you achieve a thick batter consistency that can be poured into a loaf pan.
    7. Line a Pyrex bread pan with parchment paper and pour the batter in. Smooth the top with a spatula.
    8. Bake in the preheated oven for 40 minutes. If using a metal pan, you may need to adjust the baking time slightly.
    9. Once baked, remove from the oven and let the bread cool in the pan for about 10 minutes before transferring it to a wire rack to cool completely.

    Tips

    For best results, ensure all your ingredients are at room temperature before you begin mixing. This helps in achieving a smoother batter. If you find that the batter is too thick, add water a teaspoon at a time to avoid making it too runny. Also, lining your loaf pan with parchment paper ensures that the bread doesn’t stick and makes cleanup a breeze.

    Variations & Substitutions

    This bread is a canvas for your creativity. You can substitute the quinoa flour with oat flour for a different flavor profile. To add some sweetness, consider incorporating a tablespoon of honey or maple syrup into the batter. For an extra crunch, toss in a handful of your favorite nuts or seeds like sunflower seeds or chopped walnuts.

    Storage

    Once completely cooled, store your flax, quinoa, and almond meal bread in an airtight container. It will keep well at room temperature for up to three days. For longer storage, wrap the loaf tightly in plastic wrap and freeze for up to a month. To enjoy, simply thaw at room temperature or warm it up in the oven for a fresh-baked taste.

    FAQ

    Can I make this bread vegan?

    Yes, you can make this recipe vegan by replacing the eggs with flax eggs. To make flax eggs, mix 3 tablespoons of milled flax seed with 9 tablespoons of water and let it sit for a few minutes until it forms a gel-like consistency.

    What can I use instead of almond meal?

    If you have a nut allergy or simply prefer a different flavor, sunflower seed flour or coconut flour can be used as a substitute. Keep in mind that coconut flour is highly absorbent, so you may need to adjust the amount of liquid in the recipe.

    Can I add spices to this bread?

    Absolutely! Adding spices can elevate the flavor of your bread. Try incorporating a teaspoon of cinnamon or nutmeg for a warm, aromatic touch. For a savory twist, consider adding herbs like rosemary or thyme.

    Nutrition

    This bread is a nutrient-dense option, rich in fiber and healthy fats from the flax seed and almond meal. It’s a great source of plant-based protein thanks to the quinoa flour, making it an excellent choice for those looking to maintain a balanced diet.

    Final Thoughts

    Baking this Flax, Quinoa, and Almond Meal Bread is more than just a culinary endeavor—it’s a journey into the comforting world of homemade goodness. Whether you’re embracing a gluten-free lifestyle or simply looking for a wholesome, delicious bread to enjoy, this recipe is sure to become a staple in your home. Remember, the best part about baking is making it your own, so don’t hesitate to experiment with flavors and ingredients. Happy baking!

    Related update: Flax, Quinoa, and Almond Meal Bread

  • Smokey Rainbow Chili | Made by Meaghan Moineau

    Smokey Rainbow Chili | Made by Meaghan Moineau

    Smokey Rainbow Chili

    Welcome to a warming bowl of Smokey Rainbow Chili, a dish that brings together the vibrant hues of a rainbow with the comforting smokiness of paprika. Whether you’re new to cooking or a seasoned chef, this chili is bound to become a staple in your culinary repertoire. Let me take you through why you’ll love it, and how you can make it your own.

    Why You’ll Love It

    Growing up, chili was the dish my family turned to on cool autumn evenings. I still vividly remember the aroma wafting through the house, enticing everyone to gather around the table. This Smokey Rainbow Chili captures the essence of those heartwarming moments, but with a modern twist. The addition of smoked paprika and an array of colorful vegetables makes this dish not only visually appealing but also incredibly flavorful.

    You’ll love this recipe because it’s:

    • Colorful: The vibrant mix of vegetables creates a feast for the eyes.
    • Flavorful: Smoked paprika and chili powder add depth and warmth.
    • Flexible: Easily adapted for meat lovers or kept vegetarian.
    • Nutritious: Packed with fiber and protein, it’s a wholesome meal in a bowl.

    Ingredients

    • Olive oil
    • Zucchini
    • Red bell pepper
    • Orange bell pepper
    • Diced fresh jalapeno pepper
    • Garlic
    • Onion
    • Canned stewed tomatoes
    • Canned tomato paste
    • Canned black beans
    • Canned whole kernel corn
    • Canned red kidney beans
    • Smoked paprika
    • Chili powder
    • Dried oregano
    • Black ground pepper
    • Cayenne pepper

    Instructions

    1. If using meat, brown the meat really well in the heated oil, remove and set aside. Add the meat after sautéing the veggies.
    2. Heat oil in a large pot over medium-high heat.
    3. Stir in zucchini, red bell pepper, orange bell pepper, jalapeno, garlic, and onion. Cook for 5 minutes, just until tender.
    4. Add tomatoes with liquid, tomato paste, black beans, corn, and kidney beans into the pot.
    5. Season with smoked paprika, chili powder, oregano, black pepper, and cayenne pepper.
    6. Bring to a boil. Reduce heat to low and simmer for 1 hour, stirring occasionally. Depending on how big you cut the veggies, you may want to let it simmer a little longer.

    Tips

    Here are some tips to ensure your Smokey Rainbow Chili turns out perfect every time:

    • Prep Ahead: Chop all your vegetables beforehand to make the cooking process smoother.
    • Adjust Spice Level: Control the heat by adjusting the amount of jalapeno and cayenne pepper.
    • Simmer Longer: If you have time, let the chili simmer longer for an even richer flavor.

    Variations & Substitutions

    This recipe is incredibly adaptable. Here are some ideas for variations and substitutions:

    • Add Meat: Include browned ground beef or turkey for a meatier version.
    • Go Vegan: Ensure ingredients like tomato paste are vegan-friendly, and add more vegetables like mushrooms or carrots.
    • Swap Beans: Use chickpeas or pinto beans if you prefer.
    • Extra Smokiness: Add a pinch of liquid smoke for an intensified smokey flavor.

    Storage

    Store your Smokey Rainbow Chili in an airtight container in the fridge for up to 4 days. It also freezes well; just portion it into freezer-safe containers and freeze for up to 3 months. Reheat gently on the stove or in the microwave until piping hot throughout.

    FAQ

    Can I make this chili in advance?

    Absolutely! In fact, chili often tastes better the next day as the flavors meld together. Simply reheat it on the stove or in the microwave before serving.

    What can I serve with Smokey Rainbow Chili?

    This chili pairs wonderfully with crusty bread, over rice, or topped with avocado and cheese for extra creaminess.

    Is this recipe suitable for meal prep?

    Yes, it’s perfect for meal prep. Divide into portions and store in the fridge or freezer for quick, nutritious meals throughout the week.

    Nutrition

    This Smokey Rainbow Chili is a nutritious powerhouse. Each serving is rich in fiber and protein, thanks to the variety of vegetables and beans. It’s a great choice for those seeking a balanced, wholesome meal.

    Final Thoughts

    Smokey Rainbow Chili is more than just a dish; it’s a comforting embrace in a bowl, filled with vibrant colors and rich flavors. Whether you’re sharing it with family or enjoying it solo, this chili is sure to bring warmth to your table. I hope this recipe becomes a beloved part of your culinary adventures just as it has in mine. Enjoy the journey of cooking and savoring each spoonful!

    Related update: Smokey Rainbow Chili

  • Salsa Verde By Mommie Cooks | Made by Meaghan Moineau

    Salsa Verde By Mommie Cooks | Made by Meaghan Moineau

    Salsa Verde By Mommie Cooks

    Why You’ll Love It

    There’s something magical about the zesty taste of homemade salsa verde. This recipe, handed down from my dear mother, has been a family favorite for as long as I can remember. Growing up, I would watch her expertly blend the ingredients, filling our kitchen with the fresh, invigorating aroma of tomatillos and cilantro. Each time I make it, I’m transported back to those sun-drenched afternoons in the kitchen, eagerly awaiting a taste of the vibrant green salsa. This is more than just a condiment; it’s a cherished memory, and I’m delighted to share it with you.

    You’ll love this salsa because it’s incredibly versatile, bursting with flavor, and simple to prepare. Whether you’re a seasoned cook or a kitchen novice, this recipe will quickly become a staple in your culinary repertoire. Perfect for dipping, drizzling over tacos, or topping grilled meats, this salsa verde is a refreshing addition to any meal.

    Ingredients

    • 1 pound of tomatillos, husked
    • 1/2 cup vegetable broth
    • 1 teaspoon cumin
    • 1 teaspoon coriander
    • Juice of one lime
    • 2 garlic cloves
    • 1 can of green diced chiles
    • 1 small onion, chopped
    • 1/2 cup fresh cilantro
    • 1/2 teaspoon pepper
    • Salt to taste

    Instructions

    1. Remove the husks from the tomatillos and rinse them under warm water to remove any sticky residue.
    2. Place the tomatillos in a pot of boiling water and cook for about 5-7 minutes until they are tender.
    3. Carefully remove the tomatillos from the pot and transfer them to a blender.
    4. To the blender, add the vegetable broth, cumin, coriander, lime juice, garlic cloves, green diced chiles, chopped onion, fresh cilantro, and pepper.
    5. Blend the ingredients until smooth and well combined.
    6. Taste the salsa and add salt as needed.
    7. Transfer the salsa to a bowl and chill in the fridge until you’re ready to serve.

    Tips

    For the best flavor, use fresh tomatillos that are firm and vibrant green. When selecting cilantro, look for bright, unwilted leaves. If you like your salsa with a bit more heat, consider adding a jalapeño or two to the mix. Be sure to taste your salsa as you go and adjust the seasonings to fit your preference. Remember, the key to a great salsa is balancing the acidity, heat, and saltiness to create a harmonious blend of flavors.

    Variations & Substitutions

    If you’re looking to switch things up, here are a few variations you might enjoy:

    • Roasted Tomatillos: For a deeper, smokier flavor, try roasting the tomatillos under a broiler until they are charred before blending.
    • Avocado Salsa Verde: Add a ripe avocado to the blender for a creamy twist that pairs beautifully with the tangy tomatillos.
    • Herb Substitutions: If cilantro isn’t your favorite, you can substitute with parsley or a mix of parsley and mint for a different herbal note.

    Storage

    This salsa verde can be stored in an airtight container in the refrigerator for up to a week. If you find yourself with extra, you can also freeze it. Pour the salsa into a freezer-safe container, leaving a bit of space at the top to allow for expansion, and freeze for up to three months. Thaw in the refrigerator before serving.

    FAQ

    Can I use canned tomatillos?

    While fresh tomatillos yield the best flavor and texture, you can use canned tomatillos in a pinch. Be sure to drain them well before blending.

    Is salsa verde spicy?

    This salsa verde has a mild heat thanks to the green chiles. If you prefer a spicier salsa, feel free to add more chiles or include a jalapeño or serrano pepper.

    What dishes pair well with salsa verde?

    Salsa verde is incredibly versatile and pairs well with a variety of dishes. Try it over grilled chicken, fish, or pork. It’s also delicious as a topping for tacos, enchiladas, or nachos.

    Nutrition

    This recipe is not only delicious but also a healthy choice. Packed with vitamins from the tomatillos and cilantro, and low in calories, it’s a guilt-free addition to any meal. Each serving is rich in antioxidants and offers a good dose of vitamin C, making it a nutritious and flavorful option.

    Final Thoughts

    There’s a certain joy in crafting a recipe that has been passed down through generations. This salsa verde is more than just a condiment; it’s a connection to the past, a reminder of family gatherings, and a celebration of fresh, vibrant flavors. I hope you enjoy making and sharing this recipe as much as I do. Whether you’re scooping it with a crispy tortilla chip or drizzling it over your favorite dish, may it bring you as much joy and satisfaction as it has brought to my family for years. Bon appétit!

    Related update: Salsa Verde By Mommie Cooks

  • Chocolate Almond Bark | Made by Meaghan Moineau

    Chocolate Almond Bark | Made by Meaghan Moineau

    Chocolate Almond Bark

    Chocolate Almond Bark is a delightful treat that combines the rich, smooth flavor of chocolate with the crunchy, savory goodness of almonds. This recipe is a favorite in my family, especially around the holidays. I remember my grandmother making a similar version of this bark every Christmas. The aroma of roasted almonds mingling with chocolate would fill the house, and it was the ultimate signal that the festive season had truly begun. Now, I carry on the tradition, adding a few modern twists to the classic recipe.

    Why You’ll Love It

    Chocolate Almond Bark is incredibly easy to make and requires only a handful of ingredients. It’s a perfect balance of sweet and savory, with a hint of spice from the cayenne pepper. This treat makes for a great homemade gift or a delightful snack to enjoy anytime. Plus, it’s a wonderful recipe to make with kids or friends, as it doesn’t require any special culinary skills.

    Ingredients

    • 1 cup raw almonds, chopped
    • 1/4 teaspoon cayenne pepper
    • 12 ounces candy making chocolate
    • 1/2 teaspoon sea salt
    • 1 tablespoon Worcestershire sauce

    Instructions

    1. Preheat your oven to 160 degrees.
    2. In a medium bowl, combine the chopped almonds with the Worcestershire sauce, cayenne pepper, and half of the sea salt. Mix well to ensure the almonds are evenly coated.
    3. Spread the almond mixture onto a baking sheet in a single layer. Roast in the preheated oven for 20 minutes, stirring halfway through to ensure even roasting. Let the almonds cool completely.
    4. While the almonds are cooling, melt the candy making chocolate using a double boiler or in the microwave. If using a microwave, heat the chocolate on low power, stirring every 30 seconds, until smooth.
    5. Once the almonds have cooled, mix them into the melted chocolate until thoroughly combined.
    6. Line an 8 x 8 inch baking pan with wax paper. Pour the chocolate almond mixture into the pan and spread it evenly.
    7. Sprinkle a pinch of the remaining sea salt on top of the chocolate mixture.
    8. Let the chocolate cool and harden at room temperature or in the refrigerator for faster results.
    9. Once set, break the chocolate almond bark into bite-size pieces and enjoy!

    Tips

    To ensure the best results, use high-quality candy making chocolate, as it will melt smoother and provide a richer flavor. When roasting the almonds, keep a close eye on them to prevent burning. If you don’t have a double boiler, a heatproof bowl over a saucepan of simmering water works just as well for melting chocolate.

    Variations & Substitutions

    Feel free to customize this chocolate almond bark to suit your taste preferences. You can substitute the raw almonds with your favorite nuts, such as pecans or walnuts. If you’re not a fan of cayenne pepper, you can omit it, or replace it with a milder spice like cinnamon. For a more indulgent treat, consider adding dried fruits like cranberries or raisins to the mix.

    Storage

    Store your chocolate almond bark in an airtight container at room temperature for up to two weeks. If you prefer your chocolate to be on the firmer side, you can keep it in the refrigerator. Just be sure to let it come to room temperature before serving for the best texture and flavor.

    FAQ

    Can I use dark chocolate instead of candy making chocolate?

    Absolutely! Dark chocolate is a great alternative and will provide a more intense chocolate flavor. Just make sure to use high-quality chocolate for the best results.

    Is it possible to make this recipe vegan?

    Yes, you can make this recipe vegan by substituting the Worcestershire sauce with a vegan version and using a dairy-free chocolate. Ensure that all other ingredients are vegan-friendly as well.

    Nutrition

    While I don’t have the exact nutritional breakdown for this recipe, it’s important to note that almonds are a great source of healthy fats, fiber, and protein. Chocolate, especially dark chocolate, contains antioxidants. However, this is a treat and should be enjoyed in moderation as part of a balanced diet.

    Final Thoughts

    Chocolate Almond Bark is a versatile and delectable treat that’s sure to impress anyone who tries it. With its simple ingredients and straightforward instructions, it’s an easy recipe to whip up for any occasion. Whether you’re indulging on your own or sharing with loved ones, this bark is a delightful way to satisfy your sweet tooth. I hope you enjoy making and tasting this recipe as much as my family and I do. Happy cooking!

    Related update: Chocolate Almond Bark

    Related update: Smokey Rainbow Chili

  • Minestrone | Made by Meaghan Moineau

    Minestrone | Made by Meaghan Moineau

    Minestrone: A Comforting Bowl of Italian Tradition

    There’s something magical about a steaming bowl of minestrone soup that’s hard to put into words. It’s more than just a meal; it’s a nostalgic embrace on a chilly evening, a celebration of fresh vegetables in every spoonful, and a testament to the simplicity of good cooking. I remember my grandmother simmering this hearty soup on the stove, her kitchen filled with the rich aroma of herbs and simmering tomatoes. Those memories of gathering around her table, slurping the warm broth alongside chunks of crusty bread, are treasured moments of comfort and joy.

    Why You’ll Love It

    Minestrone is a versatile and comforting dish that warms the soul. It’s packed with nutritious vegetables, making it not only delicious but also healthy. This recipe is perfect for those who love to experiment with flavors and textures, as it is easily adaptable to whatever ingredients you have on hand. Whether you’re a veteran cook or a kitchen novice, you’ll appreciate how straightforward and rewarding this dish is to make.

    • Nutritious and Filling: Packed with a variety of vegetables, it’s a nutrient-dense meal.
    • Comfort in a Bowl: Perfect for chilly days or when you need a comforting meal.
    • Customizable: You can easily adjust the ingredients to suit your taste or dietary needs.
    • Easy to Make: Simple steps lead to a delicious result, making it perfect for weeknight dinners.

    Ingredients

    • 2 tablespoons butter
    • 2 cups carrots, diced
    • 2 cups celery, diced
    • 2 cups onions, chopped
    • 4 cloves garlic, minced
    • 2 cups cabbage, shredded
    • 1 can (28 ounces) canned tomatoes
    • 6 cups water
    • 1 cup brown rice
    • 2 teaspoons salt
    • 1 teaspoon Worcestershire sauce
    • 1 tablespoon Italian mixed seasoning
    • 1/2 teaspoon pepper
    • 2 cups potatoes, diced
    • 2 beef bouillon cubes
    • 2 cups zucchini, sliced
    • 1 can (15 ounces) canned kidney beans, drained and rinsed
    • 1 cup frozen spinach
    • 1/2 cup Parmesan cheese, grated

    Instructions

    1. Melt butter in a large soup kettle over medium heat.
    2. Add carrots, celery, onions, garlic, and cabbage. Sauté for about 20 minutes, stirring often, until the vegetables are tender.
    3. Stir in canned tomatoes, water, brown rice, salt, Worcestershire sauce, Italian seasoning, pepper, potatoes, bouillon cubes, and zucchini.
    4. Bring the mixture to a boil, then reduce the heat and simmer covered for at least 30 minutes.
    5. Add the kidney beans and frozen spinach. Return the soup to a boil and cook over medium heat until the spinach is cooked through. Add more water if needed to reach your desired consistency.
    6. Serve hot, garnished with grated Parmesan cheese. Enjoy!

    Tips

    • Prep Ahead: Chop your vegetables in advance to make the cooking process quicker and smoother.
    • Consistent Size: Dice your vegetables to a similar size to ensure even cooking.
    • Stir Often: Stir the pot frequently, especially during the initial sauté step, to prevent sticking.

    Variations & Substitutions

    This minestrone soup is highly adaptable. Here are a few ideas to make it your own:

    • Vegetable Substitutions: Feel free to swap in other vegetables such as green beans, peas, or bell peppers.
    • Grain Alternatives: If you’re not a fan of brown rice, try using pasta, quinoa, or barley.
    • Protein Boost: Add cooked chicken or sausage for extra protein.
    • Vegan Version: Use vegetable bouillon cubes and omit the Parmesan cheese.

    Storage

    Minestrone soup stores exceptionally well, making it perfect for meal prep:

    • Refrigerator: Store in an airtight container for up to 5 days.
    • Freezer: Freeze in portioned containers for up to 3 months. Thaw overnight in the refrigerator before reheating.
    • Reheating: Gently reheat on the stovetop over medium heat, adding a splash of water if the soup has thickened too much.

    FAQ

    Can I make this soup in a slow cooker?

    Yes, you can! Simply add all the ingredients except for the kidney beans, spinach, and Parmesan cheese to your slow cooker. Cook on low for 6-8 hours or on high for 3-4 hours. Stir in the beans and spinach in the last 30 minutes of cooking, and garnish with Parmesan before serving.

    What can I serve with minestrone?

    Minestrone is delightful on its own but pairs beautifully with a side of crusty bread, a fresh green salad, or even a cheesy garlic bread for a bit of indulgence.

    Nutrition

    This minestrone soup is not only tasty but also nutritious, packed with vitamins, minerals, and fiber from a variety of vegetables. Each serving (without Parmesan cheese) contains approximately:

    • Calories: 150
    • Protein: 6g
    • Carbohydrates: 30g
    • Fat: 3g
    • Fiber: 7g

    Final Thoughts

    Minestrone is more than just a soup; it’s a warm hug in a bowl. Whether you’re cooking for family, friends, or just yourself, this recipe is sure to bring comfort and satisfaction. Its adaptability and ease of preparation make it a staple in any kitchen, and its rich flavors are bound to make it a favorite in your household. So, gather around the table and enjoy the simple pleasure of a homemade meal that speaks to the heart and soul.

    Related update: Minestrone

    Related update: Kale and Chickpea Soup with Lemon

  • Damn Good Corn Pudding ~from 12 Bones Smokehouse | Made by Meaghan Moineau

    Damn Good Corn Pudding ~from 12 Bones Smokehouse | Made by Meaghan Moineau

    Damn Good Corn Pudding from 12 Bones Smokehouse

    Welcome to another delightful culinary adventure! Today, we’re diving into the soul-satisfying world of corn pudding, a dish that embodies comfort and warmth. Originating from the renowned 12 Bones Smokehouse, this Damn Good Corn Pudding is a crowd-pleaser that combines the sweetness of corn with a subtle spicy kick, creating a perfect harmony of flavors. As we embark on this journey, I’ll also share a cherished memory of how this dish became a staple in my family gatherings.

    Why You’ll Love It

    This corn pudding is not just another side dish; it’s an experience. Here’s why you’ll fall head over heels for it:

    • Perfect Balance: The combination of sweet corn and spicy poblanos ensures every bite is a burst of flavor.
    • Texture Delight: With a texture akin to a moist cake, it’s hearty enough to be a standalone dish yet versatile enough to accompany any meal.
    • Easy to Make: With simple ingredients and straightforward instructions, this dish is beginner-friendly and forgiving.
    • Customizable: You can easily adapt it to suit your taste preferences or dietary needs.
    • Memorable: It’s one of those dishes that sparks conversation and leaves a lasting impression on your taste buds.

    I remember the first time I tasted this corn pudding was at a family reunion. My grandmother, known for her Southern cooking prowess, brought it out as a surprise. The moment she placed it on the table, the room was filled with an inviting aroma that transported us back to our roots. Ever since, it’s been a beloved tradition to have this dish at our gatherings, each time bringing with it a wave of nostalgia and joy.

    Ingredients

    • 1 cup flour
    • 1/2 cup sugar
    • 2 teaspoons baking powder
    • 1/2 teaspoon salt
    • 1/2 teaspoon red pepper flakes
    • 1/2 teaspoon cumin
    • 1/2 teaspoon coriander
    • 3 large eggs
    • 1 stick butter, melted
    • 1 cup heavy cream
    • 2 cans (14.75 oz each) creamed corn
    • 2 diced fresh poblano peppers
    • 1 cup fresh corn kernels

    Instructions

    1. Preheat your oven to 350 degrees F (175 degrees C).
    2. In a mixing bowl, combine the flour, sugar, baking powder, salt, red pepper flakes, cumin, and coriander. Set aside.
    3. In an electric mixer, blend together the eggs, melted butter, heavy cream, and creamed corn until smooth.
    4. Stir in the diced poblano peppers and fresh corn kernels.
    5. Gradually add the dry ingredients to the wet mixture, mixing until just combined. The consistency should resemble cake batter.
    6. Grease a large 11 x 15-inch rimmed baking dish (or two smaller dishes) and pour the pudding mixture into it.
    7. Lightly tent the dish with foil and bake for 1 hour, or until the center is just set. If using smaller pans, bake for 30-40 minutes.
    8. For a golden top, remove the foil in the last 10-15 minutes of baking.
    9. Once done, allow it to cool slightly before serving. Enjoy as a main dish or a side!

    Tips

    • Consistency Check: Ensure your batter is not too thick; it should pour easily but not be runny.
    • Foil Tent: The foil prevents the top from browning too quickly while ensuring the center cooks evenly.
    • Testing Doneness: The pudding should have a slight jiggle in the center when done. It will continue to firm up as it cools.

    Variations & Substitutions

    Feel free to make this recipe your own with these variations:

    • Cheese Lover’s Delight: Add shredded cheddar cheese to the batter for a cheesy twist.
    • Spice It Up: Swap the poblano peppers for jalapeños if you prefer more heat.
    • Vegan Version: Use plant-based butter, coconut cream, and flax eggs for a vegan-friendly option.

    Storage

    To store your corn pudding:

    • Let it cool to room temperature before transferring to an airtight container.
    • Store in the refrigerator for up to 3-4 days.
    • Reheat in the oven at 300 degrees F until warm, or microwave individual portions as needed.

    FAQ

    Can I make this corn pudding ahead of time?

    Absolutely! You can prepare the batter a day in advance and store it in the refrigerator. Just give it a good stir before baking. Alternatively, bake it fully and store it, reheating before serving.

    What can I serve with corn pudding?

    Corn pudding pairs wonderfully with grilled meats, barbecue dishes, or a fresh green salad. It’s versatile enough to complement a wide range of main courses.

    Is it possible to freeze corn pudding?

    Yes, you can freeze corn pudding. Wrap it tightly in plastic wrap and aluminum foil, then store it in the freezer for up to two months. Thaw in the refrigerator overnight before reheating.

    Nutrition

    This recipe serves 8-10 people, depending on portion size. Each serving contains approximately:

    • Calories: 320
    • Fat: 18g
    • Carbohydrates: 35g
    • Protein: 5g
    • Fiber: 2g
    • Sugar: 9g

    Final Thoughts

    This Damn Good Corn Pudding is more than just a recipe; it’s a cherished tradition that brings people together. Whether you’re making it for a holiday feast or a simple family dinner, it’s sure to become a beloved staple in your home too. Feel free to experiment with it and tailor it to your preferences. Happy cooking, and may every bite bring warmth and joy to your table!

    Related update: Damn Good Corn Pudding ~from 12 Bones Smokehouse

  • Curry and Sage Roast Chicken | Made by Meaghan Moineau

    Curry and Sage Roast Chicken | Made by Meaghan Moineau

    Curry and Sage Roast Chicken

    There’s something incredibly heartwarming about the aroma of a roast chicken wafting through the house. It takes me back to Sunday afternoons at my grandmother’s, where the kitchen was a realm of delightful scents and warm embraces. Her roast chicken, seasoned with a blend of herbs and spices, was always the centerpiece of our family gatherings. Inspired by those cherished memories, I’ve created this Curry and Sage Roast Chicken recipe. It’s a dish that not only fills the belly but also warms the soul. Whether you’re cooking for a family dinner or a special occasion, this recipe promises to be a crowd-pleaser.

    Why You’ll Love It

    This Curry and Sage Roast Chicken is a flavorful twist on the classic roast. The combination of curry and fresh sage creates a unique and aromatic profile. Here’s why you’ll fall in love with this dish:

    • Flavorful: The curry adds a mild kick, while the sage provides an earthy balance.
    • Simple Ingredients: Made with pantry staples and fresh herbs.
    • Easy Preparation: A straightforward recipe that requires minimal prep time.
    • Juicy and Tender: The citrus juices keep the chicken moist and succulent.
    • Versatile: Perfect for any occasion, from weeknight dinners to festive gatherings.

    Ingredients

    • 1 whole chicken, cleaned and patted dry
    • 3 tablespoons olive oil
    • Juice of 1 lemon
    • Juice of 1 orange
    • 4 cloves garlic, minced
    • 2 tablespoons honey
    • 1 tablespoon fresh sage, chopped
    • 2 teaspoons curry powder
    • 1 teaspoon black pepper
    • 1/2 teaspoon turmeric

    Instructions

    1. Preheat your oven to 350°F (175°C).
    2. In a small bowl, combine olive oil, lemon juice, orange juice, minced garlic, honey, chopped sage, curry powder, black pepper, and turmeric. Mix well to create a marinade.
    3. Rub the chicken thoroughly with the marinade, ensuring it’s evenly coated. Carefully lift the skin and stuff some of the garlic and sage under it for added flavor.
    4. Place the chicken in a baking pan.
    5. Bake in the preheated oven. The baking time will vary based on the size of your chicken; generally, it takes about 20 minutes per pound. Keep an eye on the chicken and let the skin become golden and crispy.
    6. Once cooked, allow the chicken to rest for about 10 minutes before carving. This helps the juices redistribute, ensuring each bite is juicy.

    Tips

    • Use a Meat Thermometer: Ensure the chicken is cooked through by checking that the internal temperature reaches 165°F (74°C).
    • Resting Time: Allow the chicken to rest after roasting to ensure it remains juicy.
    • Even Coating: Make sure to rub the marinade evenly for consistent flavor.

    Variations & Substitutions

    Feel free to experiment with this recipe to suit your taste:

    • Herbs: If you’re not a fan of sage, rosemary or thyme make excellent alternatives.
    • Spices: Add a pinch of cayenne pepper for a spicier kick.
    • Honey Substitute: Maple syrup or agave nectar can be used if you prefer.

    Storage

    Leftover roast chicken can be stored in an airtight container in the refrigerator for up to 3 days. For longer storage, you can freeze the chicken for up to 3 months. Be sure to defrost thoroughly in the refrigerator before reheating.

    FAQ

    Can I use chicken pieces instead of a whole chicken?

    Absolutely! You can use chicken thighs or breasts if you prefer. Adjust the cooking time accordingly, as pieces will cook faster than a whole chicken.

    What can I serve with this Curry and Sage Roast Chicken?

    This dish pairs beautifully with a variety of sides. Consider serving it with roasted vegetables, a fresh green salad, or buttery mashed potatoes.

    Do I need to cover the chicken while roasting?

    It’s not necessary to cover the chicken. Roasting it uncovered allows the skin to become beautifully golden and crispy. However, if it starts to brown too quickly, you can tent it with foil.

    Nutrition

    This recipe is a balanced meal rich in protein and flavor. It’s low in carbs and provides essential vitamins and minerals from the herbs and spices. The use of olive oil and fresh citrus juices adds healthy fats and a refreshing taste.

    Final Thoughts

    This Curry and Sage Roast Chicken is a delightful dish that brings a touch of nostalgia and warmth to any meal. The combination of spices and citrus creates a harmony of flavors that is both comforting and invigorating. Whether you’re an experienced cook or just starting out, this recipe is simple to follow and results in a deliciously satisfying meal. I hope you enjoy making and sharing this dish as much as I do. Happy cooking!

    Related update: Curry and Sage Roast Chicken

    Related update: Chicken Cordon Bleu