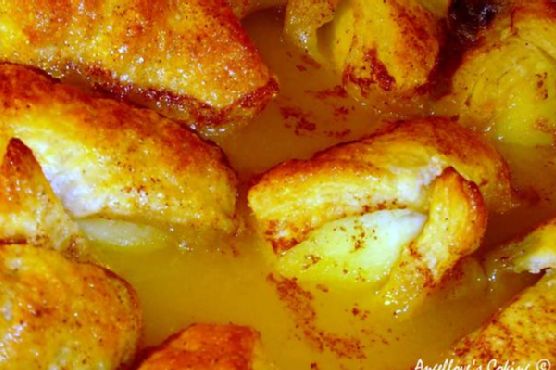
Tag: Easy

  • Green Monster Ice Pops | Made by Meaghan Moineau

    Green Monster Ice Pops | Made by Meaghan Moineau

    Green Monster Ice Pops

    There’s something magical about the refreshing taste of a homemade ice pop on a warm summer day. Growing up, I fondly remember the excitement of racing to the freezer, eagerly anticipating the moment when the ice pops would be ready. Those childhood memories inspired this recipe for Green Monster Ice Pops—a healthy twist on a classic treat that the whole family can enjoy. Packed with wholesome ingredients, these ice pops are not only delicious but also nutrient-rich, perfect for a guilt-free indulgence.

    Why You’ll Love It

    These Green Monster Ice Pops are the perfect blend of creamy and refreshing. You’ll love them because:

    • They’re incredibly easy to make, requiring just a few simple steps.
    • The combination of avocado and banana provides a natural creaminess without the need for dairy.
    • They’re packed with nutrients from spinach and mango, making them a healthy snack option.
    • They’re naturally sweetened with banana and honey, with the option to add more sweetness if desired.
    • Kids love the fun green color and delicious taste!

    Ingredients

    • 1 cup unsweetened almond milk
    • 1 ripe avocado
    • 1 cup baby spinach
    • 1 ripe banana
    • 2 tablespoons honey
    • 1 cup fresh mango, chopped

    Instructions

    1. Place all ingredients into a blender and mix well until smooth.
    2. Taste the smoothie. If it’s not sweet enough, add 1 to 2 tablespoons of maple syrup or additional honey and blend again.
    3. Pour the smoothie mixture into ice pop molds.
    4. Insert a wooden popsicle stick into each mold, leaving about a quarter of the stick above the mold.
    5. Place the molds into the freezer for 2-3 hours until fully frozen.
    6. Once frozen, remove the ice pops from the molds and enjoy!

    Tips

    • Ensure the avocado is ripe to achieve the best creamy texture.
    • For easier removal, run the molds under warm water for a few seconds to loosen the ice pops.
    • Use silicone molds for easy removal and less mess.

    Variations & Substitutions

    One of the best things about this recipe is its versatility. Here are some ideas to mix it up:

    • Substitute the almond milk: Use coconut milk for a tropical twist or regular milk if you prefer dairy.
    • Add-ins: Try adding chia seeds or flaxseeds for an extra nutritional boost.
    • Fruit swaps: Swap mango for pineapple or berries for a different flavor profile.

    Storage

    Once the ice pops are fully frozen, you can store them in the molds or remove them and place them in a freezer-safe bag or container. They will keep well for up to 1 month in the freezer. Just be sure to keep them well-sealed to prevent freezer burn.

    FAQ

    Can I make these ice pops without a blender?

    While a blender is recommended for achieving a smooth consistency, you could use a food processor or mash the ingredients by hand. However, the texture might not be as creamy.

    Are these ice pops suitable for children?

    Absolutely! These ice pops are packed with fruits and spinach, making them a fun and healthy treat for kids. The sweet taste of banana and mango masks the spinach, so it’s a clever way to sneak in some greens.

    Can I use frozen fruits instead of fresh ones?

    Yes, frozen fruits can be used in place of fresh ones. Just ensure they’re fully thawed before blending to achieve a smooth mixture.

    Nutrition

    These Green Monster Ice Pops are not only delicious but also provide a good source of vitamins and minerals:

    • Avocado: Rich in healthy fats and fiber.
    • Spinach: A powerful source of iron, calcium, and vitamins A and C.
    • Mango: High in vitamin C and antioxidants.
    • Banana: Provides potassium and natural sweetness.

    Final Thoughts

    Green Monster Ice Pops are a delightful way to enjoy a healthy treat that’s both satisfying and nourishing. Whether you’re looking to cool down on a hot day or simply want a nutritious snack, these ice pops are a fantastic choice. Try them out, and don’t be afraid to experiment with different variations to find your perfect flavor combination. Enjoy the vibrant taste and the joy of a homemade treat that brings back those cherished childhood memories.

    Related update: Green Monster Ice Pops

    Related update: Ginger Snap and Pumpkin Ice Cream Sandwiches

  • Dairy Free Chicken Salad | Made by Meaghan Moineau

    Dairy Free Chicken Salad | Made by Meaghan Moineau

    Dairy Free Chicken Salad

    Welcome to a delightful culinary journey with our Dairy Free Chicken Salad! This dish is a nostalgic nod to family picnics in the park. I remember those sunny days when my mom would whip up this comforting salad, and we’d enjoy it under the sprawling oak tree in our local park. The savory aroma of seasoned chicken mixed with the tangy zest of pickles and lemon would tantalize our senses, making each bite a moment to cherish. Now, I’m excited to share this recipe with you, hoping it brings as much joy to your table as it did to ours.

    Why You’ll Love It

    This Dairy Free Chicken Salad is a perfect blend of flavors and textures, making it a crowd-pleaser for any occasion. Whether you’re looking for a quick lunch, a picnic staple, or a dish for a potluck, this recipe has got you covered. It’s not only delicious and satisfying but also healthy, as it’s dairy-free and packed with protein. The combination of tender chicken with crunchy pickles and creamy Veganaise creates a perfect harmony that will leave your taste buds dancing. Plus, it’s incredibly easy to make, requiring minimal prep time so you can spend more time enjoying the company of your loved ones.

    Ingredients

    • 2 tablespoons olive oil
    • 1 pound skinless boneless chicken tenderloins
    • 1 teaspoon pepper
    • 1 teaspoon salt
    • 1 teaspoon paprika
    • 3 cooked whole eggs
    • 1/2 cup chopped dill pickles
    • 1/2 cup Veganaise
    • 1 tablespoon lemon juice
    • 1 teaspoon seasoned salt

    Instructions

    1. Thaw the chicken if needed.
    2. Add the olive oil to a large skillet and bring to medium heat.
    3. Add the chicken to the skillet and season with paprika, salt, and pepper.
    4. Turn every few minutes and cook until chicken is cooked through and juices run clear.
    5. Remove the chicken and place on a large cutting board.
    6. Using two forks, shred the chicken and place in a large bowl.
    7. If you haven’t already, boil the eggs. Cover the eggs with cold water in a large pot. Place pot over medium-high heat. As soon as it starts boiling, set your timer for 7 minutes. Done!
    8. Peel and chop up your eggs, then place them in the bowl with your shredded chicken.
    9. Chop up your dill pickles and add them to the bowl.
    10. Add the Veganaise, lemon juice, and seasoned salt.
    11. Toss to combine. Serve with your favorite bread.

    Tips

    For the best results, use fresh chicken tenderloins and cook them just until done to ensure they stay juicy. When shredding the chicken, don’t worry about making the pieces too small, as a bit of texture adds to the salad’s appeal. If you’re in a hurry, you can use pre-cooked rotisserie chicken as a time-saving alternative. And remember, the key to a perfect salad is tasting as you go, so feel free to adjust the seasoning to your liking.

    Variations & Substitutions

    This recipe is wonderfully adaptable. If you prefer a bit of sweetness, try adding a handful of dried cranberries or grapes. For a touch of crunch, toss in some chopped celery or nuts such as almonds or walnuts. If you don’t have Veganaise, regular mayonnaise or Greek yogurt can be used as substitutes, keeping in mind the latter will add dairy. For a spicier kick, a dash of hot sauce or a sprinkle of cayenne pepper works wonders.

    Storage

    Store any leftover chicken salad in an airtight container in the refrigerator. It will keep well for up to three days, making it a convenient option for meal prep. When ready to eat, give it a good stir and adjust the seasoning if necessary. Unfortunately, this dish doesn’t freeze well due to the mayonnaise-based dressing, so it’s best enjoyed fresh.

    FAQ

    Can I make this salad in advance?

    Absolutely! In fact, making it a day ahead allows the flavors to meld together beautifully. Just store it in the fridge and give it a good stir before serving.

    Is this recipe gluten-free?

    Yes, the salad itself is gluten-free. However, if you’re serving it with bread, make sure to choose a gluten-free variety if needed.

    Can I add fruits to this salad?

    Yes, adding fruits like grapes or diced apples can add a nice sweetness and additional texture to the salad. Just be sure to add them right before serving to maintain their freshness.

    Nutrition

    This Dairy Free Chicken Salad is a nutritious choice, packed with protein from the chicken and eggs. It’s also a good source of healthy fats from the olive oil and Veganaise. While exact nutritional values will vary based on portion sizes, you can rest assured that this dish is both satisfying and nourishing.

    Final thoughts

    Our Dairy Free Chicken Salad is a versatile dish that fits seamlessly into any meal plan. Its delightful combination of flavors and textures is sure to please even the pickiest eaters. Whether you’re making it for a family gathering, a picnic, or just a quick meal, it’s bound to become a household favorite. So gather your ingredients, follow the simple steps, and enjoy a taste of nostalgia with every bite. Happy cooking!

    Related update: Dairy Free Chicken Salad

    Related update: Lentil Salad With Vegetables

  • Monte Cristo Egg Rolls | Made by Meaghan Moineau

    Monte Cristo Egg Rolls | Made by Meaghan Moineau

    Monte Cristo Egg Rolls

    Welcome to the delightful world of Monte Cristo Egg Rolls! This unique twist on the classic Monte Cristo sandwich brings together the savory goodness of deli meats and cheese, all wrapped up in a crispy, golden egg roll. Whether you’re a fan of fusion cuisine or just love a good finger food, this recipe is sure to become a favorite in your household.

    Why You’ll Love It

    Imagine biting into a warm, crispy egg roll only to be met with the delightful flavors of ham, turkey, and Swiss cheese melded together with a hint of strawberry sweetness. These Monte Cristo Egg Rolls are perfect for those who enjoy both savory and sweet flavors in one bite. They make for an excellent appetizer at parties, a fun twist for brunch, or a delicious snack to enjoy while watching your favorite movie.

    In addition, these egg rolls are easy to make and require minimal ingredients. You can prepare them ahead of time and fry them just before serving to impress your guests with your culinary creativity. Plus, each bite is a nostalgic reminder of the classic Monte Cristo sandwich, reinvented for modern taste buds.

    Ingredients

    • 1/2 lb black deli forest ham
    • 1/2 lb deli honey ham
    • 1/2 lb smoked deli turkey
    • 12 egg roll wraps
    • 1/2 cup strawberry jam
    • 1/2 lb deli baby Swiss cheese

    Instructions

    1. Chop the black deli forest ham, honey ham, smoked turkey, and baby Swiss cheese into small pieces and place them into a mixing bowl.
    2. Add the strawberry jam to the bowl and stir until the ingredients are well combined.
    3. Lay out one egg roll wrap with one corner facing you.
    4. Place about 2 tablespoons of the filling just above the bottom corner of the wrap.
    5. Fold the bottom corner up over the filling, then fold in each side of the egg roll wrap.
    6. Roll the wrap up toward the other corner, using a little water on your finger to seal the roll and corner together.
    7. Preheat a deep fryer to 320 degrees Fahrenheit.
    8. Deep fry the egg rolls for about 3 minutes or until they are crispy and golden brown.
    9. Serve warm as is or sprinkle with powdered sugar for an extra touch of sweetness.

    Tips

    To ensure your egg rolls come out perfectly every time, here are a few tips:

    • Don’t overfill the egg rolls, as this can cause them to burst while frying.
    • Seal the egg rolls tightly to prevent the filling from leaking out.
    • If you don’t have a deep fryer, you can use a pot with enough oil to submerge the egg rolls.
    • Try using a thermometer to ensure the oil is at the right temperature for frying.

    Variations & Substitutions

    Feel free to get creative with this recipe! Here are some variations and substitutions you can try:

    • Swap out the meats for your favorites, such as roasted chicken or roast beef.
    • Use apricot or raspberry jam instead of strawberry for a different flavor profile.
    • Add a teaspoon of Dijon mustard to the filling for a tangy kick.
    • For a vegetarian version, use roasted vegetables and a variety of cheeses.

    Storage

    If you have any leftover egg rolls, store them in an airtight container in the refrigerator for up to 3 days. To reheat, place them in an oven at 350 degrees Fahrenheit for about 10 minutes or until warm and crispy.

    FAQ

    Can I make these egg rolls ahead of time?

    Yes, you can prepare the egg rolls in advance and freeze them before frying. When you’re ready to serve, fry them directly from frozen, adding an extra minute or two to the frying time.

    What can I serve with Monte Cristo Egg Rolls?

    Monte Cristo Egg Rolls pair well with a side of fresh fruit or a simple green salad. You can also serve them with a variety of dipping sauces, such as honey mustard, raspberry sauce, or even maple syrup.

    Nutrition

    Each Monte Cristo Egg Roll contains approximately:

    • Calories: 200
    • Protein: 12g
    • Fat: 10g
    • Carbohydrates: 18g
    • Sugar: 5g
    • Sodium: 500mg

    Please note that these values are approximate and can vary based on the specific ingredients used.

    Final Thoughts

    Monte Cristo Egg Rolls offer a fun and delicious way to enjoy the classic flavors of a Monte Cristo sandwich in a convenient and crispy package. Whether you’re making them for a special occasion or just as a treat for yourself, these egg rolls are sure to delight your taste buds and bring a smile to your face. Give them a try and enjoy the perfect blend of savory and sweet in every bite!

    Related update: Monte Cristo Egg Rolls

    Related update: Roasted Endive Salad With Prosciutto, Figs and Pistachios

    Related update: Green Monster Ice Pops

  • Wild Salmon Cakes | Made by Meaghan Moineau

    Wild Salmon Cakes | Made by Meaghan Moineau

    Wild Salmon Cakes: A Delicious and Nutritious Treat

    Welcome to our cozy kitchen corner, where today we’re diving into the delightful world of Wild Salmon Cakes. These savory patties are a celebration of simplicity and flavor, perfect for any occasion from a quick weeknight dinner to a lavish brunch gathering. Let me take you on a journey of taste and nostalgia, sharing not just a recipe but a piece of my culinary heart.

    Why You’ll Love It

    There’s something magical about the way these Wild Salmon Cakes come together. The fusion of fresh, wild-caught salmon with the crunch of panko and the tang of capers creates a symphony of flavors that dance on your palate. Whether you’re a seafood aficionado or a curious cook looking to expand your culinary repertoire, this dish will not disappoint.

    Growing up, seafood was a staple at our family table. I vividly remember summer evenings spent by the coast, where my grandmother would serve her famous salmon cakes. The recipe was a guarded secret, a treasured heirloom passed down through generations. Each bite was a reminder of home, of laughter shared around the table, and of the love that binds a family together. Today, I share with you a modern twist on that cherished recipe, hoping it brings as much joy to your home as it has to mine.

    Ingredients

    • 1 pound skinless, boneless wild salmon fillet
    • 1/2 cup red onion, finely diced
    • 2 tablespoons capers, drained
    • 1 large egg
    • 1 cup panko bread crumbs

    Instructions

    1. Mince the salmon fillet into fine pieces, ensuring that each piece is uniform in size for even cooking.
    2. In a medium-sized bowl, gently whip the egg until frothy. This will act as the binding agent for your salmon mixture.
    3. Add the finely diced red onion and capers to the egg, stirring until the ingredients are well incorporated.
    4. Fold in the minced salmon, mixing gently to maintain the texture of the fish.
    5. Gradually add the panko bread crumbs, mixing until the mixture holds together but is not overly dry.
    6. Form the mixture into 4 equal-sized patties, pressing gently to ensure they hold their shape.
    7. Place the patties on a preheated grill, cooking for about 2-3 minutes on each side until golden brown and cooked through. Alternatively, bake in a 350-degree oven for 15-20 minutes.
    8. Serve hot, garnished with fresh herbs or a squeeze of lemon for an extra zing.

    Tips

    For the best results, ensure that your salmon is as fresh as possible. Fresh salmon not only enhances the flavor but also improves the texture of the cakes. If your mixture seems too wet, add a little more panko to achieve the right consistency. Remember, the key to perfect salmon cakes is balance—too much panko can overpower the delicate flavor of the fish.

    Variations & Substitutions

    Feel free to get creative with this recipe! You can substitute the wild salmon with canned salmon in a pinch, though fresh is always preferred for the best flavor. If you’re looking to add a bit of spice, consider incorporating a finely chopped jalapeño or a dash of cayenne pepper. For a gluten-free version, replace panko with gluten-free bread crumbs or crushed cornflakes.

    Storage

    Store any leftover salmon cakes in an airtight container in the refrigerator for up to 3 days. To reheat, place them in a preheated oven at 350 degrees for about 10 minutes or until warmed through. Avoid microwaving as it can make them soggy. These cakes also freeze well; simply wrap them individually in plastic wrap and store them in a freezer-safe bag for up to 3 months.

    FAQ

    Can I use smoked salmon for this recipe?

    While smoked salmon adds a unique flavor, it might overpower the other ingredients in this recipe. If you love the taste of smoked salmon, consider using a mix of fresh and smoked salmon for a balanced flavor profile.

    What can I serve with salmon cakes?

    Salmon cakes pair beautifully with a fresh green salad, roasted vegetables, or a light yogurt dill sauce. For a more hearty meal, serve them alongside quinoa or couscous.

    Nutrition

    Wild salmon is packed with Omega-3 fatty acids, which are essential for heart health. Each serving of these salmon cakes is not only a source of lean protein but also provides essential vitamins and minerals, making it a nutritious choice for you and your family.

    Final Thoughts

    These Wild Salmon Cakes are more than just a meal; they’re a testament to the power of simple ingredients coming together to create something truly special. Whether you’re sharing them with loved ones or enjoying a quiet meal by yourself, I hope these salmon cakes bring a touch of warmth and nostalgia to your table.

    Thank you for joining me on this culinary journey. I look forward to hearing how this recipe finds its place in your home, creating new memories and traditions for years to come. Bon appétit!

    Related update: Wild Salmon Cakes

    Related update: Chicken Adobo & Coconut Ginger Rice

  • Pasta with Peas and Italian Sausage | Made by Meaghan Moineau

    Pasta with Peas and Italian Sausage

    Intro

    There are few things more comforting than a bowl of pasta, and this recipe for Pasta with Peas and Italian Sausage holds a special place in my heart. Growing up, Sunday dinners were a cherished tradition in my family. My grandmother would spend the afternoon bustling around the kitchen, filling the house with the aroma of fresh herbs, garlic, and tomatoes. One of her signature dishes was this simple yet flavorful pasta recipe. It’s a dish that brings back memories of laughter and love shared around the dinner table, and I’m thrilled to share it with you today.

    Why You’ll Love It

    This Pasta with Peas and Italian Sausage recipe is a delightful blend of flavors and textures that come together in perfect harmony. You’ll love how the sweet and savory Italian sausage complements the freshness of the peas, all enveloped in a rich, tomato-based sauce. It’s a hearty meal that’s incredibly easy to prepare, making it perfect for busy weeknights or a cozy weekend dinner. Plus, it’s a one-pot wonder that minimizes cleanup, allowing you more time to relax and savor your meal.

    Ingredients

    • 1 lb farfalle pasta
    • 2 tablespoons olive oil
    • 4 Italian sweet sausages, casings removed
    • 1 cup frozen peas
    • 1 can (14 oz) canned tomatoes
    • 1 cup Pomi strained tomato sauce
    • 2 tablespoons butter
    • Salt and pepper to taste

    Instructions

    1. Cook the pasta following the package directions until al dente. Drain and set aside.
    2. In a very large skillet over medium heat, add the olive oil.
    3. Add the Italian sausage meat to the skillet and sauté until slightly brown all over.
    4. Stir in the frozen peas and canned tomatoes.
    5. Season with salt and pepper to taste.
    6. Lower the heat to medium and cook for another 10 to 15 minutes, allowing the flavors to meld together.
    7. Return the drained pasta to the pan and add the butter.
    8. Pour in the tomato sauce with sausage and mix well until everything is combined.
    9. Serve hot, garnished with grated Parmesan cheese if desired.

    Tips

    Here are some tips to ensure your Pasta with Peas and Italian Sausage turns out perfectly every time:

    • Use high-quality Italian sausage for the best flavor. You can choose between sweet or spicy depending on your preference.
    • If you have fresh peas on hand, feel free to use them instead of frozen peas.
    • Be sure to cook the pasta to al dente, as it will continue to cook slightly when mixed with the sauce.
    • For an extra touch of flavor, add a pinch of red pepper flakes to the sauce.

    Variations & Substitutions

    This recipe is wonderfully versatile. Here are some variations and substitutions you can try:

    • Vegetarian Version: Omit the sausage and add more vegetables like bell peppers or mushrooms.
    • Different Pasta: Feel free to swap the farfalle for another type of pasta like penne or fusilli.
    • Gluten-Free: Use your favorite gluten-free pasta to make this dish suitable for those with gluten sensitivities.

    Storage

    Leftovers can be stored in an airtight container in the refrigerator for up to 3 days. To reheat, warm gently in a skillet over medium heat, adding a splash of water if needed to loosen the sauce. This dish can also be frozen for up to 2 months. Thaw in the refrigerator overnight before reheating.

    FAQ

    Can I use fresh tomatoes instead of canned?

    Yes, fresh tomatoes can be substituted for canned. Simply chop them and cook until they break down and form a sauce. You may need to adjust the cooking time slightly to achieve the desired consistency.

    How can I make this dish spicier?

    If you prefer a spicier dish, use hot Italian sausage instead of sweet, or add a pinch of red pepper flakes to the sauce.

    What can I serve with this pasta?

    This pasta is a meal in itself, but it pairs beautifully with a simple green salad and crusty garlic bread for a complete dinner.

    Nutrition

    This dish is a hearty meal that provides a good balance of protein, carbohydrates, and fats. The peas add a nice dose of fiber and vitamins, while the sausage contributes protein and flavor. Adjustments can be made based on dietary needs or preferences, such as using turkey sausage for a leaner option.

    Conclusion

    There you have it, a heartwarming recipe for Pasta with Peas and Italian Sausage that’s sure to become a family favorite. It’s easy to see why this dish has been a staple in my family for generations. Not only is it delicious and satisfying, but it’s also a breeze to prepare, making it perfect for any occasion. I hope this recipe brings as much joy to your table as it has to mine. Enjoy!

    Related update: Pasta with Peas and Italian Sausage

    Related update: Salmon In Banana Leaf

  • Amaranth and Roast Veggie Salad | Made by Meaghan Moineau

    Amaranth and Roast Veggie Salad | Made by Meaghan Moineau

    Amaranth and Roast Veggie Salad

    Intro

    There’s something magical about the aroma of vegetables roasting in the oven, the warmth of the kitchen embracing you as you anticipate the delightful meal ahead. I remember my grandmother’s kitchen, where every Sunday, she would prepare a hearty roast that filled the house with comforting scents. Her kitchen was a haven, a place where the worries of the world would melt away with each delicious bite. Inspired by those cherished moments, I’ve created a dish that combines the wholesome goodness of roasted vegetables with the unique texture of amaranth. This Amaranth and Roast Veggie Salad is my homage to those Sundays, and I’m thrilled to share it with you.

    Why You’ll Love It

    This Amaranth and Roast Veggie Salad is a delightful blend of flavors and textures. The nutty, slightly crunchy amaranth pairs perfectly with the tender, caramelized roasted vegetables. The basil-infused olive oil adds a fragrant touch, while the herbal salt enhances the natural sweetness of the vegetables. It’s a dish that’s not only delicious but also packed with nutrients, making it a perfect addition to any meal. Whether you’re a seasoned cook or a kitchen novice, you’ll find this salad both easy to prepare and deeply satisfying.

    Ingredients

    • 1 cup amaranth
    • 2 tablespoons basil-infused olive oil
    • 1 bell pepper, sliced
    • 1 cup diced pumpkin
    • 1 red onion, roughly chopped
    • A handful of rocket leaves
    • Herbal salt, to taste
    • 1 punnet baby tomatoes

    Instructions

    1. Cook the amaranth with about a cup of water. Bring it to a boil, then reduce the heat and simmer until it reaches a sticky consistency. This should take around 15-20 minutes.
    2. While the amaranth is cooking, preheat your oven to 400°F (200°C).
    3. Cut the red onion roughly into chunks and dice the pumpkin into bite-sized pieces.
    4. Add the onion and diced pumpkin to a tinfoil-lined baking tray.
    5. Drizzle the vegetables with basil-infused olive oil and sprinkle with herbal salt and pepper.
    6. Place the tray in the hot oven and roast for about 25-30 minutes, or until the edges of the pumpkin become crispy.
    7. Just before the veggies are done roasting, add the baby tomatoes to the tray and return to the oven for an additional 5 minutes.
    8. Once the vegetables are roasted, remove them from the oven and coat them with the cooked amaranth.
    9. Tear a few rocket leaves and add them to the mixture.
    10. Toss everything together gently, serve warm, and enjoy your unusual roast veggie salad!

    Tips

    For the best results, use fresh, seasonal vegetables. If you’re in a hurry, you can prepare the amaranth in advance and simply reheat it when you’re ready to assemble the salad. Don’t hesitate to adjust the seasoning to your taste—more herbal salt can bring out the flavors even more.

    Variations & Substitutions

    If you can’t find amaranth, quinoa is a great substitute that will give you a similar texture. For a bit of heat, consider adding a pinch of chili flakes to the roasted vegetables. You can also vary the veggies based on what you have on hand; zucchini or sweet potatoes would be excellent additions.

    Storage

    This salad is best enjoyed fresh, but any leftovers can be stored in an airtight container in the refrigerator for up to 2 days. When reheating, try to do so gently to maintain the texture of the vegetables.

    FAQ

    Can I make this salad in advance?

    Yes, you can prepare the components of the salad ahead of time. Cook the amaranth and roast the vegetables, then store them separately in the refrigerator. When you’re ready to serve, warm them slightly and toss everything together with the rocket leaves.

    Is this salad gluten-free?

    Absolutely! Amaranth is a naturally gluten-free grain, making this salad a perfect option for those with gluten sensitivities.

    What can I serve with this salad?

    This salad is versatile and pairs well with grilled chicken, fish, or even a simple lentil soup for a complete meal. It’s also an excellent side dish for a larger dinner spread.

    Nutrition

    This Amaranth and Roast Veggie Salad is not only flavorful but also nutritious. Amaranth is a great source of protein and fiber, while the roasted vegetables provide essential vitamins and minerals. The addition of olive oil offers healthy fats, making this a well-rounded, wholesome dish.

    Conclusion

    Creating this Amaranth and Roast Veggie Salad is like taking a comforting journey back to simpler times, where the kitchen was filled with warmth and love. It’s a dish that brings together the best of both worlds: a touch of nostalgia and a healthy, modern twist. I hope this salad finds a cherished place at your table, just as it has in mine. Enjoy every bite!

    Related update: Amaranth and Roast Veggie Salad

    Related update: Pasta with Peas and Italian Sausage

    Related update: Dairy Free Chicken Salad