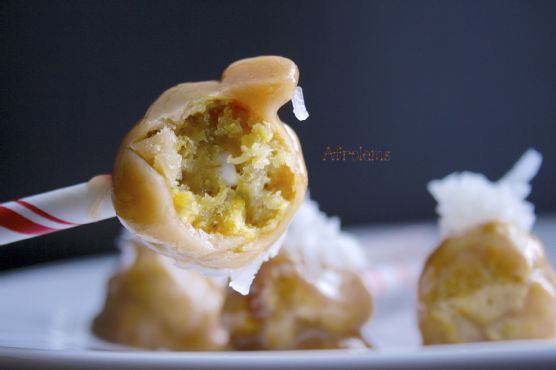
Tag: Comfort Food

  • Exquisite Saffron-Infused Chicken Korma with Toasted Almonds | Made by Meaghan Moineau

    Exquisite Saffron-Infused Chicken Korma with Toasted Almonds | Made by Meaghan Moineau

    Exquisite Saffron-Infused Chicken Korma with Toasted Almonds

    Imagine this: a luxurious aroma wafting through your kitchen, golden saffron swirling into creamy coconut milk, and the sound of almond flakes gently crackling in a pan. This isn’t just any dinner — it’s an invitation to embark on a flavorful journey with my Exquisite Saffron-Infused Chicken Korma with Toasted Almonds.

    Personal Story

    My first encounter with chicken korma was at a tiny, bustling eatery in Delhi. Packed with locals and tourists alike, the aroma of spices enveloped us as we stepped in. I was hooked at the first bite — tender chicken, a symphony of spices, and a richness that lingered long after the meal was over. But the magic ingredient I didn’t know then was saffron, which would later elevate my own version of this beloved dish.

    Back in my own kitchen, I was determined to recreate that experience. My earliest attempts were, let’s say, educational. In one misadventure, I learned that not all saffron is created equal. I somehow managed to buy saffron threads that were as colorful as my evening plans, but sadly, lacked the depth of flavor I sought. Lesson learned — quality matters!

    One day, as I experimented with different variations, a lightbulb moment struck. I was sipping on a golden milk latte, and the warm embrace of saffron inspired me to blend it with coconut milk for the korma. That was the turning point. The addition of toasted almond flakes for texture was the cherry on top, winning over the hearts (and taste buds) of my family and friends.

    Now, every time I prepare this Saffron-Infused Chicken Korma, I’m transported back to that bustling Delhi eatery. It’s a dish steeped in tradition, yet with my own personal twist — an homage to my culinary journey and the flavors that have shaped it.

    What Makes This Version Special

    This isn’t your average chicken korma. The luxurious addition of saffron transforms the dish from classic to exquisite, infusing it with a depth of flavor and a golden hue that is nothing short of mesmerizing. But that’s not all — the toasted almond flakes bring an unexpected crunch that delights the senses. It’s this unique combination that elevates the dish, making it a standout on any dinner table.

    While traditional chicken korma is undeniably delicious, this version offers a delightful contrast of textures and a richness that only saffron can provide. If you’re a fan of classic Indian cuisine, this Saffron-Infused Chicken Korma with Toasted Almonds is a must-try recipe that promises to impress.

    Flavor Profile

    Prepare your taste buds for a rich and aromatic experience. As you take your first bite, the tender chicken melts in your mouth, enveloped in a velvety coconut milk sauce. The saffron adds a luxurious hint of floral warmth, perfectly balanced by the earthiness of cumin and coriander. Just when you think you’ve savored it all, the toasted almond flakes offer a delightful crunch, and a subtle hint of lemon zest ties it all together with a refreshing finish.

    Ingredients

    • 1 lb chicken breast, cut into small pieces
    • 2 cups coconut milk
    • 1 tablespoon coriander powder
    • 1 teaspoon cumin powder
    • 2 tablespoons ginger/garlic paste
    • 2 tablespoons ground almond
    • 2 tablespoons oil
    • 1 tablespoon poppy seeds
    • 2 tablespoons raisins
    • Salt, to taste
    • 1 teaspoon saffron threads
    • 1/4 cup toasted almond flakes
    • Fresh cilantro leaves, for garnish
    • Zest of 1 lemon

    Instructions

    1. Begin by blooming the saffron threads in warm coconut milk. Heat 1/4 cup of coconut milk until it’s just warm, then add the saffron and let it sit for about 10 minutes. This step will release the full flavor and color of the saffron.
    2. In a large pan, heat the oil over low heat. Add the ginger/garlic paste and fry for about 3 minutes until fragrant, ensuring you don’t burn the paste.
    3. Stir in the cumin powder, coriander powder, ground almond, and poppy seeds. Continue frying the masala for about 3-4 minutes over low heat, until the spices are well blended and aromatic.
    4. Add the chicken pieces to the masala, stirring carefully to ensure they’re evenly coated. Cook for another 5 minutes, folding the masala over the chicken pieces gently.
    5. Pour in the remaining coconut milk along with the saffron-infused milk. Stir well to cover all the chicken pieces. Add salt to taste and the raisins.
    6. Cover the pan and let the chicken simmer on low heat for about 20-25 minutes, stirring occasionally, until the chicken is cooked through and tender.
    7. Meanwhile, toast the almond flakes in a dry pan over medium heat. Keep a close eye on them, tossing frequently until they’re golden and aromatic.
    8. Once the chicken is cooked, stir in the lemon zest. Serve the korma hot, garnished with fresh cilantro leaves and the toasted almond flakes for added crunch.

    Pro Tips from Meaghan’s Kitchen

    • Use high-quality saffron threads for the best flavor. A little goes a long way, so invest in the good stuff.
    • When toasting almond flakes, be patient. Keep them moving in the pan to avoid burning, which can happen quickly.
    • For an even creamier texture, use full-fat coconut milk — it makes a noticeable difference.
    • Don’t rush the blooming of saffron. Properly blooming it in warm liquid enhances both color and flavor.
    • If you like a little heat, add a finely chopped green chili to the masala step for a gentle kick.

    Variations & Dietary Swaps

    • Vegetarian Swap: Replace chicken with paneer or tofu. The creamy sauce pairs beautifully with these proteins.
    • Spice-It-Up Version: Add a teaspoon of garam masala or more chilies for a spicier kick.
    • Kids-Friendly Version: Tone down the spices and omit the raisins if your little ones aren’t fans of sweet surprises in savory dishes.

    What to Serve With It

    This Saffron-Infused Chicken Korma is perfectly complemented by a side of fluffy basmati rice. For a more indulgent meal, pair it with garlic naan or paratha. A chilled glass of Gewürztraminer is an excellent choice for those who enjoy a bit of wine with their meal, as its floral notes harmonize beautifully with the saffron.

    Storage & Meal Prep

    If you have leftovers, store them in an airtight container in the fridge for up to 3 days. Reheat gently on the stove over low heat, adding a splash of coconut milk if needed to maintain the creamy consistency. This dish also freezes well for up to a month. Allow it to thaw overnight in the fridge before reheating.

    FAQ

    Can I use chicken thighs instead of breasts?

    Absolutely! Chicken thighs are juicier and can add even more flavor to the dish. Adjust the cooking time slightly as thighs may take a bit longer to cook through.

    Is there a substitute for saffron?

    While there’s no perfect substitute for saffron’s unique flavor, you can try a pinch of turmeric for color, but it won’t replicate the taste. For the best experience, use saffron.

    How do I prevent the almonds from burning?

    Toast the almonds over medium heat and keep stirring them frequently. Removing them from the pan as soon as they’re golden will prevent them from overcooking.

    Can I make this dish ahead of time?

    Yes, this dish actually benefits from being made ahead as the flavors meld beautifully over time. Just reheat gently before serving.

    What if I don’t have coconut milk?

    You can substitute with heavy cream for a richer texture or almond milk for a lighter version.

    Final Thoughts

    Whether you’re a seasoned home cook or trying your hand at Indian cuisine for the first time, this Exquisite Saffron-Infused Chicken Korma with Toasted Almonds is sure to impress. It’s a dish that brings warmth and comfort to any table, and I’m thrilled to share it with you. If you try this recipe, I’d love to hear your thoughts! Feel free to leave a comment or share your creations with me. Happy cooking!

    Related update: Exquisite Saffron-Infused Chicken Korma with Toasted Almonds

    Related update: Spicy Italian Sausage & Roasted Pepper Ragu with Basil Pesto

  • Decadent Honey-Roasted Peanut Butter Ice Cream with Dark Chocolate Shards | Made by Meaghan Moineau

    Decadent Honey-Roasted Peanut Butter Ice Cream with Dark Chocolate Shards | Made by Meaghan Moineau

    Decadent Honey-Roasted Peanut Butter Ice Cream with Dark Chocolate Shards

    Imagine the creamy, nutty goodness of peanut butter ice cream taken to new heights with a luxurious swirl of homemade chocolate ganache and the crunch of honey-roasted peanuts. The first spoonful is a revelation, a dance of caramelized sweetness and rich chocolate undertones that lingers long after the last bite.

    Personal Story

    Growing up, peanut butter ice cream was a rare treat, reserved for special Sunday afternoons when my family would pile into our sun-faded station wagon and head to the local ice cream parlor. I remember the thrill of watching the server scoop out my favorite flavor, the peanut butter ribbons weaving through the creamy concoction like golden streams through a lush forest. It was pure joy in a cone.

    Fast forward a few years to my first tiny apartment kitchen, where I decided to recreate this childhood favorite. My initial attempts were, well, let’s just say, more of a learning experience than a triumph. I quickly discovered that achieving the right balance of flavors in homemade ice cream is both an art and a science, one that requires patience—and a bit of courage.

    One day, as I was experimenting with a batch, I decided to add a handful of honey-roasted peanuts that were hiding at the back of my pantry. The resulting flavor was a revelation. The caramelized crunch paired perfectly with the silky peanut butter base, and I knew I had stumbled upon something special. From there, the addition of dark chocolate shards seemed only natural, enhancing the peanut butter’s richness with a sophisticated depth.

    Now, this decadent honey-roasted peanut butter ice cream with dark chocolate shards holds a cherished spot not only in my recipe book but also in my heart. It’s a sweet reminder that sometimes the best things come from unexpected twists and a little bit of kitchen serendipity.

    What Makes This Version Special

    This isn’t your average peanut butter ice cream. What sets this recipe apart is the thoughtful addition of honey-roasted peanuts and a swirl of homemade chocolate ganache. The peanuts are roasted with honey to enhance their natural sweetness, adding a layer of caramelized flavor that complements the rich, nutty base. The chocolate ganache, made by melting dark chocolate with butter and cocoa powder, is carefully swirled into the ice cream during the final stages of churning. This technique creates deep, chocolatey undertones that elevate the classic peanut butter ice cream to something truly extraordinary.

    Flavor Profile

    The taste of this ice cream is a symphony of rich, nutty notes with a hint of caramel sweetness from the honey-roasted peanuts. Each bite delivers a creamy texture that’s punctuated by the satisfying crunch of the peanuts. The chocolate ganache adds a luxurious depth, with its bittersweet flavor cutting through the sweetness and providing a sophisticated twist. It’s a harmonious blend that dances on your palate, leaving a lingering, delectable aftertaste.

    Ingredients

    • 2 cups whole milk
    • 1 cup sugar
    • 1/4 teaspoon salt
    • 2 large eggs
    • 1 cup smooth peanut butter
    • 1 cup heavy cream
    • 1 teaspoon vanilla extract
    • 1 cup unsalted peanuts, roasted with honey
    • 1/2 cup bits of bitter chocolate
    • 1/4 cup honey
    • 1/4 cup cocoa powder
    • 4 ounces dark chocolate (70% cacao)
    • 2 tablespoons butter

    Instructions

    1. Preheat your oven to 350°F (175°C). Spread the unsalted peanuts on a baking sheet and drizzle with honey. Toss to coat, then roast in the oven for 10-15 minutes, or until golden-brown and fragrant. Allow to cool.
    2. In a medium saucepan, combine the milk, sugar, and salt. Cook over medium heat, stirring occasionally, until the mixture is just about to boil. Reduce the heat to low.
    3. In a separate bowl, beat the eggs with a hand mixer or whisk until frothy, about 2 minutes. Gradually stir about 1 cup of the hot milk mixture into the beaten eggs to temper them.
    4. Return the egg mixture to the saucepan with the remaining milk mixture. Cook over low heat, stirring constantly, until the mixture thickens slightly, about 2-3 minutes. Remove from heat.
    5. Whisk in the smooth peanut butter until fully incorporated. Transfer the mixture to a bowl, cover, and refrigerate for at least 3 hours.
    6. To make the chocolate ganache, melt the dark chocolate and butter together in a small saucepan over low heat. Stir in the cocoa powder until smooth and set aside.
    7. In a large bowl, combine the chilled peanut butter mixture with the heavy cream and vanilla extract, stirring with a whisk.
    8. Pour the mixture into an ice cream maker and churn according to the manufacturer’s instructions. In the last few minutes of churning, drizzle in the chocolate ganache to create swirls.
    9. Once churned, fold in the honey-roasted peanuts and chocolate bits. Transfer the ice cream to a plastic container and freeze for at least an hour before serving.
    10. When ready to serve, let the ice cream sit at room temperature for 5-10 minutes before scooping. Enjoy your decadent treat with an extra sprinkle of chopped peanuts and chocolate bits if desired.

    Pro Tips from Meaghan’s Kitchen

    • For the best texture, ensure your ice cream base is thoroughly chilled before churning. This helps achieve that perfect creamy consistency.
    • When roasting the peanuts, keep a close eye on them. The honey can quickly go from caramelized to burnt if left unattended.
    • If you don’t have an ice cream maker, no worries! Pour the mixture into a shallow dish and place it in the freezer. Stir every 30 minutes until it reaches your desired consistency.
    • For neat swirls, pour the ganache into the ice cream maker just moments before finishing the churn. This will create beautiful ribbons of chocolate throughout.
    • Always use high-quality dark chocolate for the ganache. It makes a significant difference in flavor.

    Variations & Dietary Swaps

    • Vegetarian option: Replace the eggs with a plant-based egg substitute, and use coconut cream instead of heavy cream for a vegan-friendly version.
    • Spice-it-up version: Add a pinch of cayenne pepper or a swirl of chili chocolate for an unexpected kick.
    • Kids-friendly version: Substitute the dark chocolate with milk chocolate and reduce the amount of cocoa powder for a sweeter, milder taste.

    What to Serve With It

    This decadent treat pairs beautifully with a glass of cold brew coffee or espresso, which provides a complementary bitter contrast to the ice cream’s rich sweetness. Alternatively, serve it alongside a warm brownie or a slice of banana bread for an indulgent dessert experience.

    Storage & Meal Prep

    Store your homemade ice cream in an airtight container in the freezer for up to two weeks. When ready to enjoy, let it sit at room temperature for 5-10 minutes before scooping to ensure it’s at the perfect creamy consistency. If the ice cream hardens too much in the freezer, a brief zap in the microwave (10-15 seconds) can soften it up for easier scooping.

    FAQ

    How do I prevent my ice cream from becoming too icy?

    Ensuring that your ice cream base is completely chilled before churning and using an ice cream maker will help prevent ice crystals from forming. Additionally, incorporating enough sugar helps achieve a smoother texture.

    Can I use crunchy peanut butter instead of smooth?

    Absolutely! Crunchy peanut butter will add extra texture and peanut bits, enhancing the nutty experience. Just ensure it’s well incorporated into the mixture.

    Is there an alternative to honey for roasting the peanuts?

    Yes, you can use maple syrup or agave nectar as a substitute for honey if you prefer a different flavor or are avoiding honey.

    Can I add more chocolate?

    Of course! Feel free to increase the amount of dark chocolate or add extra chocolate bits on top for an even richer chocolate experience.

    Final Thoughts

    Creating this decadent honey-roasted peanut butter ice cream with dark chocolate shards is a delightful culinary adventure, one that’s sure to impress family and friends. I hope you find as much joy in making and tasting this ice cream as I did in creating it. I’d love to hear about your own twists on this recipe, so feel free to share your comments and experiences below. Happy scooping!

    Related update: Decadent Honey-Roasted Peanut Butter Ice Cream with Dark Chocolate Shards

    Related update: Orange Blossom Amaretto Almond Cookies with Dark Chocolate Drizzle

  • Spicy Stir-Fried Cabbage and Tomatoes with Ginger-Lime Zest | Made by Meaghan Moineau

    Spicy Stir-Fried Cabbage and Tomatoes with Ginger-Lime Zest | Made by Meaghan Moineau

    Spicy Stir-Fried Cabbage and Tomatoes with Ginger-Lime Zest

    Imagine a dish where each bite bursts with layers of flavor — the spice dances on your tongue while a tangy, citrusy brightness lingers in the background. This is not just any stir-fry; it’s a symphony of spice and zest that transforms humble cabbage and tomatoes into a culinary delight.

    Personal Story

    I recall my first encounter with this spicy stir-fried cabbage and tomatoes vividly. It was one of those cozy evenings where the world outside was a whirlwind, but inside, my kitchen was a haven of warmth and inviting aromas. I was experimenting with Asian flavors, trying to recreate the exotic dishes I’d savored at our neighborhood dim sum place. The cabbage, a staple in my fridge, and ripe tomatoes from the market were calling out to be transformed into something extraordinary.

    The first attempt was a bit of a kitchen mishap. I was over-enthusiastic with the red chili flakes, and the dish ended up so fiery that it could’ve powered a small city. But therein lay the beauty of cooking — every hiccup is a stepping stone to perfection. The next time, I found the balance, letting the cabbage and tomatoes marry harmoniously with the zing of fresh ginger and lime, creating a dish that felt both familiar and excitingly new.

    What started as a simple experiment has now turned into one of my favorite go-to meals. It’s perfect for those nights when you crave something comforting yet vibrant, with a hint of spice to warm your soul. Over time, I’ve tweaked and enhanced the recipe, bringing my own spin that elevates the traditional stir-fry to a whole new level.

    There’s a certain magic in watching my family and friends savor this dish, their initial skepticism over the cabbage quickly turning to delight as they experience the unexpected flavor profile. It’s become a dish that not only fills our bellies but also sparks conversations and brings smiles around the dinner table.

    What Makes This Version Special

    This version of spicy stir-fried cabbage and tomatoes is not your everyday stir-fry. Infused with fresh ginger and a zesty lime finish, it offers a unique contrast of spice and tangy brightness. Unlike traditional recipes, which might focus solely on heat, this dish balances the fiery kick of red chili flakes with the refreshing zing of **lime zest** and **lime juice**. The result is a refreshing melody of flavors that dance across your taste buds, leaving you craving more.

    Moreover, we bloom the garlic and ginger in sesame oil, a technique that enhances their aromatic qualities and provides a robust base for the other ingredients. This simple yet profound step transforms the ordinary into the extraordinary, ensuring every bite is an explosion of flavor.

    Flavor Profile

    If you’re wondering what this spicy stir-fried cabbage and tomatoes with ginger-lime zest tastes like, let me paint a picture for you. It’s spicy, tangy, and aromatic with a refreshing citrusy finish. The heat from the red chili flakes is immediate, but it doesn’t overwhelm — instead, it’s tempered by the sweetness of ripe tomatoes and a subtle, savory depth from soy sauce. The ginger adds a spicy warmth, while the lime zest and juice lift the dish with a vibrant, zesty finish that invigorates the palate.

    Ingredients

    • 1 medium Beijing cabbage, coarsely shredded
    • 2 cups diced tomatoes
    • 3 cloves garlic, minced
    • 2 tablespoons fresh ginger, grated
    • 1 teaspoon salt
    • 1 tablespoon sugar
    • 2 tablespoons ketchup
    • 2-3 tablespoons water
    • Zest of 1 lime
    • Juice of 1 lime
    • 1 teaspoon red chili flakes
    • 3 tablespoons soy sauce
    • 2 tablespoons sesame oil
    • Fresh cilantro, chopped (optional for garnish)

    Instructions

    1. Start by prepping your vegetables. Coarsely shred the Beijing cabbage and rinse it well to remove any dirt. Drain thoroughly and set aside. Rinse and dice the tomatoes and keep them ready.
    2. Heat a wok or large skillet over medium-high heat. Add the sesame oil and allow it to heat until shimmering. Add the minced garlic and grated ginger, stirring continuously for about 30 seconds until they’re fragrant but not browned. This blooming technique unlocks their full aromatic potential.
    3. Increase the heat to high and add the shredded cabbage to the wok. Stir-fry for about 3-4 minutes, or until the cabbage starts to soften. If needed, add a couple of tablespoons of water to help the cooking process along without burning.
    4. Add the diced tomatoes, salt, sugar, ketchup, and soy sauce to the wok. Mix everything together and stir-fry for another 3-4 minutes, until the tomatoes have softened and the flavors have melded beautifully. The sauce should be slightly thickened.
    5. Finish by adding the red chili flakes, lime zest, and lime juice. Stir well to combine, cooking for just another minute. This final step infuses the dish with a vibrant, tangy freshness.
    6. Remove from heat, taste, and adjust seasoning if necessary. Garnish with fresh cilantro if desired, and serve immediately.

    Pro Tips from Meaghan’s Kitchen

    • For the best flavor, always bloom your garlic and ginger in hot sesame oil. It elevates the aromatics and creates a delicious base for your stir-fry.
    • Keep the wok hot and moving! A high heat helps to quickly cook the vegetables, keeping them vibrant and crisp-tender.
    • If you like a little extra heat, try adding a touch more red chili flakes at the end, but do so sparingly and taste as you go.
    • Use fresh lime juice and zest. This isn’t the place for bottled lime juice — the fresh stuff is essential for that bright, zesty finish.
    • For a more robust flavor, let the stir-fry rest for a few minutes before serving. This allows the flavors to meld together beautifully.

    Variations & Dietary Swaps

    • Vegetarian Swap: This dish is already vegetarian but make it vegan by ensuring your ketchup and soy sauce are vegan-friendly.
    • Spice-it-up Version: Add thinly sliced fresh red chilies along with the red chili flakes for an extra fiery kick.
    • Kids-Friendly Version: Reduce the chili flakes to a pinch and add a tablespoon of honey for a touch of sweetness that kids will love.

    What to Serve With It

    For a complete meal, serve this spicy stir-fried cabbage and tomatoes with a side of steamed jasmine rice. The fluffy, aromatic rice is the perfect canvas for soaking up all those delicious stir-fry juices. And don’t forget a chilled glass of Riesling — its slight sweetness and acidity make it a brilliant match for the spicy, tangy flavors of the dish.

    Storage & Meal Prep

    If you have leftovers (though I doubt you will!), store them in an airtight container in the refrigerator for up to 3 days. To reheat, simply pop it in the microwave or toss it back into a skillet over medium heat, stirring until warmed through. This dish doesn’t freeze well due to the high water content of the cabbage and tomatoes, which can result in a mushy texture upon thawing.

    FAQ

    Can I use another type of cabbage?

    Absolutely! Napa cabbage or even green cabbage can work well in this recipe, though cooking times may vary slightly.

    How can I make it less spicy?

    If you prefer a milder dish, simply reduce the amount of red chili flakes or omit them altogether. You can also add more lime juice to counteract the heat.

    Can I prepare the ingredients in advance?

    Yes, prepping your vegetables ahead of time can make the cooking process even quicker. Store the shredded cabbage and diced tomatoes separately in the fridge until you’re ready to cook.

    What else can I add to the stir-fry?

    Feel free to get creative! Add sliced bell peppers, carrots, or even tofu for extra texture and nutrients. Just be sure to adjust cooking times accordingly.

    Is there a substitute for sesame oil?

    If you don’t have sesame oil on hand, you can use vegetable or peanut oil. However, sesame oil adds a distinct nutty aroma that’s hard to replace.

    Final Thoughts

    There you have it — a dish that’s as vibrant and lively as a summer’s day, yet comforting enough to warm you on a chilly evening. This spicy stir-fried cabbage and tomatoes with ginger-lime zest is a celebration of flavors, bringing a touch of Asian cuisine into your home kitchen. I hope you’ll give it a try and experience the wonderful harmony of spice and zest for yourself. If you do, don’t forget to share your thoughts and any personal twists you might have added in the comments below. Happy cooking, my friends!

    Related update: Spicy Stir-Fried Cabbage and Tomatoes with Ginger-Lime Zest

    Related update: Exquisite Saffron-Infused Chicken Korma with Toasted Almonds

  • Truffle-Infused Poached Eggs with Spinach, Tomato, and Crispy Prosciutto | Made by Meaghan Moineau

    Truffle-Infused Poached Eggs with Spinach, Tomato, and Crispy Prosciutto | Made by Meaghan Moineau

    Truffle-Infused Poached Eggs with Spinach, Tomato, and Crispy Prosciutto

    Imagine this: A sunny Sunday morning, the aroma of freshly brewed coffee wafting through the air, and the promise of a breakfast that’s not just a meal, but an experience. The rich, earthy scent of truffle oil mingles with the savory crispness of prosciutto, tantalizing your senses in the most delightful way. This is not just any breakfast; this is truffle-infused poached eggs with spinach, tomato, and crispy prosciutto — a dish that transports you to an Italian piazza with every bite.

    Personal Story

    It was a rainy afternoon in Florence when I first discovered the magic of truffle oil. I was tucked away in a quaint trattoria, the kind where the walls are lined with dusty bottles of Chianti, and the menu is handwritten and slightly smudged. I had ordered a simple dish of poached eggs atop sautéed greens, and the unexpected drizzle of truffle oil elevated the flavors to something heavenly. I knew then and there that I had to recreate this culinary moment in my own kitchen.

    Back home, I was determined to perfect the art of poached eggs — a task that, at first, seemed daunting. My initial attempts were, let’s say, less than successful. There were yolks that broke too soon and whites that spread like wispy clouds in the water. But with perseverance, and a few tips from a seasoned chef friend, I was finally able to achieve that perfect, silky poached egg.

    The addition of crispy prosciutto was a happy accident. While rummaging through my fridge one day, I stumbled upon a few slices leftover from a charcuterie board. A quick sizzle in a hot pan turned them into the perfect crispy garnish. Each bite of this dish became a symphony of textures — the soft, runny yolk, the tender spinach, the crunchy prosciutto, and the subtle, luxurious hint of truffle oil.

    Now, this dish has become a weekend staple in my home, a reminder of my Italian adventure and a testament to the beauty of simple, yet sophisticated flavors. It’s not just breakfast; it’s a celebration of culinary creativity and a little indulgence to start the day.

    What Makes This Version Special

    This version of poached eggs is special because it takes a classic breakfast staple and elevates it with a touch of luxury. The introduction of truffle oil adds a subtle earthy aroma that transports you to the heart of Italy with every bite. But the real showstopper here is the crispy prosciutto. While most brunch dishes might rely solely on bacon for crispiness, the prosciutto offers a delicate, savory crunch that pairs wonderfully with the creamy, runny yolk of the poached egg. The combination of these elements creates a dish that’s not only indulgent but also balanced in flavor and texture.

    Flavor Profile

    The flavor profile of truffle-infused poached eggs with spinach, tomato, and crispy prosciutto is nothing short of a decadent culinary experience. The truffle oil introduces an earthy richness that complements the creamy texture of the perfectly poached eggs. The spinach brings a fresh, slightly bitter note, which is beautifully offset by the sweetness of ripe tomatoes. Add to that the savory, salty crunch of crispy prosciutto and a touch of Parmesan cheese, and you’re left with a dish that’s both indulgent and balanced. The subtle heat from the dried chili flakes adds a whisper of spice that lingers on the palate, making each bite a journey through layers of complex flavors.

    Ingredients

    • 2 slices of whole grain bread
    • 2 large eggs
    • 2 tablespoons white vinegar
    • 1 tablespoon olive oil
    • A few drops of truffle oil
    • 2 cloves garlic, minced
    • 1 teaspoon dried chili flakes
    • 2 cups fresh spinach leaves
    • Salt and pepper, to taste
    • 1 ripe tomato, sliced
    • 4 slices of prosciutto
    • 2 tablespoons grated Parmesan cheese
    • Fresh basil leaves, for garnish

    Instructions

    1. Start by preparing your poaching water. Take a wide skillet and fill it with enough water to submerge the eggs. Bring it up to a steady boil, then reduce the heat to maintain a gentle simmer. Add the white vinegar to the water, which helps the egg whites set more quickly.
    2. Crack one egg into a small bowl. Create a gentle whirlpool in the simmering water using a spoon, then slowly pour the egg into the center of the whirlpool. Repeat with the second egg. Allow the eggs to cook for about 2 to 3 minutes, until the whites are set but the yolks remain runny.
    3. Meanwhile, in a separate frying pan, heat the olive oil over medium heat. Add the minced garlic and dried chili flakes, sautéing for about a minute until fragrant but not browned. Add the fresh spinach leaves, stirring gently to coat them in the aromatic oil. Cover and cook for another minute until wilted, then season with salt and pepper.
    4. For the prosciutto, heat another pan over medium-high heat and add the slices in a single layer. Cook until golden and crispy, about 2-3 minutes per side. Remove from the pan and let them drain on a paper towel.
    5. To assemble, place the toasted whole grain bread on plates. Divide the spinach mixture between the slices, followed by the tomato slices. Carefully top each with a poached egg, then drizzle a few drops of truffle oil over the eggs for an aromatic finish. Season with salt and pepper.
    6. Garnish with crispy prosciutto, a sprinkle of grated Parmesan cheese, and fresh basil leaves. Serve immediately to enjoy the full spectrum of flavors and textures.

    Pro Tips from Meaghan’s Kitchen

    • Use the freshest eggs possible for poaching, as the whites will hold together better.
    • If you’re new to poaching eggs, try using a ramekin or small cup to gently slide the egg into the water.
    • Don’t overcrowd the pan when crisping the prosciutto; they need space to fry evenly.
    • For an extra layer of flavor, rub a cut garlic clove over the toasted bread before adding the toppings.
    • Always add the truffle oil right before serving to preserve its delicate aroma.

    Variations & Dietary Swaps

    • Vegetarian Swap: Omit the prosciutto and add a handful of sautéed mushrooms for a similar umami kick.
    • Spice-It-Up Version: Add a dash of hot sauce or a sprinkle of cayenne pepper for those who like an extra kick.
    • Kids-Friendly Version: Replace the spinach with mild sautéed zucchini and skip the chili flakes to make it more appealing to younger palates.

    What to Serve With It

    This luxurious breakfast pairs beautifully with a glass of freshly squeezed orange juice or, if you’re feeling festive, a light, citrusy mimosa. The bright acidity of the drinks complements the richness of the truffle oil and the salty prosciutto, creating a delightful balance to your meal.

    Storage & Meal Prep

    For meal prep, you can crisp the prosciutto and sauté the spinach in advance, storing them separately in airtight containers in the fridge for up to 2 days. Poached eggs are best served fresh, but you can keep them in cold water in the fridge for up to 24 hours and reheat gently in warm water before serving. Toast the bread fresh for the best texture.

    FAQ

    Can I use a different type of oil instead of truffle oil?

    While truffle oil is what gives the dish its signature aroma, you can use a high-quality extra virgin olive oil as an alternative. It will change the flavor profile slightly, but it will still be delicious.

    What’s the best way to toast the bread?

    A quick toast in the oven or a toaster works well. For an added touch, you can lightly brush the bread with olive oil before toasting for extra flavor.

    Can I make this dish in advance?

    You can prepare most components ahead of time, but poached eggs are best made fresh. You can crisp the prosciutto and sauté the spinach a day in advance.

    What can I use instead of prosciutto?

    Try using turkey bacon or pancetta for a similar crispy texture. For a vegetarian option, consider using crispy fried shallots or roasted red peppers.

    Final Thoughts

    Truffle-infused poached eggs with spinach, tomato, and crispy prosciutto is more than just a breakfast — it’s a culinary experience that transports you straight to the heart of Italy. I hope this recipe inspires you to explore new flavors and techniques in your kitchen. Your feedback and stories are always welcome, so feel free to share your experience in the comments below. Happy cooking, my friends!

    Related update: Truffle-Infused Poached Eggs with Spinach, Tomato, and Crispy Prosciutto

    Related update: Lavender-Infused Gluten-Free Blueberry Muffins with Almond Crunch

  • Tropical Spiced Pina Colada with Coconut Cream Floater | Made by Meaghan Moineau

    Tropical Spiced Pina Colada with Coconut Cream Floater | Made by Meaghan Moineau

    Tropical Spiced Pina Colada with Coconut Cream Floater

    Imagine the gentle clinking of ice cubes against a glass, the air perfumed with a symphony of tropical scents, and the first sip of a drink that feels like a warm island breeze. Welcome to the world of the Tropical Spiced Pina Colada with Coconut Cream Floater — a lush, creamy escape from the everyday.

    For me, the journey to this exotic concoction began in the most unexpected of places: my grandmother’s kitchen. During our annual family reunion, she would whip up her famous pina coladas, using a simple blend of pineapple juice, coconut milk, and a splash of rum. It became a cherished tradition, a marker of summer’s peak when the sun seemed to linger a bit longer just to savor the taste.

    One summer, as I watched her deftly work her magic, I dared to suggest a twist. The idea was born from an impromptu trip to a Caribbean spice market where the air was thick with cinnamon and nutmeg. I was captivated by these aromas and couldn’t help but imagine them mingling with the creamy, sweet notes of our beloved pina colada.

    My grandmother, ever the culinary adventurer, gave me the green light. We decided to try our hands at a Tropical Spiced Pina Colada, infusing it with a dash of these heady spices. The result was nothing short of transformative. The addition of a luxurious coconut cream floater brought a new layer of indulgence, turning a beloved classic into something sophisticated and new.

    What Makes This Version Special

    This version of the Tropical Spiced Pina Colada stands out because it introduces a hint of tropical spices and a luxurious coconut cream floater. While traditional pina coladas are undeniably delightful, they can sometimes feel a bit too sweet or one-dimensional. By blooming cinnamon and nutmeg before blending, we unlock their full aromatic potential, giving the drink warm, inviting undertones. The coconut cream floater is the crowning glory, adding a velvety richness that elevates the experience from a simple cocktail to a decadent treat.

    Flavor Profile

    Close your eyes and imagine taking a sip. The first thing you notice is the creamy texture, instantly transporting you to a sandy beach. The pineapple juice brings a vibrant, tangy sweetness that dances with the mellow richness of the coconut milk. The spiced notes of cinnamon and nutmeg are subtle yet undeniably present, adding warmth and depth. And just when you think it couldn’t get any better, the coconut cream floater glides across your palate, leaving a lingering, luxurious finish.

    Ingredients

    • 2 cups ice
    • 1 cup pineapple juice
    • 1 cup coconut milk
    • 1/2 cup coconut rum
    • 1/2 teaspoon ground cinnamon
    • 1/4 teaspoon ground nutmeg
    • **2 tablespoons coconut cream**
    • 1 tablespoon toasted coconut flakes
    • Pineapple wedges, for garnish
    • Maraschino cherries, for garnish

    Instructions

    1. In a small pan over low heat, bloom the cinnamon and nutmeg until their aromas are released, about 2 minutes. This step enhances their flavors, so don’t rush it.
    2. Add the ice, pineapple juice, coconut milk, coconut rum, and the bloomed spices to a blender.
    3. Blend the mixture on high until smooth and creamy, about 1-2 minutes. You want everything well-combined and silky.
    4. Pour the blended drink into chilled glasses, leaving a bit of space at the top for the floater.
    5. Gently float a dollop of coconut cream on top of each glass, allowing it to slowly meld with the drink as you sip.
    6. Garnish with fresh pineapple wedges, maraschino cherries, and a sprinkle of toasted coconut flakes for that extra touch of elegance.

    Pro Tips from Meaghan’s Kitchen

    • Always use fresh pineapple juice, if possible. It makes a world of difference in the taste.
    • Blooming spices is crucial; it releases their oils and intensifies their flavor without adding bitterness.
    • For an extra frothy drink, blend for another minute on high speed.
    • If you like a thicker consistency, reduce the amount of ice or add a bit more coconut cream to the blend.
    • Don’t skip the toasted coconut flakes! They add a delightful crunch and aromatic finish.

    Variations & Dietary Swaps

    • Non-Alcoholic Version: Simply omit the coconut rum. The drink remains deliciously creamy and satisfying.
    • Spice-It-Up: Add a pinch of cayenne pepper to the blender for a subtle kick.
    • Kid-Friendly Version: Replace the rum with a splash of coconut water or additional pineapple juice, perfect for little ones.

    What to Serve With It

    The Tropical Spiced Pina Colada pairs beautifully with a light and crunchy coconut shrimp appetizer. The crispy texture and subtle sweetness of the shrimp complement the creamy, spiced notes of the drink. A fresh mango salsa on the side adds a tangy contrast that ties the flavors together perfectly.

    Storage & Meal Prep

    While pina coladas are best enjoyed fresh, you can prepare the blended components ahead of time. Store the mixture in an airtight container in the fridge for up to 24 hours. Before serving, give it a quick blend to refresh its texture. If you’re storing leftovers, keep the coconut cream separate and add it just before serving. For extended storage, freeze the blended mixture in ice cube trays and blend with a splash of pineapple juice when ready to enjoy.

    FAQ

    Can I use canned pineapple juice?

    Yes, you can, but fresh pineapple juice will provide a brighter, more vibrant flavor.

    What if I don’t have coconut cream?

    You can substitute with heavy cream or simply add extra coconut milk for a similar creamy effect.

    Is it okay to use sweetened coconut milk?

    I recommend unsweetened coconut milk to avoid making the drink overly sweet, but sweetened can be used if you prefer a dessert-like taste.

    How do I toast coconut flakes?

    Simply spread the flakes on a baking sheet and toast in a 350°F oven for 5-6 minutes until golden-brown, stirring once for even color.

    Can I make this drink without a blender?

    While a blender is ideal for achieving that smooth, creamy texture, you can shake the ingredients vigorously in a cocktail shaker as an alternative.

    Final Thoughts

    Creating this Tropical Spiced Pina Colada with Coconut Cream Floater has been a journey of flavors and memories. It’s a drink that invites you to sit back, relax, and savor each luxurious sip. I hope this recipe brings a touch of the exotic to your kitchen, and I can’t wait to hear how it turns out for you. Please share your thoughts, variations, and any special memories you create along the way. Here’s to new traditions and the joy of discovery in every glass. Cheers!

    Related update: Tropical Spiced Pina Colada with Coconut Cream Floater

    Related update: Tropical Almond Matcha Energy Smoothie with Coconut and Spirulina

  • Zesty Citrus-Herb Pork Carnitas Tacos with Pineapple Salsa | Made by Meaghan Moineau

    Zesty Citrus-Herb Pork Carnitas Tacos with Pineapple Salsa | Made by Meaghan Moineau

    Zesty Citrus-Herb Pork Carnitas Tacos with Pineapple Salsa

    Imagine this: the sound of pork gently sizzling in a cast-iron pan, the aroma of rosemary wafting through the kitchen, and a splash of lime that transforms the ordinary into something extraordinary. This isn’t just any taco night; it’s an experience, a celebration of flavors with my Zesty Citrus-Herb Pork Carnitas Tacos with Pineapple Salsa.

    My love affair with carnitas began on a balmy summer night at a bustling food market in Oaxaca. The air was thick with the scent of spices, and I found myself drawn to a tiny stall nestled between colorful piñatas and fresh produce. The vendor, with twinkling eyes and a knowing smile, handed me a taco that was unlike any I’d ever tasted. It was the perfect balance of savory, zesty, and sweet. That evening, I vowed to bring that magic back home.

    Back in my kitchen, I was determined to recreate that unforgettable taste. I bought every cut of pork imaginable, tried every combination of spices, and even enlisted my friends as taste testers. It was a labor of love, filled with mishaps like the time I accidentally added too much salt and had to start over (I learned the hard way to taste as I go!). But through trial and error, I discovered my secret weapon: a hint of rosemary that adds an aromatic depth, and a pineapple salsa that gives a bright, tropical flair.

    Every time I serve these Zesty Citrus-Herb Pork Carnitas Tacos with Pineapple Salsa, I’m transported back to that enchanting night in Oaxaca. The laughter, the music, the vibrant flavors — all alive in every bite. It’s not just a meal; it’s a memory, a piece of my heart shared with you.

    What Makes This Version Special

    What sets this recipe apart from traditional carnitas is the surprising twist of pineapple salsa and rosemary infusion. By warming olive oil with fresh rosemary before browning the pork, the meat takes on an aromatic quality that’s both unexpected and delightful. Meanwhile, the pineapple salsa introduces a refreshing sweetness that balances the savory richness of the pork. Plus, adding a splash of lime juice and zest during the final browning stage elevates the flavors with a zesty brightness. This isn’t just a dish; it’s a flavor journey that transforms classic carnitas into something exceptionally vibrant and fresh.

    Flavor Profile

    Prepare to be wowed by the taste experience these tacos offer. Picture the juicy, tender pork, slightly crispy on the edges, infused with the fragrant essence of rosemary. The natural sweetness of pineapple salsa dances on your tongue, countering the savory depth of the carnitas. Add to that the zesty kick from lime juice and zest, and you’ve got a dynamic, multi-layered flavor profile that’s both invigorating and comforting. It’s a harmonious blend of zesty, savory, and sweet, with a delicate herbal note that lingers beautifully.

    Ingredients

    • 2 lbs lean pork butt, cut into large chunks
    • 4 cloves garlic, crushed
    • 1 tablespoon sea salt
    • 1 teaspoon ground pepper
    • **3 tablespoons olive oil**
    • **1 tablespoon fresh rosemary, finely chopped**
    • 1/2 cup orange juice
    • 1/4 cup milk
    • **1 lime, juiced and zested**
    • 12 corn tortillas
    • 1 cup **fresh pineapple, diced**
    • 1 small jalapeño, minced
    • 1/2 cup salsa fresca
    • 1 avocado, sliced
    • 1/4 cup cilantro, chopped
    • 1 small onion, chopped
    • 2 additional limes, sliced for serving

    Instructions

    1. In a large Dutch oven, combine the pork, garlic, sea salt, ground pepper, and enough water to cover the pork. Bring to a boil over medium-high heat, then reduce the heat, cover, and simmer over medium-low for 45 minutes to one hour, until the pork is tender and easy to shred.
    2. Drain the pork well and allow it to cool slightly. Once cool enough to handle, shred the meat using your hands or the tines of a fork. Remove and discard any remaining fat.
    3. Return the shredded pork to the Dutch oven. In a small pan, gently warm the olive oil with the rosemary for 2-3 minutes to infuse the flavors. Add the infused olive oil to the pot with the pork.
    4. Add the orange juice and milk to the pork, cooking over medium heat until the liquid has evaporated and the pork begins to brown, about 15 minutes. Stir occasionally to achieve an even golden-brown crispiness.
    5. During the final browning stage, add the lime juice and zest to the pork for a bright, citrusy finish. Season with additional salt and pepper to taste.
    6. While the pork is browning, prepare the pineapple salsa by combining the diced pineapple, minced jalapeño, and salsa fresca in a bowl. Set aside.
    7. Chop the onions and cilantro, and slice the avocado and limes. Place each in small individual bowls for serving.
    8. Heat the corn tortillas in a dry frying pan over medium heat until warm and pliable. Keep them warm by wrapping in a clean kitchen towel.
    9. To assemble the tacos, stack two tortillas, layer with warm carnitas, a spoonful of pineapple salsa, chopped cilantro, onion, and avocado slices. Finish with a squeeze of lime juice for an extra burst of flavor.

    Pro Tips from Meaghan’s Kitchen

    • Infuse the Oil: Infusing the olive oil with rosemary is key. Do it gently over low heat to avoid burning and maximize flavor transfer.
    • Crispy Edges: For those irresistible crispy edges, ensure the pork is in a single layer in the pan, allowing maximum contact with the heat.
    • Balance the Heat: If the jalapeño is too spicy for your taste, remove the seeds and veins to tone down the heat.
    • Tortilla Warmth: Warming the tortillas in a dry pan keeps them pliable and enhances their flavor, making the taco experience more enjoyable.
    • Juicy Pineapple Salsa: Let the pineapple salsa sit for a few minutes before serving to allow the flavors to meld beautifully.

    Variations & Dietary Swaps

    • Vegetarian Swap: Substitute the pork with jackfruit for a vegetarian-friendly version that still delivers that pulled texture.
    • Spice-It-Up Version: Add chipotle powder to the pork for a smoky, spicier kick that complements the pineapple salsa.
    • Kids-Friendly Version: Use sweet bell peppers instead of jalapeños in the salsa for a milder, kid-approved flavor.

    What to Serve With It

    Pair these vibrant Zesty Citrus-Herb Pork Carnitas Tacos with a chilled glass of hibiscus iced tea, which perfectly complements the tacos’ tropical flair. Alternatively, a light Mexican lager offers a refreshing balance to the zesty and savory notes of the carnitas, making it an ideal companion for this festive dish.

    Storage & Meal Prep

    Leftover carnitas can be stored in an airtight container in the fridge for up to 3 days. For longer storage, freeze the shredded pork in portions, ensuring they’re tightly sealed to prevent freezer burn, for up to 3 months. To reheat, thaw overnight in the fridge, then warm in a skillet over medium heat until hot and crispy. Pineapple salsa is best fresh but can be refrigerated for up to a day.

    FAQ

    Can I make this recipe in advance?

    Absolutely! You can prepare the carnitas a day ahead, allowing the flavors to develop further. Simply reheat in a skillet before serving to regain crispiness.

    Is there a substitute for milk in this recipe?

    Yes, you can use a non-dairy alternative like almond or coconut milk. Just be mindful of the flavor it might add to the dish.

    How can I adjust the spice level?

    To adjust the heat, simply modify the amount of jalapeño in the salsa. Removing the seeds and veins will also reduce the spiciness.

    What if I don’t have fresh pineapple?

    Canned pineapple can be used as a substitute. Just make sure to drain it well to avoid adding excess moisture to the salsa.

    Final Thoughts

    I hope these Zesty Citrus-Herb Pork Carnitas Tacos with Pineapple Salsa bring a bit of my kitchen to yours. They’re more than just a meal; they’re a celebration of flavors and memories. I’d love to hear how they turn out in your own kitchen. Feel free to leave a comment or share your experience on social media. Let’s keep the conversation going — after all, cooking is always better together!

    Related update: Zesty Citrus-Herb Pork Carnitas Tacos with Pineapple Salsa

    Related update: Spicy Stir-Fried Cabbage and Tomatoes with Ginger-Lime Zest

  • Zesty Lime-Infused Strawberry Yogurt Cake with Basil Glaze | Made by Meaghan Moineau

    Zesty Lime-Infused Strawberry Yogurt Cake with Basil Glaze | Made by Meaghan Moineau

    Zesty Lime-Infused Strawberry Yogurt Cake with Basil Glaze

    Picture this: The gentle hum of your oven warming the kitchen, the air thick with the scent of fresh strawberries and citrus, and a golden-brown Bundt cake cooling on the counter. This is the kind of moment that makes you slow down, savor the process, and anticipate that first bite. Welcome to the world of Zesty Lime-Infused Strawberry Yogurt Cake with Basil Glaze.

    Personal Story

    Every spring, as the first strawberries start appearing in the market, I’m reminded of my childhood summers spent at my grandmother’s house. Her garden was a small slice of heaven, bustling with the colors and scents of the season. Strawberries were always the crown jewels of her garden, and she would let me pick them fresh each morning, the dew still clinging to their vibrant red skins.

    My love for strawberries naturally found its way into my baking adventures. One memorable afternoon, I set out to recreate a simple strawberry cake recipe from my grandmother’s old cookbook. To my dismay, I realized I had run out of lemons. Panicking, I reached for limes instead and decided to add a bit of zest to the sugar. The outcome was unexpected but delightful, a revelation that led to the creation of this Zesty Lime-Infused Strawberry Yogurt Cake.

    Years later, I was inspired by a local chef who infused a dessert glaze with fresh herbs. That’s when it clicked: why not add a fragrant basil glaze to my lime-infused cake? It turned out to be the perfect twist — the basil’s subtle pepperiness played beautifully with the sweet strawberries and citrusy lime.

    Now, whenever I bake this cake, it feels like a gathering of old friends: the familiar sweetness of strawberries, the zing of lime, and the aromatic hug of basil. It’s a recipe that bridges my past with new culinary explorations, and I hope it becomes a staple in your kitchen too.

    What Makes This Version Special

    This isn’t just any strawberry cake. Our version adds a refreshing lime zest and a fragrant basil-infused glaze, creating a unique herbal twist that complements the sweet strawberries. The addition of Greek yogurt ensures a tender crumb, while the blooming of lime zest in sugar releases a vibrant citrus aroma that permeates the entire cake. The basil glaze is a subtle, yet sophisticated touch that elevates the cake from ordinary to extraordinary, offering a gentle herbal note that sets it apart from more traditional versions.

    Flavor Profile

    Each bite of this Zesty Lime-Infused Strawberry Yogurt Cake is a journey. Refreshing and herbaceous, the experience begins with a burst of lime and sweet ripe strawberries, followed by a vibrant citrus zing. The basil glaze adds a gentle, aromatic finish, marrying the flavors with a sweet, fruity conclusion. It’s a cake that dances on your palate, promising a delightful taste from start to finish.

    Ingredients

    • 2 cups all-purpose flour, plus an extra 1/4 cup for the strawberries
    • 1 teaspoon baking soda
    • 1/2 teaspoon salt
    • Zest of 1 lime (bloom in sugar)
    • 1 cup unsalted butter, softened (infused with basil)
    • 1 1/2 cups sugar
    • 3 large eggs
    • 1 tablespoon lime juice
    • 1 cup plain Greek yogurt
    • 2 cups diced fresh strawberries
    • 1 cup powdered sugar
    • 10 fresh basil leaves

    Instructions

    1. Preheat your oven to 325°F (160°C). Grease and flour a 10-inch Bundt pan to ensure the cake releases easily after baking.
    2. In a medium bowl, sift together 2 cups of flour, baking soda, and salt. Set aside.
    3. Bloom the lime zest by rubbing it into the sugar with your fingertips until the sugar becomes fragrant and lightly colored.
    4. In a small saucepan, melt the butter over low heat. Add the fresh basil leaves and let them infuse for about 10 minutes. Remove the leaves before using the butter.
    5. In a large mixing bowl, use an electric mixer to cream together the infused butter and sugar mixture until light and fluffy, about 3-4 minutes.
    6. Beat in the eggs one at a time, ensuring each is fully incorporated before adding the next. Stir in 1 tablespoon of lime juice.
    7. Alternate adding the flour mixture and Greek yogurt to the batter, starting and ending with the flour, mixing just until everything is incorporated.
    8. Toss the diced strawberries in the remaining 1/4 cup of flour. This helps prevent them from sinking to the bottom of the cake. Gently fold the strawberries into the batter.
    9. Pour the batter into the prepared Bundt pan, smoothing the top with a spatula.
    10. Bake in the preheated oven for about 60 minutes, or until a toothpick inserted into the center of the cake comes out clean.
    11. Allow the cake to cool in the pan for 10 minutes before turning it out onto a wire rack to cool completely.
    12. For the glaze, whisk together the powdered sugar and 2 tablespoons of lime juice until smooth. Drizzle over the cooled cake and let it set before serving.

    Pro Tips from Meaghan’s Kitchen

    • For the most flavor, make sure to rub the lime zest into the sugar before creaming it with the butter. This releases the zest’s natural oils.
    • Take your time infusing the butter with basil. Low and slow is the key to drawing out the basil’s aromatic qualities without burning the butter.
    • Ensure your strawberries are dry after washing; excess water can alter the cake’s texture.
    • Test for doneness by inserting a toothpick into the thickest part of the cake. A clean toothpick means it’s ready.
    • For best results, use fresh basil leaves rather than dried ones for the glaze. The fresh leaves impart a more vibrant flavor.

    Variations & Dietary Swaps

    • Vegetarian Swap: The recipe is already vegetarian-friendly, but for a vegan version, consider using a plant-based yogurt and flax eggs.
    • Spice-It-Up Version: Add a pinch of ground ginger or cardamom to the batter for a spiced twist.
    • Kids-Friendly Version: Omit the basil glaze and top with a simple vanilla glaze or a dusting of powdered sugar instead.

    What to Serve With It

    This Zesty Lime-Infused Strawberry Yogurt Cake pairs beautifully with a chilled glass of sparkling elderflower lemonade for a refreshing contrast. If you’re serving it as a dessert after dinner, consider a dollop of lightly whipped cream or a scoop of vanilla ice cream for an extra touch of indulgence.

    Storage & Meal Prep

    To store leftovers, wrap the cake tightly in plastic wrap or aluminum foil and keep it in the refrigerator for up to 5 days. For longer storage, you can freeze the cake for up to 3 months. To freeze, wrap the cooled cake in plastic wrap, then in foil, and place it in a resealable freezer bag. To reheat, let the cake thaw in the refrigerator overnight and bring it to room temperature before serving. If you prefer it warm, heat individual slices in the microwave for 15-20 seconds.

    FAQ

    Can I use frozen strawberries instead of fresh?

    Yes, you can use frozen strawberries, but be sure to thaw and drain them well to prevent excess moisture from affecting the cake’s texture.

    Can I substitute the Greek yogurt with regular yogurt?

    Absolutely! Regular yogurt works just fine, but Greek yogurt gives the cake a slightly richer texture due to its thickness.

    What if I don’t have a Bundt pan?

    No worries! You can use a 9×13 inch baking pan instead. Just keep an eye on the baking time, as it may vary slightly.

    How can I make the glaze thicker?

    If you prefer a thicker glaze, reduce the lime juice or add more powdered sugar until you reach your desired consistency.

    Is there a way to make this cake gluten-free?

    Yes, you can use a 1:1 gluten-free flour blend. Just make sure it’s suitable for baking for the best results.

    Final Thoughts

    Baking this Zesty Lime-Infused Strawberry Yogurt Cake with Basil Glaze is more than just a culinary endeavor — it’s a celebration of flavors and memories brought to life in your kitchen. I hope this cake brings as much joy and deliciousness to your table as it has to mine. If you give this recipe a try, I’d love to hear how it turned out for you! Feel free to drop a comment below or share your creations on social media. Happy baking, my dear friends!

    Related update: Zesty Lime-Infused Strawberry Yogurt Cake with Basil Glaze

    Related update: Zesty Lemon Poppy Seed Lava Cakes with Spiced Chocolate Ganache

  • Maple-Glazed Bacon Wrapped Pork Tenderloin with Smoked Paprika | Made by Meaghan Moineau

    Maple-Glazed Bacon Wrapped Pork Tenderloin with Smoked Paprika | Made by Meaghan Moineau

    Maple-Glazed Bacon Wrapped Pork Tenderloin with Smoked Paprika

    Imagine the sizzle of bacon meeting the gentle caramelization of maple syrup, enveloping a perfectly seasoned pork tenderloin. This culinary delight tantalizes the senses with its sweet, smoky, and savory symphony, making it an irresistible centerpiece for any meal.

    Personal Story

    Every family has that one dish that always steals the show during gatherings. For mine, it’s always been the classic pork tenderloin. I remember the first time I tried to cook it solo; I was determined to elevate the dish beyond my grandmother’s simple yet delicious recipe. I wanted something that would leave everyone talking, something unforgettable. That’s when I stumbled upon the idea of wrapping it in bacon. But, not just any bacon-wrapped tenderloin — it needed a twist.

    One autumn afternoon, while watching the leaves cascade from the trees in a flurry of reds and golds, inspiration struck. The answer was in the sweet, smoky allure of maple syrup; it was the missing puzzle piece that would elevate the dish from ordinary to extraordinary. Combining it with a hint of smoky paprika and the earthiness of fresh sage seemed like a symphonic blend of flavors destined to come together.

    However, my first attempt was a kitchen disaster. I forgot to preheat the oven and ended up with a chewy mess instead of a tender masterpiece. But with every misstep, I learned. I perfected the maple glaze, discovered the right bacon crispness, and honed my timing to a science. And every time I prepare this dish now, it’s a beautiful reminder of those early culinary adventures.

    Today, the Maple-Glazed Bacon Wrapped Pork Tenderloin with Smoked Paprika has become a signature favorite at our gatherings, always leaving family and friends asking for more. The journey from kitchen mishap to mouthwatering success is a testament to the power of creativity and persistence in the kitchen.

    What Makes This Version Special

    The beauty of this Maple-Glazed Bacon Wrapped Pork Tenderloin with Smoked Paprika lies in its complex layering of flavors. The sweet and smoky maple glaze adds depth to the dish, while the hint of smoked paprika enhances the savory punch from the bacon wrap. This version of the classic pork tenderloin transcends the mundane by infusing a rich tapestry of flavors that awaken the palate. Unlike the standard bacon-wrapped tenderloin, this recipe transforms it into a gourmet experience with its sophisticated glaze and aromatic accompaniments.

    Flavor Profile

    Imagine biting into a succulent piece of pork tenderloin, perfectly cooked and enveloped in crispy bacon. The first taste is a delightful mix of sweetness and smokiness, with the maple syrup providing a caramelized glaze that dances on the taste buds. The smoked paprika adds an earthy depth, while the fresh sage leaves impart a subtle herbaceous note. Together, these flavors create a harmonious balance that’s both comforting and exciting, a true testament to culinary craftsmanship.

    Ingredients

    • Pork tenderloin – 2 pieces
    • **Bacon** – enough slices to wrap tenderloins
    • Black pepper – to taste
    • Coarse salt – to taste
    • **Fresh sage** – about 9-10 leaves
    • Garlic powder – a pinch
    • **2 tablespoons maple syrup**
    • **1 teaspoon smoked paprika**
    • **1 teaspoon Dijon mustard**

    Instructions

    1. Preheat your oven to 425°F (220°C). This step is crucial for achieving that perfect golden-brown crust on your tenderloin.
    2. Remove about an inch off the tapered end of each tenderloin to make a perfect cylinder. This ensures even cooking throughout.
    3. Season the tenderloins generously with coarse salt, black pepper, and a pinch of garlic powder. This foundational seasoning sets the stage for the bold flavors to come.
    4. In a small bowl, mix the maple syrup and Dijon mustard until well combined. Brush this glaze over the surface of the tenderloins, ensuring every nook and cranny is covered.
    5. On a sheet of cling wrap, lay out the bacon strips in an overlapping line. This will form the crispy exterior of your dish.
    6. Sprinkle the smoked paprika over the bacon, embedding a deep smoky flavor into the wrap.
    7. Place the sage leaves all over the bacon, about 9-10 leaves in total, to add a fragrant earthy note.
    8. Position one piece of tenderloin across the short ends of the bacon and roll to cover it completely with the bacon. Repeat for the other tenderloin segment.
    9. Transfer the bacon-wrapped tenderloins to a non-stick pan and sear on all sides over medium-high heat. This step is key to achieving a crispy, golden-brown exterior.
    10. Once seared, transfer the pan to the preheated oven. Cook for 8-10 minutes, turning the pieces after 5 minutes to ensure even cooking. You’re aiming for an internal temperature of 145°F (63°C).
    11. Remove from the oven and let it rest for at least 5 minutes before slicing. This allows the juices to redistribute, ensuring every bite is juicy and flavorful.

    Pro Tips from Meaghan’s Kitchen

    • When brushing the glaze, let it sit for a few minutes to slightly absorb into the meat before wrapping it with bacon.
    • Use a meat thermometer to ensure the tenderloin reaches the perfect internal temperature without overcooking.
    • For a beautiful presentation, slice the tenderloin into 1-inch medallions and serve fanned out on a platter.
    • If you prefer a spicier kick, add a sprinkling of crushed red pepper flakes to the glaze mixture.
    • Wrapping the tenderloins tightly in bacon helps maintain their shape and ensures an even cook.

    Variations & Dietary Swaps

    • Vegetarian Swap: Replace the pork with a thick, firm tofu. Follow the same steps for seasoning and wrapping with vegetarian bacon.
    • Spice-It-Up Version: Add a tablespoon of sriracha or hot sauce to the maple-Dijon glaze for an extra spicy kick.
    • Kids-Friendly Version: Use a honey glaze instead of maple syrup for a sweeter, milder flavor that kids will love.

    What to Serve With It

    This Maple-Glazed Bacon Wrapped Pork Tenderloin pairs beautifully with a glass of medium-bodied Pinot Noir, its acidity balancing the dish’s richness. For sides, roasted Brussels sprouts with a touch of balsamic vinegar or a creamy garlic mashed potato will complement the savory-sweet profile perfectly.

    Storage & Meal Prep

    If you find yourself with leftovers (a rare occurrence with this dish), store them in an airtight container in the fridge for up to three days. To reheat, place in a preheated oven at 350°F (175°C) for about 15 minutes, or until warmed through. This dish also freezes well; wrap the cooked tenderloin in aluminum foil and store it in a freezer-safe bag for up to 2 months. Thaw overnight in the fridge before reheating.

    FAQ

    Can I use turkey bacon instead of regular bacon?

    Absolutely! Turkey bacon will work just as well, though it may not crisp up quite the same way. Keep an eye on it during the searing process.

    What if I don’t have smoked paprika?

    If smoked paprika is unavailable, you can use regular paprika and add a dash of liquid smoke to the glaze for a similar effect.

    How do I know when the pork tenderloin is done?

    The best way to ensure doneness is by using a meat thermometer. The internal temperature should reach 145°F (63°C) for perfectly cooked pork.

    Can I prepare this dish ahead of time?

    Yes, you can prepare the tenderloin up to the searing step and refrigerate it overnight. Allow it to come to room temperature before continuing with the oven cooking process.

    What other herbs can I use instead of sage?

    Rosemary or thyme can be excellent substitutes if sage is not to your liking. They will provide a different but equally aromatic flavor profile.

    Final Thoughts

    Cooking is an adventure, and this Maple-Glazed Bacon Wrapped Pork Tenderloin with Smoked Paprika is a testament to how a little creativity can transform a classic into a show-stopping masterpiece. I’d love to hear how your dish turned out, so feel free to leave a comment or share your own twists on the recipe. Until next time, happy cooking from my kitchen to yours!

    Related update: Maple-Glazed Bacon Wrapped Pork Tenderloin with Smoked Paprika

    Related update: Zesty Citrus-Herb Pork Carnitas Tacos with Pineapple Salsa

  • Smoky Jalapeno Cheddar Cornbread with Honey Butter | Made by Meaghan Moineau

    Smoky Jalapeno Cheddar Cornbread with Honey Butter | Made by Meaghan Moineau

    Smoky Jalapeno Cheddar Cornbread with Honey Butter

    Imagine the aroma of freshly baked cornbread wafting through your kitchen, the air punctuated with the smoky warmth of paprika and the gentle sweetness of roasted corn. This is the kind of bread that demands to be shared, torn apart with friends over a boisterous dinner, or savored quietly with a good book and a cup of tea.

    There’s something magical about the combination of spicy jalapenos and creamy cheddar cheese, a dance of flavors that both excites and comforts in every bite. This is no ordinary cornbread; it’s a symphony of tastes and textures, enhanced by a luscious drizzle of honey butter that melts into every nook and cranny.

    Personal Story

    I remember the first time I discovered the joy of homemade cornbread. It was a chilly autumn day, the kind where the leaves rustle like whispers and the sky hangs heavy with the promise of rain. I was in my grandmother’s cozy kitchen, her worn recipe book open on the counter, pages yellowed with age and splattered with batter from years of use. She was a woman who cooked with her heart, her hands moving deftly as she mixed ingredients with a grace that only comes from years of practice.

    As a young girl, I watched in awe as she effortlessly turned simple, everyday ingredients into something extraordinary. On that particular day, it was cornbread—warm, golden, and enticingly fragrant. I was hooked after the first bite, the cornbread’s buttery crumb melting on my tongue, leaving a playful hint of sweetness.

    Fast forward a few years, and I found myself craving that same comforting flavor but with my personal twist. I wanted more depth, more complexity, and perhaps a bit of heat. That’s when I stumbled upon the idea of adding smoked paprika and roasted corn to the mix. It was an epiphany—a revelation that transformed a beloved classic into something new and exciting.

    This Smoky Jalapeno Cheddar Cornbread with Honey Butter became a staple in my home, a dish that brings together family and friends, evoking memories of warmth, laughter, and timeless tradition. And today, I’m thrilled to share this special recipe with you, hoping it brings the same joy to your table as it does to mine.

    What Makes This Version Special

    This isn’t your run-of-the-mill cornbread. Adding smoked paprika creates a smoky depth that tantalizes the taste buds, while the roasted corn kernels introduce a subtle sweetness and delightful texture. The diced pickled jalapenos provide a gentle kick, making each bite as exciting as the last. Finally, a drizzle of homemade honey butter elevates this dish to pure bliss, adding a touch of luxurious sweetness that balances the heat and smoke.

    Flavor Profile

    With each bite of this Smoky Jalapeno Cheddar Cornbread with Honey Butter, you’ll experience a complex flavor symphony. The initial bite is smoky and cheesy, thanks to the smoked paprika and cheddar. The warmth of the jalapenos follows, providing a subtle kick that awakens the senses. As you chew, the sweetness of the roasted corn and honey butter emerges, creating a perfect harmony that keeps you reaching for more. It’s a dish that dances on your palate, leaving you both satisfied and yearning for the next bite.

    Ingredients

    • 1 cup unbleached all-purpose flour
    • 1 cup whole-wheat flour
    • 1 tablespoon baking powder
    • 1 teaspoon salt
    • 1/4 cup light olive oil
    • 1 large egg
    • 1 cup non-fat milk
    • 1 cup light cheddar cheese, shredded
    • 1/2 cup diced pickled jalapenos
    • 1 teaspoon smoked paprika
    • 1 cup roasted corn kernels
    • 2 tablespoons honey
    • 1/4 cup unsalted butter

    Instructions

    1. Preheat your oven to 350°F (175°C). Lightly grease a 9x5x3-inch loaf pan or two mini muffin pans with cooking spray.
    2. In a small saucepan over low heat, warm the olive oil slightly, then add the smoked paprika. Bloom it gently for about 2 minutes to enhance its smoky flavor. Set aside to cool.
    3. In a medium bowl, whisk together the all-purpose flour, whole-wheat flour, baking powder, and salt.
    4. In a separate bowl, whisk the egg and milk until well combined. Stir in the cooled olive oil mixture.
    5. Pour the wet ingredients into the dry, stirring gently until just combined. Avoid over-mixing to keep the bread tender.
    6. Fold in the light cheddar cheese, roasted corn kernels, and diced pickled jalapenos, ensuring they are evenly distributed throughout the batter.
    7. Pour the batter into the prepared pan(s), smoothing the top with a spatula.
    8. Bake for 30 to 45 minutes, or until the top is golden-brown and a toothpick inserted into the center comes out clean.
    9. Let the cornbread cool in the pan for 5 minutes. Run a knife around the edges to loosen, then transfer to a wire rack to cool for at least 30 minutes before slicing.
    10. While the cornbread cools, make the honey butter by combining the honey and unsalted butter in a small bowl, stirring until smooth.
    11. Serve the cornbread warm, with a generous drizzle of honey butter over each slice. Enjoy!

    Pro Tips from Meaghan’s Kitchen

    • For an extra kick, substitute half of the light cheddar with pepper jack cheese.
    • If your jalapenos are particularly spicy, rinse them briefly under cold water to tone down the heat without losing flavor.
    • Use fresh corn kernels roasted in the oven or on a skillet for the best flavor and texture.
    • Letting the batter rest for 10 minutes before baking helps develop the flavors and results in a more tender crumb.
    • For a crispier crust, sprinkle a little coarse sea salt on top of the batter before baking.

    Variations & Dietary Swaps

    • Vegetarian Swap: Substitute the cheese with a plant-based alternative and use almond milk instead of non-fat milk for a delicious vegetarian version.
    • Spice-It-Up Version: Add a pinch of cayenne pepper to the batter for those who love extra heat.
    • Kids-Friendly Version: Skip the jalapenos and add a hint of vanilla extract for a sweeter, more kid-friendly cornbread.

    What to Serve With It

    This Smoky Jalapeno Cheddar Cornbread pairs beautifully with a chilled glass of sweet iced tea, offering a refreshing contrast to the bread’s earthy flavors. For a side, consider serving a creamy avocado salad, which complements the cornbread’s rich texture with its smooth, buttery goodness. Alternatively, enjoy it with a hearty bowl of chili for a cozy, satisfying meal.

    Storage & Meal Prep

    To store, wrap the cooled cornbread tightly in plastic wrap or aluminum foil. It will keep at room temperature for up to 2 days or in the refrigerator for up to a week. For longer storage, slice the cornbread and place it in a freezer-safe bag. It can be frozen for up to 3 months. To reheat, thaw overnight in the fridge if frozen, then warm in a 350°F oven for 10-15 minutes or until heated through. For a quick snack, microwave individual slices for 20-30 seconds.

    FAQ

    Can I use canned corn instead of roasted corn kernels?

    Yes, you can use canned corn, but make sure to drain and pat it dry before adding to the batter to avoid extra moisture. Roasting it briefly in a skillet can enhance its sweetness and flavor.

    What if I don’t have smoked paprika?

    If you’re out of smoked paprika, you can substitute regular paprika and add a dash of liquid smoke for a similar effect.

    How do I make the cornbread less spicy?

    To reduce the heat, use fewer jalapenos or opt for a milder pepper like Anaheim. You can also rinse the jalapenos under cold water to remove some of the heat.

    Can I make this cornbread gluten-free?

    Yes, simply substitute the all-purpose and whole-wheat flours with a gluten-free flour blend that includes xanthan gum for structure.

    What’s the best way to reheat leftover cornbread?

    For the best texture, reheat leftover cornbread in a 350°F oven until warm. Microwaving can make it soggy, but if you’re in a hurry, a quick 20-30 seconds on a low power setting can work.

    Final Thoughts

    I hope this Smoky Jalapeno Cheddar Cornbread with Honey Butter becomes as cherished in your home as it is in mine. It’s a dish that’s both nostalgic and novel, perfect for sharing with those you love. I’d love to hear how it turns out for you, so feel free to leave a comment, share your own twists, or simply enjoy this recipe with a smile. Happy cooking, dear friends!

  • Peruvian Lomo Saltado with Crispy Quinoa Crust and Citrus Avocado Salsa | Made by Meaghan Moineau

    Peruvian Lomo Saltado with Crispy Quinoa Crust and Citrus Avocado Salsa | Made by Meaghan Moineau

    Peruvian Lomo Saltado with Crispy Quinoa Crust and Citrus Avocado Salsa

    Imagine stepping into a bustling kitchen where vibrant aromas of sizzling beef and sautéed vegetables mingle with a hint of citrus. The air practically crackles with excitement as this new twist on a classic Peruvian dish, Lomo Saltado, takes center stage. Are you ready to experience a culinary journey enhanced by a crispy quinoa crust and brightened by a refreshing citrus avocado salsa?

    Personal Story

    When I first encountered Lomo Saltado, it was love at first bite. I still remember the lively family gathering at my best friend’s house, where her grandmother served this Peruvian classic. The savory beef, the tender vegetables, and those irresistible golden fries all served over a bed of fluffy rice – it was comfort on a plate. But what truly captivated me was the way each bite felt like a celebration of flavors dancing together.

    Fast forward a few years, and I’m in my own kitchen, a place where I’ve had my share of triumphs and, let’s be honest, some mishaps too. One such mishap came when I attempted to recreate Lomo Saltado for a dinner party. In my haste, I mistimed the fries, leaving them soggy and disappointing. I realized then that this dish, though seemingly simple, demanded respect and a touch of innovation to truly shine.

    Determined to elevate this beloved dish, I experimented with different techniques and ingredients. Inspiration struck during a trip to the local farmer’s market, where I stumbled upon vibrant avocados and fresh mint. The idea of adding a citrus avocado salsa was born, providing a refreshing counterpoint to the savory beef. Then, as I was preparing quinoa for another meal, it hit me – what if I could add a crispy quinoa crust to the beef? That extra texture was the missing piece of the puzzle.

    After a few tweaks and taste tests, my enhanced Lomo Saltado was ready for prime time. It was a hit, and I knew I had found a way to honor the traditional dish while making it uniquely mine. Now, I’m thrilled to share this recipe with you, inviting you to savor every bite and perhaps make it a cherished part of your own culinary repertoire.

    What Makes This Version Special

    This version of Lomo Saltado stands out with its crispy quinoa crust on the beef, adding an unexpected crunch that takes the texture to a new level. Quinoa, a staple grain in Peruvian cuisine, brings not just texture but also a nutty flavor that complements the savory beef. Paired with the citrus avocado salsa, which adds a refreshing burst of flavor, this dish is a true sensory delight. The salsa’s tangy lime and orange juices, combined with creamy avocado and fresh mint, brighten the entire plate, making each bite a journey of layered tastes.

    Flavor Profile

    Picture this: savory, juicy beef coated in a crispy quinoa and panko breadcrumb crust, sautéed to golden-brown perfection. The cumin and complete seasoning impart a warm, earthy note, while the soy sauce and red wine vinegar add an umami depth. The sautéed onions, bell peppers, and garlic bring a sweet and aromatic base, with a hint of heat from jalapeño. The citrus avocado salsa, with its tangy and fresh profile, balances the richness of the beef, leaving a lingering lightness on your palate. It’s a symphony of flavors that elevates each component into something truly special.

    Ingredients

    • 1 lb beef tenderloin, cut into chunks
    • **1/2 cup cooked quinoa**
    • **1/2 cup panko breadcrumbs**
    • 1 teaspoon cumin
    • 1 teaspoon complete seasoning
    • 1 green bell pepper, sliced
    • 1 red bell pepper, sliced
    • 1 yellow onion, sliced
    • 2 garlic cloves, minced
    • 1 jalapeño pepper, minced
    • 2 tablespoons red wine vinegar
    • 3 tablespoons soy sauce
    • 2 plum tomatoes, cut into wedges
    • 1 lb frozen french fries, prepared according to package instructions
    • 1 avocado, diced
    • **Juice of 1 lime**
    • **Juice of 1 orange**
    • **2 tablespoons freshly chopped mint**
    • **1 tablespoon olive oil**
    • **Sea salt to taste**
    • Cilantro, for garnish

    Instructions

    1. Prepare the frozen french fries according to the package directions. Set aside and keep warm.
    2. In a large bowl, combine the cooked quinoa and panko breadcrumbs. Coat the beef chunks in this mixture, pressing gently to ensure the crumbs adhere.
    3. Heat a large wok or skillet over medium-high heat. Add a tablespoon of olive oil, then sauté the onions and bell peppers until translucent, about 10 minutes.
    4. Add the garlic and jalapeño to the skillet, cooking for an additional minute until aromatic.
    5. Push the vegetables to the side of the skillet and add the crusted beef chunks. Cook until the beef is no longer pink and the crust is golden-brown, about 5 to 7 minutes.
    6. Stir in the cumin, complete seasoning, soy sauce, and red wine vinegar. Mix everything well and let it simmer for a minute.
    7. Add the tomato wedges, cover the skillet, and cook for an additional 5 minutes, allowing the tomatoes to soften and meld with the other ingredients.
    8. In a separate bowl, prepare the citrus avocado salsa by combining the diced avocado, lime juice, orange juice, chopped mint, and a pinch of sea salt. Mix gently.
    9. When ready to serve, add the prepared french fries to the skillet, tossing everything gently to combine.
    10. Serve the Lomo Saltado over a bed of white rice, garnished with freshly chopped cilantro and a generous helping of citrus avocado salsa on top. Enjoy with a side of aji sauce for extra heat, if desired.

    Pro Tips from Meaghan’s Kitchen

    • Ensure your quinoa is well-cooked and dry before mixing with the panko breadcrumbs for the crispiest crust.
    • For even more flavor, marinate the beef in soy sauce and a splash of lime juice for 30 minutes before coating.
    • Use a cast iron skillet for even heat distribution and to achieve that perfect golden-brown crust on the beef.
    • If your salsa is too tangy, add a pinch of sugar to balance the acidity.
    • Reheat the fries in a hot oven for a quick crisp if they start to soften.

    Variations & Dietary Swaps

    • Vegetarian Swap: Replace the beef with thick slices of portobello mushrooms. They soak up flavor beautifully and have a meaty texture.
    • Spice-It-Up Version: Add a pinch of cayenne pepper to the quinoa coating for an extra kick of heat.
    • Kids-Friendly Version: Offer the salsa as a side to let kids try it at their own pace, or swap it for a milder tomato and cucumber salad.

    What to Serve With It

    This Peruvian Lomo Saltado pairs beautifully with a chilled Pisco Sour, a traditional Peruvian cocktail that enhances the dish’s flavors. If you’re keeping it alcohol-free, a lime-infused sparkling water provides a refreshing balance. For a full meal experience, serve with a simple side salad of mixed greens and a light vinaigrette.

    Storage & Meal Prep

    Store any leftovers in an airtight container in the fridge for up to 3 days. For longer storage, place the beef and vegetables in one container and the salsa in another to maintain freshness. To reheat, warm the beef and vegetables on the stove over medium heat until heated through. The salsa is best enjoyed fresh but can be stored separately for a day.

    FAQ

    Can I prepare the quinoa coating in advance?

    Absolutely! You can make the quinoa and breadcrumb mixture up to a day ahead. Store it in an airtight container at room temperature until you’re ready to use it.

    What if I don’t have red wine vinegar?

    If you’re out of red wine vinegar, apple cider vinegar or balsamic vinegar can be used as substitutes. They will alter the flavor slightly but are both delicious alternatives.

    How can I make this dish gluten-free?

    To make this Lomo Saltado gluten-free, simply replace the panko breadcrumbs with gluten-free breadcrumbs and ensure your soy sauce is labeled gluten-free.

    Can I use fresh fries instead of frozen?

    Yes, fresh fries are a fantastic option! Just be sure to slice them evenly and fry or bake them until crispy before adding them to the dish.

    Final Thoughts

    I hope this unique twist on Peruvian Lomo Saltado with a crispy quinoa crust and citrus avocado salsa brings as much joy to your kitchen as it does to mine. Cooking is about exploration and making each recipe your own, so feel free to adjust flavors and ingredients to suit your taste. I’d love to hear how your Lomo Saltado adventure turns out, so leave a comment below or share your creation on social media. Happy cooking!

    Related update: Peruvian Lomo Saltado with Crispy Quinoa Crust and Citrus Avocado Salsa

    Related update: Maple-Glazed Bacon Wrapped Pork Tenderloin with Smoked Paprika