Blackberry-Walnut Shortbread Cookies with Orange Zest and Almond Glaze
Imagine the aroma of buttery shortbread wafting through the air, mingling with the sweet tang of blackberries and the subtle nuttiness of toasted walnuts. Now, add a zesty whisper of orange and a delicate drizzle of almond glaze, and you’ve got a cookie experience that transcends the ordinary. Welcome to my kitchen, where classic meets contemporary in the most delicious way.
Personal Story
Growing up, one of my fondest memories was baking with my grandmother in her sunny, warm kitchen. She had a knack for turning simple ingredients into something magical, and her walnut shortbread cookies were a masterpiece of simplicity and flavor. Each bite was a blend of nostalgia and comfort, and her kitchen always smelled like a confectioner’s dream.
One afternoon, while rummaging through her pantry, I stumbled upon a forgotten jar of homemade blackberry jam. Inspired by a burst of curiosity and a desire to experiment, I decided to add a dollop of the jam to her classic cookie recipe. This small change transformed the cookies into little sandwiches of joy, with the jam adding a sweet, fruit-forward finish.
Years later, I recreated this memory in my own kitchen, adding my signature twist — the zest of an orange and a delicate almond glaze. It was a bit of an experiment, but the result was extraordinary. The citrusy aroma elevated the cookies to new heights, and the almond glaze added a layer of sophistication that made each cookie feel like a special occasion.
Baking these Blackberry-Walnut Shortbread Cookies with Orange Zest and Almond Glaze has become a cherished tradition in my home. They are a testament to the beauty of innovation and the joy of sharing something delicious with those you love.
What Makes This Version Special
This version of blackberry walnut cookies stands out because of the unique addition of orange zest and almond glaze. The zest infuses the dough with a burst of citrusy aroma that complements the natural sweetness of the blackberries. Meanwhile, the almond glaze adds an elegant finish that turns each bite into a multidimensional flavor experience. These enhancements transform traditional shortbread into a gourmet delight, perfect for impressing guests or treating yourself to something extraordinary.
Flavor Profile
These cookies offer a symphony of flavors that dance on your palate. The base is buttery and nutty, with the walnuts providing a satisfying crunch. The blackberry jam introduces a sweet, fruit-forward note, while the orange zest infuses a bright, citrusy aroma that lingers delightfully. The almond glaze lends a subtle nuttiness, enhancing the overall depth of flavor. It’s a cookie that feels luxurious yet inviting, a perfect balance of sweetness and sophistication.
Ingredients
- 1 cup unsalted butter, softened
- 1/2 cup granulated sugar
- 1/4 cup light brown sugar
- 1 teaspoon vanilla extract
- 3/4 teaspoon salt
- 2 cups all-purpose flour
- 1 cup chopped walnuts
- Zest of 1 orange
- 1/4 cup blackberry jam
- 1/2 teaspoon almond extract
- 1 cup confectioner’s sugar
- 2-3 tablespoons milk
Instructions
- Preheat your oven to 350°F (175°C) and position the rack in the middle. This ensures even baking for your cookies.
- In a large mixing bowl, combine the butter, granulated sugar, light brown sugar, vanilla extract, and salt. Mix in the orange zest first to release the citrus oils into the sugar, enhancing the aroma. Use a fork to blend until smooth and creamy.
- Gradually stir in the flour and chopped walnuts. The dough will be sticky, but that’s what makes these cookies so tender and crumbly.
- With floured hands, form level tablespoons of dough into small balls. You should have about 40 cookies. Arrange them 2 inches apart on two ungreased large baking sheets.
- Gently flatten each ball to about 1/3 inch thick using the bottom of a glass dipped in flour. This step ensures they bake evenly.
- Bake the cookies one sheet at a time for about 20 minutes, or until the edges are a beautiful golden brown. Allow them to cool on the sheets for 5 minutes before transferring to a wire rack to cool completely.
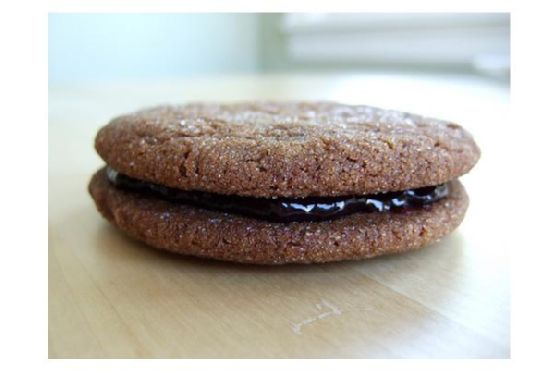
- Once cooled, spoon about 1 teaspoon of blackberry jam onto the flat side of 20 cookies. Sandwich them with the remaining cookies, pressing gently to seal.
- To make the almond glaze, whisk together the confectioner’s sugar, almond extract, and milk until smooth. Drizzle generously over the top of each sandwiched cookie, allowing it to set before serving.
Pro Tips from Meaghan’s Kitchen
- For perfectly uniform cookies, use a small ice cream scoop to portion the dough.
- Toast the walnuts before adding them to the dough. This simple step amplifies their flavor and adds an extra layer of nuttiness.
- Don’t skip cooling the cookies on the baking sheets — this allows them to set and prevents crumbling.
- If you’re in a rush, pop the dough into the fridge for 10 minutes before shaping. This makes it easier to handle.
- To achieve the perfect glaze consistency, start with 2 tablespoons of milk and add more, drop by drop, until you reach your desired drizzling thickness.
Variations & Dietary Swaps
- Gluten-Free Version: Substitute all-purpose flour with a gluten-free flour blend that includes xanthan gum for structure.
- Vegan Option: Use coconut oil instead of butter and replace milk in the glaze with almond or oat milk.
- Kid-Friendly Twist: Substitute blackberry jam with strawberry or grape jam for a sweeter, more familiar flavor.
What to Serve With It
These Blackberry-Walnut Shortbread Cookies pair beautifully with a cup of aromatic Earl Grey tea, the bergamot complementing the citrus notes. For a more festive touch, serve them alongside a glass of sparkling Prosecco — the bubbles highlight the cookies’ delicate textures and flavors.
Storage & Meal Prep
Store the cookies in an airtight container at room temperature for up to a week. If you prefer to make them in advance, they freeze well, too. Simply layer them between sheets of parchment paper in a freezer-safe container and freeze for up to three months. To enjoy, thaw overnight in the fridge and let them come to room temperature before serving. Reheat if desired at 300°F for 5 minutes to refresh their just-baked texture.
FAQ
Can I use a different type of nut?
Absolutely! Pecans or almonds would be a delicious substitute for walnuts, bringing their own unique flavors to the cookies.
What if I don’t have fresh orange zest?
You can substitute with a few drops of orange extract, but fresh zest is always best for that bright citrus flavor.
How can I prevent my cookies from spreading too much?
Ensure your butter is softened but not melted, and chill the dough briefly if it becomes too soft to handle.
What if I don’t have almond extract?
No worries! You can skip it or use vanilla extract for a more classic shortbread flavor.
Can I make the dough ahead of time?
Yes, you can prepare the dough a day in advance. Wrap it tightly in plastic wrap and store in the refrigerator until you’re ready to bake.
Final Thoughts
There’s something incredibly satisfying about baking cookies that not only taste amazing but also carry a story with them. These Blackberry-Walnut Shortbread Cookies with Orange Zest and Almond Glaze are a testament to the beauty of culinary creativity and cherished family traditions. I hope you enjoy making and sharing them as much as I do. If you try this recipe, I’d love to hear your thoughts and see your creations! Please leave a comment below or share your photos on social media using #MeaghansKitchen. Happy baking!
Related update: Blackberry-Walnut Shortbread Cookies with Orange Zest and Almond Glaze
Related update: Exotic Cardamom-Poached Pears with Spicy Mango-Nectar Reduction and Pistachio Crumble