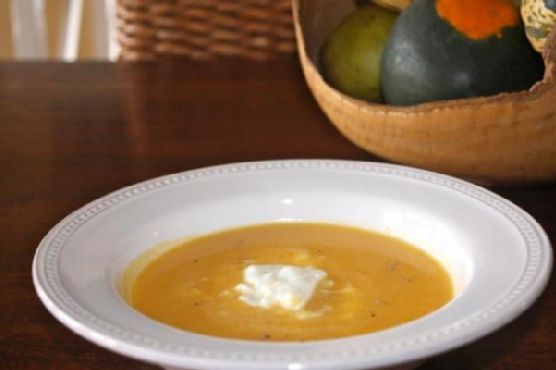
Tag: Vegetarian

  • Spicy Garlic-Curry Leaf Crunch Potatoes with Tamarind Chutney | Made by Meaghan Moineau

    Spicy Garlic-Curry Leaf Crunch Potatoes with Tamarind Chutney | Made by Meaghan Moineau

    Spicy Garlic-Curry Leaf Crunch Potatoes with Tamarind Chutney

    Imagine walking into a kitchen where the aromas of warm spices, crispy garlic, and a tangy tamarind chutney envelop you like a cozy culinary hug. The sizzle of potatoes frying to a perfect golden-brown is music to your ears, promising a dish that’s both familiar and exciting. Welcome to the world of Spicy Garlic-Curry Leaf Crunch Potatoes with Tamarind Chutney, where each bite is a journey through layers of flavor.

    Personal Story

    Let me take you back to a lazy Sunday afternoon in my childhood home, where the kitchen was always bustling with activity. My mother, the maestro of culinary artistry, would whip up dishes that could make anyone feel right at home. One of my fondest memories is of her preparing a version of these spicy potatoes, their aroma wafting through the house and drawing everyone towards the kitchen.

    However, it wasn’t always smooth sailing. I remember the day I first tried to recreate her masterpiece. I was a novice in the kitchen, eagerly tossing potatoes into hot oil, only to find them sticking to the pan and refusing to reach that coveted golden-brown hue. My mother, with her soft chuckle, stepped in to teach me the art of patience and the magic of the right heat. It was a lesson in humility and a pivotal moment in my culinary journey.

    Fast forward a few years, and those kitchen mishaps are now cherished memories. The dish evolved as I experimented with flavors and textures, especially after a trip to India where I discovered the transformative power of tamarind. That tangy delight became the perfect partner to my crispy potatoes, adding a refreshing twist that made the dish my own.

    And that’s how these Spicy Garlic-Curry Leaf Crunch Potatoes with Tamarind Chutney came into being — a harmonious blend of nostalgia, discovery, and innovation. Now, I’m thrilled to share this recipe with you, hoping it brings as much joy to your table as it has to mine.

    What Makes This Version Special

    This isn’t just any potato dish; it’s a symphony of flavors that dance on your palate. The addition of a tangy tamarind chutney and crispy garlic chips sets this version apart from traditional recipes. The chutney’s sweet and sour notes perfectly complement the spicy, aromatic potatoes, while the garlic chips add an irresistible crunch.

    Blooming the mustard and coriander seeds in oil amplifies their aroma, creating a foundation that elevates the dish from the first bite. This recipe is a testament to the power of thoughtful enhancements — each ingredient playing its role to perfection, making this version an experience rather than just a meal.

    Flavor Profile

    Prepare your taste buds for a vibrant flavor journey. The Spicy Garlic-Curry Leaf Crunch Potatoes with Tamarind Chutney offer a spicy and aromatic adventure with a tangy undertone. The hint of sweetness from the tamarind chutney balances the spice, while the fried garlic chips add a savory depth. As you enjoy this dish, the warmth of cinnamon and the freshness of cilantro will envelop you, leaving a lasting impression that beckons you to savor each bite.

    Ingredients

    • 2 lbs cooked par potatoes, cut into wedges
    • **Oil** for frying
    • 1 tsp mustard seeds
    • 1 tsp coriander seeds
    • 1 **cinnamon stick**
    • 15-20 **curry leaves**
    • 1 large onion, sliced
    • 1/2 tsp turmeric
    • 1 tsp salt (adjust to taste)
    • 1 tsp red dried chilli flakes
    • 4-5 garlic cloves, thinly sliced
    • 1/4 cup tamarind pulp
    • 2 tbsp jaggery
    • Fresh cilantro for garnish

    Instructions

    1. Begin by heating oil in a large pan over medium-high heat for deep frying. Once hot, carefully add the potato wedges. Fry them until they achieve a slight golden-brown color, about 5-7 minutes. Remove with a slotted spoon and set aside on paper towels to drain excess oil.
    2. In a separate non-stick pan, add 1 1/2 tablespoons of oil over medium heat. Once hot, add mustard seeds and coriander seeds, and let them bloom until the mustard seeds start to pop. This should take about 30 seconds.
    3. Add the cinnamon stick and curry leaves, stirring gently to release their aromas. This step should take another 30 seconds.
    4. Introduce the sliced onions to the pan, cooking for about 1 minute until they begin to soften.
    5. Return the fried potatoes to the pan, along with turmeric and salt. Stir everything together, letting the potatoes absorb the flavors for about 5 minutes on low heat. Keep an eye out for the onions turning a slightly golden-brown.
    6. Add the red dried chilli flakes and give it one final stir, cooking for an additional minute. Turn off the heat and transfer the potatoes to a serving dish.
    7. In the same pan, heat a bit more oil and fry the thinly sliced garlic until golden and crispy, about 2-3 minutes. Be careful not to burn them. Set aside.
    8. For the tamarind chutney, mix tamarind pulp and jaggery in a small saucepan over low heat until the jaggery dissolves completely. Let it simmer for a few minutes until slightly thickened. Drizzle over the potatoes.
    9. Top the dish with crispy garlic chips and a generous sprinkle of fresh cilantro. Serve warm and enjoy!

    Pro Tips from Meaghan’s Kitchen

    • To prevent the potatoes from sticking to the pan, make sure they’re completely dry before frying. Moisture on the surface can lead to sticking.
    • For an even more intense flavor, marinate the potatoes with turmeric and salt before frying. This allows the spices to penetrate deeper.
    • When frying the garlic, keep a close eye on it. Garlic turns from golden to burnt in seconds, and you want that perfect crispy texture.
    • If you find the tamarind chutney too tangy, adjust with more jaggery. It’s all about balancing the flavors to your liking.
    • Let the mustard seeds pop completely when blooming. If they don’t, they might add a bitter note to your dish.

    Variations & Dietary Swaps

    • Vegetarian Delight: This dish is already vegetarian, but for a vegan version, ensure your jaggery is plant-based, as some may contain animal by-products.
    • Spice-It-Up: For those who crave more heat, add finely chopped green chilies alongside the red dried chilli flakes.
    • Kids-Friendly: Tone down the spices by reducing the chilli flakes and skipping the green chilies. Serve with a side of ketchup if they prefer it a bit sweeter.

    What to Serve With It

    This dish pairs wonderfully with a chilled mango lassi, offering a cooling counterpoint to the spice. Alternatively, a side of cucumber raita can do wonders to mellow out the heat. If you’re looking for a fuller meal, serve these Spicy Garlic-Curry Leaf Crunch Potatoes with warm naan or freshly cooked basmati rice.

    Storage & Meal Prep

    These potatoes are best enjoyed fresh, but if you have leftovers, they can be stored in an airtight container in the fridge for up to three days. Reheat them in a dry pan over medium heat to revive their crispiness. For longer storage, freeze the fried potatoes without the chutney and garlic chips. When ready to enjoy, reheat in the oven and prepare the chutney and garlic fresh.

    FAQ

    Can I use sweet potatoes instead of regular potatoes?

    Absolutely! Sweet potatoes add a lovely sweetness that pairs well with the tangy chutney.

    What can I use as a substitute for jaggery?

    If you can’t find jaggery, brown sugar or palm sugar can work as substitutes, though the flavor profile will vary slightly.

    Why is my garlic burning before it gets crispy?

    Garlic burns quickly due to its high sugar content. Make sure the oil is not too hot and keep stirring constantly while frying.

    Can I make the tamarind chutney ahead of time?

    Yes, you can prepare the tamarind chutney up to a week in advance and store it in the fridge. It actually allows the flavors to meld and deepen over time.

    Is there a way to make this dish less spicy?

    To reduce the spice level, simply cut back on the red dried chilli flakes and avoid adding green chilies. You can also serve it with more cooling sides like raita.

    Final Thoughts

    I hope this Spicy Garlic-Curry Leaf Crunch Potatoes with Tamarind Chutney recipe becomes a favorite at your table. It’s a dish that embodies warmth, nostalgia, and a touch of adventure — perfect for sharing with loved ones or savoring alone on a quiet evening. I’d love to hear how it turned out for you. Feel free to leave a comment or share your version with me on social media. Bon appétit and happy cooking!

    Related update: Spicy Garlic-Curry Leaf Crunch Potatoes with Tamarind Chutney

    Related update: Smoky Maple Chipotle Grilled Sweet Potatoes

  • Ginger-Sesame Baby Bok Choy Stir Fry with Toasted Almonds | Made by Meaghan Moineau

    Ginger-Sesame Baby Bok Choy Stir Fry with Toasted Almonds | Made by Meaghan Moineau

    Ginger-Sesame Baby Bok Choy Stir Fry with Toasted Almonds

    Imagine the tantalizing aroma of fresh ginger and sesame oil swirling together in a hot pan, mingling with the crisp sweetness of bok choy and the nutty crunch of toasted almonds. This Ginger-Sesame Baby Bok Choy Stir Fry is more than just a dish; it’s an aromatic dance of flavors that will enchant your taste buds and warm your soul.

    Personal Story

    It was a crisp autumn afternoon when I first stumbled upon the charm of baby bok choy. Wandering through an open-air market, I was drawn to their petite and vibrant green bundles, standing out like jewels among the earthy tones of root vegetables and gourds. Until then, my culinary adventures with Asian greens had been limited to the familiar crunch of broccoli and the peppery bite of arugula. But something about these little bok choy bundles beckoned me to explore further.

    Back in my cozy kitchen, I recall the gentle rustle of their leaves as I washed them, a sound reminiscent of a soft breeze stirring through a forest. I was nervous yet excited to experiment with a vegetable that was new to me. My first attempt at a stir fry ended in a delicious disaster — I had underestimated the power of fresh ginger and overdone the soy sauce, creating a saltier dish than anticipated. But every crackle of the pan and fragrant whiff of sesame oil encouraged me to keep trying.

    Through trial and a little error, I refined my approach, adding ingredients that would enhance rather than overpower. That’s when I discovered the magic of adding toasted almonds and a hint of honey, introducing a sweet, nutty balance to the dish. This initial kitchen mishap led to a delightful discovery — a recipe that became a staple in my household, loved by family and friends alike.

    Now, every time I make this Ginger-Sesame Baby Bok Choy Stir Fry with Toasted Almonds, I am transported back to that market day, feeling the crisp autumn air and hearing the chatter of bustling stalls. This dish, with its aromatic warmth and intricate flavors, has become a cherished part of my culinary repertoire, and I’m thrilled to share it with you.

    What Makes This Version Special

    The unique twist in this recipe lies in the incorporation of ginger and sesame seeds, which add an extra layer of aromatic complexity and nutty depth. Many traditional stir fry recipes stick to the basics, but this version elevates the dish to a new level by enhancing the natural sweetness of the bok choy with honey and balancing it with the umami of soy sauce. The **ginger** and **toasted sesame seeds** not only infuse the dish with rich scents but also bring a delightful texture and flavor contrast. By toasting the sesame seeds, we unlock a warm, nutty aroma that complements the leafy green crunch of the bok choy. Each bite is a symphony of textures and flavors, making this stir fry stand out from the standard versions.

    Flavor Profile

    This Ginger-Sesame Baby Bok Choy Stir Fry offers an aromatic explosion of flavors. The dish is delicately balanced with nutty, spicy, and sweet notes that dance on your palate. The **fresh ginger** provides a subtle heat, while the **coconut oil** brings a silky mouthfeel and a hint of tropical flair. The **honey** adds just the right amount of sweetness to counterbalance the savory **soy sauce**. As the stir fry cooks, the **aromas** of garlic and ginger bloom in the pan, weaving together a tapestry of scents that are both comforting and exciting. The **toasted almonds** contribute a satisfying crunch and a toasty flavor that amplifies the nutty profile of the dish.

    Ingredients

    • 1 tablespoon coconut oil
    • 2 shallots, thinly sliced
    • 2 lbs baby bok choy, halved lengthwise
    • 3 cloves garlic, minced
    • 1 tablespoon minced fresh ginger
    • 1 teaspoon salt
    • 1/2 teaspoon black pepper
    • 1/4 teaspoon red pepper flakes
    • 1/3 cup sliced almonds
    • 1 tablespoon sesame oil
    • 1 tablespoon honey
    • 2 tablespoons soy sauce
    • 2 tablespoons toasted sesame seeds

    Instructions

    1. Heat the coconut oil in a large nonstick skillet over medium-high heat until shimmering.
    2. Add the sliced shallots and cook for 3 to 4 minutes until they are soft and translucent.
    3. Introduce the bok choy to the skillet, setting the leafy tops aside for later. Cook for another 3 to 4 minutes, stirring occasionally, until the stalks are crisp-tender and slightly charred.
    4. In a separate small dry pan, toast the sliced almonds over medium heat, stirring frequently, until golden brown and fragrant, about 3 minutes. Be sure to keep an eye on them to prevent burning.
    5. Add the minced garlic and ginger to the bok choy in the skillet, allowing them to bloom in the remaining coconut oil until fragrant, about 30 seconds.
    6. Sprinkle in the salt, black pepper, and red pepper flakes, stirring to coat the bok choy evenly.
    7. Stir in the reserved bok choy leaves, sesame oil, honey, and soy sauce. Toss everything together and let it cook for another 2 minutes until the leaves have wilted slightly.
    8. Finally, top the stir fry with the toasted almonds and toasted sesame seeds before serving warm.

    Pro Tips from Meaghan’s Kitchen

    • Balancing flavors: If you find the dish too sweet or salty, adjust by adding a splash of rice vinegar for acidity.
    • Toasting sesame seeds: Always toast seeds and nuts in a dry pan to bring out their natural oils and enhance their flavor.
    • Timing is key: Add bok choy leaves towards the end of cooking to preserve their color and nutrients.
    • Infusion technique: Blooming garlic and ginger in oil releases their essential oils, maximizing their flavor impact.
    • Ingredient swaps: Feel free to substitute almonds with cashews for a creamier texture or use maple syrup in place of honey for a vegan version.

    Variations & Dietary Swaps

    • Vegetarian Swap: Replace soy sauce with tamari for a gluten-free version, and swap honey with maple syrup for a vegan-friendly dish.
    • Spice It Up: For those who love heat, increase the red pepper flakes to 1/2 teaspoon or add a dash of sriracha for an extra kick.
    • Kids-Friendly Version: Tone down the spice by omitting the red pepper flakes and adding a handful of snap peas or baby corn for added sweetness and color.

    What to Serve With It

    Pair this Ginger-Sesame Baby Bok Choy Stir Fry with a bowl of steamed jasmine rice or quinoa for a complete meal. For a refreshing beverage, serve alongside a chilled glass of Jasmine tea, whose floral notes complement the dish beautifully. Alternatively, a light, crisp Sauvignon Blanc offers a bright acidity that enhances the fresh ginger and sesame flavors.

    Storage & Meal Prep

    Store any leftovers in an airtight container in the refrigerator for up to 3 days. To reheat, gently warm in a skillet over medium heat until heated through, adding a splash of water if necessary to maintain moisture. This stir fry is not recommended for freezing, as the texture of the bok choy may become mushy upon thawing.

    FAQ

    Can I use regular bok choy instead of baby bok choy?

    Yes, regular bok choy can be used, though you may need to slice it into smaller pieces to ensure even cooking. The flavor will be slightly more robust, but still delicious.

    What can I use instead of coconut oil?

    If coconut oil isn’t available, substitute with any neutral oil like vegetable or avocado oil. Keep in mind that coconut oil adds a hint of sweetness that complements the dish.

    Can I make this dish ahead of time?

    While it’s best enjoyed fresh, you can prep the ingredients ahead of time by slicing the shallots and bok choy, and toasting the almonds. Assemble and cook when ready to serve for maximum flavor and texture.

    How do I prevent the garlic and ginger from burning?

    Ensure the garlic and ginger are added when the oil is hot but not smoking, and always keep stirring them in the pan to avoid burning. Adding them just before the liquid ingredients also helps protect them from high heat.

    Final Thoughts

    Creating this Ginger-Sesame Baby Bok Choy Stir Fry with Toasted Almonds is a journey of flavors and textures that transforms simple ingredients into something extraordinary. Whether you’re new to cooking Asian-inspired dishes or a seasoned pro, this recipe offers a delightful challenge with aromatic rewards. I hope you enjoy making and sharing this dish as much as I do. I’d love to hear your thoughts and see your creations — feel free to leave a comment below or share your photos on social media. Let’s keep the conversation and the culinary exploration going!

    Related update: Ginger-Sesame Baby Bok Choy Stir Fry with Toasted Almonds

    Related update: Spicy Garlic-Curry Leaf Crunch Potatoes with Tamarind Chutney

  • Spicy Maple-Roasted Autumn Vegetables with Herbed Goat Cheese Drizzle | Made by Meaghan Moineau

    Spicy Maple-Roasted Autumn Vegetables with Herbed Goat Cheese Drizzle | Made by Meaghan Moineau

    Spicy Maple-Roasted Autumn Vegetables with Herbed Goat Cheese Drizzle

    Imagine the rich aroma of butternut squash, beet roots, and potatoes roasting in your kitchen, kissed by a spicy maple glaze that caramelizes to perfection. As the heat transforms these autumn vegetables into golden-brown morsels, a drizzle of creamy, herbed goat cheese awaits, ready to crown the masterpiece with a fragrant finish. This is not just a side dish; it’s a savory-sweet symphony that dances across your taste buds.

    Opening Hook

    There’s nothing quite like the comforting embrace of a kitchen filled with the scent of roasting vegetables. The sizzle of olive oil meeting the skin of vibrant butternut squash, the earthy undertones of beet roots mingling with the sweetness of maple syrup — it’s a sensory experience that transforms a simple dish into something extraordinary. This is where culinary magic happens, blending nostalgia with innovation in every bite.

    Personal Story

    Growing up, autumn was always a season of wonder and warmth. I remember the first time I helped my grandmother in her cozy kitchen, the windows fogged up from the heat of the oven, and the tantalizing aroma of roasting vegetables swirling around us. She taught me the importance of timing and patience, how to know when the vegetables were just right by their golden-brown hue and tender texture.

    It was in her kitchen that I first discovered the magic of maple syrup in savory dishes. I accidentally spilled some into our roasted vegetables — an unintentional twist that received rave reviews from my family. The sweetness intertwined with the earthy flavors, creating a delightful surprise that quickly became a family classic. Since then, I’ve been on a quest to recreate and elevate those beloved flavors.

    Years later, in my own kitchen, I found myself experimenting with spices and textures, determined to craft a dish that would honor my grandmother’s original while adding my personal flair. After numerous trials and some spicy mishaps, I stumbled upon the perfect combination: a spicy maple glaze paired with a creamy, herbed goat cheese drizzle. This version of maple-roasted autumn vegetables has become a staple at my table, always evoking cherished memories with every bite.

    What Makes This Version Special

    This version of Spicy Maple-Roasted Autumn Vegetables stands out with its unforgettable sweet and spicy contrast. The introduction of a **spicy maple glaze** elevates the classic roasted veggies to a new level of flavor complexity, while the **creamy, herbed goat cheese drizzle** adds a luxurious touch. The result is a dish that’s both comforting and exciting, with each element working in harmony to deliver a taste experience that’s both familiar and refreshingly new. The combination of cayenne pepper with the sweetness of maple syrup creates a caramelized, sticky finish that clings to the vegetables, offering a delightful crunch with every bite. The goat cheese drizzle, infused with fresh thyme and chives, provides an herbaceous, creamy counterpoint that balances the heat, making this dish a must-try for those eager to embrace the flavors of fall.

    Flavor Profile

    The Spicy Maple-Roasted Autumn Vegetables with Herbed Goat Cheese Drizzle is a flavor journey that begins with the initial hit of spicy heat, courtesy of the cayenne pepper, followed by the comforting sweetness of maple syrup. As you savor each bite, the creaminess of the goat cheese drizzle melts into the earthy tones of the roasted vegetables, enhanced by the aromatic notes of fresh thyme and chives. This dish is a delightful dance of sweet, spicy, and creamy, with a peppery, herbaceous finish that lingers on your palate — a true celebration of autumn’s bounty.

    Ingredients

    • 1 medium butternut squash, peeled and cut into bite-sized pieces
    • 3 medium beet roots, peeled and cut into bite-sized pieces
    • 4 medium potatoes, cut into bite-sized pieces (peeling optional)
    • 3 tablespoons olive oil
    • 1 tablespoon paprika
    • 1 teaspoon dried basil
    • Salt and pepper to taste
    • **1/4 cup maple syrup**
    • **1/2 teaspoon cayenne pepper**
    • **1/2 cup crumbled goat cheese**
    • **1 tablespoon fresh thyme, chopped**
    • **1 tablespoon fresh chives, chopped**

    Instructions

    1. Preheat your oven to 200 degrees Celsius (fan: 180 degrees Celsius) to ensure an even roast.
    2. In a large bowl, toss the butternut squash, beet roots, and potatoes with olive oil, paprika, dried basil, salt, and pepper until every piece is well-coated.
    3. Add the maple syrup and cayenne pepper to the bowl, mixing until the vegetables are covered in a sticky, spicy glaze.
    4. Spread the glazed vegetables in a single layer on a large baking tray, ensuring even cooking. Bake in the preheated oven for 30 minutes, or until the vegetables are golden-brown and tender but still have a slight bite.
    5. While the vegetables roast, blend the crumbled goat cheese with fresh thyme and chives in a small bowl until smooth and creamy.
    6. Once the vegetables are done, drizzle the herbed goat cheese over them while still warm. Serve immediately for the best texture and flavor.

    Pro Tips from Meaghan’s Kitchen

    • Always preheat your oven fully before roasting to ensure the vegetables cook evenly and achieve that perfect golden-brown finish.
    • When cutting your vegetables, aim for uniform sizes to guarantee even cooking. Smaller pieces tend to crisp up more, adding a delightful texture contrast.
    • For an extra crispy finish, don’t overcrowd your baking tray. A single layer of vegetables is key to achieving the right texture.
    • Adjust the cayenne pepper to suit your spice preference. A little goes a long way, so start small and increase if you enjoy more heat.
    • Save time by preparing the goat cheese drizzle ahead of time and storing it in the fridge until ready to use. Just give it a good stir before serving.

    Variations & Dietary Swaps

    • **Vegetarian version**: Swap the goat cheese for a plant-based cheese alternative to make this dish suitable for vegans.
    • **Spice-it-up version**: Add a pinch of smoked paprika to the glaze for an extra layer of smoky flavor.
    • **Kids-friendly version**: Reduce the cayenne pepper and serve the goat cheese drizzle on the side, allowing kids to add as much or as little as they like.

    What to Serve With It

    This dish pairs beautifully with a chilled glass of Riesling, whose crispness complements the sweetness of the maple syrup. For a heartier meal, serve it alongside warm rosemary focaccia to sop up every last bit of the creamy goat cheese drizzle. Alternatively, a simple green salad with a light lemon vinaigrette can provide a refreshing counterbalance to the rich flavors.

    Storage & Meal Prep

    Store any leftovers in an airtight container in the fridge for up to three days. To reheat, spread the vegetables on a baking tray and warm in a preheated oven at 180 degrees Celsius for 10-12 minutes. The goat cheese drizzle should be added fresh each time for the best texture. This dish is not suitable for freezing, as the texture of the vegetables can become soggy upon thawing.

    FAQ

    Can I use different vegetables?

    Absolutely! Feel free to substitute or add other root vegetables like sweet potatoes or parsnips for a unique twist.

    How can I make the dish less spicy?

    Simply reduce or omit the cayenne pepper in the glaze. The maple syrup will still provide a lovely sweetness.

    Is there a substitute for goat cheese?

    If you’re not a fan of goat cheese, try using feta or ricotta for a different creamy element.

    Can I prepare this dish in advance?

    The vegetables can be prepped and glazed ahead of time, but for the best taste and texture, roast them just before serving.

    What if I don’t have fresh herbs?

    Dried herbs can be used in a pinch, but remember they are more concentrated, so use about a third of the amount specified for fresh herbs.

    Final Thoughts

    Spicy Maple-Roasted Autumn Vegetables with Herbed Goat Cheese Drizzle is more than just a dish; it’s an invitation to savor the flavors of the season with loved ones. Whether you’re gathering around the table for a family dinner or hosting friends for a festive feast, this recipe is sure to impress and delight. I can’t wait for you to try it out and make it your own. Don’t forget to leave a comment below sharing your experience or any creative variations you came up with. Happy cooking, my friends!

    Related update: Spicy Maple-Roasted Autumn Vegetables with Herbed Goat Cheese Drizzle

    Related update: Ginger-Sesame Baby Bok Choy Stir Fry with Toasted Almonds

  • Meyer Lemon Ricotta Pancakes with Vanilla-Infused Blackberry-Cardamom Compote | Made by Meaghan Moineau

    Meyer Lemon Ricotta Pancakes with Vanilla-Infused Blackberry-Cardamom Compote | Made by Meaghan Moineau

    Meyer Lemon Ricotta Pancakes with Vanilla-Infused Blackberry-Cardamom Compote

    There’s something undeniably magical about the moment when a stack of pancakes hits the table, their golden-brown edges inviting you to dive in. Picture this: delicate, fluffy Meyer lemon ricotta pancakes crowned with a luscious, aromatic blackberry-cardamom compote. The sweet fragrance of vanilla mingles with the tartness of blackberries, creating a breakfast experience you’ll want to savor slowly.

    Personal Story

    I still remember the first time I tasted pancakes that transcended the usual weekend breakfast fare. It was at a quaint little café tucked away in a bustling city, where the chef had a knack for turning simple dishes into culinary works of art. There, amidst the comforting hum of conversations and the intoxicating scent of fresh coffee, I discovered a delightful twist on the classic pancake.

    This discovery inspired me to experiment in my own kitchen, eager to capture that enchanting blend of flavors and make it my own. One Saturday morning, armed with a bowl of fresh blackberries and a few humble pantry staples, I set out to recreate the magic. A few attempts and a couple of kitchen mishaps later — including one memorable incident involving a runaway vanilla bean — I finally perfected my recipe.

    As I whisked together Meyer lemon zest and ricotta, I realized I was crafting something truly special. The tangy brightness of the lemon melded beautifully with the creamy richness of the ricotta. It was the blackberry compote, however, that truly elevated the dish. Infusing it with a hint of cardamom and vanilla gave it an exotic flair that was both unexpected and delightful.

    Now, these Meyer lemon ricotta pancakes with vanilla-infused blackberry-cardamom compote have become a weekend staple in my home, a dish I love sharing with friends and family. They never fail to impress, and I’m thrilled to share the recipe with you today.

    What Makes This Version Special

    This recipe takes traditional pancakes and gives them a luxurious upgrade. By introducing a hint of cardamom and vanilla to the blackberry compote, we’re elevating the classic flavors to a new level. The fragrant and exotic notes of cardamom pair beautifully with the sweet, juicy blackberries, while the vanilla adds a subtle floral depth that harmonizes with the Meyer lemon’s bright acidity.

    What sets these Meyer lemon ricotta pancakes apart is their ability to transform a simple breakfast into an indulgent experience. The richness of ricotta creates an incredibly tender and moist pancake, while the Meyer lemon zest and juice add a refreshing zing. This version is better than the standard recipe because it combines unexpected flavors in a way that is both comforting and sophisticated.

    Flavor Profile

    Imagine biting into a pancake that’s fruity and creamy, with subtle floral notes and a hint of warm spice. The Meyer lemon ricotta pancakes offer a delicate balance of sweet and tangy, while the blackberry-compote enhances each mouthful with its aromatic infusion of cardamom and vanilla. The browned butter in the batter adds a nutty richness that rounds out the flavor profile, making every bite a taste sensation to remember.

    Ingredients

    • 1 cup all-purpose flour
    • 1 cup fresh blackberries
    • **4 tablespoons butter**
    • 2 large eggs, separated
    • 2 tablespoons granulated sugar
    • Zest of 1 Meyer lemon
    • 2 tablespoons Meyer lemon juice
    • 1 cup ricotta
    • Pinch of salt
    • 2 tablespoons water
    • **1 vanilla bean, split**
    • **1/4 teaspoon ground cardamom**
    • Pure maple syrup, for serving

    Instructions

    1. In a small saucepan over medium heat, add the fresh blackberries, Meyer lemon zest, granulated sugar, and water. Stir to combine.
    2. Add the split vanilla bean and a pinch of ground cardamom to the saucepan. Continue cooking until the water starts to thicken and the berries lose their shape, stirring occasionally, about 10 minutes. Remove from heat and set aside.
    3. In a medium bowl, whisk together the ricotta cheese, Meyer lemon zest, Meyer lemon juice, sugar, and egg yolks until smooth.
    4. Gradually stir in the all-purpose flour until just combined, being careful not to overmix.
    5. Using a stand mixer or hand mixer, beat the egg whites with a pinch of salt until stiff peaks form.
    6. Gently fold a large spoonful of the egg whites into the batter to lighten it. Then, fold in half of the remaining egg whites, slowly turning the bowl while you fold. It’s fine if there are some white streaks left in the batter. Fold in the remaining egg whites.
    7. Set the pancake batter aside and heat a griddle or non-stick pan over medium heat. Add a tablespoon of browned butter to the pre-heated pan, swirling to coat.
    8. Pour about 1/4 cup of batter onto the hot pan, spreading it slightly. Cook until bubbles start to form on the surface and the edges begin to brown slightly, about 2-3 minutes.
    9. Flip the pancakes and cook for an additional minute until golden-brown. Remove and keep warm while you repeat with the remaining batter.
    10. Serve the pancakes stacked high, topped with the vanilla-infused blackberry-cardamom compote and a drizzle of pure maple syrup.

    Pro Tips from Meaghan’s Kitchen

    • Use room temperature ingredients for the batter to ensure a smooth, lump-free mixture.
    • Brown the butter carefully, watching closely as it turns golden and releases a nutty aroma. This adds depth to the pancakes.
    • Don’t overmix the pancake batter; a few lumps are perfectly fine and will result in fluffier pancakes.
    • Keep the pancakes warm in a low oven (around 200°F) if you’re making a large batch.
    • If you don’t have a vanilla bean, substitute with 1 teaspoon of pure vanilla extract added to the compote after cooking.

    Variations & Dietary Swaps

    • Vegetarian Swap: These pancakes are already vegetarian-friendly, but for a vegan version, substitute the ricotta with a vegan option and use flax eggs instead of regular eggs.
    • Spice-It-Up Version: Add a pinch of cinnamon to the compote for an extra layer of warmth and spice.
    • Kids-Friendly Version: Skip the cardamom and vanilla for a simpler blackberry compote. Add some chocolate chips to the pancake batter for a fun twist.

    What to Serve With It

    These Meyer lemon ricotta pancakes pair beautifully with a lavender-infused latte, providing a calming floral note to complement the citrusy and fruity flavors. For a brunch-worthy treat, serve them with a chilled glass of prosecco, adding a touch of sparkle to your leisurely morning.

    Storage & Meal Prep

    Store any leftover pancakes in an airtight container in the refrigerator for up to 3 days. To freeze, layer them between sheets of parchment paper and place in a freezer-safe bag for up to 2 months. Reheat in a toaster or warm oven until heated through. The compote can be stored separately in the fridge for up to a week and reheated gently on the stove before serving.

    FAQ

    Can I use frozen blackberries for the compote?

    Yes, you can use frozen blackberries. Just be sure to thaw them first and drain any excess liquid before using.

    What if I can’t find Meyer lemons?

    If Meyer lemons are unavailable, you can substitute with regular lemons. The flavor will be a bit more tart, so you might want to add a touch more sugar to balance it out.

    How do I know when the pancakes are ready to flip?

    Look for bubbles forming on the surface of the pancakes and the edges starting to look set and slightly browned. That’s your cue to flip!

    Can I make the batter ahead of time?

    It’s best to make the batter just before cooking to keep the pancakes light and fluffy. If you need to prep ahead, you can mix the dry and wet ingredients separately and combine them right before cooking.

    What can I use instead of ricotta?

    If you don’t have ricotta, you can try cottage cheese or mascarpone for a similar creamy texture, though the flavor will vary slightly.

    Final Thoughts

    I hope these Meyer lemon ricotta pancakes with vanilla-infused blackberry-cardamom compote bring as much joy to your kitchen as they do to mine. Whether you’re cooking for a special occasion or just want to elevate your weekend breakfast, this recipe is sure to impress. I’d love to hear how your pancakes turn out and any personal twists you might add — feel free to share your thoughts and photos in the comments below!

    Related update: Meyer Lemon Ricotta Pancakes with Vanilla-Infused Blackberry-Cardamom Compote

    Related update: Truffle-Infused Poached Eggs with Spinach, Tomato, and Crispy Prosciutto

  • Zesty Citrus-Infused Tabouleh with Pomegranate Seeds | Made by Meaghan Moineau

    Zesty Citrus-Infused Tabouleh with Pomegranate Seeds | Made by Meaghan Moineau

    Zesty Citrus-Infused Tabouleh with Pomegranate Seeds

    Imagine the sun-dappled kitchen, where a cool breeze carries the scent of fresh herbs, mingling with the tangy zest of lemons and the sweet allure of ripe pomegranates. This isn’t just any tabouleh; it’s a vibrant, citrus-infused delight that promises to transport your taste buds straight to the bustling markets of the Middle East.

    My Journey to the Perfect Tabouleh

    Tabouleh has long been a staple in my culinary repertoire, a dish I first fell in love with during a summer spent exploring the diverse flavors of Middle Eastern cuisine. I vividly remember the first bite I took at a tiny café in Beirut, where the salad was as bright and refreshing as the Mediterranean Sea itself. The balance of fresh herbs, juicy tomatoes, and the unexpected crunch of pomegranate seeds was a revelation.

    Back in my own kitchen, I was determined to recreate that magic — but with my own personal twist. After many delicious experiments, I discovered that the secret to capturing that vibrant essence lay in the citrus. By incorporating the zest and juice of fresh lemons, and adding a sprinkle of sumac for a subtle kick, I could elevate this classic dish to new heights.

    Of course, not every experiment was a success. There was that one time I mistook cumin for sumac — let’s just say it led to a very spicy surprise! But with each misstep came the invaluable lessons that have shaped my culinary journey.

    Now, this Zesty Citrus-Infused Tabouleh has become a beloved recipe, not just for its refreshing taste, but for the memories it evokes — of sunlit kitchens and the joy of discovery. I can’t wait to share it with you.

    What Makes This Version Special

    This tabouleh isn’t your standard salad. The addition of **pomegranate seeds** introduces a burst of sweetness that dances on the palate, while **sumac** lends a subtle, lemony spice that contrasts beautifully with the traditional flavors. The lemon zest, a simple but transformative upgrade, infuses the dish with a citrusy aroma that lingers long after the last bite. It’s a salad that’s not just fresh but full of surprises, making it a standout at any gathering.

    Flavor Profile

    When you savor a forkful of this tabouleh, you’re met with an orchestra of flavors: the refreshing, herbaceous notes of parsley and mint; the juicy, sun-ripened tomatoes; and the sweet, jewel-like pomegranate seeds that pop with every bite. The dish is tangy and invigorating, thanks to the fresh lemon juice, while the sumac provides a spicy, lemony warmth that ties everything together. It’s a flavor journey that’s both familiar and delightfully new.

    Ingredients

    • 1 cup cooked bulgur wheat
    • 1 cup flat leaf parsley, stems removed
    • 1/2 cup fresh mint, stems removed
    • 3 green onions, finely chopped
    • 2 roma tomatoes, diced
    • 1/2 cup **pomegranate seeds**
    • 1 teaspoon **sumac**
    • Zest of one **lemon**
    • Juice from 1 lemon
    • 1/4 cup olive oil
    • 1/2 cucumber, diced

    Instructions

    1. Begin by removing the stems from the parsley and mint. Rinse the leaves thoroughly in a colander to remove any dirt. Pat them dry with a paper towel.
    2. In a food processor, pulse the parsley and mint until finely chopped. This should only take a few quick pulses — be careful not to over-process into a paste.
    3. Transfer the chopped herbs to a large mixing bowl. Add the diced green onions, roma tomatoes, cucumber, and cooked bulgur wheat. Stir gently to combine, ensuring the ingredients are evenly distributed.
    4. In a small bowl, combine the lemon juice and olive oil. Remember to zest the lemon before juicing to release those essential oils, which enhance the citrus flavor.
    5. Pour the lemon and olive oil mixture over the salad. Toss everything together, making sure every ingredient is coated in the citrusy dressing.
    6. Refrigerate the tabouleh for at least an hour before serving. This allows the flavors to meld beautifully.
    7. Just before serving, sprinkle the sumac over the salad for that final spicy finish. Serve chilled or at room temperature, on its own or with warm pita bread.

    Pro Tips from Meaghan’s Kitchen

    • Use fresh herbs for the best flavor. Dry herbs won’t provide the same vibrant taste.
    • For a quicker prep, chop the herbs with a sharp knife if you don’t have a food processor. Just be sure to chop them finely.
    • If you can’t find bulgur, couscous or quinoa makes a great substitute.
    • Toast the bulgur wheat before cooking to bring out a nutty flavor that adds depth to the dish.
    • Adjust the amount of lemon juice to your taste. Some like it tangier, while others prefer a milder citrus zing.

    Variations & Dietary Swaps

    • Vegetarian Delight: This tabouleh is already vegetarian, but for a vegan version, ensure all your ingredients, like the olive oil, are certified vegan.
    • Spice-It-Up Version: Add a pinch of cayenne pepper for a fiery kick that complements the lemony notes.
    • Kid-Friendly Version: Reduce the sumac and add more pomegranate seeds for extra sweetness that kids love.

    What to Serve With It

    This Zesty Citrus-Infused Tabouleh pairs beautifully with a chilled glass of crisp Sauvignon Blanc, which complements the citrus notes perfectly. For a complete meal, serve it alongside grilled halloumi cheese for a delightful contrast in textures. It’s also a great side dish to roasted lamb or chicken kebabs, adding a refreshing balance to rich, savory meats.

    Storage & Meal Prep

    Store any leftover tabouleh in an airtight container in the refrigerator for up to three days. The flavors continue to develop, making it even more delicious the next day. While tabouleh doesn’t freeze well due to the fresh vegetable content, it’s quick to whip up as part of your weekly meal prep. For best results, keep the dressing separate until ready to serve.

    FAQ

    Can I make tabouleh ahead of time?

    Absolutely! In fact, making it a day ahead allows the flavors to meld, resulting in an even tastier dish.

    What can I use instead of bulgur wheat?

    If you’re out of bulgur wheat, couscous or cooked quinoa are great alternatives that maintain the dish’s texture.

    Is sumac essential to this recipe?

    While sumac adds a unique, tangy flavor, you can omit it if unavailable. Consider substituting with a bit of lemon zest for a similar effect.

    Can I add more vegetables to the tabouleh?

    Feel free to experiment! Diced bell peppers or radishes make excellent additions for extra crunch and flavor.

    Final Thoughts

    There you have it — a vibrant, Zesty Citrus-Infused Tabouleh with Pomegranate Seeds that is sure to impress both your palate and your guests. Whether you’re new to the kitchen or a seasoned cook, this dish is an easy yet impressive addition to your culinary repertoire. I’d love to hear how your tabouleh turns out, so feel free to share your experiences and any twists you might add in the comments below. Happy cooking!

    Related update: Zesty Citrus-Infused Tabouleh with Pomegranate Seeds

    Related update: Tropical Avocado Salad with Grilled Shrimp and Toasted Coconut

  • Truffle-Infused Panzanella with Burrata and Roasted Garlic | Made by Meaghan Moineau

    Truffle-Infused Panzanella with Burrata and Roasted Garlic | Made by Meaghan Moineau

    Truffle-Infused Panzanella with Burrata and Roasted Garlic

    The sun is setting, casting a golden hue across your kitchen, and the air is filled with the intoxicating scent of roasted garlic combined with an earthy, luxurious hit of truffle oil. Before you sits a Panzanella salad unlike any you’ve ever known — this is no ordinary Tuscan bread salad. It’s a symphony of flavors, each bite a melody of creamy burrata and the unexpected richness of roasted garlic.

    Personal Story

    I still remember the first time I tasted a traditional Panzanella. I was backpacking through Tuscany, a time in my life when adventure filled my days and food was my guide. I stumbled into a small trattoria, my feet weary and my appetite piqued. The waitress, a warm Italian grandmother type, recommended the Panzanella. It arrived at my table, a rustic dish that mirrored the simplicity and beauty of the Tuscan countryside.

    Its taste was transformative — ripe tomatoes, the basil’s fragrant kiss, and the bread soaking up every bit of the flavorful juices. I fell in love instantly, and that love followed me home, inspiring countless attempts in my own kitchen. Over the years, I’ve kept experimenting, each iteration a little bolder, a little more “me.”

    One memorable summer evening, I decided to elevate this humble dish. I had recently discovered truffle oil and was captivated by its aroma. Roasting garlic was another new obsession, its caramelized depth taking root in my culinary repertoire. The idea to marry these ingredients with Panzanella came like a lightning bolt — a way to honor the original while making it feel luxurious and indulgent.

    After a few trials — one mishap involving too much truffle oil (lesson learned!) — I landed on the perfect balance. Adding creamy burrata was the final stroke of genius. Now, every time I make this dish, I’m transported back to that little Tuscan trattoria, but with my own twist that makes it truly special.

    What Makes This Version Special

    This version of Truffle-Infused Panzanella with Burrata and Roasted Garlic takes the beloved classic and wraps it in a layer of opulence. The addition of truffle oil introduces an unmistakable earthy aroma that elevates the dish to gourmet status. Burrata cheese brings a creamy richness, contrasting beautifully with the vibrant, fresh ingredients. The roasted garlic, with its caramelized, umami depth, is mashed into the dressing, infusing every bite with a subtle, luxurious flavor. These elements come together to create a Panzanella that’s not just a salad, but an experience.

    Flavor Profile

    Picture this: each forkful of Panzanella offers a decadent and earthy journey. The creamy burrata melts in your mouth, mingling with the deep, garlicky undertones. The roasted garlic adds a sweet, caramelized complexity, while the truffle oil provides an aromatic finish that lingers delightfully. The tomatoes and basil offer freshness, while the red onion adds a hint of peppery spice. It’s a harmony of textures and flavors that tantalizes your senses with every bite.

    Ingredients

    • 6 slices day-old Tuscan bread
    • 1/4 cup extra virgin olive oil
    • 1 cup fresh basil leaves, chopped
    • 1/2 red onion, thinly sliced
    • 2 tablespoons red wine vinegar
    • Salt and pepper to taste
    • 2 cups ripe tomatoes, chopped
    • 2 tablespoons truffle oil
    • 1 ball of burrata cheese
    • 1 whole garlic bulb
    • 2 cups baby arugula

    Instructions

    1. Preheat your oven to 400°F. Slice the top off the garlic bulb to expose the cloves. Drizzle with a bit of olive oil, wrap in foil, and roast for 30-40 minutes until soft and caramelized. Once done, let it cool slightly, then squeeze the garlic out of its skin and mash into a smooth paste.
    2. In a large bowl, combine the Tuscan bread slices with water and let them stand for at least 20 minutes, or until the bread is softened. Drain the water and squeeze out as much moisture as possible. Crumble the softened bread into a serving bowl.
    3. Scatter the chopped tomatoes, sliced red onion, and chopped basil leaves over the crumbled bread.
    4. In a small bowl, mix the mashed roasted garlic with extra virgin olive oil and red wine vinegar. Season with salt and pepper. Pour this dressing over the bread and vegetable mixture, tossing well to combine.
    5. Before serving, gently tear the burrata and place it over the salad. Drizzle with truffle oil for that aromatic finish.
    6. Finally, add the baby arugula and give the salad a gentle toss. Let the Panzanella stand for 15 minutes to allow the flavors to meld. Serve at room temperature and enjoy!

    Pro Tips from Meaghan’s Kitchen

    • Choose the Right Bread: Use day-old bread that has a sturdy crumb to soak up the flavors without getting mushy.
    • Go Easy on the Truffle Oil: A little goes a long way! Too much can overwhelm the dish, so start with less and add more to taste.
    • Room Temperature Magic: Serve this salad at room temperature. It allows the flavors to shine and the burrata to soften slightly.
    • Season Generously: Don’t skimp on the salt and pepper. They enhance the overall taste and balance the acidity of the vinegar.
    • Experiment with Tomatoes: Use a mix of heirloom tomatoes for a variety of colors and flavors.

    Variations & Dietary Swaps

    • Vegetarian Delight: This recipe is already vegetarian, but to make it vegan, swap out the burrata for a plant-based cheese alternative.
    • Spice It Up: Add a pinch of red pepper flakes to the dressing for a subtle kick of heat.
    • Kid-Friendly Version: Omit the truffle oil and roasted garlic for a simpler version that kids will love.

    What to Serve With It

    This Truffle-Infused Panzanella pairs beautifully with a chilled glass of Sauvignon Blanc, which complements the earthy tones of the truffle oil and richness of the burrata. For a more robust meal, consider serving it alongside prosciutto-wrapped asparagus or a simple grilled chicken breast. The flavors of the salad will enhance the savory notes of these dishes without overpowering them.

    Storage & Meal Prep

    While this salad is best enjoyed fresh, you can store leftovers in an airtight container in the refrigerator for up to 2 days. The bread will continue to absorb flavors, so it might become softer over time. To refresh, add a touch more olive oil and vinegar before serving. Unfortunately, this dish is not suitable for freezing due to the fresh ingredients.

    FAQ

    Can I use a different type of cheese?

    Absolutely! While burrata adds a creamy texture, fresh mozzarella is a great alternative. If you like a tangy note, try adding crumbled goat cheese.

    What if I don’t have truffle oil?

    If truffle oil is unavailable, you can still make a delicious Panzanella. Simply increase the amount of olive oil and add a sprinkle of truffle salt for a similar effect.

    Can I use a different type of bread?

    Yes, you can use any rustic, crusty bread. Ciabatta or a sourdough loaf both work well, as they hold up to the dressing without becoming mushy.

    How do I know if the garlic is roasted properly?

    The garlic is ready when it’s soft and caramelized, with a rich, sweet aroma. It should mash easily into a paste when pressed.

    Is this dish gluten-free?

    As it stands, this dish is not gluten-free due to the bread. However, you can substitute with a gluten-free baguette or bread of your choice.

    Final Thoughts

    And there you have it — a Truffle-Infused Panzanella with Burrata and Roasted Garlic that promises to transport you to the sun-drenched hills of Tuscany, all from the comfort of your kitchen. I hope this dish inspires you to experiment and make it your own. Share your creations with me in the comments below or tag me on social media. Remember, cooking is an adventure best shared with others, so invite a friend over and enjoy this elevated classic together. Buon appetito!

    Related update: Truffle-Infused Panzanella with Burrata and Roasted Garlic

    Related update: Zesty Kohlrabi and Apple Salad with Smoky Chipotle Bacon

  • Spiced Apple Cider Brioche with Maple-Cinnamon Glaze | Made by Meaghan Moineau

    Spiced Apple Cider Brioche with Maple-Cinnamon Glaze | Made by Meaghan Moineau

    Spiced Apple Cider Brioche with Maple-Cinnamon Glaze

    Picture a chilly autumn morning, leaves crunching underfoot, and the air filled with the sweet, spicy aroma of apple cider. Now imagine that fragrance is wafting from your own kitchen as you pull a loaf of Spiced Apple Cider Brioche with Maple-Cinnamon Glaze out of the oven. It’s a sensory delight that wraps you in a warm culinary hug.

    Personal Story

    I still remember the first time I tried to make brioche. My kitchen looked like a flour bomb had gone off, and let’s just say I underestimated the power of yeast. But, like with most of my culinary adventures, it was a learning experience, and eventually, I got the hang of it. That initial attempt, albeit messy, was the springboard for my now beloved Spiced Apple Cider Brioche.

    The inspiration for this recipe came from an autumn visit to an apple orchard. Surrounded by trees heavy with ripe fruit, I sipped on warm cider and knew I needed to capture that essence in a bake. This brioche became my ode to autumn — the perfect blend of cozy spices and the natural sweetness of apples.

    One memorable evening, as the sun set and the kitchen filled with the scent of baking dough and bubbling apples, I knew this recipe was something special. Friends gathered around the table, tearing pieces of the fluffy brioche, still warm from the oven, and dipping them in extra glaze. The room was filled with laughter and full bellies — the true measure of a successful dish.

    From that day on, Spiced Apple Cider Brioche has been a staple in my recipe collection, a reminder of crisp autumn days and the joy of sharing delicious food with loved ones.

    What Makes This Version Special

    What sets this Spiced Apple Cider Brioche apart from your standard brioche recipe is the infusion of warm spices and a touch of autumn. By incorporating ground nutmeg into the dough, you elevate the flavor profile, adding depth and warmth. But the real pièce de résistance is the luxurious maple-cinnamon glaze. Brushed on while the brioche is still warm, it creates a glossy, sweet finish that perfectly complements the spiced dough. This glaze doesn’t just add flavor; it adds a visual allure that makes the brioche look as irresistible as it tastes.

    Flavor Profile

    Biting into this brioche is like a journey through an autumn landscape. The first taste is all about the buttery, tender crumb, laced with the subtle warmth of cinnamon and nutmeg. As you continue, the rich maple sweetness of the glaze comes through, harmonizing beautifully with the soft spiced dough. Each bite offers a hint of tart apple that cuts through the richness, making it a symphony of flavors dancing on your palate.

    Ingredients

    • 3/4 cup warm water
    • 1/4 cup vegetable oil
    • 1/4 cup **runny honey**
    • 2 1/4 teaspoons dried/instant yeast
    • 3 1/2 cups flour
    • 1 teaspoon salt
    • 2 large eggs
    • 1/2 cup **apple cider**
    • 1/2 teaspoon ground nutmeg
    • 1 teaspoon ground cinnamon
    • 1 tablespoon **orange zest**
    • 1 teaspoon vanilla extract
    • 1/2 cup **maple syrup**
    • 2 tablespoons butter, melted
    • 1 cup diced **apples**
    • 1/4 cup sugar
    • 1 cup powdered sugar

    Instructions

    1. Mix the warm (not hot) water with the vegetable oil, runny honey, and yeast. Allow it to foam for 10 minutes.
    2. Meanwhile, bloom the ground cinnamon and nutmeg by melting the butter in a small pan and stirring in the spices. This will deepen their flavor.
    3. Add the foamy yeast mixture, flour, salt, eggs, apple cider, orange zest, and vanilla extract to a large bowl. Stir in the butter-spice mixture.
    4. Mix and knead the dough using a mixer with a bread hook, or by hand, until you have a soft, smooth, and elastic dough (about 8-10 minutes).
    5. Place the dough in an oiled bowl and let it rise, covered, for about 2 hours or until it’s puffy and nearly doubled in size.
    6. While the dough rises, toss the apple chunks with sugar and cinnamon.
    7. Gently deflate the dough, transfer it to a lightly greased work surface, and flatten it into a rough rectangle, about 8 x 10 inches.
    8. Spread half the apple chunks in the center of the dough. Fold a short edge of the dough over the apples, patting firmly to seal them. Spread the remaining apples on top and fold the other side over, sealing well.
    9. Cut the apple-filled dough into 16 pieces, arranging them in a greased 9-inch round cake pan.
    10. Cover the pan with lightly greased plastic wrap or a damp towel and let it rise for about 1-1 1/2 hours, until it’s a generous 2 inches high.
    11. Preheat the oven to 325°F. Bake the brioche in the lower third of the oven for 55 minutes, or until the top is at least light golden brown all over.
    12. Remove from the oven and let cool for 5 minutes. Loosen the edges and carefully transfer to a rack.
    13. Whisk together the maple syrup and powdered sugar. Brush the warm glaze over the brioche, allowing it to drizzle down the sides for a glossy finish.

    Pro Tips from Meaghan’s Kitchen

    • Make sure your yeast is fresh; if it’s not foaming after 10 minutes, start again with a new batch.
    • Blooming spices in butter enhances their natural oils, giving the brioche a more aromatic flavor.
    • Don’t skip the resting period; it’s crucial for developing the dough’s gluten structure.
    • If the top is browning too quickly, tent it with foil during the last 15 minutes of baking.
    • For a slightly sweeter dough, add an extra tablespoon of honey.

    Variations & Dietary Swaps

    Looking to mix things up? Try these variations:

    • Vegetarian Swap: Substitute the honey with agave syrup to make it vegan-friendly.
    • Spice-It-Up Version: Add a pinch of cayenne pepper to the glaze for a subtle kick.
    • Kids-Friendly Version: Leave out the nutmeg and opt for a chocolate glaze instead of maple.

    What to Serve With It

    This brioche is a treat on its own, but if you want to elevate your experience, pair it with a warm mug of chai tea or a creamy vanilla latte. The spices in the chai will complement the brioche beautifully, while the smoothness of a latte will balance the sweetness of the glaze.

    Storage & Meal Prep

    To store, wrap the brioche tightly in plastic wrap and keep it at room temperature for up to 3 days. For longer storage, wrap it in aluminum foil and freeze for up to 2 months. To reheat, thaw at room temperature and warm in a 300°F oven for 10 minutes.

    FAQ

    Can I make this dough ahead of time?

    Yes! You can prepare the dough, let it rise once, then punch it down and refrigerate overnight. Bring it back to room temperature before the second rise.

    What type of apples work best?

    Granny Smith apples are great for their tartness, but you can also use Honeycrisp or Fuji for a sweeter touch.

    How do I know if my dough has risen enough?

    The dough should be puffy and nearly doubled in size. If you gently press it with a finger, the indentation should slowly spring back.

    Why is my glaze not sticking?

    Ensure the brioche is still warm when you brush on the glaze, as this helps it adhere better and creates a glossy finish.

    Can I use whole wheat flour?

    You can replace up to half of the all-purpose flour with whole wheat, but the texture will be denser.

    Final Thoughts

    There you have it — your very own Spiced Apple Cider Brioche with Maple-Cinnamon Glaze, a delightful autumnal treat that’s sure to impress. I hope you enjoy making and sharing this recipe as much as I do. Don’t forget to leave a comment below with your thoughts or share your own variations. Happy baking!

    Related update: Spiced Apple Cider Brioche with Maple-Cinnamon Glaze

    Related update: Meyer Lemon Ricotta Pancakes with Vanilla-Infused Blackberry-Cardamom Compote

  • Banana Blueberry Pancakes with Lemon Ricotta and Almond Crunch | Made by Meaghan Moineau

    Banana Blueberry Pancakes with Lemon Ricotta and Almond Crunch | Made by Meaghan Moineau

    Banana Blueberry Pancakes with Lemon Ricotta and Almond Crunch

    Picture this: a lazy Sunday morning, rays of sunlight streaming through your kitchen window, the air filled with the irresistible aroma of pancakes sizzling on the griddle. These aren’t just any pancakes; these are Banana Blueberry Pancakes with Lemon Ricotta and Almond Crunch — a delightful symphony of flavors and textures that will make your taste buds dance.

    Personal Story

    I still remember the first time I tried to make pancakes from scratch. I was a teenager, determined to surprise my family with a breakfast that would rival the best brunch spots in town. Armed with a basic recipe I found online, I embarked on what I thought would be a simple task. But as it turns out, my youthful confidence didn’t quite match my kitchen skills. The batter was too runny, the pancakes were either overcooked or raw in the middle, and my family graciously ate them with forced smiles. That day taught me a valuable lesson: great pancakes require a little finesse.

    Fast forward a few years, and I’ve become somewhat of a pancake aficionado, constantly tweaking and experimenting until I landed on a recipe that not only works but shines. The inspiration for these Banana Blueberry Pancakes with Lemon Ricotta and Almond Crunch came on a whim. I was at the farmer’s market, surrounded by the bounty of fresh produce, when I spotted some ripe bananas and plump blueberries. Suddenly, I was transported back to the kitchen mishap of my teenage years, but this time, I was armed with experience and a spark of creativity.

    By adding lemon zest and ricotta cheese to the mix, I discovered a way to bring brightness and creaminess to the pancakes. The sliced almonds, toasted with honey and a touch of salt, add a delightful crunch to contrast the pillowy softness of the pancakes. It’s a recipe that feels like a hug on a plate, and it’s become a beloved staple in my home.

    These pancakes aren’t just about satisfying hunger; they’re about creating a moment — a pause in the hustle and bustle of life to savor something truly special. And today, I’m thrilled to share this journey and recipe with you.

    What Makes This Version Special

    This isn’t just your average stack of pancakes. What sets these Banana Blueberry Pancakes apart is the infusion of **zesty lemon ricotta** and a **crunchy almond topping**. The lemon zest and ricotta bring a tangy creaminess that elevates the humble pancake into something utterly irresistible. Meanwhile, the almond crunch, with its honey-kissed golden edges, adds texture and a touch of sophistication. These aren’t just breakfast pancakes; they’re an experience, a delicious departure from the norm.

    Flavor Profile

    Every bite of these pancakes is a delightful journey through layers of flavor and texture. The soft, fluffy pancakes are punctuated with bursts of sweet, juicy blueberries and creamy banana. The lemon ricotta adds a subtle citrusy zing, complementing the natural sweetness of the fruits. And then, there’s the almond crunch — nutty, slightly salty, with a hint of honey that ties everything together. It’s a symphony of taste and texture that dances on your palate, leaving you craving another bite.

    Ingredients

    • 3 whole eggs
    • 1/2 cup water
    • 2 tablespoons liquid coconut oil
    • 1/3 cup coconut flour
    • 1 teaspoon cream of tartar
    • 1/2 teaspoon ground cinnamon
    • 2 ripe bananas, mashed
    • 1 cup frozen blueberries
    • 1 tablespoon **lemon zest**
    • 1/2 cup **ricotta cheese**
    • 1/4 cup **sliced almonds**
    • 1 tablespoon **honey**
    • 1 teaspoon vanilla extract

    Instructions

    1. In a large mixing bowl, beat the eggs for 1 minute until they are fluffy and pale. This helps create a lighter pancake.
    2. Add the water, liquid coconut oil, and coconut flour to the eggs. Whisk together until the mixture is smooth and lump-free. Allow the batter to sit for 5 minutes so the coconut flour can absorb the liquid and expand. This step is crucial for achieving a tender texture.
    3. Mix in the cream of tartar, ground cinnamon, and mashed bananas. Whisk until combined, ensuring the bananas are evenly distributed.
    4. Gently fold in the frozen blueberries with a spatula. Be careful not to over-mix, as this can lead to tough pancakes.
    5. Fold the lemon zest and ricotta cheese into the batter just before cooking. This ensures the fresh lemon flavor stands out.
    6. In a skillet over medium heat, toast the sliced almonds with honey and a pinch of salt, stirring frequently until they’re golden and fragrant. Remove from the skillet and set aside.
    7. Heat a little oil or butter in the same skillet over medium to low heat. Ladle 1/2 cup of batter for each pancake onto the hot skillet. Cook for about 5 minutes on one side, or until bubbles form and the edges look set.
    8. Flip the pancakes and cook the other side until they are golden-brown and cooked through, about 3 more minutes.
    9. Repeat the process until all the batter is used, keeping the cooked pancakes warm in an oven on low heat if desired.
    10. Serve the pancakes topped with the toasted almond crunch and a drizzle of maple syrup if desired.

    Pro Tips from Meaghan’s Kitchen

    • For extra fluffy pancakes, make sure your eggs are at room temperature before you start.
    • Don’t rush the resting phase of the batter; it’s key for the coconut flour to do its magic.
    • If you find your batter too thick after resting, add a splash more water to reach your desired consistency.
    • Use a non-stick skillet and a light hand with the oil to ensure perfectly golden pancakes every time.
    • Experiment with different nut toppings like pecans or walnuts for a twist on the almond crunch.

    Variations & Dietary Swaps

    If you’re looking to make these Banana Blueberry Pancakes with Lemon Ricotta and Almond Crunch your own, here are a few ideas:

    • Vegetarian Swap: Substitute the honey in the almond crunch with maple syrup or agave nectar.
    • Spice-It-Up Version: Add a pinch of nutmeg or cardamom to the batter for a warming spice note.
    • Kids-Friendly Version: Top the pancakes with a dollop of whipped cream and rainbow sprinkles for a fun twist that kids will love.

    What to Serve With It

    These pancakes are a meal in themselves, but why not make breakfast even more special? Serve them with a frothy cappuccino for a classic pairing, or try an iced matcha latte for a refreshing contrast. Fresh fruit or a side of crispy bacon would also complement the pancakes beautifully.

    Storage & Meal Prep

    If you find yourself with leftovers (a rare occurrence, I assure you), these pancakes store beautifully. Stack them with parchment paper in between each pancake and store in an airtight container in the fridge for up to 3 days. For longer storage, freeze them in a single layer before transferring to a freezer bag. To reheat, simply pop them in the toaster or a warm oven until heated through.

    FAQ

    Can I use fresh blueberries instead of frozen?

    Absolutely! Fresh blueberries work just as well. Just be gentle when folding them into the batter to avoid bursting them.

    Can I make the batter ahead of time?

    It’s best to prepare the batter fresh, but you can mix the dry ingredients a day ahead. Add wet ingredients just before cooking for optimal texture.

    What if I don’t have coconut flour?

    You can substitute with all-purpose flour or almond flour, but you’ll need to adjust the liquid amounts as coconut flour is more absorbent.

    How do I prevent pancakes from sticking?

    Ensure your skillet is hot before adding the batter and use a non-stick pan or a well-greased surface to prevent sticking.

    Can I skip the almond crunch?

    While the almond crunch adds a delightful texture, you can skip it or substitute with another nut or seed topping for a different crunch.

    Final Thoughts

    Cooking is about more than just following a recipe; it’s about creating memories and savoring moments. These Banana Blueberry Pancakes with Lemon Ricotta and Almond Crunch are not just a delicious breakfast treat — they’re an invitation to pause, enjoy, and share with those you love. I hope you’ll give this recipe a try, and I’d love to hear your thoughts. Did you add your own twist? Let me know in the comments below or share your pancake creations on social media. Happy cooking!

    Related update: Banana Blueberry Pancakes with Lemon Ricotta and Almond Crunch

    Related update: Fluffy Buttermilk Pancakes with Vanilla-Cinnamon Swirl

  • Spicy Black Bean and Quinoa Burgers with Pineapple-Jalapeño Salsa | Made by Meaghan Moineau

    Spicy Black Bean and Quinoa Burgers with Pineapple-Jalapeño Salsa

    Imagine the savory aroma of smoky black beans mingling with the tropical sweetness of grilled pineapple, all encased in a golden-brown crust. These Spicy Black Bean and Quinoa Burgers with Pineapple-Jalapeño Salsa are more than just a meal; they’re an experience for your senses, right from the first sizzling bite.

    Personal Story

    I first stumbled upon the idea of using quinoa in burgers during a summer barbecue when my vegetarian friend challenged me to create a dish that would satisfy her plant-based lifestyle. I have to admit, I was skeptical at first. Could these little grains actually hold up in a burger? It was a culinary experiment that needed just the right balance of flavors and textures.

    As I rummaged through my pantry that day, the idea of adding a sweet-spicy twist to the standard veggie burger hit me like a flash of inspiration. I had some fresh pineapple and jalapeños in the fridge, and the rest, as they say, is history. The combination of smoky black beans and nutty quinoa, paired with a zesty pineapple-jalapeño salsa, turned out to be a game-changer. My friend, along with everyone else at the barbecue, was hooked on these Spicy Black Bean and Quinoa Burgers.

    Since then, this recipe has become a staple in my kitchen. It reminds me of that sunny afternoon, full of laughter and good company. Every time I make these burgers, it’s like having a little piece of that day right in my home. Sharing this recipe with you feels like inviting you to that very barbecue, where every bite is a celebration of flavors.

    What Makes This Version Special

    The unique twist in these Spicy Black Bean and Quinoa Burgers lies in the addition of quinoa and a sweet-spicy pineapple twist to the salsa. Quinoa isn’t just a trendy grain; it’s the secret to achieving that hearty yet fluffy texture that makes these burgers stand out. Toasting the quinoa before cooking enhances its nutty flavor, adding depth to the burger base.

    Moreover, the Pineapple-Jalapeño Salsa is where the magic truly happens. Grilling the pineapple slices before dicing them infuses a smoky sweetness that complements the jalapeño’s heat, creating a delightful contrast of flavors. This salsa isn’t just a topping; it’s a transformative element that elevates these veggie burgers to a whole new level.

    Flavor Profile

    Biting into these Spicy Black Bean and Quinoa Burgers is a multi-sensory experience. The patties are smoky and spicy, thanks to the smoked paprika and jalapeños, with a hint of tropical sweetness from the pineapple. Each bite delivers a hearty texture from the toasted quinoa, balanced by the freshness of the cilantro and the tanginess of lime. It’s a culinary dance of flavors that keeps your taste buds engaged from start to finish.

    Ingredients

    • 1 can black beans, drained and rinsed
    • **1 cup cooked quinoa**
    • 1 carrot, diced and microwaved
    • 1 stalk celery, diced
    • **1/2 cup diced fresh pineapple**
    • 1/2 cup canned corn, drained
    • 1 jalapeño, diced
    • 1/2 cup diced tomatoes
    • 2 green onions, diced
    • 1-2 garlic cloves, minced
    • 1/4 cup fresh parsley, chopped
    • Juice of 1 lime
    • 1 tsp creole seasoning
    • 1 tsp smoked paprika
    • 1 tsp cumin
    • 1/2 cup oatmeal
    • 1/2 cup panko breadcrumbs
    • 1/4 cup flour
    • Salt and pepper, to taste

    Instructions

    1. Preheat your oven to 425 degrees F. Lightly spray two baking sheets with nonstick spray and set aside.
    2. Toast the **quinoa** in a dry pan over medium heat for about 5 minutes or until you hear popping, and it turns golden-brown. Cook the quinoa according to package instructions.
    3. In a large bowl, mash the drained black beans until they reach a chunky consistency. Add the microwaved diced carrot and mix.
    4. Add the diced celery, smoked paprika, cumin, oatmeal, panko breadcrumbs, and creole seasoning to the bean mixture. Stir to combine.
    5. If the mixture is too moist, add more flour a tablespoon at a time until you can form patties without them falling apart.
    6. Form the mixture into patties, about 1/2 inch thick, and place them on the prepared baking sheets. Bake for 20 minutes, flipping halfway through until they are firm and golden-brown.
    7. While the burgers are baking, prepare the salsa. Grill the pineapple slices on a grill pan over medium-high heat until they have char marks, about 3 minutes per side. Dice the grilled pineapple and combine with canned corn, jalapeño, tomatoes, green onions, garlic, parsley, lime juice, salt, and pepper. Mix well and chill for about an hour before serving.
    8. Serve the burgers hot off the oven, topped with a generous spoonful of Pineapple-Jalapeño Salsa.

    Pro Tips from Meaghan’s Kitchen

    • For extra crispy edges, run a tablespoon of oil around the patties before baking.
    • To prevent the patties from sticking, let them rest for a minute before trying to flip them.
    • Chill the salsa for at least an hour to allow the flavors to meld together beautifully.
    • Use a potato masher for a quick and uniform mash of the black beans.

    Variations & Dietary Swaps

    • To make it gluten-free, swap the panko breadcrumbs for a gluten-free alternative.
    • For a spicier version, add an extra jalapeño to the salsa or sprinkle red pepper flakes into the burger mix.
    • Make it kid-friendly by replacing the jalapeño with a small, mild sweet bell pepper in the salsa.

    What to Serve With It

    These Spicy Black Bean and Quinoa Burgers pair perfectly with a chilled mango-lime agua fresca for a refreshing contrast. A side of crispy sweet potato fries complements the meal beautifully. If you’re feeling indulgent, add a slice of creamy avocado on top of your burger — it’s the perfect cool counterpart to the spicy salsa.

    Storage & Meal Prep

    Store cooked burger patties in an airtight container in the refrigerator for up to 3 days. For longer storage, freeze the patties on a baking sheet until solid, then transfer to a freezer-safe bag for up to 2 months. Reheat from frozen in a 350 degrees F oven for about 15 minutes or until heated through. The salsa, however, is best consumed fresh, as the texture changes over time.

    FAQ

    Can I use canned pineapple instead of fresh?

    While fresh pineapple is preferable for its vibrant flavor, canned pineapple can be used in a pinch. Ensure to drain it well before grilling.

    How can I make the burgers firmer?

    If your patties aren’t firm enough, try adding more panko breadcrumbs or flour to the mixture until you achieve the desired consistency.

    Can these burgers be grilled?

    Yes, these burgers can be grilled. Just be sure to oil the grill grates to prevent sticking, and handle the patties gently as they can be more fragile than meat-based burgers.

    Is there a way to make the salsa less spicy?

    To make the salsa milder, reduce the number of jalapeños or remove the seeds and membranes before dicing.

    What can I use instead of black beans?

    If you’re out of black beans, kidney beans or chickpeas make excellent substitutes in this recipe.

    Final Thoughts

    There you have it, friends — a recipe that brings a touch of tropical summers into your kitchen, with every bite of these Spicy Black Bean and Quinoa Burgers with Pineapple-Jalapeño Salsa bursting with flavor and heartiness. I hope you feel inspired to bring this dish to your next meal, and if you do, I’d love to hear all about it! Share your experiences, tweaks, and photos in the comments below. Happy cooking!

    Related update: Spicy Black Bean and Quinoa Burgers with Pineapple-Jalapeño Salsa

    Related update: Mediterranean Swiss Chard Wraps with Spicy Citrus Tahini

  • Chocolate Chip Coconut Muffins | Made by Meaghan Moineau

    Chocolate Chip Coconut Muffins | Made by Meaghan Moineau

    Chocolate Chip Coconut Muffins

    There’s something utterly magical about the combination of chocolate and coconut. It takes me back to my childhood, where weekend mornings meant waking up to the smell of freshly baked goods. My mom would often whip up a batch of her famous muffins, the aroma wafting through the house and luring sleepy-eyed kids to the kitchen. These Chocolate Chip Coconut Muffins capture that essence perfectly, offering a delightful blend of flavors that are both comforting and indulgent.

    Why You’ll Love It

    These muffins are designed to be loved by everyone, from kids to adults. The combination of dark chocolate chips and coconut flakes provides a rich and decadent taste, while the coconut butter adds a moistness that can’t be beaten. They’re gluten-free, using almond milk and a delicate blend of gluten-free flour, making them suitable for those with dietary restrictions without sacrificing flavor or texture. Plus, they are surprisingly easy to whip up, making them perfect for a quick morning treat or an afternoon snack.

    Ingredients

    • Coconut butter
    • Eggs
    • Almond milk
    • Vanilla extract
    • Gluten-free flour
    • Sucanat
    • Baking powder
    • Sea salt
    • Dark chocolate chips
    • Coconut flakes

    Instructions

    1. Preheat your oven to 350°F (175°C) and line a muffin tin with paper liners.
    2. In a large bowl, mix coconut butter and sucanat until smooth.
    3. Add eggs, almond milk, and vanilla extract, and beat until well combined.
    4. In another bowl, whisk gluten-free flour, baking powder, and sea salt.
    5. Gradually add the dry ingredients to the wet mixture, stirring until just combined.
    6. Fold in the dark chocolate chips and coconut flakes.
    7. Spoon the batter into the prepared muffin tin, filling each cup about two-thirds full.
    8. Bake for 18-22 minutes or until a toothpick inserted into the center of a muffin comes out clean.
    9. Let the muffins cool in the tin for a few minutes, then transfer to a wire rack to cool completely.

    For detailed step-by-step instructions, visit my blog.

    Tips

    For the best results, make sure your coconut butter is at room temperature. This will help it blend more easily with the other ingredients. If you want a more intense coconut flavor, lightly toast the coconut flakes before folding them into the batter. Additionally, using high-quality dark chocolate chips will enhance the overall flavor of the muffins.

    Variations & Substitutions

    If you’re looking to mix things up, try adding a handful of chopped nuts, like almonds or pecans, for added crunch. For a lower sugar option, you can replace sucanat with your preferred sugar alternative, such as coconut sugar or a sugar-free sweetener. If you don’t have almond milk, any other plant-based milk will work just as well.

    Storage

    These muffins are best enjoyed fresh, but they can be stored in an airtight container at room temperature for up to three days. For longer storage, you can freeze them for up to three months. To defrost, simply leave them at room temperature or warm them up in the oven for a few minutes.

    FAQ

    Can I use regular flour instead of gluten-free flour?

    Yes, you can substitute all-purpose flour for gluten-free flour in this recipe if gluten is not a concern for you. The muffins will still turn out delicious!

    Is there an egg substitute for this recipe?

    If you’re looking for an egg-free version, you can try using flax eggs. Mix one tablespoon of ground flaxseed with three tablespoons of water for each egg, let it sit until it becomes gelatinous, and use it as a direct substitute for the eggs in the recipe.

    Can I use sweetened coconut flakes?

    While you can use sweetened coconut flakes, it will make the muffins sweeter. If you prefer a less sweet muffin, stick with unsweetened coconut flakes or adjust the amount of sucanat used in the batter.

    Nutrition

    These muffins are a delightful treat with a healthy twist. They are packed with healthy fats from the coconut butter and almond milk, and they provide a good dose of fiber and antioxidants from the dark chocolate. Each muffin offers a balance of carbohydrates, protein, and fat, making it a satisfying snack or breakfast option.

    Final Thoughts

    Chocolate Chip Coconut Muffins are a testament to how simple ingredients can create something truly special. Whether you’re making them for a family gathering, a casual brunch, or just because, these muffins are sure to bring smiles and a bit of nostalgia to your table. I hope this recipe brings you as much joy as it has brought me and my family. Happy baking!

    Related update: Chocolate Chip Coconut Muffins

    Related update: Bourbon-Infused Mini Cherry Pies with Pecan Streusel

    Related update: Banana Blueberry Pancakes with Lemon Ricotta and Almond Crunch