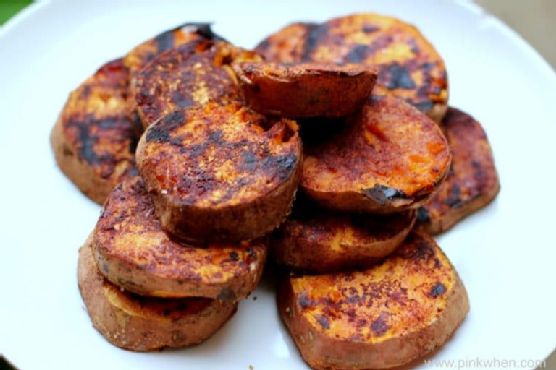
Tag: Vegetarian

  • Guacamole | Made by Meaghan Moineau

    Guacamole | Made by Meaghan Moineau

    Deliciously Fresh Guacamole Recipe

    Growing up, guacamole was a staple at our family gatherings. I vividly remember those sun-drenched afternoons where laughter filled the air, and everyone was gathered around the table, eagerly scooping fresh guacamole onto their plates. My grandmother would always say that the secret to the best guacamole is not just about the freshest ingredients but also the love and care you put into making it. Now, I’m excited to share this cherished recipe with you, so you can create your own delicious memories.

    Why You’ll Love It

    This guacamole recipe is a crowd-pleaser for several reasons:

    • Simple and Fresh: With just a few fresh ingredients, this guacamole comes together quickly and packs a punch of flavor.
    • Customizable: You can easily tweak the recipe to suit your taste, making it as mild or as spicy as you like.
    • Healthy and Nutritious: Avocados are rich in healthy fats, fiber, and a variety of vitamins, making this a guilt-free snack or appetizer.

    Ingredients

    • 3 ripe Haas avocados
    • 1/4 cup finely chopped onion
    • 1 jalapeño pepper, seeded and finely chopped
    • 2 tablespoons chopped fresh cilantro
    • Salt to taste
    • Black pepper to taste
    • Juice of 1 fresh lime
    • 1 tablespoon chopped fresh basil
    • 1 tablespoon chopped fresh oregano

    Instructions

    1. Cut the avocados in half lengthwise. Carefully drive a chef’s knife into the large pit, twist to remove, and discard the pit.
    2. Scoop the avocado flesh out from the skin into a mixing bowl.
    3. Using a fork, mash the avocado to your desired consistency—smooth or chunky.
    4. Add the finely chopped onion, jalapeño, cilantro, basil, and oregano to the mashed avocados. Mix to combine.
    5. Season the mix to taste with salt, black pepper, and fresh lime juice.
    6. Serve immediately for the freshest flavor or chill in the refrigerator if serving later.
    7. If storing, press plastic film wrap directly onto the surface of the guacamole to prevent browning and refrigerate.

    Tips

    • Ensure your avocados are ripe by giving them a gentle squeeze; they should yield slightly under pressure.
    • For a spicier kick, leave some of the jalapeño seeds in the mix.
    • To prevent browning, keep the avocado pits in the guacamole when storing, in addition to using plastic film wrap.

    Variations & Substitutions

    • Tomato Addition: Add diced tomatoes for extra flavor and color. Be sure to remove the seeds to keep the guacamole from becoming watery.
    • Garlic Twist: Add a clove of minced garlic for an extra layer of flavor.
    • Mango Mix: For a sweet touch, add diced mango, which pairs beautifully with the creamy avocado.

    Storage

    To keep your guacamole fresh, store it in an airtight container with plastic film wrap pressed directly onto the surface to minimize exposure to air. It will keep in the refrigerator for up to two days. However, for the best taste and texture, it’s recommended to enjoy it as fresh as possible.

    FAQ

    Can I make guacamole ahead of time?

    Yes, you can make guacamole a few hours in advance. Just be sure to store it properly with plastic wrap pressed directly onto the surface to prevent browning.

    How can I make my guacamole spicier?

    To increase the heat level, you can add more jalapeño peppers or include some of the seeds. Alternatively, try adding a pinch of cayenne pepper for an extra kick.

    What can I serve with guacamole?

    Guacamole pairs well with tortilla chips, veggie sticks, tacos, burritos, or as a topping for grilled meats. It’s a versatile dip that complements many dishes.

    Nutrition

    This guacamole recipe is not only delicious but also packed with nutritional benefits. Avocados are high in heart-healthy monounsaturated fats, fiber, and various vitamins and minerals. The added herbs and lime juice provide extra antioxidants and a boost of vitamin C. Enjoy this guacamole as part of a balanced diet.

    Final Thoughts

    Guacamole is more than just a dip; it’s a dish that brings people together and creates lasting memories. Whether you’re hosting a party, having a quiet family dinner, or simply enjoying a snack, this guacamole recipe is sure to delight. With its fresh ingredients and customizable nature, it’s easy to see why this classic dish is loved by so many. So gather your ingredients, and let’s make some guacamole that’s as rich in flavor as it is in tradition.

    Related update: Guacamole

    Related update: Gourmet Blue Cheese Tartlets with Lavender-Infused Fig Jam and Candied Walnuts

  • Detox Orange Carrot Juice | Made by Meaghan Moineau

    Detox Orange Carrot Juice | Made by Meaghan Moineau

    Detox Orange Carrot Juice

    There’s something truly magical about the vibrant hue and zesty punch of a freshly made juice. This Detox Orange Carrot Juice recipe is not just a drink, but a nostalgic journey back to sun-drenched mornings in my grandmother’s kitchen, where the aroma of freshly squeezed juice filled the air. She always believed in the power of nature’s bounty to heal and energize, and this juice is a testament to her wisdom.

    Why You’ll Love It

    This invigorating juice is a perfect blend of sweet, tangy, and spicy, with a kick of freshness that awakens your senses. Here’s why you’ll adore it:

    • Boosts Immunity: Packed with vitamin C and antioxidants, it strengthens your immune system.
    • Easy to Make: With just a few ingredients and a juicer, you can whip this up in no time.
    • Guilt-Free Refreshment: Low in calories and high in nutrients, it’s perfect for health-conscious individuals.
    • Nature’s Energy Drink: The natural sugars and vitamins provide an instant energy boost.

    Ingredients

    • 4 medium carrots
    • 2 large oranges
    • 1-inch piece of fresh ginger
    • 1/2 teaspoon fresh ground turmeric (or a small piece of fresh turmeric, if available)
    • 1 tablespoon honey (optional)

    Instructions

    1. Wash and peel the carrots, oranges, and ginger. If using fresh turmeric, peel that as well.
    2. Juice the carrots, oranges, and ginger in your juicer. If using fresh turmeric, juice it along with the other ingredients.
    3. Pour the juice into a large pitcher. If you used ground turmeric, stir it into the juice at this stage.
    4. Add honey to the juice, if desired, and mix well.
    5. Divide the juice between two medium glasses or one large glass.
    6. Enjoy immediately for the freshest taste and maximum nutrient intake.

    Tips

    • Choose Fresh Ingredients: Use the freshest carrots and oranges you can find for the best flavor and nutrient content.
    • Adjust Sweetness: Taste the juice before adding honey; the oranges may provide enough sweetness on their own.
    • Chill Before Serving: For an extra refreshing drink, chill your ingredients in the fridge before juicing.

    Variations & Substitutions

    If you’re feeling adventurous or need to adjust based on available ingredients, here are some suggestions:

    • Substitute Honey: Use agave syrup or maple syrup as a vegan alternative to honey.
    • Add a Twist: Incorporate a splash of lemon or lime juice for extra tanginess.
    • Boost with Greens: Add a handful of spinach or kale for added nutrients and a green hue.

    Storage

    While fresh juice is best consumed immediately, you can store any leftovers in an airtight container in the refrigerator for up to 24 hours. Shake well before drinking, as natural separation may occur.

    FAQ

    Can I make this juice without a juicer?

    Yes, you can! If you don’t have a juicer, simply blend all the ingredients in a high-speed blender and strain the mixture through a fine-mesh sieve or cheesecloth to remove the pulp.

    Is it okay to drink this juice every day?

    Absolutely! Drinking this juice regularly can be a wonderful way to increase your intake of vitamins and antioxidants. Just keep in mind that moderation is key, as with any dietary habit.

    Nutrition

    This juice is a powerhouse of nutrients. Here’s a rough nutritional breakdown per serving:

    • Calories: Approximately 150 (without honey)
    • Vitamin A: Over 200% of the daily recommended value
    • Vitamin C: Over 100% of the daily recommended value
    • Fiber: Minimal, as most is removed in the juicing process

    Final Thoughts

    Detox Orange Carrot Juice is not just a drink; it’s an experience that connects you with nature’s finest offerings. Whether you’re looking to kickstart your day with something refreshing or cleanse your body with a nutrient-rich elixir, this juice is your perfect companion. As you sip, let it transport you to that sunlit kitchen of nostalgia, where health and happiness are just a glass away. Cheers to vibrant health and energizing mornings!

    Related update: Detox Orange Carrot Juice

    Related update: Bacon & Egg Toast Cups

    Related update: Hazelnut Espresso Cream Martinis with Cinnamon-Sugar Rim

  • Easy Tabouleh | Made by Meaghan Moineau

    Easy Tabouleh | Made by Meaghan Moineau

    Easy Tabouleh

    Welcome to my kitchen! Today, I’m thrilled to share a recipe that is close to my heart—Easy Tabouleh. This vibrant and refreshing salad has been a staple in my family for generations. I vividly remember summers at my grandmother’s house, where she would prepare a massive bowl of tabouleh for our family gatherings. The aroma of freshly chopped parsley and the tang of lemon juice would fill the air, signaling that something delicious was on its way. I’m excited to bring that same joy to your table with this simple and delightful recipe.

    Why You’ll Love It

    Tabouleh is more than just a salad; it’s a celebration of fresh ingredients and bold flavors. Here’s why you’ll love this easy tabouleh recipe:

    • Quick and Simple: With only a handful of ingredients and minimal prep time, you can whip up this dish in no time.
    • Nutritious and Healthy: Packed with fresh vegetables and herbs, this dish is a nutritious powerhouse that is both satisfying and light.
    • Perfect for Any Occasion: Whether it’s a family picnic, a potluck, or a simple weeknight dinner, tabouleh is a versatile dish that fits any occasion.
    • Flavorful and Refreshing: The combination of lemon juice and fresh herbs makes every bite a burst of refreshing flavor.

    Ingredients

    • 1 cup bulgur
    • 2 cucumbers, finely chopped
    • 1 bunch of flat leaf parsley, finely chopped
    • Juice from 1 lemon
    • 3 tablespoons olive oil
    • Salt, to taste
    • 2 tomatoes, finely chopped

    Instructions

    1. Start by preparing the bulgur. Place it in a fine mesh sieve and rinse under cold water. Allow it to drain thoroughly.
    2. Finely chop the cucumbers, parsley, and tomatoes. The key is to keep the vegetables diced fairly small to stay true to the traditional tabouleh texture.
    3. In a large bowl, combine the rinsed bulgur, chopped cucumbers, parsley, and tomatoes.
    4. Add the lemon juice and olive oil to the bowl. Mix everything together gently to ensure the ingredients are well combined.
    5. Season with salt to taste. Start with a small amount, and add more if needed as you mix and taste.
    6. Let the salad sit for at least 30 minutes before serving. This allows the flavors to meld together beautifully.

    Tips

    • Chill for Flavor: For the best flavor, let the tabouleh chill in the refrigerator for an hour before serving. This gives the bulgur time to absorb the lemon juice and olive oil.
    • Use Fresh Ingredients: Fresh parsley and ripe tomatoes make a huge difference in the taste, so opt for the freshest produce you can find.
    • Adjust to Taste: Feel free to adjust the amount of lemon juice and salt to your liking. Some prefer a tangier salad, while others enjoy a milder version.

    Variations & Substitutions

    Tabouleh is a versatile salad with room for creativity. Here are some variations and substitutions you can try:

    • Quinoa Substitute: For a gluten-free version, substitute the bulgur with cooked quinoa. It offers a similar texture and absorbs the flavors wonderfully.
    • Add Mint: Incorporating a handful of finely chopped mint leaves adds an extra layer of freshness to the dish.
    • Additional Veggies: Feel free to add other vegetables such as bell peppers or red onions for added crunch and color.

    Storage

    Tabouleh can be stored in an airtight container in the refrigerator for up to 3 days. The flavors will continue to develop, making it even more delicious the next day. However, the texture of the vegetables might soften over time, so it’s best enjoyed fresh.

    FAQ

    Can I make tabouleh ahead of time?

    Absolutely! Making tabouleh ahead of time is a great idea as it allows the flavors to meld. Prepare it a few hours before serving and let it chill in the refrigerator. Just give it a good stir before serving to redistribute the dressing.

    Is tabouleh served cold or warm?

    Tabouleh is traditionally served cold or at room temperature. Chilling it enhances its refreshing qualities and makes it a perfect dish for warm weather.

    Nutrition

    This easy tabouleh is not only delicious but also nutritious. It is rich in vitamins from the fresh vegetables and herbs, and the bulgur provides a good source of fiber. The olive oil adds healthy fats, while the lemon juice offers a boost of vitamin C. It’s a wholesome dish that fits well into a balanced diet.

    Final Thoughts

    Thank you for joining me in making this easy tabouleh recipe. I hope it brings as much joy to your table as it has to mine. Whether you’re enjoying it as a side dish, a light lunch, or a part of a larger meal, tabouleh is a delightful way to embrace fresh, simple ingredients. I’d love to hear how it turns out for you, so feel free to share your experiences and any personal twists you add to the recipe. Bon appétit!

    Related update: Easy Tabouleh

    Related update: Maple Pecan Honey Cornbread with Orange Zest

    Related update: Zesty Tropical Lump Crab and Avocado Salad with Mango-Lime Dressing

  • Almond and cranberry shortbread | Made by Meaghan Moineau

    Almond and cranberry shortbread | Made by Meaghan Moineau

    Almond and Cranberry Shortbread

    Growing up, the holiday season in our home was synonymous with the aroma of freshly baked cookies wafting through the air. My mother would spend countless hours in the kitchen, her apron dusted with flour, crafting the most beautiful and delicious shortbread cookies. One of my all-time favorites was her almond and cranberry shortbread, a delightful combination of buttery goodness and the tart sweetness of cranberries. Today, I’m thrilled to share this treasured recipe with you, so you can create your own sweet memories.

    Why You’ll Love It

    This almond and cranberry shortbread recipe is a true delight for the senses. The buttery richness of the shortbread pairs wonderfully with the tartness of dried cranberries and the nutty crunch of almonds. These cookies are perfect for holiday gatherings, afternoon tea, or as an indulgent treat just for you. What makes this recipe even more special is its simplicity—requiring just a few ingredients and some easy steps, you’ll have a batch of homemade cookies ready to enjoy in no time. Plus, these cookies have a perfect balance of flavors and textures that are bound to impress anyone who takes a bite.

    Ingredients

    • 1 cup unsalted butter, softened
    • 3/4 cup icing sugar
    • 2 large egg yolks
    • 1 tablespoon lemon juice
    • 2 cups all-purpose flour
    • 1/2 cup finely chopped almonds
    • 1/2 cup dried cranberries
    • 1/3 cup blanched almonds, finely chopped (for rolling)

    Instructions

    1. Cream the butter for about 5 minutes until fluffy.
    2. Add icing sugar and continue beating until the mixture is shiny and smooth.
    3. Add the egg yolks and lemon juice, whisking until fully incorporated.
    4. Mix the flour and chopped almonds, then gradually add to the butter mixture, mixing until the dough reaches the consistency of a thick paste. Be careful not to overmix.
    5. By hand, knead in the dried cranberries.
    6. Divide the dough into two equal parts, shaping each into a 20-22 cm long roll.
    7. Roll each dough roll in the finely chopped blanched almonds.
    8. Wrap each roll in aluminum foil, twisting the ends, and refrigerate for several hours or preferably overnight.
    9. Preheat the oven to 180°C (350°F).
    10. Remove the foil from one roll of dough and place it on a cutting board. Keep the other roll in the refrigerator until ready to use.
    11. Using a sharp knife, cut the roll into 5-6 mm wide slices.
    12. Place the slices well apart on a baking sheet lined with parchment paper.
    13. Bake the cookies for about 12 minutes, being careful not to burn them. Let them cool on the sheet for about 5 minutes before transferring to a rack to cool completely.
    14. Repeat with the second roll of dough.

    Tips

    For best results, ensure your butter is at room temperature before starting the recipe. This will help it cream better and give you a smoother dough. When slicing the dough, use a sharp knife to get clean cuts. If you notice the dough is too hard to slice, allow it to warm up slightly outside the refrigerator. To enhance the flavor, you can toast the chopped almonds lightly before mixing them into the dough.

    Variations & Substitutions

    If you’re looking to switch things up, consider substituting dried cherries or apricots for the cranberries. For a different nutty flavor, try using pistachios or pecans instead of almonds. If you prefer a gluten-free version, you can replace the all-purpose flour with a gluten-free flour blend. Additionally, adding a teaspoon of vanilla extract to the dough can provide a lovely depth of flavor.

    Storage

    Store these almond and cranberry shortbread cookies in an airtight container at room temperature for up to one week. If you want to keep them fresh for longer, consider storing them in the refrigerator. These cookies also freeze well; just place them in a freezer-safe bag or container, and they’ll keep for up to three months. Simply thaw at room temperature before serving.

    FAQ

    Can I use salted butter instead of unsalted butter?

    Yes, you can use salted butter if that’s what you have on hand. Just be sure to omit any additional salt in the recipe to avoid overly salty cookies.

    Can I make the dough ahead of time?

    Absolutely! The dough can be prepared and refrigerated up to two days in advance. This makes it a convenient option for holiday prep or when you’re planning to bake multiple batches.

    Nutrition

    While I don’t have specific nutrition data for this recipe, almond and cranberry shortbread cookies are generally high in calories and fat due to the butter and almonds. However, they also offer some nutritional benefits, such as vitamin E from almonds and antioxidants from cranberries. As with any treat, enjoy them in moderation as part of a balanced diet.

    Final Thoughts

    These almond and cranberry shortbread cookies are more than just a delicious treat; they are a piece of my childhood, a reminder of cozy holiday seasons filled with warmth and love. I hope this recipe brings the same joy and cherished memories to your home. Whether you’re baking them for family, friends, or yourself, these cookies are sure to be a hit. Happy baking!

    Related update: Almond and cranberry shortbread

    Related update: Chocolate Spelt Cake

  • Mediterranean semolina cake | Made by Meaghan Moineau

    Mediterranean semolina cake | Made by Meaghan Moineau

    Mediterranean Semolina Cake

    There’s something magical about family recipes passed down through generations, and this Mediterranean semolina cake is no exception. I vividly remember the first time I tasted this cake at my grandmother’s sunny kitchen table. The sweet aroma of citrus and honey wafted through the room as she sliced into the tender cake, revealing a delightful medley of almonds and raisins. Each bite was a little piece of sunshine, and I felt instantly connected to my roots. Today, I’m thrilled to share this cherished recipe with you, hoping it brings as much joy to your table as it has to mine.

    Why You’ll Love It

    This Mediterranean semolina cake is a delightful blend of flavors and textures that are sure to win you over. Here’s why you’ll love it:

    • Unique Texture: Made with semolina and almond meal, this cake has a wonderfully unique, slightly coarse texture that is both moist and tender.
    • Rich Flavor: The combination of citrus zest, olive oil, and honey syrup creates a rich, aromatic flavor profile that’s distinctly Mediterranean.
    • Nutritious Ingredients: With wholesome ingredients like almonds, yoghurt, and olive oil, this cake is a healthier alternative to many traditional desserts.
    • Versatile and Adaptable: Whether you’re serving it as a dessert, a teatime treat, or even for breakfast, this cake is versatile enough to suit any occasion.
    • Easy to Make: This recipe is straightforward and perfect for bakers of all skill levels.

    Ingredients

    • 1 cup sugar
    • 3 large eggs
    • 1 cup plain yoghurt
    • Zest of 1 lemon
    • Zest of 1 orange
    • 1 cup almond meal
    • 1 cup semolina
    • 2 teaspoons baking powder
    • 1/2 cup olive oil
    • 1/4 cup almonds, roughly chopped
    • 1/4 cup raisins
    • 1/4 cup dry cranberries
    • 1/2 cup honey
    • Juice of 1 orange

    Instructions

    1. Preheat your oven to 180°C (160°C fan) and line a 20-23cm round baking tin with baking paper, or use a silicone mold.
    2. In a mixer, whisk the eggs and sugar together until the mixture is thick and pale in color.
    3. Add the yoghurt, lemon zest, and orange zest to the egg mixture. Mix until well combined.
    4. Gradually add the almond meal, semolina, and baking powder to the wet ingredients. Mix until just combined.
    5. Slowly incorporate the olive oil into the batter, mixing until smooth.
    6. Pour the batter into the prepared baking tin and smooth the top with a spatula.
    7. Bake in the preheated oven for 35 minutes, or until a skewer inserted into the center of the cake comes out clean.
    8. While the cake is baking, prepare the syrup by adding the chopped almonds, raisins, cranberries, honey, and orange juice to a pot. Bring to a boil and cook for 1-2 minutes.
    9. Remove the cake from the oven and pierce it all over with a skewer.
    10. Pour the prepared syrup evenly over the warm cake. Allow it to soak in and cool slightly before serving.

    Tips

    • Measure Carefully: Precise measurements ensure the perfect texture. Use a kitchen scale if possible.
    • Room Temperature Ingredients: Make sure your eggs and yoghurt are at room temperature for a smoother batter.
    • Don’t Overmix: Mix the ingredients until just combined to avoid a dense cake.
    • Cooling Time: Allow the cake to cool slightly before slicing to ensure it holds together well.

    Variations & Substitutions

    • Nuts: Substitute walnuts or pistachios for almonds for a different flavor.
    • Dried Fruits: Use chopped dried apricots or figs instead of raisins and cranberries.
    • Citrus: Swap lime zest for lemon for a different citrus note.
    • Gluten-Free: Ensure your semolina and baking powder are certified gluten-free for a gluten-free version.

    Storage

    This cake can be stored in an airtight container at room temperature for up to 3 days. For longer storage, wrap the cake tightly in plastic wrap and keep it in the refrigerator for up to a week. You can also freeze the cake for up to 3 months. To enjoy, thaw it overnight in the refrigerator or at room temperature.

    FAQ

    Can I make this cake ahead of time?

    Absolutely! This cake can be made a day in advance and stored in an airtight container. In fact, the flavors often develop and improve overnight.

    What can I serve with this cake?

    This cake pairs beautifully with a dollop of whipped cream or a scoop of vanilla ice cream. A cup of strong coffee or tea also complements its flavors perfectly.

    Is this cake suitable for special diets?

    With its wholesome ingredients, this cake can be adapted for gluten-free diets if you use certified gluten-free semolina. It is also naturally dairy-free if you substitute the yoghurt with a plant-based alternative.

    Nutrition

    This Mediterranean semolina cake offers a balance of nutrients. It’s rich in healthy fats from the olive oil and almonds, provides protein from the eggs and yoghurt, and contains natural sugars from the honey and dried fruits. While it is a sweet treat, its wholesome ingredients make it a better-for-you dessert option.

    Final Thoughts

    Baking this Mediterranean semolina cake is like taking a journey to sun-drenched coasts, where each ingredient tells a story of tradition and love. Whether you’re enjoying it with your morning coffee, serving it at a family gathering, or gifting it to a friend, this cake is sure to become a beloved favorite. I hope this recipe brings warmth and sweetness to your kitchen, just as it has to mine. Happy baking!

    Related update: Mediterranean semolina cake

    Related update: Chocolate and Szechuan Peppercorn Brownies

  • Roasted Broccoli with Lemon and Garlic | Made by Meaghan Moineau

    Roasted Broccoli with Lemon and Garlic | Made by Meaghan Moineau

    Roasted Broccoli with Lemon and Garlic

    There’s something magical about the simple yet profound combination of roasted vegetables with citrus and herbs. This Roasted Broccoli with Lemon and Garlic recipe brings a burst of flavor and a delightful crisp texture to your table. Let me take you on a journey of flavors that will transform a humble vegetable into a dish that stands out on its own.

    Why You’ll Love It

    This roasted broccoli recipe is one you’ll want to make over and over again. It’s not just about the taste; it’s about the experience it brings to the table. Growing up, I remember my grandmother’s kitchen filled with the aroma of roasted vegetables. She had a knack for making the simplest ingredients extraordinary. That nostalgic memory is what inspired this recipe. You’ll love it for its simplicity, quick preparation, and the way it elevates broccoli into something truly special.

    Ingredients

    • 1 pound of broccoli florets
    • 2 tablespoons extra virgin olive oil
    • 3 cloves of garlic, minced
    • 1/2 teaspoon black ground pepper
    • 2 tablespoons lemon juice
    • Salt to taste

    Instructions

    1. Preheat your oven to 400 degrees Fahrenheit (200 degrees Celsius).
    2. In a large mixing bowl, combine the broccoli florets, olive oil, minced garlic, salt, and black ground pepper. Toss well to ensure the broccoli is evenly coated.
    3. Spread the broccoli out in an even layer on a baking sheet. Ensure they are not overlapping to allow even roasting.
    4. Bake in the preheated oven until the broccoli is tender enough to pierce the stems with a fork, about 15 to 20 minutes.
    5. Remove the broccoli from the oven and place it in a serving bowl. Drizzle with fresh lemon juice and give it a gentle toss to combine.
    6. Serve immediately and enjoy the vibrant flavors.

    Tips

    For the best results, make sure your broccoli florets are similar in size. This ensures even cooking. Always use fresh lemon juice for that zesty punch, and feel free to adjust the garlic to your preference if you’re a garlic lover like me.

    Variations & Substitutions

    If you want to add a little heat, sprinkle some red pepper flakes before roasting. For a touch of umami, add a tablespoon of grated Parmesan cheese just before serving. If you’re out of fresh garlic, garlic powder is a feasible substitute, though fresh will always give you the best flavor.

    Storage

    Store any leftover roasted broccoli in an airtight container in the refrigerator for up to 3 days. Reheat it in an oven or air fryer to regain its crispness. Avoid microwaving as it can make the broccoli soggy.

    FAQ

    Can I use frozen broccoli instead of fresh?

    Yes, you can use frozen broccoli. Just be sure to thaw and pat it dry thoroughly to remove excess moisture before roasting. This will help achieve a crispy texture.

    What can I serve with roasted broccoli?

    Roasted broccoli is versatile and pairs well with a variety of main courses. Try it alongside grilled chicken, salmon, or a hearty pasta dish. It also works beautifully as a topping for salads or grain bowls.

    How do I prevent the broccoli from becoming too soft?

    To keep the broccoli from getting too soft, make sure not to overcrowd the pan. This allows the hot air to circulate and roast the broccoli rather than steam it.

    Nutrition

    This dish is not only delicious but also nutritious. Broccoli is a powerhouse of vitamins K and C, fiber, and numerous antioxidants. With minimal olive oil and fresh lemon juice, this recipe keeps the calorie count low while delivering maximum flavor.

    Final Thoughts

    This Roasted Broccoli with Lemon and Garlic is more than just a side dish; it’s a celebration of simple ingredients coming together to create something wonderful. Whether you’re looking to add more greens to your diet or searching for an easy weeknight side, this recipe fits the bill. Happy cooking!

    Related update: Roasted Broccoli with Lemon and Garlic

  • Azteca Soup | Made by Meaghan Moineau

    Azteca Soup | Made by Meaghan Moineau

    Azteca Soup: A Warm Embrace of Flavor

    Why You’ll Love It

    Azteca Soup is not just a recipe; it’s a journey to the heart of Mesoamerican culinary tradition. This soup is a delightful fusion of fresh ingredients and bold flavors, perfect for warming up on a chilly day. I remember the first time I tasted this soup at a small family gathering. The aroma filled the room, and the vibrant colors of the ingredients were a feast for the eyes. My grandmother, with her apron slightly dusted with flour, ladled the soup into our bowls while sharing stories of her childhood in the bustling markets of Mexico City. The soup was a hit, and the warmth of that moment still lingers whenever I make it today.

    Ingredients

    • 2 tablespoons olive oil
    • 2 garlic cloves, minced
    • 1 onion, chopped
    • 1 jalapeño pepper, chopped
    • 2 celery stalks, chopped
    • 1 can (14 oz) canned tomatoes, with juice
    • 2 teaspoons chili powder
    • 1 teaspoon cumin
    • 1 cup fresh corn, cut from the cob
    • 1 handful fresh basil, cut into ribbons
    • 4 cups vegetable stock
    • 2 tablespoons lime juice
    • 1 avocado, diced
    • 1 cup nacho chips
    • 1/2 cup sour cream
    • Fresh basil shreds for garnish

    Instructions

    1. In a medium saucepan, heat the olive oil over medium heat. Add the garlic, onions, jalapeño pepper, and celery. Sauté for about 5 minutes until the onions become translucent.
    2. Add the canned tomatoes, chili powder, and cumin. Cook down over medium heat for about 10 minutes, stirring often to prevent sticking.
    3. Stir in the fresh corn, basil ribbons, reserved tomato juice, and vegetable stock. Bring the mixture to a boil, then reduce the heat and let it simmer for 15 minutes.
    4. When ready to serve, remove the soup from heat and stir in the lime juice and diced avocado.
    5. To serve, break several nacho chips into each bowl, ladle in the soup, then top each with a spoonful of sour cream. Garnish with a few fresh basil shreds and a whole nacho chip on top.

    Serve hot, and enjoy as a complete lunch or a substantial first course. This recipe serves 6 people.

    Tips

    For the best flavor, use fresh, ripe avocados and sweet corn. If you prefer a spicier soup, leave the seeds in the jalapeño pepper. Make sure to stir the soup frequently to prevent the ingredients from sticking to the bottom of the pot.

    Variations & Substitutions

    If you’re looking to add some protein, consider adding grilled chicken or shrimp. For a vegetarian version, you can substitute the sour cream with a vegan alternative. Feel free to experiment with different herbs like cilantro for a unique twist on the flavor profile.

    Storage

    Azteca Soup can be stored in an airtight container in the refrigerator for up to 3 days. To reheat, simply warm it on the stove over medium heat, stirring occasionally. The soup may thicken as it cools, so you might need to add a splash of vegetable stock when reheating.

    FAQ

    Can I use canned corn instead of fresh corn?

    Yes, canned corn can be used as a substitute for fresh corn. Just be sure to drain and rinse it before adding it to the soup.

    What can I use instead of jalapeño pepper?

    If you prefer a milder soup, you can substitute the jalapeño with a green bell pepper, or add a pinch of smoked paprika for a different kind of warmth without the heat.

    Nutrition

    This soup is a low-calorie, nutrient-rich option. It’s packed with vitamins from the fresh vegetables and offers heart-healthy fats from the avocado. Ideal for those seeking a wholesome meal without the extra calories.

    Final Thoughts

    Azteca Soup is more than just a dish; it’s an experience that brings people together. Whether you’re enjoying it with family around the dinner table or serving it at a gathering, this soup is sure to bring warmth and joy to your meal. With its vibrant flavors and comforting aroma, Azteca Soup is a testament to the rich culinary traditions that have been passed down through generations. I hope you enjoy making and sharing this recipe as much as I have. Bon appétit!

    Related update: Azteca Soup

    Related update: Mixed Paella

  • Rich Jelly Scones | Made by Meaghan Moineau

    Rich Jelly Scones | Made by Meaghan Moineau

    Rich Jelly Scones

    There’s something incredibly comforting about the aroma of freshly baked scones wafting through the kitchen. I remember when I was a child, visiting my grandmother’s house every Sunday morning. The highlight of those visits was her famous scones, baked to perfection and topped with a generous dollop of homemade berry preserves. These Rich Jelly Scones are my tribute to those cherished memories, and I’m thrilled to share this recipe with you.

    Why You’ll Love It

    These scones are not just a delight to the senses; they are also incredibly easy to make. The texture is light and fluffy with a slightly crisp exterior, and the sweet surprise of fruit preserves in the center makes each bite pure bliss. Whether you’re a seasoned baker or a beginner, this recipe is foolproof and sure to impress.

    Ingredients

    • 2 cups all-purpose flour
    • 1/3 cup white granulated sugar
    • 1 tablespoon baking powder
    • 1/4 teaspoon baking soda
    • 1/2 teaspoon salt
    • 1/2 cup unsalted butter, chilled and diced
    • 2 eggs
    • 1/2 cup milk
    • 1 teaspoon vanilla extract
    • 1/2 cup fruit preserves (your choice)
    • 1 egg (for egg wash)
    • 1 tablespoon milk (for egg wash)

    Instructions

    1. Pre-heat your oven to 400 degrees Fahrenheit.
    2. In a large mixing bowl, combine the all-purpose flour, sugar, baking powder, baking soda, and salt.
    3. Cut the chilled butter into the dry ingredients using a fork or hand-held pastry blender until the mixture resembles coarse crumbs.
    4. Add the vanilla extract, eggs, and milk to the mixture. Stir just until combined, being careful not to over-mix.
    5. Turn the dough onto a lightly floured surface. Shape it into a round disc approximately 8 inches in diameter, ensuring it is slightly thicker in the center.
    6. With a sharp knife, cut the disc into eight even pie-shaped wedges.
    7. Place the wedges onto a lightly greased baking sheet.
    8. Using a spoon, press a small well into the wide end of each scone and fill with a spoonful of fruit preserves.
    9. In a small bowl, whisk together the extra egg and tablespoon of milk. Brush this mixture over the exposed surfaces of each scone.
    10. Bake for 25 minutes, or until the scones are golden brown and cooked through.

    Tips

    When making scones, it’s crucial to keep your ingredients cold, particularly the butter. This helps create the flaky texture we all love. Also, resist the urge to over-mix the dough; mixing too much can make the scones tough.

    Variations & Substitutions

    Feel free to experiment with different types of fruit preserves. Strawberry, raspberry, and apricot are all excellent choices. If you’re looking for a healthier option, you could substitute whole wheat flour for half of the all-purpose flour. For a dairy-free version, use a vegan butter substitute and almond milk.

    Storage

    Scones are best enjoyed fresh but can be stored in an airtight container at room temperature for up to two days. For longer storage, you can freeze them for up to three months. To reheat, simply pop them in the oven at 350 degrees Fahrenheit for about 10 minutes.

    FAQ

    Can I use frozen fruit instead of preserves?

    While frozen fruit can be a tempting alternative, it may release too much liquid during baking, making the scones soggy. It’s best to stick with fruit preserves for this recipe.

    Why are my scones not rising?

    If your scones aren’t rising, it could be due to expired baking powder or soda. Make sure these leavening agents are fresh for the best results.

    Nutrition

    Each scone contains approximately 250 calories, 12 grams of fat, 30 grams of carbohydrates, and 5 grams of protein. These values may vary depending on the type of fruit preserves used.

    Final Thoughts

    Baking these Rich Jelly Scones is more than just creating a delicious treat; it’s about embracing a tradition and making your own memories. I hope this recipe brings as much joy to your home as it has to mine. So, preheat your oven, gather your ingredients, and enjoy the delightful experience of making and sharing these scones with your loved ones.

    Related update: Rich Jelly Scones

  • Vegetable Cheddar Quiche | Made by Meaghan Moineau

    Vegetable Cheddar Quiche | Made by Meaghan Moineau

    Vegetable Cheddar Quiche: A Comforting Classic

    There’s something magical about the aroma of a freshly baked quiche wafting through the house. Growing up, my grandmother’s kitchen was always filled with the comforting scent of baking, and her vegetable cheddar quiche was a family favorite. I remember sitting at her kitchen table, eagerly waiting for the quiche to cool just enough to savor that first warm, cheesy bite. Today, I’m sharing her recipe with you, hoping it brings the same warmth and joy to your home.

    Why You’ll Love It

    This vegetable cheddar quiche is perfect for any meal of the day. Whether you’re enjoying it as a savory breakfast, a light lunch, or a satisfying dinner, it’s a versatile dish that’s packed with flavor and nutrition. Here’s why you’ll fall in love with this recipe:

    • Simple Ingredients: Made with everyday ingredients you likely have on hand.
    • Customizable: Easily adapt the recipe to suit your taste preferences or dietary needs.
    • Deliciously Comforting: Rich, cheesy, and full of hearty vegetables.
    • Perfect for Leftovers: Enjoy warm or cold, making it ideal for meal prep.

    Ingredients

    • 1 refrigerated pie crust
    • 1 tablespoon olive oil
    • 1 cup broccoli florets, chopped
    • 1 cup fresh mushrooms, sliced
    • 1 cup fresh spinach, chopped
    • 1 medium onion, diced
    • 2 cloves garlic, minced
    • 1/2 teaspoon salt
    • 1/4 teaspoon pepper
    • 1/4 teaspoon cayenne pepper
    • 3 large eggs
    • 1/2 cup mayonnaise
    • 1/2 cup milk
    • 1 cup shredded sharp cheddar cheese
    • 3 tablespoons grated parmesan cheese
    • Fresh cilantro for garnish

    Instructions

    1. Preheat your oven to 375°F (190°C).
    2. Unroll the refrigerated pie crust and place it into a pie plate. Crimp the edges and set aside.
    3. In a frying pan, heat olive oil over medium heat. Add broccoli, mushrooms, spinach, onion, and garlic. Cook for about 5 minutes until the vegetables are tender, stirring occasionally. Season with salt, pepper, and cayenne pepper while cooking.
    4. Once vegetables are tender, remove the pan from the heat and set aside to cool.
    5. In a large bowl, beat the eggs, mayonnaise, and milk with a whisk until smooth and well-blended.
    6. Add the cooled vegetable mixture to the egg mixture, stirring until combined. Mix in the shredded cheddar cheese.
    7. Pour the mixture into the prepared pie crust. Sprinkle the top with the grated parmesan cheese.
    8. Bake in the preheated oven for 40-45 minutes, or until the center of the quiche is set and the top is golden brown.
    9. Let the quiche stand for 10 minutes before slicing. Garnish with fresh cilantro before serving.

    Tips

    • For a crispier crust, pre-bake the pie crust for 5-7 minutes before adding the filling.
    • Ensure your vegetables are well-drained to prevent the quiche from becoming soggy.
    • Use a sharp cheddar for a more pronounced cheesy flavor.

    Variations & Substitutions

    This quiche is wonderfully adaptable. Here are some ideas to make it your own:

    • Cheese: Try swapping cheddar for Swiss or Gruyère for a different flavor profile.
    • Vegetables: Substitute or add vegetables like bell peppers, zucchini, or asparagus.
    • Spices: Add herbs like thyme, basil, or chives for extra aromatic notes.
    • Crust: Make it crustless for a low-carb option by skipping the pie crust and pouring the egg mixture directly into a greased pie plate.

    Storage

    Once cooled, store any leftover quiche in an airtight container in the refrigerator for up to 3 days. Reheat slices in the oven at 350°F (175°C) for about 10 minutes or enjoy cold straight from the fridge.

    FAQ

    Can I freeze this quiche?

    Yes, you can freeze the baked quiche. Allow it to cool completely, then wrap it tightly in plastic wrap and aluminum foil before placing it in the freezer. It can be stored for up to 2 months. Thaw overnight in the refrigerator before reheating in the oven.

    Can I make this quiche without mayonnaise?

    Absolutely! If you prefer not to use mayonnaise, substitute with an equal amount of sour cream or Greek yogurt for a similar creamy texture.

    How can I make this quiche dairy-free?

    For a dairy-free version, use a dairy-free milk alternative such as almond milk and a plant-based cheese substitute. Ensure your pie crust is also dairy-free if you’re not making it from scratch.

    Nutrition

    This quiche is not only delicious but also a nutritious choice. Packed with vegetables, it provides a good source of vitamins and minerals. The eggs and cheese offer a boost of protein, making it a satisfying meal option.

    Final Thoughts

    This vegetable cheddar quiche is more than just a meal; it’s a slice of nostalgia and comfort. Whether you’re sharing it with family or savoring it solo, each bite is a reminder of simpler times and the joy of homemade cooking. I hope this recipe becomes a beloved part of your family’s culinary tradition, just as it is in mine. Enjoy your quiche-making journey!

    Related update: Vegetable Cheddar Quiche

    Related update: Rich Jelly Scones

    Related update: Beef Cottage Pie

  • Pennsylvania Dutch Pickled Eggs | Made by Meaghan Moineau

    Pennsylvania Dutch Pickled Eggs | Made by Meaghan Moineau

    Pennsylvania Dutch Pickled Eggs

    Why You’ll Love It

    Pickled eggs are a delightful and tangy treat that will transport you to the heart of Pennsylvania Dutch country. Not only are they visually striking with their vibrant pink hue, but they also pack a punch of flavor that is both sweet and tangy. These pickled eggs are a testament to the simplicity and resourcefulness of traditional cooking, using basic pantry staples to create something truly special. Whether you’re a fan of traditional pickling or looking to try something new, these eggs are sure to become a favorite in your household.

    I remember the first time I encountered pickled eggs at a small family gathering in rural Pennsylvania. My great-aunt Martha would bring a large jar of these beautifully colored eggs, and they were always the first to disappear from the table. To this day, the taste of these pickled eggs brings back cherished memories of family, laughter, and the warm kitchen where we gathered to share stories and food.

    Ingredients

    • 1 can of beets, drained (reserve the liquid)
    • 1 cup cider vinegar
    • 12 hard-boiled eggs, peeled
    • 1/2 cup granulated sugar
    • 1 onion, thinly sliced
    • 1 teaspoon table salt

    Instructions

    1. Drain the liquid from the beets into a medium saucepan. Set the beets aside for later use.
    2. In a large bowl or jar, layer the beets, sliced onions, and hard-boiled eggs.
    3. Add the granulated sugar and cider vinegar to the saucepan with the beet liquid and stir well.
    4. Bring the mixture to a boil over medium heat, stirring occasionally to ensure the sugar dissolves completely.
    5. Once boiling, reduce the heat to low and let the mixture simmer for 15 minutes.
    6. Carefully pour the hot beet juice mixture over the beets, eggs, and onions in the bowl or jar.
    7. Seal the bowl or jar tightly with a lid.
    8. Refrigerate the pickled eggs for at least one day before serving. The longer the eggs sit, the more flavorful they will become.

    Tips

    For the best results, ensure that the eggs are completely submerged in the pickling liquid. If necessary, you can weigh them down with a small plate or a clean object that fits inside the jar. Allowing the eggs to sit for at least three days will enhance the flavor and color even more. Always use freshly boiled eggs for easier peeling, and make sure they are completely cooled before pickling.

    Variations & Substitutions

    The beauty of this recipe lies in its versatility. Here are some variations and substitutions you can try to suit your taste preferences:

    • Spice it up: Add whole cloves, peppercorns, or a cinnamon stick to the pickling liquid for a spicier kick.
    • Sweeter touch: Increase the granulated sugar by a few tablespoons if you prefer a sweeter pickled egg.
    • Alternative vinegar: White vinegar or red wine vinegar can be used in place of cider vinegar for a slightly different flavor profile.
    • Vegetarian option: Omit the eggs and use only beets and onions for a vibrant pickled veggie side dish.

    Storage

    Store the pickled eggs in the refrigerator in a sealed jar or airtight container. They will keep for up to two weeks, but are best enjoyed within the first week for optimal flavor and texture. Always ensure the eggs are covered completely by the pickling liquid to prevent spoilage.

    FAQ

    Can I use fresh beets instead of canned?

    Yes, you can use fresh beets. Simply boil them until tender, peel, and slice. Use the cooking water as part of your beet liquid for the pickling process.

    Why did my eggs turn rubbery?

    If your eggs turned rubbery, they may have been overcooked during the boiling process. Ensure that you cook the eggs just until the yolks are set and immediately cool them in ice water to stop the cooking process.

    Can I reuse the pickling liquid?

    Reusing pickling liquid is not recommended as it loses potency and may harbor bacteria after the initial use. It’s best to make a fresh batch for each new set of pickled eggs.

    Nutrition

    Each pickled egg contains approximately:

    • Calories: 80
    • Protein: 6g
    • Fat: 5g
    • Carbohydrates: 5g
    • Sugar: 4g
    • Sodium: 200mg

    Final Thoughts

    Pennsylvania Dutch Pickled Eggs are a delightful way to bring a touch of tradition into your kitchen. Their vibrant color and unique flavor make them a standout addition to any meal, whether it’s a picnic, a holiday gathering, or simply a snack on a lazy afternoon. As you savor each bite, may it bring you comfort and nostalgia, just as it has for generations of families before. Enjoy the taste of history and the love that goes into every jar of these pickled treasures.

    Related update: Pennsylvania Dutch Pickled Eggs

    Related update: Oven-Baked Feta Cheese Dip