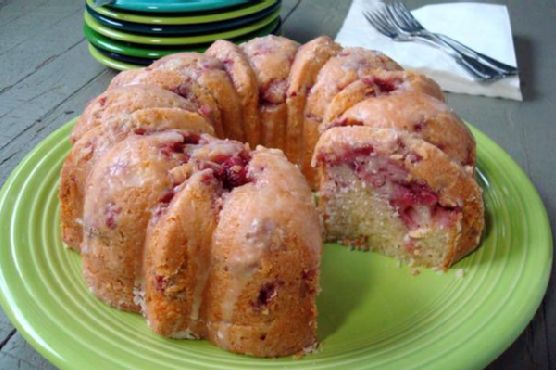
Tag: Comfort Food

  • Rich Jelly Scones | Made by Meaghan Moineau

    Rich Jelly Scones | Made by Meaghan Moineau

    Rich Jelly Scones

    There’s something incredibly comforting about the aroma of freshly baked scones wafting through the kitchen. I remember when I was a child, visiting my grandmother’s house every Sunday morning. The highlight of those visits was her famous scones, baked to perfection and topped with a generous dollop of homemade berry preserves. These Rich Jelly Scones are my tribute to those cherished memories, and I’m thrilled to share this recipe with you.

    Why You’ll Love It

    These scones are not just a delight to the senses; they are also incredibly easy to make. The texture is light and fluffy with a slightly crisp exterior, and the sweet surprise of fruit preserves in the center makes each bite pure bliss. Whether you’re a seasoned baker or a beginner, this recipe is foolproof and sure to impress.

    Ingredients

    • 2 cups all-purpose flour
    • 1/3 cup white granulated sugar
    • 1 tablespoon baking powder
    • 1/4 teaspoon baking soda
    • 1/2 teaspoon salt
    • 1/2 cup unsalted butter, chilled and diced
    • 2 eggs
    • 1/2 cup milk
    • 1 teaspoon vanilla extract
    • 1/2 cup fruit preserves (your choice)
    • 1 egg (for egg wash)
    • 1 tablespoon milk (for egg wash)

    Instructions

    1. Pre-heat your oven to 400 degrees Fahrenheit.
    2. In a large mixing bowl, combine the all-purpose flour, sugar, baking powder, baking soda, and salt.
    3. Cut the chilled butter into the dry ingredients using a fork or hand-held pastry blender until the mixture resembles coarse crumbs.
    4. Add the vanilla extract, eggs, and milk to the mixture. Stir just until combined, being careful not to over-mix.
    5. Turn the dough onto a lightly floured surface. Shape it into a round disc approximately 8 inches in diameter, ensuring it is slightly thicker in the center.
    6. With a sharp knife, cut the disc into eight even pie-shaped wedges.
    7. Place the wedges onto a lightly greased baking sheet.
    8. Using a spoon, press a small well into the wide end of each scone and fill with a spoonful of fruit preserves.
    9. In a small bowl, whisk together the extra egg and tablespoon of milk. Brush this mixture over the exposed surfaces of each scone.
    10. Bake for 25 minutes, or until the scones are golden brown and cooked through.

    Tips

    When making scones, it’s crucial to keep your ingredients cold, particularly the butter. This helps create the flaky texture we all love. Also, resist the urge to over-mix the dough; mixing too much can make the scones tough.

    Variations & Substitutions

    Feel free to experiment with different types of fruit preserves. Strawberry, raspberry, and apricot are all excellent choices. If you’re looking for a healthier option, you could substitute whole wheat flour for half of the all-purpose flour. For a dairy-free version, use a vegan butter substitute and almond milk.

    Storage

    Scones are best enjoyed fresh but can be stored in an airtight container at room temperature for up to two days. For longer storage, you can freeze them for up to three months. To reheat, simply pop them in the oven at 350 degrees Fahrenheit for about 10 minutes.

    FAQ

    Can I use frozen fruit instead of preserves?

    While frozen fruit can be a tempting alternative, it may release too much liquid during baking, making the scones soggy. It’s best to stick with fruit preserves for this recipe.

    Why are my scones not rising?

    If your scones aren’t rising, it could be due to expired baking powder or soda. Make sure these leavening agents are fresh for the best results.

    Nutrition

    Each scone contains approximately 250 calories, 12 grams of fat, 30 grams of carbohydrates, and 5 grams of protein. These values may vary depending on the type of fruit preserves used.

    Final Thoughts

    Baking these Rich Jelly Scones is more than just creating a delicious treat; it’s about embracing a tradition and making your own memories. I hope this recipe brings as much joy to your home as it has to mine. So, preheat your oven, gather your ingredients, and enjoy the delightful experience of making and sharing these scones with your loved ones.

    Related update: Rich Jelly Scones

  • Pecan Pumpkin Pie Dessert Pizza with Maple Whipped Cream | Made by Meaghan Moineau

    Pecan Pumpkin Pie Dessert Pizza with Maple Whipped Cream | Made by Meaghan Moineau

    Pecan Pumpkin Pie Dessert Pizza with Maple Whipped Cream

    As the crisp autumn air fills our days and the leaves turn vibrant shades of red and gold, there’s nothing more comforting than the warm embrace of a cozy kitchen. This Pecan Pumpkin Pie Dessert Pizza is a delightful twist on traditional fall desserts, and it brings me back to my childhood. I remember gathering around the family table, where the aroma of freshly baked pumpkin pies would fill the air. This recipe is inspired by those cherished memories, with a unique spin that’s sure to become a family favorite.

    Why You’ll Love It

    This Pecan Pumpkin Pie Dessert Pizza combines the best of both worlds: the beloved flavors of pumpkin pie and the fun of a pizza. It’s an easy-to-make treat that’s perfect for gatherings or a cozy night in. The crunchy pecans and rich pumpkin pie filling create a delicious contrast of textures, while the maple whipped cream adds an extra layer of indulgence. Plus, it’s a great way to use up leftover pumpkin pie filling, making it both economical and scrumptious.

    Ingredients

    • 2 tablespoons brown sugar, divided
    • 1/4 cup butter, divided
    • 1/2 cup heavy cream
    • 2 tablespoons maple syrup
    • 1/2 cup pecans
    • 1 Mama Mary’s Original Pizza Crust
    • 1 cup canned pumpkin pie filling/mix
    • 1 teaspoon pumpkin pie spice

    Instructions

    1. Preheat your oven to 425 degrees Fahrenheit.
    2. Melt 1/2 of the butter and 1 tablespoon of brown sugar in a small skillet.
    3. Brush the butter mixture onto one side of the pizza crust.
    4. Place the crust on a baking sheet and bake for 3 minutes.
    5. Meanwhile, add the remaining butter and 1 tablespoon of brown sugar to the skillet.
    6. Once melted, add the pecans and stir. Cook for 2-3 minutes over medium heat until the pecans are toasted and coated in sugar. Remove from heat.
    7. Take the crust out of the oven and spread the pumpkin pie filling evenly on top.
    8. Sprinkle with pumpkin pie spice.
    9. Remove pecans from the butter mixture and sprinkle them evenly over the pizza.
    10. Bake for an additional 7 minutes.
    11. For the Maple Whipped Cream: Using a cold bowl and beaters (chill them in the freezer for about 30 minutes before using), beat the heavy cream and maple syrup on high until stiff peaks form.
    12. Remove the pizza from the oven. Cut into 4 pieces. Top with a dollop or two of whipped cream and serve!

    Tips

    For the best results, ensure that your heavy cream is very cold before whipping it. This helps it to whip up faster and maintain its texture. You can also toast the pecans ahead of time to save some minutes if you’re making this for a gathering. Finally, always taste your pumpkin pie filling before spreading it on the crust; if you prefer a sweeter filling, consider adding a touch more brown sugar.

    Variations & Substitutions

    If you’re looking to mix things up, consider adding a sprinkle of chocolate chips or a drizzle of caramel sauce on top of the pizza before baking. You can also swap out the pecans for walnuts or almonds if you prefer. For a healthier twist, use whole wheat pizza crust instead of the traditional one.

    Storage

    While this dessert pizza is best served fresh, you can store any leftovers in an airtight container in the refrigerator for up to 2 days. To reheat, simply place the pizza in a preheated oven at 350 degrees Fahrenheit for a few minutes until warmed through. The whipped cream is best made fresh, but it can be stored separately in the fridge for up to a day.

    FAQ

    Can I make this dessert pizza ahead of time?

    Yes, you can prepare the components separately. Bake the pizza crust and prepare the pecans ahead of time. When ready to serve, spread the pumpkin pie filling and bake for the final 7 minutes. Whip the cream just before serving.

    What if I don’t have maple syrup?

    If you’re out of maple syrup, you can substitute honey or agave syrup in the whipped cream. It will slightly alter the flavor but still be delicious.

    Nutrition

    This is a decadent dessert, so it’s best enjoyed in moderation. Each serving of Pecan Pumpkin Pie Dessert Pizza provides a delightful mix of creamy and crunchy textures, with the indulgent flavors of butter, cream, and maple syrup. Remember, sharing is caring!

    Final thoughts

    Our Pecan Pumpkin Pie Dessert Pizza with Maple Whipped Cream is a delightful treat that encapsulates the essence of fall. It’s a nostalgic nod to traditional flavors with a modern twist that’s sure to enchant your taste buds. Whether you’re serving it at a holiday gathering or enjoying it on a quiet evening, this dessert is bound to bring warmth and joy to your table. We hope it becomes a beloved recipe in your home as it has in ours. Enjoy!

    Related update: Pecan Pumpkin Pie Dessert Pizza with Maple Whipped Cream

    Related update: Brownie Cupcakes

  • Vegetable Cheddar Quiche | Made by Meaghan Moineau

    Vegetable Cheddar Quiche | Made by Meaghan Moineau

    Vegetable Cheddar Quiche: A Comforting Classic

    There’s something magical about the aroma of a freshly baked quiche wafting through the house. Growing up, my grandmother’s kitchen was always filled with the comforting scent of baking, and her vegetable cheddar quiche was a family favorite. I remember sitting at her kitchen table, eagerly waiting for the quiche to cool just enough to savor that first warm, cheesy bite. Today, I’m sharing her recipe with you, hoping it brings the same warmth and joy to your home.

    Why You’ll Love It

    This vegetable cheddar quiche is perfect for any meal of the day. Whether you’re enjoying it as a savory breakfast, a light lunch, or a satisfying dinner, it’s a versatile dish that’s packed with flavor and nutrition. Here’s why you’ll fall in love with this recipe:

    • Simple Ingredients: Made with everyday ingredients you likely have on hand.
    • Customizable: Easily adapt the recipe to suit your taste preferences or dietary needs.
    • Deliciously Comforting: Rich, cheesy, and full of hearty vegetables.
    • Perfect for Leftovers: Enjoy warm or cold, making it ideal for meal prep.

    Ingredients

    • 1 refrigerated pie crust
    • 1 tablespoon olive oil
    • 1 cup broccoli florets, chopped
    • 1 cup fresh mushrooms, sliced
    • 1 cup fresh spinach, chopped
    • 1 medium onion, diced
    • 2 cloves garlic, minced
    • 1/2 teaspoon salt
    • 1/4 teaspoon pepper
    • 1/4 teaspoon cayenne pepper
    • 3 large eggs
    • 1/2 cup mayonnaise
    • 1/2 cup milk
    • 1 cup shredded sharp cheddar cheese
    • 3 tablespoons grated parmesan cheese
    • Fresh cilantro for garnish

    Instructions

    1. Preheat your oven to 375°F (190°C).
    2. Unroll the refrigerated pie crust and place it into a pie plate. Crimp the edges and set aside.
    3. In a frying pan, heat olive oil over medium heat. Add broccoli, mushrooms, spinach, onion, and garlic. Cook for about 5 minutes until the vegetables are tender, stirring occasionally. Season with salt, pepper, and cayenne pepper while cooking.
    4. Once vegetables are tender, remove the pan from the heat and set aside to cool.
    5. In a large bowl, beat the eggs, mayonnaise, and milk with a whisk until smooth and well-blended.
    6. Add the cooled vegetable mixture to the egg mixture, stirring until combined. Mix in the shredded cheddar cheese.
    7. Pour the mixture into the prepared pie crust. Sprinkle the top with the grated parmesan cheese.
    8. Bake in the preheated oven for 40-45 minutes, or until the center of the quiche is set and the top is golden brown.
    9. Let the quiche stand for 10 minutes before slicing. Garnish with fresh cilantro before serving.

    Tips

    • For a crispier crust, pre-bake the pie crust for 5-7 minutes before adding the filling.
    • Ensure your vegetables are well-drained to prevent the quiche from becoming soggy.
    • Use a sharp cheddar for a more pronounced cheesy flavor.

    Variations & Substitutions

    This quiche is wonderfully adaptable. Here are some ideas to make it your own:

    • Cheese: Try swapping cheddar for Swiss or Gruyère for a different flavor profile.
    • Vegetables: Substitute or add vegetables like bell peppers, zucchini, or asparagus.
    • Spices: Add herbs like thyme, basil, or chives for extra aromatic notes.
    • Crust: Make it crustless for a low-carb option by skipping the pie crust and pouring the egg mixture directly into a greased pie plate.

    Storage

    Once cooled, store any leftover quiche in an airtight container in the refrigerator for up to 3 days. Reheat slices in the oven at 350°F (175°C) for about 10 minutes or enjoy cold straight from the fridge.

    FAQ

    Can I freeze this quiche?

    Yes, you can freeze the baked quiche. Allow it to cool completely, then wrap it tightly in plastic wrap and aluminum foil before placing it in the freezer. It can be stored for up to 2 months. Thaw overnight in the refrigerator before reheating in the oven.

    Can I make this quiche without mayonnaise?

    Absolutely! If you prefer not to use mayonnaise, substitute with an equal amount of sour cream or Greek yogurt for a similar creamy texture.

    How can I make this quiche dairy-free?

    For a dairy-free version, use a dairy-free milk alternative such as almond milk and a plant-based cheese substitute. Ensure your pie crust is also dairy-free if you’re not making it from scratch.

    Nutrition

    This quiche is not only delicious but also a nutritious choice. Packed with vegetables, it provides a good source of vitamins and minerals. The eggs and cheese offer a boost of protein, making it a satisfying meal option.

    Final Thoughts

    This vegetable cheddar quiche is more than just a meal; it’s a slice of nostalgia and comfort. Whether you’re sharing it with family or savoring it solo, each bite is a reminder of simpler times and the joy of homemade cooking. I hope this recipe becomes a beloved part of your family’s culinary tradition, just as it is in mine. Enjoy your quiche-making journey!

    Related update: Vegetable Cheddar Quiche

    Related update: Rich Jelly Scones

    Related update: Beef Cottage Pie

  • Creamsicle Cookies | Made by Meaghan Moineau

    Creamsicle Cookies | Made by Meaghan Moineau

    Creamsicle Cookies: A Delightful Twist on a Classic Treat

    Welcome to a delightful baking adventure with our Creamsicle Cookies! These cookies are the perfect blend of zesty orange and creamy white chocolate, reminiscent of the classic creamsicle ice cream bars. Growing up, my summer afternoons were often spent chasing the ice cream truck down my neighborhood street, eagerly clutching a dollar bill to purchase my favorite treat: a creamsicle. Now, as an adult, I’ve transformed that nostalgic flavor into a cookie that brings the same joy and warmth in every bite.

    Why You’ll Love It

    These Creamsicle Cookies are sure to become a favorite in your household, and here’s why:

    • Unique Flavor Combination: The refreshing taste of orange zest paired with creamy white chocolate chips offers a delightful contrast that’s both sweet and tangy.
    • Soft and Chewy Texture: The cookies bake up soft and chewy, with a slightly crisp edge that provides the ideal cookie bite.
    • Nostalgic Appeal: Perfect for those who loved creamsicles as a child, these cookies bring that cherished flavor into a new format.
    • Simple Ingredients: Made with pantry staples, these cookies are easy to whip up whenever the craving strikes.

    Ingredients

    • 1 3/4 cups all-purpose flour
    • 1/2 teaspoon baking soda
    • 1/2 teaspoon salt
    • 3/4 cup firmly packed brown sugar
    • 1/2 cup unsalted butter, softened
    • 1 large egg
    • 2 teaspoons orange zest
    • 1/4 cup granulated sugar
    • 1 teaspoon vanilla extract
    • 1 cup white chocolate chips

    Instructions

    1. Preheat your oven to 375 degrees Fahrenheit (190 degrees Celsius).
    2. In a small bowl, combine the all-purpose flour, baking soda, and salt; set aside.
    3. In a large bowl, cream together the butter, brown sugar, and granulated sugar until the mixture is light and creamy.
    4. Beat in the egg and vanilla extract until smooth and well combined.
    5. Gradually add the flour mixture to the wet ingredients, mixing until just combined.
    6. Stir in the orange zest and white chocolate chips.
    7. Drop rounded teaspoonfuls of dough onto ungreased cookie sheets. Do not flatten the cookies to preserve their chewy texture.
    8. Bake in the preheated oven for 8-10 minutes, or until the edges are golden brown. Be careful not to overcook; the cookies should remain plump.
    9. Allow the cookies to cool on the cookie sheets for several minutes before transferring them to a wire rack to cool completely.
    10. Store the cooled cookies in an airtight container to maintain freshness.

    Tips

    • For best results, use fresh orange zest. It imparts a more vibrant flavor compared to dried zest.
    • Ensure your butter is at room temperature before you start mixing. This helps in achieving a smooth, creamy texture when creaming with sugars.
    • Chill the dough for about 30 minutes if you find the cookies spreading too much during baking.

    Variations & Substitutions

    • Chocolate Chips: Swap white chocolate chips with dark or milk chocolate chips for a different flavor profile.
    • Nutty Twist: Add chopped nuts like walnuts or pecans for extra crunch.
    • Gluten-Free Option: Substitute the all-purpose flour with a gluten-free baking blend to accommodate dietary preferences.

    Storage

    These cookies can be stored in an airtight container at room temperature for up to a week. If you want to enjoy them later, consider freezing the dough balls. Simply place them on a baking sheet, freeze until solid, then transfer to a zip-top bag. When you’re ready to bake, add a couple of extra minutes to the baking time without thawing.

    FAQ

    Can I use orange extract instead of orange zest?

    Yes, you can use orange extract, but start with a small amount (about 1/2 teaspoon) since extracts are more concentrated. Adjust to taste, keeping in mind that the zest provides a fresher, more natural flavor.

    My cookies turned out flat. What went wrong?

    Flat cookies can result from butter that’s too warm or dough that hasn’t been chilled. Ensure your butter is just softened, not melted, and consider chilling the dough if you’re in a warm environment.

    Can I use salted butter instead of unsalted?

    Yes, you can use salted butter, but reduce the added salt in the recipe to about 1/4 teaspoon to prevent the cookies from being too salty.

    Nutrition

    Each cookie contains approximately 150 calories, 8 grams of fat, 20 grams of carbohydrates, and 2 grams of protein. These values are estimates and can vary based on ingredient brands and portion sizes.

    Final Thoughts

    These Creamsicle Cookies are a perfect way to capture the essence of summer in a delicious baked treat. Whether you’re reminiscing about childhood memories or exploring new flavor combinations, these cookies will surely bring a smile to your face. I hope you enjoy baking and sharing them with your loved ones as much as I do. Happy baking!

    Related update: Creamsicle Cookies

    Related update: Pecan Pumpkin Pie Dessert Pizza with Maple Whipped Cream

  • How Sweet It Is Sweet Potato Lasagne | Made by Meaghan Moineau

    How Sweet It Is Sweet Potato Lasagne | Made by Meaghan Moineau

    How Sweet It Is Sweet Potato Lasagne

    There’s something truly magical about the combination of sweet and savory, and this Sweet Potato Lasagne is a delightful testament to that. This dish takes me back to chilly autumn evenings spent in my grandmother’s kitchen, where the warmth of the oven and the rich aroma of spices filled the air. It’s a comforting, hearty meal that brings people together, just like those cherished family dinners of my childhood.

    Why You’ll Love It

    This Sweet Potato Lasagne is not just another lasagne; it’s a celebration of flavors and textures. The sweetness of the potatoes perfectly balances with the savory notes of the mushrooms and spinach. The hint of curry powder adds a unique twist, making this dish an exciting adventure for your taste buds. It’s a fantastic vegetarian option that’s both satisfying and nutritious, making it a perfect choice for family dinners or potlucks.

    Ingredients

    • Baby portabella mushrooms
    • Dry curry powder
    • Dried basil leaves
    • Eggplants
    • Frozen spinach
    • Heavy cream
    • Monterey Jack & cheddar cheese mix
    • Jalapenos
    • Marinara sauce
    • Salt & pepper
    • Sweet potatoes
    • Vegetable cooking oil

    Instructions

    1. Slice the sweet potatoes into 1/4 inch thick slices. Boil them until semi-cooked, which should take about 10 minutes.
    2. Mix dry curry powder with olive oil (1 cup) and rub this mixture over the sweet potato slices. Set aside and let marinate for at least 10 minutes.
    3. Slice eggplants into 1/4 inch thick slices and rub all over with an olive oil (1 cup), dried basil, salt, and pepper mix. Set aside and let marinate for at least 15 minutes.
    4. In a pan, pour canola or vegetable cooking oil and sauté spinach and mushrooms for about 3-5 minutes. Add jalapenos and salt & pepper to taste.
    5. Reduce the heat and add heavy cream and about half of the Monterey Jack & cheddar cheese mix until the mixture is creamy but not watery.
    6. Start layering the lasagne in the following order: sweet potatoes, spinach/mushroom mix, eggplants, marinara sauce, sweet potatoes, spinach/mushroom mix, eggplants.
    7. Finally, sprinkle the remaining Monterey Jack & cheddar cheese blend on top.
    8. Bake at 350-375°F for about 35-45 minutes, depending on your oven. You’ll know it’s ready when you can easily pass a fork through all the layers.
    9. Devour with passion!

    Tips

    To ensure the sweet potato slices cook evenly, cut them as uniformly as possible. If you prefer a spicier kick, feel free to add more jalapenos or even a sprinkle of red pepper flakes. Allow the lasagne to cool slightly before serving; this will make it easier to cut and serve intact slices.

    Variations & Substitutions

    If you’re a fan of heat, consider adding some crushed red pepper flakes to the marinara sauce. For a vegan version, substitute the heavy cream with coconut cream and use a dairy-free cheese alternative. If eggplants aren’t your favorite, zucchini makes a great substitute in this recipe.

    Storage

    This Sweet Potato Lasagne stores beautifully. Place any leftovers in an airtight container and refrigerate for up to 3 days. You can also freeze portions for up to 2 months. To reheat, simply thaw overnight in the fridge and bake at 350°F until heated through.

    FAQ

    Can I make this lasagne ahead of time?

    Absolutely! You can prepare the lasagne a day in advance. Just assemble it, cover it tightly, and refrigerate. When you’re ready to enjoy, bake it as instructed.

    What can I serve with Sweet Potato Lasagne?

    This dish pairs wonderfully with a fresh green salad or some crusty garlic bread. A glass of red wine would complement the flavors beautifully as well.

    Nutrition

    While the exact nutritional values will depend on the specific brands and quantities of ingredients used, this Sweet Potato Lasagne is a good source of vitamins A and C from the sweet potatoes, iron from the spinach, and calcium from the cheese.

    Final Thoughts

    Whether you’re looking to try something new or searching for a tasty vegetarian dish, this Sweet Potato Lasagne is a must-try. It’s a dish that embodies warmth, love, and nostalgia, much like the family gatherings it reminds me of. I hope it brings as much joy to your table as it does to mine. Happy cooking!

    Related update: How Sweet It Is Sweet Potato Lasagne

  • Classic Greek Moussaka | Made by Meaghan Moineau

    Classic Greek Moussaka

    There’s something inherently comforting about a dish that has been passed down through generations, and Classic Greek Moussaka is no exception. I still remember the first time I tasted my grandmother’s moussaka as a child during a family reunion in her sunlit kitchen overlooking the Aegean Sea. The aroma of cinnamon and nutmeg filled the room, and the flavors were like nothing I had experienced before. Now, every time I prepare this dish, it brings back those cherished memories, and I’m delighted to share this recipe with you.

    Why You’ll Love It

    This Classic Greek Moussaka is a hearty and satisfying meal that combines layers of savory eggplants, rich meat sauce, and creamy béchamel topping. It’s perfect for family gatherings or a special dinner. The combination of flavors and textures will transport you to a sun-drenched Greek island, even if just for a meal. Whether you’re a fan of Greek cuisine or trying it for the first time, this dish is sure to become a beloved favorite.

    Ingredients

    • Eggplants
    • Sea salt
    • Olive oil
    • Onions
    • Lean beef
    • Canned tomatoes
    • Garlic
    • Ground cinnamon
    • Ground allspice
    • White salt and ground pepper
    • Tomato paste
    • Butter
    • Flour
    • Warm milk
    • Ground nutmeg
    • Egg yolks
    • Feta cheese
    • Bread crumbs

    Instructions

    1. Sprinkle the eggplant slices with sea salt and let them stand for 45 minutes to draw out the bitterness. Then rinse thoroughly to remove excess salt.
    2. Thinly brush each slice with olive oil and bake in a preheated grill pan for several minutes on each side. Set aside. Repeat until all slices are grilled.
    3. For the meat sauce, lightly sauté the onions in olive oil until tender. Add the ground beef and sauté, stirring frequently to break up the clumps of meat, until the meat is no longer pink.
    4. Stir in canned tomatoes, garlic, cinnamon, allspice, salt, and pepper and simmer briefly on low heat. Add in tomato paste and a little water if the sauce is too thick. Remove from heat and set aside.
    5. For the béchamel sauce, add flour to the melted butter, stirring constantly. When the mixture is evenly thick, gradually whisk in warm milk. Gently bring to a boil, then remove from heat, season with pepper and nutmeg. Whisk in the egg yolks vigorously. Set aside.
    6. Thinly coat with olive oil a suitable ovenproof baking dish, sprinkle the bottom with homemade bread crumbs. Place a layer of eggplant, cover with some meat sauce and feta cheese, and repeat this until the pan is almost full. Finish with a layer of feta cheese.
    7. Top with béchamel sauce. Cover with tin foil and bake in a preheated oven at 180°C for 1 hour.
    8. Remove moussaka from the oven and let it set at room temperature for 45 minutes before serving.

    Tips

    To achieve the perfect moussaka, make sure to let the eggplant slices sit with salt for the full 45 minutes to remove any bitterness. When preparing the béchamel sauce, stir continuously to avoid lumps and ensure a smooth consistency. Lastly, giving the moussaka time to set before serving helps the layers hold together better when sliced.

    Variations & Substitutions

    If you prefer a vegetarian version, you can replace the ground beef with lentils or a plant-based meat substitute. For a slightly different flavor profile, try using ground lamb instead of beef. You can also experiment with different cheeses, such as Parmesan or Ricotta, to suit your taste preferences.

    Storage

    Leftover moussaka can be stored in an airtight container in the refrigerator for up to three days. For longer storage, freeze individual portions in airtight containers for up to three months. To reheat, thaw overnight in the refrigerator and bake in a preheated oven at 175°C until heated through.

    FAQ

    Can I prepare Moussaka ahead of time?

    Yes, you can assemble the moussaka a day in advance and store it in the refrigerator. When ready to bake, allow it to come to room temperature before placing it in the oven.

    What should I serve with Moussaka?

    Moussaka pairs beautifully with a fresh Greek salad and some crusty bread. A glass of red wine complements the flavors wonderfully.

    Nutrition

    Moussaka is a rich and hearty dish, so it is best enjoyed as an occasional treat. It provides a good source of protein from the beef and egg yolks, as well as essential vitamins and minerals from the eggplants and tomatoes. For a lighter option, consider serving with a side of steamed vegetables.

    Final Thoughts

    Classic Greek Moussaka is more than just a dish; it’s a culinary journey that tells a story with every bite. Whether you’re sharing it with family or savoring it on a quiet evening at home, its warmth and richness are sure to bring comfort and joy. I hope this recipe becomes as beloved in your home as it is in mine. Happy cooking!

    Related update: Classic Greek Moussaka

    Related update: How Sweet It Is Sweet Potato Lasagne

  • Sauteed Chicken With Mushrooms and Cream | Made by Meaghan Moineau

    Sauteed Chicken With Mushrooms and Cream | Made by Meaghan Moineau

    Sauteed Chicken With Mushrooms and Cream

    Welcome to a dish that brings warmth and comfort to your table, Sauteed Chicken With Mushrooms and Cream. This recipe has been a beloved staple in my family for generations, often gracing our tables during special gatherings and Sunday dinners. I fondly remember my grandmother preparing this dish with such love and care, her kitchen filled with the rich aroma of sautéed mushrooms and creamy sauce. Today, I share this cherished recipe with you, hoping it brings as much joy to your family as it has to mine.

    Why You’ll Love It

    This Sauteed Chicken With Mushrooms and Cream is a culinary delight that you’ll find yourself returning to again and again. Here’s why:

    • Rich and Flavorful: The combination of tender chicken, earthy mushrooms, and a creamy wine sauce creates a depth of flavor that’s simply irresistible.
    • Easy to Prepare: Despite its gourmet taste, this dish is straightforward to make, requiring just a few steps to bring it all together.
    • Perfect for Any Occasion: Whether it’s a weeknight dinner or a special occasion, this dish fits the bill, impressing family and friends alike.

    Ingredients

    • Frying chicken parts
    • Mushrooms
    • Butter
    • Olive oil
    • Salt
    • Black fresh ground pepper
    • Dry white wine
    • Heavy cream

    Instructions

    1. Rinse the chicken in cool water, then pat dry with clean paper towels.
    2. Set a heavy-bottomed frying pan over moderately-high heat. Add 2 tablespoons of butter and 1 tablespoon of olive oil to the pan.
    3. When very hot (but not smoking), place the chicken pieces skin-side down and season with salt and pepper.
    4. Saute for 5-6 minutes, basting with the juices and fat, until the underside is browned. Turn pieces over, season again with salt and pepper, and saute the same way for an additional 5-6 minutes, or until juices run clear.
    5. While the chicken is cooking, in a separate pan, saute the mushrooms in 1 tablespoon of butter. Remove to a plate when finished browning.
    6. When chicken is finished cooking, remove to a warm plate.
    7. Rapidly spoon all but a tablespoon of fat out of the pan. Add 1/2 cup of wine to deglaze the pan, scraping the sides and bottom to incorporate all the seasoning into the liquid. Deglaze until the alcohol has burned off.
    8. Add cream and mushrooms to the deglazing sauce and incorporate; boil down rapidly for a minute or two, or until the sauce starts to thicken.
    9. Add the chicken and baste with the sauce and mushrooms. Cover and simmer 2-3 minutes to bring the chicken back up to a hot temperature. Season again if necessary with salt and pepper.

    Tips

    • Use Fresh Ingredients: Fresh mushrooms and quality chicken make a significant difference in flavor.
    • Patience is Key: Allow the sauce to thicken naturally by simmering, enhancing its richness.
    • Season to Taste: Remember to taste the sauce before serving and adjust the seasoning as needed.

    Variations & Substitutions

    This recipe is versatile and can be adapted to suit your preferences:

    • Swap the Mushrooms: Try using a mix of mushrooms like cremini, shiitake, or portobello for added texture and flavor.
    • Wine Alternatives: If you prefer not to use wine, chicken broth makes a good substitute, though you might lose some of the depth that wine provides.
    • Herb Additions: Adding herbs like thyme or rosemary can enhance the dish’s aromatic profile.

    Storage

    Store any leftovers in an airtight container in the refrigerator for up to 3 days. To reheat, gently warm the chicken and sauce in a pan over low heat, adding a splash of cream if the sauce has thickened too much.

    FAQ

    Can I use chicken breasts instead of parts?

    Yes, boneless chicken breasts can be used. Adjust the cooking time accordingly to ensure they don’t dry out. Chicken thighs are also a great option for added juiciness.

    What is the best type of white wine to use?

    A dry white wine, such as Sauvignon Blanc or Chardonnay, works best for deglazing and complements the creamy sauce beautifully.

    Can I make this dish dairy-free?

    For a dairy-free version, substitute the butter with olive oil and use coconut cream in place of heavy cream. Note that the flavor will change slightly, but it will still be delicious.

    Nutrition

    This dish, rich in protein and healthy fats, can be part of a balanced meal. However, due to the cream and butter, it’s higher in calories and fat. Adjust portion sizes or pair with a light side salad to balance your meal.

    Final Thoughts

    Sauteed Chicken With Mushrooms and Cream is more than just a meal; it’s a comforting embrace on a plate, carrying with it the essence of family gatherings and cherished memories. Whether you’re recreating a nostalgic dish or trying it for the first time, I hope this recipe finds a special place in your heart and home. Enjoy every bite!

    Related update: Sauteed Chicken With Mushrooms and Cream

    Related update: Classic Greek Moussaka

  • Yorkshire Pudding | Made by Meaghan Moineau

    Yorkshire Pudding | Made by Meaghan Moineau

    Yorkshire Pudding: A Classic British Delight

    There’s something magical about the aroma of Yorkshire puddings baking in the oven, reminiscent of Sunday family dinners and festive holiday gatherings. I remember as a child, eagerly waiting by the kitchen door, peeking through the oven window to watch these golden puffs rise to perfection. This classic British side dish is the perfect complement to a roast beef dinner, and today, I’m thrilled to share with you my family’s cherished recipe.

    Why You’ll Love It

    Yorkshire pudding is a versatile and delectable addition to any meal. Its crispy exterior and soft, airy interior make it the perfect vehicle for soaking up savory sauces and gravies. Whether you’re serving it alongside a traditional roast beef or experimenting with other dishes, Yorkshire pudding is sure to impress your guests with its delightful texture and rich flavor. Plus, it’s made with just a few simple ingredients you likely have on hand.

    Ingredients

    • 3 large eggs
    • 1 cup all-purpose flour
    • 1 cup milk
    • 2-3 tablespoons pan drippings from roast beef (or vegetable oil)
    • 1/2 teaspoon salt

    Instructions

    1. Preheat your oven to between 400-450°F (200-230°C). The exact temperature can vary depending on your oven, so once you’ve made these a few times, you’ll be able to fine-tune it to your liking.
    2. Sift the flour and salt together into a large mixing bowl.
    3. In a separate bowl, beat the eggs and milk together until well combined.
    4. Gradually add the flour mixture to the wet ingredients, stirring continuously to avoid lumps. The batter should be smooth and slightly runny.
    5. Pour the pan drippings into your Yorkshire pudding tray. A muffin or cupcake tray works well too. Place the tray in the oven to heat the oil until it’s nice and hot.
    6. Once the oil is heated, carefully remove the tray from the oven. Quickly spoon a couple of tablespoons of batter into each section of your tray.
    7. Return the tray to the oven and bake for about 20 minutes or until the puddings are golden brown and puffed up. It’s crucial not to open the oven during this time, as it will cause the puddings to deflate.

    Tips

    For the best Yorkshire puddings, make sure your batter is smooth and your oil is sizzling hot before adding the batter. This will ensure they rise beautifully. Additionally, resist the urge to open the oven door while they’re baking, as the sudden change in temperature can cause them to collapse.

    Variations & Substitutions

    If you don’t have pan drippings, you can substitute with vegetable oil or melted butter. For a fun twist, try adding a pinch of herbs like rosemary or thyme to the batter for an aromatic flair. You can also experiment with different types of flour, such as whole wheat or gluten-free blends, to suit dietary preferences.

    Storage

    Yorkshire puddings are best enjoyed fresh out of the oven, but if you have leftovers, store them in an airtight container in the refrigerator for up to two days. To reheat, place them in a preheated oven at 350°F (175°C) for about 5-8 minutes until warmed through and crispy again.

    FAQ

    Why did my Yorkshire puddings not rise?

    If your Yorkshire puddings didn’t rise, it could be due to a few reasons. Ensure your oven is preheated to the correct temperature, and your oil is hot before adding the batter. Also, avoid opening the oven door during baking, as this can cause them to deflate.

    Can I make Yorkshire pudding without eggs?

    Eggs are crucial for the structure and texture of Yorkshire puddings, but you can try using an egg substitute if you have dietary restrictions. Keep in mind that the texture may vary slightly.

    Nutrition

    Yorkshire puddings are relatively low in calories, with each pudding containing around 80-100 calories. They provide a modest amount of protein from the eggs and are a good source of carbohydrates. However, their nutritional content can vary based on the type of oil or drippings used.

    Final Thoughts

    Yorkshire pudding is a beloved classic that brings warmth and comfort to any meal. With its simple ingredients and easy preparation, it’s a dish that allows you to focus on spending time with loved ones rather than fussing in the kitchen. Whether you’re new to making Yorkshire pudding or a seasoned pro, I hope this recipe finds a special place at your table, evoking cherished memories and creating new ones. Happy cooking!

    Related update: Yorkshire Pudding

  • Make Olive Garden’s Delicious Pasta Fagioli At Home | Made by Meaghan Moineau

    Make Olive Garden’s Delicious Pasta Fagioli At Home | Made by Meaghan Moineau

    Make Olive Garden’s Delicious Pasta Fagioli At Home

    There’s something incredibly comforting about a steaming bowl of soup, especially when it’s inspired by a beloved restaurant favorite. Olive Garden’s Pasta Fagioli has always been a dish that evokes warmth and a sense of home. I remember the first time I tasted it; I was dining out with my family, and the rich, hearty flavors made me feel like I was wrapped in a cozy blanket. It’s been a staple in my kitchen ever since, and today, I’m excited to share how you can recreate this delicious soup at home.

    Why You’ll Love It

    This homemade version of Olive Garden’s Pasta Fagioli is not only delicious and hearty but also incredibly easy to make. It brings together healthy ingredients in a way that feels indulgent without being heavy. Here’s why you’ll fall in love with making this soup at home:

    • Hearty and Filling: Packed with protein-rich beans and lean ground turkey, this soup is a meal in itself.
    • Nutritious: Loaded with vegetables like carrots, celery, and zucchini, it’s a great way to get your daily dose of veggies.
    • Easy to Prepare: With simple steps and common ingredients, it’s a dish that fits into any busy schedule.
    • Family Favorite: It’s a crowd-pleaser that’s perfect for family dinners or gatherings with friends.
    • Customizable: Easily tweak the recipe to suit your dietary preferences or what you have on hand.

    Ingredients

    • 1 pound lean ground turkey
    • 2 tablespoons olive oil
    • 1 cup chopped onions
    • 1 cup chopped carrots
    • 1 cup chopped celery stalks
    • 3 garlic cloves, minced
    • 2 cans (14.5 oz each) diced tomatoes, undrained
    • 1 can (15 oz) red kidney beans, drained and rinsed
    • 1 can (15 oz) white kidney beans, drained and rinsed
    • 1 can (15 oz) great northern beans, drained and rinsed
    • 4 cups canned beef broth
    • 1 jar (24 oz) pasta sauce
    • 1 medium zucchini, chopped
    • 2 teaspoons Italian seasoning blend
    • Fresh ground pepper to taste
    • 1 cup whole wheat penne pasta
    • Grated Parmesan cheese (optional, for serving)

    Instructions

    1. In a large soup pot, brown the ground turkey over medium heat. Once cooked, drain the turkey in a colander and set aside.
    2. In the same pot, heat the olive oil over medium heat. Add the onions, carrots, celery, and garlic, and cook for about 2 minutes, stirring often to prevent sticking.
    3. Return the drained turkey to the pot. Add the canned tomatoes, red kidney beans, white kidney beans, great northern beans, beef broth, pasta sauce, chopped zucchini, Italian seasoning, and fresh ground pepper. Stir well to combine.
    4. Bring the soup to a boil. Then, reduce the heat to a simmer, cover the pot, and let it cook for 50 minutes, allowing the flavors to meld together.
    5. Add the whole wheat penne pasta to the soup. Cover the pot again and cook for about 10 minutes or until the pasta is tender.
    6. Ladle the soup into bowls and top with grated Parmesan cheese if desired. Serve hot and enjoy!

    Tips

    • For a richer flavor, consider browning the turkey with a little garlic and onion powder.
    • Ensure you stir the soup occasionally as it simmers to prevent the ingredients from sticking to the bottom of the pot.
    • If you prefer a thicker soup, reduce the amount of broth or simmer uncovered for the last 10 minutes of cooking.

    Variations & Substitutions

    • Meat Substitutes: Replace ground turkey with ground beef, chicken, or even a plant-based meat alternative for a vegetarian version.
    • Bean Choices: If you don’t have the specified beans, feel free to use any combination of beans you have on hand.
    • Gluten-Free Option: Use gluten-free pasta to make this dish suitable for those with gluten sensitivities.
    • Spice it Up: Add a pinch of red pepper flakes for some heat, or use spicy Italian sausage instead of turkey.

    Storage

    This Pasta Fagioli soup stores well, making it perfect for meal prep. Here’s how to store it:

    • Refrigerator: Store leftovers in an airtight container in the refrigerator for up to 4 days. Reheat on the stove or in the microwave.
    • Freezer: This soup freezes beautifully. Allow it to cool completely, then transfer to freezer-safe containers. It will keep for up to 3 months. Thaw overnight in the refrigerator before reheating.

    FAQ

    Can I use fresh tomatoes instead of canned?

    Yes, you can use fresh tomatoes if desired. Use about 4 cups of chopped fresh tomatoes. You may need to add an extra cup of broth to maintain the soup’s consistency.

    Is it necessary to use beef broth?

    While beef broth adds depth to the soup, you can substitute chicken broth or vegetable broth if preferred. Each will slightly alter the flavor profile, but the soup will still be delicious.

    How can I make this soup vegetarian?

    To make a vegetarian version, simply omit the ground turkey and use vegetable broth instead of beef broth. You can also add extra beans or vegetables for additional texture and flavor.

    Nutrition

    This soup is a hearty meal that provides an excellent balance of protein, fiber, and essential nutrients. Here’s a rough estimate of the nutritional information per serving (without Parmesan cheese):

    • Calories: 250
    • Protein: 18g
    • Carbohydrates: 35g
    • Fat: 6g
    • Fiber: 8g
    • Sodium: 600mg

    Final Thoughts

    Making Olive Garden’s Pasta Fagioli at home is not just about recreating a favorite restaurant dish; it’s about bringing a bit of comfort and warmth to your table. This recipe is straightforward, adaptable, and sure to become a staple in your meal rotation. Whether you’re enjoying it on a chilly evening or sharing it with family and friends, it’s a dish that brings people together. I hope you enjoy making and eating it as much as I do!

    Related update: Make Olive Garden’s Delicious Pasta Fagioli At Home

    Related update: Curried Chicken Roll-Ups

    Related update: Truffle-Infused Mushroom Soup with Parmesan Crisps & Tarragon Creme Fraiche

  • Jambalaya Stew | Made by Meaghan Moineau

    Jambalaya Stew | Made by Meaghan Moineau

    Jambalaya Stew: A Cozy, Flavor-Packed Delight

    There’s something about a hearty stew that feels like a warm hug on a chilly day. Jambalaya Stew, with its rich flavors and comforting ingredients, is one of those dishes that transports you straight to the vibrant heart of Louisiana. I remember my first taste of Jambalaya during a family trip to New Orleans. The bustling streets, soulful music, and the aroma of spices in the air made it an unforgettable experience. This recipe is my homage to that memory, bringing a taste of the bayou to your kitchen.

    Why You’ll Love It

    Jambalaya Stew is not just a meal; it’s an experience. Here’s why you’ll fall in love with this dish:

    • Flavor Explosion: The blend of Italian sweet chicken sausage, shrimp, and Cajun spices creates a symphony of flavors that dance on your taste buds.
    • Wholesome Ingredients: Packed with vegetables, lean meats, and whole grains, this stew is as nutritious as it is delicious.
    • Simple and Satisfying: With an easy one-pot preparation, you’ll spend less time cooking and more time savoring the rich, hearty goodness.
    • Versatile Comfort: Perfect for a family dinner, a cozy night in, or entertaining guests with a dish that captures the essence of Southern hospitality.

    Ingredients

    • 2 cooked Italian sweet chicken sausage links, sliced
    • 1 can (14.5 oz) diced tomatoes
    • 1 medium onion, chopped
    • 1 yellow bell pepper, diced
    • 1 green bell pepper, diced
    • 2 stalks celery, chopped
    • 4 cups low sodium chicken broth
    • 1 cup brown rice
    • 3 cloves garlic, minced
    • 2 tablespoons Cajun seasoning
    • 1 tablespoon hot sauce (plus more to taste)
    • 1 teaspoon dried oregano
    • 1 teaspoon dried thyme
    • 1 pound raw shrimp, peeled and deveined

    Instructions

    1. Add all ingredients except the shrimp to a large pot on the stove. Mix thoroughly to combine.
    2. Bring the mixture to a boil over medium-high heat.
    3. Once boiling, reduce the heat to medium-low. Cover the pot and let it simmer until the vegetables are tender and the rice is fluffy, about 35 minutes.
    4. Add the shrimp and re-cover the pot. Continue to cook until the shrimp are tender and cooked through, about 6 minutes.
    5. If desired, season the stew to taste with salt, black pepper, and additional hot sauce.
    6. Serve hot and enjoy the comforting flavors of this Southern classic!

    Tips

    • Prep Ahead: Chop the vegetables and sausage the night before to save time during the cooking process.
    • Flavor Boost: For an extra kick, add a splash of Worcestershire sauce or a squeeze of fresh lemon juice before serving.
    • Adjust the Heat: Control the spiciness by adjusting the amount of Cajun seasoning and hot sauce to suit your taste.

    Variations & Substitutions

    This Jambalaya Stew is wonderfully versatile. Here are some ideas to make it your own:

    • Protein Swap: Substitute chicken or andouille sausage for the Italian sweet chicken sausage for a more traditional flavor.
    • Vegetarian Version: Omit the sausage and shrimp, and add more vegetables like zucchini or mushrooms for a vegetarian-friendly dish.
    • Rice Alternatives: Use white rice, quinoa, or even cauliflower rice for different textures and nutritional profiles.

    Storage

    Store any leftover Jambalaya Stew in an airtight container in the refrigerator for up to 3 days. Reheat gently on the stove or in the microwave, adding a splash of broth or water if needed to maintain the desired consistency.

    FAQ

    Can I make this stew in advance?

    Absolutely! Jambalaya Stew is an excellent make-ahead meal. The flavors meld beautifully when allowed to rest, making it even more delicious the next day.

    Can I freeze Jambalaya Stew?

    Yes, you can freeze the stew for up to 3 months. Allow it to cool completely before transferring it to freezer-safe containers. Thaw in the refrigerator overnight before reheating.

    What can I serve with Jambalaya Stew?

    This stew is a hearty meal on its own, but you can serve it with crusty bread, cornbread, or a simple side salad for a complete feast.

    Nutrition

    While exact nutrition can vary based on specific ingredients and serving sizes, this Jambalaya Stew is a balanced meal, rich in protein from the sausage and shrimp, fiber from the vegetables and brown rice, and packed with essential vitamins and minerals. It’s a wholesome choice for a satisfying dinner.

    Final Thoughts

    Jambalaya Stew is a dish that brings people together, much like the vibrant culture from which it originates. It’s a celebration of flavors and a reminder of the warmth and joy that comes from sharing a meal with loved ones. Whether you’re a seasoned cook or a kitchen novice, this recipe is approachable and rewarding, ensuring a delightful dining experience every time. So gather your ingredients, let the spices fill your kitchen, and enjoy the cozy embrace of Jambalaya Stew.

    Related update: Jambalaya Stew