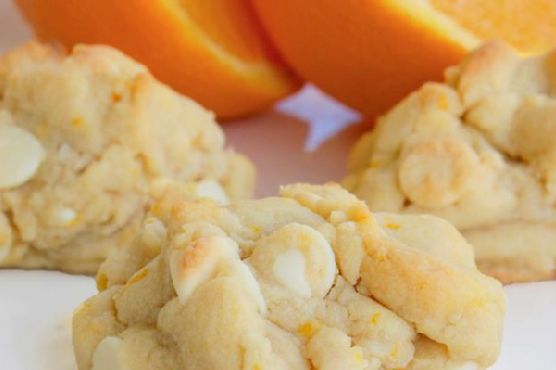
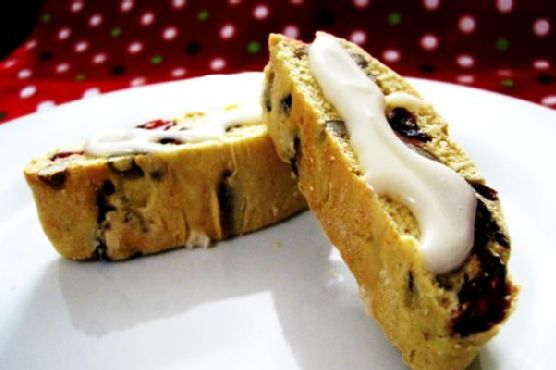
Category: dessert

  • Meyer Lemon Cheesecake | Made by Meaghan Moineau

    Meyer Lemon Cheesecake | Made by Meaghan Moineau

    Meyer Lemon Cheesecake: A Zesty Delight

    There’s something magical about a cheesecake that perfectly balances creamy richness and zesty freshness. Meyer Lemon Cheesecake does just that, offering a delightful dance of flavors that transport you to sunlit lemon orchards with every bite. This recipe holds a special place in my heart, reminding me of summer afternoons spent at my grandmother’s house, where we’d bake together, the scent of lemon filling the air.

    Why You’ll Love It

    Meyer Lemon Cheesecake is not only a feast for the taste buds but also a joy to create. Whether you’re a seasoned baker or a novice in the kitchen, this recipe is approachable and rewarding. The gingersnap crust adds a spicy twist that complements the tangy lemon filling beautifully. It’s a perfect dessert for special occasions or whenever you need a little sunshine in your life.

    Ingredients

    • 2 cups gingersnaps, crushed
    • 1/2 cup unsalted butter, melted
    • 24 oz cream cheese, softened
    • 1 cup sugar
    • 1/4 teaspoon salt
    • 3 large eggs
    • 1 cup sour cream
    • 1/2 cup Meyer lemon juice (about 4-5 lemons)
    • 2 tablespoons Meyer lemon zest
    • Cooking spray

    Instructions

    1. Preheat your oven to 300°F (150°C).
    2. In a Ninja Blender or food processor, combine the gingersnaps and melted butter until the gingersnaps are crumbly.
    3. Press the mixture firmly into the bottom of two 6-inch Springform pans coated with cooking spray. Bake for 15 minutes, then cool on a wire rack.
    4. Using an electric mixer, beat the cream cheese until smooth. Gradually add the sugar and salt, mixing well.
    5. Add the eggs one at a time, beating after each addition. Then incorporate the sour cream, lemon juice, and zest, mixing until thoroughly combined. Ensure all cream cheese from the bottom of the mixing bowl is integrated.
    6. Pour the filling into the prepared pans, leaving some space at the top as the mixture will expand slightly.
    7. If there is extra filling, bake it in a small baking dish.
    8. Place an 11×13-inch pan filled with water on a lower oven rack. Position the Springform pans on the middle rack above the water pan.
    9. Bake for 1 hour and 10 minutes. After 35 minutes, switch the positions of the pans if necessary to ensure even baking.
    10. Turn off the oven and allow the cheesecakes to rest inside for another hour.
    11. Remove from the oven and cool to room temperature on a wire rack.
    12. Refrigerate for 8 hours or overnight.
    13. Before serving, run a knife around the edges of the pans to loosen the cheesecakes. Release the Springform clasp and transfer the cheesecakes to a serving plate.

    Tips

    For the best results, use room temperature ingredients, especially the cream cheese, which ensures a smooth and creamy filling. Also, make sure to mix the batter thoroughly to avoid lumps. If you find your cheesecake cracking, don’t fret; a little sour cream or lemon curd can be a delightful topping to cover any imperfections.

    Variations & Substitutions

    If Meyer lemons are unavailable, regular lemons can be used, though the flavor will be slightly more tart. For a different crust experience, try using graham crackers or digestive biscuits instead of gingersnaps. You can also add a teaspoon of vanilla extract for a subtle flavor enhancement.

    Storage

    Store any leftovers in an airtight container in the refrigerator for up to 5 days. You can also freeze the cheesecake for up to 2 months. To freeze, wrap the cheesecake tightly in plastic wrap and foil, then place it in a freezer-safe container.

    FAQ

    Can I use low-fat cream cheese?

    While you can use low-fat cream cheese, the texture and richness of the cheesecake may be affected. For the best results, I recommend using full-fat cream cheese.

    How do I prevent my cheesecake from cracking?

    To avoid cracks, ensure the ingredients are at room temperature for smooth mixing. Baking the cheesecake in a water bath and allowing it to cool gradually in the oven also help prevent cracking.

    Can I make this cheesecake ahead of time?

    Absolutely! This cheesecake is perfect for making ahead. Prepare it a day in advance and store it in the refrigerator until you’re ready to serve.

    Nutrition

    This cheesecake is an indulgent dessert, so it’s best enjoyed in moderation. Each slice (based on 12 servings) contains approximately 350 calories, with 25 grams of fat, 28 grams of carbohydrates, and 6 grams of protein.

    Final Thoughts

    Meyer Lemon Cheesecake is a testament to the beauty of combining classic flavors with a modern twist. Whether you’re an ardent lemon lover or simply searching for a dessert that impresses, this cheesecake is sure to delight. I hope it brings as much joy to your table as it does to mine, evoking cherished memories and creating new ones with every bite.

    Related update: Meyer Lemon Cheesecake

    Related update: Chocolate Almond Bark

  • Noodle Kugel with Pineapple-Gluten free, Dairy Free | Made by Meaghan Moineau

    Noodle Kugel with Pineapple-Gluten free, Dairy Free | Made by Meaghan Moineau

    Noodle Kugel with Pineapple: Gluten-Free, Dairy-Free Delight

    There are few things as comforting as a warm noodle kugel, and this version brings a delightful twist with the addition of pineapple, all while being gluten-free and dairy-free. Growing up, noodle kugel was a staple at family gatherings, a dish that brought everyone to the table with eager anticipation. The sweet, cinnamon-spiced aroma would fill the house, creating an inviting atmosphere that promised delicious memories. This recipe is my gluten-free, dairy-free adaptation, perfect for those who want to indulge in nostalgic flavors without compromising on dietary needs.

    Why You’ll Love It

    This Noodle Kugel with Pineapple is a unique blend of sweet and savory, perfect for any occasion. Here’s why this dish will become a favorite in your home:

    • It’s gluten-free and dairy-free, making it suitable for those with dietary restrictions.
    • The pineapple adds a refreshing twist that brightens the classic kugel flavor.
    • Made in cupcake form, it’s perfect for portion control and easy serving.
    • It’s a versatile dish that works as a side, dessert, or even a breakfast treat!

    Ingredients

    • Gluten-free spiral rice pasta
    • Canned pineapple chunks
    • Unsweetened vanilla coconut milk or coconut creamer
    • Sunflower oil
    • Egg yolks
    • Xylitol or sugar
    • Evaporated cane sugar
    • Ground cinnamon
    • Ground nutmeg
    • Kosher salt
    • Cupcake liners
    • Cinnamon
    • Evaporated cane sugar
    • Earth Balance soy-free margarine
    • Red brown rice flour

    Instructions

    1. Preheat your oven to 350 degrees F.
    2. Fill a medium stockpot with water and set it over high heat. Once the water boils, add 2 tablespoons of kosher salt, then the pasta. Stir well to prevent sticking.
    3. Stir occasionally and cook the pasta for 8-10 minutes. Let it sit in the water for a few minutes before transferring it to a large glass or heatproof bowl to cool slightly.
    4. While the pasta cools, prepare the other ingredients. In a large mixing bowl, combine the coconut milk, creamer, pineapple, sugar, xylitol, cinnamon, nutmeg, and sunflower oil. Mix well.
    5. Add the egg yolks to the mixture and stir to combine thoroughly.
    6. Prepare the crumble topping by mixing together a small amount of cinnamon and evaporated cane sugar with the red brown rice flour and margarine.
    7. Line two cupcake pans with cupcake liners.
    8. Using a dry 1/4 cup measuring spoon, fill each cupcake liner with the noodle mixture, filling over the top. Distribute any remaining liquid to each kugel that looks dry.
    9. Sprinkle the crumble over each kugel, using about 1/2 teaspoon per cupcake.
    10. Bake for 40-45 minutes, until golden brown.
    11. Cool for 10 minutes before removing from the cupcake pans. Serve hot or warm, with or without the liners.

    Tips

    • Ensure the pasta is cooked al dente to maintain a pleasant texture.
    • Feel free to adjust the sweetness by adding more or less sugar according to your taste.
    • Using cupcake liners makes cleanup easy and helps the kugel hold its shape.

    Variations & Substitutions

    • Fruit Variations: Swap the pineapple for apples or pears for a different fruity twist.
    • Nutty Additions: Add chopped nuts such as pecans or walnuts to the crumble for added crunch.
    • Sugar Alternatives: Substitute xylitol with maple syrup or agave nectar for a different sweetness profile.

    Storage

    Store leftover kugels in an airtight container in the refrigerator for up to 4 days. To reheat, simply place them in the oven at 300 degrees F for about 10 minutes or until warmed through. These kugels can also be frozen for up to 2 months; thaw in the refrigerator overnight before reheating.

    FAQ

    Can I make this recipe ahead of time?

    Yes, you can prepare the noodle mixture and fill the cupcake liners a day in advance. Cover and store them in the refrigerator, then bake the next day.

    Is there a substitute for coconut milk or creamer?

    If coconut milk isn’t available, almond milk or soy milk can be used as alternatives, although it may slightly alter the flavor.

    Nutrition

    This noodle kugel offers a balanced treat with a touch of sweetness and fruit, making it a delightful addition to any meal. It’s a gluten-free and dairy-free option that can fit into many dietary plans. Always check specific brands for nutritional content, especially regarding sugar and calorie counts.

    Final Thoughts

    This Noodle Kugel with Pineapple brings a modern twist to a beloved classic. The tropical notes of pineapple paired with the warm spices of cinnamon and nutmeg create a delightful harmony of flavors. Whether it’s for a holiday gathering or a weekend brunch, this dish is sure to impress. Enjoy the comfort and nostalgia of noodle kugel, reimagined for today’s dietary preferences, without sacrificing any of the flavors that make it a favorite. Happy cooking!

    Related update: Noodle Kugel with Pineapple-Gluten free, Dairy Free

    Related update: Meyer Lemon Cheesecake

    Related update: Damn Good Corn Pudding ~from 12 Bones Smokehouse

    Related update: Vegetable Cheddar Quiche

  • Almond Cookie Bar | Made by Meaghan Moineau

    Almond Cookie Bar | Made by Meaghan Moineau

    Almond Cookie Bar

    Welcome to the delightful world of homemade almond cookie bars! These delectable treats have been a family favorite for generations. I vividly remember my grandmother preparing these bars during the festive seasons, the kitchen filled with the warm, inviting aroma of baking dough and sweet apricot jam. Today, I’m excited to share this cherished recipe with you, hoping it brings as much joy to your home as it has to ours.

    Why You’ll Love It

    These almond cookie bars are a perfect blend of texture and flavor. The crunchy base is complemented by a luscious apricot layer, topped with a nutty, sweet almond and oatmeal mixture. They’re not only delicious but also incredibly satisfying, making them a hit at parties or as an afternoon snack. Plus, with ingredients like wholemeal flour and oatmeal cornflakes, you can feel a bit better about indulging in these treats.

    Ingredients

    • Almond flakes
    • Apricot gel/jam
    • Brown sugar
    • Butter
    • Cookie base
    • Fresh milk
    • Oatmeal cornflakes
    • Plain flour
    • Wholemeal flour

    Instructions

    1. Beat butter and sugar until light and fluffy.
    2. In a bowl, combine wholemeal flour and plain flour together, then mix in the butter mixture with a rubber spatula and knead gently to form a soft dough.
    3. Turn out the dough onto a floured surface or line with a plastic sheet below and with another plastic sheet on top. Then roll into a square. Chill for at least 1 hour.
    4. Transfer the dough onto non-grease paper and cover with a plastic sheet on top, then roll the dough to about 3mm thick.
    5. Prick the dough with a fork and bake for about 15-18 minutes until brown in a preheated oven at 180°C. Leave the biscuit to cool.
    6. Spread the apricot jam over the top of the biscuit and set aside.
    7. Mix topping ingredients and spread evenly on the biscuit with a palette knife.
    8. Bake for 15 minutes until golden.
    9. Remove the cooked biscuit from the oven and leave to cool completely, then cut into bars.

    Tips

    To ensure the dough is easy to work with, make sure the butter is at room temperature before you start. Chilling the dough is crucial as it helps in maintaining the shape while baking. When spreading the apricot jam, ensure the base has cooled completely to prevent the jam from melting and becoming runny.

    Variations & Substitutions

    These almond cookie bars are quite versatile. If you’re not a fan of apricot, try substituting with raspberry or strawberry jam for a different twist. For a healthier version, you can replace brown sugar with coconut sugar or a sugar substitute of your choice. If you prefer, add a sprinkle of cinnamon to the almond mixture for a warm, spicy note.

    Storage

    Store your almond cookie bars in an airtight container at room temperature for up to a week. For longer storage, you can freeze them for up to three months. Just ensure they are well wrapped to prevent freezer burn.

    FAQ

    Can I make these bars gluten-free?

    Yes, you can substitute the plain and wholemeal flours with a gluten-free baking blend. Make sure it contains xanthan gum to help bind the dough.

    What if I don’t have oatmeal cornflakes?

    If oatmeal cornflakes are not available, you can use regular rolled oats or crushed cornflakes as an alternative. They will provide a similar texture to the topping.

    Nutrition

    Each almond cookie bar contains approximately 150 calories, with a balance of carbohydrates, fats, and protein. The wholemeal flour and oatmeal add dietary fiber, making this a more wholesome treat.

    Final Thoughts

    These almond cookie bars are more than just a treat; they’re a piece of nostalgia and comfort. Whether you’re enjoying them with a cup of tea or sharing them with loved ones, they’re sure to bring a smile to your face. I hope this recipe becomes a beloved part of your baking repertoire, just as it has been in my family for years. Happy baking!

    Related update: Almond Cookie Bar

  • Rugelach | Made by Meaghan Moineau

    Rugelach | Made by Meaghan Moineau

    Delightful Rugelach: A Comforting Classic

    There’s something magical about the aroma of freshly baked rugelach wafting through the house. It takes me back to my grandmother’s cozy kitchen, where I first learned how to roll these delicate pastries. I remember the way she would hum softly, her hands expertly folding the dough around sweet preserves and crunchy walnuts. These moments, filled with warmth and love, are the essence of why I adore baking rugelach. Now, I’m excited to share this beloved recipe with you, hoping it brings the same joy and comfort to your home.

    Why You’ll Love It

    Rugelach is a delightful pastry that combines a tender, buttery dough with a sweet and nutty filling. It’s perfect for any occasion, whether you’re hosting a tea party, celebrating a holiday, or simply enjoying a quiet moment with a cup of coffee. Here’s why you’ll fall in love with this recipe:

    • Easy to make: With simple ingredients and clear instructions, this recipe is accessible for bakers of all levels.
    • Irresistible flavor: The combination of buttery dough, fruity preserves, and spiced cinnamon-sugar is simply divine.
    • Versatile: You can easily adapt the filling to suit your preferences or what you have on hand.

    Ingredients

    • Salted butter
    • Block of cream cheese
    • Salt
    • Plain flour
    • Egg yolks
    • Vanilla extract
    • Caster sugar
    • Fruit preserves
    • Walnuts
    • Butter (for brushing)
    • Ground cinnamon

    Instructions

    1. Leave butter and cream cheese in a warm place for a couple of hours to soften. They have to be soft and cannot be used straight out of the fridge.
    2. Pre-heat oven to 180°C.
    3. Place softened butter in a large mixing bowl. Add a block of cream cheese. Use block cream cheese, not cream cheese in a tub.
    4. Set the beater to medium speed and beat the butter and cream cheese until combined and light and fluffy.
    5. Add 2 large egg yolks, 1 teaspoon of vanilla extract, 1/2 cup of caster sugar, a pinch of salt, and 2.5 cups of plain flour. Mix all the ingredients together in the mixer on medium speed until the dough comes together.
    6. While the dough is being mixed, chop 1/2 cup of walnuts into fine pieces and set aside.
    7. When the dough is ready, scatter some flour on the table or countertop. Knead the dough and gently form it into a large block. Add more flour if the dough is too sticky. The dough should be a nice elastic block.
    8. Cut the dough into 4 equal pieces. Set 3 pieces of dough aside, covering them with a slightly damp cloth to prevent them from drying out.
    9. Roll the 4th piece of dough into a ball. Using a floured rolling pin, roll out the ball of dough into a flat circle about 2 to 3 mm thick.
    10. Cut the rolled dough into 8 triangles.
    11. Prepare some fruit preserves. If the preserves are thick and difficult to spread, whisk them with a fork for a minute.
    12. Place one teaspoon of preserves on the long end of each triangular piece of dough. Lightly spread it towards the other end, keeping most of the preserves on the long end.
    13. Scatter some chopped walnuts on the preserves at the long end.
    14. To roll the rugelach, tuck in the sides of the triangle slightly to hold the preserves and nuts in. Roll towards the third corner of the triangle.
    15. Repeat for all the blocks of dough until the rugelach are prepared.
    16. Place all the prepared rugelach on a sheet of baking paper on a baking tray.
    17. Mix 1/4 cup of caster sugar and 1 teaspoon of ground cinnamon in a small bowl.
    18. Melt 50g of butter. Gently brush each rugelach with melted butter and sprinkle with the cinnamon-sugar mixture. You can also roll the rugelach in the mixture.
    19. Place the rugelach in the pre-heated oven and bake at 180°C for about 35 minutes or until they are a dark golden brown.
    20. Leave the rugelach to cool before storing them.

    Tips

    • Softening: Make sure the butter and cream cheese are softened before you start. This ensures a smooth, cohesive dough.
    • Rolling: Keep your rolling pin and surface lightly floured to prevent sticking.
    • Filling: Be generous with the preserves and walnuts for a more flavorful pastry.

    Variations & Substitutions

    Rugelach is wonderfully adaptable, so feel free to experiment with different flavors:

    • Preserves: Try raspberry, apricot, or fig preserves for a different twist.
    • Nuts: Substitute pecans or almonds for walnuts if you prefer.
    • Spices: Add a pinch of nutmeg or cardamom to the cinnamon-sugar mix for an extra layer of flavor.

    Storage

    Store your rugelach in an airtight container at room temperature for up to a week. For longer storage, place them in a freezer-safe bag and freeze for up to three months. Just thaw them at room temperature before serving.

    FAQ

    Can I prepare the dough in advance?

    Absolutely! You can prepare the dough up to two days in advance. Just wrap it tightly in plastic wrap and store it in the refrigerator. Let it come to room temperature before rolling it out.

    Is it possible to use low-fat cream cheese?

    While you can use low-fat cream cheese, the texture and flavor may not be as rich. For the best results, I recommend using full-fat block cream cheese.

    Nutrition

    Each rugelach contains approximately 150 calories, 10g of fat, 15g of carbohydrates, and 2g of protein. Keep in mind that these values can vary based on the specific ingredients and portion sizes you use.

    Final Thoughts

    Baking rugelach is a beautiful way to connect with tradition while creating new memories with loved ones. Whether you’re savoring them fresh from the oven or sharing them with friends over tea, these delightful pastries are sure to bring happiness and warmth to your table. I hope this recipe becomes a cherished part of your baking repertoire, just as it has been for me.

    Related update: Rugelach

    Related update: Almond Cookie Bar

  • Mascarpone & Ricotta Cheese Cake | Made by Meaghan Moineau

    Mascarpone & Ricotta Cheese Cake | Made by Meaghan Moineau

    Decadent Mascarpone & Ricotta Cheese Cake

    There’s something magical about the aroma of a cheesecake baking in the oven. I remember the first time I made this Mascarpone & Ricotta Cheese Cake. It was a chilly Sunday afternoon, and the kitchen was filled with warmth and laughter as my grandmother guided me through the recipe, her hands deftly working the ingredients into something extraordinary. This recipe has since become a cherished tradition, a sweet reminder of those cozy afternoons spent together. Now, I’m excited to share this delightful recipe with you, so you too can experience the joy it brings.

    Why You’ll Love It

    This Mascarpone & Ricotta Cheese Cake is a slice of heaven, combining the creamy richness of mascarpone and ricotta cheeses with the perfect hint of lemon and vanilla. The nutty crunch of the almond-infused graham cracker crust complements the smooth, luscious filling. It’s a sophisticated dessert that’s surprisingly easy to make, perfect for celebrations or as a special treat for yourself. Whether you’re a seasoned baker or a novice, this cheesecake will impress everyone with its luxurious texture and delightful flavor.

    Ingredients

    • 1 cup almonds
    • 1/2 cup butter, melted
    • 1 cup whipped cream cheese
    • 4 large eggs
    • 1/4 cup flour
    • 1 1/2 cups graham crackers
    • 2 tablespoons lemon juice
    • 1 cup mascarpone cheese
    • 1 cup ricotta cheese
    • 1/4 teaspoon salt
    • 1 cup sugar
    • 1 teaspoon vanilla extract

    Instructions

    1. Preheat your oven to 325°F (160°C).
    2. Crust: Grind the graham crackers and almonds using a food processor or a mortar and pestle until they form fine crumbs. Add the melted butter and salt, mixing until combined. Press this mixture into the bottom of a greased springform pan or deep dish pie pan. Bake for 10 minutes, then let cool.
    3. Mix the sugar and flour together and sprinkle over the top of the cooled crust. This step helps prevent the crust from becoming soggy.
    4. Filling: In a large bowl, beat together the cream cheese, mascarpone cheese, ricotta cheese, and sugar until smooth.
    5. Beat in the lemon juice and vanilla extract until well combined.
    6. Add the eggs one at a time, beating well after each addition.
    7. Pour the cheese mixture over the prepared crust in the pan.
    8. Bake in the preheated oven until the center of the cheesecake is wobbly when shaken, about 1 hour and 5 minutes.
    9. Let the cheesecake cool completely, then refrigerate, preferably overnight, to allow it to set fully.

    Tips

    For best results, ensure that all your ingredients are at room temperature before starting. This helps in achieving a smooth and creamy cheesecake filling. Also, avoid over-mixing the batter as it can incorporate too much air, leading to cracks on the surface of your cheesecake.

    Variations & Substitutions

    If you prefer a gluten-free version, simply replace the graham crackers with your favorite gluten-free cookies. For a different flavor profile, try adding a teaspoon of almond extract to the filling. You can also top the cheesecake with fresh berries or a drizzle of chocolate sauce before serving for an added layer of indulgence.

    Storage

    This cheesecake can be stored in the refrigerator for up to 5 days. Make sure to cover it with plastic wrap or store it in an airtight container to keep it fresh. If you need to store it longer, slice the cheesecake and wrap each piece individually in plastic wrap, then place in a freezer-safe container for up to 2 months. Thaw in the refrigerator before serving.

    FAQ

    Can I use low-fat cheeses for this recipe?

    While you can use low-fat versions of the cheeses, the texture and flavor of the cheesecake may be slightly different. Full-fat cheeses provide the best creamy texture and rich flavor.

    What if my cheesecake cracks?

    If your cheesecake happens to crack, don’t worry! It’s just a cosmetic issue and doesn’t affect the taste. You can easily cover any cracks with toppings such as whipped cream, fruit, or ganache.

    Nutrition

    This Mascarpone & Ricotta Cheese Cake is an indulgent treat, so it’s best enjoyed in moderation. Each slice contains approximately 450 calories, with 30g of fat, 40g of carbohydrates, and 9g of protein. These values can vary based on portion size and any variations or substitutions you choose.

    Final Thoughts

    This Mascarpone & Ricotta Cheese Cake is truly a dessert to savor and share. It’s an elegant addition to any dessert table and a wonderful way to celebrate special occasions or simply indulge in a sweet treat. I hope this recipe brings as much joy to your kitchen as it has to mine. Enjoy every creamy, dreamy bite!

    Related update: Mascarpone & Ricotta Cheese Cake

    Related update: Almond Ricotta Cake

  • Eggless Blueberry and White Chocolate Baked Cheesecake | Made by Meaghan Moineau

    Eggless Blueberry and White Chocolate Baked Cheesecake | Made by Meaghan Moineau

    Eggless Blueberry and White Chocolate Baked Cheesecake

    There are few things more comforting than a slice of cheesecake, and this Eggless Blueberry and White Chocolate Baked Cheesecake is no exception. I remember the first time I tried cheesecake. It was a chilly autumn day, and my grandmother had just pulled a golden, creamy cheesecake out of the oven. The smell alone was enough to make my mouth water. This recipe is inspired by those cherished moments, blending the tangy taste of blueberries with the decadent richness of white chocolate—all without eggs.

    Why You’ll Love It

    This cheesecake is a delightful fusion of flavors and textures. The buttery biscuit crust provides a perfect foundation for the creamy filling, while the blueberries add a burst of freshness, and the white chocolate enhances the dessert’s richness. Whether you’re catering to those with egg allergies or simply looking for a unique twist on the classic cheesecake, this recipe is sure to become a favorite.

    Ingredients

    • 200g digestive biscuits, crushed
    • 100g butter, melted
    • 200g white chocolate, melted
    • 500g cream cheese
    • 250g ricotta cheese
    • 200ml double cream
    • 150g granulated sugar
    • 2 tablespoons cornflour
    • 1 teaspoon vanilla extract
    • 1 tablespoon lemon juice
    • 200g plain blueberries

    Instructions

    1. Preheat your oven to 180 degrees Celsius.
    2. Combine the crushed digestive biscuits with the melted butter. Mix thoroughly to ensure the butter is evenly distributed.
    3. Firmly press the mixture into the base of a greased 10-inch springform tin, creating an even crust.
    4. In a large mixing bowl, beat together the cream cheese, ricotta cheese, double cream, granulated sugar, cornflour, vanilla extract, lemon juice, and melted white chocolate until the mixture is smooth and thickened. Avoid overmixing.
    5. Pour half of the cheese mixture over the prepared crust.
    6. Scatter the blueberries evenly over the cheese mixture.
    7. Pour the remaining cheese mixture over the blueberries, gently spreading it to cover all the berries.
    8. Bake the cheesecake in the oven for 1 to 1 1/4 hours until set. Adjust the time if using a fan oven.
    9. Allow the cheesecake to cool at room temperature, then refrigerate for at least 8 hours or overnight for best results.
    10. Cut into large wedges and serve chilled.

    Tips

    For the best texture, ensure all ingredients are at room temperature before mixing. This will help everything blend smoothly and create a creamier cheesecake. When pressing the crust into the tin, use the bottom of a glass to get an even, compact layer.

    Variations & Substitutions

    If you prefer a gluten-free version, swap the digestive biscuits for a gluten-free alternative. You can also experiment with different berries if blueberries aren’t in season—raspberries or blackberries make excellent substitutes. For a dairy-free twist, use a plant-based cream cheese and coconut cream in place of double cream.

    Storage

    Store the cheesecake in an airtight container in the refrigerator for up to five days. You can also freeze individual slices wrapped in cling film and foil for up to three months. Defrost in the fridge overnight before serving.

    FAQ

    Can I make this cheesecake in advance?

    Absolutely! This cheesecake actually tastes better after it’s had time to set, making it perfect for preparing a day or two ahead of serving.

    How can I tell when the cheesecake is done baking?

    You’ll know the cheesecake is ready when the edges are set, but the center still has a slight wobble. It will firm up as it cools.

    What can I use instead of a springform tin?

    If you don’t have a springform tin, a regular cake tin will work. Just line it with parchment paper for easy removal.

    Nutrition

    This cheesecake is a rich and indulgent dessert, perfect for special occasions. While exact nutritional values can vary, each slice is estimated to contain around 450 calories, 30g of fat, and 35g of sugar, depending on portion size and specific ingredients used.

    Final Thoughts

    Baking can be a beautiful journey of creativity and nostalgia, and this Eggless Blueberry and White Chocolate Baked Cheesecake is a testament to that. Whether you’re baking for loved ones or treating yourself, this recipe is a comforting reminder of how food can be both a sensory delight and a heartfelt hug. Enjoy every bite, and maybe even share a slice with someone special.

    Related update: Eggless Blueberry and White Chocolate Baked Cheesecake

    Related update: Mascarpone & Ricotta Cheese Cake

  • Apple Dumplings In Fanta Sauce | Made by Meaghan Moineau

    Apple Dumplings In Fanta Sauce | Made by Meaghan Moineau

    Apple Dumplings In Fanta Sauce

    There’s something about the smell of apples and cinnamon baking in the oven that can transport you back to a simpler time. Growing up, my grandmother would make apple dumplings every autumn. The warm, sweet aroma would fill the kitchen, drawing everyone in for a taste. She had a secret ingredient that made her dumplings truly special—Fanta. Today, I’m excited to share a modern twist on her classic recipe: Apple Dumplings in Fanta Sauce.

    Why You’ll Love It

    This recipe is a delightful blend of sweet and tangy flavors, with a touch of nostalgia. The flaky puff pastry envelops tender apple crescents, while the Fanta sauce adds a unique citrusy sweetness that perfectly complements the apples. It’s a fun and easy recipe that even beginners can tackle with confidence. Whether you’re serving it as a dessert or a special treat, these apple dumplings are sure to become a family favorite.

    Ingredients

    • 2 crusts package puff pastry
    • 4 apples
    • 1 lemon (juice)
    • 1 cup Fanta Lemon
    • 1 cup sugar
    • 1/2 cup butter
    • 1 teaspoon lemon extract
    • Grounded cinnamon (optional)

    Instructions

    1. Preheat your oven to 400°F (about 200°C).
    2. Peel and core the apples, then cut each apple into 8 crescent-shaped pieces. Sprinkle them with lemon juice to prevent browning.
    3. Unroll the puff pastry and cut each crust into 8 equal triangles.
    4. Place an apple crescent on each puff pastry triangle and roll it up towards the top, enclosing the apple.
    5. In a pan, melt the butter. Add sugar and lemon extract, stirring well to combine.
    6. Arrange the dumplings in a baking pan, ensuring they are close enough to touch each other.
    7. Pour the melted butter and sugar mixture generously over each dumpling.
    8. Pour Fanta Lemon over the dumplings, ensuring they are well coated.
    9. Optionally, sprinkle with grounded cinnamon for extra flavor.
    10. Bake in the preheated oven for about 30 minutes. After the first 15-20 minutes, cover with baking paper to prevent burning.

    Tips

    For best results, make sure your puff pastry is cold before working with it. This will make it easier to cut and roll. If you find your dumplings browning too quickly, reduce the oven temperature slightly and cover them with baking paper to prevent burning. Keep an eye on the baking time as ovens can vary.

    Variations & Substitutions

    Feel free to experiment with different types of apples for this recipe. Granny Smith apples offer a tart contrast to the sweet sauce, while Honeycrisp and Fuji apples provide a sweeter profile. If you don’t have Fanta Lemon, you can substitute with another citrus-flavored soda or even a splash of lemon-lime soda mixed with orange juice. For a spicier kick, try adding a pinch of nutmeg or cloves to the sugar mixture.

    Storage

    Store any leftover apple dumplings in an airtight container in the refrigerator for up to 3 days. To reheat, simply pop them in a preheated oven at 350°F (175°C) for about 10 minutes or until heated through. You can also microwave them for a quick warm-up, but the pastry may lose some of its crispiness.

    FAQ

    Can I make these apple dumplings ahead of time?

    Yes, you can prepare the dumplings up to the baking step and refrigerate them for a few hours before baking. This can be a great time-saver if you’re planning to serve them at a gathering. Just ensure that the dumplings are well-covered so they don’t dry out in the fridge.

    What type of apples work best for this recipe?

    While you can use any type of apple, firmer varieties like Granny Smith or Honeycrisp hold their shape well during baking. Their flavor profiles also complement the sweet and tangy sauce beautifully.

    Can I use homemade puff pastry?

    Absolutely! Homemade puff pastry can elevate the dish, offering a richer, buttery flavor. Just ensure it’s rolled out to the same thickness as store-bought pastry for consistent results.

    Nutrition

    The nutritional content will vary depending on the type of apples and soda used. On average, each dumpling contains approximately 200-250 calories. It’s a treat best enjoyed in moderation, but the delicious flavor is well worth it!

    Final Thoughts

    Apple Dumplings in Fanta Sauce is a delightful recipe that combines the warmth and comfort of traditional apple desserts with a modern twist. It’s perfect for any occasion, from a cozy family dinner to a festive holiday gathering. The ease of preparation and the unique flavor make it a standout dish that you’ll return to time and again. Enjoy the sweet nostalgia and happy baking!

    Related update: Apple Dumplings In Fanta Sauce

    Related update: Eggless Blueberry and White Chocolate Baked Cheesecake

  • Ginger Snap and Pumpkin Ice Cream Sandwiches | Made by Meaghan Moineau

    Ginger Snap and Pumpkin Ice Cream Sandwiches

    There’s something enchantingly nostalgic about ice cream sandwiches. They remind me of warm summer evenings spent on my grandmother’s porch, where the world seemed to pause for a moment. With a gentle breeze and the laughter of family in the background, we would savor every bite, letting the creamy goodness melt away the day’s worries. As autumn rolls in, I find myself craving that same delightful treat, reimagined with the rich, spicy flavors of the season. Enter Ginger Snap and Pumpkin Ice Cream Sandwiches—a perfect fusion of summer nostalgia and autumn warmth.

    Why You’ll Love It

    This recipe is the epitome of seasonal indulgence, combining the creamy richness of homemade pumpkin ice cream with the spicy crunch of ginger snap cookies. It’s the best of both worlds: a cool treat for those sunny fall days and a comforting spice for the crisp evenings. Each bite is a sensory delight, offering a harmonious blend of flavors and textures that will leave you and your loved ones reaching for seconds.

    Ingredients

    • Whole milk
    • Heavy cream
    • Granulated sugar
    • Ground cinnamon
    • Nutmeg
    • Ground ginger
    • Whole cinnamon stick
    • Kosher salt
    • Egg yolks
    • Canned pumpkin puree
    • Vanilla
    • All-purpose flour
    • Baking soda
    • Ground pepper
    • Unsalted butter
    • Molasses
    • Egg

    Instructions

    1. In a medium saucepan over medium heat, combine the milk, cream, granulated sugar, ginger, ground cinnamon, cinnamon stick, nutmeg, and salt. Heat the mixture until steaming and it begins to foam. Remove from the heat.
    2. In a small bowl, whisk the egg yolks until pale yellow. Gradually whisk in one cup of the warm cream mixture, whisking constantly.
    3. Pour the yolks and cream mixture back into the saucepan and cook over low heat, stirring constantly. Continue cooking until the mixture thickens and coats the back of a spoon.
    4. Place some ice and water into a large bowl and place a smaller bowl inside. Pour the cream mixture through a mesh strainer into the bowl. Stir in the pumpkin and vanilla, add the cinnamon stick back to the mixture. Chill thoroughly, preferably overnight.
    5. Pour the mixture into the freezer can of an electric ice cream maker and freeze according to the manufacturer’s instructions.
    6. In a small bowl, whisk together the dry ingredients for the cookies.
    7. In the bowl of an electric mixer, beat the butter until soft. Add the sugar and continue beating until smooth and creamy, occasionally scraping down the sides of the bowl.
    8. Stir in the vanilla, molasses, and egg; combine thoroughly. Mix in the dry ingredients gradually until the dough is smooth.
    9. Turn the dough out onto a lightly floured surface and divide in half. Roll each half into a log about 2 inches around. Wrap each log in plastic wrap and roll them lightly to smooth them out. Refrigerate or freeze until firm.
    10. Preheat the oven to 350 degrees and line two baking sheets with parchment.
    11. Slice the dough into 1/4 inch rounds with a serrated knife, being careful to keep their shape. Place the rounds on the baking sheet and sprinkle with granulated or coarse sugar.
    12. Bake for 10-13 minutes, rotating the pans halfway through. Let the cookies cool in the pan for about 2 minutes and then transfer to a wire cooling rack. Dough can be refrigerated for up to five days or frozen for up to three months. Baked cookies can be stored in an air-tight container for approximately a week.

    Tips

    For best results, make sure all your ingredients are at room temperature before starting. This helps everything blend smoothly and evenly. If you’re short on time, the cookies can be prepared ahead and stored, as mentioned, which will make assembling the sandwiches a breeze when your ice cream is ready!

    Variations & Substitutions

    If you’re not a fan of ginger, you can substitute the ginger snap cookies with chocolate chip cookies for a different but equally delightful flavor combination. For a dairy-free version, substitute coconut milk and cream for the whole milk and heavy cream, and use a dairy-free butter alternative for the cookies.

    Storage

    Store any leftover ice cream sandwiches in an airtight container in the freezer. If you want to avoid them sticking together, place a small piece of parchment paper between each sandwich. They should keep well for up to a month, though they’re so delicious they probably won’t last that long!

    FAQ

    Can I make the ice cream without an ice cream maker?

    Yes, you can! Simply pour the chilled mixture into a shallow dish and freeze. Stir the mixture every 30 minutes to break up ice crystals until it’s fully frozen. This method might result in a slightly less creamy texture, but it’s still delicious!

    What can I use instead of canned pumpkin puree?

    If you prefer fresh, you can roast and puree your own pumpkin. Make sure it’s well-drained to avoid excess moisture, which can affect the texture of the ice cream.

    Nutrition

    While these indulgent treats are meant to be enjoyed without too much concern for calories, it’s good to know that they contain wholesome ingredients. Each sandwich offers a balanced mix of carbohydrates, fats, and proteins, along with a dose of dietary fiber from the pumpkin. Plus, the spices bring antioxidants, aiding in overall health. Enjoy them as an occasional treat and savor each delightful bite!

    Final Thoughts

    Ginger Snap and Pumpkin Ice Cream Sandwiches are more than just a dessert; they’re a tribute to cherished memories and the comforting flavors of fall. Whether you’re sharing them with family on a cozy evening or surprising guests at a festive gathering, these sandwiches are sure to bring smiles and spark joy. So, gather your ingredients, embrace the process, and enjoy the delicious rewards of your labor. Happy indulging!

    Related update: Ginger Snap and Pumpkin Ice Cream Sandwiches

    Related update: Apple Dumplings In Fanta Sauce

  • Green Monster Ice Pops | Made by Meaghan Moineau

    Green Monster Ice Pops | Made by Meaghan Moineau

    Green Monster Ice Pops

    There’s something magical about the refreshing taste of a homemade ice pop on a warm summer day. Growing up, I fondly remember the excitement of racing to the freezer, eagerly anticipating the moment when the ice pops would be ready. Those childhood memories inspired this recipe for Green Monster Ice Pops—a healthy twist on a classic treat that the whole family can enjoy. Packed with wholesome ingredients, these ice pops are not only delicious but also nutrient-rich, perfect for a guilt-free indulgence.

    Why You’ll Love It

    These Green Monster Ice Pops are the perfect blend of creamy and refreshing. You’ll love them because:

    • They’re incredibly easy to make, requiring just a few simple steps.
    • The combination of avocado and banana provides a natural creaminess without the need for dairy.
    • They’re packed with nutrients from spinach and mango, making them a healthy snack option.
    • They’re naturally sweetened with banana and honey, with the option to add more sweetness if desired.
    • Kids love the fun green color and delicious taste!

    Ingredients

    • 1 cup unsweetened almond milk
    • 1 ripe avocado
    • 1 cup baby spinach
    • 1 ripe banana
    • 2 tablespoons honey
    • 1 cup fresh mango, chopped

    Instructions

    1. Place all ingredients into a blender and mix well until smooth.
    2. Taste the smoothie. If it’s not sweet enough, add 1 to 2 tablespoons of maple syrup or additional honey and blend again.
    3. Pour the smoothie mixture into ice pop molds.
    4. Insert a wooden popsicle stick into each mold, leaving about a quarter of the stick above the mold.
    5. Place the molds into the freezer for 2-3 hours until fully frozen.
    6. Once frozen, remove the ice pops from the molds and enjoy!

    Tips

    • Ensure the avocado is ripe to achieve the best creamy texture.
    • For easier removal, run the molds under warm water for a few seconds to loosen the ice pops.
    • Use silicone molds for easy removal and less mess.

    Variations & Substitutions

    One of the best things about this recipe is its versatility. Here are some ideas to mix it up:

    • Substitute the almond milk: Use coconut milk for a tropical twist or regular milk if you prefer dairy.
    • Add-ins: Try adding chia seeds or flaxseeds for an extra nutritional boost.
    • Fruit swaps: Swap mango for pineapple or berries for a different flavor profile.

    Storage

    Once the ice pops are fully frozen, you can store them in the molds or remove them and place them in a freezer-safe bag or container. They will keep well for up to 1 month in the freezer. Just be sure to keep them well-sealed to prevent freezer burn.

    FAQ

    Can I make these ice pops without a blender?

    While a blender is recommended for achieving a smooth consistency, you could use a food processor or mash the ingredients by hand. However, the texture might not be as creamy.

    Are these ice pops suitable for children?

    Absolutely! These ice pops are packed with fruits and spinach, making them a fun and healthy treat for kids. The sweet taste of banana and mango masks the spinach, so it’s a clever way to sneak in some greens.

    Can I use frozen fruits instead of fresh ones?

    Yes, frozen fruits can be used in place of fresh ones. Just ensure they’re fully thawed before blending to achieve a smooth mixture.

    Nutrition

    These Green Monster Ice Pops are not only delicious but also provide a good source of vitamins and minerals:

    • Avocado: Rich in healthy fats and fiber.
    • Spinach: A powerful source of iron, calcium, and vitamins A and C.
    • Mango: High in vitamin C and antioxidants.
    • Banana: Provides potassium and natural sweetness.

    Final Thoughts

    Green Monster Ice Pops are a delightful way to enjoy a healthy treat that’s both satisfying and nourishing. Whether you’re looking to cool down on a hot day or simply want a nutritious snack, these ice pops are a fantastic choice. Try them out, and don’t be afraid to experiment with different variations to find your perfect flavor combination. Enjoy the vibrant taste and the joy of a homemade treat that brings back those cherished childhood memories.

    Related update: Green Monster Ice Pops

    Related update: Ginger Snap and Pumpkin Ice Cream Sandwiches