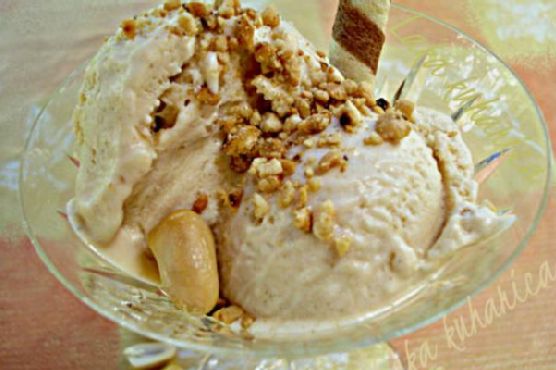
Category: dessert

  • Chocolate Chip Coconut Muffins | Made by Meaghan Moineau

    Chocolate Chip Coconut Muffins | Made by Meaghan Moineau

    Chocolate Chip Coconut Muffins

    There’s something utterly magical about the combination of chocolate and coconut. It takes me back to my childhood, where weekend mornings meant waking up to the smell of freshly baked goods. My mom would often whip up a batch of her famous muffins, the aroma wafting through the house and luring sleepy-eyed kids to the kitchen. These Chocolate Chip Coconut Muffins capture that essence perfectly, offering a delightful blend of flavors that are both comforting and indulgent.

    Why You’ll Love It

    These muffins are designed to be loved by everyone, from kids to adults. The combination of dark chocolate chips and coconut flakes provides a rich and decadent taste, while the coconut butter adds a moistness that can’t be beaten. They’re gluten-free, using almond milk and a delicate blend of gluten-free flour, making them suitable for those with dietary restrictions without sacrificing flavor or texture. Plus, they are surprisingly easy to whip up, making them perfect for a quick morning treat or an afternoon snack.

    Ingredients

    • Coconut butter
    • Eggs
    • Almond milk
    • Vanilla extract
    • Gluten-free flour
    • Sucanat
    • Baking powder
    • Sea salt
    • Dark chocolate chips
    • Coconut flakes

    Instructions

    1. Preheat your oven to 350°F (175°C) and line a muffin tin with paper liners.
    2. In a large bowl, mix coconut butter and sucanat until smooth.
    3. Add eggs, almond milk, and vanilla extract, and beat until well combined.
    4. In another bowl, whisk gluten-free flour, baking powder, and sea salt.
    5. Gradually add the dry ingredients to the wet mixture, stirring until just combined.
    6. Fold in the dark chocolate chips and coconut flakes.
    7. Spoon the batter into the prepared muffin tin, filling each cup about two-thirds full.
    8. Bake for 18-22 minutes or until a toothpick inserted into the center of a muffin comes out clean.
    9. Let the muffins cool in the tin for a few minutes, then transfer to a wire rack to cool completely.

    For detailed step-by-step instructions, visit my blog.

    Tips

    For the best results, make sure your coconut butter is at room temperature. This will help it blend more easily with the other ingredients. If you want a more intense coconut flavor, lightly toast the coconut flakes before folding them into the batter. Additionally, using high-quality dark chocolate chips will enhance the overall flavor of the muffins.

    Variations & Substitutions

    If you’re looking to mix things up, try adding a handful of chopped nuts, like almonds or pecans, for added crunch. For a lower sugar option, you can replace sucanat with your preferred sugar alternative, such as coconut sugar or a sugar-free sweetener. If you don’t have almond milk, any other plant-based milk will work just as well.

    Storage

    These muffins are best enjoyed fresh, but they can be stored in an airtight container at room temperature for up to three days. For longer storage, you can freeze them for up to three months. To defrost, simply leave them at room temperature or warm them up in the oven for a few minutes.

    FAQ

    Can I use regular flour instead of gluten-free flour?

    Yes, you can substitute all-purpose flour for gluten-free flour in this recipe if gluten is not a concern for you. The muffins will still turn out delicious!

    Is there an egg substitute for this recipe?

    If you’re looking for an egg-free version, you can try using flax eggs. Mix one tablespoon of ground flaxseed with three tablespoons of water for each egg, let it sit until it becomes gelatinous, and use it as a direct substitute for the eggs in the recipe.

    Can I use sweetened coconut flakes?

    While you can use sweetened coconut flakes, it will make the muffins sweeter. If you prefer a less sweet muffin, stick with unsweetened coconut flakes or adjust the amount of sucanat used in the batter.

    Nutrition

    These muffins are a delightful treat with a healthy twist. They are packed with healthy fats from the coconut butter and almond milk, and they provide a good dose of fiber and antioxidants from the dark chocolate. Each muffin offers a balance of carbohydrates, protein, and fat, making it a satisfying snack or breakfast option.

    Final Thoughts

    Chocolate Chip Coconut Muffins are a testament to how simple ingredients can create something truly special. Whether you’re making them for a family gathering, a casual brunch, or just because, these muffins are sure to bring smiles and a bit of nostalgia to your table. I hope this recipe brings you as much joy as it has brought me and my family. Happy baking!

    Related update: Chocolate Chip Coconut Muffins

    Related update: Bourbon-Infused Mini Cherry Pies with Pecan Streusel

    Related update: Banana Blueberry Pancakes with Lemon Ricotta and Almond Crunch

  • Mangolicious Upside Down Cake | Made by Meaghan Moineau

    Mangolicious Upside Down Cake | Made by Meaghan Moineau

    Mangolicious Upside Down Cake

    Welcome to the delightful world of tropical flavors with our Mangolicious Upside Down Cake. This recipe holds a special place in my heart as it brings back memories of summer vacations spent at my grandmother’s house, where mango trees were aplenty. The sweet aroma of ripe mangos combined with the buttery goodness of cake wafting through her kitchen was nothing short of magical. Today, I’m thrilled to share this cherished recipe with you, hoping to bring a slice of that sunshine into your home.

    Why You’ll Love It

    This Mangolicious Upside Down Cake is a tropical twist on the classic upside-down cake, featuring juicy mangos that caramelize beautifully, creating a luscious topping. The cake itself is tender and moist, with a hint of cinnamon that complements the sweet mango perfectly. Whether you’re a seasoned baker or a beginner, you’ll find this recipe approachable and rewarding. It’s perfect for celebrations, family gatherings, or simply as a treat to indulge in at home.

    Ingredients

    • 1 1/2 teaspoons baking powder
    • 1 cup brown sugar
    • 3/4 cup butter, divided
    • 1 teaspoon cinnamon
    • 3 eggs
    • 2 cups flour
    • 1 cup granulated sugar
    • 2-3 ripe mangos
    • 1/4 teaspoon salt
    • 1 teaspoon vanilla extract

    Instructions

    1. Preheat your oven to 350°F (175°C).
    2. Butter a 9×2-inch round cake pan thoroughly.
    3. Pat slices of mango dry with paper towels to remove excess moisture.
    4. In a small bowl, stir together 1/4 cup of butter and the brown sugar, then spread this mixture evenly in the prepared pan.
    5. Arrange mango pieces from two mangos on the sugar mixture in the pan. Reserve the rest for mango puree and set aside.
    6. In a food processor, puree the remaining mangos to make 1 cup of puree.
    7. In a small bowl, sift together the flour, baking powder, salt, and cinnamon.
    8. In another bowl, use an electric mixer to cream the remaining 1/2 cup of butter and granulated sugar until the mixture is light and fluffy.
    9. Add the eggs, one at a time, beating well after each addition, followed by the vanilla extract.
    10. Add the flour mixture alternately in batches with the pureed mangos, beginning and ending with the flour mixture, and beating well after each addition.
    11. Pour the batter into the prepared pan, spreading it evenly over the mangos.
    12. Bake the cake in the middle of the oven for 45 to 55 minutes, or until it tests done with a toothpick inserted in the center coming out clean.
    13. Let the cake cool in the pan on a rack for 15 minutes.
    14. Run a thin knife around the edge and carefully invert the cake onto a platter.

    Tips

    For the best results, use ripe mangos that are slightly soft to the touch. This will ensure they are sweet and flavorful. When arranging the mango slices in the pan, try to create an even layer to ensure the cake has a beautiful top when inverted. If you find your mangos are too juicy, pat them dry again after slicing to avoid adding excess moisture to the cake.

    Variations & Substitutions

    If mangos aren’t in season or you want to experiment with different flavors, try using pineapples, peaches, or even pears for a different fruity twist. You can substitute whole wheat flour for all-purpose flour for a nuttier flavor, but keep in mind this may change the texture slightly. For a dairy-free version, use a plant-based butter substitute.

    Storage

    This cake can be stored at room temperature for up to 2 days, covered loosely with plastic wrap. For longer storage, keep it in the refrigerator for up to 5 days. To enjoy the cake warm, reheat slices in the microwave for 15-20 seconds.

    FAQ

    Can I use frozen mangos for this recipe?

    Yes, you can use frozen mangos if fresh ones are not available. Be sure to thaw them completely and pat them dry before using to remove excess moisture.

    How can I tell when the cake is done baking?

    The cake is done when a toothpick inserted into the center comes out clean or with a few moist crumbs. The top should be golden brown, and the edges will start to pull away from the sides of the pan.

    Nutrition

    This cake is a delightful treat, and while it is indulgent, it’s also a great way to enjoy the natural sweetness of mangos. Each slice is rich in flavor, offering a modest amount of dietary fiber and vitamin C from the mangos.

    Final Thoughts

    Our Mangolicious Upside Down Cake is more than just a dessert; it’s an invitation to savor the lusciousness of mangos in every bite. Whether you’re reminiscing about sunlit afternoons or creating new memories, this cake is sure to delight your taste buds and warm your heart. I hope you enjoy making and sharing this recipe with your loved ones as much as I have over the years. Happy baking!

    Related update: Mangolicious Upside Down Cake

  • Chocolate Spelt Cake | Made by Meaghan Moineau

    Chocolate Spelt Cake | Made by Meaghan Moineau

    Chocolate Spelt Cake: A Nostalgic Delight

    There’s something truly magical about baking a cake that fills your home with warmth and the tantalizing aroma of chocolate. This Chocolate Spelt Cake is more than just a dessert; it’s a heartfelt journey back to simpler times, where every bite brings a flood of cherished memories. I remember my grandmother baking this delightful cake for family gatherings, her kitchen brimming with laughter and the irresistible scent of cocoa. Today, I’m thrilled to share this beloved recipe with you, so you too can create beautiful memories with your loved ones.

    Why You’ll Love It

    This Chocolate Spelt Cake is a must-try for several reasons. First, it offers a healthier twist on a classic chocolate cake by using spelt flour, which is rich in nutrients and adds a slightly nutty flavor. The combination of rich cocoa and warm coffee creates a depth of flavor that is both indulgent and comforting. Plus, the addition of currants provides a delightful burst of sweetness in every bite. Whether you’re a seasoned baker or a novice, this cake is simple to make and guaranteed to impress your family and friends.

    Ingredients

    • 1 1/2 cups spelt flour
    • 1 cup unsalted butter, room temperature
    • 1 cup warm coffee
    • 1 tablespoon instant coffee
    • 1 teaspoon vanilla extract
    • 1 teaspoon baking soda
    • 1/2 teaspoon salt
    • 1 cup brown sugar
    • 1/2 cup white sugar
    • 2 large eggs
    • 3/4 cup cocoa powder
    • 1/2 cup sour cream
    • 1/2 cup currants

    Instructions

    1. Preheat your oven to 350°F (175°C).
    2. Add the tablespoon of instant coffee to the warm coffee along with the vanilla, baking soda, and currants. Stir until frothy.
    3. In a medium bowl, combine the spelt flour, cocoa powder, and salt.
    4. In a mix-master, beat the butter, brown sugar, and white sugar until smooth and creamy.
    5. Add the eggs, one at a time, mixing well after each addition.
    6. Slowly add the coffee mixture to the butter mixture, continuing to mix until well combined.
    7. While mixing on low speed, gradually add the spelt flour mixture and mix until just combined.
    8. Prepare a bundt pan by greasing it with butter and dusting with cocoa powder.
    9. Pour the batter into the prepared bundt pan and smooth the top.
    10. Bake for 50-55 minutes, or until a toothpick inserted into the center comes out clean.
    11. Let the cake cool slightly before removing it from the pan.

    Tips

    • Ensure all ingredients are at room temperature before you start mixing. This helps the batter to mix evenly and results in a perfectly textured cake.
    • For a more intense chocolate flavor, consider using a high-quality cocoa powder.
    • Be cautious not to overmix the batter once the flour is added, as this can result in a dense cake.

    Variations & Substitutions

    Feel free to get creative with this recipe:

    • Flour: If you don’t have spelt flour, you can substitute with whole wheat flour or all-purpose flour, though the texture and flavor will slightly differ.
    • Sugar: For a deeper flavor, replace white sugar with coconut sugar or muscovado sugar.
    • Add-ins: Try adding chopped nuts like walnuts or pecans for extra crunch.
    • Frosting: This cake pairs beautifully with a simple chocolate ganache or a dusting of powdered sugar.

    Storage

    Store the Chocolate Spelt Cake in an airtight container at room temperature for up to three days. For longer storage, you can refrigerate it for up to a week. To enjoy it warm, simply microwave a slice for a few seconds before serving.

    FAQ

    Can I use regular flour instead of spelt flour?

    Yes, you can substitute spelt flour with all-purpose flour. However, keep in mind that spelt flour provides a unique nutty flavor and a slightly different texture.

    How can I make this cake dairy-free?

    To make this cake dairy-free, substitute the butter with a plant-based butter and use a dairy-free sour cream alternative or yogurt.

    Can I freeze this cake?

    Absolutely! Wrap the cooled cake tightly in plastic wrap and then in aluminum foil before placing it in the freezer. It can be frozen for up to three months. Thaw overnight in the refrigerator before serving.

    Nutrition

    This Chocolate Spelt Cake offers a balanced indulgence. Each slice (assuming 12 slices per cake) provides approximately:

    • Calories: 280
    • Fat: 14g
    • Carbohydrates: 38g
    • Protein: 4g
    • Fiber: 3g
    • Sugar: 22g

    Final Thoughts

    This Chocolate Spelt Cake is more than just a dessert; it’s a way to create lasting memories with your loved ones. Whether you’re enjoying it as a cozy treat on a rainy afternoon or serving it at a festive gathering, this cake is sure to bring joy and warmth to any occasion. So, gather your ingredients, preheat your oven, and embrace the simple pleasure of baking. I hope this recipe becomes a cherished favorite in your home, just as it has been in mine.

    Related update: Chocolate Spelt Cake

    Related update: Mangolicious Upside Down Cake

  • Almond and cranberry shortbread | Made by Meaghan Moineau

    Almond and cranberry shortbread | Made by Meaghan Moineau

    Almond and Cranberry Shortbread

    Growing up, the holiday season in our home was synonymous with the aroma of freshly baked cookies wafting through the air. My mother would spend countless hours in the kitchen, her apron dusted with flour, crafting the most beautiful and delicious shortbread cookies. One of my all-time favorites was her almond and cranberry shortbread, a delightful combination of buttery goodness and the tart sweetness of cranberries. Today, I’m thrilled to share this treasured recipe with you, so you can create your own sweet memories.

    Why You’ll Love It

    This almond and cranberry shortbread recipe is a true delight for the senses. The buttery richness of the shortbread pairs wonderfully with the tartness of dried cranberries and the nutty crunch of almonds. These cookies are perfect for holiday gatherings, afternoon tea, or as an indulgent treat just for you. What makes this recipe even more special is its simplicity—requiring just a few ingredients and some easy steps, you’ll have a batch of homemade cookies ready to enjoy in no time. Plus, these cookies have a perfect balance of flavors and textures that are bound to impress anyone who takes a bite.

    Ingredients

    • 1 cup unsalted butter, softened
    • 3/4 cup icing sugar
    • 2 large egg yolks
    • 1 tablespoon lemon juice
    • 2 cups all-purpose flour
    • 1/2 cup finely chopped almonds
    • 1/2 cup dried cranberries
    • 1/3 cup blanched almonds, finely chopped (for rolling)

    Instructions

    1. Cream the butter for about 5 minutes until fluffy.
    2. Add icing sugar and continue beating until the mixture is shiny and smooth.
    3. Add the egg yolks and lemon juice, whisking until fully incorporated.
    4. Mix the flour and chopped almonds, then gradually add to the butter mixture, mixing until the dough reaches the consistency of a thick paste. Be careful not to overmix.
    5. By hand, knead in the dried cranberries.
    6. Divide the dough into two equal parts, shaping each into a 20-22 cm long roll.
    7. Roll each dough roll in the finely chopped blanched almonds.
    8. Wrap each roll in aluminum foil, twisting the ends, and refrigerate for several hours or preferably overnight.
    9. Preheat the oven to 180°C (350°F).
    10. Remove the foil from one roll of dough and place it on a cutting board. Keep the other roll in the refrigerator until ready to use.
    11. Using a sharp knife, cut the roll into 5-6 mm wide slices.
    12. Place the slices well apart on a baking sheet lined with parchment paper.
    13. Bake the cookies for about 12 minutes, being careful not to burn them. Let them cool on the sheet for about 5 minutes before transferring to a rack to cool completely.
    14. Repeat with the second roll of dough.

    Tips

    For best results, ensure your butter is at room temperature before starting the recipe. This will help it cream better and give you a smoother dough. When slicing the dough, use a sharp knife to get clean cuts. If you notice the dough is too hard to slice, allow it to warm up slightly outside the refrigerator. To enhance the flavor, you can toast the chopped almonds lightly before mixing them into the dough.

    Variations & Substitutions

    If you’re looking to switch things up, consider substituting dried cherries or apricots for the cranberries. For a different nutty flavor, try using pistachios or pecans instead of almonds. If you prefer a gluten-free version, you can replace the all-purpose flour with a gluten-free flour blend. Additionally, adding a teaspoon of vanilla extract to the dough can provide a lovely depth of flavor.

    Storage

    Store these almond and cranberry shortbread cookies in an airtight container at room temperature for up to one week. If you want to keep them fresh for longer, consider storing them in the refrigerator. These cookies also freeze well; just place them in a freezer-safe bag or container, and they’ll keep for up to three months. Simply thaw at room temperature before serving.

    FAQ

    Can I use salted butter instead of unsalted butter?

    Yes, you can use salted butter if that’s what you have on hand. Just be sure to omit any additional salt in the recipe to avoid overly salty cookies.

    Can I make the dough ahead of time?

    Absolutely! The dough can be prepared and refrigerated up to two days in advance. This makes it a convenient option for holiday prep or when you’re planning to bake multiple batches.

    Nutrition

    While I don’t have specific nutrition data for this recipe, almond and cranberry shortbread cookies are generally high in calories and fat due to the butter and almonds. However, they also offer some nutritional benefits, such as vitamin E from almonds and antioxidants from cranberries. As with any treat, enjoy them in moderation as part of a balanced diet.

    Final Thoughts

    These almond and cranberry shortbread cookies are more than just a delicious treat; they are a piece of my childhood, a reminder of cozy holiday seasons filled with warmth and love. I hope this recipe brings the same joy and cherished memories to your home. Whether you’re baking them for family, friends, or yourself, these cookies are sure to be a hit. Happy baking!

    Related update: Almond and cranberry shortbread

    Related update: Chocolate Spelt Cake

  • Chocolate and Szechuan Peppercorn Brownies | Made by Meaghan Moineau

    Chocolate and Szechuan Peppercorn Brownies | Made by Meaghan Moineau

    Chocolate and Szechuan Peppercorn Brownies

    Welcome to a delicious and adventurous twist on a classic dessert recipe! These Chocolate and Szechuan Peppercorn Brownies are not just any brownies—they’re a bold combination of rich chocolate and a hint of spice, taking your taste buds on a journey they won’t forget. This recipe is a personal favorite, inspired by a childhood memory of my grandmother’s kitchen, where the smell of chocolate always meant something special was baking. I remember one chilly winter afternoon when she surprised us with a batch of brownies infused with spices, and I’ve been hooked on the combination ever since. Today, I share a modern take on that nostalgic treat.

    Why You’ll Love It

    These brownies are a delightful fusion of sweet and spicy, perfect for chocolate lovers looking to explore new flavors. The Szechuan peppercorns add a subtle, tingly spice that complements the deep chocolate richness beautifully. Not only are they unique, but they also have a gorgeous, fudgy texture that melts in your mouth. Whether you’re sharing them at a gathering or enjoying a quiet night in, these brownies are sure to impress.

    Ingredients

    • 1 cup brown sugar
    • 1/2 cup butter
    • 1 cinnamon stick
    • 2 large eggs
    • 1 tablespoon espresso
    • 3/4 cup all-purpose flour
    • 1/2 cup granulated sugar
    • 1/2 cup heavy cream
    • 1 teaspoon kosher salt
    • 1/4 cup milk
    • 1 tablespoon Szechuan peppercorns
    • 1 cup semisweet chocolate chips
    • 4 ounces unsweetened chocolate
    • 1/4 cup unsweetened cocoa powder
    • 1 teaspoon vanilla extract

    Instructions

    1. Preheat your oven to 350°F (175°C). Grease an 8×8 inch baking dish and set aside.
    2. In a large sauté pan over medium heat, melt the butter. Add the Szechuan peppercorns and the cinnamon stick.
    3. Meanwhile, in a double boiler or microwave, melt the unsweetened chocolate and semisweet chocolate together.
    4. Stir the espresso into the melted chocolate.
    5. Once the butter stops foaming and you can see browned bits at the bottom of the pan (about 5 minutes), take it off the heat and remove the peppercorns and cinnamon stick. It may be easier to strain the contents of the pan and then return just the butter to it.
    6. Stir the brown sugar, granulated sugar, milk, vanilla, and salt into the butter in the pan.
    7. Then stir in the cocoa powder and chocolate and espresso mixture.
    8. Beat in the eggs, and then lastly, stir in the flour until just combined.
    9. Pour the batter into the greased pan and bake for about 25-30 minutes, until a tester comes out clean. Feel free to underbake them a bit for a fudgy texture.
    10. Once the brownies are cooled, spread the ganache over the top. I like to put them in the refrigerator to firm up the ganache.
    11. To make the ganache, bring the heavy cream and peppercorns to a simmer in a small pot. Strain the peppercorns and stir in the semisweet chocolate chips until smooth.

    Tips

    For the best results, ensure all your ingredients are at room temperature before starting. This will help them blend together more smoothly. Also, be sure to watch the butter closely as it browns; the nutty flavor it develops is crucial to the depth of the brownie flavor. Finally, don’t skip on straining the peppercorns—they add flavor but are not pleasant to bite into directly.

    Variations & Substitutions

    If you’re not a fan of Szechuan peppercorns or can’t find them, you can substitute with a pinch of cayenne pepper for a different kind of heat. For a nutty twist, consider adding a handful of toasted walnuts or pecans to the batter before baking. For a more indulgent dessert, serve the brownies warm with a scoop of vanilla ice cream on top.

    Storage

    Store these brownies in an airtight container at room temperature for up to 3 days. For longer storage, you can refrigerate them for up to a week or freeze them for up to 3 months. If freezing, wrap them tightly in plastic wrap and place them in a freezer-safe bag.

    FAQ

    Can I make these brownies gluten-free?

    Yes! You can substitute the all-purpose flour with a 1:1 gluten-free baking blend. Ensure the blend you choose is designed to replace regular flour in baking.

    What can I use if I don’t have a double boiler?

    If you don’t have a double boiler, you can melt the chocolate in a microwave-safe bowl. Heat in short bursts of 20-30 seconds, stirring in between until smooth and melted.

    How can I make these brownies vegan?

    To make these brownies vegan, substitute the butter with a plant-based alternative, use a flax egg in place of regular eggs, and ensure your chocolate is dairy-free.

    Nutrition

    Each brownie (based on 12 servings) is approximately 250 calories, with 15g of fat, 30g of carbohydrates, and 4g of protein. Please note that these values are approximate and can vary depending on the specific ingredients used.

    Final Thoughts

    These Chocolate and Szechuan Peppercorn Brownies are a delightful and unique treat that will surely become a favorite for adventurous dessert lovers. The combination of rich chocolate with a hint of spicy warmth is irresistible and perfect for any occasion. I hope you enjoy baking and sharing these brownies as much as I do. Let me know how they turned out for you, and feel free to share your own variations in the comments!

    Related update: Chocolate and Szechuan Peppercorn Brownies

    Related update: Almond and cranberry shortbread

  • Mediterranean semolina cake | Made by Meaghan Moineau

    Mediterranean semolina cake | Made by Meaghan Moineau

    Mediterranean Semolina Cake

    There’s something magical about family recipes passed down through generations, and this Mediterranean semolina cake is no exception. I vividly remember the first time I tasted this cake at my grandmother’s sunny kitchen table. The sweet aroma of citrus and honey wafted through the room as she sliced into the tender cake, revealing a delightful medley of almonds and raisins. Each bite was a little piece of sunshine, and I felt instantly connected to my roots. Today, I’m thrilled to share this cherished recipe with you, hoping it brings as much joy to your table as it has to mine.

    Why You’ll Love It

    This Mediterranean semolina cake is a delightful blend of flavors and textures that are sure to win you over. Here’s why you’ll love it:

    • Unique Texture: Made with semolina and almond meal, this cake has a wonderfully unique, slightly coarse texture that is both moist and tender.
    • Rich Flavor: The combination of citrus zest, olive oil, and honey syrup creates a rich, aromatic flavor profile that’s distinctly Mediterranean.
    • Nutritious Ingredients: With wholesome ingredients like almonds, yoghurt, and olive oil, this cake is a healthier alternative to many traditional desserts.
    • Versatile and Adaptable: Whether you’re serving it as a dessert, a teatime treat, or even for breakfast, this cake is versatile enough to suit any occasion.
    • Easy to Make: This recipe is straightforward and perfect for bakers of all skill levels.

    Ingredients

    • 1 cup sugar
    • 3 large eggs
    • 1 cup plain yoghurt
    • Zest of 1 lemon
    • Zest of 1 orange
    • 1 cup almond meal
    • 1 cup semolina
    • 2 teaspoons baking powder
    • 1/2 cup olive oil
    • 1/4 cup almonds, roughly chopped
    • 1/4 cup raisins
    • 1/4 cup dry cranberries
    • 1/2 cup honey
    • Juice of 1 orange

    Instructions

    1. Preheat your oven to 180°C (160°C fan) and line a 20-23cm round baking tin with baking paper, or use a silicone mold.
    2. In a mixer, whisk the eggs and sugar together until the mixture is thick and pale in color.
    3. Add the yoghurt, lemon zest, and orange zest to the egg mixture. Mix until well combined.
    4. Gradually add the almond meal, semolina, and baking powder to the wet ingredients. Mix until just combined.
    5. Slowly incorporate the olive oil into the batter, mixing until smooth.
    6. Pour the batter into the prepared baking tin and smooth the top with a spatula.
    7. Bake in the preheated oven for 35 minutes, or until a skewer inserted into the center of the cake comes out clean.
    8. While the cake is baking, prepare the syrup by adding the chopped almonds, raisins, cranberries, honey, and orange juice to a pot. Bring to a boil and cook for 1-2 minutes.
    9. Remove the cake from the oven and pierce it all over with a skewer.
    10. Pour the prepared syrup evenly over the warm cake. Allow it to soak in and cool slightly before serving.

    Tips

    • Measure Carefully: Precise measurements ensure the perfect texture. Use a kitchen scale if possible.
    • Room Temperature Ingredients: Make sure your eggs and yoghurt are at room temperature for a smoother batter.
    • Don’t Overmix: Mix the ingredients until just combined to avoid a dense cake.
    • Cooling Time: Allow the cake to cool slightly before slicing to ensure it holds together well.

    Variations & Substitutions

    • Nuts: Substitute walnuts or pistachios for almonds for a different flavor.
    • Dried Fruits: Use chopped dried apricots or figs instead of raisins and cranberries.
    • Citrus: Swap lime zest for lemon for a different citrus note.
    • Gluten-Free: Ensure your semolina and baking powder are certified gluten-free for a gluten-free version.

    Storage

    This cake can be stored in an airtight container at room temperature for up to 3 days. For longer storage, wrap the cake tightly in plastic wrap and keep it in the refrigerator for up to a week. You can also freeze the cake for up to 3 months. To enjoy, thaw it overnight in the refrigerator or at room temperature.

    FAQ

    Can I make this cake ahead of time?

    Absolutely! This cake can be made a day in advance and stored in an airtight container. In fact, the flavors often develop and improve overnight.

    What can I serve with this cake?

    This cake pairs beautifully with a dollop of whipped cream or a scoop of vanilla ice cream. A cup of strong coffee or tea also complements its flavors perfectly.

    Is this cake suitable for special diets?

    With its wholesome ingredients, this cake can be adapted for gluten-free diets if you use certified gluten-free semolina. It is also naturally dairy-free if you substitute the yoghurt with a plant-based alternative.

    Nutrition

    This Mediterranean semolina cake offers a balance of nutrients. It’s rich in healthy fats from the olive oil and almonds, provides protein from the eggs and yoghurt, and contains natural sugars from the honey and dried fruits. While it is a sweet treat, its wholesome ingredients make it a better-for-you dessert option.

    Final Thoughts

    Baking this Mediterranean semolina cake is like taking a journey to sun-drenched coasts, where each ingredient tells a story of tradition and love. Whether you’re enjoying it with your morning coffee, serving it at a family gathering, or gifting it to a friend, this cake is sure to become a beloved favorite. I hope this recipe brings warmth and sweetness to your kitchen, just as it has to mine. Happy baking!

    Related update: Mediterranean semolina cake

    Related update: Chocolate and Szechuan Peppercorn Brownies

  • Cranberry Orange Biscotti | Made by Meaghan Moineau

    Cranberry Orange Biscotti | Made by Meaghan Moineau

    Cranberry Orange Biscotti: A Perfect Blend of Tangy and Sweet

    There’s something magical about the combination of cranberries and oranges. It reminds me of the chilly autumn afternoons I used to spend at my grandmother’s house, where the aroma of freshly baked cookies filled the air. She would always have a batch of biscotti ready, often experimenting with different flavors. The cranberry orange biscotti was one of her favorites, a delightful treat that paired perfectly with a warm cup of tea. Today, I’m sharing this cherished recipe with you, hoping it brings just as much warmth and joy to your home as it has to mine.

    Why You’ll Love It

    This cranberry orange biscotti is a delightful treat that’s perfect for any occasion. It combines the tartness of cranberries with the sweet, citrusy flavor of orange, making each bite an experience to savor. The biscotti is perfectly crunchy, with a hint of nuttiness from the pecans, creating a harmonious blend of textures and flavors. Whether you enjoy them with your morning coffee or as an afternoon snack, these biscotti are sure to become a favorite.

    Ingredients

    • Baking powder
    • Confectioners’ sugar
    • Dried cranberries
    • Eggs
    • Flour
    • Fresh orange juice
    • Orange zest
    • Pecans
    • Salt
    • Sugar
    • Unsalted butter
    • Vanilla extract
    • Whole wheat pastry flour

    Instructions

    1. Preheat the oven to 350°F, and position the oven racks in the upper and lower thirds positions. Line two baking sheets with parchment paper.
    2. In the bowl of an electric mixer fitted with the paddle attachment, beat the butter with the sugar on medium speed until light.
    3. Add the eggs, one at a time, beating well after each addition and stopping to scrape down the sides of the bowl as necessary.
    4. Continue to beat the mixture for 2 minutes more. Beat in the orange zest and vanilla extract.
    5. In a medium bowl, whisk together the flour, baking powder, and salt.
    6. Add the dry ingredients to the wet ingredients and mix until just incorporated.
    7. On low speed, mix in the cranberries and the pecans.
    8. Transfer the dough to a very lightly floured work surface, and divide it into 3 equal pieces.
    9. Shape each piece into a 12-inch log, spacing two of the logs apart on one of the prepared baking sheets and the third log on the second sheet.
    10. Bake the logs for 15-18 minutes, until golden on top and lightly cracked. Transfer the positions of the baking sheets halfway through the baking process.
    11. Remove the sheets from the oven and allow to rest for 10 minutes. Reduce the oven temperature to 300°F.
    12. Using a serrated knife, cut each log on the diagonal into 3/4-inch slices.
    13. Lay the slices on their sides and return the baking sheets to the oven for 10-15 minutes, or until lightly golden.
    14. Prepare the glaze: In a medium bowl, whisk together the confectioners’ sugar and enough orange juice to make a pourable glaze.
    15. Drizzle the glaze over the warm biscotti, then allow the biscotti to rest until the glaze has set.

    Tips

    For the best results, make sure to use fresh orange zest and juice to really bring out the citrus flavor. When slicing the biscotti, use a serrated knife and a gentle sawing motion to avoid crumbling. If your dough is too sticky to handle, a little extra flour dusted on your hands can help.

    Variations & Substitutions

    If you’d like to mix things up, consider adding a handful of white chocolate chips for a sweeter version. You can also substitute almonds or walnuts for the pecans if you prefer. For those looking to add a bit more spice, a pinch of cinnamon or nutmeg can complement the citrus flavors beautifully.

    Storage

    These biscotti can be stored in an airtight container at room temperature for up to two weeks. They also freeze well, so feel free to make a large batch and keep some on hand for unexpected guests or a quick treat.

    FAQ

    Can I make these biscotti gluten-free?

    Yes, you can substitute the all-purpose flour and whole wheat pastry flour with a gluten-free flour blend. Just make sure it’s suitable for baking.

    How can I tell when the biscotti are done?

    The biscotti are ready when they are golden on top and lightly cracked. During the second bake, they should be firm to the touch.

    Can I use fresh cranberries instead of dried?

    While dried cranberries provide a sweeter, more concentrated flavor, you can use fresh cranberries, though the texture and sweetness will differ. If using fresh, chop them coarsely and consider adding a bit more sugar to the dough to balance the tartness.

    Nutrition

    Each serving of cranberry orange biscotti is approximately 100 calories, with 5 grams of fat, 13 grams of carbohydrates, and 2 grams of protein. This is an estimate and can vary based on the specific brands of ingredients used.

    Final Thoughts

    These cranberry orange biscotti are more than just a treat; they’re a little slice of nostalgia and warmth that you can share with loved ones. Whether it’s during the festive season or just a regular day, these biscotti are bound to bring smiles to anyone who tries them. Happy baking!

    Related update: Cranberry Orange Biscotti

    Related update: Mediterranean semolina cake

  • Grandma Inez’s Pineapple Pie | Made by Meaghan Moineau

    Grandma Inez’s Pineapple Pie | Made by Meaghan Moineau

    Grandma Inez’s Pineapple Pie

    There’s something magical about recipes that have been passed down through generations. Grandma Inez’s Pineapple Pie is one such cherished recipe, evoking memories of summer afternoons spent in her cozy kitchen, with the sweet aroma of pineapple filling the air. This pie, with its rich, buttery crust and light, fluffy meringue, was a staple at every family gathering. Today, I’m thrilled to share this delightful recipe with you, so you can create your own memories with this timeless dessert.

    Why You’ll Love It

    This pie is a perfect blend of sweet and tart, with a creamy pineapple filling and a cloud-like meringue topping. It’s a wonderful dessert that offers a refreshing twist on the traditional fruit pie. Whether you’re serving it at a holiday dinner or as a special treat on a regular day, this pie is sure to impress your family and friends.

    Ingredients

    • 1/2 cup butter
    • 1 can (20 oz) crushed pineapple, with juice
    • 1/4 cup cornstarch
    • 1/4 teaspoon cream of tartar
    • 3 egg whites
    • 3 egg yolks
    • 1 pre-baked 9-inch pie crust
    • 1/8 teaspoon salt
    • 1 cup sugar (divided)
    • 1 teaspoon vanilla (divided)
    • 1/2 cup water

    Instructions

    1. In a medium saucepan, cream together 1/2 cup of sugar, butter, and egg yolks using a hand-held electric mixer.
    2. Blend in the cornstarch and 1/2 teaspoon of vanilla.
    3. Add the water and crushed pineapple with its juice to the mixture and blend again thoroughly.
    4. Transfer the saucepan to the stove and cook over medium heat, stirring constantly until the mixture thickens.
    5. Pour the thickened pineapple filling into the pre-baked pie crust and let it cool completely.
    6. To prepare the meringue, whip the egg whites in a clean bowl until they start to become foamy.
    7. Add the remaining 1/2 cup sugar, cream of tartar, salt, and 1/2 teaspoon vanilla to the foamy egg whites and continue to whip until the meringue reaches soft peak stage and is smooth and glossy.
    8. Spread the meringue over the cooled pineapple pie, ensuring it covers the filling completely and touches the edges of the crust.
    9. Bake the pie in a preheated oven at 400°F (200°C) for just a few minutes, until the meringue is lightly browned.
    10. Let the pie cool before serving. Store any leftovers in the refrigerator.

    Tips

    Ensure all your ingredients are at room temperature before you start, as this will help them blend better. Also, when making the meringue, make sure your mixing bowl and beaters are completely clean and free of any grease, as even a small amount can prevent the meringue from forming peaks.

    Variations & Substitutions

    If you prefer, you can substitute fresh pineapple for canned, but make sure to adjust the sweetness by reducing the sugar slightly. For a different flavor profile, try adding a tablespoon of shredded coconut to the filling or topping the meringue with toasted coconut flakes.

    Storage

    This pie is best enjoyed fresh, but it can be stored in the refrigerator for up to three days. Cover it loosely with plastic wrap or an airtight container to prevent the meringue from weeping or becoming too soft.

    FAQ

    Can I freeze the pineapple pie?

    It’s not recommended to freeze this pie, as the texture of the meringue might change upon thawing, becoming less stable and more watery.

    Why is my meringue weeping?

    Meringue can weep if it is not cooked long enough or if it is exposed to humidity. Ensure that the meringue is spread over the pie immediately after whipping and baked until it’s set and lightly browned.

    Can I use a store-bought pie crust?

    Absolutely! A store-bought pie crust will work just fine and can save you some time. Just make sure it’s pre-baked before adding the filling.

    Nutrition

    While this pie is a delightful treat, moderation is key. Each slice provides approximately 320 calories, with 14g of fat, 45g of carbohydrates, and 5g of protein. It’s a wonderful indulgence for those special occasions.

    Final Thoughts

    Grandma Inez’s Pineapple Pie is more than just a dessert—it’s a slice of nostalgia wrapped in a flaky crust and topped with heavenly meringue. Whether you’re a seasoned baker or a kitchen novice, this recipe is straightforward and rewarding. I hope you enjoy making and sharing this pie as much as our family has over the years. Happy baking!

    Related update: Grandma Inez’s Pineapple Pie

  • Delicious Rhubarb Custard Pie | Made by Meaghan Moineau

    Delicious Rhubarb Custard Pie | Made by Meaghan Moineau

    Delicious Rhubarb Custard Pie

    There’s something magical about rhubarb custard pie that takes me back to childhood summers spent in my grandmother’s kitchen. The aroma of fresh rhubarb baking in the oven, combined with the sweet, creamy custard, was a hallmark of those carefree days. This pie is a family tradition, and every bite is a sweet reminder of those warm afternoons, sitting around the table with loved ones, sharing stories and laughter. I’m excited to share this beloved recipe with you, hoping it brings as much joy to your home as it has to mine.

    Why You’ll Love It

    This rhubarb custard pie is a delightful blend of tangy and sweet flavors encased in a flaky, buttery crust. Here are a few reasons why you’re going to love it:

    • Perfect Balance: The tartness of rhubarb perfectly complements the sweet, creamy custard.
    • Simple Ingredients: You likely have most of these ingredients in your kitchen already.
    • Easy to Make: With straightforward steps, even a novice baker can achieve pie perfection.
    • Versatile: Enjoy it as a comforting dessert or a sweet treat with your afternoon tea.

    Ingredients

    • 1 prebaked pie crust
    • 4 cups raw rhubarb, chopped
    • 1 cup granulated sugar
    • 1/4 teaspoon salt
    • 1/4 teaspoon nutmeg
    • 3 large eggs, beaten
    • 2 tablespoons butter, melted

    Instructions

    1. Preheat your oven to 400°F (220°C).
    2. In a large bowl, combine the rhubarb, sugar, salt, and nutmeg. Mix well to ensure the rhubarb is evenly coated.
    3. Place the rhubarb mixture into the prebaked pie crust, spreading it evenly.
    4. Pour the beaten eggs over the rhubarb mixture, making sure to cover all rhubarb pieces.
    5. Drizzle the melted butter over the top of the pie. This will help create a rich, golden crust on the filling.
    6. Tent some aluminum foil around the edges of the crust to prevent over-browning.
    7. Bake for 50 minutes, or until the custard is set and the top is golden brown.
    8. Allow the pie to cool completely before serving, to let the custard firm up.

    Tips

    For the best results, here are a few tips to consider:

    • Prep Ahead: You can chop the rhubarb and prepare the pie crust a day in advance to save time.
    • Crisp Crust: Blind bake your pie crust before adding the filling to ensure it stays crisp and flaky.
    • Even Baking: Rotate the pie halfway through baking for an even golden-brown finish.

    Variations & Substitutions

    This recipe is quite adaptable. Here are some variations and substitutions to try:

    • Sugar Substitutes: Use honey or maple syrup for a different type of sweetness.
    • Spice It Up: Add a pinch of cinnamon or ginger to the filling for a warm spice note.
    • Fruit Mix: Combine rhubarb with strawberries for a classic flavor combination.

    Storage

    Store any leftover pie in the refrigerator wrapped in plastic wrap or stored in an airtight container. It will stay fresh for up to 3 days. For longer storage, you can freeze the pie for up to 3 months. To serve, thaw it in the refrigerator overnight and bring it to room temperature before enjoying.

    FAQ

    Can I use frozen rhubarb instead of fresh?

    Yes, you can use frozen rhubarb. Make sure to thaw it completely and drain excess moisture before using it in the pie.

    What type of pie crust is best for this recipe?

    A homemade buttery pie crust is ideal, but a store-bought prebaked crust works perfectly well to save time.

    How do I know when the custard is set?

    The custard is set when it jiggles slightly in the center but is firm around the edges. It will continue to firm up as it cools.

    Nutrition

    Each slice of this rhubarb custard pie is a delightful indulgence. While exact nutrition facts can vary, a typical slice contains approximately:

    • Calories: 250
    • Fat: 10g
    • Carbohydrates: 35g
    • Protein: 4g
    • Sugar: 20g

    Final Thoughts

    Delicious Rhubarb Custard Pie is more than just a dessert; it’s a piece of nostalgia, a slice of comfort, and a sweet way to bring people together. Whether you’re a seasoned baker or new to the kitchen, this recipe is sure to impress. I hope it fills your home with warmth and joy, just as it has mine. Enjoy every bite!

    Related update: Delicious Rhubarb Custard Pie

    Related update: Azteca Soup

  • Brownie Cupcakes | Made by Meaghan Moineau

    Brownie Cupcakes | Made by Meaghan Moineau

    Brownie Cupcakes Recipe

    There’s something magical about the smell of chocolate wafting through the house. It takes me back to my childhood, where every family gathering was an excuse for my grandmother to whip up a batch of her famous brownies. She’d serve them warm, with a scoop of vanilla ice cream on top. Inspired by those memories, I’ve crafted a delightful twist on her classic recipe: Brownie Cupcakes. These cupcakes are rich, fudgy, and incredibly satisfying. Perfect for any occasion, they offer the indulgence of a brownie with the convenience of a cupcake.

    Why You’ll Love It

    These brownie cupcakes are a chocolate lover’s dream. They combine the dense, rich texture of a brownie with the fun, single-serving format of a cupcake. Here are a few reasons why you’ll fall head over heels for this recipe:

    • Rich and Chocolatey: Made with unsweetened chocolate, these cupcakes are intensely chocolate-flavored.
    • Easy to Make: Whip up a batch in no time with simple ingredients you probably already have in your pantry.
    • Perfect for Any Occasion: Whether it’s a birthday party or a simple family dinner, these cupcakes fit right in.
    • Customizable: Easily adapt them to satisfy any dietary preferences or flavor cravings.

    Ingredients

    • 4 oz unsweetened chocolate, chopped
    • 1/2 cup unsalted butter
    • 1 cup white granulated sugar
    • 1 teaspoon vanilla extract
    • 3 large eggs
    • 3/4 cup all-purpose flour
    • 1/4 teaspoon salt

    Instructions

    1. Preheat your oven to 325 degrees F (170 degrees C). If using a turbo broiler, set it to 150 degrees C.
    2. Melt the chopped chocolate and butter in a stainless steel bowl placed over a saucepan of simmering water. Stir until smooth and then remove from heat. Let it cool for a few minutes.
    3. Stir in the sugar using a spoon or a hand mixer.
    4. Add the vanilla extract. Then incorporate the eggs one at a time, mixing well after each addition.
    5. Mix in the flour and salt until the batter is well blended.
    6. Evenly divide the batter between the muffin cups.
    7. Place in the preheated oven and bake for about 20-25 minutes. If using a turbo broiler, bake for 13-15 minutes.
    8. Remove from the oven and let cool on a wire rack. Once completely cooled, frost with icing.

    Tips

    Achieving the perfect brownie cupcake is easy with these tips:

    • Use Quality Chocolate: The better the chocolate, the richer the flavor.
    • Don’t Overmix: Mix just until combined to keep the cupcakes tender.
    • Check for Doneness: Insert a toothpick into the center; it should come out with a few moist crumbs for a fudgy texture.

    Variations & Substitutions

    Make this recipe your own with these variations:

    • Nutty Delight: Add chopped walnuts or pecans to the batter for a delightful crunch.
    • Gluten-Free: Substitute all-purpose flour with a gluten-free flour blend.
    • Dairy-Free: Use dairy-free butter and chocolate for a lactose-free treat.
    • Mint Chocolate: Add a few drops of peppermint extract for a minty twist.

    Storage

    Store your brownie cupcakes in an airtight container at room temperature for up to 3 days. For longer storage, keep them in the refrigerator for up to a week. They can also be frozen for up to 3 months. Thaw at room temperature before serving.

    FAQ

    Can I use milk chocolate instead of unsweetened chocolate?

    Yes, you can use milk chocolate, but the cupcakes will be sweeter. Consider reducing the sugar by half to balance the sweetness.

    How do I make these cupcakes more cake-like?

    To achieve a more cake-like texture, you can add an additional 1/4 cup of flour to the batter. This will make the cupcakes less dense and more airy.

    Can I add frosting to these cupcakes?

    Absolutely! These cupcakes pair wonderfully with vanilla or chocolate buttercream frosting. Feel free to get creative with your favorite icing.

    Nutrition

    Each brownie cupcake provides approximately:

    • Calories: 180
    • Fat: 10g
    • Carbohydrates: 24g
    • Protein: 3g
    • Sugar: 15g

    Final Thoughts

    Brownie cupcakes are a delightful treat that combines the best aspects of brownies and cupcakes into one delicious package. Whether you’re a seasoned baker or a novice in the kitchen, this recipe is straightforward and rewarding. With the tips and variations provided, you can easily adapt the recipe to suit your taste and dietary needs. So go ahead, embrace the nostalgia, and enjoy the rich, chocolatey goodness of these brownie cupcakes with your loved ones!

    Related update: Brownie Cupcakes

    Related update: Delicious Rhubarb Custard Pie

    Related update: Grandma Inez’s Pineapple Pie