Author: Meaghan Moineau

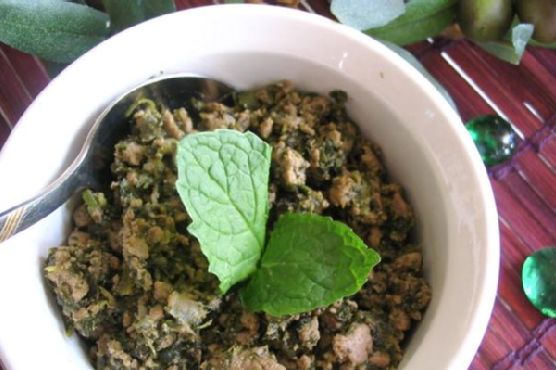
  • Sumptuous Indian-Spiced Beef with Creamy Coconut Spinach | Made by Meaghan Moineau

    Sumptuous Indian-Spiced Beef with Creamy Coconut Spinach | Made by Meaghan Moineau

    Sumptuous Indian-Spiced Beef with Creamy Coconut Spinach

    Imagine walking into a warm, inviting kitchen where the air is rich with the aromatic blend of exotic spices, hints of citrus, and a whisper of coconut. The sizzle of beef in a hot pan mingles with the fragrant steam rising from a pot, instantly whisking you away to distant lands. This is not just a meal; it’s an experience.

    Personal Story

    I still remember the first time I encountered the enchanting world of Indian spices. It was a few years ago during a trip to a bustling local market in Delhi. The vibrant colors of spices piled high in baskets were a feast for the senses. I was mesmerized by the cacophony of voices, the clatter of cookware, and the intoxicating aromas that seemed to dance in the air. That day, I became captivated by the art of blending spices to create flavors that tell a story.

    Back in my kitchen, I tried my hand at recreating the magic I had tasted. My first attempt at Indian-spiced beef was, let’s say, rustic. The aroma was there, but the complexity of the flavors seemed just out of reach. It was then my culinary journey really began. I started experimenting with various ingredients, adjusting the balance of spices, and infusing my own personal twists into traditional recipes.

    One particularly chilly winter evening, I decided to try something new. I wanted to bring warmth to the dish with the addition of creamy coconut milk and a pop of freshness with lemon zest. The creamy coconut milk melded beautifully with the spices, while the lemon zest added a surprising brightness. It was an instant hit, transforming the dish into something truly special.

    Now, this sumptuous Indian-spiced beef with creamy coconut spinach has become a beloved staple in my home. It’s a testament to how a bit of creativity and a dash of courage can elevate a classic dish into a culinary masterpiece.

    What Makes This Version Special

    This version of Indian-spiced beef is elevated by the addition of creamy coconut milk and a tangy lemon zest infusion. The coconut milk not only adds a luscious, smooth texture but also tempers the heat of the spices, creating a harmonious balance. The lemon zest, on the other hand, provides a burst of citrusy brightness that cuts through the richness, making the dish feel vibrant and fresh.

    Traditional recipes often stick to the basics, but this twist brings a new dimension to the table. The subtle tropical undertones from the coconut milk and the aromatic infusion of curry leaves make this version stand out. It’s an experience that transcends the ordinary, inviting you to savor each and every bite.

    Flavor Profile

    The rich, aromatic flavors of this dish are truly captivating. Imagine tender ground beef, infused with an exotic blend of spices like garam masala, cumin, and cardamom, each contributing to a multi-layered taste sensation. The creamy coconut milk adds a hint of tropical creaminess, perfectly complementing the bold spices. And just when you think you’ve tasted it all, the lemon zest infuses a citrusy brightness that refreshes the palate. It’s a delightful dance of flavors that leaves you craving more.

    Ingredients

    • 2 tablespoons canola oil
    • 1 teaspoon red chilli powder
    • 2 tablespoons fresh cilantro
    • 1 cinnamon stick
    • 1/4 cup fresh mint leaves
    • 1 cup frozen spinach, thawed and drained
    • 2 teaspoons garam masala
    • 1 garlic clove, minced
    • 1 tablespoon ginger paste
    • 3 green cardamom pods
    • 2 green chillies, chopped
    • 1 pound ground beef
    • 1 teaspoon ground cumin
    • 1/2 teaspoon black ground pepper
    • 1 large onion, finely chopped
    • 1/2 cup plain yogurt
    • Salt to taste
    • 1 cup coconut milk
    • Zest of 1 lemon
    • 10 fresh curry leaves

    Instructions

    1. Begin by making a vibrant green paste. In a food processor, puree the spinach, cilantro, and mint with a tablespoon or two of water. Be cautious not to overdo the mint to avoid bitterness.
    2. In a large pan, heat the canola oil over medium heat. Infuse the oil by adding fresh curry leaves and lemon zest, stirring for about 30 seconds until aromatic.
    3. Add the cardamom pods, cloves, and cinnamon stick to the infused oil. After a minute, introduce the chopped onion, sautéing until it turns golden-brown, approximately 5-7 minutes.
    4. Stir in the green chillies, minced garlic, and ginger paste. Cook for another minute, letting the flavors meld together.
    5. Add the ground beef to the pan. Sprinkle in the red chilli powder, ground cumin, garam masala, black pepper, and salt. Cook on medium-high heat for 10 minutes, stirring often to prevent burning.
    6. Incorporate half of the plain yogurt, mixing well until fully integrated. Cook for an additional 2 minutes.
    7. Pour in all of the green paste and mix thoroughly, letting it simmer for 10 minutes to allow the flavors to develop.
    8. Add the remaining yogurt, stirring well, and continue cooking for another 5 minutes. Taste and adjust salt if necessary.
    9. Finish with a swirl of creamy coconut milk, stirring gently to combine. Serve hot with parathas and fresh tomato salsa for a delightful meal.

    Pro Tips from Meaghan’s Kitchen

    • Use fresh curry leaves whenever possible for the best flavor infusion. If you can’t find them, dried leaves are a good substitute.
    • Be mindful of the mint quantity in the green paste. Too much can overpower the dish with bitterness.
    • If you don’t have a food processor, finely chop the spinach, cilantro, and mint by hand. It takes more time but yields a chunkier texture that’s equally delicious.
    • For an extra layer of flavor, toast the spices in the pan before adding the beef, releasing their essential oils.
    • When zesting the lemon, avoid the white pith as it can add unwanted bitterness.

    Variations & Dietary Swaps

    • Vegetarian Swap: Replace the ground beef with crumbled paneer or chickpeas for a delicious vegetarian version.
    • Spice-It-Up Version: Add a pinch of cayenne pepper or an extra green chilli for those who like it hot!
    • Kids-Friendly Version: Reduce the red chilli powder and omit the green chillies to make it more palatable for younger taste buds.

    What to Serve With It

    To complement this sumptuous Indian-spiced beef with creamy coconut spinach, serve it over a bed of fragrant basmati rice, which absorbs the rich, spicy sauce beautifully. A chilled mango lassi on the side provides a sweet, cooling contrast that’ll balance the dish’s heat perfectly. Alternatively, pair it with warm, fluffy naan or crispy parathas, perfect for scooping up every last bite.

    Storage & Meal Prep

    This dish is a meal prep superstar! Store leftovers in an airtight container in the refrigerator for up to 3 days. For longer storage, freeze it for up to 3 months. When reheating, add a splash of coconut milk or water to maintain its creamy texture. Heat gently on the stove or in the microwave until heated through.

    FAQ

    Can I use fresh spinach instead of frozen?

    Absolutely! Fresh spinach works just as well. Simply blanch it quickly in boiling water, drain, and then use it in the green paste as directed.

    Is there a substitute for coconut milk?

    If you’re not a fan of coconut milk or have dietary restrictions, you can substitute with cashew cream or heavy cream for a similar creamy texture.

    How can I make this dish less spicy?

    To reduce the heat, simply omit the green chillies and decrease the amount of red chilli powder. This will still leave you with a flavorful dish without the extra kick.

    What can I do if I don’t have garam masala?

    If you run out of garam masala, a quick homemade blend of ground cumin, coriander, cardamom, cinnamon, cloves, and nutmeg can work in a pinch.

    Can I prepare this dish in advance?

    Yes! This dish actually tastes better the next day as the flavors have time to meld. Prepare it a day ahead and store it in the fridge, then reheat before serving.

    Final Thoughts

    Cooking is all about exploration and making each dish your own. This sumptuous Indian-spiced beef with creamy coconut spinach is a testament to that journey. I encourage you to dive into the world of spices and let your creativity shine. I can’t wait to hear your thoughts on this recipe and any personal twists you might add. Share your experiences in the comments below or tag me on social media. Let’s keep the culinary conversation going!

    Related update: Sumptuous Indian-Spiced Beef with Creamy Coconut Spinach

    Related update: Umami-Truffle Infused Mushroom Parmesan Brown Rice Risotto
  • Caramelized Banana Rum Ice Cream with Toasted Coconut and Spiced Maple Drizzle | Made by Meaghan Moineau

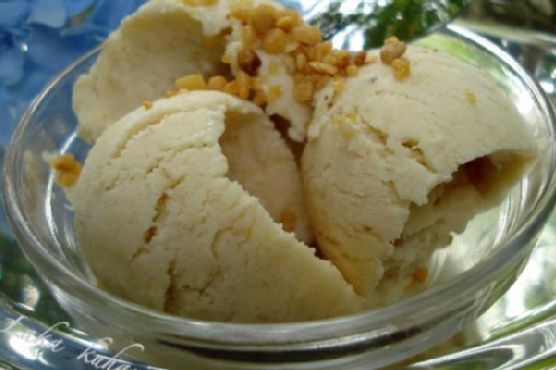
    Caramelized Banana Rum Ice Cream with Toasted Coconut and Spiced Maple Drizzle | Made by Meaghan Moineau

    Caramelized Banana Rum Ice Cream with Toasted Coconut and Spiced Maple Drizzle

    Imagine the sizzling sound of ripe bananas caramelizing in a warm, golden syrup, the air filled with the sweet and earthy aroma of dark rum. Now add the crunch of toasted coconut and a fragrant spiced maple drizzle, and you have a dessert that promises to transport your taste buds straight to paradise.

    Personal Story

    It was a sultry summer evening when I first stumbled upon the inspiration for this Caramelized Banana Rum Ice Cream. I was visiting a small coastal town, hidden away from the typical tourist trails, and found myself in a quaint little café by the beach. The menu boasted locally inspired desserts, but it was the rum-infused banana ice cream that caught my eye. One spoonful, and I was hooked.

    Back home, I couldn’t stop thinking about that dessert. I recreated it in my kitchen, infusing it with my own culinary twists. I remember the first time I tried adding toasted coconut and a spiced maple drizzle — it was a revelation. The warmth of the spices danced on my tongue, while the coconut added a delightful crunch, elevating the creamy ice cream to an entirely new level.

    But not every attempt was a triumph. I recall one particularly memorable kitchen mishap when I added too much rum. The ice cream refused to freeze properly, resulting in a slushy, albeit delicious, mess. That taught me the importance of balance — a lesson that turned my recipe into the masterpiece it is today.

    Through trial and error, and a fair share of tasting, I’ve perfected this Caramelized Banana Rum Ice Cream. It’s now a staple in my summer dessert repertoire, a reminder of that breezy coastal evening, and a testament to the magic of culinary creativity.

    What Makes This Version Special

    This version of Caramelized Banana Rum Ice Cream is special because it embraces the harmonious contrast of textures and flavors. The addition of toasted coconut introduces a delightful crunch that plays beautifully against the creamy backdrop of the ice cream. But it’s the spiced maple drizzle that truly sets this dessert apart. Warming the maple syrup with a touch of cinnamon and nutmeg creates a rich, aromatic finish that enhances the tropical notes of the dish.

    Unlike standard recipes that might overlook these elements, this version offers a multi-textured experience that keeps every spoonful exciting. The warmth of the spices adds depth, while the toasted coconut provides a satisfying bite, making this more than just a dessert — it’s an adventure for your senses.

    Flavor Profile

    Get ready for a taste experience that is sweet and creamy with a hint of tropical warmth, thanks to the caramelized bananas and dark rum. The spiced maple drizzle adds a touch of complexity with its fragrant cinnamon and nutmeg notes. Each bite of this Caramelized Banana Rum Ice Cream is a delightful dance of flavors, with the toasted coconut adding a crunchy contrast to the smooth, velvety ice cream.

    Ingredients

    • 3 ripe bananas, sliced
    • 1/4 cup dark rum
    • 1 cup sour full-fat cream or coconut milk
    • 1 tablespoon fresh lemon juice
    • 1/2 cup light brown sugar
    • 1/2 teaspoon sea salt
    • 1 teaspoon vanilla extract
    • 1/2 cup toasted coconut flakes
    • 1/4 cup maple syrup
    • 1/2 teaspoon ground cinnamon
    • 1/4 teaspoon nutmeg

    Instructions

    1. In a wide skillet or saucepan, heat the brown sugar with one-quarter of the sour cream or coconut milk over medium heat, stirring until smooth and bubbly.
    2. Add the sliced bananas and sea salt. Continue to cook for about 5 minutes, stirring occasionally, until the bananas are soft and completely cooked through.
    3. Remove from heat and stir in the remaining sour cream or coconut milk, dark rum, and vanilla extract. If the mixture tastes too sweet, add a few drops of fresh lemon juice.
    4. Transfer the mixture to a blender or food processor and puree until completely smooth.
    5. Chill the mixture thoroughly for at least 1 hour or overnight.
    6. Once chilled, pour the mixture into your ice cream maker and follow the manufacturer’s instructions.
    7. While the ice cream churns, toast the coconut flakes in a dry skillet over medium heat. Stir frequently until golden and aromatic, about 3-5 minutes.
    8. In a small saucepan, warm the maple syrup with ground cinnamon and nutmeg over low heat, stirring until fragrant.
    9. Before serving, let the ice cream sit out for 5-10 minutes to reach the perfect scooping temperature. Serve in chilled glass or porcelain bowls, and drizzle with the spiced maple syrup and sprinkle with toasted coconut flakes.

    Pro Tips from Meaghan’s Kitchen

    • Use ripe bananas for the best caramelization and natural sweetness.
    • If the ice cream mixture curdles while cooking with sour cream, don’t worry — it’ll smooth out once blended.
    • Chill your serving bowls in the freezer for a few minutes before scooping the ice cream to keep it from melting too quickly.
    • Scoop the ice cream with a hot, dry ice-cream spoon for perfect scoops.
    • Adjust the level of rum to your taste. Remember, too much can affect the freezing process!

    Variations & Dietary Swaps

    • Vegetarian Swap: Use coconut milk instead of sour cream for a plant-based version.
    • Spice-It-Up Version: Add a pinch of cayenne pepper to the spiced maple drizzle for a spicy kick.
    • Kids-Friendly Version: Omit the rum and replace it with additional vanilla extract for a non-alcoholic version.

    What to Serve With It

    This Caramelized Banana Rum Ice Cream pairs beautifully with a chilled glass of spiced rum, enhancing the tropical and warm notes of the dessert. Alternatively, serve it with a cup of rich, dark coffee for a delightful contrast that highlights the creamy sweetness of the ice cream.

    Storage & Meal Prep

    Store any leftover ice cream in an airtight container in the freezer for up to two weeks. For the best texture, let it sit at room temperature for a few minutes before serving. The spiced maple drizzle can be made in advance and stored in the refrigerator. Reheat gently before using to bring back its aromatic qualities.

    FAQ

    Can I use a different type of alcohol instead of dark rum?

    Yes, you can substitute dark rum with other spirits like bourbon or spiced rum, though it will slightly alter the flavor profile.

    What if I don’t have an ice cream maker?

    No worries! You can freeze the mixture in a shallow dish, stirring every hour until it reaches your desired consistency.

    Is this recipe gluten-free?

    Yes, this Caramelized Banana Rum Ice Cream is naturally gluten-free. Just ensure that the ingredients you use, like the maple syrup and vanilla extract, are certified gluten-free.

    How can I prevent the ice cream from becoming too hard?

    Adding a bit of alcohol, like rum, helps keep the ice cream softer. You can also let it sit at room temperature for a few minutes before serving to soften it up.

    Can I make this without an ice cream maker?

    Absolutely! Pour the chilled mixture into a shallow dish, freeze, and stir every 30-45 minutes until it reaches the desired consistency.

    Final Thoughts

    This Caramelized Banana Rum Ice Cream with Toasted Coconut and Spiced Maple Drizzle is more than just a treat; it’s an experience. Whether you’re indulging on a warm summer evening or serving it up at a dinner party, it’s sure to impress. I’d love to hear how this recipe turned out for you, so feel free to leave a comment or share your creation on social media. Happy scooping!

    Related update: Caramelized Banana Rum Ice Cream with Toasted Coconut and Spiced Maple Drizzle

    Related update: Caribbean Spiced Plantain Toffee Balls with Spiced Rum Glaze

  • Mediterranean Stuffed Eggplants with Spiced Sausage and Herb-Crust | Made by Meaghan Moineau

    Mediterranean Stuffed Eggplants with Spiced Sausage and Herb-Crust | Made by Meaghan Moineau

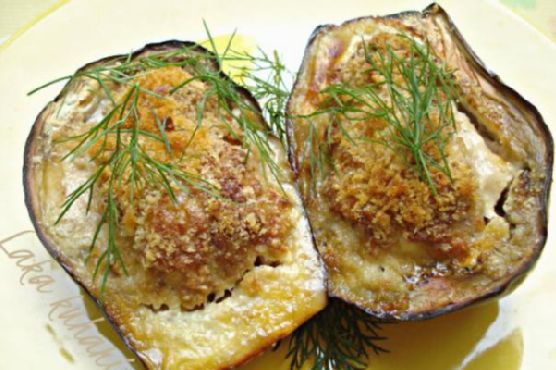
    Mediterranean Stuffed Eggplants with Spiced Sausage and Herb-Crust

    Picture this: the comforting aroma of roasted eggplant mingling with the warm, inviting scent of smoked paprika and lemon zest. It’s a sensory journey that transports you straight to a Mediterranean kitchen, where every bite is a harmonious blend of bold flavors and rustic charm. Welcome to my twist on a classic — Mediterranean Stuffed Eggplants with Spiced Sausage and Herb-Crust.

    Personal Story

    My love affair with stuffed eggplants began in a small, bustling market in the heart of Santorini. I was on a long-overdue vacation, seeking solace and inspiration amidst the azure waters and sun-kissed landscapes. The market was alive with colors and sounds, each stall brimming with fresh produce and aromatic spices. There, I discovered a humble vendor selling perfectly roasted eggplants, filled with a savory stuffing that seemed to capture the essence of the Mediterranean in every bite.

    That first bite was revelatory. The eggplant was tender, almost creamy, and the stuffing was a perfect medley of flavors — rich, savory, and unexpectedly smoky. I was hooked. I knew I had to recreate this magic back home, but with my own signature twist.

    Back in my kitchen, I set out to capture that same magic. After a few (okay, several) kitchen experiments, I settled on a combination that’s become a beloved staple in my culinary repertoire. The addition of smoked paprika and lemon zest in the stuffing brings a smoky, citrusy depth, while a walnut-parsley crust adds an earthy crunch that elevates the dish beyond the classic version.

    Every time I prepare these Mediterranean Stuffed Eggplants, I’m transported back to that sun-drenched market, and I’m thrilled to share this journey with you. Whether you’re a seasoned home cook or just beginning your culinary adventures, this dish is a testament to the power of food to connect us to places and memories.

    What Makes This Version Special

    The magic of my Mediterranean Stuffed Eggplants lies in the details. The stuffing, enriched with smoked paprika and a hint of lemon zest, sings with a smoky, citrusy depth that enlivens the palate. These flavors harmonize beautifully with the creamy eggplant, making each bite a delightful surprise.

    But that’s not all. I’ve added a walnut-parsley crust that offers an earthy crunch, contrasting with the softness of the eggplant and the juiciness of the sausage. This crust is not just a topping; it’s a flavor-packed layer that transforms this dish into a textural masterpiece. By blooming the smoked paprika in olive oil, the spice’s essence is fully realized, permeating the sausage with a warmth that is both unexpected and comforting.

    In essence, this version of Mediterranean Stuffed Eggplants isn’t just about filling a vegetable; it’s about creating a symphony of flavors and textures that elevate a simple dish to something truly special.

    Flavor Profile

    Imagine a rich, smoky aroma wafting from your oven, mingling with the zesty brightness of lemon. As you take a bite, the eggplant’s tender flesh melts into a savory stuffing enriched with the depth of smoked paprika. The citrusy burst from lemon zest cuts through the richness of the sausage, balancing the flavors beautifully.

    And then, the final flourish: a crunchy, nutty crust of walnuts and parsley that adds a herbaceous finish, leaving you craving just one more bite. This dish is a sensory journey — rich, smoky, citrusy, and delightfully crunchy, all in one experience.

    Ingredients

    • 2 large eggplants
    • 2 tablespoons **olive oil**
    • 1/2 cup **walnuts**, finely chopped
    • 1/4 cup **fresh parsley**, chopped
    • 1/2 cup bread crumbs
    • 1 tablespoon **smoked paprika**
    • 1 tablespoon **lemon zest**
    • 1 pound fresh sausage, casings removed
    • 1/2 cup feta cheese, crumbled
    • 1/2 cup mozzarella cheese, shredded
    • 1/4 cup almonds, chopped
    • 1 large egg
    • Salt and pepper to taste
    • Fresh dill, chives, or basil for garnish

    Instructions

    1. Preheat your oven to 230°C (450°F). Line a baking sheet with parchment paper.
    2. Wash the eggplants thoroughly. Cut the stems off and halve them lengthwise. Use a spoon to scoop out the middle, leaving about a half-inch border to create a boat for the stuffing.
    3. In a small pan, heat the olive oil over medium heat. Add **smoked paprika** and cook for about 1 minute, stirring continuously, until it releases its aroma. This blooming process intensifies the paprika’s flavor.
    4. In a mixing bowl, combine the sausage meat, egg, feta cheese, mozzarella, almonds, and the bloomed paprika. Add salt and pepper to taste. Mix until well incorporated.
    5. Using a spoon, generously stuff the eggplant halves with the sausage mixture. Press down lightly to ensure even distribution.
    6. In a separate bowl, combine the **walnuts**, fresh parsley, and bread crumbs. Sprinkle this mixture over the stuffed eggplants, pressing down gently to form the crust.
    7. Drizzle the stuffed eggplants with a bit more olive oil to encourage browning, then place them on the prepared baking sheet.
    8. Bake in the preheated oven for 25 minutes, or until the crust is golden-brown and crispy, and the eggplants are tender.
    9. Remove from the oven and let them cool slightly. Garnish with fresh dill, chives, or basil before serving.

    Pro Tips from Meaghan’s Kitchen

    • For the best flavor, choose eggplants that are firm and heavy for their size. They should have smooth, glossy skin and feel slightly springy when pressed.
    • Blooming spices like smoked paprika in oil unlocks their full flavor potential, so don’t skip this step!
    • If the walnut-parsley crust starts to brown too quickly, cover the eggplants loosely with foil halfway through baking.
    • For added depth, toast the walnuts lightly in a dry pan before chopping. This enhances their nuttiness.
    • Feel free to adjust the amount of lemon zest to suit your taste. A bit more zest can brighten the overall flavor profile.

    Variations & Dietary Swaps

    • Vegetarian Version: Swap the sausage for a plant-based sausage or a mixture of cooked lentils and mushrooms for a hearty, meat-free option.
    • Spice-It-Up Version: Add a pinch of red pepper flakes to the sausage mixture for a spicy kick that complements the smoky paprika.
    • Kid-Friendly Version: Simplify by omitting the lemon zest and using only mozzarella in the stuffing. Serve with a side of marinara sauce for dipping.

    What to Serve With It

    These Mediterranean Stuffed Eggplants are a meal in themselves, but they pair beautifully with a fresh, crisp salad of arugula and cherry tomatoes. The peppery greens and juicy tomatoes offer a refreshing contrast to the rich, savory eggplants.

    For a complete dining experience, serve with a crisp, chilled glass of Sauvignon Blanc. The wine’s acidity and fruity notes complement the smoky, citrusy flavors of the dish perfectly.

    Storage & Meal Prep

    Leftovers can be stored in an airtight container in the fridge for up to three days. To reheat, place the eggplants in a preheated oven at 180°C (350°F) for about 10-15 minutes, or until warmed through.

    For meal prep, you can assemble the stuffed eggplants in advance and store them, uncooked, in the fridge for up to a day. When ready to serve, simply bake as directed.

    FAQ

    Can I freeze the stuffed eggplants?

    Yes, you can freeze the stuffed eggplants before baking. Wrap them tightly in plastic wrap and place in a freezer-safe container. Freeze for up to three months. To bake, thaw overnight in the fridge and proceed with the baking instructions.

    What can I use instead of walnuts for the crust?

    If you’re avoiding nuts, consider using panko bread crumbs or crushed sunflower seeds for a similar crunch without the nuts.

    How can I make this dish vegan?

    To make this dish vegan, use a plant-based sausage, replace the cheese with a vegan alternative, and use a flax egg (1 tablespoon ground flaxseed mixed with 2.5 tablespoons water) instead of the egg.

    Can I use a different type of cheese?

    Absolutely! Goat cheese or ricotta can be wonderful substitutes, adding a creamy texture and slight tang to the stuffing.

    Is there a way to reduce the saltiness?

    If you find the dish too salty, use reduced-sodium cheese and sausage, and rinse the feta under cold water before crumbling.

    Final Thoughts

    I hope these Mediterranean Stuffed Eggplants with Spiced Sausage and Herb-Crust inspire you to bring a taste of the Mediterranean into your kitchen. They’re a testament to the joy of cooking and the power of food to connect us to faraway places and cherished memories. I’d love to hear how this recipe turns out for you, so please leave a comment or share a photo of your creation. Happy cooking, and may your kitchen be filled with delicious aromas and happy memories!

    Related update: Mediterranean Stuffed Eggplants with Spiced Sausage and Herb-Crust

    Related update: Sumptuous Indian-Spiced Beef with Creamy Coconut Spinach

  • Spiced Double-Layered Peanut Butter Cups with Sea Salt Crystals | Made by Meaghan Moineau

    Spiced Double-Layered Peanut Butter Cups with Sea Salt Crystals | Made by Meaghan Moineau

    Spiced Double-Layered Peanut Butter Cups with Sea Salt Crystals

    Imagine biting into a velvety, rich peanut butter cup that whispers of exotic lands, where warm spices linger on your palate and a sprinkle of sea salt punctuates the sweetness. These are not your ordinary peanut butter cups; they are a journey of flavors, a little unexpected, and utterly irresistible.

    Personal Story

    I remember the first time I attempted to make my own peanut butter cups at home. It was a chilly autumn afternoon, the scent of falling leaves mingling with the warm aroma of melting chocolate in my tiny kitchen. My first batch was a humble attempt, delicious but missing a certain something — that extra oomph that would elevate them from good to unforgettable.

    One day, while rummaging through my spice cabinet, inspiration struck. A forgotten jar of ground cardamom called my name, a fragrant reminder of the chai lattes I adored. Could this be the secret ingredient my peanut butter cups had been waiting for? I decided to give it a whirl, adding a sprinkle of cinnamon for good measure. The result was magical: each bite carried a hint of warmth, a whisper of far-off places, and a balance of flavors that danced on my tongue.

    That day, I shared these spiced double-layered peanut butter cups with friends. The look of surprise and delight on their faces confirmed it — this was the version that deserved to be shared with the world. These treats became my signature dessert, the perfect ending to a cozy dinner or a sweet surprise at a gathering.

    What Makes This Version Special

    This version of peanut butter cups stands out because of its unique twist on a classic favorite. The addition of **ground cinnamon** and **ground cardamom** imbues the creamy filling with a warming spice profile that contrasts beautifully with the sweetness of the chocolate. The sprinkle of **flaky sea salt** on top offers a delightful contrast, balancing the sweetness perfectly and elevating the entire taste experience.

    Unlike standard recipes, this one isn’t just about sweetness; it’s about depth and complexity. The **vanilla extract** enhances the peanut butter’s natural nuttiness, while the careful blooming of spices in melted **non-hydrogenated shortening** with the chocolate enriches every bite. It’s a treat that feels both familiar and exotic, making it an exciting addition to any dessert repertoire.

    Flavor Profile

    Each bite of these spiced double-layered peanut butter cups offers a rich, creamy experience. The chocolate shell is smooth and melts in your mouth, while the spiced peanut butter filling surprises with its warm, aromatic blend of cinnamon and cardamom. The sea salt crystals on top provide a delightful crunch and a burst of salinity that heightens the sweetness and creaminess, making every mouthful a balanced and luxurious treat.

    Ingredients

    • 1 cup **Enjoy Life semi-sweet chocolate chips**
    • 2 tablespoons **non-hydrogenated shortening**
    • 3/4 cup creamy peanut butter
    • 2 tablespoons agave nectar
    • 1/4 teaspoon salt
    • 1/2 teaspoon **ground cinnamon**
    • 1/4 teaspoon **ground cardamom**
    • 1 teaspoon **vanilla extract**
    • 1 tablespoon **flaky sea salt**

    Instructions

    1. Begin by lining a mini muffin tin with paper liners or spraying it with a thin coat of cooking oil. This will ensure the peanut butter cups release easily once set.
    2. In a small bowl, mix together the creamy peanut butter, agave nectar, salt, and vanilla extract. Set this filling mixture aside.
    3. In a heatproof bowl, combine the chocolate chips and shortening. Place this bowl over a pot of simmering water, ensuring the bottom of the bowl does not touch the water. Stir continuously until the chocolate is completely melted and smooth.
    4. Sprinkle the ground cinnamon and cardamom over the melted chocolate and shortening. Allow the spices to bloom in the heat, stirring gently until they’re fully incorporated and aromatic.
    5. Spoon about one teaspoon of the melted chocolate mixture into each of the prepared muffin cups. Gently tap the tin on the counter to settle the chocolate evenly.
    6. Top the chocolate layer with a scant teaspoon of the peanut butter mixture, spreading it slightly to cover the chocolate.
    7. Finish by topping each cup with another teaspoon of the melted chocolate, ensuring the peanut butter layer is completely covered.
    8. Sprinkle a pinch of flaky sea salt crystals over each cup.
    9. Refrigerate the peanut butter cups for at least 30 minutes, or until they are fully set.
    10. Once set, store the spiced double-layered peanut butter cups in an airtight container in the refrigerator to maintain their firm texture.

    Pro Tips from Meaghan’s Kitchen

    • Use a double boiler technique for melting the chocolate to prevent scorching. If you don’t have one, a heatproof bowl over a pot works wonders.
    • For a smoother filling, make sure the peanut butter is at room temperature before mixing with other ingredients.
    • Don’t skip the step of blooming the spices in the chocolate. This simple technique maximizes their flavors, making a significant difference.
    • Adjust the amount of sea salt to your liking. A little goes a long way, but it can really enhance the overall taste.
    • If you’re short on time, these can also be set in the freezer for about 10-15 minutes to speed up the process.

    Variations & Dietary Swaps

    • Vegetarian Swap: Replace the non-hydrogenated shortening with coconut oil for a plant-based twist.
    • Spice-It-Up Version: Add a pinch of cayenne pepper to the chocolate for a subtle heat that complements the spices.
    • Kids-Friendly Version: Omit the spices for a classic peanut butter cup that kids will love, and use milk chocolate instead of semi-sweet.

    What to Serve With It

    These spiced double-layered peanut butter cups pair beautifully with a chai-spiced almond milk latte, enhancing the warming spices with each sip. For a refreshing contrast, a glass of cold almond milk also makes for a classic and satisfying combination. If you’re hosting a dinner party, consider serving them alongside a scoop of vanilla bean ice cream for an indulgent dessert duo.

    Storage & Meal Prep

    Once your peanut butter cups are set, store them in an airtight container in the refrigerator where they’ll stay fresh for up to two weeks. If you prefer to make a larger batch, they freeze beautifully — simply layer them between sheets of parchment paper in a freezer-safe container for up to three months. When you’re ready to enjoy them, just let them thaw in the fridge or at room temperature for a few minutes. To reheat and slightly soften, you can pop them in the microwave for about 10 seconds, but be careful not to overheat as this can alter the texture.

    FAQ

    Can I use other nut butters instead of peanut butter?

    Absolutely! Almond butter or cashew butter would be delicious alternatives that still pair well with the spices and chocolate.

    What if I don’t have agave nectar?

    No worries! You can substitute agave nectar with honey or maple syrup for a similar sweetness and consistency.

    How do I prevent the chocolate from seizing?

    Ensure that no water gets into the chocolate while melting. Keep the heat low and stir continuously for smooth results.

    Can I make these in a regular muffin tin?

    Yes, but you’ll need to adjust the amount of filling and chocolate layers accordingly. They may take a bit longer to set, too.

    Final Thoughts

    There’s something truly special about creating a dessert that’s both familiar and adventurous, and these spiced double-layered peanut butter cups with sea salt crystals achieve just that. I hope this recipe brings as much joy to your kitchen as it does to mine. I’d love to hear how yours turn out — feel free to leave a comment or share your own variations. Happy cooking, and may your culinary adventures be as sweet and exciting as these little treats!

    Related update: Spiced Double-Layered Peanut Butter Cups with Sea Salt Crystals

    Related update: Caramelized Banana Rum Ice Cream with Toasted Coconut and Spiced Maple Drizzle

  • Zesty Crab Salad Avocado Boats with Mango Salsa | Made by Meaghan Moineau

    Zesty Crab Salad Avocado Boats with Mango Salsa | Made by Meaghan Moineau

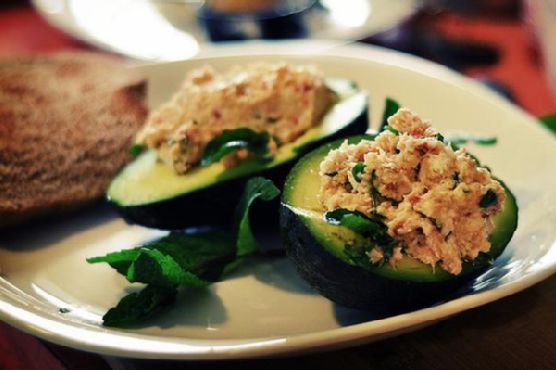
    Zesty Crab Salad Avocado Boats with Mango Salsa

    Imagine diving into a sun-drenched oasis of flavors where every bite whisks you away to a tropical paradise. The creamy richness of avocado cradles a vibrant crab salad, crowned with a fresh mango salsa that dances with a hint of heat. This isn’t just a meal; it’s a mini vacation for your taste buds.

    Personal Story

    It was during my first trip to the Bahamas that I fell head over heels for the tropical fusion cuisine. I remember sitting on a sun-bleached patio, the ocean breeze tousling my hair, as I tasted the most incredible crab salad. It was a medley of flavors — tangy, sweet, and just the right amount of spice. That moment lingered with me, becoming a cherished culinary memory that I often revisited in my own kitchen.

    Back home, I was determined to recreate that experience. But my initial attempts were rather forgettable. The crab salad was missing that spark, that tropical zing that made the original dish unforgettable. I was about to give up when I had a lightbulb moment: why not add a fresh mango salsa and a hint of coconut milk to infuse it with that island magic?

    After a few tweaks and taste tests, my Zesty Crab Salad Avocado Boats with Mango Salsa was born. Each spoonful felt like a celebration of those Bahamian days, and I couldn’t wait to share it. This dish wasn’t just a recipe; it was a story, a piece of my heart on a plate.

    What Makes This Version Special

    In this version, the classic crab salad is elevated with a tropical twist that makes it truly unforgettable. By incorporating fresh mango salsa and a hint of coconut milk, the salad becomes a delightful fusion dish that sings with both flavor and texture. The mango introduces a juicy sweetness that pairs beautifully with the delicate crab meat, while the coconut milk adds a creamy, luxurious touch. The hot sauce lends a subtle kick, balancing the sweetness and bringing everything together. This isn’t just any crab salad; it’s a vibrant celebration of flavors that transports you to a tropical paradise with every bite.

    Flavor Profile

    The flavor profile of these Zesty Crab Salad Avocado Boats with Mango Salsa is a harmonious blend of tropical, creamy, and subtly spicy notes. Imagine the lushness of ripe avocados, their creamy flesh offering a perfect counterpoint to the delicate, slightly sweet crab meat. The mango salsa adds a pop of sweetness and freshness, while the coconut milk provides a silky, tropical backdrop. A dash of hot sauce introduces a gentle heat that tingles the palate, and the toasted coconut flakes add a crunchy, nutty finish. It’s a symphony of flavors and textures — every mouthful is a delightful surprise.

    Ingredients

    • 1 small red onion, finely chopped
    • 1/2 cup mayonnaise
    • 2 teaspoons hot sauce (such as sriracha)
    • 1/4 cup fresh cilantro, chopped
    • 3 teaspoons fresh lime juice, divided
    • 1/2 teaspoon ground cumin
    • 1 teaspoon lime zest
    • 1 pound lump crab meat, picked over for shells
    • 2 large avocados, halved and pitted
    • 1 cup **diced mango**
    • 1/4 cup **coconut milk**
    • 2 tablespoons fresh mint leaves, chopped
    • 1/4 cup **toasted coconut flakes**

    Instructions

    1. In a medium bowl, stir together the red onion, mayonnaise, hot sauce, cilantro, 2 teaspoons of lime juice, cumin, and lime zest until well blended.
    2. Gently fold in the crab meat, being careful not to break up the lumps. Season the salad with salt and pepper to taste.
    3. Heat a dry pan over medium heat and add the coconut flakes. Toast them, stirring frequently, until they are golden brown and fragrant, about 3-4 minutes. Remove from heat and set aside to cool.
    4. For the mango salsa, combine the diced mango, mint leaves, and remaining lime juice in a small bowl. Stir gently to mix.
    5. Mix the coconut milk with the mayonnaise mixture to create a creamy tropical base that binds everything together.
    6. Brush each avocado half with the remaining teaspoon of lime juice to prevent browning.
    7. Mound the crab salad onto each avocado half, then top with a generous spoonful of mango salsa.
    8. Sprinkle the toasted coconut flakes over the top for a crunchy finish. Serve immediately with lime wedges on the side.

    Pro Tips from Meaghan’s Kitchen

    • When selecting avocados, choose ones that give slightly to gentle pressure — they’ll be perfectly ripe and creamy.
    • For the crab meat, fresh is best, but if you’re using canned, ensure it’s well-drained to avoid a watery salad.
    • Toasting the coconut flakes is key; it enhances their natural nutty flavor and adds a delightful crunch to the dish.
    • Feel free to adjust the hot sauce to your taste. If you love a fiery kick, add a dash more.
    • Prepare the mango salsa just before serving to keep it fresh and vibrant.

    Variations & Dietary Swaps

    • For a vegetarian version, substitute crab meat with hearts of palm or chickpeas for a similar texture.
    • If you prefer a spicier profile, add finely chopped jalapeños to the mango salsa.
    • Make it kid-friendly by omitting the hot sauce and serving the avocado boats with a side of tortilla chips for dipping.

    What to Serve With It

    These Zesty Crab Salad Avocado Boats pair beautifully with a chilled glass of Sauvignon Blanc, which complements the tropical notes of the dish perfectly. Alternatively, a light mango smoothie would be a refreshing, non-alcoholic option that enhances the fruitiness of the mango salsa.

    Storage & Meal Prep

    This dish is best enjoyed fresh, but if you need to prepare it in advance, store the components separately. Keep the crab salad in an airtight container in the fridge for up to two days. The mango salsa should be made just before serving to maintain its vibrant texture and flavor. Avocados tend to brown quickly, so it’s best to slice them right before assembling the dish. If you have leftovers, consume them within a day for the best taste.

    FAQ

    Can I use frozen mango for the salsa?

    Yes, you can use frozen mango if fresh is not available. Just make sure to thaw and drain it well to prevent excess water in the salsa.

    What if my avocado isn’t ripe enough?

    If your avocado isn’t quite ripe, you can speed up the process by placing it in a paper bag with a banana overnight.

    Is there a dairy-free option for this recipe?

    This recipe is naturally dairy-free, thanks to the use of coconut milk instead of cream.

    Can I make this dish ahead for a party?

    Yes, you can prepare the crab salad a day in advance. Assemble the avocado boats just before your guests arrive to ensure freshness.

    Final Thoughts

    There you have it, my friends — a fusion dish that brings a taste of the tropics right to your table. These Zesty Crab Salad Avocado Boats with Mango Salsa are sure to impress with their vibrant flavors and beautiful presentation. Whether you’re looking for a unique appetizer or a light, satisfying meal, this recipe is a winner. I’d love to hear how your version turned out, so feel free to leave a comment or share your photos. Let’s cook and create memories together!

    Related update: Zesty Crab Salad Avocado Boats with Mango Salsa

    Related update: Zesty Quinoa Tabbouleh with Pomegranate and Toasted Almonds

    Related update: Gourmet Truffle Goat Cheese, Fig, and Prosciutto Crostini

  • Smoky Broccoli Cheddar Soup with Truffle Oil Drizzle | Made by Meaghan Moineau

    Smoky Broccoli Cheddar Soup with Truffle Oil Drizzle | Made by Meaghan Moineau

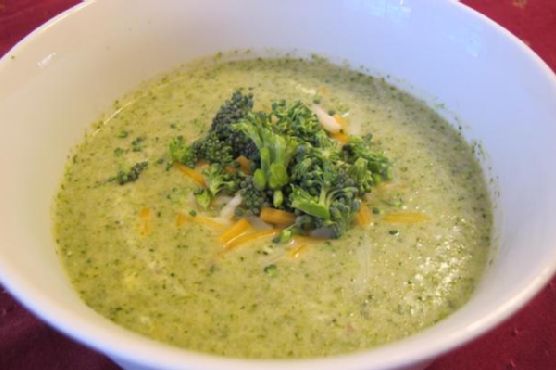
    Smoky Broccoli Cheddar Soup with Truffle Oil Drizzle

    Picture this: a chilly autumn evening, the kind where the golden leaves crunch underfoot and a brisk wind nips at your cheeks. You’re wrapped in a cozy sweater, and as you step into the warmth of your kitchen, the intoxicating aroma of a simmering Smoky Broccoli Cheddar Soup wafts through the air. It’s a sensory embrace, promising comfort and delight with each savory spoonful.

    Personal Story

    Growing up, Sunday lunches at my grandmother’s house were a cherished tradition. Her kitchen was always filled with the comforting scents of homemade soups, and her Broccoli Cheddar Soup was a family favorite. As a child, I would sit at the counter, my legs swinging from the stool, watching her chop ingredients with rhythmic precision. The memory of her stirring the thick, cheesy broth is etched in my mind like a cozy quilt of love and warmth.

    Years later, as I began my culinary journey, I decided to recreate her beloved soup. But, as is often the case in the kitchen, things didn’t go quite as planned. A misplaced jar of cayenne pepper led to a particularly fiery batch that had my family guzzling water between spoonfuls. Despite the mishap, it was a lesson in the art of balance and the power of subtlety in flavoring.

    Over time, I developed my own version of the Broccoli Cheddar Soup, one that paid homage to my grandmother’s recipe while incorporating my own twist. It was inspired by the discovery of smoked paprika and nutmeg during a trip to a bustling spice market. These spices, when combined with a drizzle of truffle oil, transformed the soup into something truly exceptional.

    Now, this Smoky Broccoli Cheddar Soup with Truffle Oil Drizzle is a staple in my home. It’s a dish that bridges the gap between nostalgia and innovation, offering a rich tapestry of flavors that tell a story with every sip.

    What Makes This Version Special

    This version of the classic Broccoli Cheddar Soup brings a smoky depth that will make your taste buds dance. The addition of smoked paprika and a hint of nutmeg elevates the soup to a whole new level of sophistication. The smoky notes add warmth and complexity, creating a perfect harmony with the creamy cheddar and broccoli.

    But what truly sets this soup apart is the luxurious drizzle of truffle oil just before serving. This simple addition transforms the dish from comforting to downright opulent. It’s the kind of meal that feels like a special occasion, even on a regular Tuesday night.

    Flavor Profile

    The Smoky Broccoli Cheddar Soup with Truffle Oil Drizzle is a symphony of rich, creamy flavors with a surprising smoky twist. Each spoonful delivers a velvety texture, enhanced by the nutty, sharp cheddar cheese. The smoked paprika offers a gentle, warm smokiness, while the nutmeg provides a subtle, aromatic depth that lingers on the palate.

    The star of the show, however, is the truffle oil. Its earthy, luxurious aroma envelopes the senses, providing a lingering finish that elevates the entire soup experience. Imagine the richness of traditional broccoli cheddar soup, but with layers of complexity that make each bite more intriguing than the last.

    Ingredients

    • 1 large head of raw broccoli, chopped (reserve a few florets for garnish)
    • 1 shallot, diced
    • Juice of 1 lemon
    • 4 cups vegetable broth
    • Salt and pepper to taste
    • 1 red onion, diced
    • 1 cup plain yogurt
    • 2 medium Yukon Gold potatoes, peeled and diced
    • 2 tablespoons fresh parsley, chopped
    • 1 bay leaf
    • 3 tablespoons olive oil
    • 1 cup plain almond milk
    • 2 cups shredded cheddar cheese
    • 1 teaspoon smoked paprika
    • 1/2 teaspoon ground nutmeg
    • Truffle oil for drizzling
    • 2 tablespoons fresh basil, chopped (optional)

    Instructions

    1. In a large soup pot, heat 2 tablespoons of olive oil over medium-high heat. Add the shallot and red onion, stirring occasionally, until they are translucent and fragrant, about 5 minutes.
    2. Sprinkle in the smoked paprika and ground nutmeg, stirring for about 1 minute to bloom the spices and enhance their aroma.
    3. Pour in the lemon juice and vegetable broth, then season with salt and pepper. Bring the mixture to a boil.
    4. Add the diced Yukon Gold potatoes to the pot, reducing the heat to medium. Cook until the potatoes are tender, roughly 15 minutes.
    5. Introduce the chopped broccoli to the pot, reserving a few florets for later use. Cover the pot and cook until the broccoli is tender, approximately 5 minutes.
    6. Turn off the heat and transfer the soup to a large mixing bowl. Allow it to cool slightly before folding in the yogurt and almond milk.
    7. In batches, puree the soup in a blender until it reaches a smooth, creamy consistency. Return the pureed soup to the soup pot.
    8. Add the reserved broccoli florets along with a dash of vegetable broth. Sauté covered for about a minute until tender.
    9. Return the pureed soup to the pot and add the bay leaf and optional chopped basil. Simmer uncovered for 20 minutes, stirring occasionally to release air bubbles.
    10. Remove the bay leaf before serving. Ladle the soup into bowls and finish with a drizzle of truffle oil for that luxurious touch.

    Pro Tips from Meaghan’s Kitchen

    • Don’t rush sautéing the onions; it’s essential for building a flavorful base. Let them sweat until they’re sweet and translucent.
    • Blooming the spices in oil is key. It wakes them up and ensures they infuse the soup with their maximum aroma and flavor.
    • For an extra creamy texture, consider adding a splash of heavy cream alongside the almond milk.
    • Always taste and adjust the seasoning before serving. The truffle oil adds a unique complexity, so balance with salt if necessary.
    • When blending hot soup, work in small batches and be cautious of steam build-up to avoid a kitchen mess.

    Variations & Dietary Swaps

    • Vegetarian Version: Use vegetable broth as directed, and ensure your cheddar cheese is vegetarian-friendly.
    • Spice-It-Up Version: Add a pinch of cayenne pepper with the smoked paprika for a fiery kick.
    • Kids-Friendly Version: Reduce the smoked paprika and omit the truffle oil to cater to younger palates.

    What to Serve With It

    This Smoky Broccoli Cheddar Soup pairs beautifully with a crisp Sauvignon Blanc, which cuts through the richness with its bright acidity. Alternatively, serve it alongside a side of crusty garlic bread, perfect for dipping and soaking up every last drop of the luxurious broth.

    Storage & Meal Prep

    To store, allow the soup to cool completely before transferring it to an airtight container. It will keep in the fridge for up to 3 days. For longer storage, portion the soup into freezer-safe containers and freeze for up to 2 months. To reheat, thaw overnight in the fridge if frozen, then warm gently on the stove over low heat, stirring occasionally.

    FAQ

    Can I use frozen broccoli?

    Yes, frozen broccoli can be used. Simply adjust the cooking time as it may take less time to tenderize than fresh broccoli.

    What can I use instead of truffle oil?

    If you don’t have truffle oil, a drizzle of extra virgin olive oil or a sprinkle of truffle salt can provide a similar luxurious touch.

    How can I make this soup thicker?

    For a thicker soup, you can add an extra potato or reduce the amount of vegetable broth slightly. Alternatively, blend in a small amount of cooked white beans.

    Can I use a different type of cheese?

    Absolutely! A sharp white cheddar or even Gruyère can add a different flavor profile while maintaining the creamy texture.

    Is there a non-dairy substitute for the yogurt?

    Yes, you can replace the yogurt with a non-dairy alternative like cashew cream or coconut yogurt for a vegan-friendly version.

    Final Thoughts

    Thank you for joining me in the kitchen today to create this Smoky Broccoli Cheddar Soup with Truffle Oil Drizzle. It’s a dish that invites warmth and indulgence, perfect for sharing with loved ones or savoring in solitude. I hope it brings a sense of comfort and joy to your table, just as it does to mine. Please feel free to share your own twists and experiences in the comments below — I love hearing from you!

    Related update: Smoky Broccoli Cheddar Soup with Truffle Oil Drizzle

    Related update: Tuscan White Bean & Kale Pasta Fagioli with Lemon Zest

  • Zesty Lemon-Lavender Bundt Cake with Vanilla Bean Glaze | Made by Meaghan Moineau

    Zesty Lemon-Lavender Bundt Cake with Vanilla Bean Glaze | Made by Meaghan Moineau

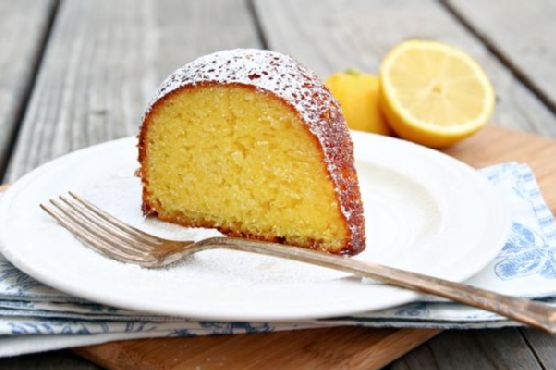
    Zesty Lemon-Lavender Bundt Cake with Vanilla Bean Glaze

    Imagine a late afternoon when golden sunlight spills across your kitchen counter, the air filled with the scent of fresh lemons and a hint of lavender. That’s the moment I knew — a classic lemon bundt cake could be so much more than just a simple citrus delight. Today, I’m sharing my secret to transforming this traditional dessert into something truly remarkable: the Zesty Lemon-Lavender Bundt Cake with a luscious Vanilla Bean Glaze.

    Personal Story

    My love affair with bundt cakes began in my grandmother’s cozy kitchen, a place where the walls seemed to echo with laughter and the smell of baked goods always lingered. I remember one winter afternoon, with the world outside blanketed in snow, she handed me a lemon bundt cake recipe, saying, “This is a recipe for any season.” It was simple, yet its tartness and subtle sweetness were enough to lift anyone’s spirits.

    Years later, I found myself craving that same comforting cake but with a bit of a twist. My culinary journey took me to Provence, where fields of lavender swayed gently in the breeze. The idea struck me like a bolt of inspiration: why not infuse my grandmother’s beloved lemon bundt cake with the elegant aroma of lavender? On my return home, I spent countless afternoons experimenting in my kitchen, a place now filled with the fragrant blend of citrus and flowers.

    There were mishaps, of course — too much lavender, and the cake tasted like soap; too little, and it barely registered against the lemon. But eventually, I struck the right balance, yielding a cake that was not only beautiful to behold but also a delight to the senses. The addition of a vanilla bean glaze was the final touch, creating a dessert that feels both luxurious and homemade.

    Every time I bake this Zesty Lemon-Lavender Bundt Cake, I am transported back to those fields in Provence and my grandmother’s kitchen, both places of simple, profound joy.

    What Makes This Version Special

    This isn’t your average lemon bundt cake. By infusing it with aromatic lavender and topping it with a rich vanilla bean glaze, this version offers an elegant floral note that elevates the classic citrusy treat. The lavender adds a subtle but impressive depth, while the vanilla bean glaze brings a creamy sweetness that complements the cake’s tartness. It’s a harmonious blend of flavors that dances on your palate, making this cake a standout at any gathering.

    Flavor Profile

    Biting into this cake is like taking a sensory journey. First, the vibrant taste of lemon dances across your tongue, bright and refreshing. Then, the floral undertones of lavender emerge, adding a soft, aromatic note that intrigues and delights. The vanilla bean glaze, speckled and aromatic, wraps everything in a sweet, creamy finish. This Zesty Lemon-Lavender Bundt Cake is a delightful balance of citrus and floral notes with a creamy, vanilla-infused sweetness.

    Ingredients

    • 1 package lemon cake mix
    • 1 package lemon pudding mix
    • 4 large eggs
    • 1 cup sour cream
    • 1/2 cup vegetable oil
    • 1/2 cup water
    • 1 tablespoon **dried culinary lavender**
    • 1/4 cup frozen lemonade concentrate, thawed
    • 2 cups powdered sugar
    • 1 **vanilla bean**
    • 2 tablespoons fresh lemon zest

    Instructions

    1. Preheat your oven to 350 degrees Fahrenheit. Grease and flour a 10-inch bundt pan thoroughly, ensuring every nook is covered to prevent sticking.
    2. In a small pot, bring 1/4 cup of water to a boil. Add the dried lavender and let it steep for about 10 minutes. Strain the lavender, reserving the infused water.
    3. In a large mixing bowl, combine the lemon cake mix, lemon pudding mix, eggs, sour cream, vegetable oil, and the lavender-infused water. Mix until the batter is smooth and creamy.
    4. Gently fold in the fresh lemon zest, ensuring it is evenly distributed throughout the batter.
    5. Pour the batter into the prepared bundt pan, smoothing the top with a spatula. Bake for 50-60 minutes, or until a toothpick inserted into the center comes out clean.
    6. Allow the cake to cool in the pan for 10-15 minutes. Then, invert it onto a wire rack to cool completely.
    7. For the glaze, halve the vanilla bean and scrape out the seeds into a mixing bowl. Add the lemonade concentrate and 1 cup of powdered sugar, stirring until smooth.
    8. Gradually add the remaining powdered sugar, mixing until the glaze reaches your desired consistency. It should be thick but pourable.
    9. Spoon the glaze over the cooled cake, letting it drip down the sides. Dust with additional powdered sugar, if desired.

    Pro Tips from Meaghan’s Kitchen

    • For a more pronounced lavender flavor, you can add a drop of food-grade lavender essential oil to the batter.
    • Ensure your bundt pan is well-greased and floured; otherwise, the intricate details can cause the cake to stick.
    • Use a fine-mesh sieve to strain the lavender infusion, ensuring no bits of flower remain in the water.
    • When scraping the vanilla bean, use the back of a knife for easier handling and maximum seed extraction.
    • Let the cake cool slightly before glazing to avoid the glaze melting and sliding off completely.

    Variations & Dietary Swaps

    • Vegetarian Swap: Replace eggs with a plant-based egg substitute like aquafaba or flaxseed meal mixed with water.
    • Spice-it-Up Version: Add a teaspoon of cardamom to the cake batter for a warm, spicy note.
    • Kids-Friendly Version: Omit the lavender and add a swirl of blueberry jam to the batter before baking for a fruity twist.

    What to Serve With It

    This cake pairs beautifully with a cup of Earl Grey tea, its bergamot notes playing off the lavender beautifully. For a more celebratory feel, serve with a chilled glass of sparkling wine, which highlights the cake’s citrusy brightness.

    Storage & Meal Prep

    Store any leftovers in an airtight container at room temperature for up to three days. For longer storage, wrap slices individually in plastic wrap and freeze for up to a month. To reheat, let the cake thaw at room temperature, then warm slices in a microwave for 10-15 seconds or in an oven at 300 degrees Fahrenheit for a few minutes.

    FAQ

    Can I use fresh lavender instead of dried?

    While fresh lavender can be used, it’s more potent, so use sparingly. Dried lavender is recommended for a more controlled flavor infusion.

    What if I don’t have a bundt pan?

    You can use a regular cake pan, but adjust the baking time accordingly. Check for doneness around the 40-minute mark.

    How do I prevent the cake from sticking to the pan?

    Ensure your bundt pan is greased and floured thoroughly, and allow the cake to cool before attempting to remove it.

    Can I prepare the batter ahead of time?

    It’s best to bake the batter immediately for optimal rise. However, you can prepare the dry ingredients in advance to save time.

    Is there a substitute for the vanilla bean?

    If you don’t have a vanilla bean, use a teaspoon of pure vanilla extract in the glaze.

    Final Thoughts

    I hope this Zesty Lemon-Lavender Bundt Cake with Vanilla Bean Glaze brings a touch of elegance and delight to your next gathering. Its harmonious flavors are sure to impress, making it a memorable addition to any occasion. I’d love to hear how it turns out for you, so feel free to leave a comment or share your baking adventures on social media. Happy baking, friends!

    Related update: Zesty Lemon-Lavender Bundt Cake with Vanilla Bean Glaze

    Related update: Spiced Double-Layered Peanut Butter Cups with Sea Salt Crystals

  • Spiced Egyptian Roasted Cauliflower Salad with Tahini Drizzle | Made by Meaghan Moineau

    Spiced Egyptian Roasted Cauliflower Salad with Tahini Drizzle | Made by Meaghan Moineau

    Spiced Egyptian Roasted Cauliflower Salad with Tahini Drizzle

    Imagine the sizzle of cauliflower roasting to a perfect golden-brown, enveloped in a fragrant cloud of smoky paprika and garlic. The anticipation builds as the creamy tahini drizzle awaits its turn to dance on top, promising a meal that’s as visually stunning as it is delicious.

    Personal Story

    Ah, cauliflower. It’s one of those humble vegetables that I used to overlook in my kitchen adventures. That is, until a trip to Cairo a few years back changed everything. I remember meandering through the bustling streets, where the air was filled with exotic spices and the scent of roasting vegetables from roadside stalls. I stumbled upon a small eatery tucked away in an alley, offering a simple yet transformative dish: a roasted cauliflower salad that was a revelation.

    Back home, I couldn’t shake the memory of that salad. The cauliflower was roasted to perfection, with a smoky depth that I couldn’t quite replicate with just plain ol’ steaming. So, I began experimenting in my kitchen, determined to recreate that unforgettable flavor. My first attempts were a bit of a kitchen mishap—too much spice here, not enough there—but eventually, I found my groove. The secret lay in a careful balance of smoked paprika, garlic powder, and the creamy tang of tahini.

    Now, whenever I prepare my Spiced Egyptian Roasted Cauliflower Salad, I’m transported back to that vibrant Cairo street corner. It’s a dish steeped in personal discovery and culinary triumph, and I’m thrilled to share it with you.

    What Makes This Version Special

    This isn’t your average roasted cauliflower salad. My version elevates the humble vegetable by roasting it with a medley of spices that imbue a smoky depth, then topping it with a luxurious creamy tahini drizzle. The magic happens in the roasting process, where the spices create a caramelized crust that’s simply irresistible. What sets this recipe apart is the interplay of textures and flavors: the silky tahini meets the nutty crunch of toasted pine nuts, and everything is brightened with a squeeze of fresh lemon juice.

    Flavor Profile

    Prepare for a taste journey that is smoky, nutty, and oh-so satisfying. The smoked paprika and garlic powder give the cauliflower a bold, earthy flavor, while the tahini drizzle adds a creamy, tangy finish. The roasted bell peppers bring a touch of sweetness, contrasting beautifully with the savory notes. Each bite is an experience, from the warm spices to the cool, refreshing mint that finishes the dish.

    Ingredients

    • 1 large cauliflower, cut into medium-sized florets
    • 2 tablespoons olive oil
    • 1 teaspoon smoked paprika
    • 1 teaspoon garlic powder
    • 1 teaspoon cumin
    • Salt, to taste
    • Freshly ground black pepper, to taste
    • 1 red bell pepper, diced
    • 2 tablespoons lemon juice
    • 1/4 cup tahini
    • 2 tablespoons water (to thin the tahini)
    • 1/4 cup toasted pine nuts
    • 1/4 cup chopped fresh parsley
    • 1/4 cup fresh mint leaves, torn

    Instructions

    1. Preheat your oven to 425°F (220°C). While the oven heats, separate the cauliflower into medium-sized florets. If you have a steamer, steam the cauliflower for 5 minutes until slightly tender. If not, you can boil the whole cauliflower for 5 minutes, then cut it into pieces once it cools slightly.
    2. In a large mixing bowl, toss the steamed cauliflower with olive oil, smoked paprika, garlic powder, cumin, and a generous pinch of salt and pepper. Spread the cauliflower in a single layer on a baking sheet lined with parchment paper.
    3. Roast in the oven for 20-25 minutes, or until the cauliflower is golden-brown and slightly crisp around the edges. The aroma will be irresistible!
    4. While the cauliflower is roasting, dice the bell pepper and toast the pine nuts in a dry skillet over medium heat until they are golden and fragrant. Be sure to stir frequently to prevent burning.
    5. In a small bowl, mix the tahini with lemon juice and water until smooth and slightly runny. Adjust the water amount if necessary to reach your desired consistency.
    6. Once the cauliflower is done, remove it from the oven and let it cool for a few minutes. Combine it with the diced bell pepper in a serving bowl.
    7. Drizzle the tahini mixture over the cauliflower and bell pepper. Sprinkle with toasted pine nuts, chopped parsley, and fresh mint leaves for a burst of flavor and color.

    Pro Tips from Meaghan’s Kitchen

    • Spice it up: Add a pinch of cayenne pepper to the spice mix for a touch of heat.
    • Crispy Cauliflower: Make sure the cauliflower is well-drained before roasting to achieve the perfect crispiness.
    • Tahini Tips: If your tahini is too thick, warm it slightly in the microwave to make it easier to mix.
    • Extra Crunch: Don’t skip the toasting step for the pine nuts; it enhances their flavor and adds an irresistible crunch.
    • Herbaceous Finish: Add a sprinkle of sumac for a tangy, lemony finish.

    Variations & Dietary Swaps

    • Vegetarian Delight: Add roasted chickpeas for added protein and texture.
    • Spice-it-up Version: Incorporate a teaspoon of harissa paste into the tahini drizzle for an extra kick.
    • Kids-Friendly Version: Swap smoked paprika with sweet paprika and omit the cumin for a milder flavor.

    What to Serve With It

    This Spiced Egyptian Roasted Cauliflower Salad pairs beautifully with a chilled glass of Sauvignon Blanc or a side of warm pita bread. For a heartier meal, serve it alongside grilled chicken or lamb kebabs. The salad’s vibrant flavors and textures also complement a simple bowl of couscous or quinoa, allowing the dish to shine as a centerpiece.

    Storage & Meal Prep

    This salad is best enjoyed fresh, but it can be stored in the refrigerator for up to 2 days in an airtight container. If you plan to make it ahead, keep the tahini drizzle and pine nuts separate until just before serving to maintain their texture. Reheat the salad gently in the oven at a low temperature, or enjoy it cold as a refreshing lunch option.

    FAQ

    Can I use frozen cauliflower?

    Yes, you can use frozen cauliflower. Just be sure to thaw and drain it well before roasting to prevent sogginess.

    What’s the best way to toast pine nuts?

    Toast pine nuts in a dry skillet over medium heat, stirring frequently, until they are golden and fragrant. This usually takes about 3-5 minutes.

    Is there a substitute for tahini?

    If tahini isn’t available, you can use almond butter or sunflower seed butter for a similar creamy texture, though the flavor will be different.

    Can I make this salad vegan?

    Absolutely! This recipe is already vegan-friendly as it is free from animal products.

    How can I add more protein to the salad?

    Consider adding roasted chickpeas or grilled tofu for an added protein boost.

    Final Thoughts

    I hope this Spiced Egyptian Roasted Cauliflower Salad with Tahini Drizzle finds its way into your kitchen and becomes a beloved part of your culinary repertoire. Its unique combination of flavors and textures is sure to impress at any gathering or simply elevate a weekday dinner. I’d love to hear how it turns out for you, so please share your thoughts or variations in the comments below. Happy cooking, my friends!

    Related update: Spiced Egyptian Roasted Cauliflower Salad with Tahini Drizzle

    Related update: Garlicky Kale with Toasted Pine Nuts and Sun-Dried Tomatoes

  • Umami-Packed Truffle Veggie Fried Rice with Crispy Shiitake | Made by Meaghan Moineau

    Umami-Packed Truffle Veggie Fried Rice with Crispy Shiitake | Made by Meaghan Moineau

    Umami-Packed Truffle Veggie Fried Rice with Crispy Shiitake

    Imagine walking into a kitchen filled with the earthy aroma of sautéed garlic and ginger, mingling with the rich scent of truffle oil. The sound of sizzling vegetables in the wok invites you closer, promising a dish that’s both comforting and luxurious. This is not just any fried rice; this is an Umami-Packed Truffle Veggie Fried Rice with Crispy Shiitake — a gourmet twist on a beloved classic.

    Personal Story

    My journey with fried rice started in my grandmother’s bustling kitchen, where the scent of soy sauce and sesame oil was as familiar as a warm hug. I remember sitting on the counter, peering over the edge of her well-worn wok, entranced by the rhythm of her spatula as she expertly tossed the rice and vegetables. Despite my fascination, I was too young to understand the magic of her seasoned hands, but I could certainly taste it.

    Years later, as I began exploring my culinary path, I found myself yearning to recreate those flavors. However, a kitchen mishap became a turning point: I accidentally added a drizzle of truffle oil to my rice while reaching for the soy sauce. What I expected to be a disaster turned out to be a revelation. The truffle oil added an unexpected depth, transforming the dish from simple to sensational. It was as if I had discovered a secret ingredient that could elevate a classic to new heights.

    Since that day, Umami-Packed Truffle Veggie Fried Rice with Crispy Shiitake has become a staple in my kitchen, a dish that marries the comforting nostalgia of my grandmother’s recipe with the sophisticated allure of gourmet dining. It’s a dish that tells a story — of tradition and innovation, of happy accidents and culinary inspiration.

    On a recent evening, as I stood in my kitchen, I couldn’t help but smile. The aroma of the sizzling shiitake mushrooms brought me back to those childhood days, but the luxurious twist of truffle reminded me of how far I’ve come. Each bite is a celebration of flavors that I can’t wait for you to experience.

    What Makes This Version Special

    What sets this version of fried rice apart is its luxurious infusion of truffle oil and the delightful crunch of crispy shiitake mushrooms. Traditional fried rice is undeniably comforting, but adding a touch of truffle oil transforms it into a sophisticated dish that’s perfect for any occasion. The crispy shiitake mushrooms provide a textural contrast that elevates the dish, making every bite an experience.

    Most fried rice recipes skip the step of separately sautéing the mushrooms, but this simple technique makes all the difference. By cooking the mushrooms until they’re golden and crisp, you add a layer of flavor that’s both earthy and umami-rich. This dish is not just a meal; it’s a journey of flavors and textures that will make you rethink everything you thought you knew about fried rice.

    Flavor Profile

    Prepare to be swept away by the earthy, aromatic notes of ginger and garlic, which form the foundation of this dish. The truffle oil adds a luxurious umami depth that’s both velvety and intoxicating, while the citrusy hint of lime juice cuts through the richness, leaving a refreshing finish on your palate. The crispy shiitake mushrooms bring an additional dimension with their nutty, savory crunch, creating a symphony of flavors that dance in your mouth.

    Ingredients

    • 3 teaspoons sesame oil, divided
    • 1 tablespoon minced ginger
    • 2 teaspoons minced garlic, divided
    • **1 cup shiitake mushrooms, sliced**
    • 1 cup baby corns, sliced
    • 1/2 cup green onions (white part), chopped
    • 1 carrot, julienned
    • 1 bell pepper, sliced
    • 2 tablespoons low sodium soy sauce
    • Salt and black pepper, to taste
    • **1 tablespoon truffle oil**
    • 1/2 cup edamame, shelled
    • Fresh cilantro, for garnish
    • **Juice of 1 lime**
    • 2 cups cooked cold rice
    • Sesame seeds, for garnish

    Instructions

    1. Heat a wok or large skillet over medium-high heat and add 1 teaspoon of sesame oil. Once shimmering, add the minced ginger and 1 teaspoon of minced garlic. Sauté for about 1 minute until fragrant but not burnt.
    2. Add the sliced shiitake mushrooms to the wok. Cook them until they are golden-brown and crispy, about 5-6 minutes. Keep an eye on them to prevent burning. Once done, transfer them to a bowl along with any juices.
    3. Heat the wok again and add another teaspoon of sesame oil. Add the remaining garlic and sauté until fragrant, about 30 seconds.
    4. Introduce all the vegetables (baby corns, green onions, carrot, bell pepper) to the wok. Stir them together over high heat, adding a pinch of salt, black pepper, and a splash of soy sauce. Toss to coat and let them cook for a few more minutes until they’re tender but still have a slight crunch.
    5. Add the cold, cooked rice to the wok. Gently stir everything together to combine, taking care not to break the rice grains. Allow the rice to warm through, maintaining a medium-high heat.
    6. Drizzle the remaining teaspoon of sesame oil over the rice, along with the rest of the soy sauce, and season with salt and pepper to taste. Return the crispy mushrooms to the pan. Mix gently, ensuring everything is well combined.
    7. Finish the dish with a drizzle of truffle oil and a squeeze of lime juice. Toss and taste, adjusting seasoning if necessary.
    8. Serve the fried rice garnished with the green parts of the green onions, a sprinkle of sesame seeds, and fresh cilantro.

    Pro Tips from Meaghan’s Kitchen

    • Use cold, day-old rice for the best texture in your fried rice. Freshly cooked rice can become mushy when stir-fried.
    • For the crispiest shiitake mushrooms, make sure not to overcrowd the pan. Cook them in batches if necessary to ensure even browning.
    • Adjust the amount of truffle oil to your taste. A little goes a long way, so start with a small amount and add more if desired.
    • To enhance the umami flavor, try adding a splash of fish sauce or miso paste to the rice during cooking.
    • If you’re short on time, pre-chop all your vegetables and have them ready to go before you start cooking. This will make the stir-frying process much smoother.

    Variations & Dietary Swaps

    • Vegetarian Swap: Use tofu instead of mushrooms for a protein-packed vegetarian option. Cook the tofu cubes until golden before adding them to the rice.
    • Spice-It-Up Version: Add a diced chili pepper or a dash of sriracha sauce for a spicy kick that complements the savory flavors.
    • Kids-Friendly Version: Omit the truffle oil and add a handful of sweet peas or corn kernels for a milder, kid-approved version of this dish.

    What to Serve With It

    This Umami-Packed Truffle Veggie Fried Rice with Crispy Shiitake pairs beautifully with a chilled glass of sake or a light, crisp white wine. For a complete meal, serve it alongside a simple cucumber salad or a bowl of miso soup to enhance the Asian fusion experience. The refreshing notes of these sides will balance the rich flavors of the fried rice perfectly.

    Storage & Meal Prep

    If you have leftovers, store the fried rice in an airtight container in the refrigerator for up to 3 days. To reheat, add a splash of water or soy sauce to a pan and warm the rice over medium heat, stirring occasionally to ensure even heating. For longer storage, freeze the fried rice in portions for up to 2 months. Thaw in the fridge overnight before reheating.

    FAQ

    Can I use other types of mushrooms?

    Absolutely! While shiitake mushrooms add a unique flavor and texture, you can substitute them with button mushrooms or portobello for a different taste.

    Do I have to use truffle oil?

    Truffle oil is optional, but it adds a luxurious depth to the dish. If you prefer a simpler flavor, you can omit it or substitute with a flavored olive oil.

    Why is my rice mushy?

    Mushy rice usually results from using freshly cooked rice. Be sure to use cold, day-old rice for the best texture in your fried rice.

    Can I add protein to this dish?

    Yes, you can easily add protein such as shrimp, chicken, or tofu. Cook the protein separately and add it to the rice during the final mixing stage.

    How can I make this dish gluten-free?

    To make this dish gluten-free, use tamari or a gluten-free soy sauce instead of regular soy sauce. Ensure all other ingredients are gluten-free as well.

    Final Thoughts

    Cooking is about embracing creativity and making each dish your own. This Umami-Packed Truffle Veggie Fried Rice with Crispy Shiitake is not just a recipe, but an invitation to explore flavors and techniques that elevate a classic into something extraordinary. I hope you enjoy making and sharing this dish as much as I do. I’d love to hear your thoughts and see your creations — feel free to leave a comment below or tag me in your culinary adventures. Happy cooking!

    Related update: Umami-Packed Truffle Veggie Fried Rice with Crispy Shiitake

    Related update: Mediterranean Stuffed Eggplants with Spiced Sausage and Herb-Crust

  • Spiced Rhubarb and Apple Phyllo Pockets with Hazelnut Drizzle | Made by Meaghan Moineau

    Spiced Rhubarb and Apple Phyllo Pockets with Hazelnut Drizzle | Made by Meaghan Moineau

    Spiced Rhubarb and Apple Phyllo Pockets with Hazelnut Drizzle

    Imagine biting into a warm, flaky pastry where the crunch gives way to a sweet and tart filling, perfumed with the scent of cinnamon and ginger, and topped with a luscious hazelnut drizzle. It’s not just dessert; it’s an experience to savor. Welcome to the world of Spiced Rhubarb and Apple Phyllo Pockets — a creation where the familiar meets the extraordinary.

    Personal Story

    It was a crisp autumn afternoon when I first stumbled upon the idea of making Spiced Rhubarb and Apple Phyllo Pockets. I was at the farmers’ market, surrounded by vibrant displays of fall produce. The rhubarb’s bright red stalks caught my eye, and I felt a pang of nostalgia. My grandmother used to bake rhubarb pie every Sunday, her farmhouse kitchen filled with a warm, comforting aroma that could chase away the chill of any October day.

    As a child, I’d sit on the worn wooden stool by the counter, eyes wide with anticipation as I watched her work magic with simple ingredients. The way she handled the dough, effortlessly rolling and folding, was like watching a dance. I wanted to capture that magic but with my own twist, something that would honor her legacy yet stand on its own.

    Fast forward a few years; I found myself experimenting with phyllo dough, its delicate layers a new canvas for my culinary adventures. The idea to meld the tartness of rhubarb with the crisp sweetness of Granny Smith apples struck me like a revelation. I added a dash of cinnamon and ginger, warming spices that evoke the coziness of a fall evening. To top it all off, a hazelnut drizzle — a nutty, sweet finish that tied everything together.

    My first batch of Spiced Rhubarb and Apple Phyllo Pockets wasn’t without hiccups. A phyllo sheet tore, the filling escaped, but the taste was incredible. With each attempt, I perfected the technique, and now, it’s a staple in my fall dessert repertoire. Every bite is a tribute to my grandmother, a nod to tradition with a deliciously modern twist.

    What Makes This Version Special

    What sets these Spiced Rhubarb and Apple Phyllo Pockets apart is the clever interplay of flavors and textures. The addition of diced Granny Smith apples introduces a crisp, sweet contrast to the tartness of the rhubarb. Meanwhile, the spiced hazelnut drizzle brings an unexpected yet delightful nuttiness that elevates the entire dish. Unlike a traditional rhubarb pie, these pockets offer a sophisticated spin, perfect for impressing dinner guests or savoring a quiet moment alone.

    Flavor Profile

    Prepare for a symphony of flavors with every bite of these phyllo pockets. The filling marries the sweet-tart blend of rhubarb and Granny Smith apples, enriched by the aromatic warmth of cinnamon and ginger. As you bite through the flaky, buttery layers of the phyllo, the crunch gives way to the juicy filling, which is perfectly complemented by the rich, nutty sweetness of the hazelnut drizzle. It’s a culinary journey that takes your taste buds from tangy heights to warm, spiced depths.

    Ingredients

    • 2 cups diced rhubarb
    • 1 cup diced Granny Smith apples
    • 1/2 cup granulated sugar
    • 2 tablespoons cornstarch
    • 1/4 teaspoon salt
    • 1 teaspoon vanilla extract
    • 1 teaspoon **cinnamon**
    • 1/2 teaspoon **ground ginger**
    • 8 phyllo sheets
    • 1/2 cup melted butter
    • 1/2 cup **chopped toasted hazelnuts**
    • 1/4 cup **honey**

    Instructions

    1. Combine the diced rhubarb, sugar, cornstarch, and salt in a medium saucepan over medium-low heat. Cook, stirring occasionally, until the rhubarb releases its liquid and begins to break down, creating a thick, chunky sauce, about 10 minutes. Remove from heat and stir in the vanilla extract. Set aside to cool to room temperature.
    2. In a small saucepan, melt a tablespoon of butter over low heat. Add the cinnamon and ground ginger, blooming them in the butter for about 30 seconds until aromatic. Stir this fragrant mixture into the rhubarb filling for added depth of flavor.
    3. Preheat the oven to 350°F (175°C). Layer four phyllo sheets, brushing each sheet with melted butter as you stack them. This ensures a crispy, golden outcome.
    4. Cut the phyllo stack into four 4-inch squares. Place 2 teaspoons of the cooled rhubarb and apple filling in the center of each square.
    5. Brush the edges of the phyllo from the filling to each point of the square lightly with water. Gather the points and pinch them together just above the filling to form a pouch. Brush the outside with butter to achieve that beautiful golden-brown finish.
    6. Place the filled pouches at least 1 inch apart on an ungreased baking sheet. Bake in the preheated oven for 12 to 15 minutes, or until the phyllo is crisp and golden brown.
    7. While the pockets bake, prepare the hazelnut drizzle. In a small saucepan, gently warm the honey and chopped toasted hazelnuts together until the honey is thin and the nuts are thoroughly coated. Remove from heat.
    8. Once the pockets are baked, remove them from the oven and let them cool on a wire rack for about 5 minutes. Drizzle the warm hazelnut honey over each pocket before serving.

    Pro Tips from Meaghan’s Kitchen

    • Always keep your phyllo sheets covered with a damp cloth while working to prevent them from drying out and becoming brittle.
    • If you don’t have hazelnuts, walnuts or pecans make a great substitute, offering a different but equally delicious nutty flavor.
    • For an even crispier texture, consider using clarified butter to brush the phyllo sheets.
    • Make sure your filling is completely cooled before assembling the pockets to avoid soggy dough.
    • Blooming your spices in butter is a game changer — it releases their full aromatic potential and infuses your dishes with deeper flavor.

    Variations & Dietary Swaps

    • Vegetarian Swap: This dish is naturally vegetarian, but for a vegan version, use vegan butter and agave nectar instead of honey for the drizzle.
    • Spice-it-up Version: Add a pinch of cayenne pepper to the filling for a surprising kick that will excite your taste buds.
    • Kids-friendly Version: Reduce the amount of ginger and cinnamon for a milder flavor that children will enjoy. You can also involve them in the assembly process for some family fun!

    What to Serve With It

    These Spiced Rhubarb and Apple Phyllo Pockets are a treat on their own, but they truly shine when paired with the right accompaniments. Serve them with a cold glass of apple cider for a refreshing contrast or, for an indulgent touch, a scoop of creamy vanilla ice cream. The warmth of the pockets against the chill of the ice cream creates a delightful taste and temperature sensation.

    Storage & Meal Prep

    These phyllo pockets can be stored in the refrigerator for up to three days. To maintain their crispiness, reheat them in a preheated oven at 350°F (175°C) for about 5-7 minutes. If you’d like to prep them ahead of time, assemble the pockets and freeze them unbaked. When ready to enjoy, bake straight from the freezer, adding a few extra minutes to the baking time.

    FAQ

    Can I use frozen rhubarb for this recipe?

    Yes, you can use frozen rhubarb. Just make sure to thaw and drain it well before using to avoid excess moisture in your filling.

    What if I can’t find phyllo dough?

    If phyllo dough is unavailable, you can substitute with puff pastry for a flakier texture. Adjust the baking time accordingly, as puff pastry may take a bit longer to achieve a golden brown color.

    Can I make the filling in advance?

    Absolutely! The filling can be made up to two days in advance and stored in the refrigerator. This not only saves time but also allows the flavors to meld together beautifully.

    What other nuts can I use instead of hazelnuts?

    Walnuts, pecans, or even almonds work well as substitutes for hazelnuts. Each type of nut will bring its own unique flavor profile to the dish.

    Final Thoughts

    Creating these Spiced Rhubarb and Apple Phyllo Pockets with Hazelnut Drizzle is like embarking on a culinary adventure, one that rewards with every flaky, sweet, and aromatic bite. I hope this recipe brings as much joy to your kitchen as it does to mine. I would love to hear your thoughts and see your creations, so please leave a comment below or share your photos on social media. Let’s keep the conversation (and the deliciousness) going!

    Related update: Spiced Rhubarb and Apple Phyllo Pockets with Hazelnut Drizzle

    Related update: Zesty Lemon-Lavender Bundt Cake with Vanilla Bean Glaze