Tropical Coconut-Curry Chicken Tenders with Spicy Mango Dip
Imagine the sizzle of golden-brown chicken tenders emerging from the oven, their aroma mingling with the fragrant spices of a tropical breeze. The crispy coating gives way to juicy, tender chicken, each bite a whisper of exotic lands. This isn’t your average chicken tender; this is a culinary vacation on a plate.
Personal Story
Every summer, as a child, my family would take a trip to the coast, where the salty sea air mixed with the sweet scents of local street food. One particular summer, I stumbled upon a small food stall offering skewers of chicken marinated in coconut and spices. The taste was a revelation, a burst of flavors that danced on my tongue and made the ocean view even more memorable.
Years later, I found myself craving that same vibrant flavor. While experimenting in my home kitchen, I decided to recreate this memory with my own special twist: an infusion of curry powder and a tangy mango dip that added a touch of heat. I wanted to share that sense of discovery with my friends and family, and this recipe was born from that desire.
Of course, my first few attempts were a bit of a kitchen comedy. I remember the coconut scattering across the floor like confetti, the curry powder puffing up in a small cloud. But soon, I had it down to a science. The key was balancing the flavors, making sure each element complemented the others without overpowering them.
Now, these tropical coconut-curry chicken tenders have become a staple at our summer gatherings. They evoke memories of the beach, laughter, and the joy of trying something new. Sharing this recipe with you feels like inviting you into those cherished moments of my life.
What Makes This Version Special
What sets these tropical coconut-curry chicken tenders apart is the aromatic curry powder blended into the breadcrumb and coconut mixture. This addition transforms a simple dish into a flavor-packed experience, transporting your taste buds straight to a tropical paradise. But we don’t stop there; the spicy mango dip made from dried mango slices, lime juice, honey, and red chili flakes elevates the dish, adding a zesty punch that complements the savory tenders perfectly. This version takes the standard chicken tender and turns it into a dish worthy of any adventurous palate.
Flavor Profile
The taste experience of these chicken tenders is a harmonious blend of savory, sweet, and spicy, with a hint of tropical curry essence. The coconut provides a subtle sweetness and crisp texture, while the curry powder infuses the tenders with warm, earthy notes. The spicy mango dip is a bright contrast, offering a sweet and tangy zip with just the right amount of heat from the red chili flakes. Together, these flavors create a culinary symphony that is both comforting and exhilarating.
Ingredients
- 1 pound chicken tenders
- 2 egg whites
- 1 cup **unsweetened coconut**
- 1 cup **whole wheat bread crumbs**
- 2 tablespoons **curry powder**
- 1/2 cup **dried mango slices**
- 2 tablespoons **lime juice**
- 1 tablespoon **honey**
- 1 teaspoon **red chili flakes**
- Fresh cilantro for garnish
Instructions
- Preheat your oven to 350°F (175°C). This ensures that the chicken tenders cook evenly and achieve that perfect golden-brown crust.
- In a shallow bowl, whisk the egg whites until frothy. This will help the breadcrumb mixture adhere to the chicken tenders.
- In a separate bowl, combine the whole wheat bread crumbs, unsweetened coconut, and curry powder. Mix well to ensure the curry powder is evenly distributed.
- Dip each chicken tender into the egg whites, allowing any excess to drip off. Then, roll the chicken in the breadcrumb and coconut mixture, pressing gently to ensure it sticks.
- Place the coated chicken tenders on a baking sheet lined with parchment paper. Bake for 20 minutes, or until the tenders are golden-brown and cooked through.
- Meanwhile, prepare the spicy mango dip. In a food processor, blend the dried mango slices, lime juice, honey, and red chili flakes until smooth and well combined.
- Serve the chicken tenders hot, garnished with fresh cilantro, alongside the spicy mango dip for dunking.
Pro Tips from Meaghan’s Kitchen
- For extra-crispy tenders, spray a light mist of cooking oil over the coated chicken before baking.
- Let the egg whites come to room temperature before using; it helps the coating stick better.
- Do not skip the step of grinding the dried mango slices; it creates a smoother dip with a more intense mango flavor.
- If the dip is too thick, add a splash of water or extra lime juice to reach your desired consistency.
- For a more uniform coating, use panko breadcrumbs instead of standard breadcrumbs.
Variations & Dietary Swaps
- Vegetarian Swap: Substitute the chicken tenders with firm tofu slices for a vegetarian-friendly version.
- Spice-It-Up: Increase the red chili flakes in the mango dip or add a dash of cayenne pepper for those who crave more heat.
- Kids-Friendly: Omit the chili flakes from the mango dip and serve with a honey mustard or sweet chili sauce instead.
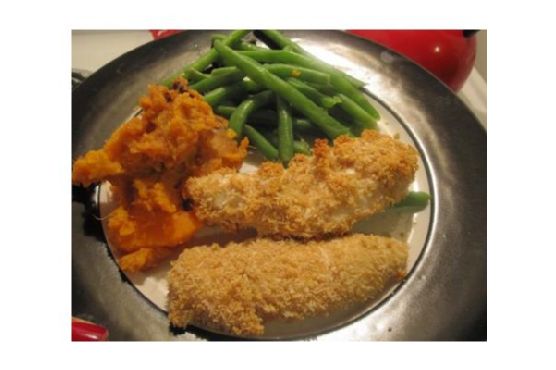
What to Serve With It
These tropical coconut-curry chicken tenders pair beautifully with a chilled glass of tropical fruit punch or a light mango lassi. For a more substantial meal, serve alongside a vibrant salad of mixed greens, avocado, and a squeeze of lime. The refreshing elements will balance out the rich flavors of the chicken and dip, creating a well-rounded meal that’s perfect for any occasion.
Storage & Meal Prep
Store any leftover chicken tenders in an airtight container in the fridge for up to three days. To reheat, bake in a preheated oven at 350°F (175°C) for about 10 minutes to retain their crispiness. The spicy mango dip can be stored in the refrigerator for up to a week. For longer storage, freeze the coated, uncooked chicken tenders on a baking sheet, then transfer them to a freezer bag. They can be baked straight from the freezer, adding an extra 5 minutes to the cooking time.
FAQ
Can I use sweetened coconut instead of unsweetened?
While you can use sweetened coconut, it may make the dish a bit too sweet and overpower the curry flavor. I recommend sticking with unsweetened coconut for the best balance.
What if I don’t have a food processor for the mango dip?
No worries! You can finely chop the dried mango slices and mix the ingredients by hand, though the texture will be chunkier. Consider using a blender as an alternative.
Can I fry the chicken tenders instead of baking them?
Absolutely! Frying will give them an even crispier texture, but make sure to monitor the heat to avoid burning the coconut. Fry in hot oil until golden-brown and cooked through, usually about 3-4 minutes on each side.
Is there a gluten-free option for this recipe?
Yes! Substitute the whole wheat bread crumbs with gluten-free bread crumbs or crushed rice cereal for a gluten-free version.
Can I make the mango dip less spicy?
Definitely. Simply reduce the amount of red chili flakes or omit them entirely for a milder version of the dip.
Final Thoughts
I hope you enjoy making and devouring these tropical coconut-curry chicken tenders as much as I do. They’re a delightful blend of flavors that bring a touch of the exotic to your dinner table. I love hearing from fellow food enthusiasts, so feel free to share your experiences, tweaks, or even any mishaps in the comments below. And, of course, if you think someone else might enjoy this recipe, don’t hesitate to share it. Happy cooking!
Related update: Tropical Coconut-Curry Chicken Tenders with Spicy Mango Dip
Related update: Herb-Crusted Lemon Roast Chicken with Truffle-Infused Potatoes