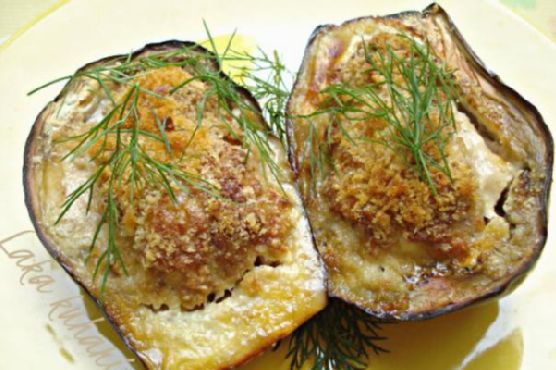
Tag: Weeknight Dinner

  • Zesty Citrus-Herb Baked Chicken Wings with Honey-Lime Glaze | Made by Meaghan Moineau

    Zesty Citrus-Herb Baked Chicken Wings with Honey-Lime Glaze | Made by Meaghan Moineau

    Zesty Citrus-Herb Baked Chicken Wings with Honey-Lime Glaze

    Imagine this: the sound of sizzling chicken wings in the oven, the kitchen enveloped in an aromatic symphony of citrus and herbs, and the anticipation of that first juicy bite. These are no ordinary wings — they are a vibrant explosion of sweet, tangy, and herbaceous flavors, perfectly sticky from a honey-lime glaze that beckons you back for more.

    Personal Story

    Growing up, chicken wings were a family favorite in our household, a weekend staple that brought us all together around the kitchen table. My earliest memories involve me standing on a stool next to my grandfather, watching as he expertly marinated the wings, adding just a splash of this and a pinch of that. The magic of his cooking wasn’t just in the ingredients but in the love and patience he poured into each dish.

    But it wasn’t always smooth sailing in my culinary journey with chicken wings. I recall a kitchen mishap in my early cooking days when, in a moment of overzealous ambition, I decided to improvise with a marinade that was more vinegar than anything else. The result was a batch of wings so tangy they made our mouths pucker more than smile. It was a humbling lesson in balance and restraint.

    Over the years, I’ve experimented and refined my approach, aiming to replicate the warmth and joy of those family gatherings in every bite. This current version, the Zesty Citrus-Herb Baked Chicken Wings with Honey-Lime Glaze, feels like the culmination of those lessons. It’s a dish that not only tantalizes the taste buds but also pays homage to the culinary memories that shaped my love for cooking.

    One evening, while preparing these wings for friends, I stumbled upon the magic of pairing citrus with herbs like fresh cilantro and mint. The result was a revelation, a perfect marriage of flavors that elevated the humble chicken wing to new heights. And the honey-lime glaze? Well, that was the sticky, sweet cherry on top.

    What Makes This Version Special

    This version of baked chicken wings is special because it infuses the wings with a vibrant citrus-herb marinade, accented with a honey-lime glaze for an irresistible sticky finish. Unlike traditional recipes that might rely solely on hot sauce or a simple barbecue glaze, this recipe brings in a medley of fresh herbs and citrus elements. The inclusion of **orange zest** adds a fragrant layer of citrus aroma, which, when combined with the **fresh cilantro** and **mint**, provides an herbaceous depth that traditional wing recipes often lack.

    The sweet, tangy, and herbaceous profile is enhanced by the **dark brown sugar** and **smoked paprika**, which introduce a subtle smokiness and sweetness that complements the natural flavors of the chicken. And then, finishing the wings under the broiler caramelizes the honey-lime glaze, offering that delightful sticky texture that everyone loves.

    Flavor Profile

    Prepare yourself for a taste experience like no other: these citrus-herb baked chicken wings are a harmonious blend of sweet, tangy, and herbaceous with a touch of smokiness. As you take your first bite, the initial sweetness of the honey-lime glaze hits your palate, quickly followed by the zesty brightness of the citrus. The herbs — parsley, cilantro, and mint — dance in the background, providing a refreshing counterpoint to the richness of the chicken. Finally, the smoked paprika leaves a gentle smoky finish, making each bite a multi-layered journey of flavors.

    Ingredients

    • 2 pounds chicken wings
    • **2 tablespoons lemon juice**
    • **2 tablespoons lime juice**
    • **1 tablespoon orange zest**
    • 2 cloves garlic, minced
    • **1/4 cup honey**
    • 2 tablespoons dark brown sugar
    • 2 tablespoons red wine
    • 1/4 cup chicken broth
    • 2 tablespoons vegetable oil
    • **1/4 cup fresh Italian parsley, chopped**
    • **1/4 cup fresh cilantro, chopped**
    • **2 tablespoons fresh mint, chopped**
    • 1 teaspoon smoked paprika
    • 1 teaspoon salt
    • 1/2 teaspoon freshly ground black pepper

    Instructions

    1. In a large mixing bowl, combine the lemon juice, lime juice, orange zest, garlic, honey, dark brown sugar, red wine, chicken broth, and vegetable oil. Whisk until the sugar has dissolved.
    2. Add the fresh parsley, cilantro, mint, smoked paprika, salt, and black pepper to the marinade, stirring until well incorporated.
    3. Place the chicken wings in a large resealable plastic bag or a shallow dish. Pour the marinade over the wings, ensuring they are well coated. Seal the bag or cover the dish and marinate in the refrigerator for at least 1 hour, or up to a few hours for maximum flavor infusion.
    4. Preheat your oven to 400°F (200°C). Line a baking sheet with aluminum foil and place a wire rack on top. Arrange the wings in a single layer on the rack, reserving the marinade.
    5. Bake the wings for 35-40 minutes, basting with the reserved marinade every 10 minutes, until the wings are cooked through and golden-brown.
    6. For an irresistible sticky finish, turn on the broiler and broil the wings for an additional 2-3 minutes, watching closely to ensure they don’t burn, until the honey-lime glaze is caramelized and sticky.
    7. Remove the wings from the oven and let them rest for a few minutes before serving. Garnish with additional fresh herbs if desired.

    Pro Tips from Meaghan’s Kitchen

    • If you’re short on time, a quick 30-minute marinade will still yield flavorful results, but for the best taste, go for at least a few hours.
    • Use a microplane to zest the orange; it’s the best tool for getting fine, fragrant zest without the bitter pith.
    • For extra crispy skin, pat the wings dry with paper towels before marinating. The less moisture, the crispier the skin will become.
    • Don’t overcrowd the baking rack. Ensuring space between the wings allows for even cooking and optimal crispiness.
    • Store leftover marinade in a sealed container in the fridge and use it to marinate other proteins like shrimp or pork for an easy meal later in the week.

    Variations & Dietary Swaps

    • Vegetarian Swap: Try this marinade on cauliflower florets or tofu. Both absorb the flavors wonderfully and make a great vegetarian alternative.
    • Spice-It-Up Version: Add a teaspoon of chili flakes or a dash of hot sauce to the marinade for some extra heat.
    • Kids-Friendly Version: Reduce the smoked paprika and skip the broiling step to keep the wings milder and less sticky, perfect for little ones.

    What to Serve With It

    These zesty wings pair beautifully with a chilled glass of Sauvignon Blanc, whose crispness complements the citrus notes perfectly. For a more substantial meal, serve with a zesty coleslaw tossed in a lime vinaigrette or alongside some roasted sweet potatoes for a delightful contrast of flavors.

    Storage & Meal Prep

    Leftover wings can be stored in an airtight container in the refrigerator for up to 3 days. To reheat, place them in a preheated 350°F (175°C) oven for about 10-12 minutes until heated through. For longer storage, freeze the wings in a single layer on a baking sheet; once frozen, transfer them to a freezer-safe bag or container. They can be frozen for up to 3 months. Reheat directly from frozen in a 375°F (190°C) oven for about 20-25 minutes.

    FAQ

    What if I don’t have fresh herbs?

    If fresh herbs are unavailable, you can substitute with dried herbs. Use a third of the quantity as dried herbs are more concentrated in flavor.

    Can I use chicken drumsticks instead of wings?

    Absolutely! Chicken drumsticks will work just as well, though you may need to adjust the cooking time, baking them for an additional 10-15 minutes to ensure they’re cooked through.

    Is there a non-alcoholic substitute for red wine?

    You can substitute the red wine with either red grape juice or additional chicken broth. Both will provide the necessary liquid and flavor.

    How can I make the wings crispier?

    For extra crispiness, consider adding a tablespoon of baking powder to the marinade. It raises the pH level of the skin, helping it crisp up beautifully in the oven.

    What’s the best way to zest an orange?

    Use a microplane or fine grater for zesting. Avoid the white pith as it can be bitter; focus on just the colorful outer layer of the orange peel.

    Final Thoughts

    There’s something deeply satisfying about crafting a dish that not only delights the senses but also carries the warmth of shared memories and culinary adventures. These Zesty Citrus-Herb Baked Chicken Wings with Honey-Lime Glaze are a testament to flavor exploration and a celebration of the simple joys of cooking. I hope you savor every bite as much as I do. If you give this recipe a try, I’d love to hear how it turned out for you. Share your thoughts in the comments below or tag me on social media with your delicious creations. Happy cooking, dear friends!

    Related update: Zesty Citrus-Herb Baked Chicken Wings with Honey-Lime Glaze

    Related update: Peruvian Lomo Saltado with Crispy Quinoa Crust and Citrus Avocado Salsa

  • Ginger-Sesame Baby Bok Choy Stir Fry with Toasted Almonds | Made by Meaghan Moineau

    Ginger-Sesame Baby Bok Choy Stir Fry with Toasted Almonds | Made by Meaghan Moineau

    Ginger-Sesame Baby Bok Choy Stir Fry with Toasted Almonds

    Imagine the tantalizing aroma of fresh ginger and sesame oil swirling together in a hot pan, mingling with the crisp sweetness of bok choy and the nutty crunch of toasted almonds. This Ginger-Sesame Baby Bok Choy Stir Fry is more than just a dish; it’s an aromatic dance of flavors that will enchant your taste buds and warm your soul.

    Personal Story

    It was a crisp autumn afternoon when I first stumbled upon the charm of baby bok choy. Wandering through an open-air market, I was drawn to their petite and vibrant green bundles, standing out like jewels among the earthy tones of root vegetables and gourds. Until then, my culinary adventures with Asian greens had been limited to the familiar crunch of broccoli and the peppery bite of arugula. But something about these little bok choy bundles beckoned me to explore further.

    Back in my cozy kitchen, I recall the gentle rustle of their leaves as I washed them, a sound reminiscent of a soft breeze stirring through a forest. I was nervous yet excited to experiment with a vegetable that was new to me. My first attempt at a stir fry ended in a delicious disaster — I had underestimated the power of fresh ginger and overdone the soy sauce, creating a saltier dish than anticipated. But every crackle of the pan and fragrant whiff of sesame oil encouraged me to keep trying.

    Through trial and a little error, I refined my approach, adding ingredients that would enhance rather than overpower. That’s when I discovered the magic of adding toasted almonds and a hint of honey, introducing a sweet, nutty balance to the dish. This initial kitchen mishap led to a delightful discovery — a recipe that became a staple in my household, loved by family and friends alike.

    Now, every time I make this Ginger-Sesame Baby Bok Choy Stir Fry with Toasted Almonds, I am transported back to that market day, feeling the crisp autumn air and hearing the chatter of bustling stalls. This dish, with its aromatic warmth and intricate flavors, has become a cherished part of my culinary repertoire, and I’m thrilled to share it with you.

    What Makes This Version Special

    The unique twist in this recipe lies in the incorporation of ginger and sesame seeds, which add an extra layer of aromatic complexity and nutty depth. Many traditional stir fry recipes stick to the basics, but this version elevates the dish to a new level by enhancing the natural sweetness of the bok choy with honey and balancing it with the umami of soy sauce. The **ginger** and **toasted sesame seeds** not only infuse the dish with rich scents but also bring a delightful texture and flavor contrast. By toasting the sesame seeds, we unlock a warm, nutty aroma that complements the leafy green crunch of the bok choy. Each bite is a symphony of textures and flavors, making this stir fry stand out from the standard versions.

    Flavor Profile

    This Ginger-Sesame Baby Bok Choy Stir Fry offers an aromatic explosion of flavors. The dish is delicately balanced with nutty, spicy, and sweet notes that dance on your palate. The **fresh ginger** provides a subtle heat, while the **coconut oil** brings a silky mouthfeel and a hint of tropical flair. The **honey** adds just the right amount of sweetness to counterbalance the savory **soy sauce**. As the stir fry cooks, the **aromas** of garlic and ginger bloom in the pan, weaving together a tapestry of scents that are both comforting and exciting. The **toasted almonds** contribute a satisfying crunch and a toasty flavor that amplifies the nutty profile of the dish.

    Ingredients

    • 1 tablespoon coconut oil
    • 2 shallots, thinly sliced
    • 2 lbs baby bok choy, halved lengthwise
    • 3 cloves garlic, minced
    • 1 tablespoon minced fresh ginger
    • 1 teaspoon salt
    • 1/2 teaspoon black pepper
    • 1/4 teaspoon red pepper flakes
    • 1/3 cup sliced almonds
    • 1 tablespoon sesame oil
    • 1 tablespoon honey
    • 2 tablespoons soy sauce
    • 2 tablespoons toasted sesame seeds

    Instructions

    1. Heat the coconut oil in a large nonstick skillet over medium-high heat until shimmering.
    2. Add the sliced shallots and cook for 3 to 4 minutes until they are soft and translucent.
    3. Introduce the bok choy to the skillet, setting the leafy tops aside for later. Cook for another 3 to 4 minutes, stirring occasionally, until the stalks are crisp-tender and slightly charred.
    4. In a separate small dry pan, toast the sliced almonds over medium heat, stirring frequently, until golden brown and fragrant, about 3 minutes. Be sure to keep an eye on them to prevent burning.
    5. Add the minced garlic and ginger to the bok choy in the skillet, allowing them to bloom in the remaining coconut oil until fragrant, about 30 seconds.
    6. Sprinkle in the salt, black pepper, and red pepper flakes, stirring to coat the bok choy evenly.
    7. Stir in the reserved bok choy leaves, sesame oil, honey, and soy sauce. Toss everything together and let it cook for another 2 minutes until the leaves have wilted slightly.
    8. Finally, top the stir fry with the toasted almonds and toasted sesame seeds before serving warm.

    Pro Tips from Meaghan’s Kitchen

    • Balancing flavors: If you find the dish too sweet or salty, adjust by adding a splash of rice vinegar for acidity.
    • Toasting sesame seeds: Always toast seeds and nuts in a dry pan to bring out their natural oils and enhance their flavor.
    • Timing is key: Add bok choy leaves towards the end of cooking to preserve their color and nutrients.
    • Infusion technique: Blooming garlic and ginger in oil releases their essential oils, maximizing their flavor impact.
    • Ingredient swaps: Feel free to substitute almonds with cashews for a creamier texture or use maple syrup in place of honey for a vegan version.

    Variations & Dietary Swaps

    • Vegetarian Swap: Replace soy sauce with tamari for a gluten-free version, and swap honey with maple syrup for a vegan-friendly dish.
    • Spice It Up: For those who love heat, increase the red pepper flakes to 1/2 teaspoon or add a dash of sriracha for an extra kick.
    • Kids-Friendly Version: Tone down the spice by omitting the red pepper flakes and adding a handful of snap peas or baby corn for added sweetness and color.

    What to Serve With It

    Pair this Ginger-Sesame Baby Bok Choy Stir Fry with a bowl of steamed jasmine rice or quinoa for a complete meal. For a refreshing beverage, serve alongside a chilled glass of Jasmine tea, whose floral notes complement the dish beautifully. Alternatively, a light, crisp Sauvignon Blanc offers a bright acidity that enhances the fresh ginger and sesame flavors.

    Storage & Meal Prep

    Store any leftovers in an airtight container in the refrigerator for up to 3 days. To reheat, gently warm in a skillet over medium heat until heated through, adding a splash of water if necessary to maintain moisture. This stir fry is not recommended for freezing, as the texture of the bok choy may become mushy upon thawing.

    FAQ

    Can I use regular bok choy instead of baby bok choy?

    Yes, regular bok choy can be used, though you may need to slice it into smaller pieces to ensure even cooking. The flavor will be slightly more robust, but still delicious.

    What can I use instead of coconut oil?

    If coconut oil isn’t available, substitute with any neutral oil like vegetable or avocado oil. Keep in mind that coconut oil adds a hint of sweetness that complements the dish.

    Can I make this dish ahead of time?

    While it’s best enjoyed fresh, you can prep the ingredients ahead of time by slicing the shallots and bok choy, and toasting the almonds. Assemble and cook when ready to serve for maximum flavor and texture.

    How do I prevent the garlic and ginger from burning?

    Ensure the garlic and ginger are added when the oil is hot but not smoking, and always keep stirring them in the pan to avoid burning. Adding them just before the liquid ingredients also helps protect them from high heat.

    Final Thoughts

    Creating this Ginger-Sesame Baby Bok Choy Stir Fry with Toasted Almonds is a journey of flavors and textures that transforms simple ingredients into something extraordinary. Whether you’re new to cooking Asian-inspired dishes or a seasoned pro, this recipe offers a delightful challenge with aromatic rewards. I hope you enjoy making and sharing this dish as much as I do. I’d love to hear your thoughts and see your creations — feel free to leave a comment below or share your photos on social media. Let’s keep the conversation and the culinary exploration going!

    Related update: Ginger-Sesame Baby Bok Choy Stir Fry with Toasted Almonds

    Related update: Spicy Garlic-Curry Leaf Crunch Potatoes with Tamarind Chutney

  • Gourmet Turkey Burgers with Roasted Red Pepper and Feta | Made by Meaghan Moineau

    Gourmet Turkey Burgers with Roasted Red Pepper and Feta | Made by Meaghan Moineau

    Gourmet Turkey Burgers with Roasted Red Pepper and Feta

    The warm sizzle of turkey burgers hitting a hot pan, a hint of tangy feta cheese mingling with the fresh aroma of mint, and the smoky allure of roasted red pepper relish – this is not your average cookout fare. Welcome to a Mediterranean-inspired flavor journey that will transform your typical burger night into a gourmet dining experience.

    Personal Story

    Growing up, turkey burgers were a weeknight staple in our home. My mom, ever the culinary magician, would whip them up with whatever we had on hand. It was always a delicious surprise to bite into the latest creation. One summer evening, after a particularly adventurous attempt involving pineapple and a questionable spice mix, I decided it was time to craft my own signature turkey burger recipe.

    Fast forward a few years to a bustling Saturday morning at the local farmer’s market. As I browsed the vibrant stalls, the aroma of freshly roasted red peppers drew me in. That’s when inspiration struck. Why not combine the savory goodness of turkey with the zesty kick of feta and the aromatic freshness of mint? The result was nothing short of extraordinary.

    My first attempt at these gourmet turkey burgers was during a backyard gathering with friends. As the burgers sizzled on the grill, guests began to gather, drawn by the intoxicating smell. The roasted red pepper relish added a layer of depth, complimenting the juicy, herb-infused turkey patties perfectly. It was a hit, and I knew this recipe was a keeper.

    Now, this recipe has become my go-to when I want to impress or simply indulge in something a bit more sophisticated than your average burger night. It’s a dish that carries memories of family dinners and farmer’s market discoveries – a true testament to the beauty of elevating the everyday.

    What Makes This Version Special

    What sets these gourmet turkey burgers apart is the incorporation of **tangy feta cheese** and a hint of **fresh mint**. These ingredients elevate the flavor profile of traditional turkey burgers, transforming them into a Mediterranean delight. Add a rich, smoky **roasted red pepper relish**, and you’ve got a dish that’s bursting with complexity and flavor.

    Most turkey burger recipes stick to the basics, but this version dares to be different. The feta cheese adds a creamy tang that perfectly complements the lean ground turkey, while the fresh mint introduces a delightful contrast of brightness and flavor. The roasted red pepper relish, with its deep, smoky notes, ties everything together, creating a burger that’s anything but ordinary.

    Flavor Profile

    Prepare yourself for a taste sensation with these gourmet turkey burgers. The savory turkey, combined with the **tanginess of feta** and the **freshness of mint**, creates a harmonious balance that delights the palate. As you bite into the juicy patty, the subtle **smokiness from the roasted red pepper relish** adds a layer of depth, making each mouthful a truly memorable experience. It’s a dish that dances between savory, zesty, and slightly sweet – a perfect melody of flavors.

    Ingredients

    • 1 lb lean extra ground turkey
    • 1/2 cup shredded carrots
    • 1 egg, beaten
    • 2 cloves garlic, minced
    • 3 green onions, finely chopped
    • 1/2 cup panko breadcrumbs
    • 1/2 cup crumbled **feta cheese**
    • 1/4 cup finely chopped **fresh mint leaves**
    • 1/2 cup grated zucchini
    • 1/4 cup spinach, chopped
    • 1 tbsp tomato paste
    • 1 tsp smoked paprika
    • Salt and pepper to taste
    • 2 large **red bell peppers**
    • Olive oil for spritzing
    • **Roasted red pepper relish**

    Instructions

    1. Begin by preparing the roasted red peppers. Char the skins of the red bell peppers directly over an open flame until blackened. This step adds a deeper smoky flavor that will penetrate the relish. Once charred, slice the peppers, remove the seeds, and spritz with olive oil. Roast in the oven at 425°F (220°C) for 20 minutes until they become tender and aromatic.
    2. In a large mixing bowl, combine the ground turkey, shredded carrots, egg, minced garlic, green onions, panko breadcrumbs, crumbled **feta cheese**, and chopped **fresh mint leaves**. Add grated zucchini, chopped spinach, tomato paste, and smoked paprika. Season with salt and pepper.
    3. Gently fold the mixture together, being careful not to overwork it. You want all ingredients to be well combined but not overly compacted to ensure juicy burgers.
    4. Divide the mixture into 4-6 equal portions and shape each into a round patty. Aim for uniform thickness to ensure even cooking.
    5. Preheat a grill or skillet to medium-high heat. Cook the patties for about 4-5 minutes per side, or until they reach an internal temperature of 165°F (74°C) and are golden-brown on the outside.
    6. As the burgers cook, prepare the roasted red pepper relish by chopping the roasted peppers and combining them with a drizzle of olive oil, salt, and pepper. The relish should be slightly chunky, adding texture to the burgers.
    7. Serve your gourmet turkey burgers topped with the smoky roasted red pepper relish, and enjoy the symphony of flavors.

    Pro Tips from Meaghan’s Kitchen

    • When forming the patties, create a small indentation in the center of each burger. This helps them cook more evenly and prevents them from puffing up in the middle.
    • If you’re short on time, prepare the roasted red pepper relish a day ahead. It allows the flavors to meld beautifully, enhancing the overall taste.
    • Consider using a combination of fresh herbs such as parsley or cilantro for an added layer of flavor complexity.
    • Make sure your grill or skillet is properly preheated before adding the patties. This ensures a good sear and locks in the juices.
    • For extra flavor, toast the burger buns on the grill for a quick minute before serving.

    Variations & Dietary Swaps

    • Vegetarian Version: Swap out the turkey for a hearty mix of chickpeas and quinoa. Add extra breadcrumbs to bind the mixture.
    • Spice-It-Up: Add a pinch of cayenne pepper or a dash of sriracha sauce to the burger mix for a spicy kick.
    • Kids-Friendly: Skip the mint and smoked paprika, and add a touch of mild cheddar cheese to make the burgers more appealing to younger taste buds.

    What to Serve With It

    Pair these gourmet turkey burgers with a chilled glass of Sauvignon Blanc to complement the tangy feta and fresh mint. For a classic side, serve with crispy sweet potato fries, which naturally balance the savory notes of the burger. A light side salad with a lemon vinaigrette also works beautifully to refresh the palate between bites.

    Storage & Meal Prep

    These turkey burgers are perfect for meal prep. Once cooked, allow the patties to cool completely before storing them in an airtight container in the refrigerator for up to 3 days. To freeze, arrange the patties on a baking sheet lined with parchment paper and place them in the freezer until solid. Transfer to a freezer-safe bag or container and store for up to 3 months. Reheat in the oven at 350°F (175°C) until heated through, being careful not to dry them out.

    FAQ

    Can I use a different cheese instead of feta?

    Absolutely! Goat cheese or a mild blue cheese can make great substitutes, adding their own unique flavors to the mix.

    How can I make the burgers juicier?

    Incorporating ingredients like grated zucchini and carrots not only adds moisture but also boosts the nutritional profile of the burgers.

    What if I don’t have a grill?

    No problem! You can cook these burgers in a skillet on your stovetop. Just ensure it’s heated to medium-high for a good sear.

    Can I make the burgers ahead of time?

    Yes, you can prepare the patties and store them uncooked in the fridge for up to 24 hours. This makes it easy to simply cook them when you’re ready to eat.

    What’s the best way to reheat the burgers?

    For the best results, reheat the burgers in the oven to maintain their juiciness. Avoid microwaving as it can make them rubbery.

    Final Thoughts

    Embrace the flavors of the Mediterranean with these gourmet turkey burgers, a delightful dish that proves healthy eating doesn’t have to be boring. I hope you’ll give this recipe a try and make it your own. Whether you’re grilling for friends or enjoying a quiet night in, these burgers are sure to impress. I’d love to hear how yours turned out or any twists you added, so feel free to drop a comment or share your photos. Happy cooking!

    Related update: Gourmet Turkey Burgers with Roasted Red Pepper and Feta

    Related update: Zesty Citrus-Herb Baked Chicken Wings with Honey-Lime Glaze

  • Sumptuous Mediterranean Moussaka with Pistachio-Crusted Eggplants | Made by Meaghan Moineau

    Sumptuous Mediterranean Moussaka with Pistachio-Crusted Eggplants

    Imagine the scent of roasted eggplant mingling with the warm, spicy aroma of cinnamon and nutmeg. The sizzle of sautéing onions and garlic fills the air, drawing you into the kitchen where a Mediterranean feast is unfolding. This isn’t just any moussaka — it’s a Sumptuous Mediterranean Moussaka with Pistachio-Crusted Eggplants, and it’s about to redefine your culinary expectations.

    Personal Story

    My love affair with moussaka began on a sun-soaked trip to Crete, where the vibrant flavors and hospitable locals made every meal an unforgettable experience. One evening, nestled in a cozy taverna overlooking the Aegean Sea, I was served a slice of moussaka that stopped time. The layers of eggplant, rich meat sauce, and creamy béchamel were perfectly balanced, each bite a harmonious dance of flavors.

    Back home, I was determined to recreate that magical dish. My first few attempts were less than stellar, resulting in soggy eggplant and bland béchamel. But with persistence and a few creative twists, I found a version that not only captured the essence of that Cretan evening but elevated it in unexpected ways.

    One day, while rummaging through my pantry, I stumbled upon a bag of pistachios. A light bulb moment occurred — why not add a nutty crust to the eggplant layers? The result was a delightful crunch that contrasted beautifully with the creamy béchamel. My family, who had been my patient taste-testers, were unanimous in their verdict: this was the best moussaka yet.

    And so, the Sumptuous Mediterranean Moussaka with Pistachio-Crusted Eggplants was born, a dish that now holds a special place in my kitchen and heart. It’s a testament to the power of experimentation and the joy of bringing a taste of the Mediterranean home.

    What Makes This Version Special

    This version of moussaka stands out with its unique pistachio-crusted eggplant layers. The crunch of the pistachios adds a delightful texture that transforms the dish from ordinary to extraordinary. Meanwhile, the béchamel sauce is infused with a hint of lemon zest, offering a refreshing lift that brightens the rich, hearty flavors. These tweaks not only elevate the classic moussaka but also provide a new dimension to every bite.

    Flavor Profile

    The Sumptuous Mediterranean Moussaka with Pistachio-Crusted Eggplants is a feast for the senses. Imagine the rich and hearty flavors of a traditional moussaka, now enhanced by a zesty, nutty undertone. The pistachio crust adds a satisfying crunch that complements the savory meat sauce, while the lemon-infused béchamel provides a light, aromatic finish. It’s a symphony of textures and tastes, with each layer bringing something special to the table.

    Ingredients

    • 4 medium-sized eggplants, cut into 1/4 inch slices
    • **1 cup pistachios, finely chopped**
    • 2 tablespoons olive oil
    • 1 teaspoon sea salt
    • 1 tablespoon butter
    • 1/4 cup flour
    • 2 cups warm milk
    • **Zest of 1 lemon**
    • 1/4 cup fresh mint leaves, chopped
    • 3 egg yolks
    • 1/2 teaspoon ground nutmeg
    • 1 pound lean beef
    • 1 onion, finely chopped
    • 2 cloves garlic, minced
    • 1/2 teaspoon ground cinnamon
    • 1/2 teaspoon ground allspice
    • 1/2 teaspoon white salt
    • 1/2 teaspoon ground pepper
    • 1 can (14 oz) tomatoes, crushed
    • 2 tablespoons tomato paste
    • 1 cup feta cheese, crumbled
    • 1 cup bread crumbs

    Instructions

    1. Sprinkle the eggplant slices with sea salt and let them stand for 45 minutes to draw out excess moisture. Rinse thoroughly and pat dry.
    2. Preheat your oven to 180°C (350°F). Coat each eggplant slice with olive oil and dip them into the **finely chopped pistachios**. Arrange on a baking sheet and bake until golden-brown, about 15 minutes per side. Set aside.
    3. In a large skillet, heat olive oil over medium heat. Sauté the onions until soft, about 5 minutes. Add garlic and cook for another minute.
    4. Add the ground beef, breaking it into small pieces as it cooks. Once browned, stir in the crushed tomatoes, cinnamon, allspice, white salt, and ground pepper. Simmer on low heat for about 10 minutes. Mix in the tomato paste and adjust consistency with a little water if needed. Set aside.
    5. For the béchamel, melt butter in a saucepan over medium heat. Add flour and stir constantly until it forms a smooth paste. Gradually whisk in warm milk, bringing it to a gentle boil. Remove from heat and season with ground nutmeg. Whisk in the egg yolks vigorously until smooth. Stir in the **lemon zest** and fresh mint.
    6. Lightly oil a suitable ovenproof baking dish and sprinkle the base with bread crumbs. Layer with pistachio-crusted eggplants, some meat sauce, and crumbled feta cheese. Repeat these layers until the dish is nearly full, finishing with a layer of feta.
    7. Top everything with the lemon-mint béchamel sauce. Cover with foil and bake in the preheated oven for 1 hour.
    8. Remove the foil and let the moussaka set at room temperature for about 45 minutes before serving. This helps the layers to firm up and blend their flavors beautifully.

    Pro Tips from Meaghan’s Kitchen

    • For an even crunchier pistachio crust, toast the pistachios lightly in a dry pan before chopping.
    • Letting the eggplant sit with salt not only removes bitterness but also makes them absorb less oil during baking.
    • Don’t skip the resting time after baking; it’s crucial for achieving neat, well-defined layers when you cut into the moussaka.
    • To save time, make the meat sauce a day ahead. It allows the flavors to meld and makes your kitchen work more manageable.
    • If you prefer a thicker béchamel, simply add a bit more flour to your roux and adjust the milk accordingly.

    Variations & Dietary Swaps

    • Vegetarian Swap: Replace the beef with a mixture of mushrooms and lentils for a hearty vegetarian option.
    • Spice-It-Up Version: Add a teaspoon of crushed red pepper flakes to the meat sauce for a bit of heat.
    • Kids-Friendly Version: Substitute the eggplant with zucchini to make it more appealing to younger palates.

    What to Serve With It

    This Sumptuous Mediterranean Moussaka pairs wonderfully with a glass of chilled Sauvignon Blanc, whose crisp acidity complements the richness of the dish. For a side, consider a classic Greek salad with olives, cucumbers, and a sprinkle of feta cheese to keep the Mediterranean theme going.

    Storage & Meal Prep

    For leftovers, store the moussaka in an airtight container in the fridge for up to four days. It also freezes exceptionally well; just wrap tightly in foil and place in a freezer-safe container for up to two months. Reheat in the oven at 180°C (350°F) until heated through. This dish is perfect for meal prep, as it often tastes even better the next day!

    FAQ

    Can I make this moussaka ahead of time?

    Yes, you can! Prepare the moussaka up to the baking step, cover it, and refrigerate for up to 24 hours. When you’re ready to bake, simply add an extra 10-15 minutes to the cooking time.

    What is the best way to chop pistachios?

    For a fine chop, use a food processor, pulsing a few times until you reach the desired consistency. Be careful not to over-process, as you want small pieces, not a paste.

    How can I prevent the béchamel sauce from curdling?

    Always add the egg yolks off the heat and whisk vigorously. Slowly tempering the yolks with a bit of the hot milk before adding to the sauce can also help prevent curdling.

    What’s a good substitute for feta cheese?

    If you’re not a fan of feta, ricotta cheese can be a milder alternative, or you can use goat cheese for a slightly tangier flavor.

    Can I use pre-cooked meat for the sauce?

    Absolutely. If you have leftover cooked beef, simply crumble it into the sauce after sautéing the onions and garlic.

    Final Thoughts

    Creating this Sumptuous Mediterranean Moussaka with Pistachio-Crusted Eggplants is more than just making dinner; it’s an exploration of texture and flavor that brings the spirit of the Mediterranean into your home. I hope you’ll find as much joy in making and sharing this dish as I do. If you give it a try, please leave a comment or share your version on social media. Happy cooking, my friends!

    Related update: Sumptuous Mediterranean Moussaka with Pistachio-Crusted Eggplants

    Related update: Gourmet Turkey Burgers with Roasted Red Pepper and Feta

  • Smoky Slow Cooker Chicken Gumbo with Charred Jalapeño | Made by Meaghan Moineau

    Smoky Slow Cooker Chicken Gumbo with Charred Jalapeño | Made by Meaghan Moineau

    Smoky Slow Cooker Chicken Gumbo with Charred Jalapeño

    Imagine the rich aroma of a smoky, spicy gumbo, bubbling away in your slow cooker, melding its flavors into a perfect harmony. The distinct scent of charred jalapeños mingles with the warm, inviting notes of Cajun seasoning, creating a culinary experience that dances on the senses and warms the soul. This is my Smoky Slow Cooker Chicken Gumbo with Charred Jalapeño — a dish that promises a little slice of heaven in every spoonful.

    Personal Story

    Gumbo has always had a special place in my heart. I can vividly recall my first encounter with this classic Cajun dish. It was during a road trip through Louisiana with my college friends, a spontaneous adventure filled with jazz, laughter, and of course, unforgettable food. We stumbled upon a small, family-owned restaurant just outside of New Orleans, where I tasted my first authentic chicken gumbo. The complexity of flavors, the unexpected warmth of spices, and the soul-comforting nature of the dish left an indelible mark on me.

    Fast forward a few years, and I found myself yearning to recreate that experience in my own kitchen. But as any home cook knows, the journey to mastering a dish is not without its mishaps. I remember my first attempt vividly — the broth was too watery, and the seasoning was all wrong. My family, ever supportive, tried to reassure me with polite nods and forced smiles. I knew I had to try again.

    After countless trials and tweaks, I discovered my own twist on the beloved gumbo. By charring jalapeños for a smoky depth and adding a hint of lime for brightness, I crafted a version that not only satisfied my cravings but also became a household favorite. It’s a recipe that’s been passed around at gatherings and shared among friends, each one adding their own spin. This gumbo isn’t just a dish; it’s a story of persistence and discovery, a testament to the magic that happens when you pour your heart into cooking.

    What Makes This Version Special

    This version of chicken gumbo takes the traditional elements and elevates them with a few key twists. The addition of charred jalapeños introduces a smoky depth that complements the richness of the Cajun flavors beautifully. Charring the jalapeños in a hot skillet or over an open flame until blackened unlocks a new dimension of flavor that transforms the entire dish. Moreover, a squeeze of fresh lime juice adds a citrusy finish that brightens the palate after each bite. These small but significant tweaks make this gumbo stand out from the standard recipe, offering a unique and unforgettable experience.

    Flavor Profile

    The flavor profile of this smoky slow cooker chicken gumbo is a delightful dance of smoky, spicy, and tangy notes. The charred jalapeños lend a deep, smoky aroma that pairs perfectly with the savory richness of the cooked whole chicken and the robust Cajun seasoning. The smoked paprika enhances this depth, while the lime juice adds a refreshing, citrusy finish that lifts the dish. As you savor each spoonful, you’ll experience a complex interplay of flavors that leaves you craving more.

    Ingredients

    • 1 cooked whole chicken, shredded
    • 4 cups canned chicken broth
    • 1 carrot, diced
    • 1 green bell pepper, diced
    • 1 onion, diced
    • 1 (14.5 oz) can diced tomatoes
    • 1 cup fresh okra, sliced
    • 2 cups water
    • 2 tablespoons Cajun seasoning
    • 1 teaspoon black pepper
    • 1 teaspoon salt
    • 1 tablespoon hot sauce
    • 1 cup long grain rice
    • 2 jalapeños, charred
    • 1 lime, juiced
    • 1 teaspoon smoked paprika
    • 1 bay leaf
    • Fresh cilantro for garnish

    Instructions

    1. Begin by charring the jalapeños. Place them over an open flame or in a hot skillet, turning occasionally until the skin is blackened and blistered. This should take about 5-7 minutes. Once charred, allow them to cool slightly, then chop finely and set aside.
    2. In a small skillet, heat a tablespoon of oil over medium heat. Add the Cajun seasoning and smoked paprika, stirring constantly for about 1-2 minutes until the spices are fragrant and slightly darkened. This blooming process will enhance their flavors beautifully.
    3. In your slow cooker, combine the shredded chicken, chicken broth, carrot, green bell pepper, onion, diced tomatoes, and sliced okra. Stir in the water, bloomed spices, black pepper, salt, hot sauce, and long grain rice.
    4. Add the chopped, charred jalapeños and the bay leaf to the mixture. Give everything a good stir to ensure the ingredients are well combined.
    5. Set your slow cooker to high and cook for 4 hours, or on low for 6 to 7 hours. The gumbo is ready when the vegetables are tender and the flavors have melded together.
    6. Just before serving, stir in the lime juice and remove the bay leaf. Taste and adjust seasoning if necessary.
    7. Garnish with fresh cilantro and serve hot. Enjoy your smoky, flavorful creation!

    Pro Tips from Meaghan’s Kitchen

    • For the best smoky flavor, don’t rush charring the jalapeños. Let them blacken fully to get that delicious depth.
    • Blooming spices may seem like an extra step, but it’s the secret to unlocking their full potential. Don’t skip it!
    • If your gumbo is too thick, add a splash more chicken broth to reach your desired consistency.
    • For extra depth, consider adding a teaspoon of fish sauce. It sounds odd, but it adds umami without overpowering the dish.
    • Make sure to taste and adjust the seasoning at the end, as slow cooking can mellow flavors.

    Variations & Dietary Swaps

    Looking to shake things up or accommodate dietary needs? Here are some variations:

    • Vegetarian Swap: Replace chicken with hearty vegetables like mushrooms, zucchini, and eggplant. Use vegetable broth instead of chicken broth.
    • Spice-It-Up Version: Add an extra jalapeño or a dash of cayenne pepper if you love extra heat.
    • Kids-Friendly Version: Skip the jalapeños and reduce the Cajun seasoning for a milder, kid-approved version.

    What to Serve With It

    This smoky slow cooker chicken gumbo pairs beautifully with a side of crusty cornbread, providing the perfect vessel to mop up every drop of that flavorful broth. For a refreshing contrast, serve with a chilled glass of Sauvignon Blanc. The wine’s crispness complements the gumbo’s smoky depth, making for a delightful dining experience.

    Storage & Meal Prep

    Leftover gumbo can be stored in an airtight container in the fridge for up to 3 days. For longer storage, freeze in individual portions for up to 3 months. To reheat, thaw overnight in the fridge and warm on the stovetop over medium heat, stirring occasionally until heated through. Add a splash of broth if the gumbo thickens too much during reheating.

    FAQ

    Can I use fresh tomatoes instead of canned?

    Absolutely! Fresh tomatoes can be used, although you’ll need to peel and dice them first. Use about 4-5 medium tomatoes to replace a 14.5 oz can.

    What if I don’t have a slow cooker?

    You can make this gumbo on the stovetop. Use a large pot and simmer on low heat for about 2-3 hours, or until the flavors meld beautifully and the vegetables are tender.

    Is there a way to reduce the sodium content?

    To cut down on sodium, opt for low-sodium chicken broth and reduce the added salt. You can also make your own broth to control the ingredients.

    Can I prepare this recipe in advance?

    Yes, you can prepare the ingredients the night before and store them in the refrigerator. In the morning, simply combine everything in the slow cooker and start cooking.

    How do I thicken the gumbo if needed?

    If you prefer a thicker gumbo, you can make a slurry with 1 tablespoon of cornstarch mixed with 2 tablespoons of cold water. Stir it into the gumbo in the last 30 minutes of cooking.

    Final Thoughts

    There you have it, my friends — a smoky slow cooker chicken gumbo with charred jalapeño that’s sure to impress at any meal. I hope you find as much joy in making and sharing this dish as I do. If you give this recipe a try, please leave a comment below or share your own variations. Cooking is all about community and creativity, after all. Bon appétit!

    Related update: Smoky Slow Cooker Chicken Gumbo with Charred Jalapeño

    Related update: Maple-Glazed Bacon Wrapped Gouda-Stuffed Chicken Breast

    Related update: Savory Truffle-Infused Minestrone with Crispy Pancetta

  • Spicy Saffron Mussels & Clams in White Wine Broth | Made by Meaghan Moineau

    Spicy Saffron Mussels & Clams in White Wine Broth | Made by Meaghan Moineau

    Spicy Saffron Mussels & Clams in White Wine Broth

    Imagine the sound of clams popping open, releasing their briny aroma, mingling with the earthy scent of saffron. The heat of the chili tickles your nose, and the bright zest of lemon dances in the air. This is not just a dish; it’s an invitation to savor the luxury of the sea with every spoonful.

    Personal Story

    I first encountered the delightful harmony of mussels and clams in a small family-run trattoria on the Amalfi Coast. The rustic charm, the gentle clinking of cutlery, and the soft hum of Italian conversation set the perfect stage for my culinary revelation. As a passionate home cook, I was eager to recreate that magic back home.

    My first attempt was, let’s say, a spirited adventure. The mussels refused to open, and the broth was more reminiscent of a watery soup than the rich, golden elixir I remembered. But every mishap in the kitchen is a learning opportunity, and I was determined to master the art of Italian seafood dishes.

    After experimenting with different techniques and flavors, I discovered the transformative magic of saffron. Infusing the white wine broth with saffron threads elevated the dish to new heights, reminding me of the golden sunsets over the Mediterranean. The spice not only imparted a luxurious color but enriched the aroma, creating a truly unforgettable dining experience.

    Now, this dish has become a staple in my home, especially when I want to impress guests or simply indulge in a little culinary escapism. Each time I prepare it, I’m transported back to that charming trattoria, and I hope to share that experience with you.

    What Makes This Version Special

    My version of Spicy Saffron Mussels & Clams in White Wine Broth stands out because of its unique infusion of saffron threads. This addition not only gives the dish a luxurious color but also infuses the broth with a rich, aromatic flavor that standard recipes often lack. Furthermore, I incorporate a touch of lemon zest to brighten the overall taste, providing a refreshing contrast to the rich, buttery broth. This extra step makes all the difference, transforming a simple seafood dish into a gourmet experience.

    Flavor Profile

    The flavor profile of this dish is a symphony of sensations. The rich and aromatic broth is infused with the earthy warmth of saffron and complemented by a citrusy brightness from the lemon zest. A subtle heat from the chili flakes adds a delightful kick, perfectly balanced by the sweet, juicy burst of cherry tomatoes. The mussels and clams lend their briny essence, while fresh parsley ties everything together with a hint of freshness. Each bite is a layered experience, inviting you to savor the rich tapestry of flavors.

    Ingredients

    • 3-4 glugs of olive oil
    • **8 saffron threads**
    • 4 cloves of garlic, sliced
    • 1/2 teaspoon chili flakes
    • 1 pound clams, cleaned
    • 1 pound mussels, cleaned
    • **1 cup cherry tomatoes, halved**
    • **1/2 cup white wine**
    • **Zest of 1 lemon**
    • Salt to taste
    • 2 tablespoons butter
    • 1/4 cup fresh parsley, chopped
    • 1 cup arugula (optional)
    • Crusty sourdough bread, for serving

    Instructions

    1. Begin by warming the white wine slightly in a small saucepan. Add the saffron threads and let them bloom for about 10 minutes to release their full color and flavor.
    2. In a large frying pan, heat the olive oil over low heat. Add the garlic and cook until it turns golden-brown. Remove and discard the garlic unless you prefer to keep it in for extra flavor.
    3. Turn up the heat to medium and add the chili flakes. Stir them briefly before adding the clams. Cook for about 30 seconds to 1 minute.
    4. Next, add the mussels to the pan. Increase the heat to high and toss in the cherry tomatoes. Sauté for 2 minutes, allowing the tomatoes to soften slightly.
    5. Pour in the saffron-infused white wine and cover the pan. Let it cook for 1-2 minutes, just until the shells of the mussels and clams have opened. Discard any that remain closed.
    6. Turn off the heat and stir in the fresh parsley and butter, allowing it to melt into the broth.
    7. For an extra touch of freshness, you can top the dish with arugula before serving. Serve immediately with plenty of crusty sourdough bread for dipping, and a glass of white wine.

    Pro Tips from Meaghan’s Kitchen

    • Always clean your mussels and clams thoroughly. Scrub the shells and remove any beards to prevent grit in your dish.
    • Toasting lemon zest in olive oil before adding other ingredients releases its essential oils for maximum flavor.
    • If you’re short on time, you can prepare the saffron-infused wine a day ahead and store it in the fridge.
    • For a richer broth, don’t skimp on the butter. It brings a velvety texture that pairs beautifully with the seafood.
    • If a mussel or clam doesn’t open, don’t force it. Discard it to avoid any unpleasant surprises.

    Variations & Dietary Swaps

    • Vegetarian Swap: Use vegetable broth instead of seafood and double the cherry tomatoes. Substitute mussels and clams with artichoke hearts for a satisfying alternative.
    • Spice-It-Up Version: Add a teaspoon of smoked paprika and a pinch of cayenne pepper for an extra fiery kick.
    • Kids-Friendly Version: Reduce or omit the chili flakes and add sweet, roasted bell peppers for a milder taste.

    What to Serve With It

    This dish pairs beautifully with a chilled glass of crisp Sauvignon Blanc, which complements the citrusy notes, or a citrusy Belgian Witbier, enhancing the fresh flavors of the seafood. For a heartier meal, serve alongside a simple arugula salad drizzled with lemon vinaigrette, and don’t forget the crusty sourdough bread to soak up every drop of the delicious broth!

    Storage & Meal Prep

    Store any leftovers in an airtight container in the refrigerator for up to two days. To reheat, gently warm them on the stove over low heat to avoid overcooking the seafood. Unfortunately, this dish does not freeze well, as the texture of the mussels and clams may change. If you’re planning for a future meal, prepare the broth in advance and add fresh seafood when you’re ready to serve.

    FAQ

    Can I use frozen mussels and clams?

    Yes, you can use frozen seafood, but be sure to thaw them completely and drain any excess liquid before cooking.

    What if I can’t find saffron?

    If saffron is unavailable, you can use a pinch of turmeric for color, but be aware that it won’t replicate the unique flavor of saffron.

    How do I know when the mussels and clams are cooked?

    The mussels and clams are done when their shells open wide. Any that remain closed should be discarded as they may not be safe to eat.

    Can I make this dish ahead of time?

    The broth can be made a day ahead, but for the freshest taste, cook the mussels and clams just before serving.

    What if my broth is too salty?

    If your broth ends up too salty, add a bit more wine or a splash of water to dilute it. Taste and adjust as needed.

    Final Thoughts

    Spicy Saffron Mussels & Clams in White Wine Broth is more than a recipe; it’s a journey to the heart of Italian coastal cuisine. Whether you’re impressing guests or treating yourself to a special dinner, this dish is sure to delight. I’d love to hear about your experience making it — feel free to leave a comment or share your own twists on this seafood classic. Let’s keep the conversation delicious!

    Related update: Spicy Saffron Mussels & Clams in White Wine Broth

    Related update: Smoky Slow Cooker Chicken Gumbo with Charred Jalapeño

  • Saffron-Infused Seafood & Chorizo Paella with Roasted Red Peppers | Made by Meaghan Moineau

    Saffron-Infused Seafood & Chorizo Paella with Roasted Red Peppers | Made by Meaghan Moineau

    Saffron-Infused Seafood & Chorizo Paella with Roasted Red Peppers

    Imagine the sizzle of chorizo releasing its crimson oils in a skillet, mingling with the sweet, smoky aroma of roasted red peppers. As the saffron-infused broth bubbles away, your kitchen transforms into a cozy, aromatic Spanish haven. This isn’t just any paella; this is a culinary journey to the sun-drenched coasts of Spain, right from your very own home.

    Personal Story

    My love affair with paella began many years ago during a serendipitous trip to Valencia, Spain, where I first experienced the enchanting flair of this iconic dish. I remember the vibrant street market, bustling with vendors and the seductive scent of spices and seafood wafting through the air. It was there, amidst the lively chatter and colorful stalls, that I tasted my first bite of authentic paella. The flavors were a revelation—a harmonious symphony of saffron, seafood, and a hint of earthiness from the chorizo.

    Back in my own kitchen, I was determined to recreate that unforgettable experience. However, my first few attempts were, shall we say, less than successful. I vividly recall a memorable kitchen mishap involving a stubborn mussel that just wouldn’t open. Despite these early culinary challenges, I was undeterred. With each attempt, my connection to the dish deepened, and I began to understand the nuances that make a great paella.

    It wasn’t until I discovered the magic of roasted red peppers and smoked paprika that my paella truly came alive. These ingredients, with their deep, caramelized sweetness and subtle smokiness, added an unexpected depth to the dish. It’s these little discoveries that turn cooking from a mere task into a joyful, creative endeavor.

    Now, whenever I prepare my Saffron-Infused Seafood & Chorizo Paella with Roasted Red Peppers, I’m transported back to those cobblestone streets of Valencia, and I hope to bring a slice of that Spanish magic to your kitchen, too.

    What Makes This Version Special

    The secret to elevating this classic Spanish paella lies in the addition of caramelized roasted red peppers and a touch of smoked paprika. The roasted red peppers are roasted until charred, then peeled to reveal their sweet, silky flesh. When mingled with the smoky paprika, these flavors infuse the paella with an irresistible depth and subtle smokiness that sets it apart from the traditional version.

    These ingredients bring a balance to the richness of the seafood and the spiciness of the chorizo, creating a dish that is as vibrant in flavor as it is in color. This isn’t just paella—it’s a sensory delight that captures the very essence of Spanish cuisine.

    Flavor Profile

    From the first bite, you’ll be greeted with a rich and smoky aroma, thanks to our star ingredients: **smoked paprika** and **caramelized roasted red peppers**. The saffron threads, bloomed in warm broth, add an aromatic warmth that envelops the senses. The delicate sweetness of the seafood—shrimp, mussels, and white fish—balances beautifully with the spicy savoriness of crumbled chorizo sausage. Each mouthful offers a perfect harmony of flavors, with the peas and lemon zest providing bursts of freshness amidst the depth.

    Ingredients

    • 2 teaspoons extra virgin olive oil
    • 2 cloves garlic, minced
    • 1/2 teaspoon crushed red pepper flakes
    • 1 1/2 cups dry rice
    • **1 pinch saffron threads**
    • 2 cups chicken broth
    • 1 bay leaf
    • 1/2 teaspoon thyme
    • 8 ounces chorizo sausage
    • **1 large red bell pepper, roasted and peeled**
    • 1 spanish onion, diced
    • 8 ounces white fish, cut into chunks
    • 8 ounces shrimp, peeled and deveined
    • 1 pound mussels, cleaned
    • 1/2 cup peas
    • 1 teaspoon lemon zest
    • 1 tablespoon parsley, chopped
    • **1 teaspoon smoked paprika**
    • Lemon wedges, for serving
    • Salt and pepper, to taste

    Instructions

    1. Begin by roasting the red bell peppers. Place them under a broiler or directly on a gas flame, turning occasionally, until charred all over. Let them cool, then peel and set aside.
    2. In a small bowl, bloom the saffron threads in a few tablespoons of warm chicken broth. This will help release their aromatic flavor.
    3. In a very large non-stick skillet or paella pan preheated over medium-high heat, add 2 teaspoons of olive oil. Add the minced garlic, crushed red pepper flakes, and dry rice. Sauté for about 3 minutes until the rice is slightly translucent and fragrant.
    4. Add the bloomed saffron, thyme, bay leaf, and the remaining chicken broth. Bring to a boil, then cover and reduce the heat to a simmer. Do not stir the rice; let it cook undisturbed for about 15 minutes.
    5. In another non-stick skillet, cook the chorizo over medium-high heat, crumbling it with a spoon. Once browned, add the diced spanish onion and roasted red peppers. Sauté until the onion is tender, then remove from heat and set aside.
    6. When the rice is nearly done, gently press the white fish and shrimp into the rice. Add the mussels and peas, then sprinkle with lemon zest. Cover and continue to simmer until the rice is cooked through and the mussels have opened, discarding any that do not.
    7. Top the paella with the chorizo mixture and sprinkle with chopped parsley. Serve with lemon wedges and crusty bread.

    Pro Tips from Meaghan’s Kitchen

    • For perfectly cooked mussels, ensure they are tightly closed before cooking and discard any that don’t open after cooking.
    • Use a good-quality saffron for the best flavor—trust me, it makes a difference!
    • Invest in a paella pan if possible; its shallow, wide shape ensures even cooking and the perfect rice texture.
    • For a crisp, golden-brown socarrat (the crusty bottom layer of rice), let the paella sit over medium heat, uncovered, for a few extra minutes after cooking.
    • Feel free to add a splash of white wine to the broth for an extra layer of depth and flavor.

    Variations & Dietary Swaps

    • Vegetarian Version: Swap out the seafood and chorizo for artichoke hearts, more peas, and chickpeas. Use vegetable broth instead of chicken broth.
    • Spicy Kick Version: Add an extra teaspoon of crushed red pepper flakes and a dash of hot sauce for heat lovers.
    • Kid-Friendly Version: Omit the chorizo and red pepper flakes, and substitute with cooked chicken pieces and mild sweet peppers.

    What to Serve With It

    This Saffron-Infused Seafood & Chorizo Paella pairs beautifully with a chilled glass of Spanish Albariño wine, which complements the dish’s rich flavors with its bright acidity and hints of citrus. To complete your meal, consider serving a simple mixed green salad with a light vinaigrette and some crusty bread for soaking up the delicious juices.

    Storage & Meal Prep

    Any leftover paella can be stored in an airtight container in the refrigerator for up to 3 days. To reheat, gently warm it on the stovetop over low heat, adding a splash of broth or water to prevent it from drying out. While paella is best enjoyed fresh, you can freeze it for up to 1 month. Just be aware that the texture of the seafood might change slightly upon thawing.

    FAQ

    Can I make paella without a paella pan?

    Yes, a large non-stick skillet will work just fine. The key is to ensure even heat distribution and avoid overcrowding the pan.

    What is the best rice to use for paella?

    Bomba rice is the traditional choice for paella due to its excellent absorption qualities, but Arborio rice can be a good substitute if Bomba isn’t available.

    Do I have to include saffron?

    Saffron is essential for traditional flavor and color; however, if you’re in a pinch, you can substitute with turmeric for color, though the flavor won’t be the same.

    How do I know when the paella is done?

    The paella is done when the rice is tender and has absorbed the liquid, and the mussels have opened up. Remember, a slight socarrat is desirable!

    Final Thoughts

    Cooking this Saffron-Infused Seafood & Chorizo Paella with Roasted Red Peppers is more than just preparing a meal—it’s about creating an experience, a celebration of flavors that transports you to the heart of Spanish cuisine. I hope you enjoy making and sharing this dish as much as I do. Please feel free to leave a comment below with your thoughts or any variations you tried. And don’t forget to share your culinary creations on social media with the hashtag #PaellaWithMeaghan. Here’s to many more flavorful adventures in your kitchen!

    Related update: Saffron-Infused Seafood & Chorizo Paella with Roasted Red Peppers

    Related update: Smoky Chipotle Turkey Chili with Dark Chocolate and Lager

  • Szechuan-Style Spicy Chicken Lo Mein with Crunchy Cashews | Made by Meaghan Moineau

    Szechuan-Style Spicy Chicken Lo Mein with Crunchy Cashews | Made by Meaghan Moineau

    Szechuan-Style Spicy Chicken Lo Mein with Crunchy Cashews

    Imagine a sizzling pan filled with tender strips of chicken, vibrant vegetables, and a glossy, spicy sauce that coats every strand of noodle. The air is thick with the aroma of ginger and garlic, dancing together in a fragrant waltz that promises a delicious adventure. This isn’t just any lo mein; it’s my Szechuan-Style Spicy Chicken Lo Mein with Crunchy Cashews, a dish that tantalizes the senses and transforms your kitchen into a bustling Chinese eatery.

    Personal Story

    I still vividly recall the first time I attempted to make lo mein at home. It was a rainy Sunday afternoon, and I was craving something comforting yet vibrant. As the rain poured down, I turned on my favorite playlist and began experimenting in the kitchen. I had a stack of takeout menus on my counter, but I was determined to create something better, something with more life and zest.

    In my quest for the perfect lo mein, I had my fair share of mishaps. I once added too much soy sauce, transforming my noodles into a salty ocean. Another time, I overcooked the vegetables until they resembled a soggy mess. But each kitchen mishap brought me closer to discovering the secrets of a truly remarkable dish.

    Then came the revelation: a jar of Szechuan peppercorns tucked away in my spice cabinet. I toasted them with red chili flakes in hot peanut oil, and the aroma was sensational. It was a game-changer. That spicy, tingly kick turned my ordinary lo mein into something extraordinary. I knew I had found the secret ingredient that would define my version of this classic dish.

    It’s amazing how a simple twist can elevate a recipe, turning it into something uniquely yours. My Szechuan-Style Spicy Chicken Lo Mein is now a family favorite, the dish we turn to when we need a little culinary excitement. And every time I make it, I smile, remembering that rainy afternoon and the delicious journey it inspired.

    What Makes This Version Special

    This Szechuan-Style Spicy Chicken Lo Mein isn’t just your standard takeout fare. What makes this version special is the spicy Szechuan twist that comes from a homemade chili oil. By toasting Szechuan peppercorns and red chili flakes in peanut oil, we infuse the dish with a deep, spicy flavor that’s both bold and tingly. The addition of crunchy roasted cashews elevates the texture, providing a delightful contrast to the tender noodles and chicken. This version is all about layers of flavor and texture, making each bite an exciting experience.

    Flavor Profile

    Prepare your taste buds for an adventure. This lo mein offers a spicy, savory experience with a hint of sweetness from honey and a satisfying nutty crunch from roasted cashews. The dish balances the heat of Szechuan peppercorns and chili flakes with the aromatic warmth of garlic and ginger. Each mouthful is a symphony of flavors, where the spicy notes are harmonized by the subtle sweetness and rounded out by the umami of soy sauce. The freshness of bok choy and bean sprouts adds a crisp, clean finish to this delicious ensemble.

    Ingredients

    • 8 oz skinless boneless chicken breast, sliced thin
    • 2 tablespoons peanut oil
    • 1 tablespoon Szechuan peppercorns
    • 1 teaspoon red chili flakes
    • 3 cloves garlic, minced
    • 1 tablespoon fresh ginger, grated
    • 2 cups cooked spaghetti
    • 1 cup bok choy, chopped
    • 1 cup bean sprouts
    • 1 carrot, julienned
    • 1 cup mushrooms, sliced
    • 1/4 cup low sodium chicken broth
    • 2 tablespoons low sodium soy sauce
    • 1 tablespoon honey
    • 2 tablespoons roasted cashews, chopped
    • 1 tablespoon sesame oil
    • 2 scallions, sliced
    • Fresh cilantro, for garnish

    Instructions

    1. Start by preparing the homemade chili oil. In a large nonstick skillet over medium heat, add the peanut oil. Once shimmering, add the Szechuan peppercorns and red chili flakes. Toast them for about 2 minutes until fragrant. Remove from heat and strain the oil into a bowl, discarding the solids.
    2. Return the infused oil to the skillet. Add the garlic and ginger, cooking over medium heat for 1 minute until aromatic. Be careful not to burn them; you want a gentle sizzle.
    3. Increase the heat to medium-high and add the sliced chicken breast and carrot. Stir-fry for about 2 minutes until the chicken is lightly browned and the carrot is starting to soften.
    4. Add the mushrooms, bok choy, and bean sprouts to the skillet. Pour in the chicken broth and soy sauce, and drizzle with honey. Stir constantly, cooking for about 3 minutes until the vegetables are tender-crisp.
    5. Reduce the heat to low and add the cooked spaghetti. Toss everything together, ensuring the noodles are well coated with the sauce. Cook for another minute until heated through.
    6. Finish by garnishing with the roasted cashews, scallions, and fresh cilantro. Drizzle with sesame oil just before serving for a fragrant touch.

    Pro Tips from Meaghan’s Kitchen

    • To ensure even cooking, slice the chicken breast thinly and uniformly. This allows it to cook quickly without drying out.
    • Keep your vegetables crisp by not over-stirring. Let them sit in the pan for a few seconds before tossing, which helps them develop a slight char and deeper flavor.
    • If you prefer a milder heat, reduce the amount of red chili flakes in the chili oil. You can always add more spice later.
    • Use freshly cooked spaghetti for the best texture, but if you’re using leftovers, rinse them under hot water to refresh before adding to the skillet.
    • For an extra punch of flavor, add a dash of rice vinegar or lime juice just before serving to brighten up the dish.

    Variations & Dietary Swaps

    • Vegetarian Swap: Replace the chicken with firm tofu or tempeh. Ensure it’s well-pressed and seasoned before adding to the stir-fry.
    • Spice-It-Up Version: Add extra chili flakes or a splash of hot sauce for those who love a fiery kick.
    • Kids-Friendly Version: Dial down the spices and add sweet bell peppers for a colorful, mild version that kids will love.

    What to Serve With It

    This Szechuan-Style Spicy Chicken Lo Mein pairs beautifully with a cold, crisp lager, which complements the spicy elements perfectly. For a non-alcoholic option, serve it with jasmine tea, which offers a soothing contrast to the heat. A side of steamed dumplings or a simple cucumber salad would round out the meal nicely, adding a refreshing crunch.

    Storage & Meal Prep

    Leftovers can be stored in an airtight container in the fridge for up to 3 days. To reheat, add a splash of water or chicken broth and warm gently in a skillet over medium heat until heated through. For longer storage, freeze the lo mein in individual portions for up to 2 months. Thaw overnight in the fridge before reheating.

    FAQ

    Can I use a different type of noodle?

    Absolutely! While spaghetti is convenient, you can use traditional lo mein noodles, udon, or even rice noodles for a gluten-free option.

    How can I make this dish less spicy?

    To reduce the heat, use fewer red chili flakes when making the chili oil. You can also serve the dish with a dollop of plain yogurt or a squeeze of lime to mellow the spice.

    What other vegetables can I add?

    Feel free to get creative with your vegetables. Snap peas, bell peppers, and broccoli all work wonderfully in this recipe.

    Can I make this dish in advance?

    Yes, you can prepare the components separately and combine them just before serving. The homemade chili oil can be made days in advance and stored in the fridge.

    How do I ensure the chicken stays tender?

    Thinly slice the chicken and avoid overcooking. Stir-fry over medium-high heat and remove from the pan as soon as it’s browned.

    Final Thoughts

    I hope you’re as excited to try this Szechuan-Style Spicy Chicken Lo Mein with Crunchy Cashews as I was when I first discovered its magic. It’s a dish that brings warmth, flavor, and a touch of adventure to your table. I’d love to hear how it turns out for you, so feel free to leave a comment or share your own creative twists on the recipe. Happy cooking!

    Related update: Szechuan-Style Spicy Chicken Lo Mein with Crunchy Cashews

    Related update: Saffron-Infused Seafood & Chorizo Paella with Roasted Red Peppers

  • Truffle-Infused Macaroni and Cheese with Crispy Pancetta Crumble | Made by Meaghan Moineau

    Truffle-Infused Macaroni and Cheese with Crispy Pancetta Crumble | Made by Meaghan Moineau

    Truffle-Infused Macaroni and Cheese with Crispy Pancetta Crumble

    Imagine a chilly evening with a comforting blanket of warmth enveloping your kitchen, the air heavy with the decadent aroma of truffle oil mingling with bubbling cheese. As the golden-brown crust of your macaroni and cheese forms and crisps under a blanket of pancetta crumble, anticipation builds for that first creamy, savory bite.

    Personal Story

    The first time I tasted truffle oil, I was in a cozy bistro in Paris, where the chef drizzled it over a simple risotto. The earthy, luxurious aroma transported me to a place of pure culinary bliss. Since then, I’ve been on a quest to incorporate that same level of indulgence into my own cooking. Truffle oil, with its distinct and irresistible fragrance, became my secret weapon in transforming everyday dishes into gourmet experiences.

    Macaroni and cheese, a beloved American classic, was one of the first dishes I experimented with. I recall a time when, as a child, Kraft’s boxed version was a staple in our household, a quick and easy comfort after long school days. The ritual of mixing in the powdered cheese with milk and butter holds a nostalgic charm, but my grown-up palate craved more sophistication.

    On a rainy Saturday afternoon, I decided to take the plunge and experiment. The idea was simple: elevate my childhood favorite by marrying its comforting aspects with the luxurious notes of truffle and the salty, crispy delight of pancetta. The result was far beyond my expectations, and it quickly became a signature dish at gatherings, always met with wide-eyed approval and requests for seconds.

    Since then, this truffle-infused macaroni and cheese with crispy pancetta crumble has become a staple in my repertoire, a testament to the comforting power of home-cooked food elevated with a few gourmet touches. It’s a dish that never fails to impress and satisfy, and I’m thrilled to share it with you.

    What Makes This Version Special

    This version stands out not just for its rich, creamy texture but for the luxurious addition of truffle oil. By incorporating this ingredient just before serving, we preserve its aromatic qualities, ensuring that each bite carries its full, earthy essence. The crispy pancetta crumble isn’t just a garnish; it adds a savory, salty crunch that perfectly contrasts the smoothness of the cheese sauce. The combination transforms a standard macaroni and cheese into a gourmet delight, worthy of any dinner party or cozy night in.

    Flavor Profile

    This dish offers an indulgent taste experience. The creamy cheese sauce, enriched with Gruyere and white cheddar, blankets each piece of macaroni in a velvety embrace. The subtle heat from cayenne pepper and the aromatic nutmeg enhance the cheese’s complexity without overpowering it. The truffle oil’s distinct, earthy aroma complements the cheese, creating an olfactory symphony. Finally, the topping of crispy pancetta and fresh thyme adds a delightful crunch and a savory note, creating a perfect balance of flavors and textures.

    Ingredients

    • 1 pound elbow macaroni
    • 8 tablespoons unsalted butter, divided
    • 2 cups whole milk
    • 1/4 cup all-purpose flour
    • **1 tablespoon truffle oil**
    • **1/2 cup diced pancetta**
    • 3 cups sharp white cheddar cheese, shredded
    • 2 cups Gruyere cheese, shredded
    • 1/2 cup Parmesan cheese, grated
    • 1/4 teaspoon cayenne pepper
    • 1/4 teaspoon grated nutmeg
    • Kosher salt, to taste
    • Freshly ground black pepper, to taste
    • **1 cup white bread, torn into small pieces**
    • 2 tablespoons fresh thyme leaves

    Instructions

    1. Preheat your oven to 375 degrees Fahrenheit. Butter a 3-quart casserole dish and set it aside.
    2. In a medium bowl, place the torn pieces of white bread. In a small saucepan over medium heat, melt 2 tablespoons of butter. Pour the melted butter over the bread pieces, tossing to coat evenly. Set the breadcrumbs aside.
    3. Heat the whole milk in a medium saucepan over medium heat until it is hot but not boiling. Keep it warm.
    4. In a high-sided skillet over medium heat, melt the remaining 6 tablespoons of butter. Once the butter starts bubbling, add the flour and cook, stirring constantly, for about 1 minute to form a roux.
    5. Slowly pour the hot milk into the roux, whisking vigorously to prevent lumps. Continue cooking and whisking until the mixture starts to bubble and thickens to a smooth, creamy consistency.
    6. Remove the pan from the heat and stir in the salt, nutmeg, black pepper, cayenne pepper, 3 cups of white cheddar cheese, and 1 1/2 cups of Gruyere cheese. Mix until the cheese is fully melted and the sauce is smooth. Set the cheese sauce aside.
    7. Fill a large saucepan with salted water and bring it to a boil. Add the macaroni and cook for 2 to 3 minutes less than the package instructions, ensuring the pasta is slightly undercooked. Drain the macaroni and rinse it under cold water to stop the cooking process.
    8. Gently fold the drained macaroni into the cheese sauce until all the pasta is well coated. Add the truffle oil, stirring just before transferring the mixture to the casserole dish to preserve its aromatic quality.
    9. Pour the macaroni and cheese mixture into the prepared casserole dish. Sprinkle the remaining 1 1/2 cups of cheddar and 1/2 cup of Gruyere over the top, followed by the buttered breadcrumbs.
    10. Fry the diced pancetta in a skillet over medium heat until crispy. In a small bowl, toss the crispy pancetta with breadcrumbs and fresh thyme.
    11. Scatter the pancetta crumble over the macaroni and cheese. Bake in the oven for about 30 minutes, or until the top is golden-brown and crispy.
    12. Transfer the dish to a wire rack and let it cool for 5 minutes before serving. Enjoy your gourmet creation!

    Pro Tips from Meaghan’s Kitchen

    • Don’t overcook your pasta; it will continue cooking in the oven and absorb more flavor from the cheese sauce.
    • Use freshly grated cheese for the best melting quality. Pre-shredded cheese often contains anti-caking agents that can affect the sauce’s texture.
    • Adjust the amount of truffle oil to your taste. A little goes a long way, so start with less and add more if desired.
    • If you want a more pronounced truffle flavor, consider adding a bit of truffle salt in addition to the kosher salt.
    • For a richer topping, mix some Parmesan cheese with the breadcrumbs before baking.

    Variations & Dietary Swaps

    • Vegetarian Version: Simply omit the pancetta and opt for a mix of sautéed mushrooms to complement the truffle oil’s earthy notes.
    • Spicy Version: Amp up the heat by adding finely diced jalapeños or a sprinkle of red pepper flakes to the cheese sauce.
    • Kids-Friendly Version: Skip the truffle oil and pancetta, focusing on a creamy, cheesy core with a breadcrumb topping for a milder approach that’s sure to please young palates.

    What to Serve With It

    This truffle-infused macaroni and cheese pairs beautifully with a crisp, chilled glass of Sauvignon Blanc, whose acidity cuts through the rich creaminess of the dish. Alternatively, a light, fruity Pinot Noir makes a great companion, enhancing the earthy, savory notes. For a non-alcoholic option, consider serving it with a refreshing glass of iced tea or sparkling water with a twist of lemon.

    Storage & Meal Prep

    Leftovers can be stored in an airtight container in the refrigerator for up to 3 days. To reheat, cover with foil and warm in a 350-degree oven until heated through. If freezing, do so before baking—assemble the dish in a freezer-safe container, cover tightly, and freeze for up to 2 months. When ready to serve, thaw overnight in the refrigerator, then bake as directed, adding an extra 5-10 minutes to the cooking time.

    FAQ

    Can I make this dish ahead of time?

    Yes, you can assemble the macaroni and cheese without baking it, cover it, and refrigerate it for up to 24 hours before baking. Just remember to add a few extra minutes to the baking time if it’s coming straight from the fridge.

    What can I substitute for truffle oil if I don’t have any?

    If you don’t have truffle oil, you can omit it or substitute it with truffle salt or a touch of mushroom powder for a similar earthy flavor.

    How do I prevent my cheese sauce from becoming grainy?

    To keep your cheese sauce smooth, make sure to whisk constantly when adding the milk to the roux and use low heat to melt the cheese slowly, preventing it from seizing up.

    Can I use a different type of pasta?

    Absolutely! While elbow macaroni is traditional, shell pasta or cavatappi are excellent alternatives, as their shapes hold the cheese sauce well.

    Is there a lower-fat version of this recipe?

    You can reduce the fat content by using reduced-fat cheese and milk, though this may slightly alter the creamy texture. Consider adding a bit more seasoning to compensate for the reduced richness.

    Final Thoughts

    This truffle-infused macaroni and cheese with crispy pancetta crumble is more than just a meal; it’s an experience to be savored. I hope you enjoy making and sharing this dish as much as I have. Please leave a comment and let me know how it turns out for you—or share your own creative twist! Happy cooking, friends.

    Related update: Truffle-Infused Macaroni and Cheese with Crispy Pancetta Crumble

    Related update: Szechuan-Style Spicy Chicken Lo Mein with Crunchy Cashews

  • Spicy Maple Andouille Sausage and Sweet Potato Hash | Made by Meaghan Moineau

    Spicy Maple Andouille Sausage and Sweet Potato Hash | Made by Meaghan Moineau

    Spicy Maple Andouille Sausage and Sweet Potato Hash

    Imagine the sizzle of sausage as it hits a hot pan, mingling with the sweet aroma of caramelized onions and the earthy scent of roasting sweet potatoes. Each bite is a delightful dance of sweet, smoky, and spicy flavors, a cozy culinary hug perfect for any meal of the day. Welcome to Spicy Maple Andouille Sausage and Sweet Potato Hash — a dish that turns any breakfast, brunch, or dinner into a flavor adventure.

    Personal Story

    There’s something about the humble hash that takes me straight back to lazy Sunday mornings in my grandmother’s kitchen. As a child, I remember waking up to the smells of sizzling sausage and sweet onions, drifting into the dining room like an aromatic alarm clock. My grandmother, with her flour-dusted apron and ever-present wooden spoon, would hum to herself as she worked, adding a dash of this or a sprinkle of that, creating magic from simple ingredients.

    One particularly rainy Sunday, the cupboard was bare of regular potatoes, and we were left with only sweet potatoes. My grandmother, never one to be deterred by minor setbacks, decided to improvise. A little spicy, a little sweet, and suddenly our beloved breakfast took on a new life. The sweet potatoes added a depth and warmth to the dish that paired beautifully with the smoky sausage.

    Years later, inspired by her creativity, I decided to take her idea and run with it. I added a spicy maple glaze to the mix, giving the dish a sweet heat that complements the smoky andouille sausage and sweet potatoes. This unique twist has made this hash a go-to favorite in my home — a testament to my grandmother’s legacy of culinary ingenuity and resourcefulness.

    What Makes This Version Special

    This version of the classic hash stands out with its bold use of sweet potatoes instead of the traditional yukon golds, adding natural sweetness and a beautiful color contrast. But the real secret weapon here is the spicy maple glaze. By reducing maple syrup with smoked paprika and cayenne, you get a glaze that envelops the roasted ingredients in a sweet, smoky heat, perfectly balancing the savory andouille sausage.

    The combination of sweet and spicy, with the rich, smoky undertones of the sausage, elevates this dish beyond a simple hash. It’s an unforgettable ensemble of flavors that brings comfort and excitement to the table, making it perfect for both special occasions and everyday meals.

    Flavor Profile

    Biting into this hash is an experience of contrasts and harmony. The sweet potatoes bring a soft, earthy sweetness that is beautifully contrasted by the smoky, robust flavor of the andouille sausage. Meanwhile, the spicy maple glaze adds a layer of complexity, delivering a gentle heat that lingers pleasantly on the palate. The caramelized onions and roasted peppers add a sweetness and aroma that rounds out the dish, while fresh thyme and scallions provide a burst of herbal freshness in every bite.

    Ingredients

    • 1 large Yukon Gold potato, diced
    • 1 large sweet potato, diced
    • 1 red bell pepper, diced
    • 1 yellow bell pepper, diced
    • 1 large red onion, sliced
    • 8 oz smoked pork andouille sausage, sliced
    • 2 teaspoons canola oil
    • 1 teaspoon garlic salt
    • 1/4 teaspoon cayenne pepper
    • 2 tablespoons maple syrup
    • 1 teaspoon smoked paprika
    • 1 tablespoon fresh thyme, chopped
    • 2 scallions, finely chopped, for garnish

    Instructions

    1. Preheat your oven to 425°F (220°C). This high heat is crucial for ensuring the potatoes and peppers develop a lovely golden-brown crispness.
    2. In a large mixing bowl, toss the diced Yukon Gold potato, sweet potato, red bell pepper, yellow bell pepper, and sliced red onion with 1 teaspoon of canola oil. Spread this mixture evenly onto a baking sheet. Sprinkle with garlic salt and a dash of black pepper for seasoning.
    3. Roast in the preheated oven for 10 minutes. This initial roasting helps the vegetables start to caramelize, enhancing their natural sweetness.
    4. While the vegetables are roasting, create the spicy maple glaze. In a small saucepan over medium heat, combine the maple syrup, smoked paprika, and cayenne pepper. Stir frequently, allowing the mixture to reduce slightly, about 5 minutes, until it thickens.
    5. Remove the baking sheet from the oven and add the sliced andouille sausage. Toss everything together, ensuring the sausage is evenly distributed amongst the vegetables. Return to the oven and roast for an additional 10 minutes, or until the sausage is cooked through and the potatoes are fork-tender.
    6. Remove the pan from the oven and drizzle the spicy maple glaze over the roasted hash, tossing to coat all the pieces evenly. This will add a beautiful glossy finish and infuse every bite with flavor.
    7. Sprinkle with fresh thyme and garnish with finely chopped scallions for a pop of green and a touch of freshness. Serve immediately and enjoy the symphony of flavors!

    Pro Tips from Meaghan’s Kitchen

    • Caramelization is Key: Don’t rush the initial roasting. Allowing the vegetables to develop a deep golden-brown color brings out their natural sweetness and adds depth to the hash.
    • Balance the Heat: If you’re sensitive to spice, reduce the cayenne pepper in the glaze. You can always add more to taste after serving.
    • Prep Ahead: Chop all your veggies the night before and store them in airtight containers. This makes the morning prep a breeze!
    • Get Creative with Sausage: If you can’t find andouille, try using chorizo for a similar smoky flavor, or go for a milder sausage if you’re serving a crowd with varied tastes.
    • Use a Heavy Baking Sheet: A sturdy sheet pan ensures even roasting and prevents burning, especially at high temperatures.

    Variations & Dietary Swaps

    • Vegetarian Version: Swap the sausage for a plant-based alternative or roasted chickpeas. The hash remains just as satisfying and flavorful.
    • Spice-It-Up: Add a few dashes of hot sauce right before serving for those who crave extra heat.
    • Kids-Friendly Option: Tone down the spice by omitting the cayenne pepper and smoked paprika, and add a little more maple syrup for sweetness.

    What to Serve With It

    This spicy maple andouille sausage and sweet potato hash pairs beautifully with a crisp apple cider or a cold wheat beer, enhancing the dish’s sweet and smoky notes. For a lighter option, serve with a simple green salad dressed in lemon vinaigrette, or with a side of fluffy scrambled eggs for a complete breakfast spread.

    Storage & Meal Prep

    Store any leftovers in an airtight container in the fridge for up to three days. To reheat, spread the hash on a baking sheet and warm in a preheated oven at 350°F (175°C) until heated through, about 10-15 minutes. To freeze, portion the hash into freezer-safe bags, removing as much air as possible, and freeze for up to two months. Thaw in the refrigerator overnight before reheating.

    FAQ

    Can I make this dish ahead of time?

    Absolutely! You can prepare the vegetables and sausage a day in advance and store them separately in the fridge. Then, assemble and roast on the day you’re serving it. The glaze can also be made ahead and stored in the refrigerator.

    Is there a vegetarian substitute for andouille sausage?

    Yes, there are many plant-based sausages available that mimic the smoky flavor of andouille. Alternatively, roasted chickpeas can add a nice texture and protein to the dish.

    What’s the best way to get the potatoes crispy?

    Ensure your oven is fully preheated before roasting, and don’t overcrowd the baking sheet. This allows the potatoes to roast rather than steam, leading to a crisper texture.

    Can I use different types of peppers?

    Definitely! Feel free to use any combination of bell peppers you have on hand. Green bell peppers will add a slightly more bitter note, while orange or yellow ones will keep the dish sweet.

    How do I adjust the spice level?

    To make it less spicy, reduce or omit the cayenne pepper in the glaze. If you want to increase the heat, add more cayenne or even a pinch of red pepper flakes.

    Final Thoughts

    This Spicy Maple Andouille Sausage and Sweet Potato Hash is more than just a meal — it’s a celebration of flavors that come together in perfect harmony. Whether you’re making it for a weekend brunch or a cozy dinner, this dish is sure to impress and satisfy. I’d love to hear how it turned out for you! Feel free to leave a comment below or share your version on social media. Remember, the best meals are the ones shared with those we love. Happy cooking!

    Related update: Spicy Maple Andouille Sausage and Sweet Potato Hash

    Related update: Truffle-Infused Macaroni and Cheese with Crispy Pancetta Crumble

    Related update: Spiced Apple Cider Brioche with Maple-Cinnamon Glaze