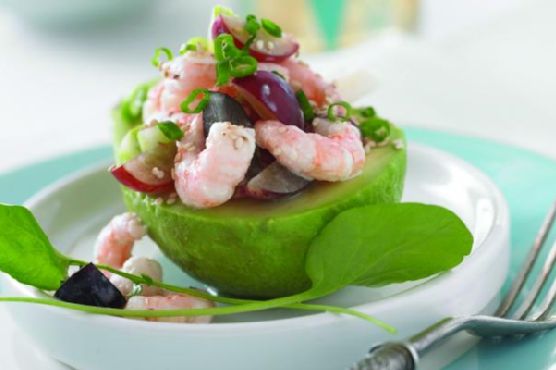
Tag: Party Food

  • Truffle-Infused Macaroni and Cheese with Crispy Pancetta Crumble | Made by Meaghan Moineau

    Truffle-Infused Macaroni and Cheese with Crispy Pancetta Crumble | Made by Meaghan Moineau

    Truffle-Infused Macaroni and Cheese with Crispy Pancetta Crumble

    Imagine a chilly evening with a comforting blanket of warmth enveloping your kitchen, the air heavy with the decadent aroma of truffle oil mingling with bubbling cheese. As the golden-brown crust of your macaroni and cheese forms and crisps under a blanket of pancetta crumble, anticipation builds for that first creamy, savory bite.

    Personal Story

    The first time I tasted truffle oil, I was in a cozy bistro in Paris, where the chef drizzled it over a simple risotto. The earthy, luxurious aroma transported me to a place of pure culinary bliss. Since then, I’ve been on a quest to incorporate that same level of indulgence into my own cooking. Truffle oil, with its distinct and irresistible fragrance, became my secret weapon in transforming everyday dishes into gourmet experiences.

    Macaroni and cheese, a beloved American classic, was one of the first dishes I experimented with. I recall a time when, as a child, Kraft’s boxed version was a staple in our household, a quick and easy comfort after long school days. The ritual of mixing in the powdered cheese with milk and butter holds a nostalgic charm, but my grown-up palate craved more sophistication.

    On a rainy Saturday afternoon, I decided to take the plunge and experiment. The idea was simple: elevate my childhood favorite by marrying its comforting aspects with the luxurious notes of truffle and the salty, crispy delight of pancetta. The result was far beyond my expectations, and it quickly became a signature dish at gatherings, always met with wide-eyed approval and requests for seconds.

    Since then, this truffle-infused macaroni and cheese with crispy pancetta crumble has become a staple in my repertoire, a testament to the comforting power of home-cooked food elevated with a few gourmet touches. It’s a dish that never fails to impress and satisfy, and I’m thrilled to share it with you.

    What Makes This Version Special

    This version stands out not just for its rich, creamy texture but for the luxurious addition of truffle oil. By incorporating this ingredient just before serving, we preserve its aromatic qualities, ensuring that each bite carries its full, earthy essence. The crispy pancetta crumble isn’t just a garnish; it adds a savory, salty crunch that perfectly contrasts the smoothness of the cheese sauce. The combination transforms a standard macaroni and cheese into a gourmet delight, worthy of any dinner party or cozy night in.

    Flavor Profile

    This dish offers an indulgent taste experience. The creamy cheese sauce, enriched with Gruyere and white cheddar, blankets each piece of macaroni in a velvety embrace. The subtle heat from cayenne pepper and the aromatic nutmeg enhance the cheese’s complexity without overpowering it. The truffle oil’s distinct, earthy aroma complements the cheese, creating an olfactory symphony. Finally, the topping of crispy pancetta and fresh thyme adds a delightful crunch and a savory note, creating a perfect balance of flavors and textures.

    Ingredients

    • 1 pound elbow macaroni
    • 8 tablespoons unsalted butter, divided
    • 2 cups whole milk
    • 1/4 cup all-purpose flour
    • **1 tablespoon truffle oil**
    • **1/2 cup diced pancetta**
    • 3 cups sharp white cheddar cheese, shredded
    • 2 cups Gruyere cheese, shredded
    • 1/2 cup Parmesan cheese, grated
    • 1/4 teaspoon cayenne pepper
    • 1/4 teaspoon grated nutmeg
    • Kosher salt, to taste
    • Freshly ground black pepper, to taste
    • **1 cup white bread, torn into small pieces**
    • 2 tablespoons fresh thyme leaves

    Instructions

    1. Preheat your oven to 375 degrees Fahrenheit. Butter a 3-quart casserole dish and set it aside.
    2. In a medium bowl, place the torn pieces of white bread. In a small saucepan over medium heat, melt 2 tablespoons of butter. Pour the melted butter over the bread pieces, tossing to coat evenly. Set the breadcrumbs aside.
    3. Heat the whole milk in a medium saucepan over medium heat until it is hot but not boiling. Keep it warm.
    4. In a high-sided skillet over medium heat, melt the remaining 6 tablespoons of butter. Once the butter starts bubbling, add the flour and cook, stirring constantly, for about 1 minute to form a roux.
    5. Slowly pour the hot milk into the roux, whisking vigorously to prevent lumps. Continue cooking and whisking until the mixture starts to bubble and thickens to a smooth, creamy consistency.
    6. Remove the pan from the heat and stir in the salt, nutmeg, black pepper, cayenne pepper, 3 cups of white cheddar cheese, and 1 1/2 cups of Gruyere cheese. Mix until the cheese is fully melted and the sauce is smooth. Set the cheese sauce aside.
    7. Fill a large saucepan with salted water and bring it to a boil. Add the macaroni and cook for 2 to 3 minutes less than the package instructions, ensuring the pasta is slightly undercooked. Drain the macaroni and rinse it under cold water to stop the cooking process.
    8. Gently fold the drained macaroni into the cheese sauce until all the pasta is well coated. Add the truffle oil, stirring just before transferring the mixture to the casserole dish to preserve its aromatic quality.
    9. Pour the macaroni and cheese mixture into the prepared casserole dish. Sprinkle the remaining 1 1/2 cups of cheddar and 1/2 cup of Gruyere over the top, followed by the buttered breadcrumbs.
    10. Fry the diced pancetta in a skillet over medium heat until crispy. In a small bowl, toss the crispy pancetta with breadcrumbs and fresh thyme.
    11. Scatter the pancetta crumble over the macaroni and cheese. Bake in the oven for about 30 minutes, or until the top is golden-brown and crispy.
    12. Transfer the dish to a wire rack and let it cool for 5 minutes before serving. Enjoy your gourmet creation!

    Pro Tips from Meaghan’s Kitchen

    • Don’t overcook your pasta; it will continue cooking in the oven and absorb more flavor from the cheese sauce.
    • Use freshly grated cheese for the best melting quality. Pre-shredded cheese often contains anti-caking agents that can affect the sauce’s texture.
    • Adjust the amount of truffle oil to your taste. A little goes a long way, so start with less and add more if desired.
    • If you want a more pronounced truffle flavor, consider adding a bit of truffle salt in addition to the kosher salt.
    • For a richer topping, mix some Parmesan cheese with the breadcrumbs before baking.

    Variations & Dietary Swaps

    • Vegetarian Version: Simply omit the pancetta and opt for a mix of sautéed mushrooms to complement the truffle oil’s earthy notes.
    • Spicy Version: Amp up the heat by adding finely diced jalapeños or a sprinkle of red pepper flakes to the cheese sauce.
    • Kids-Friendly Version: Skip the truffle oil and pancetta, focusing on a creamy, cheesy core with a breadcrumb topping for a milder approach that’s sure to please young palates.

    What to Serve With It

    This truffle-infused macaroni and cheese pairs beautifully with a crisp, chilled glass of Sauvignon Blanc, whose acidity cuts through the rich creaminess of the dish. Alternatively, a light, fruity Pinot Noir makes a great companion, enhancing the earthy, savory notes. For a non-alcoholic option, consider serving it with a refreshing glass of iced tea or sparkling water with a twist of lemon.

    Storage & Meal Prep

    Leftovers can be stored in an airtight container in the refrigerator for up to 3 days. To reheat, cover with foil and warm in a 350-degree oven until heated through. If freezing, do so before baking—assemble the dish in a freezer-safe container, cover tightly, and freeze for up to 2 months. When ready to serve, thaw overnight in the refrigerator, then bake as directed, adding an extra 5-10 minutes to the cooking time.

    FAQ

    Can I make this dish ahead of time?

    Yes, you can assemble the macaroni and cheese without baking it, cover it, and refrigerate it for up to 24 hours before baking. Just remember to add a few extra minutes to the baking time if it’s coming straight from the fridge.

    What can I substitute for truffle oil if I don’t have any?

    If you don’t have truffle oil, you can omit it or substitute it with truffle salt or a touch of mushroom powder for a similar earthy flavor.

    How do I prevent my cheese sauce from becoming grainy?

    To keep your cheese sauce smooth, make sure to whisk constantly when adding the milk to the roux and use low heat to melt the cheese slowly, preventing it from seizing up.

    Can I use a different type of pasta?

    Absolutely! While elbow macaroni is traditional, shell pasta or cavatappi are excellent alternatives, as their shapes hold the cheese sauce well.

    Is there a lower-fat version of this recipe?

    You can reduce the fat content by using reduced-fat cheese and milk, though this may slightly alter the creamy texture. Consider adding a bit more seasoning to compensate for the reduced richness.

    Final Thoughts

    This truffle-infused macaroni and cheese with crispy pancetta crumble is more than just a meal; it’s an experience to be savored. I hope you enjoy making and sharing this dish as much as I have. Please leave a comment and let me know how it turns out for you—or share your own creative twist! Happy cooking, friends.

    Related update: Truffle-Infused Macaroni and Cheese with Crispy Pancetta Crumble

    Related update: Szechuan-Style Spicy Chicken Lo Mein with Crunchy Cashews

  • Hazelnut Espresso Cream Martinis with Cinnamon-Sugar Rim | Made by Meaghan Moineau

    Hazelnut Espresso Cream Martinis with Cinnamon-Sugar Rim | Made by Meaghan Moineau

    Hazelnut Espresso Cream Martinis with Cinnamon-Sugar Rim

    Imagine stepping into a cozy evening where the air is filled with the rich, inviting aroma of freshly brewed espresso, mingling with a hint of nutty sweetness and warm spices. This isn’t just a dream — it’s the enchanting experience of sipping a Hazelnut Espresso Cream Martini with a Cinnamon-Sugar Rim, a luxurious twist on the classic espresso martini.

    Personal Story

    There’s something about the ritual of cocktail-making that feels almost sacred to me. It takes me back to an unforgettable evening when I first tried my hand at crafting martinis. My kitchen was transformed into a mini speakeasy, complete with dimmed lights and my favorite jazz playlist in the background. I was eager to impress a dear friend with a perfectly shaken espresso martini. Little did I know, it would turn into a bit of a comedy act.

    The first attempt was a frothy mess, with coffee grounds scattered across the counter like confetti. I had forgotten to secure the shaker lid — a rookie mistake, but one that left us in fits of laughter. By the third attempt, I’d finally perfected the technique, and the result was a silky, chilled concoction that won us over with its bold coffee flavor.

    That evening sparked a newfound love for experimenting with cocktail recipes. I started playing around with flavors, trying to capture the essence of cozy, decadent evenings. That’s when I discovered the magic of hazelnut liqueur and cinnamon in an espresso martini. The combination was nothing short of revelatory.

    Now, whenever I want to evoke that same sense of warmth and indulgence, I whip up a Hazelnut Espresso Cream Martini. It’s a blend of nostalgia and creativity in a glass — a drink that turns any night into a special occasion.

    What Makes This Version Special

    This Hazelnut Espresso Cream Martini isn’t just another cocktail; it’s a sensory journey. The addition of **hazelnut liqueur** introduces a nutty dimension that transforms the standard espresso martini into something extraordinary. By rimming the glass with a blend of granulated sugar and **ground cinnamon**, we add a warm, aromatic boost that elevates the entire experience. Each sip is a dance of flavors, making this cocktail not only better than the classic version but a true signature drink.

    Flavor Profile

    As you take your first sip of the Hazelnut Espresso Cream Martini, you’re greeted with a rich, nutty essence that melds seamlessly with the deep, robust coffee flavor from the freshly brewed **espresso shot**. The subtle warmth of cinnamon from the sugar rim wraps around your senses, creating a comforting, autumnal vibe. It’s a cocktail that balances boldness with delicacy, each ingredient playing its part in a harmonious symphony of flavors.

    Ingredients

    • 2 tablespoons granulated sugar
    • 1 teaspoon ground coffee
    • 1 ounce vodka
    • 1 ounce Baileys Irish Cream
    • 1 ounce Kahlua
    • 1 tablespoon chocolate syrup
    • Ice cubes
    • 1 ounce **hazelnut liqueur**
    • 1/2 teaspoon **ground cinnamon**
    • 1 freshly brewed **espresso shot**

    Instructions

    1. In a small bowl, combine the granulated sugar and ground cinnamon. Mix well to create a fragrant blend.
    2. Spoon a layer of the cinnamon-sugar mixture onto a plate. Moisten the rim of a martini glass with water, then invert it and dip into the sugar-cinnamon mixture, ensuring a nice, even coating. Set aside.
    3. Fill a martini shaker three-quarters full with ice cubes.
    4. Add the vodka, Baileys Irish Cream, Kahlua, and **hazelnut liqueur** to the shaker. Pour in the freshly brewed **espresso shot** for a robust coffee flavor. Shake vigorously until condensation forms on the outside of the shaker, about 20-30 seconds.
    5. Drizzle chocolate syrup on the inside of the prepared martini glass, creating a decorative swirl.
    6. Strain the martini mixture into the glass, allowing the velvety cocktail to fill the chocolate-laced interior.
    7. Serve immediately, savoring the aroma and flavor of your artisanal creation.

    Pro Tips from Meaghan’s Kitchen

    • Chill your martini glasses in the freezer beforehand for an extra frosty experience.
    • Use freshly brewed espresso for the best flavor — instant coffee just won’t cut it here.
    • Shake your cocktail until it’s thoroughly chilled; the shaker should feel icy cold in your hands.
    • If you love a sweet kick, drizzle a little extra chocolate syrup directly into the cocktail shaker before shaking.
    • Experiment with different coffee types for the espresso shot to vary the flavor profile slightly.

    Variations & Dietary Swaps

    • Vegetarian/Vegan Swap: Replace Baileys Irish Cream with a vegan cream liqueur like Baileys Almande or a homemade almond milk version.
    • Spice-It-Up Version: Add a dash of cayenne pepper to the cinnamon-sugar rim for a spicy kick that pairs surprisingly well with the nutty and coffee flavors.
    • Kids-Friendly Version: Create a non-alcoholic version by using decaf espresso, hazelnut syrup, and a splash of chocolate milk for a mocktail that the whole family can enjoy.

    What to Serve With It

    This Hazelnut Espresso Cream Martini pairs beautifully with a small plate of dark chocolate truffles. The deep cocoa notes complement the nutty and spiced flavors of the martini. For a more substantial pairing, consider serving with a selection of cheeses, nuts, and dried fruits to create a sophisticated dessert board that invites leisurely sipping and snacking.

    Storage & Meal Prep

    If you’re prepping for a party, you can mix the vodka, Baileys, Kahlua, and hazelnut liqueur up to a day in advance and store it in the refrigerator. Just shake with ice and espresso when ready to serve. Leftover martini mix can be stored in an airtight container in the fridge for up to 24 hours, but the flavor is best fresh. Refrain from freezing, as the consistency and flavor may change.

    FAQ

    Can I use instant coffee instead of espresso?

    While you can use instant coffee in a pinch, the depth of flavor from a freshly brewed espresso shot is unmatched. It’s worth the extra effort!

    What if I don’t have a martini shaker?

    No shaker? No problem! A mason jar with a tight-fitting lid works equally well for mixing and chilling.

    Is there a non-alcoholic version of this cocktail?

    Yes! Substitute the alcohol with coffee-flavored syrup and a splash of hazelnut syrup. Use decaf espresso for a caffeine-free treat.

    Can I make this ahead of time for a party?

    You can prepare the alcohol mix in advance, but wait to add the espresso and ice until just before serving for optimal flavor and presentation.

    What type of chocolate syrup should I use?

    Opt for a high-quality chocolate syrup for the best results. Dark chocolate syrup adds a rich, indulgent touch to the cocktail.

    Final Thoughts

    Crafting a Hazelnut Espresso Cream Martini with a Cinnamon-Sugar Rim is more than just making a drink — it’s creating an experience. Whether you’re sharing it with friends or enjoying a cozy night in, this cocktail is sure to elevate the moment. I’d love to hear how it turns out for you and any fun twists you decide to try. Don’t hesitate to leave a comment, and if you loved this recipe, feel free to share it with fellow cocktail enthusiasts. Cheers to delicious discoveries!

    Related update: Hazelnut Espresso Cream Martinis with Cinnamon-Sugar Rim

    Related update: Tropical Berry Bliss Smoothie with Coconut and Lime

  • Decadent Oreo-Banana Cheesecake with Salted Caramel Swirl | Made by Meaghan Moineau

    Decadent Oreo-Banana Cheesecake with Salted Caramel Swirl | Made by Meaghan Moineau

    Decadent Oreo-Banana Cheesecake with Salted Caramel Swirl

    Imagine biting into a slice of cheesecake so creamy, it feels like velvet on your tongue. Now add the rich, bittersweet dance of dark chocolate, the luscious embrace of a homemade salted caramel swirl, and the comforting, nostalgic crunch of Oreos. This, my friends, is no ordinary dessert — it’s a decadent Oreo-Banana Cheesecake that will redefine your expectations of indulgence.

    Personal Story

    Growing up, cheesecake was a special-occasion dessert, reserved for birthdays and holidays when the whole family gathered around the dining table. I remember the first time I attempted to make one; it was a classic New York-style cheesecake, and let’s just say the results were less than perfect. The crust was soggy, the filling was dense, and I forgot to let it cool before devouring it. But that experience sparked a curiosity in me that led to years of experimenting with flavors and techniques.

    Flash forward to a summer evening last year, when the sweet aroma of bananas filled my kitchen. I had an excess of ripe bananas and a pantry begging for creativity. That’s when inspiration struck. What if I combined the familiar comfort of banana bread with the elegance of a cheesecake? And, why not throw in some Oreos and a salted caramel swirl for good measure?

    This Oreo-Banana Cheesecake with a Salted Caramel Swirl was born out of a love for pushing culinary boundaries and a desire to create a dessert that felt both familiar and exciting. As I took that first bite, the creamy texture, the rich Oreo crust, and the sophisticated caramel notes danced together perfectly. It’s been a family favorite ever since.

    What Makes This Version Special

    This isn’t just any cheesecake; it’s an elevated version that marries comfort with sophistication. The luscious salted caramel swirl weaves through the creamy filling, offering a delightful contrast to the rich Oreo and banana flavors. A hint of dark chocolate adds depth, turning this dessert into a complex symphony of flavors. Unlike the standard cheesecake, this version delivers a perfect balance of sweet and salty tones, making it a standout centerpiece for any dessert table.

    Flavor Profile

    Prepare your taste buds for an unforgettable experience. The Oreo-Banana Cheesecake with Salted Caramel Swirl is rich and creamy, with a delightful balance of sweet and savory notes. The Oreo crust adds a satisfying crunch, while the banana-infused filling is smooth and velvety. The salted caramel swirl introduces a sophisticated edge, and the hint of dark chocolate provides a lingering, slightly bitter finish. Each bite is a harmonious blend of flavors and textures that will leave you craving more.

    Ingredients

    • **Oreo cookies** – 200g, crushed
    • **Butter** – 75g, melted
    • **Cream cheese** – 500g
    • **Fresh whipping cream** – 300ml
    • **Gelatin powder** – 10g
    • **Water** – 50ml
    • **Nutella** or hazelnut spread – 100g
    • Skinless bananas – 3, mashed
    • **Lemon juice** – 1/2 tbsp
    • **Milk** – 3 tbsp
    • **Dark chocolate shavings** – optional, for garnish
    • **Sea salt flakes** – pinch
    • **Homemade salted caramel sauce** – 200ml

    Instructions

    1. Start by infusing the melted butter with a pinch of sea salt to give your Oreo crust a slightly savory edge. Mix the crushed Oreo cookies with the butter until well combined.
    2. Firmly press the Oreo mixture into a 9-inch cake pan. Place this in the refrigerator to chill until firm, about 30 minutes.
    3. In a large bowl, whisk the fresh whipping cream until soft peaks form. Set aside.
    4. Combine the gelatin powder and water in a small bowl and let it soak for a few minutes. Place the bowl over a double boiler and heat gently until the gelatin dissolves completely. Set aside to cool slightly.
    5. In a separate bowl, beat the cream cheese at medium speed with 3 tablespoons of milk until it’s smooth and creamy. Add the Nutella, and continue to beat for about 1 minute.
    6. Mash the bananas and mix them with the lemon juice to prevent browning, then fold them into the cream cheese mixture until well combined. Transfer to a large bowl.
    7. Gently fold the whipped cream into the cream cheese mixture using a hand whisk, then add the dissolved gelatin and mix until fully incorporated.
    8. Fold in 20g of crushed Oreo cookies with a rubber spatula for an added crunch.
    9. Pour half of the cream cheese mixture into the prepared cake pan. Drizzle half of the homemade salted caramel sauce over the top, using a knife to swirl it through. Repeat with the remaining mixture and caramel.
    10. Refrigerate the cheesecake for at least 4 hours or overnight to set. Once chilled, remove the cheesecake from the cake pan and sprinkle with extra crushed Oreo biscuits and dark chocolate shavings, if desired.

    Pro Tips from Meaghan’s Kitchen

    • Make sure your cream cheese is at room temperature before you start. It blends much more smoothly, preventing lumps in your cheesecake.
    • For a perfectly smooth caramel swirl, let the caramel cool slightly before adding it to the cheesecake mixture.
    • To avoid over-mixing, fold the whipped cream in gently. This keeps the mixture light and airy.
    • If your bananas are too ripe, consider adding a touch more lemon juice to balance the sweetness.
    • For a clean slice, dip your knife in hot water before cutting and wipe it clean between slices.

    Variations & Dietary Swaps

    • Vegetarian swap: Use agar-agar instead of gelatin for a plant-based gelling agent.
    • Spice it up: Add a pinch of cinnamon to the crust mixture for a warm, spicy twist.
    • Kids-friendly version: Skip the dark chocolate shavings and add colorful sprinkles on top for a fun, festive look.

    What to Serve With It

    This cheesecake pairs beautifully with a chilled glass of espresso martini, marrying the dessert’s rich flavors with the cocktail’s coffee notes. Alternatively, serve a side of fresh strawberries for a refreshing contrast that complements the cheesecake’s sweetness.

    Storage & Meal Prep

    Store any leftover cheesecake in an airtight container in the refrigerator for up to 3 days. For longer storage, wrap individual slices in plastic wrap and place them in a freezer-safe bag; they can be frozen for up to 2 months. To reheat, simply thaw a slice in the refrigerator for a few hours before serving. Avoid microwaving to maintain its creamy texture.

    FAQ

    Can I make this cheesecake without a mixer?

    Yes, you can! While a mixer makes the process quicker, you can achieve a smooth texture by thoroughly whisking by hand. Just be prepared to put in a little extra elbow grease.

    Is there a substitute for Nutella?

    If you’re not a fan of hazelnut spread, you can use melted dark chocolate or even peanut butter for a different flavor profile.

    How do I prevent my cheesecake from cracking?

    The key to preventing cracks is ensuring the cream cheese is at room temperature before you start. Also, avoid over-mixing once the gelatin is added, as this can cause air bubbles that lead to cracking.

    Can I use pre-made caramel sauce?

    While homemade salted caramel sauce enhances the cheesecake’s flavor, a high-quality store-bought version will work in a pinch. Just be sure to choose one that’s thick and rich.

    What if I don’t have a double boiler?

    If you don’t have a double boiler, you can create a makeshift one by placing a heatproof bowl over a pot of simmering water, ensuring the bowl doesn’t touch the water.

    Final Thoughts

    There you have it, my take on a Decadent Oreo-Banana Cheesecake with Salted Caramel Swirl — a dessert that’s as indulgent as it is delightful. I hope this recipe brings as much joy to your table as it has to mine. I’d love to hear how your cheesecake turns out, so feel free to share your creations in the comments below. Happy baking, and remember, the best recipes are shared with love!

    Related update: Decadent Oreo-Banana Cheesecake with Salted Caramel Swirl

    Related update: Decadent Mocha Raspberry Chiffon Cake with Hazelnut Praline Crunch

  • Maple Pecan Honey Cornbread with Orange Zest | Made by Meaghan Moineau

    Maple Pecan Honey Cornbread with Orange Zest | Made by Meaghan Moineau

    Maple Pecan Honey Cornbread with Orange Zest

    Imagine this: the golden crust of a freshly baked cornbread, still warm from the oven, with a sweet aroma that dances through your kitchen. A slice reveals a moist, sun-kissed interior dotted with crunchy pecans and hints of bright orange zest. This is not your grandmother’s cornbread — it’s something a little more magical.

    My Love Affair with Cornbread

    Growing up in the South, cornbread was more than just a side dish; it was a family staple, gracing our table during Sunday dinners, holiday feasts, and even simple weekday suppers. My earliest memory of this comforting dish is watching my grandmother expertly mix cornmeal and buttermilk in her old ceramic bowl, a routine she had perfected over decades. I vividly remember the scent of it baking, mingling with the savory tang of collard greens or the rich aroma of a beef stew.

    However, my journey to crafting the perfect cornbread was not without its hiccups. I recall a particularly chaotic Thanksgiving where, in my excitement to impress the family with my own take on the classic, I inadvertently forgot the baking powder. The result was a flat, sad disk that my family graciously ate with polite smiles. That little mishap taught me a valuable lesson about the science of baking and the importance of precision.

    Determined to redeem myself, I spent months experimenting with different ingredients and techniques, seeking to elevate the traditional recipe without losing its comforting soul. It was during a trip to a local farmer’s market that I stumbled upon fresh pecans and a basket of fragrant oranges, sparking an idea. What if I could infuse my cornbread with these vibrant flavors? Hence, the Maple Pecan Honey Cornbread with Orange Zest was born, a creation that has since become a beloved staple in my home.

    What Makes This Version Special

    This isn’t just any cornbread recipe, and here’s why: by infusing the batter with aromatic **orange zest** and crunchy **pecans**, I’ve added layers of texture and flavor that transform this humble side into a standout dish. The warm, earthy notes of **maple syrup** replace the usual vanilla, giving it a subtle sweetness that’s both comforting and sophisticated. Each element plays its part in creating a cornbread that is vibrant, complex, and utterly satisfying.

    Flavor Profile

    The Maple Pecan Honey Cornbread with Orange Zest bursts with a sweet and nutty profile, where each bite reveals a bright citrus aroma and a warm maple undertone. The cornmeal provides a heartiness, while the pecans add a delightful crunch. The orange zest weaves a thread of freshness throughout, ensuring a balanced bite that is both familiar and refreshingly new.

    Ingredients

    • 1 cup corn meal
    • 1 cup flour
    • 1 tablespoon baking powder
    • 1/2 cup white sugar
    • 1/2 teaspoon salt
    • 1/4 cup **honey**
    • 1/4 cup **maple syrup**
    • 1 large egg
    • 1 cup milk
    • 1/2 cup melted butter
    • 1 tablespoon grated **orange zest**
    • 1/2 cup chopped **pecans**

    Instructions

    1. Preheat your oven to 350°F (175°C) and grease a 9×9 inch baking pan.
    2. In a large bowl, combine the corn meal, flour, baking powder, sugar, and salt. Whisk these dry ingredients together until well mixed.
    3. In a separate bowl, whisk together the honey, maple syrup, egg, and milk. Ensure the mixture is smooth and the honey is fully integrated.
    4. Pour the wet ingredients into the dry ingredients and stir until just combined. Avoid over-mixing as this can lead to a dense cornbread.
    5. Gently fold in the melted butter, followed by the grated orange zest. Be careful to preserve the citrus aroma by folding lightly.
    6. Heat a dry skillet over medium heat and toast the pecans until they are fragrant and slightly golden, about 3-4 minutes. This step enhances their flavor and crunch.
    7. Fold the toasted pecans into the batter, distributing evenly.
    8. Pour the batter into the prepared pan and smooth the top with a spatula. Bake in the preheated oven for 25-30 minutes, or until the top is golden-brown and a toothpick inserted into the center comes out clean.
    9. Allow the cornbread to cool in the pan for at least 10 minutes before slicing. Serve warm.

    Pro Tips from Meaghan’s Kitchen

    • Use fresh orange zest for maximum flavor. Store-bought zest can sometimes be dry and lack vibrancy.
    • To ensure even mixing, bring your egg and milk to room temperature before combining with other ingredients.
    • If you prefer a slightly sweeter cornbread, try drizzling a bit of maple syrup over the top before serving.
    • For a more robust flavor, use dark maple syrup instead of the regular one.
    • Letting the cornbread cool slightly before cutting will make it easier to get clean slices.

    Variations & Dietary Swaps

    • Vegetarian Swap: Substitute the butter with a plant-based alternative like coconut oil or vegan butter for a vegetarian-friendly version.
    • Spice-It-Up Version: Add a teaspoon of cinnamon or nutmeg to the dry ingredients for a warm, spiced version.
    • Kids-Friendly Version: Reduce the orange zest to a teaspoon and add in a handful of mini chocolate chips for a sweeter, kid-approved treat.

    What to Serve With It

    Pair this Maple Pecan Honey Cornbread with a refreshing glass of iced green tea or a light citrus salad to complement its flavors. It’s also a fantastic side for hearty soups or chili, where its sweet nuttiness can shine against savory, spicy notes.

    Storage & Meal Prep

    Store any leftover cornbread in an airtight container at room temperature for up to 3 days. For longer storage, wrap individual slices in plastic wrap and place them in a zip-top freezer bag. Freeze for up to 3 months. To reheat, simply thaw at room temperature and warm in a 350°F oven for about 10 minutes.

    FAQ

    Can I use whole wheat flour instead of all-purpose flour?

    Yes, you can substitute whole wheat flour, but it may result in a denser texture. Consider using half whole wheat and half all-purpose to maintain a lighter crumb.

    How can I make this cornbread gluten-free?

    To make it gluten-free, you can use a 1:1 gluten-free baking flour blend in place of the all-purpose flour. Ensure your cornmeal is also certified gluten-free.

    What if I don’t have fresh oranges?

    If fresh oranges aren’t available, you can use store-bought orange juice and a teaspoon of orange extract as a substitute. However, fresh zest is recommended for the best flavor.

    Can I add other nuts or seeds?

    Absolutely! Feel free to swap the pecans for walnuts or even add sunflower seeds for extra crunch.

    How do I know when the cornbread is done?

    The cornbread is done when the top is golden-brown and a toothpick inserted into the center comes out clean. If the top browns too quickly, cover it with foil and continue baking.

    Final Thoughts

    There you have it, my dear kitchen adventurers, a Maple Pecan Honey Cornbread with Orange Zest that is sure to become a favorite in your baking repertoire. I hope this recipe brings warmth and joy to your table, just as it has to mine. Please feel free to leave comments about how your cornbread turned out or any tweaks you made. Sharing is caring, after all — let’s spread the cornbread love!

    Related update: Maple Pecan Honey Cornbread with Orange Zest

    Related update: Spicy Maple-Roasted Autumn Vegetables with Herbed Goat Cheese Drizzle

  • Almond Amaretto Cloud Cake with Rosewater Marzipan Glaze | Made by Meaghan Moineau

    Almond Amaretto Cloud Cake with Rosewater Marzipan Glaze | Made by Meaghan Moineau

    Almond Amaretto Cloud Cake with Rosewater Marzipan Glaze

    Imagine slicing through a pillowy-soft cake, the knife gliding like a whisper, releasing a sweet, floral fragrance that fills your kitchen with a sense of serenity. The Almond Amaretto Cloud Cake with Rosewater Marzipan Glaze is not just a dessert; it’s an experience, a delicate dance of flavors that brings elegance to the everyday.

    Personal Story

    The first time I encountered the ethereal combination of almonds and rosewater was during a quaint summer trip to Provence. Wandering through a bustling market, I was drawn to a small patisserie by the wafting scent of freshly baked confections. I stood in awe as the baker, a charming elderly man with flour-dusted hands, handed me a slice of their signature almond cake drizzled with a mysterious glaze. Each bite was like a revelation — a perfect harmony of nutty richness and floral grace that lingered long after the last crumb disappeared.

    Back home, inspired and determined, I set out to recreate that magical moment in my own kitchen. My initial attempts were far from perfect, mind you. I remember one particular instance when the glaze turned into a gloopy mess because I underestimated the power of rosewater. But with each trial, I inched closer to that memory, learning to respect the delicate balance of flavors.

    Eventually, I crafted my own interpretation, the Almond Amaretto Cloud Cake with Rosewater Marzipan Glaze. This cake has since become my go-to for celebrations and quiet afternoons alike, a shared joy among friends and family. It captures the essence of that enchanting patisserie and infuses it with my personal culinary journey.

    What Makes This Version Special

    My version of the Almond Amaretto Cloud Cake is elevated by a few key elements that set it apart from traditional recipes. Infusing the cake with the delicate aroma of rosewater adds an ethereal twist, making each bite a fragrant journey. The rosewater isn’t just in the cake; it’s also in the glistening marzipan glaze that crowns the top, turning a simple cake into a masterpiece of flavor and presentation.

    This isn’t your standard almond cake. By incorporating amaretto liqueur, we deepen the almond flavor, creating a richer, more complex taste profile. The marzipan glaze adds a luxurious finish, its silky texture enhanced with powdered sugar and just a hint of rosewater. This cake is not only a treat for the palate but also a delight for the senses, offering a floral, citrus-kissed finish that is simply unforgettable.

    Flavor Profile

    The taste of the Almond Amaretto Cloud Cake is delightfully fragrant, a sensory journey that begins with the soft, nutty foundation of almonds. As you savor each bite, the floral notes of rosewater unfold, dancing alongside a subtle citrus warmth from the lemon zest. The amaretto liqueur adds depth, weaving through the flavor tapestry with its own unique sweetness. Topped with a rosewater marzipan glaze, every slice is a delicate balance of floral, nutty, and sweet, offering a culinary escape that is both sophisticated and comforting.

    Ingredients

    • 1 cup almond flour
    • 2 tablespoons **amaretto liqueur**
    • 1 teaspoon baking powder
    • 1/2 cup unsalted butter, melted
    • 1 tablespoon **cornstarch**
    • 4 large egg whites
    • 3/4 cup sugar, divided
    • 1 cup all-purpose flour
    • 1/2 cup **marzipan**, divided
    • 1 tablespoon **rosewater**, divided
    • 1/4 cup powdered sugar
    • Zest of 1 **lemon**
    • 1/4 cup sliced almonds

    Instructions

    1. Preheat your oven to 180°C (350°F). Prepare a silicon mold or a regular round cake pan by greasing it lightly and sprinkling it with breadcrumbs for easy release.
    2. In a small bowl, combine the lemon zest with 1/2 tablespoon of rosewater. Let it sit for a few minutes to bloom, enhancing the fragrance.
    3. In a large mixing bowl, beat the egg whites until they form stiff peaks, then gradually add 2 tablespoons of sugar, continuing to beat until glossy.
    4. In a separate bowl, whisk together the remaining sugar, all-purpose flour, almond flour, cornstarch, and baking powder. Sift this mixture gently into the egg whites, folding carefully to maintain the airy texture.
    5. Stir in the melted butter, followed by the bloomed rosewater and lemon zest mixture. Add half of the marzipan and the amaretto liqueur, mixing until just combined.
    6. Pour the batter into the prepared pan, smoothing the top. Sprinkle with the remaining marzipan and sliced almonds.
    7. Bake for 30-40 minutes, or until a toothpick inserted into the center comes out clean. The top should be golden-brown and slightly springy to the touch.
    8. While the cake cools in the pan, create the marzipan glaze. In a small saucepan, combine the remaining marzipan with powdered sugar and 1/2 tablespoon of rosewater. Melt over low heat, stirring until silky smooth.
    9. Once the cake has completely cooled, turn it onto a serving plate and drizzle with the marzipan glaze, letting it cascade down the sides for a beautiful finish.

    Pro Tips from Meaghan’s Kitchen

    • Room temperature egg whites whip up to stiff peaks more easily, giving your cake the airy texture it needs.
    • Blooming the rosewater with lemon zest not only intensifies the flavor but also prevents it from overpowering the cake.
    • For an even almond flavor throughout, consider lightly toasting the sliced almonds before sprinkling them on top.
    • When melting marzipan for the glaze, patience is key. Melt it slowly on low heat to prevent any lumps from forming.
    • If you prefer a stronger floral note, you can add an extra teaspoon of rosewater to the glaze, but proceed with caution; a little goes a long way.

    Variations & Dietary Swaps

    • Gluten-Free Option: Substitute the all-purpose flour with a high-quality gluten-free flour blend to accommodate dietary needs without compromising on taste.
    • Spice It Up: For an added depth of flavor, incorporate a teaspoon of cardamom into the dry ingredients. It pairs wonderfully with the almond and rosewater notes.
    • Kid-Friendly Version: Skip the amaretto and add a splash of vanilla extract instead, making it a delightful treat for the whole family.

    What to Serve With It

    The Almond Amaretto Cloud Cake pairs beautifully with a glass of chilled Moscato, offering a refreshing contrast to the cake’s sweet and floral notes. For a non-alcoholic option, a cup of fragrant Earl Grey tea complements the rosewater and almond flavors exquisitely. Serve with fresh berries or a dollop of whipped cream for an extra touch of indulgence.

    Storage & Meal Prep

    To store, wrap the cake tightly in plastic wrap and keep it in the refrigerator for up to 5 days. For longer storage, you can freeze the cake (without the glaze) for up to 3 months; thaw overnight in the refrigerator before glazing. To reheat, let the slices come to room temperature naturally. Avoid microwaving as it can alter the cake’s delicate texture.

    FAQ

    Can I make this cake in advance?

    Absolutely! The flavors meld beautifully over time, so feel free to bake the cake a day ahead. Just add the glaze before serving for the best presentation.

    Is marzipan necessary for the glaze?

    While marzipan adds a unique texture and flavor to the glaze, you can substitute it with almond paste for a similar effect. Just adjust the sweetness to your liking.

    Can I use fresh rose petals as a garnish?

    Yes, fresh rose petals make a stunning and edible garnish. Ensure they are pesticide-free and rinse them gently before use.

    What can I do if I don’t have amaretto?

    If you don’t have amaretto, almond extract can be used as a substitute. Use it sparingly to avoid overpowering the other flavors.

    Final Thoughts

    There you have it, my dear friends — a culinary masterpiece that is both easy and rewarding to make. I hope this Almond Amaretto Cloud Cake with Rosewater Marzipan Glaze brings a touch of elegance and a burst of flavor to your table. Don’t forget to share your creations with me in the comments below or tag me on social media. Happy baking, and may your kitchen be filled with delicious aromas and joyful moments!

    Related update: Almond Amaretto Cloud Cake with Rosewater Marzipan Glaze

    Related update: Decadent Oreo-Banana Cheesecake with Salted Caramel Swirl

  • Decadent Caramel Bourbon Apple Brown Betty | Made by Meaghan Moineau

    Decadent Caramel Bourbon Apple Brown Betty | Made by Meaghan Moineau

    Decadent Caramel Bourbon Apple Brown Betty

    Picture this: a cozy kitchen filled with the warm, inviting aroma of sweet spiced apples mingling with the rich, buttery scent of freshly toasted bread. As the apples soften and release their juices, the air becomes heavy with notes of caramel and a whisper of bourbon. It’s an olfactory delight that promises comfort and indulgence in every bite.

    My Journey with Apple Brown Betty

    My love affair with Apple Brown Betty began in my grandmother’s sun-dappled kitchen. Every fall, she would orchestrate a symphony of flavors with the simplest of ingredients: apples picked from the backyard, day-old bread, and a dusting of brown sugar and cinnamon. It was a humble dessert, but to me, it was magic. I remember the way the top layer would turn irresistibly crispy, giving way to the tender, spiced apples beneath. Each spoonful was a taste of nostalgia, a reminder of her warm embrace and endless love.

    But let me share a little secret: not all my adventures with Apple Brown Betty were seamless. There was the time I ambitiously tried to make it for a Thanksgiving potluck, only to discover I’d forgotten to buy apples. I had to improvise with pears and, though delicious, it just wasn’t the same. It taught me an important lesson about the integrity of ingredients and the stories they carry. The apples were more than a flavor — they were a bridge to my past.

    Years later, as I grew more confident in my culinary skills, I decided to give this classic dessert an adult twist. Inspired by a bottle of bourbon gifted by a dear friend and a craving for something a little more decadent, I embarked on a mission to elevate my beloved Apple Brown Betty. The result? A rich caramel bourbon sauce that transforms each layer of apples into something truly luxurious. And for a touch of crunch, a sprinkle of candied pecans that adds a delightful contrast to the soft, spiced filling.

    What Makes This Version Special

    This version of Apple Brown Betty takes a beloved classic and infuses it with a touch of indulgence that feels both familiar and exciting. The addition of a **caramel bourbon sauce** brings an elevated richness, enhancing the natural sweetness of the apples while adding a smoky depth that’s utterly irresistible. But that’s not all. The **candied pecans** I use for this recipe add a delightful crunch, offering a nutty counterpoint that pairs perfectly with the soft, buttery bread cubes.

    By toasting the bread cubes before layering them with the apples, we enhance their texture and flavor, ensuring that the final dessert has a satisfying crispness that contrasts beautifully with the tender apple layers. This upgraded version is not just an Apple Brown Betty, but an experience — one that marries tradition with a modern twist, creating a dessert that’s perfect for cozy evenings and special occasions alike.

    Flavor Profile

    Prepare your senses for a journey through layers of warm, rich flavors with this Decadent Caramel Bourbon Apple Brown Betty. The first bite greets you with the buttery crunch of toasted bread, mingled with the toasty sweetness of caramel. As you delve deeper, the apples reveal themselves — tender and juicy, infused with the aromatic spice of cinnamon and the sophisticated warmth of bourbon. The candied pecans punctuate the experience, adding a nutty sweetness that lingers on your palate, making each spoonful a harmonious blend of textures and tastes.

    Ingredients

    • 5 cups of diced apples, peeled and cored
    • 3 cups of cubed bread (preferably day-old)
    • **1/2 cup of butter, melted**
    • 1/2 cup of white sugar
    • 1 teaspoon of cinnamon
    • 1 teaspoon of nutmeg
    • Juice of 1 lemon
    • **1/2 cup of caramel sauce**
    • **1/4 cup of bourbon**
    • **1/2 cup of candied pecans**

    Instructions

    1. Preheat your oven to 375°F (190°C). Butter a soufflé dish that holds 1-1/2 quarts to ensure the dessert doesn’t stick.
    2. In a large bowl, mix the diced apples with the white sugar, cinnamon, and nutmeg until well combined. Add the lemon juice and toss to coat, which helps to prevent the apples from browning and enhances their flavor.
    3. On a baking sheet, spread the cubed bread and toast in the oven for about 10 minutes, or until lightly golden-brown. This step not only intensifies the bread’s flavor but also helps it absorb the delicious apple juices without becoming soggy.
    4. In a small saucepan over medium heat, combine the **caramel sauce** with the **bourbon**, stirring until the mixture is smooth and aromatic. This will be our luscious drizzle that ties all the flavors together.
    5. Begin layering in the prepared soufflé dish: start with a base layer of toasted bread cubes. Add a layer of the apple mixture, followed by a drizzle of the caramel bourbon sauce. Dot with some of the melted butter.
    6. Repeat the layering process, ending with a top layer of bread cubes. Make sure the dish is well-heaped, as the ingredients will settle as they bake.
    7. Cover the dish with foil and bake in the preheated oven for 30 minutes.
    8. Remove the foil and continue baking for an additional 30 minutes, or until the apples are tender and the top is a beautiful golden-brown.
    9. Once out of the oven, sprinkle the **candied pecans** over the top for a finishing touch.

    Pro Tips from Meaghan’s Kitchen

    • Choose apples that hold up well during baking, like Granny Smith or Honeycrisp, for the best texture.
    • If your caramel sauce is too thick, gently warm it before mixing with the bourbon to ensure a smooth consistency.
    • For extra depth of flavor, consider adding a pinch of salt to the caramel bourbon mixture.
    • You can prepare the bread cubes and apple mixture a day ahead, saving you time on the day of baking.
    • If you prefer a less sweet dessert, reduce the sugar to 1/3 cup and let the natural sweetness of the apples shine.

    Variations & Dietary Swaps

    • Vegetarian Swap: Use a plant-based butter alternative and ensure your caramel sauce contains no dairy for a vegan-friendly dessert.
    • Spice-It-Up Version: Add a pinch of ground cloves or ginger to the apple mixture for a spicier kick.
    • Kids-Friendly Version: Omit the bourbon and use a splash of apple juice instead for a family-friendly treat.

    What to Serve With It

    This Decadent Caramel Bourbon Apple Brown Betty pairs beautifully with a scoop of vanilla bean ice cream, allowing the cold, creamy texture to balance the warm, spiced flavors of the dessert. For a cozy beverage pairing, consider a glass of spiced cider — the subtle warmth of the spices will complement the dessert wonderfully.

    Storage & Meal Prep

    Any leftovers can be stored in an airtight container in the fridge for up to three days. For longer storage, wrap portions individually and freeze for up to a month. When you’re ready to enjoy your Apple Brown Betty again, simply reheat in a 350°F (175°C) oven until warmed through, or microwave on medium power to maintain the dessert’s delightful texture.

    FAQ

    Can I use a different type of bread?

    Absolutely! While day-old white bread works well, you can experiment with brioche or challah for a richer flavor, or even whole wheat if you prefer a heartier texture.

    What can I use if I don’t have bourbon?

    If bourbon isn’t available, you can substitute it with a similar spirit like rum or omit it altogether for a non-alcoholic version.

    How can I make this gluten-free?

    Simply replace the bread cubes with a gluten-free bread variety. Make sure all other ingredients, like the caramel sauce, are also gluten-free.

    Does the alcohol cook out?

    Yes, most of the alcohol in the bourbon will cook off during baking, leaving behind just the rich, complex flavors.

    Can I prepare this dish in advance?

    Yes! You can assemble the dish a day in advance and store it in the fridge. Bake it fresh before serving for the best results.

    Final Thoughts

    There you have it — a sumptuous twist on the classic Apple Brown Betty, perfect for impressing guests or simply indulging yourself. I hope you find as much joy in making and eating this dessert as I do. If you try it, I’d love to hear your thoughts and see your creations! Share your experiences in the comments below, and don’t hesitate to pass this recipe along to fellow dessert lovers.

    Related update: Decadent Caramel Bourbon Apple Brown Betty

    Related update: Almond Amaretto Cloud Cake with Rosewater Marzipan Glaze

  • Bourbon-Infused Mini Cherry Pies with Pecan Streusel | Made by Meaghan Moineau

    Bourbon-Infused Mini Cherry Pies with Pecan Streusel | Made by Meaghan Moineau

    Bourbon-Infused Mini Cherry Pies with Pecan Streusel

    Imagine a warm summer evening, the air thick with the fragrance of ripe cherries mingling with a hint of vanilla and the subtle allure of bourbon. These mini cherry pies, crowned with a delightful pecan streusel, promise to be the star of any dessert table. Each bite offers a rich tapestry of flavors, leaving you longing for more.

    My Cherry Pie Love Affair

    There’s something about cherry pies that always takes me back to my childhood. Growing up, summer weekends meant visits to my grandmother’s house. Her kitchen was a sanctuary filled with the sweet and tangy aroma of freshly baked pies cooling by the window. I remember her laughing as I tried to sneak a cherry from the bowl while she wasn’t looking, always failing to escape her watchful eye. Those moments sparked my love for baking and the magic of turning simple ingredients into something extraordinary.

    Fast forward a few years, and I’m in my own kitchen, trying to recreate those memories. I soon discovered that while I could replicate the basics, I had a desire to make the recipe my own. I wanted to elevate the classic cherry pie with a twist that would resonate with my adult palate. After a few kitchen experiments, I found that a splash of bourbon in the filling, paired with a crunchy pecan streusel, brought out an intriguing depth and complexity to the pies.

    However, it wasn’t always smooth sailing. There was a time I miscalculated the amount of bourbon, and let’s just say the pies were more suited for a cocktail party than a family gathering! But with each attempt, I fine-tuned the recipe until it became a cherished favorite that I’m thrilled to share with you today.

    What Makes This Version Special

    Our Bourbon-Infused Mini Cherry Pies with Pecan Streusel are not your grandmother’s cherry pies — they’re a bold, grown-up take on the classic. The addition of bourbon adds a smoky undertone that beautifully complements the tart cherries. Meanwhile, the pecan streusel topping provides a delightful crunch that contrasts with the soft, juicy filling. This unique twist transforms a traditional dessert into an unforgettable treat that’s perfect for any occasion.

    Flavor Profile

    These mini pies offer a symphony of flavors and textures that dance on your taste buds. The filling is rich and fruity, with the cherries providing a natural sweetness that’s enhanced by the hint of smokiness from the bourbon. The pecan streusel topping adds a satisfying crunch and a nutty warmth, while the buttery crust holds it all together. Each bite is a complex, satisfying experience that leaves a lingering taste of nostalgia and innovation.

    Ingredients

    • 2 cups fresh or frozen sour cherries, pitted
    • **2 tablespoons bourbon**
    • 1/4 cup granulated sugar
    • 1 tablespoon cornstarch
    • 1 tablespoon fresh lemon juice
    • 1 teaspoon vanilla extract
    • 1 1/2 cups all-purpose flour
    • 1/4 cup **brown sugar**
    • 1/2 teaspoon ground cinnamon
    • 1/2 cup **chopped pecans**
    • 1/2 cup (1 stick) unsalted butter, cold and cut into cubes
    • 2/3 cup cold water
    • 1 tablespoon heavy whipping cream
    • 2 teaspoons turbinado sugar
    • 1/2 teaspoon salt

    Instructions

    1. Start by preparing the pie crust. In a food processor, combine flour and salt. Add butter to the mixture, pulsing until the mixture resembles coarse crumbs, approximately 30 seconds.
    2. With the processor running, gradually add 2/3 cup cold water in a slow, steady stream through the lid opening until the mixture forms a ball. Divide the dough into two disks, wrap in plastic wrap, and refrigerate for 1 hour.
    3. Preheat your oven to 350°F (175°C). On a lightly floured surface, roll one pastry disk to a 1/8-inch thickness. Fit the dough into 12 (2-1/2-inch) mini pie plates. Trim the dough around the edges and freeze until firm, about 10 minutes.
    4. Prick the bottoms and sides of the dough with a fork and bake until golden, about 6 to 8 minutes. Remove from the oven and let cool.
    5. In a small bowl, mix cornstarch with 2 tablespoons cold water until blended. In a large saucepan, combine cherries, bourbon, cornstarch mixture, sugar, and salt. Cook over medium heat until cherries are soft and the mixture is thickened. Stir in lemon juice and vanilla extract, then set aside to cool slightly.
    6. For the pecan streusel topping, mix chopped pecans, brown sugar, flour, and cinnamon in a bowl. Make sure it’s well-combined and set aside.
    7. Roll the remaining pastry disk to a 1/8-inch thickness. Cut into thin strips for lattice topping. Weave strips over each pie to create a lattice pattern. Carefully transfer lattice tops to prepared pie plates and seal the edges.
    8. Brush the tops and edges with cream and sprinkle each pie with turbinado sugar.
    9. Bake until the crusts are golden and the streusel is crisp, about 18 to 24 minutes. Serve warm, perhaps with a scoop of bourbon vanilla ice cream for the perfect finishing touch.

    Pro Tips from Meaghan’s Kitchen

    • For the best crust, keep your butter and water as cold as possible. This ensures a flaky, tender pastry.
    • When weaving your lattice, use a ruler to keep your strips even and straight for a professional-looking finish.
    • If using frozen cherries, thaw and drain them well to prevent a soggy filling.
    • Enhance the streusel by toasting the pecans before adding them for a deeper nutty flavor.
    • Let the pies cool slightly before serving to allow the filling to set, making slicing easier.

    Variations & Dietary Swaps

    • Vegetarian Swap: The original recipe is vegetarian, but ensure your bourbon is vegetarian-friendly by checking for any animal-derived clarifiers.
    • Gluten-Free Version: Use a gluten-free flour blend for the crust and streusel topping to make these pies celiac-friendly.
    • Kid-Friendly Version: Skip the bourbon and add an extra tablespoon of vanilla extract to keep the flavor rich without the alcohol.

    What to Serve With It

    These mini cherry pies are a delight on their own, but pairing them with a glass of chilled dessert wine elevates the experience. Alternatively, a scoop of bourbon vanilla ice cream perfectly complements the smoky undertones of the pie, creating a harmonious dessert duo that will undoubtedly impress your guests.

    Storage & Meal Prep

    To store leftovers, cover the pies with plastic wrap or place them in an airtight container in the refrigerator for up to 3 days. For longer storage, freeze the baked pies in a single layer on a baking sheet, then transfer them to a freezer-safe container for up to 1 month. To reheat, place frozen pies in a preheated 350°F (175°C) oven for about 10-15 minutes or until warmed through.

    FAQ

    Can I make the pie dough ahead of time?

    Absolutely! The dough can be made and refrigerated for up to two days in advance. Just be sure to let it sit at room temperature for about 10 minutes before rolling it out.

    What if I don’t have mini pie plates?

    No mini pie plates? No problem. You can use a muffin tin as an alternative. Simply adjust the dough circle size to fit each muffin cup.

    Can I use canned cherries instead of fresh or frozen?

    Yes, canned cherries can work. Just make sure to drain them well and adjust the sugar in the filling since canned cherries are often in syrup.

    Is there a non-alcoholic substitute for bourbon?

    If you’d prefer to avoid alcohol, replace the bourbon with an equal amount of apple juice or cherry juice for a similar depth of flavor without the booze.

    How do I prevent my pie filling from being too runny?

    Ensure your cornstarch mixture is well combined and cooked until thick before adding it to the pie. If your cherries are particularly juicy, you may need to increase the cornstarch slightly.

    Final Thoughts

    These Bourbon-Infused Mini Cherry Pies with Pecan Streusel are a testament to how a classic can be reimagined with a touch of creativity and a dash of bold flavors. I hope this recipe brings as much joy to your table as it has to mine. I’d love to hear about your baking adventures and any tweaks you make to the recipe. Please feel free to share your experiences or any questions in the comments below. Happy baking, my friends!

    Related update: Bourbon-Infused Mini Cherry Pies with Pecan Streusel

    Related update: Decadent Caramel Bourbon Apple Brown Betty