Decadent Chai Rice Pudding with Rosewater and Pistachio Crunch
Imagine the heady aroma of chai spices curling around you as you take a spoonful of creamy rice pudding that feels like a warm hug on a chilly evening. Each bite is a dance of floral and nutty notes, thanks to the luxurious touch of rosewater and a crunchy pistachio topping. This isn’t just any rice pudding—it’s an invitation to indulge in something truly special.
Personal Story
Growing up, rice pudding was a staple in our household, a humble dessert that evoked comfort and a sense of home. My grandmother, the matriarch of our kitchen, would stand over the stove, patiently stirring the pot, with the sweet fragrance of vanilla and cinnamon wafting through the air. This simple dish was her way of bringing the family together, sharing stories and laughter around the table.
One chilly autumn afternoon, craving the nostalgia of those family gatherings, I attempted to recreate her classic rice pudding. It was then I had my first kitchen mishap—spilling a jar of cardamom pods into the simmering milk. Rather than a disaster, it turned into a delightful discovery. The unexpected spice added a new depth to the dish, and I was inspired to experiment further.
That’s how I stumbled upon the idea of infusing the rice pudding with chai spices. By adding rosewater and a pistachio crunch, I created a dish that pays homage to my roots while offering a new, luxurious twist. This Decadent Chai Rice Pudding with Rosewater and Pistachio Crunch is a testament to how sometimes, a little kitchen accident can lead to culinary magic.
What Makes This Version Special
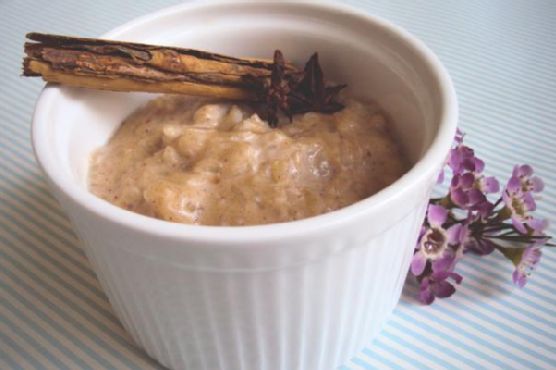
This version of rice pudding is an elevated take on the beloved classic, transformed by the infusion of **aromatic rosewater** and topped with a **pistachio crunch**. The rosewater adds a fragrant, floral note that perfectly complements the warm chai spices, making each bite an experience. The pistachios, toasted to perfection, provide a delightful contrast to the creamy texture of the pudding. It’s a dessert that feels both familiar and indulgently exotic, offering the best of both worlds.
Flavor Profile
The flavor profile of this Decadent Chai Rice Pudding with Rosewater and Pistachio Crunch is a celebration of contrasts. The richness of the creamy rice is beautifully balanced by the floral sweetness of the rosewater. The chai spices—cinnamon, cardamom, ginger, and cloves—infuse the pudding with a warm, comforting aroma. The crunchy pistachio topping adds a nutty depth, making every bite a symphony of flavors that lingers on the palate.
Ingredients
- 1 cup long grain rice
- 4 cups whole milk
- 2 bags English breakfast tea
- 1 teaspoon cinnamon powder
- 1 teaspoon ginger powder
- 4 whole cardamom pods
- 1 whole star anise
- 3 large cloves
- 1 teaspoon vanilla essence
- 1/2 cup brown sugar
- 1 tablespoon **rosewater**
- 1/2 cup **pistachios**, crushed
- 1 tablespoon honey
- Pinch of salt
Instructions
- In a small saucepan, combine the milk, tea bags, rice, and all the spices: cinnamon, ginger, cardamom, star anise, and cloves. Bring the mixture to a gentle boil over medium heat.
- Once boiling, lower the heat and let it simmer for about 20 minutes, stirring occasionally. This allows the rice to absorb the spice-infused milk.
- While the pudding simmers, toast the pistachios in a dry pan over medium heat with a pinch of salt. Stir frequently until they are lightly golden and aromatic, about 5 minutes. Remove from heat and crush coarsely.
- After 20 minutes, remove the tea bags from the pudding, and stir in the brown sugar. Increase the heat to high and cook for another 3-4 minutes, stirring continuously until the pudding thickens and turns creamy.
- Stir in the vanilla essence and rosewater, ensuring they are evenly distributed. Remove from heat.
- Spoon the rice pudding into individual serving bowls. Drizzle with honey and sprinkle the toasted pistachios on top before serving.
Pro Tips from Meaghan’s Kitchen
- Rinse the rice in cold water before cooking to remove excess starch and prevent clumping.
- For a creamier texture, use a combination of whole milk and half-and-half.
- If you prefer a thicker pudding, let it cool slightly before serving; it will continue to thicken as it cools.
- Adjust the sweetness to your liking by tasting the pudding before adding the full amount of sugar.
- For a burst of color and extra flavor, garnish with a sprinkle of edible dried rose petals.
Variations & Dietary Swaps
- Vegan Swap: Replace whole milk with coconut milk or almond milk for a dairy-free version.
- Spice-It-Up Version: Add a pinch of cayenne pepper to the pistachio topping for a subtle heat contrast.
- Kids-Friendly Version: Reduce the amount of chai spices and serve with a drizzle of chocolate syrup to appeal to younger palates.
What to Serve With It
This Decadent Chai Rice Pudding pairs wonderfully with a glass of chilled sweet dessert wine, like a late harvest Riesling, which complements the floral and nutty notes. Alternatively, for a warm beverage pairing, a steaming cup of masala chai enhances the spice profile and rounds out the meal beautifully.
Storage & Meal Prep
Leftover rice pudding can be stored in an airtight container in the refrigerator for up to 3 days. To reheat, gently warm on the stovetop over low heat, stirring in a splash of milk to restore its creamy consistency. While it’s best enjoyed fresh, the pudding can also be frozen for up to a month. Thaw overnight in the refrigerator before reheating.
FAQ
Can I use a different type of rice?
Yes, you can use short grain rice for a creamier texture, but adjust the cooking time as it may cook faster than long grain rice.
Is it possible to make this dessert ahead of time?
Absolutely! Prepare the pudding a day in advance and store it in the fridge. Add the rosewater and pistachio topping just before serving to maintain freshness.
What if I don’t have rosewater?
If rosewater isn’t available, you can substitute it with a few drops of orange blossom water or simply omit it for a classic chai rice pudding experience.
How do I know when the pudding is ready?
The pudding is ready when the rice is tender and the mixture has thickened to a creamy consistency. It should coat the back of a spoon without being too runny.
Final Thoughts
I hope this Decadent Chai Rice Pudding with Rosewater and Pistachio Crunch becomes a new favorite in your dessert repertoire. It’s a dish that brings warmth and a touch of luxury to any occasion, whether you’re serving it at a family dinner or enjoying a quiet moment for yourself. I’d love to hear how it turns out for you, so feel free to leave a comment below or share your creation on social media. Remember, the kitchen is a place of exploration and joy—happy cooking!
Related update: Decadent Chai Rice Pudding with Rosewater and Pistachio Crunch
Related update: Caramelized Fig and Walnut Upside-Down Cake with Rosemary-Honey Drizzle