Tag: Meaghan Moineau

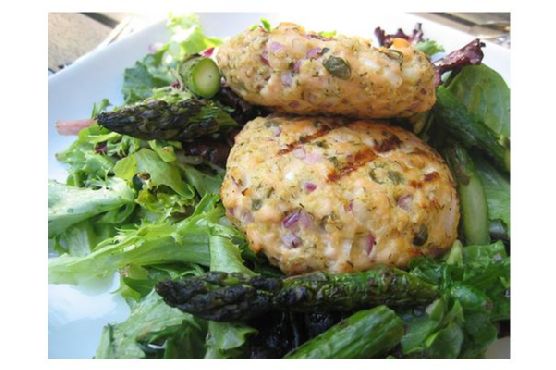
  • Wild Salmon Cakes | Made by Meaghan Moineau

    Wild Salmon Cakes | Made by Meaghan Moineau

    Wild Salmon Cakes: A Delicious and Nutritious Treat

    Welcome to our cozy kitchen corner, where today we’re diving into the delightful world of Wild Salmon Cakes. These savory patties are a celebration of simplicity and flavor, perfect for any occasion from a quick weeknight dinner to a lavish brunch gathering. Let me take you on a journey of taste and nostalgia, sharing not just a recipe but a piece of my culinary heart.

    Why You’ll Love It

    There’s something magical about the way these Wild Salmon Cakes come together. The fusion of fresh, wild-caught salmon with the crunch of panko and the tang of capers creates a symphony of flavors that dance on your palate. Whether you’re a seafood aficionado or a curious cook looking to expand your culinary repertoire, this dish will not disappoint.

    Growing up, seafood was a staple at our family table. I vividly remember summer evenings spent by the coast, where my grandmother would serve her famous salmon cakes. The recipe was a guarded secret, a treasured heirloom passed down through generations. Each bite was a reminder of home, of laughter shared around the table, and of the love that binds a family together. Today, I share with you a modern twist on that cherished recipe, hoping it brings as much joy to your home as it has to mine.

    Ingredients

    • 1 pound skinless, boneless wild salmon fillet
    • 1/2 cup red onion, finely diced
    • 2 tablespoons capers, drained
    • 1 large egg
    • 1 cup panko bread crumbs

    Instructions

    1. Mince the salmon fillet into fine pieces, ensuring that each piece is uniform in size for even cooking.
    2. In a medium-sized bowl, gently whip the egg until frothy. This will act as the binding agent for your salmon mixture.
    3. Add the finely diced red onion and capers to the egg, stirring until the ingredients are well incorporated.
    4. Fold in the minced salmon, mixing gently to maintain the texture of the fish.
    5. Gradually add the panko bread crumbs, mixing until the mixture holds together but is not overly dry.
    6. Form the mixture into 4 equal-sized patties, pressing gently to ensure they hold their shape.
    7. Place the patties on a preheated grill, cooking for about 2-3 minutes on each side until golden brown and cooked through. Alternatively, bake in a 350-degree oven for 15-20 minutes.
    8. Serve hot, garnished with fresh herbs or a squeeze of lemon for an extra zing.

    Tips

    For the best results, ensure that your salmon is as fresh as possible. Fresh salmon not only enhances the flavor but also improves the texture of the cakes. If your mixture seems too wet, add a little more panko to achieve the right consistency. Remember, the key to perfect salmon cakes is balance—too much panko can overpower the delicate flavor of the fish.

    Variations & Substitutions

    Feel free to get creative with this recipe! You can substitute the wild salmon with canned salmon in a pinch, though fresh is always preferred for the best flavor. If you’re looking to add a bit of spice, consider incorporating a finely chopped jalapeño or a dash of cayenne pepper. For a gluten-free version, replace panko with gluten-free bread crumbs or crushed cornflakes.

    Storage

    Store any leftover salmon cakes in an airtight container in the refrigerator for up to 3 days. To reheat, place them in a preheated oven at 350 degrees for about 10 minutes or until warmed through. Avoid microwaving as it can make them soggy. These cakes also freeze well; simply wrap them individually in plastic wrap and store them in a freezer-safe bag for up to 3 months.

    FAQ

    Can I use smoked salmon for this recipe?

    While smoked salmon adds a unique flavor, it might overpower the other ingredients in this recipe. If you love the taste of smoked salmon, consider using a mix of fresh and smoked salmon for a balanced flavor profile.

    What can I serve with salmon cakes?

    Salmon cakes pair beautifully with a fresh green salad, roasted vegetables, or a light yogurt dill sauce. For a more hearty meal, serve them alongside quinoa or couscous.

    Nutrition

    Wild salmon is packed with Omega-3 fatty acids, which are essential for heart health. Each serving of these salmon cakes is not only a source of lean protein but also provides essential vitamins and minerals, making it a nutritious choice for you and your family.

    Final Thoughts

    These Wild Salmon Cakes are more than just a meal; they’re a testament to the power of simple ingredients coming together to create something truly special. Whether you’re sharing them with loved ones or enjoying a quiet meal by yourself, I hope these salmon cakes bring a touch of warmth and nostalgia to your table.

    Thank you for joining me on this culinary journey. I look forward to hearing how this recipe finds its place in your home, creating new memories and traditions for years to come. Bon appétit!

    Related update: Wild Salmon Cakes

    Related update: Chicken Adobo & Coconut Ginger Rice
  • Salmon In Banana Leaf | Made by Meaghan Moineau

    Salmon In Banana Leaf: A Flavorful Island Experience

    Intro

    Salmon in banana leaf is a dish that transports me back to my childhood summers spent on the tropical islands of Southeast Asia. I remember the vibrant markets filled with the aroma of freshly caught fish and the earthy scent of banana leaves. My grandmother would lovingly prepare this dish, infusing each bite with flavors that spoke of her heritage and our family’s history. Today, I’m thrilled to share this recipe with you, so you can create your own flavorful memories around the dinner table.

    Why You’ll Love It

    This dish is a culinary adventure wrapped in the simplicity of banana leaves. The salmon is marinated to perfection, absorbing the savory, sweet, and slightly spicy flavors of the marinade. Steaming in banana leaves adds an earthy aroma and keeps the fish perfectly moist. It’s a healthy, gluten-free meal that’s also visually stunning, perfect for impressing guests or treating yourself to an exotic dinner at home.

    Ingredients

    • Banana leaves
    • 1 teaspoon cinnamon
    • 1 teaspoon fennel seed
    • 2 tablespoons fish sauce
    • 2 cloves garlic, minced
    • 1 tablespoon ginger, minced
    • 3 tablespoons peach preserves
    • 2 red chiles, sliced
    • 1 cup rice
    • 1/4 cup rice wine vinegar
    • 2 salmon steaks
    • 2 scallions, chopped
    • 1 tablespoon sesame oil
    • 2 tablespoons soy sauce
    • 1 star anise
    • 2 tablespoons tahini
    • 2 tablespoons vegetable oil

    Instructions

    1. Mix all marinade ingredients: fish sauce, garlic, ginger, peach preserves, red chiles, rice wine vinegar, sesame oil, soy sauce, and tahini in a bowl.
    2. Place salmon steaks in a large resealable bag or container and pour the marinade over them. Seal and refrigerate for at least 30 minutes, up to 2 hours.
    3. Meanwhile, prepare your scented rice powder by grinding rice, cinnamon, fennel seed, and star anise in a spice grinder until coarsely ground. Leave some larger crumbles for texture.
    4. Remove salmon from the marinade (discard any leftover marinade) and coat each fillet with the scented rice powder. Reserve some powder for future use.
    5. Lay banana leaves flat. Place one salmon fillet in the center of each leaf. Fold one side over the salmon, then the opposite side, followed by folding both ends to create a package.
    6. Place the salmon packets in a steamer basket over boiling water. Steam for about 10-13 minutes until the salmon is cooked through.
    7. For the dipping sauce, heat the remaining marinade ingredients in a small saucepot or microwave-safe dish. Whisk together until warm and blended.
    8. To serve, make a slit in the banana leaves to reveal the salmon. Serve with steamed rice or noodles, corn, and the dipping sauce on the side.

    Tips

    Ensure your banana leaves are pliable by briefly passing them over an open flame or soaking them in hot water. This prevents them from cracking when folding. If you can’t find fresh banana leaves, parchment paper can be a substitute, though it won’t provide the same aromatic quality.

    Variations & Substitutions

    If you prefer a milder flavor, omit the red chiles or reduce the amount. For a different twist, substitute the salmon with your favorite fish, such as tilapia or cod. Vegetarians can replace the fish with thick slices of tofu, adjusting the marinating time to allow the flavors to penetrate fully. For a nutty flavor, add a sprinkle of ground peanuts to the marinade.

    Storage

    Leftover salmon can be stored in the refrigerator for up to 2 days. Keep it wrapped in the banana leaf to retain moisture and flavor. Reheat gently in a steamer or microwave to prevent drying out. The scented rice powder can be stored in an airtight container for up to a month, ready to use for your next culinary creation.

    FAQ

    Can I use frozen salmon for this recipe?

    Yes, frozen salmon can be used, but make sure it is fully thawed before marinating to ensure the flavors are absorbed properly.

    Where can I find banana leaves?

    Banana leaves are often available at Asian grocery stores or specialty markets. They are typically sold fresh or frozen. If using frozen, allow them to thaw before use.

    How can I tell when the salmon is fully cooked?

    The salmon is done when it flakes easily with a fork and has a light pink color throughout. Cooking times may vary slightly depending on the thickness of the fillets.

    Nutrition

    This dish is rich in omega-3 fatty acids, thanks to the salmon, and it offers a balanced profile of protein and healthy fats. The aromatic spices add flavor without the need for excessive salt or sugars, making it a heart-healthy choice. Adjust the oil and soy sauce quantities if you are monitoring your sodium or fat intake.

    Conclusion

    Salmon in banana leaf is more than just a meal—it’s an experience. With its rich flavors and aromatic presentation, it brings a touch of tropical paradise to your dining table. Whether you’re reminiscing about past travels or dreaming of future adventures, this dish is sure to delight your senses and warm your heart. Enjoy preparing and savoring this special recipe, and don’t forget to share it with those you love, creating new memories one delicious bite at a time.

    Related update: Salmon In Banana Leaf

    Related update: Wild Salmon Cakes

  • Pasta with Peas and Italian Sausage | Made by Meaghan Moineau

    Pasta with Peas and Italian Sausage

    Intro

    There are few things more comforting than a bowl of pasta, and this recipe for Pasta with Peas and Italian Sausage holds a special place in my heart. Growing up, Sunday dinners were a cherished tradition in my family. My grandmother would spend the afternoon bustling around the kitchen, filling the house with the aroma of fresh herbs, garlic, and tomatoes. One of her signature dishes was this simple yet flavorful pasta recipe. It’s a dish that brings back memories of laughter and love shared around the dinner table, and I’m thrilled to share it with you today.

    Why You’ll Love It

    This Pasta with Peas and Italian Sausage recipe is a delightful blend of flavors and textures that come together in perfect harmony. You’ll love how the sweet and savory Italian sausage complements the freshness of the peas, all enveloped in a rich, tomato-based sauce. It’s a hearty meal that’s incredibly easy to prepare, making it perfect for busy weeknights or a cozy weekend dinner. Plus, it’s a one-pot wonder that minimizes cleanup, allowing you more time to relax and savor your meal.

    Ingredients

    • 1 lb farfalle pasta
    • 2 tablespoons olive oil
    • 4 Italian sweet sausages, casings removed
    • 1 cup frozen peas
    • 1 can (14 oz) canned tomatoes
    • 1 cup Pomi strained tomato sauce
    • 2 tablespoons butter
    • Salt and pepper to taste

    Instructions

    1. Cook the pasta following the package directions until al dente. Drain and set aside.
    2. In a very large skillet over medium heat, add the olive oil.
    3. Add the Italian sausage meat to the skillet and sauté until slightly brown all over.
    4. Stir in the frozen peas and canned tomatoes.
    5. Season with salt and pepper to taste.
    6. Lower the heat to medium and cook for another 10 to 15 minutes, allowing the flavors to meld together.
    7. Return the drained pasta to the pan and add the butter.
    8. Pour in the tomato sauce with sausage and mix well until everything is combined.
    9. Serve hot, garnished with grated Parmesan cheese if desired.

    Tips

    Here are some tips to ensure your Pasta with Peas and Italian Sausage turns out perfectly every time:

    • Use high-quality Italian sausage for the best flavor. You can choose between sweet or spicy depending on your preference.
    • If you have fresh peas on hand, feel free to use them instead of frozen peas.
    • Be sure to cook the pasta to al dente, as it will continue to cook slightly when mixed with the sauce.
    • For an extra touch of flavor, add a pinch of red pepper flakes to the sauce.

    Variations & Substitutions

    This recipe is wonderfully versatile. Here are some variations and substitutions you can try:

    • Vegetarian Version: Omit the sausage and add more vegetables like bell peppers or mushrooms.
    • Different Pasta: Feel free to swap the farfalle for another type of pasta like penne or fusilli.
    • Gluten-Free: Use your favorite gluten-free pasta to make this dish suitable for those with gluten sensitivities.

    Storage

    Leftovers can be stored in an airtight container in the refrigerator for up to 3 days. To reheat, warm gently in a skillet over medium heat, adding a splash of water if needed to loosen the sauce. This dish can also be frozen for up to 2 months. Thaw in the refrigerator overnight before reheating.

    FAQ

    Can I use fresh tomatoes instead of canned?

    Yes, fresh tomatoes can be substituted for canned. Simply chop them and cook until they break down and form a sauce. You may need to adjust the cooking time slightly to achieve the desired consistency.

    How can I make this dish spicier?

    If you prefer a spicier dish, use hot Italian sausage instead of sweet, or add a pinch of red pepper flakes to the sauce.

    What can I serve with this pasta?

    This pasta is a meal in itself, but it pairs beautifully with a simple green salad and crusty garlic bread for a complete dinner.

    Nutrition

    This dish is a hearty meal that provides a good balance of protein, carbohydrates, and fats. The peas add a nice dose of fiber and vitamins, while the sausage contributes protein and flavor. Adjustments can be made based on dietary needs or preferences, such as using turkey sausage for a leaner option.

    Conclusion

    There you have it, a heartwarming recipe for Pasta with Peas and Italian Sausage that’s sure to become a family favorite. It’s easy to see why this dish has been a staple in my family for generations. Not only is it delicious and satisfying, but it’s also a breeze to prepare, making it perfect for any occasion. I hope this recipe brings as much joy to your table as it has to mine. Enjoy!

    Related update: Pasta with Peas and Italian Sausage

    Related update: Salmon In Banana Leaf

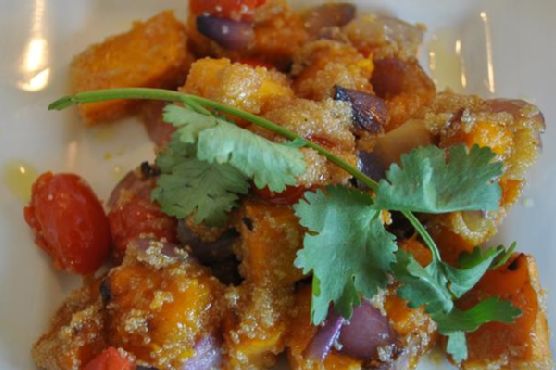
  • Amaranth and Roast Veggie Salad | Made by Meaghan Moineau

    Amaranth and Roast Veggie Salad | Made by Meaghan Moineau

    Amaranth and Roast Veggie Salad

    Intro

    There’s something magical about the aroma of vegetables roasting in the oven, the warmth of the kitchen embracing you as you anticipate the delightful meal ahead. I remember my grandmother’s kitchen, where every Sunday, she would prepare a hearty roast that filled the house with comforting scents. Her kitchen was a haven, a place where the worries of the world would melt away with each delicious bite. Inspired by those cherished moments, I’ve created a dish that combines the wholesome goodness of roasted vegetables with the unique texture of amaranth. This Amaranth and Roast Veggie Salad is my homage to those Sundays, and I’m thrilled to share it with you.

    Why You’ll Love It

    This Amaranth and Roast Veggie Salad is a delightful blend of flavors and textures. The nutty, slightly crunchy amaranth pairs perfectly with the tender, caramelized roasted vegetables. The basil-infused olive oil adds a fragrant touch, while the herbal salt enhances the natural sweetness of the vegetables. It’s a dish that’s not only delicious but also packed with nutrients, making it a perfect addition to any meal. Whether you’re a seasoned cook or a kitchen novice, you’ll find this salad both easy to prepare and deeply satisfying.

    Ingredients

    • 1 cup amaranth
    • 2 tablespoons basil-infused olive oil
    • 1 bell pepper, sliced
    • 1 cup diced pumpkin
    • 1 red onion, roughly chopped
    • A handful of rocket leaves
    • Herbal salt, to taste
    • 1 punnet baby tomatoes

    Instructions

    1. Cook the amaranth with about a cup of water. Bring it to a boil, then reduce the heat and simmer until it reaches a sticky consistency. This should take around 15-20 minutes.
    2. While the amaranth is cooking, preheat your oven to 400°F (200°C).
    3. Cut the red onion roughly into chunks and dice the pumpkin into bite-sized pieces.
    4. Add the onion and diced pumpkin to a tinfoil-lined baking tray.
    5. Drizzle the vegetables with basil-infused olive oil and sprinkle with herbal salt and pepper.
    6. Place the tray in the hot oven and roast for about 25-30 minutes, or until the edges of the pumpkin become crispy.
    7. Just before the veggies are done roasting, add the baby tomatoes to the tray and return to the oven for an additional 5 minutes.
    8. Once the vegetables are roasted, remove them from the oven and coat them with the cooked amaranth.
    9. Tear a few rocket leaves and add them to the mixture.
    10. Toss everything together gently, serve warm, and enjoy your unusual roast veggie salad!

    Tips

    For the best results, use fresh, seasonal vegetables. If you’re in a hurry, you can prepare the amaranth in advance and simply reheat it when you’re ready to assemble the salad. Don’t hesitate to adjust the seasoning to your taste—more herbal salt can bring out the flavors even more.

    Variations & Substitutions

    If you can’t find amaranth, quinoa is a great substitute that will give you a similar texture. For a bit of heat, consider adding a pinch of chili flakes to the roasted vegetables. You can also vary the veggies based on what you have on hand; zucchini or sweet potatoes would be excellent additions.

    Storage

    This salad is best enjoyed fresh, but any leftovers can be stored in an airtight container in the refrigerator for up to 2 days. When reheating, try to do so gently to maintain the texture of the vegetables.

    FAQ

    Can I make this salad in advance?

    Yes, you can prepare the components of the salad ahead of time. Cook the amaranth and roast the vegetables, then store them separately in the refrigerator. When you’re ready to serve, warm them slightly and toss everything together with the rocket leaves.

    Is this salad gluten-free?

    Absolutely! Amaranth is a naturally gluten-free grain, making this salad a perfect option for those with gluten sensitivities.

    What can I serve with this salad?

    This salad is versatile and pairs well with grilled chicken, fish, or even a simple lentil soup for a complete meal. It’s also an excellent side dish for a larger dinner spread.

    Nutrition

    This Amaranth and Roast Veggie Salad is not only flavorful but also nutritious. Amaranth is a great source of protein and fiber, while the roasted vegetables provide essential vitamins and minerals. The addition of olive oil offers healthy fats, making this a well-rounded, wholesome dish.

    Conclusion

    Creating this Amaranth and Roast Veggie Salad is like taking a comforting journey back to simpler times, where the kitchen was filled with warmth and love. It’s a dish that brings together the best of both worlds: a touch of nostalgia and a healthy, modern twist. I hope this salad finds a cherished place at your table, just as it has in mine. Enjoy every bite!

    Related update: Amaranth and Roast Veggie Salad

    Related update: Pasta with Peas and Italian Sausage

    Related update: Dairy Free Chicken Salad

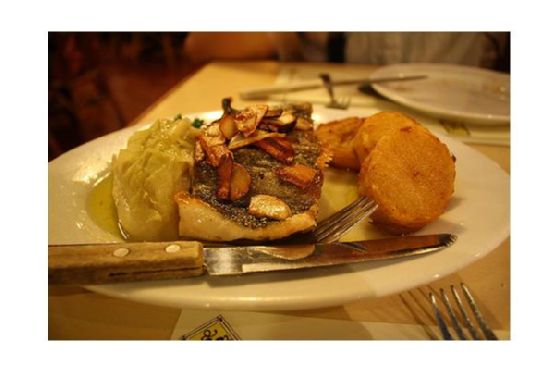
  • Bacalhau Macau | Made by Meaghan Moineau

    Bacalhau Macau | Made by Meaghan Moineau

    Bacalhau Macau: A Delicious Journey to Flavorful Memories

    Intro

    Growing up, weekends at my grandmother’s house were always a culinary adventure. Her kitchen was filled with the fragrant aroma of traditional dishes, each telling its own story. One of my favorites was Bacalhau Macau, a delightful fusion dish that combines the rich heritage of Portuguese and Asian cuisines. The crispy, golden fish cakes with their fluffy interiors never failed to bring the family together at the dinner table, filled with laughter and love. Today, I’m excited to share this cherished recipe with you, bringing a piece of my childhood to your home.

    Why You’ll Love It

    Bacalhau Macau is more than just a recipe; it’s an experience. The combination of salt cod and creamy potatoes creates a wonderful texture, while the addition of cilantro, green onion, and ginger infuses the dish with vibrant flavors. The lightness of the whipped cream balances the savory notes, and the crunchy breadcrumb coating provides the perfect finishing touch. It’s a dish that will transport your taste buds and impress your guests with its unique blend of cultures.

    Ingredients

    • Japanese breadcrumbs
    • Butter
    • Cilantro
    • Egg
    • Egg white
    • Garlic
    • Ginger
    • Green onion
    • Russet (Idaho) potato
    • Oil-cured olives
    • Salt
    • Salt cod fillets
    • Sesame oil
    • Whipping cream
    • White pepper

    Instructions

    1. Place the cod in a bowl and cover with cold water. Soak for 6 to 8 hours, changing the water once or twice. Drain, rinse very well, and pat dry. Shred the fish with your fingers.
    2. Pour 3 inches of water into a medium saucepan and bring to a boil. Add the diced potatoes and cook until tender, about 10 to 12 minutes. Drain the potatoes and return them to the pan briefly to evaporate excess moisture. Mash the potatoes until smooth, then whisk in the butter.
    3. Stir the cod into the mashed potatoes. Add the green onion, cilantro, olives, egg white, sesame oil, salt, garlic, ginger, and pepper. Mix well.
    4. In a chilled bowl, whip the cream until it holds soft peaks. Gently fold the whipped cream into the cod mixture with a rubber spatula.
    5. Using two large soup spoons, form about 3 tablespoons of the cod-potato mixture into an oval fish cake. Set the cod cake on a baking sheet and repeat with the remaining potato mixture.
    6. Spread the breadcrumbs on a plate. Beat the egg in a wide, shallow bowl. Dip each cod cake into the egg, turning gently to coat all sides. Allow any excess egg to drip back into the bowl, then roll the cake in breadcrumbs to coat all sides. Set the coated fish cakes on a baking sheet.
    7. Place a large skillet over medium heat and pour in 1/4 inch of vegetable oil. When the oil is hot, add as many of the fish cakes to the skillet as will fit without touching each other. Cook, turning once, until golden brown, about 5 to 7 minutes. Remove the fish cakes with a slotted spoon and drain them on paper towels. Repeat with the remaining cod cakes, if necessary.
    8. Serve warm and enjoy your Bacalhau Macau.

    Tips

    To ensure the best results, make sure to thoroughly soak and rinse the salt cod to remove excess saltiness. Chilling the whipped cream and bowl helps achieve the perfect consistency. Don’t overcrowd the pan when frying the cakes to ensure even browning.

    Variations & Substitutions

    If you’re looking to experiment, consider adding a touch of chili for some heat or swapping the cilantro for parsley for a milder flavor. For a gluten-free version, substitute the Japanese breadcrumbs with gluten-free breadcrumbs or crushed rice crackers.

    Storage

    Leftover Bacalhau Macau can be stored in an airtight container in the refrigerator for up to 3 days. To reheat, place the cakes in a preheated oven at 350°F (175°C) for 10 minutes or until heated through. Avoid microwaving to maintain the crispy texture.

    FAQ

    Can I use fresh cod instead of salt cod?

    While the traditional recipe uses salt cod, you can use fresh cod for a less salty version. However, the unique flavor of Bacalhau Macau comes from the preserved fish, so the taste will differ slightly.

    What can I serve with Bacalhau Macau?

    Bacalhau Macau pairs beautifully with a simple green salad, steamed vegetables, or even a tangy lemon aioli for dipping.

    Nutrition

    This recipe yields 4 servings. Each serving contains approximately:

    • Calories: 420
    • Protein: 25g
    • Carbohydrates: 35g
    • Fat: 20g
    • Fiber: 3g
    • Sodium: 580mg

    Please note that these values are approximate and can vary based on specific ingredients used.

    Conclusion

    Bacalhau Macau is a delightful dish that brings a taste of the past into the present, blending cultural influences into a comforting and delicious meal. Whether you’re sharing it with family or introducing it to friends, it’s sure to become a favorite. I hope this recipe brings as much joy to your table as it does to mine, creating new memories with every bite. Enjoy!

    Related update: Bacalhau Macau