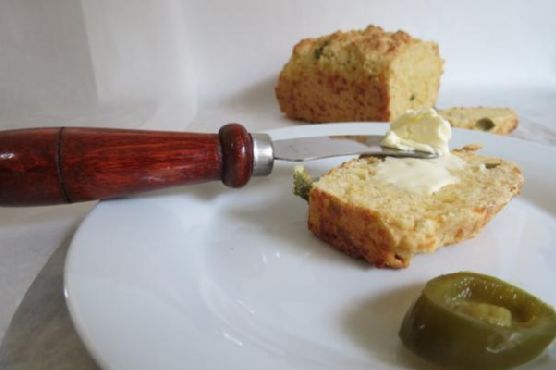
Tag: Meaghan Moineau

  • Almond and cranberry shortbread | Made by Meaghan Moineau

    Almond and cranberry shortbread | Made by Meaghan Moineau

    Almond and Cranberry Shortbread

    Growing up, the holiday season in our home was synonymous with the aroma of freshly baked cookies wafting through the air. My mother would spend countless hours in the kitchen, her apron dusted with flour, crafting the most beautiful and delicious shortbread cookies. One of my all-time favorites was her almond and cranberry shortbread, a delightful combination of buttery goodness and the tart sweetness of cranberries. Today, I’m thrilled to share this treasured recipe with you, so you can create your own sweet memories.

    Why You’ll Love It

    This almond and cranberry shortbread recipe is a true delight for the senses. The buttery richness of the shortbread pairs wonderfully with the tartness of dried cranberries and the nutty crunch of almonds. These cookies are perfect for holiday gatherings, afternoon tea, or as an indulgent treat just for you. What makes this recipe even more special is its simplicity—requiring just a few ingredients and some easy steps, you’ll have a batch of homemade cookies ready to enjoy in no time. Plus, these cookies have a perfect balance of flavors and textures that are bound to impress anyone who takes a bite.

    Ingredients

    • 1 cup unsalted butter, softened
    • 3/4 cup icing sugar
    • 2 large egg yolks
    • 1 tablespoon lemon juice
    • 2 cups all-purpose flour
    • 1/2 cup finely chopped almonds
    • 1/2 cup dried cranberries
    • 1/3 cup blanched almonds, finely chopped (for rolling)

    Instructions

    1. Cream the butter for about 5 minutes until fluffy.
    2. Add icing sugar and continue beating until the mixture is shiny and smooth.
    3. Add the egg yolks and lemon juice, whisking until fully incorporated.
    4. Mix the flour and chopped almonds, then gradually add to the butter mixture, mixing until the dough reaches the consistency of a thick paste. Be careful not to overmix.
    5. By hand, knead in the dried cranberries.
    6. Divide the dough into two equal parts, shaping each into a 20-22 cm long roll.
    7. Roll each dough roll in the finely chopped blanched almonds.
    8. Wrap each roll in aluminum foil, twisting the ends, and refrigerate for several hours or preferably overnight.
    9. Preheat the oven to 180°C (350°F).
    10. Remove the foil from one roll of dough and place it on a cutting board. Keep the other roll in the refrigerator until ready to use.
    11. Using a sharp knife, cut the roll into 5-6 mm wide slices.
    12. Place the slices well apart on a baking sheet lined with parchment paper.
    13. Bake the cookies for about 12 minutes, being careful not to burn them. Let them cool on the sheet for about 5 minutes before transferring to a rack to cool completely.
    14. Repeat with the second roll of dough.

    Tips

    For best results, ensure your butter is at room temperature before starting the recipe. This will help it cream better and give you a smoother dough. When slicing the dough, use a sharp knife to get clean cuts. If you notice the dough is too hard to slice, allow it to warm up slightly outside the refrigerator. To enhance the flavor, you can toast the chopped almonds lightly before mixing them into the dough.

    Variations & Substitutions

    If you’re looking to switch things up, consider substituting dried cherries or apricots for the cranberries. For a different nutty flavor, try using pistachios or pecans instead of almonds. If you prefer a gluten-free version, you can replace the all-purpose flour with a gluten-free flour blend. Additionally, adding a teaspoon of vanilla extract to the dough can provide a lovely depth of flavor.

    Storage

    Store these almond and cranberry shortbread cookies in an airtight container at room temperature for up to one week. If you want to keep them fresh for longer, consider storing them in the refrigerator. These cookies also freeze well; just place them in a freezer-safe bag or container, and they’ll keep for up to three months. Simply thaw at room temperature before serving.

    FAQ

    Can I use salted butter instead of unsalted butter?

    Yes, you can use salted butter if that’s what you have on hand. Just be sure to omit any additional salt in the recipe to avoid overly salty cookies.

    Can I make the dough ahead of time?

    Absolutely! The dough can be prepared and refrigerated up to two days in advance. This makes it a convenient option for holiday prep or when you’re planning to bake multiple batches.

    Nutrition

    While I don’t have specific nutrition data for this recipe, almond and cranberry shortbread cookies are generally high in calories and fat due to the butter and almonds. However, they also offer some nutritional benefits, such as vitamin E from almonds and antioxidants from cranberries. As with any treat, enjoy them in moderation as part of a balanced diet.

    Final Thoughts

    These almond and cranberry shortbread cookies are more than just a delicious treat; they are a piece of my childhood, a reminder of cozy holiday seasons filled with warmth and love. I hope this recipe brings the same joy and cherished memories to your home. Whether you’re baking them for family, friends, or yourself, these cookies are sure to be a hit. Happy baking!

    Related update: Almond and cranberry shortbread

    Related update: Chocolate Spelt Cake

  • Chicken Liver Salad | Made by Meaghan Moineau

    Chicken Liver Salad | Made by Meaghan Moineau

    Chicken Liver Salad: A Warm and Hearty Delight

    There’s something inherently comforting about the aromas wafting through the kitchen as chicken livers sizzle with onions and bacon. This Chicken Liver Salad takes me back to Sunday afternoons at my grandmother’s house. She would whip up a batch of this savory salad while recounting stories from her childhood. The combination of rich, tender chicken livers with the crisp freshness of Boston lettuce was, and still is, my favorite part of those cherished family gatherings.

    Why You’ll Love It

    This Chicken Liver Salad is more than just a dish; it’s a sensory experience. The savory, slightly tangy flavor of the chicken livers, when combined with crispy bacon and balsamic vinegar, creates a taste explosion. Besides its delightful flavors, this salad is also packed with nutrients, making it a wholesome option for those who want to enjoy a hearty meal without compromising on health. It’s simple to make, requiring only a handful of ingredients and minimal preparation time, yet it never fails to impress both family and guests alike.

    Ingredients

    • Bacon
    • Balsamic vinegar
    • Boston lettuce
    • Chicken livers
    • Olive oil
    • Onion
    • Salt and pepper

    Instructions

    1. In a large skillet, heat the olive oil over medium-high heat.
    2. Add the sliced onion and bacon to the skillet, sautéing until the bacon is slightly crisp and the onions are soft.
    3. Add the chicken livers to the skillet, stirring well to combine with the bacon and onions.
    4. Pour in the balsamic vinegar, allowing the livers to simmer slowly. Stir occasionally, and add more vinegar if necessary to keep the mixture moist.
    5. Once the livers are cooked through and tender, season with salt and pepper to taste.
    6. Arrange a bed of Boston lettuce on a serving platter, and spoon the warm liver mixture over the top.
    7. Serve immediately, ensuring each plate has a generous portion of both liver mixture and lettuce.

    Tips

    For the best results, use fresh chicken livers and make sure to clean them thoroughly before cooking. If you’re not a fan of balsamic vinegar, you can substitute it with red wine vinegar for a slightly different flavor profile. Make sure to taste as you go, adjusting the seasoning according to your preference. To add an extra layer of texture, consider topping the salad with toasted nuts, such as walnuts or pine nuts.

    Variations & Substitutions

    There are numerous ways to tweak this recipe to better suit your palate or dietary needs:

    • Vegetarian Option: Replace chicken livers with grilled portobello mushrooms for a vegetarian-friendly version.
    • Different Greens: Swap Boston lettuce for arugula or spinach for a peppery or more robust flavor.
    • Additional Vegetables: Incorporate roasted red peppers or cherry tomatoes for a burst of color and sweetness.
    • Herbs: Add fresh herbs like thyme or rosemary to enhance the aromatic profile of the dish.

    Storage

    If you have leftovers, store the chicken liver mixture separately from the lettuce to prevent it from becoming soggy. Place the liver mixture in an airtight container and refrigerate for up to two days. Reheat gently in a skillet before serving over fresh lettuce. Note that the texture of the liver might change slightly upon reheating, but the flavors will remain delightful.

    FAQ

    Can I prepare this dish in advance?

    While you can prepare the liver mixture a day ahead, it’s best to serve the salad fresh to retain the crispness of the lettuce. Reheat the liver mixture just before serving.

    Is chicken liver healthy?

    Yes, chicken liver is a rich source of protein, iron, and various vitamins, including vitamin A and B12. It can be a nutritious addition to your diet when consumed in moderation.

    Nutrition

    Chicken Liver Salad is a nutrient-dense dish, offering a substantial amount of protein and essential vitamins. A serving provides approximately:

    • Calories: 250
    • Protein: 20g
    • Fat: 15g
    • Carbohydrates: 8g
    • Iron: 10mg

    Please note that these values are estimates and can vary based on specific brands and preparation methods.

    Final Thoughts

    This Chicken Liver Salad is more than just a meal; it’s a journey back to simpler times filled with love, laughter, and delicious food. It’s a testament to how traditional recipes can still hold a special place in our modern lives. Whether you’re a fan of chicken livers or looking to try something new, this salad is a delightful way to enjoy a nutritious and flavorful meal. Gather your loved ones, share stories, and enjoy this comforting dish together.

    Related update: Chicken Liver Salad

    Related update: Crab Cakes Rockefeller

    Related update: Easy Tabouleh

  • Chocolate and Szechuan Peppercorn Brownies | Made by Meaghan Moineau

    Chocolate and Szechuan Peppercorn Brownies | Made by Meaghan Moineau

    Chocolate and Szechuan Peppercorn Brownies

    Welcome to a delicious and adventurous twist on a classic dessert recipe! These Chocolate and Szechuan Peppercorn Brownies are not just any brownies—they’re a bold combination of rich chocolate and a hint of spice, taking your taste buds on a journey they won’t forget. This recipe is a personal favorite, inspired by a childhood memory of my grandmother’s kitchen, where the smell of chocolate always meant something special was baking. I remember one chilly winter afternoon when she surprised us with a batch of brownies infused with spices, and I’ve been hooked on the combination ever since. Today, I share a modern take on that nostalgic treat.

    Why You’ll Love It

    These brownies are a delightful fusion of sweet and spicy, perfect for chocolate lovers looking to explore new flavors. The Szechuan peppercorns add a subtle, tingly spice that complements the deep chocolate richness beautifully. Not only are they unique, but they also have a gorgeous, fudgy texture that melts in your mouth. Whether you’re sharing them at a gathering or enjoying a quiet night in, these brownies are sure to impress.

    Ingredients

    • 1 cup brown sugar
    • 1/2 cup butter
    • 1 cinnamon stick
    • 2 large eggs
    • 1 tablespoon espresso
    • 3/4 cup all-purpose flour
    • 1/2 cup granulated sugar
    • 1/2 cup heavy cream
    • 1 teaspoon kosher salt
    • 1/4 cup milk
    • 1 tablespoon Szechuan peppercorns
    • 1 cup semisweet chocolate chips
    • 4 ounces unsweetened chocolate
    • 1/4 cup unsweetened cocoa powder
    • 1 teaspoon vanilla extract

    Instructions

    1. Preheat your oven to 350°F (175°C). Grease an 8×8 inch baking dish and set aside.
    2. In a large sauté pan over medium heat, melt the butter. Add the Szechuan peppercorns and the cinnamon stick.
    3. Meanwhile, in a double boiler or microwave, melt the unsweetened chocolate and semisweet chocolate together.
    4. Stir the espresso into the melted chocolate.
    5. Once the butter stops foaming and you can see browned bits at the bottom of the pan (about 5 minutes), take it off the heat and remove the peppercorns and cinnamon stick. It may be easier to strain the contents of the pan and then return just the butter to it.
    6. Stir the brown sugar, granulated sugar, milk, vanilla, and salt into the butter in the pan.
    7. Then stir in the cocoa powder and chocolate and espresso mixture.
    8. Beat in the eggs, and then lastly, stir in the flour until just combined.
    9. Pour the batter into the greased pan and bake for about 25-30 minutes, until a tester comes out clean. Feel free to underbake them a bit for a fudgy texture.
    10. Once the brownies are cooled, spread the ganache over the top. I like to put them in the refrigerator to firm up the ganache.
    11. To make the ganache, bring the heavy cream and peppercorns to a simmer in a small pot. Strain the peppercorns and stir in the semisweet chocolate chips until smooth.

    Tips

    For the best results, ensure all your ingredients are at room temperature before starting. This will help them blend together more smoothly. Also, be sure to watch the butter closely as it browns; the nutty flavor it develops is crucial to the depth of the brownie flavor. Finally, don’t skip on straining the peppercorns—they add flavor but are not pleasant to bite into directly.

    Variations & Substitutions

    If you’re not a fan of Szechuan peppercorns or can’t find them, you can substitute with a pinch of cayenne pepper for a different kind of heat. For a nutty twist, consider adding a handful of toasted walnuts or pecans to the batter before baking. For a more indulgent dessert, serve the brownies warm with a scoop of vanilla ice cream on top.

    Storage

    Store these brownies in an airtight container at room temperature for up to 3 days. For longer storage, you can refrigerate them for up to a week or freeze them for up to 3 months. If freezing, wrap them tightly in plastic wrap and place them in a freezer-safe bag.

    FAQ

    Can I make these brownies gluten-free?

    Yes! You can substitute the all-purpose flour with a 1:1 gluten-free baking blend. Ensure the blend you choose is designed to replace regular flour in baking.

    What can I use if I don’t have a double boiler?

    If you don’t have a double boiler, you can melt the chocolate in a microwave-safe bowl. Heat in short bursts of 20-30 seconds, stirring in between until smooth and melted.

    How can I make these brownies vegan?

    To make these brownies vegan, substitute the butter with a plant-based alternative, use a flax egg in place of regular eggs, and ensure your chocolate is dairy-free.

    Nutrition

    Each brownie (based on 12 servings) is approximately 250 calories, with 15g of fat, 30g of carbohydrates, and 4g of protein. Please note that these values are approximate and can vary depending on the specific ingredients used.

    Final Thoughts

    These Chocolate and Szechuan Peppercorn Brownies are a delightful and unique treat that will surely become a favorite for adventurous dessert lovers. The combination of rich chocolate with a hint of spicy warmth is irresistible and perfect for any occasion. I hope you enjoy baking and sharing these brownies as much as I do. Let me know how they turned out for you, and feel free to share your own variations in the comments!

    Related update: Chocolate and Szechuan Peppercorn Brownies

    Related update: Almond and cranberry shortbread

  • Sweet and Spicy Country-Style Ribs | Made by Meaghan Moineau

    Sweet and Spicy Country-Style Ribs | Made by Meaghan Moineau

    Sweet and Spicy Country-Style Ribs

    There’s something incredibly comforting about the aroma of ribs slowly cooking in a rich, spicy sauce. This recipe for Sweet and Spicy Country-Style Ribs brings back memories of long summer evenings spent with family in the backyard, the air filled with laughter and the tantalizing smell of barbecue wafting through the air. When I was a child, my grandfather would often prepare ribs for our family gatherings, and I remember watching him patiently tend to the grill, basting the ribs with a secret sauce he had perfected over the years. This recipe is inspired by those cherished memories, with a modern twist that adds a little extra kick.

    Why You’ll Love It

    These Sweet and Spicy Country-Style Ribs are a perfect blend of flavors that will satisfy both your sweet and savory cravings. The rich tomato sauce is balanced with the sweetness of honey and the tang of apple cider vinegar, while a touch of cayenne pepper and hot sauce adds just the right amount of heat. This dish is perfect for any occasion, whether you’re hosting a barbecue, enjoying a Sunday family dinner, or simply looking to treat yourself to a delicious homemade meal.

    Ingredients

    • 2 lbs beef short ribs
    • 2 tablespoons vegetable oil
    • 1 large yellow onion, diced
    • 2 cloves garlic, minced
    • 2 tablespoons unsalted butter
    • 1 cup tomato sauce
    • 1/4 cup apple cider vinegar
    • 3 tablespoons honey
    • 2 tablespoons hot sauce
    • 1/2 teaspoon cayenne pepper
    • 1 tablespoon ancho chili powder
    • 1 teaspoon salt
    • 1 teaspoon dry mustard
    • Vegetable scraps – carrot, celery, etc.
    • 3 cups beef stock
    • Water, as needed

    Instructions

    1. Heat the vegetable oil in a 6-quart enameled Dutch oven over medium-high heat. Brown the ribs on all sides.
    2. Pour in the beef stock; add water to cover if necessary. Add the vegetable scraps and bring to a boil. Lower the heat to a simmer, cover, and cook for 45 minutes to an hour, or until the ribs are tender.
    3. While the ribs are braising, melt the unsalted butter in a large cast-iron skillet over medium-low heat. Sauté the onions until soft, then add the garlic and sauté for another minute more.
    4. Stir in the tomato sauce, apple cider vinegar, honey, hot sauce, cayenne pepper, ancho chili powder, salt, and dry mustard. Bring the mixture to a boil, then reduce the heat and simmer uncovered for 25 minutes, stirring occasionally.
    5. When the ribs are tender, remove them from the braising liquid and add them to the spicy tomato sauce in the skillet.
    6. Raise the heat and cook, stirring frequently, until the sauce has glazed the ribs, about 10 minutes.
    7. Serve the ribs with the remaining sauce on the side, if desired.

    Tips

    To ensure the ribs are perfectly tender, make sure to simmer them gently and check for doneness by inserting a fork; it should slide in easily. If you find the ribs are tough, allow them to simmer a bit longer. Also, don’t rush the sauce; letting it simmer slowly allows the flavors to meld beautifully.

    Variations & Substitutions

    If you prefer a milder flavor, you can reduce the amount of cayenne pepper or omit the hot sauce altogether. For a different twist, try using maple syrup instead of honey for a deeper sweetness, or substitute red wine vinegar for apple cider vinegar for a more robust flavor. If you don’t have beef short ribs, pork ribs can be an excellent alternative.

    Storage

    Leftover ribs can be stored in an airtight container in the refrigerator for up to 3 days. To reheat, place the ribs in a baking dish, cover with foil, and warm them in a preheated oven at 350°F (175°C) until heated through. You can also freeze the ribs for up to 2 months; just make sure to thaw them in the refrigerator before reheating.

    FAQ

    Can I make these ribs in advance?

    Absolutely! You can prepare the ribs and sauce a day ahead, then store them separately in the refrigerator. When you’re ready to serve, simply reheat the ribs, combine them with the sauce, and let them cook together until the sauce is perfectly glazed.

    What side dishes go well with these ribs?

    These Sweet and Spicy Country-Style Ribs pair wonderfully with classic barbecue sides like coleslaw, cornbread, or baked beans. For a lighter option, a simple green salad or roasted vegetables would also complement the flavors nicely.

    Nutrition

    While specific nutritional values can vary based on the exact ingredients and serving sizes, a general serving of these ribs provides a hearty amount of protein, along with essential vitamins and minerals from the vegetables and spices. If you’re watching your sodium intake, you may wish to reduce the added salt or choose a low-sodium beef stock.

    Final Thoughts

    These Sweet and Spicy Country-Style Ribs are more than just a meal; they’re a way to bring people together. Whether you’re reminiscing about family gatherings or creating new memories, this dish offers a delightful blend of flavors that are sure to impress. So gather your loved ones, roll up your sleeves, and dive into these delicious ribs. Enjoy every sticky, savory-sweet bite!

    Related update: Sweet and Spicy Country-Style Ribs

  • Mixed Paella | Made by Meaghan Moineau

    Mixed Paella | Made by Meaghan Moineau

    Delicious Mixed Paella: A Taste of Spain in Your Kitchen

    Remember those long summer evenings when the family would gather around a large, vibrant dish, the aroma of saffron filling the air? Mixed Paella has always been a dish of celebration for me. Growing up, my family would often host get-togethers, and my mother would prepare this dish with love and enthusiasm. The sizzle of chorizo in the pan and the vibrant colors of fresh vegetables and seafood always created a symphony of flavors that we couldn’t resist. Today, I’m excited to share this cherished recipe with you, hoping it will bring as much joy to your table as it has to mine.

    Why You’ll Love It

    This Mixed Paella recipe is an ideal blend of land and sea, bringing together a rich tapestry of flavors and textures. The rice soaks up the robust taste of saffron and broth, while the seafood adds a delightful freshness. The crispy chorizo introduces a smoky depth that ties the dish together perfectly. Whether you’re a novice cook or a seasoned chef, this dish is both accessible and impressive, making it perfect for family dinners and special occasions alike.

    Ingredients

    • Bay leaf
    • Chicken broth
    • Chorizo sausage
    • Extra virgin olive oil
    • White fish
    • Garlic
    • Lemon
    • Lemon zest
    • Mussels
    • Spanish onion
    • Parsley
    • Peas
    • Red bell pepper
    • Crushed red pepper flakes
    • Dry rice
    • Saffron threads
    • Shrimp
    • Thyme

    Instructions

    1. In a very large non-stick skillet or paella pan preheated over medium-high heat, add 2 teaspoons of your olive oil (you will need more oil if you’re not using non-stick), garlic, red pepper flakes, and rice. Sauté for about 3 minutes.
    2. Add saffron, thyme, bay leaf, and chicken broth and bring to a boil. Cover and reduce the heat to a simmer. Leave covered, do not stir.
    3. In another non-stick skillet, heat to medium-high. Add chorizo and crumble as you sauté. When the sausage is cooked through, add red pepper and onion. Salt and pepper to taste if needed. Sauté until the onion is tender, then remove from heat and set aside.
    4. When the rice is nearly done (about 15 minutes), add fish and shrimp and press into the rice. Add mussels, peas, and sprinkle with lemon zest. Cover and continue to simmer until the rice is done and the mussels have opened. Discard any that do not open.
    5. Top with the chorizo mixture and parsley. Serve with lemon wedges and crusty bread.

    Tips

    For the best results, use a paella pan if you have one, as its wide and shallow shape allows the rice to cook evenly. Remember not to stir the rice once the liquid has been added; this ensures the classic paella texture. Use fresh seafood for the best flavor, and don’t skimp on the saffron—it truly is the soul of this dish.

    Variations & Substitutions

    If you’re looking to customize your paella, consider these variations:

    • Vegetarian Option: Replace the seafood and chorizo with a variety of mushrooms and artichokes for a hearty vegetarian version.
    • Meat Lovers: Add some diced chicken thighs or rabbit for a more traditional take on paella Valenciana.
    • Spice It Up: If you enjoy a kick of heat, increase the amount of crushed red pepper flakes or add a splash of hot sauce.

    Storage

    Leftover paella can be stored in an airtight container in the refrigerator for up to 3 days. To reheat, add a splash of water or broth and warm slowly over low heat to maintain the dish’s moist texture. Avoid using the microwave as it can dry out the rice.

    FAQ

    Can I make paella in advance?

    Yes, you can prepare the components in advance, such as cooking the chorizo and chopping the vegetables. However, for the best flavor and texture, it’s recommended to cook the rice and assemble the dish just before serving.

    What type of rice should I use for paella?

    Short-grain rice, such as Bomba or Arborio, is ideal for paella as it absorbs the liquid well without becoming mushy. Avoid using long-grain rice as it doesn’t provide the traditional paella texture.

    Can I use frozen seafood?

    While fresh seafood is preferred for the best flavor, you can use frozen seafood in a pinch. Just ensure it is fully thawed and drained before adding to the paella to avoid excess moisture.

    Nutrition

    This Mixed Paella is a balanced dish, providing a good source of protein from the seafood and chorizo, and plenty of vitamins and minerals from the vegetables. Saffron is known for its antioxidant properties, and the olive oil adds heart-healthy fats.

    Final Thoughts

    Mixed Paella is more than just a dish; it’s a celebration of flavors and cultures, a reminder of family gatherings and joyous occasions. With its vibrant colors and rich flavors, it’s sure to become a favorite in your household. I hope this recipe brings warmth and happiness to your table, just as it has to mine. Bon appétit!

    Related update: Mixed Paella

    Related update: Sweet and Spicy Country-Style Ribs

  • Mediterranean semolina cake | Made by Meaghan Moineau

    Mediterranean semolina cake | Made by Meaghan Moineau

    Mediterranean Semolina Cake

    There’s something magical about family recipes passed down through generations, and this Mediterranean semolina cake is no exception. I vividly remember the first time I tasted this cake at my grandmother’s sunny kitchen table. The sweet aroma of citrus and honey wafted through the room as she sliced into the tender cake, revealing a delightful medley of almonds and raisins. Each bite was a little piece of sunshine, and I felt instantly connected to my roots. Today, I’m thrilled to share this cherished recipe with you, hoping it brings as much joy to your table as it has to mine.

    Why You’ll Love It

    This Mediterranean semolina cake is a delightful blend of flavors and textures that are sure to win you over. Here’s why you’ll love it:

    • Unique Texture: Made with semolina and almond meal, this cake has a wonderfully unique, slightly coarse texture that is both moist and tender.
    • Rich Flavor: The combination of citrus zest, olive oil, and honey syrup creates a rich, aromatic flavor profile that’s distinctly Mediterranean.
    • Nutritious Ingredients: With wholesome ingredients like almonds, yoghurt, and olive oil, this cake is a healthier alternative to many traditional desserts.
    • Versatile and Adaptable: Whether you’re serving it as a dessert, a teatime treat, or even for breakfast, this cake is versatile enough to suit any occasion.
    • Easy to Make: This recipe is straightforward and perfect for bakers of all skill levels.

    Ingredients

    • 1 cup sugar
    • 3 large eggs
    • 1 cup plain yoghurt
    • Zest of 1 lemon
    • Zest of 1 orange
    • 1 cup almond meal
    • 1 cup semolina
    • 2 teaspoons baking powder
    • 1/2 cup olive oil
    • 1/4 cup almonds, roughly chopped
    • 1/4 cup raisins
    • 1/4 cup dry cranberries
    • 1/2 cup honey
    • Juice of 1 orange

    Instructions

    1. Preheat your oven to 180°C (160°C fan) and line a 20-23cm round baking tin with baking paper, or use a silicone mold.
    2. In a mixer, whisk the eggs and sugar together until the mixture is thick and pale in color.
    3. Add the yoghurt, lemon zest, and orange zest to the egg mixture. Mix until well combined.
    4. Gradually add the almond meal, semolina, and baking powder to the wet ingredients. Mix until just combined.
    5. Slowly incorporate the olive oil into the batter, mixing until smooth.
    6. Pour the batter into the prepared baking tin and smooth the top with a spatula.
    7. Bake in the preheated oven for 35 minutes, or until a skewer inserted into the center of the cake comes out clean.
    8. While the cake is baking, prepare the syrup by adding the chopped almonds, raisins, cranberries, honey, and orange juice to a pot. Bring to a boil and cook for 1-2 minutes.
    9. Remove the cake from the oven and pierce it all over with a skewer.
    10. Pour the prepared syrup evenly over the warm cake. Allow it to soak in and cool slightly before serving.

    Tips

    • Measure Carefully: Precise measurements ensure the perfect texture. Use a kitchen scale if possible.
    • Room Temperature Ingredients: Make sure your eggs and yoghurt are at room temperature for a smoother batter.
    • Don’t Overmix: Mix the ingredients until just combined to avoid a dense cake.
    • Cooling Time: Allow the cake to cool slightly before slicing to ensure it holds together well.

    Variations & Substitutions

    • Nuts: Substitute walnuts or pistachios for almonds for a different flavor.
    • Dried Fruits: Use chopped dried apricots or figs instead of raisins and cranberries.
    • Citrus: Swap lime zest for lemon for a different citrus note.
    • Gluten-Free: Ensure your semolina and baking powder are certified gluten-free for a gluten-free version.

    Storage

    This cake can be stored in an airtight container at room temperature for up to 3 days. For longer storage, wrap the cake tightly in plastic wrap and keep it in the refrigerator for up to a week. You can also freeze the cake for up to 3 months. To enjoy, thaw it overnight in the refrigerator or at room temperature.

    FAQ

    Can I make this cake ahead of time?

    Absolutely! This cake can be made a day in advance and stored in an airtight container. In fact, the flavors often develop and improve overnight.

    What can I serve with this cake?

    This cake pairs beautifully with a dollop of whipped cream or a scoop of vanilla ice cream. A cup of strong coffee or tea also complements its flavors perfectly.

    Is this cake suitable for special diets?

    With its wholesome ingredients, this cake can be adapted for gluten-free diets if you use certified gluten-free semolina. It is also naturally dairy-free if you substitute the yoghurt with a plant-based alternative.

    Nutrition

    This Mediterranean semolina cake offers a balance of nutrients. It’s rich in healthy fats from the olive oil and almonds, provides protein from the eggs and yoghurt, and contains natural sugars from the honey and dried fruits. While it is a sweet treat, its wholesome ingredients make it a better-for-you dessert option.

    Final Thoughts

    Baking this Mediterranean semolina cake is like taking a journey to sun-drenched coasts, where each ingredient tells a story of tradition and love. Whether you’re enjoying it with your morning coffee, serving it at a family gathering, or gifting it to a friend, this cake is sure to become a beloved favorite. I hope this recipe brings warmth and sweetness to your kitchen, just as it has to mine. Happy baking!

    Related update: Mediterranean semolina cake

    Related update: Chocolate and Szechuan Peppercorn Brownies

  • Roasted Broccoli with Lemon and Garlic | Made by Meaghan Moineau

    Roasted Broccoli with Lemon and Garlic | Made by Meaghan Moineau

    Roasted Broccoli with Lemon and Garlic

    There’s something magical about the simple yet profound combination of roasted vegetables with citrus and herbs. This Roasted Broccoli with Lemon and Garlic recipe brings a burst of flavor and a delightful crisp texture to your table. Let me take you on a journey of flavors that will transform a humble vegetable into a dish that stands out on its own.

    Why You’ll Love It

    This roasted broccoli recipe is one you’ll want to make over and over again. It’s not just about the taste; it’s about the experience it brings to the table. Growing up, I remember my grandmother’s kitchen filled with the aroma of roasted vegetables. She had a knack for making the simplest ingredients extraordinary. That nostalgic memory is what inspired this recipe. You’ll love it for its simplicity, quick preparation, and the way it elevates broccoli into something truly special.

    Ingredients

    • 1 pound of broccoli florets
    • 2 tablespoons extra virgin olive oil
    • 3 cloves of garlic, minced
    • 1/2 teaspoon black ground pepper
    • 2 tablespoons lemon juice
    • Salt to taste

    Instructions

    1. Preheat your oven to 400 degrees Fahrenheit (200 degrees Celsius).
    2. In a large mixing bowl, combine the broccoli florets, olive oil, minced garlic, salt, and black ground pepper. Toss well to ensure the broccoli is evenly coated.
    3. Spread the broccoli out in an even layer on a baking sheet. Ensure they are not overlapping to allow even roasting.
    4. Bake in the preheated oven until the broccoli is tender enough to pierce the stems with a fork, about 15 to 20 minutes.
    5. Remove the broccoli from the oven and place it in a serving bowl. Drizzle with fresh lemon juice and give it a gentle toss to combine.
    6. Serve immediately and enjoy the vibrant flavors.

    Tips

    For the best results, make sure your broccoli florets are similar in size. This ensures even cooking. Always use fresh lemon juice for that zesty punch, and feel free to adjust the garlic to your preference if you’re a garlic lover like me.

    Variations & Substitutions

    If you want to add a little heat, sprinkle some red pepper flakes before roasting. For a touch of umami, add a tablespoon of grated Parmesan cheese just before serving. If you’re out of fresh garlic, garlic powder is a feasible substitute, though fresh will always give you the best flavor.

    Storage

    Store any leftover roasted broccoli in an airtight container in the refrigerator for up to 3 days. Reheat it in an oven or air fryer to regain its crispness. Avoid microwaving as it can make the broccoli soggy.

    FAQ

    Can I use frozen broccoli instead of fresh?

    Yes, you can use frozen broccoli. Just be sure to thaw and pat it dry thoroughly to remove excess moisture before roasting. This will help achieve a crispy texture.

    What can I serve with roasted broccoli?

    Roasted broccoli is versatile and pairs well with a variety of main courses. Try it alongside grilled chicken, salmon, or a hearty pasta dish. It also works beautifully as a topping for salads or grain bowls.

    How do I prevent the broccoli from becoming too soft?

    To keep the broccoli from getting too soft, make sure not to overcrowd the pan. This allows the hot air to circulate and roast the broccoli rather than steam it.

    Nutrition

    This dish is not only delicious but also nutritious. Broccoli is a powerhouse of vitamins K and C, fiber, and numerous antioxidants. With minimal olive oil and fresh lemon juice, this recipe keeps the calorie count low while delivering maximum flavor.

    Final Thoughts

    This Roasted Broccoli with Lemon and Garlic is more than just a side dish; it’s a celebration of simple ingredients coming together to create something wonderful. Whether you’re looking to add more greens to your diet or searching for an easy weeknight side, this recipe fits the bill. Happy cooking!

    Related update: Roasted Broccoli with Lemon and Garlic

  • Strawberry Pretzel Salad | Made by Meaghan Moineau

    Strawberry Pretzel Salad | Made by Meaghan Moineau

    Strawberry Pretzel Salad

    Welcome to a delightful world of flavors with our Strawberry Pretzel Salad—a refreshing and vibrant dish that combines sweet, salty, and savory in a way that is sure to become your new favorite. This salad is not only delicious but also brings a touch of nostalgia with every bite. Let me take you on a journey back to my childhood summers at my grandmother’s house, where I first tasted the magic of strawberries and pretzels together. I remember sitting on her porch, the sun warming my face, as I enjoyed this unique combination that seemed to capture the essence of summer. Now, I am thrilled to share this cherished recipe with you.

    Why You’ll Love It

    This Strawberry Pretzel Salad is a symphony of flavors and textures. Here are a few reasons why you’ll fall in love with it:

    • Sweet and Savory Balance: The sweetness of strawberries paired with the salty crunch of pretzels creates a perfect harmony.
    • Texture Delight: Crisp cucumbers, creamy avocado, and crunchy pretzels make every bite exciting.
    • Healthy and Nutritious: Packed with greens, healthy fats, and fresh ingredients, this salad is as wholesome as it is delicious.
    • Easy to Make: With simple steps and readily available ingredients, this salad comes together in no time.
    • Versatile: Perfect as a light lunch, a side dish, or a beautiful addition to your dinner table.

    Ingredients

    • 2 cups arugula
    • 1 avocado, sliced
    • 6 slices bacon
    • 2 tablespoons balsamic vinegar
    • 1 cucumber, sliced
    • 2 tablespoons flax seed oil
    • 4 cups mixed spring greens
    • 1 red bell pepper, sliced
    • 1 cup pretzels, crushed
    • Salt and pepper to taste
    • 1 cup strawberries, sliced
    • 1 tablespoon whole grain mustard

    Instructions

    1. Preheat your oven to 300°F (150°C).
    2. Arrange the bacon slices on a baking sheet lined with tin foil.
    3. Bake the bacon for 30 minutes, turning once halfway through. Set aside and let cool.
    4. In a small bowl, combine flax seed oil, balsamic vinegar, whole grain mustard, salt, and pepper. Mix well and set aside.
    5. In a large salad bowl, place strawberries, cucumber, mixed greens, arugula, and bacon. Toss lightly to combine.
    6. Add the prepared dressing to the salad and toss to coat evenly.
    7. Divide the salad among four plates and serve topped with sliced avocado and crushed pretzels.

    Tips

    • Choose Fresh Ingredients: For the best flavor, select ripe strawberries and fresh greens.
    • Prepare Ahead: You can pre-cook the bacon and mix the dressing ahead of time to save on prep work.
    • Serving Suggestion: Pair this salad with grilled chicken or fish for a more substantial meal.

    Variations & Substitutions

    Feel free to get creative with this recipe:

    • Nuts for Crunch: Substitute pretzels with toasted almonds or pecans for a different kind of crunch.
    • Vegan Option: Omit the bacon and add grilled tofu or chickpeas for protein.
    • Seasonal Fruits: Swap strawberries for other seasonal fruits like peaches or blueberries.

    Storage

    To store leftovers, keep the salad and dressing separate in airtight containers in the refrigerator. The salad can be stored for up to 2 days. Add the dressing and pretzels just before serving to maintain freshness and crunch.

    FAQ

    Can I make this salad ahead of time?

    Yes, you can prepare the components like the bacon and dressing in advance. However, for the freshest taste, it’s best to assemble the salad just before serving.

    What can I use instead of flax seed oil?

    If you don’t have flax seed oil, you can substitute it with extra virgin olive oil or avocado oil for a similar flavor profile.

    Nutrition

    This salad is a nutritious choice, offering a good balance of healthy fats, vitamins, and fiber. The combination of greens, avocado, and strawberries provides a wealth of nutrients, while the bacon and pretzels add protein and carbohydrates to keep you satisfied.

    Final Thoughts

    This Strawberry Pretzel Salad is more than just a dish; it’s a celebration of flavors and memories. Whether you’re serving it at a family gathering or enjoying it as a rewarding meal for yourself, it is sure to bring joy and satisfaction. I hope this recipe becomes a staple in your kitchen, as it has in mine. Enjoy the delightful crunch, the burst of fruity sweetness, and the comforting savory notes in every bite. Happy cooking!

    Related update: Strawberry Pretzel Salad

    Related update: Roasted Broccoli with Lemon and Garlic

    Related update: Chicken Liver Salad

  • Cranberry Orange Biscotti | Made by Meaghan Moineau

    Cranberry Orange Biscotti | Made by Meaghan Moineau

    Cranberry Orange Biscotti: A Perfect Blend of Tangy and Sweet

    There’s something magical about the combination of cranberries and oranges. It reminds me of the chilly autumn afternoons I used to spend at my grandmother’s house, where the aroma of freshly baked cookies filled the air. She would always have a batch of biscotti ready, often experimenting with different flavors. The cranberry orange biscotti was one of her favorites, a delightful treat that paired perfectly with a warm cup of tea. Today, I’m sharing this cherished recipe with you, hoping it brings just as much warmth and joy to your home as it has to mine.

    Why You’ll Love It

    This cranberry orange biscotti is a delightful treat that’s perfect for any occasion. It combines the tartness of cranberries with the sweet, citrusy flavor of orange, making each bite an experience to savor. The biscotti is perfectly crunchy, with a hint of nuttiness from the pecans, creating a harmonious blend of textures and flavors. Whether you enjoy them with your morning coffee or as an afternoon snack, these biscotti are sure to become a favorite.

    Ingredients

    • Baking powder
    • Confectioners’ sugar
    • Dried cranberries
    • Eggs
    • Flour
    • Fresh orange juice
    • Orange zest
    • Pecans
    • Salt
    • Sugar
    • Unsalted butter
    • Vanilla extract
    • Whole wheat pastry flour

    Instructions

    1. Preheat the oven to 350°F, and position the oven racks in the upper and lower thirds positions. Line two baking sheets with parchment paper.
    2. In the bowl of an electric mixer fitted with the paddle attachment, beat the butter with the sugar on medium speed until light.
    3. Add the eggs, one at a time, beating well after each addition and stopping to scrape down the sides of the bowl as necessary.
    4. Continue to beat the mixture for 2 minutes more. Beat in the orange zest and vanilla extract.
    5. In a medium bowl, whisk together the flour, baking powder, and salt.
    6. Add the dry ingredients to the wet ingredients and mix until just incorporated.
    7. On low speed, mix in the cranberries and the pecans.
    8. Transfer the dough to a very lightly floured work surface, and divide it into 3 equal pieces.
    9. Shape each piece into a 12-inch log, spacing two of the logs apart on one of the prepared baking sheets and the third log on the second sheet.
    10. Bake the logs for 15-18 minutes, until golden on top and lightly cracked. Transfer the positions of the baking sheets halfway through the baking process.
    11. Remove the sheets from the oven and allow to rest for 10 minutes. Reduce the oven temperature to 300°F.
    12. Using a serrated knife, cut each log on the diagonal into 3/4-inch slices.
    13. Lay the slices on their sides and return the baking sheets to the oven for 10-15 minutes, or until lightly golden.
    14. Prepare the glaze: In a medium bowl, whisk together the confectioners’ sugar and enough orange juice to make a pourable glaze.
    15. Drizzle the glaze over the warm biscotti, then allow the biscotti to rest until the glaze has set.

    Tips

    For the best results, make sure to use fresh orange zest and juice to really bring out the citrus flavor. When slicing the biscotti, use a serrated knife and a gentle sawing motion to avoid crumbling. If your dough is too sticky to handle, a little extra flour dusted on your hands can help.

    Variations & Substitutions

    If you’d like to mix things up, consider adding a handful of white chocolate chips for a sweeter version. You can also substitute almonds or walnuts for the pecans if you prefer. For those looking to add a bit more spice, a pinch of cinnamon or nutmeg can complement the citrus flavors beautifully.

    Storage

    These biscotti can be stored in an airtight container at room temperature for up to two weeks. They also freeze well, so feel free to make a large batch and keep some on hand for unexpected guests or a quick treat.

    FAQ

    Can I make these biscotti gluten-free?

    Yes, you can substitute the all-purpose flour and whole wheat pastry flour with a gluten-free flour blend. Just make sure it’s suitable for baking.

    How can I tell when the biscotti are done?

    The biscotti are ready when they are golden on top and lightly cracked. During the second bake, they should be firm to the touch.

    Can I use fresh cranberries instead of dried?

    While dried cranberries provide a sweeter, more concentrated flavor, you can use fresh cranberries, though the texture and sweetness will differ. If using fresh, chop them coarsely and consider adding a bit more sugar to the dough to balance the tartness.

    Nutrition

    Each serving of cranberry orange biscotti is approximately 100 calories, with 5 grams of fat, 13 grams of carbohydrates, and 2 grams of protein. This is an estimate and can vary based on the specific brands of ingredients used.

    Final Thoughts

    These cranberry orange biscotti are more than just a treat; they’re a little slice of nostalgia and warmth that you can share with loved ones. Whether it’s during the festive season or just a regular day, these biscotti are bound to bring smiles to anyone who tries them. Happy baking!

    Related update: Cranberry Orange Biscotti

    Related update: Mediterranean semolina cake

  • Oven-Baked Feta Cheese Dip | Made by Meaghan Moineau

    Oven-Baked Feta Cheese Dip | Made by Meaghan Moineau

    Oven-Baked Feta Cheese Dip

    There’s something magical about a warm cheese dip that brings people together, and this Oven-Baked Feta Cheese Dip is no exception. I remember the first time I made this dish for my family; it was a chilly autumn evening, and we were gathered around the kitchen island, eager to dip fresh flatbread into the bubbling, cheesy goodness. The warmth and comfort of this dip have made it a staple at our family gatherings ever since. Let’s dive into why you’ll love this dish as much as we do!

    Why You’ll Love It

    This Oven-Baked Feta Cheese Dip is the epitome of comfort food. It combines the salty, tangy flavor of feta cheese with the richness of mozzarella and cheddar, all enveloped in a savory tomato sauce. It’s perfect for any occasion, whether you’re hosting a party, enjoying a game day, or simply craving a cozy night in. The best part? It’s incredibly easy to make, requiring minimal prep and only a handful of ingredients. Plus, it’s versatile enough for you to put your own spin on it!

    Ingredients

    • 8 oz feta cheese, crumbled
    • 2 cloves garlic, minced
    • 1 cup tomato sauce
    • 1 cup shredded part-skim mozzarella cheese
    • 1 cup shredded mild cheddar cheese

    Instructions

    1. Preheat your oven to 400°F (200°C).
    2. In a small oven-safe baking dish or clay pot, layer the crumbled feta cheese, covering the entire bottom of the dish.
    3. Sprinkle the minced garlic on top of the feta cheese.
    4. Spoon the tomato sauce over the cheese and garlic mixture, ensuring it’s evenly covered.
    5. In a separate bowl, mix together the mozzarella cheese and the cheddar cheese; then layer this mixture on top of the tomato sauce.
    6. Bake in the preheated oven for 15 minutes, or until the cheese is melted and bubbly.
    7. Serve warm with a side of flatbread or tortilla chips.

    Tips

    For the best results, make sure to use a high-quality feta cheese, as it will melt more smoothly and provide a richer flavor. To achieve a perfectly golden top, you can broil the dip for an additional 1-2 minutes after baking. Keep a close eye on it to prevent burning. Lastly, serving it immediately ensures you get the best texture and taste.

    Variations & Substitutions

    This recipe is incredibly adaptable! If you’re looking to add some heat, consider mixing in a teaspoon of red pepper flakes with the tomato sauce. You can also add olives, sun-dried tomatoes, or roasted red peppers for extra flavor. If you’re looking for a lower-fat option, feel free to use reduced-fat cheeses. For a vegetarian twist, sprinkle some fresh herbs like basil or parsley just before serving.

    Storage

    Any leftovers can be stored in an airtight container in the refrigerator for up to three days. To reheat, simply pop it in the oven at 350°F (175°C) until warmed through, or microwave it for a quick fix. Keep in mind that the texture of the cheese may change slightly upon reheating, but the flavor will remain delicious.

    FAQ

    Can I make this dip ahead of time?

    Absolutely! You can prepare the dip up to the baking step and store it covered in the refrigerator for up to a day. When you’re ready to serve, simply bake it according to the instructions. This makes it a perfect dish for entertaining, as you can spend more time with your guests and less time in the kitchen!

    Is there a way to make this vegan?

    Yes, you can make a vegan version by using plant-based cheese substitutes. There are many delicious vegan feta, mozzarella, and cheddar options available that melt beautifully. Pair these with a vegan-friendly garlic and tomato sauce, and you have a fantastic plant-based appetizer!

    Nutrition

    This dip is rich and indulgent, perfect for a treat. The main ingredients provide a good source of calcium and protein. However, it’s important to enjoy it in moderation due to its higher fat content. For those watching their intake, consider using reduced-fat cheeses and serving it with whole-grain flatbread or vegetable sticks for added fiber.

    Final Thoughts

    The Oven-Baked Feta Cheese Dip is more than just a dish; it’s a warm embrace on a plate. Whether you’re sharing it with family, friends, or enjoying it all to yourself, it offers a comforting and delicious experience. Easy to make and even easier to love, this dip is sure to become a favorite in your recipe collection. I hope it brings as much joy to your table as it has to mine.

    Related update: Oven-Baked Feta Cheese Dip

    Related update: Cranberry Orange Biscotti

    Related update: Guacamole