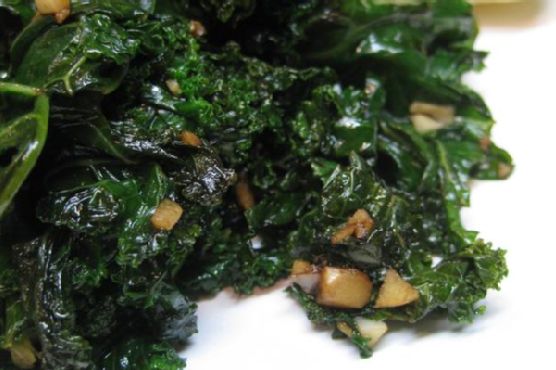
Category: Side Dish

  • Smoky Maple Chipotle Grilled Sweet Potatoes | Made by Meaghan Moineau

    Smoky Maple Chipotle Grilled Sweet Potatoes | Made by Meaghan Moineau

    Smoky Maple Chipotle Grilled Sweet Potatoes

    Imagine the aroma of sweet potatoes sizzling on the grill, their natural sugars caramelizing into golden-brown perfection. The air is filled with a hint of smokiness, a whisper of maple, and a bold, chipotle kick that promises an unforgettable flavor journey. This isn’t just another side dish; it’s a sensory celebration that transforms humble sweet potatoes into the star of your meal.

    Personal Story

    Growing up, sweet potatoes were a staple at our holiday table, usually in the form of my grandmother’s marshmallow-covered casserole. As delightful as that dish was, I always felt there was more to explore in the realm of sweet potatoes. It wasn’t until a summer barbecue a few years back that I discovered the true potential of this versatile root vegetable.

    The day was perfect: sun-drenched and breezy, with the smell of freshly cut grass mingling with the tantalizing aroma of food grilling nearby. I was a guest at a friend’s cookout, where the host casually mentioned a new recipe he was trying: grilled sweet potatoes. Curious and a little skeptical, I watched as he prepared them with a simple glaze of butter and spices. One bite, and I was hooked. The smoky, sweet, and subtly spicy flavors danced together in a way I’d never experienced before.

    Inspired, I began experimenting in my own kitchen, determined to create a version of grilled sweet potatoes that would wow family and friends alike. After several delicious trials and a few not-so-successful attempts, I found the perfect balance. Adding a smoky chipotle kick and a touch of maple syrup elevated the dish beyond my wildest expectations. This recipe has since become a beloved part of our family gatherings, a testament to the magic that happens when you dare to try something new.

    What Makes This Version Special

    The signature twist in my Smoky Maple Chipotle Grilled Sweet Potatoes lies in the unique blend of flavors that elevate this dish from ordinary to extraordinary. The addition of smoky chipotle powder infuses the sweet potatoes with a gentle heat that’s perfectly tempered by the natural sweetness of pure maple syrup. This sweet and savory sensation enhances each bite, making this version far superior to the standard grilled sweet potatoes you’re used to.

    Moreover, the use of smoked paprika provides a depth of flavor that complements the chipotle, creating a rich, robust taste profile. The buttery glaze not only adds a luscious texture but also helps the spices adhere lovingly to every slice. In my book, this is not just an upgrade; it’s a revelation that brings out the best in sweet potatoes.

    Flavor Profile

    From the first bite, you’re greeted with a harmonious blend of sweet and smoky flavors. The sweet potatoes offer a natural sweetness that’s enhanced by the sticky, caramel-like maple syrup. Simultaneously, the chipotle powder introduces a subtle yet satisfying kick, warming your palate without overwhelming it.

    The smoked paprika weaves throughout the dish, adding an earthy undertone that complements the chipotle’s heat. Just when you think it can’t get any better, a refreshing citrus finish from the fresh lime juice cuts through the richness, leaving you ready for the next enticing bite. Each mouthful is a journey, a balancing act of flavors that keeps you coming back for more.

    Ingredients

    • 4 large sweet potatoes
    • 1/4 cup melted butter
    • 1 tablespoon pure maple syrup
    • 1 teaspoon ground cinnamon
    • 1 teaspoon chipotle powder
    • 1 teaspoon smoked paprika
    • 1 teaspoon sea salt
    • Juice of 1 fresh lime
    • 1/4 cup fresh cilantro, chopped (optional)

    Instructions

    1. Preheat your grill to 350 degrees Fahrenheit. While it’s heating up, wash and slice the sweet potatoes into 1-inch rounds. This size ensures they cook evenly and maintain a perfect texture.
    2. In a small bowl, mix the melted butter with the maple syrup, chipotle powder, smoked paprika, and sea salt to create a rich glaze. This mixture will serve as both a flavor bomb and a barrier against sticking.
    3. Spray both sides of the sweet potato slices with additional butter spray and sprinkle with cinnamon. The cinnamon adds a warm, aromatic note that complements the other spices beautifully.
    4. Cover the grill grates with aluminum foil to prevent sticking, then place the sweet potatoes directly onto the foil. Spray the sweet potatoes again lightly with butter spray to ensure they don’t stick.
    5. Close the grill lid and cook for 30 minutes, turning and flipping the sweet potatoes every 10 minutes. This ensures even cooking and those desirable grill marks. Add more butter spray as needed to prevent sticking and promote caramelization.
    6. Once the sweet potatoes are tender and slightly charred, remove them from the grill. Drizzle with fresh lime juice and sprinkle with chopped cilantro for a fresh finish that brightens the dish.

    Pro Tips from Meaghan’s Kitchen

    • Choose the right sweet potatoes: Opt for firm, evenly sized sweet potatoes to ensure even cooking.
    • Sweetness balance: If you prefer a less sweet version, you can reduce the maple syrup to 1/2 tablespoon.
    • Grill maintenance: Regularly check your grill’s temperature to maintain consistent heat, which is key for even cooking.
    • Glaze application: Brush the glaze on the sweet potatoes just before serving to maintain its vibrancy and prevent the sugars from burning.
    • Avoid crowding: Give each slice enough space on the grill to ensure they cook evenly and develop a good char.

    Variations & Dietary Swaps

    • Vegetarian Swap: Use a plant-based butter alternative for a vegan-friendly version.
    • Spice-it-up Version: Add a pinch of cayenne pepper to the glaze for extra heat.
    • Kid-Friendly Version: Omit the chipotle powder and smoked paprika, and add a touch more cinnamon for a sweeter, milder flavor.

    What to Serve With It

    These Smoky Maple Chipotle Grilled Sweet Potatoes are a versatile side dish that pairs beautifully with a range of mains. Serve them alongside grilled chicken or steak for a hearty meal. They also complement a fresh, vibrant grilled corn salad wonderfully. For a refreshing beverage pairing, consider a chilled glass of Riesling, whose subtle sweetness and acidity will balance the dish’s smoky-spicy notes perfectly.

    Storage & Meal Prep

    To store any leftovers, place the sweet potatoes in an airtight container and refrigerate for up to 3 days. They can also be frozen for up to 3 months; just ensure they are completely cooled before freezing. For reheating, use an oven at 350 degrees Fahrenheit for about 10-15 minutes to maintain their texture. Avoid microwaving, as this can make them soggy.

    FAQ

    Can I make this recipe without a grill?

    Yes, you can use a grill pan on your stovetop or bake the sweet potatoes in the oven at 400 degrees Fahrenheit for 25-30 minutes, flipping halfway through.

    What if I don’t have chipotle powder?

    You can substitute with a combination of smoked paprika and cayenne pepper, adjusting the heat level to your preference.

    Can I prepare the glaze in advance?

    Absolutely! You can mix the glaze ingredients a day ahead and store it in the fridge. Just give it a good stir before using.

    Is there a substitute for fresh lime juice?

    If you don’t have lime juice, lemon juice can be used instead for a similar citrusy finish.

    How do I know when the sweet potatoes are done?

    They’re done when they are fork-tender and have a nice char on the edges. The interior should be soft, but the exterior should have a slight crisp.

    Final Thoughts

    I hope you find as much joy in making and sharing these Smoky Maple Chipotle Grilled Sweet Potatoes as I do. They’re a testament to how a few bold ingredients can transform a simple vegetable into something spectacular. I’d love to hear how you make this dish your own, so feel free to leave a comment below or share your creations on social media. Here’s to delicious adventures in the kitchen!

    Related update: Smoky Maple Chipotle Grilled Sweet Potatoes

  • Spicy Garlic-Curry Leaf Crunch Potatoes with Tamarind Chutney | Made by Meaghan Moineau

    Spicy Garlic-Curry Leaf Crunch Potatoes with Tamarind Chutney | Made by Meaghan Moineau

    Spicy Garlic-Curry Leaf Crunch Potatoes with Tamarind Chutney

    Imagine walking into a kitchen where the aromas of warm spices, crispy garlic, and a tangy tamarind chutney envelop you like a cozy culinary hug. The sizzle of potatoes frying to a perfect golden-brown is music to your ears, promising a dish that’s both familiar and exciting. Welcome to the world of Spicy Garlic-Curry Leaf Crunch Potatoes with Tamarind Chutney, where each bite is a journey through layers of flavor.

    Personal Story

    Let me take you back to a lazy Sunday afternoon in my childhood home, where the kitchen was always bustling with activity. My mother, the maestro of culinary artistry, would whip up dishes that could make anyone feel right at home. One of my fondest memories is of her preparing a version of these spicy potatoes, their aroma wafting through the house and drawing everyone towards the kitchen.

    However, it wasn’t always smooth sailing. I remember the day I first tried to recreate her masterpiece. I was a novice in the kitchen, eagerly tossing potatoes into hot oil, only to find them sticking to the pan and refusing to reach that coveted golden-brown hue. My mother, with her soft chuckle, stepped in to teach me the art of patience and the magic of the right heat. It was a lesson in humility and a pivotal moment in my culinary journey.

    Fast forward a few years, and those kitchen mishaps are now cherished memories. The dish evolved as I experimented with flavors and textures, especially after a trip to India where I discovered the transformative power of tamarind. That tangy delight became the perfect partner to my crispy potatoes, adding a refreshing twist that made the dish my own.

    And that’s how these Spicy Garlic-Curry Leaf Crunch Potatoes with Tamarind Chutney came into being — a harmonious blend of nostalgia, discovery, and innovation. Now, I’m thrilled to share this recipe with you, hoping it brings as much joy to your table as it has to mine.

    What Makes This Version Special

    This isn’t just any potato dish; it’s a symphony of flavors that dance on your palate. The addition of a tangy tamarind chutney and crispy garlic chips sets this version apart from traditional recipes. The chutney’s sweet and sour notes perfectly complement the spicy, aromatic potatoes, while the garlic chips add an irresistible crunch.

    Blooming the mustard and coriander seeds in oil amplifies their aroma, creating a foundation that elevates the dish from the first bite. This recipe is a testament to the power of thoughtful enhancements — each ingredient playing its role to perfection, making this version an experience rather than just a meal.

    Flavor Profile

    Prepare your taste buds for a vibrant flavor journey. The Spicy Garlic-Curry Leaf Crunch Potatoes with Tamarind Chutney offer a spicy and aromatic adventure with a tangy undertone. The hint of sweetness from the tamarind chutney balances the spice, while the fried garlic chips add a savory depth. As you enjoy this dish, the warmth of cinnamon and the freshness of cilantro will envelop you, leaving a lasting impression that beckons you to savor each bite.

    Ingredients

    • 2 lbs cooked par potatoes, cut into wedges
    • **Oil** for frying
    • 1 tsp mustard seeds
    • 1 tsp coriander seeds
    • 1 **cinnamon stick**
    • 15-20 **curry leaves**
    • 1 large onion, sliced
    • 1/2 tsp turmeric
    • 1 tsp salt (adjust to taste)
    • 1 tsp red dried chilli flakes
    • 4-5 garlic cloves, thinly sliced
    • 1/4 cup tamarind pulp
    • 2 tbsp jaggery
    • Fresh cilantro for garnish

    Instructions

    1. Begin by heating oil in a large pan over medium-high heat for deep frying. Once hot, carefully add the potato wedges. Fry them until they achieve a slight golden-brown color, about 5-7 minutes. Remove with a slotted spoon and set aside on paper towels to drain excess oil.
    2. In a separate non-stick pan, add 1 1/2 tablespoons of oil over medium heat. Once hot, add mustard seeds and coriander seeds, and let them bloom until the mustard seeds start to pop. This should take about 30 seconds.
    3. Add the cinnamon stick and curry leaves, stirring gently to release their aromas. This step should take another 30 seconds.
    4. Introduce the sliced onions to the pan, cooking for about 1 minute until they begin to soften.
    5. Return the fried potatoes to the pan, along with turmeric and salt. Stir everything together, letting the potatoes absorb the flavors for about 5 minutes on low heat. Keep an eye out for the onions turning a slightly golden-brown.
    6. Add the red dried chilli flakes and give it one final stir, cooking for an additional minute. Turn off the heat and transfer the potatoes to a serving dish.
    7. In the same pan, heat a bit more oil and fry the thinly sliced garlic until golden and crispy, about 2-3 minutes. Be careful not to burn them. Set aside.
    8. For the tamarind chutney, mix tamarind pulp and jaggery in a small saucepan over low heat until the jaggery dissolves completely. Let it simmer for a few minutes until slightly thickened. Drizzle over the potatoes.
    9. Top the dish with crispy garlic chips and a generous sprinkle of fresh cilantro. Serve warm and enjoy!

    Pro Tips from Meaghan’s Kitchen

    • To prevent the potatoes from sticking to the pan, make sure they’re completely dry before frying. Moisture on the surface can lead to sticking.
    • For an even more intense flavor, marinate the potatoes with turmeric and salt before frying. This allows the spices to penetrate deeper.
    • When frying the garlic, keep a close eye on it. Garlic turns from golden to burnt in seconds, and you want that perfect crispy texture.
    • If you find the tamarind chutney too tangy, adjust with more jaggery. It’s all about balancing the flavors to your liking.
    • Let the mustard seeds pop completely when blooming. If they don’t, they might add a bitter note to your dish.

    Variations & Dietary Swaps

    • Vegetarian Delight: This dish is already vegetarian, but for a vegan version, ensure your jaggery is plant-based, as some may contain animal by-products.
    • Spice-It-Up: For those who crave more heat, add finely chopped green chilies alongside the red dried chilli flakes.
    • Kids-Friendly: Tone down the spices by reducing the chilli flakes and skipping the green chilies. Serve with a side of ketchup if they prefer it a bit sweeter.

    What to Serve With It

    This dish pairs wonderfully with a chilled mango lassi, offering a cooling counterpoint to the spice. Alternatively, a side of cucumber raita can do wonders to mellow out the heat. If you’re looking for a fuller meal, serve these Spicy Garlic-Curry Leaf Crunch Potatoes with warm naan or freshly cooked basmati rice.

    Storage & Meal Prep

    These potatoes are best enjoyed fresh, but if you have leftovers, they can be stored in an airtight container in the fridge for up to three days. Reheat them in a dry pan over medium heat to revive their crispiness. For longer storage, freeze the fried potatoes without the chutney and garlic chips. When ready to enjoy, reheat in the oven and prepare the chutney and garlic fresh.

    FAQ

    Can I use sweet potatoes instead of regular potatoes?

    Absolutely! Sweet potatoes add a lovely sweetness that pairs well with the tangy chutney.

    What can I use as a substitute for jaggery?

    If you can’t find jaggery, brown sugar or palm sugar can work as substitutes, though the flavor profile will vary slightly.

    Why is my garlic burning before it gets crispy?

    Garlic burns quickly due to its high sugar content. Make sure the oil is not too hot and keep stirring constantly while frying.

    Can I make the tamarind chutney ahead of time?

    Yes, you can prepare the tamarind chutney up to a week in advance and store it in the fridge. It actually allows the flavors to meld and deepen over time.

    Is there a way to make this dish less spicy?

    To reduce the spice level, simply cut back on the red dried chilli flakes and avoid adding green chilies. You can also serve it with more cooling sides like raita.

    Final Thoughts

    I hope this Spicy Garlic-Curry Leaf Crunch Potatoes with Tamarind Chutney recipe becomes a favorite at your table. It’s a dish that embodies warmth, nostalgia, and a touch of adventure — perfect for sharing with loved ones or savoring alone on a quiet evening. I’d love to hear how it turned out for you. Feel free to leave a comment or share your version with me on social media. Bon appétit and happy cooking!

    Related update: Spicy Garlic-Curry Leaf Crunch Potatoes with Tamarind Chutney

    Related update: Smoky Maple Chipotle Grilled Sweet Potatoes

  • Ginger-Sesame Baby Bok Choy Stir Fry with Toasted Almonds | Made by Meaghan Moineau

    Ginger-Sesame Baby Bok Choy Stir Fry with Toasted Almonds | Made by Meaghan Moineau

    Ginger-Sesame Baby Bok Choy Stir Fry with Toasted Almonds

    Imagine the tantalizing aroma of fresh ginger and sesame oil swirling together in a hot pan, mingling with the crisp sweetness of bok choy and the nutty crunch of toasted almonds. This Ginger-Sesame Baby Bok Choy Stir Fry is more than just a dish; it’s an aromatic dance of flavors that will enchant your taste buds and warm your soul.

    Personal Story

    It was a crisp autumn afternoon when I first stumbled upon the charm of baby bok choy. Wandering through an open-air market, I was drawn to their petite and vibrant green bundles, standing out like jewels among the earthy tones of root vegetables and gourds. Until then, my culinary adventures with Asian greens had been limited to the familiar crunch of broccoli and the peppery bite of arugula. But something about these little bok choy bundles beckoned me to explore further.

    Back in my cozy kitchen, I recall the gentle rustle of their leaves as I washed them, a sound reminiscent of a soft breeze stirring through a forest. I was nervous yet excited to experiment with a vegetable that was new to me. My first attempt at a stir fry ended in a delicious disaster — I had underestimated the power of fresh ginger and overdone the soy sauce, creating a saltier dish than anticipated. But every crackle of the pan and fragrant whiff of sesame oil encouraged me to keep trying.

    Through trial and a little error, I refined my approach, adding ingredients that would enhance rather than overpower. That’s when I discovered the magic of adding toasted almonds and a hint of honey, introducing a sweet, nutty balance to the dish. This initial kitchen mishap led to a delightful discovery — a recipe that became a staple in my household, loved by family and friends alike.

    Now, every time I make this Ginger-Sesame Baby Bok Choy Stir Fry with Toasted Almonds, I am transported back to that market day, feeling the crisp autumn air and hearing the chatter of bustling stalls. This dish, with its aromatic warmth and intricate flavors, has become a cherished part of my culinary repertoire, and I’m thrilled to share it with you.

    What Makes This Version Special

    The unique twist in this recipe lies in the incorporation of ginger and sesame seeds, which add an extra layer of aromatic complexity and nutty depth. Many traditional stir fry recipes stick to the basics, but this version elevates the dish to a new level by enhancing the natural sweetness of the bok choy with honey and balancing it with the umami of soy sauce. The **ginger** and **toasted sesame seeds** not only infuse the dish with rich scents but also bring a delightful texture and flavor contrast. By toasting the sesame seeds, we unlock a warm, nutty aroma that complements the leafy green crunch of the bok choy. Each bite is a symphony of textures and flavors, making this stir fry stand out from the standard versions.

    Flavor Profile

    This Ginger-Sesame Baby Bok Choy Stir Fry offers an aromatic explosion of flavors. The dish is delicately balanced with nutty, spicy, and sweet notes that dance on your palate. The **fresh ginger** provides a subtle heat, while the **coconut oil** brings a silky mouthfeel and a hint of tropical flair. The **honey** adds just the right amount of sweetness to counterbalance the savory **soy sauce**. As the stir fry cooks, the **aromas** of garlic and ginger bloom in the pan, weaving together a tapestry of scents that are both comforting and exciting. The **toasted almonds** contribute a satisfying crunch and a toasty flavor that amplifies the nutty profile of the dish.

    Ingredients

    • 1 tablespoon coconut oil
    • 2 shallots, thinly sliced
    • 2 lbs baby bok choy, halved lengthwise
    • 3 cloves garlic, minced
    • 1 tablespoon minced fresh ginger
    • 1 teaspoon salt
    • 1/2 teaspoon black pepper
    • 1/4 teaspoon red pepper flakes
    • 1/3 cup sliced almonds
    • 1 tablespoon sesame oil
    • 1 tablespoon honey
    • 2 tablespoons soy sauce
    • 2 tablespoons toasted sesame seeds

    Instructions

    1. Heat the coconut oil in a large nonstick skillet over medium-high heat until shimmering.
    2. Add the sliced shallots and cook for 3 to 4 minutes until they are soft and translucent.
    3. Introduce the bok choy to the skillet, setting the leafy tops aside for later. Cook for another 3 to 4 minutes, stirring occasionally, until the stalks are crisp-tender and slightly charred.
    4. In a separate small dry pan, toast the sliced almonds over medium heat, stirring frequently, until golden brown and fragrant, about 3 minutes. Be sure to keep an eye on them to prevent burning.
    5. Add the minced garlic and ginger to the bok choy in the skillet, allowing them to bloom in the remaining coconut oil until fragrant, about 30 seconds.
    6. Sprinkle in the salt, black pepper, and red pepper flakes, stirring to coat the bok choy evenly.
    7. Stir in the reserved bok choy leaves, sesame oil, honey, and soy sauce. Toss everything together and let it cook for another 2 minutes until the leaves have wilted slightly.
    8. Finally, top the stir fry with the toasted almonds and toasted sesame seeds before serving warm.

    Pro Tips from Meaghan’s Kitchen

    • Balancing flavors: If you find the dish too sweet or salty, adjust by adding a splash of rice vinegar for acidity.
    • Toasting sesame seeds: Always toast seeds and nuts in a dry pan to bring out their natural oils and enhance their flavor.
    • Timing is key: Add bok choy leaves towards the end of cooking to preserve their color and nutrients.
    • Infusion technique: Blooming garlic and ginger in oil releases their essential oils, maximizing their flavor impact.
    • Ingredient swaps: Feel free to substitute almonds with cashews for a creamier texture or use maple syrup in place of honey for a vegan version.

    Variations & Dietary Swaps

    • Vegetarian Swap: Replace soy sauce with tamari for a gluten-free version, and swap honey with maple syrup for a vegan-friendly dish.
    • Spice It Up: For those who love heat, increase the red pepper flakes to 1/2 teaspoon or add a dash of sriracha for an extra kick.
    • Kids-Friendly Version: Tone down the spice by omitting the red pepper flakes and adding a handful of snap peas or baby corn for added sweetness and color.

    What to Serve With It

    Pair this Ginger-Sesame Baby Bok Choy Stir Fry with a bowl of steamed jasmine rice or quinoa for a complete meal. For a refreshing beverage, serve alongside a chilled glass of Jasmine tea, whose floral notes complement the dish beautifully. Alternatively, a light, crisp Sauvignon Blanc offers a bright acidity that enhances the fresh ginger and sesame flavors.

    Storage & Meal Prep

    Store any leftovers in an airtight container in the refrigerator for up to 3 days. To reheat, gently warm in a skillet over medium heat until heated through, adding a splash of water if necessary to maintain moisture. This stir fry is not recommended for freezing, as the texture of the bok choy may become mushy upon thawing.

    FAQ

    Can I use regular bok choy instead of baby bok choy?

    Yes, regular bok choy can be used, though you may need to slice it into smaller pieces to ensure even cooking. The flavor will be slightly more robust, but still delicious.

    What can I use instead of coconut oil?

    If coconut oil isn’t available, substitute with any neutral oil like vegetable or avocado oil. Keep in mind that coconut oil adds a hint of sweetness that complements the dish.

    Can I make this dish ahead of time?

    While it’s best enjoyed fresh, you can prep the ingredients ahead of time by slicing the shallots and bok choy, and toasting the almonds. Assemble and cook when ready to serve for maximum flavor and texture.

    How do I prevent the garlic and ginger from burning?

    Ensure the garlic and ginger are added when the oil is hot but not smoking, and always keep stirring them in the pan to avoid burning. Adding them just before the liquid ingredients also helps protect them from high heat.

    Final Thoughts

    Creating this Ginger-Sesame Baby Bok Choy Stir Fry with Toasted Almonds is a journey of flavors and textures that transforms simple ingredients into something extraordinary. Whether you’re new to cooking Asian-inspired dishes or a seasoned pro, this recipe offers a delightful challenge with aromatic rewards. I hope you enjoy making and sharing this dish as much as I do. I’d love to hear your thoughts and see your creations — feel free to leave a comment below or share your photos on social media. Let’s keep the conversation and the culinary exploration going!

    Related update: Ginger-Sesame Baby Bok Choy Stir Fry with Toasted Almonds

    Related update: Spicy Garlic-Curry Leaf Crunch Potatoes with Tamarind Chutney

  • Spicy Maple-Roasted Autumn Vegetables with Herbed Goat Cheese Drizzle | Made by Meaghan Moineau

    Spicy Maple-Roasted Autumn Vegetables with Herbed Goat Cheese Drizzle | Made by Meaghan Moineau

    Spicy Maple-Roasted Autumn Vegetables with Herbed Goat Cheese Drizzle

    Imagine the rich aroma of butternut squash, beet roots, and potatoes roasting in your kitchen, kissed by a spicy maple glaze that caramelizes to perfection. As the heat transforms these autumn vegetables into golden-brown morsels, a drizzle of creamy, herbed goat cheese awaits, ready to crown the masterpiece with a fragrant finish. This is not just a side dish; it’s a savory-sweet symphony that dances across your taste buds.

    Opening Hook

    There’s nothing quite like the comforting embrace of a kitchen filled with the scent of roasting vegetables. The sizzle of olive oil meeting the skin of vibrant butternut squash, the earthy undertones of beet roots mingling with the sweetness of maple syrup — it’s a sensory experience that transforms a simple dish into something extraordinary. This is where culinary magic happens, blending nostalgia with innovation in every bite.

    Personal Story

    Growing up, autumn was always a season of wonder and warmth. I remember the first time I helped my grandmother in her cozy kitchen, the windows fogged up from the heat of the oven, and the tantalizing aroma of roasting vegetables swirling around us. She taught me the importance of timing and patience, how to know when the vegetables were just right by their golden-brown hue and tender texture.

    It was in her kitchen that I first discovered the magic of maple syrup in savory dishes. I accidentally spilled some into our roasted vegetables — an unintentional twist that received rave reviews from my family. The sweetness intertwined with the earthy flavors, creating a delightful surprise that quickly became a family classic. Since then, I’ve been on a quest to recreate and elevate those beloved flavors.

    Years later, in my own kitchen, I found myself experimenting with spices and textures, determined to craft a dish that would honor my grandmother’s original while adding my personal flair. After numerous trials and some spicy mishaps, I stumbled upon the perfect combination: a spicy maple glaze paired with a creamy, herbed goat cheese drizzle. This version of maple-roasted autumn vegetables has become a staple at my table, always evoking cherished memories with every bite.

    What Makes This Version Special

    This version of Spicy Maple-Roasted Autumn Vegetables stands out with its unforgettable sweet and spicy contrast. The introduction of a **spicy maple glaze** elevates the classic roasted veggies to a new level of flavor complexity, while the **creamy, herbed goat cheese drizzle** adds a luxurious touch. The result is a dish that’s both comforting and exciting, with each element working in harmony to deliver a taste experience that’s both familiar and refreshingly new. The combination of cayenne pepper with the sweetness of maple syrup creates a caramelized, sticky finish that clings to the vegetables, offering a delightful crunch with every bite. The goat cheese drizzle, infused with fresh thyme and chives, provides an herbaceous, creamy counterpoint that balances the heat, making this dish a must-try for those eager to embrace the flavors of fall.

    Flavor Profile

    The Spicy Maple-Roasted Autumn Vegetables with Herbed Goat Cheese Drizzle is a flavor journey that begins with the initial hit of spicy heat, courtesy of the cayenne pepper, followed by the comforting sweetness of maple syrup. As you savor each bite, the creaminess of the goat cheese drizzle melts into the earthy tones of the roasted vegetables, enhanced by the aromatic notes of fresh thyme and chives. This dish is a delightful dance of sweet, spicy, and creamy, with a peppery, herbaceous finish that lingers on your palate — a true celebration of autumn’s bounty.

    Ingredients

    • 1 medium butternut squash, peeled and cut into bite-sized pieces
    • 3 medium beet roots, peeled and cut into bite-sized pieces
    • 4 medium potatoes, cut into bite-sized pieces (peeling optional)
    • 3 tablespoons olive oil
    • 1 tablespoon paprika
    • 1 teaspoon dried basil
    • Salt and pepper to taste
    • **1/4 cup maple syrup**
    • **1/2 teaspoon cayenne pepper**
    • **1/2 cup crumbled goat cheese**
    • **1 tablespoon fresh thyme, chopped**
    • **1 tablespoon fresh chives, chopped**

    Instructions

    1. Preheat your oven to 200 degrees Celsius (fan: 180 degrees Celsius) to ensure an even roast.
    2. In a large bowl, toss the butternut squash, beet roots, and potatoes with olive oil, paprika, dried basil, salt, and pepper until every piece is well-coated.
    3. Add the maple syrup and cayenne pepper to the bowl, mixing until the vegetables are covered in a sticky, spicy glaze.
    4. Spread the glazed vegetables in a single layer on a large baking tray, ensuring even cooking. Bake in the preheated oven for 30 minutes, or until the vegetables are golden-brown and tender but still have a slight bite.
    5. While the vegetables roast, blend the crumbled goat cheese with fresh thyme and chives in a small bowl until smooth and creamy.
    6. Once the vegetables are done, drizzle the herbed goat cheese over them while still warm. Serve immediately for the best texture and flavor.

    Pro Tips from Meaghan’s Kitchen

    • Always preheat your oven fully before roasting to ensure the vegetables cook evenly and achieve that perfect golden-brown finish.
    • When cutting your vegetables, aim for uniform sizes to guarantee even cooking. Smaller pieces tend to crisp up more, adding a delightful texture contrast.
    • For an extra crispy finish, don’t overcrowd your baking tray. A single layer of vegetables is key to achieving the right texture.
    • Adjust the cayenne pepper to suit your spice preference. A little goes a long way, so start small and increase if you enjoy more heat.
    • Save time by preparing the goat cheese drizzle ahead of time and storing it in the fridge until ready to use. Just give it a good stir before serving.

    Variations & Dietary Swaps

    • **Vegetarian version**: Swap the goat cheese for a plant-based cheese alternative to make this dish suitable for vegans.
    • **Spice-it-up version**: Add a pinch of smoked paprika to the glaze for an extra layer of smoky flavor.
    • **Kids-friendly version**: Reduce the cayenne pepper and serve the goat cheese drizzle on the side, allowing kids to add as much or as little as they like.

    What to Serve With It

    This dish pairs beautifully with a chilled glass of Riesling, whose crispness complements the sweetness of the maple syrup. For a heartier meal, serve it alongside warm rosemary focaccia to sop up every last bit of the creamy goat cheese drizzle. Alternatively, a simple green salad with a light lemon vinaigrette can provide a refreshing counterbalance to the rich flavors.

    Storage & Meal Prep

    Store any leftovers in an airtight container in the fridge for up to three days. To reheat, spread the vegetables on a baking tray and warm in a preheated oven at 180 degrees Celsius for 10-12 minutes. The goat cheese drizzle should be added fresh each time for the best texture. This dish is not suitable for freezing, as the texture of the vegetables can become soggy upon thawing.

    FAQ

    Can I use different vegetables?

    Absolutely! Feel free to substitute or add other root vegetables like sweet potatoes or parsnips for a unique twist.

    How can I make the dish less spicy?

    Simply reduce or omit the cayenne pepper in the glaze. The maple syrup will still provide a lovely sweetness.

    Is there a substitute for goat cheese?

    If you’re not a fan of goat cheese, try using feta or ricotta for a different creamy element.

    Can I prepare this dish in advance?

    The vegetables can be prepped and glazed ahead of time, but for the best taste and texture, roast them just before serving.

    What if I don’t have fresh herbs?

    Dried herbs can be used in a pinch, but remember they are more concentrated, so use about a third of the amount specified for fresh herbs.

    Final Thoughts

    Spicy Maple-Roasted Autumn Vegetables with Herbed Goat Cheese Drizzle is more than just a dish; it’s an invitation to savor the flavors of the season with loved ones. Whether you’re gathering around the table for a family dinner or hosting friends for a festive feast, this recipe is sure to impress and delight. I can’t wait for you to try it out and make it your own. Don’t forget to leave a comment below sharing your experience or any creative variations you came up with. Happy cooking, my friends!

    Related update: Spicy Maple-Roasted Autumn Vegetables with Herbed Goat Cheese Drizzle

    Related update: Ginger-Sesame Baby Bok Choy Stir Fry with Toasted Almonds

  • Maple Pecan Honey Cornbread with Orange Zest | Made by Meaghan Moineau

    Maple Pecan Honey Cornbread with Orange Zest | Made by Meaghan Moineau

    Maple Pecan Honey Cornbread with Orange Zest

    Imagine this: the golden crust of a freshly baked cornbread, still warm from the oven, with a sweet aroma that dances through your kitchen. A slice reveals a moist, sun-kissed interior dotted with crunchy pecans and hints of bright orange zest. This is not your grandmother’s cornbread — it’s something a little more magical.

    My Love Affair with Cornbread

    Growing up in the South, cornbread was more than just a side dish; it was a family staple, gracing our table during Sunday dinners, holiday feasts, and even simple weekday suppers. My earliest memory of this comforting dish is watching my grandmother expertly mix cornmeal and buttermilk in her old ceramic bowl, a routine she had perfected over decades. I vividly remember the scent of it baking, mingling with the savory tang of collard greens or the rich aroma of a beef stew.

    However, my journey to crafting the perfect cornbread was not without its hiccups. I recall a particularly chaotic Thanksgiving where, in my excitement to impress the family with my own take on the classic, I inadvertently forgot the baking powder. The result was a flat, sad disk that my family graciously ate with polite smiles. That little mishap taught me a valuable lesson about the science of baking and the importance of precision.

    Determined to redeem myself, I spent months experimenting with different ingredients and techniques, seeking to elevate the traditional recipe without losing its comforting soul. It was during a trip to a local farmer’s market that I stumbled upon fresh pecans and a basket of fragrant oranges, sparking an idea. What if I could infuse my cornbread with these vibrant flavors? Hence, the Maple Pecan Honey Cornbread with Orange Zest was born, a creation that has since become a beloved staple in my home.

    What Makes This Version Special

    This isn’t just any cornbread recipe, and here’s why: by infusing the batter with aromatic **orange zest** and crunchy **pecans**, I’ve added layers of texture and flavor that transform this humble side into a standout dish. The warm, earthy notes of **maple syrup** replace the usual vanilla, giving it a subtle sweetness that’s both comforting and sophisticated. Each element plays its part in creating a cornbread that is vibrant, complex, and utterly satisfying.

    Flavor Profile

    The Maple Pecan Honey Cornbread with Orange Zest bursts with a sweet and nutty profile, where each bite reveals a bright citrus aroma and a warm maple undertone. The cornmeal provides a heartiness, while the pecans add a delightful crunch. The orange zest weaves a thread of freshness throughout, ensuring a balanced bite that is both familiar and refreshingly new.

    Ingredients

    • 1 cup corn meal
    • 1 cup flour
    • 1 tablespoon baking powder
    • 1/2 cup white sugar
    • 1/2 teaspoon salt
    • 1/4 cup **honey**
    • 1/4 cup **maple syrup**
    • 1 large egg
    • 1 cup milk
    • 1/2 cup melted butter
    • 1 tablespoon grated **orange zest**
    • 1/2 cup chopped **pecans**

    Instructions

    1. Preheat your oven to 350°F (175°C) and grease a 9×9 inch baking pan.
    2. In a large bowl, combine the corn meal, flour, baking powder, sugar, and salt. Whisk these dry ingredients together until well mixed.
    3. In a separate bowl, whisk together the honey, maple syrup, egg, and milk. Ensure the mixture is smooth and the honey is fully integrated.
    4. Pour the wet ingredients into the dry ingredients and stir until just combined. Avoid over-mixing as this can lead to a dense cornbread.
    5. Gently fold in the melted butter, followed by the grated orange zest. Be careful to preserve the citrus aroma by folding lightly.
    6. Heat a dry skillet over medium heat and toast the pecans until they are fragrant and slightly golden, about 3-4 minutes. This step enhances their flavor and crunch.
    7. Fold the toasted pecans into the batter, distributing evenly.
    8. Pour the batter into the prepared pan and smooth the top with a spatula. Bake in the preheated oven for 25-30 minutes, or until the top is golden-brown and a toothpick inserted into the center comes out clean.
    9. Allow the cornbread to cool in the pan for at least 10 minutes before slicing. Serve warm.

    Pro Tips from Meaghan’s Kitchen

    • Use fresh orange zest for maximum flavor. Store-bought zest can sometimes be dry and lack vibrancy.
    • To ensure even mixing, bring your egg and milk to room temperature before combining with other ingredients.
    • If you prefer a slightly sweeter cornbread, try drizzling a bit of maple syrup over the top before serving.
    • For a more robust flavor, use dark maple syrup instead of the regular one.
    • Letting the cornbread cool slightly before cutting will make it easier to get clean slices.

    Variations & Dietary Swaps

    • Vegetarian Swap: Substitute the butter with a plant-based alternative like coconut oil or vegan butter for a vegetarian-friendly version.
    • Spice-It-Up Version: Add a teaspoon of cinnamon or nutmeg to the dry ingredients for a warm, spiced version.
    • Kids-Friendly Version: Reduce the orange zest to a teaspoon and add in a handful of mini chocolate chips for a sweeter, kid-approved treat.

    What to Serve With It

    Pair this Maple Pecan Honey Cornbread with a refreshing glass of iced green tea or a light citrus salad to complement its flavors. It’s also a fantastic side for hearty soups or chili, where its sweet nuttiness can shine against savory, spicy notes.

    Storage & Meal Prep

    Store any leftover cornbread in an airtight container at room temperature for up to 3 days. For longer storage, wrap individual slices in plastic wrap and place them in a zip-top freezer bag. Freeze for up to 3 months. To reheat, simply thaw at room temperature and warm in a 350°F oven for about 10 minutes.

    FAQ

    Can I use whole wheat flour instead of all-purpose flour?

    Yes, you can substitute whole wheat flour, but it may result in a denser texture. Consider using half whole wheat and half all-purpose to maintain a lighter crumb.

    How can I make this cornbread gluten-free?

    To make it gluten-free, you can use a 1:1 gluten-free baking flour blend in place of the all-purpose flour. Ensure your cornmeal is also certified gluten-free.

    What if I don’t have fresh oranges?

    If fresh oranges aren’t available, you can use store-bought orange juice and a teaspoon of orange extract as a substitute. However, fresh zest is recommended for the best flavor.

    Can I add other nuts or seeds?

    Absolutely! Feel free to swap the pecans for walnuts or even add sunflower seeds for extra crunch.

    How do I know when the cornbread is done?

    The cornbread is done when the top is golden-brown and a toothpick inserted into the center comes out clean. If the top browns too quickly, cover it with foil and continue baking.

    Final Thoughts

    There you have it, my dear kitchen adventurers, a Maple Pecan Honey Cornbread with Orange Zest that is sure to become a favorite in your baking repertoire. I hope this recipe brings warmth and joy to your table, just as it has to mine. Please feel free to leave comments about how your cornbread turned out or any tweaks you made. Sharing is caring, after all — let’s spread the cornbread love!

    Related update: Maple Pecan Honey Cornbread with Orange Zest

    Related update: Spicy Maple-Roasted Autumn Vegetables with Herbed Goat Cheese Drizzle

  • Easy Tabouleh | Made by Meaghan Moineau

    Easy Tabouleh | Made by Meaghan Moineau

    Easy Tabouleh

    Welcome to my kitchen! Today, I’m thrilled to share a recipe that is close to my heart—Easy Tabouleh. This vibrant and refreshing salad has been a staple in my family for generations. I vividly remember summers at my grandmother’s house, where she would prepare a massive bowl of tabouleh for our family gatherings. The aroma of freshly chopped parsley and the tang of lemon juice would fill the air, signaling that something delicious was on its way. I’m excited to bring that same joy to your table with this simple and delightful recipe.

    Why You’ll Love It

    Tabouleh is more than just a salad; it’s a celebration of fresh ingredients and bold flavors. Here’s why you’ll love this easy tabouleh recipe:

    • Quick and Simple: With only a handful of ingredients and minimal prep time, you can whip up this dish in no time.
    • Nutritious and Healthy: Packed with fresh vegetables and herbs, this dish is a nutritious powerhouse that is both satisfying and light.
    • Perfect for Any Occasion: Whether it’s a family picnic, a potluck, or a simple weeknight dinner, tabouleh is a versatile dish that fits any occasion.
    • Flavorful and Refreshing: The combination of lemon juice and fresh herbs makes every bite a burst of refreshing flavor.

    Ingredients

    • 1 cup bulgur
    • 2 cucumbers, finely chopped
    • 1 bunch of flat leaf parsley, finely chopped
    • Juice from 1 lemon
    • 3 tablespoons olive oil
    • Salt, to taste
    • 2 tomatoes, finely chopped

    Instructions

    1. Start by preparing the bulgur. Place it in a fine mesh sieve and rinse under cold water. Allow it to drain thoroughly.
    2. Finely chop the cucumbers, parsley, and tomatoes. The key is to keep the vegetables diced fairly small to stay true to the traditional tabouleh texture.
    3. In a large bowl, combine the rinsed bulgur, chopped cucumbers, parsley, and tomatoes.
    4. Add the lemon juice and olive oil to the bowl. Mix everything together gently to ensure the ingredients are well combined.
    5. Season with salt to taste. Start with a small amount, and add more if needed as you mix and taste.
    6. Let the salad sit for at least 30 minutes before serving. This allows the flavors to meld together beautifully.

    Tips

    • Chill for Flavor: For the best flavor, let the tabouleh chill in the refrigerator for an hour before serving. This gives the bulgur time to absorb the lemon juice and olive oil.
    • Use Fresh Ingredients: Fresh parsley and ripe tomatoes make a huge difference in the taste, so opt for the freshest produce you can find.
    • Adjust to Taste: Feel free to adjust the amount of lemon juice and salt to your liking. Some prefer a tangier salad, while others enjoy a milder version.

    Variations & Substitutions

    Tabouleh is a versatile salad with room for creativity. Here are some variations and substitutions you can try:

    • Quinoa Substitute: For a gluten-free version, substitute the bulgur with cooked quinoa. It offers a similar texture and absorbs the flavors wonderfully.
    • Add Mint: Incorporating a handful of finely chopped mint leaves adds an extra layer of freshness to the dish.
    • Additional Veggies: Feel free to add other vegetables such as bell peppers or red onions for added crunch and color.

    Storage

    Tabouleh can be stored in an airtight container in the refrigerator for up to 3 days. The flavors will continue to develop, making it even more delicious the next day. However, the texture of the vegetables might soften over time, so it’s best enjoyed fresh.

    FAQ

    Can I make tabouleh ahead of time?

    Absolutely! Making tabouleh ahead of time is a great idea as it allows the flavors to meld. Prepare it a few hours before serving and let it chill in the refrigerator. Just give it a good stir before serving to redistribute the dressing.

    Is tabouleh served cold or warm?

    Tabouleh is traditionally served cold or at room temperature. Chilling it enhances its refreshing qualities and makes it a perfect dish for warm weather.

    Nutrition

    This easy tabouleh is not only delicious but also nutritious. It is rich in vitamins from the fresh vegetables and herbs, and the bulgur provides a good source of fiber. The olive oil adds healthy fats, while the lemon juice offers a boost of vitamin C. It’s a wholesome dish that fits well into a balanced diet.

    Final Thoughts

    Thank you for joining me in making this easy tabouleh recipe. I hope it brings as much joy to your table as it has to mine. Whether you’re enjoying it as a side dish, a light lunch, or a part of a larger meal, tabouleh is a delightful way to embrace fresh, simple ingredients. I’d love to hear how it turns out for you, so feel free to share your experiences and any personal twists you add to the recipe. Bon appétit!

    Related update: Easy Tabouleh

    Related update: Maple Pecan Honey Cornbread with Orange Zest

    Related update: Zesty Tropical Lump Crab and Avocado Salad with Mango-Lime Dressing

  • Chicken Liver Salad | Made by Meaghan Moineau

    Chicken Liver Salad | Made by Meaghan Moineau

    Chicken Liver Salad: A Warm and Hearty Delight

    There’s something inherently comforting about the aromas wafting through the kitchen as chicken livers sizzle with onions and bacon. This Chicken Liver Salad takes me back to Sunday afternoons at my grandmother’s house. She would whip up a batch of this savory salad while recounting stories from her childhood. The combination of rich, tender chicken livers with the crisp freshness of Boston lettuce was, and still is, my favorite part of those cherished family gatherings.

    Why You’ll Love It

    This Chicken Liver Salad is more than just a dish; it’s a sensory experience. The savory, slightly tangy flavor of the chicken livers, when combined with crispy bacon and balsamic vinegar, creates a taste explosion. Besides its delightful flavors, this salad is also packed with nutrients, making it a wholesome option for those who want to enjoy a hearty meal without compromising on health. It’s simple to make, requiring only a handful of ingredients and minimal preparation time, yet it never fails to impress both family and guests alike.

    Ingredients

    • Bacon
    • Balsamic vinegar
    • Boston lettuce
    • Chicken livers
    • Olive oil
    • Onion
    • Salt and pepper

    Instructions

    1. In a large skillet, heat the olive oil over medium-high heat.
    2. Add the sliced onion and bacon to the skillet, sautéing until the bacon is slightly crisp and the onions are soft.
    3. Add the chicken livers to the skillet, stirring well to combine with the bacon and onions.
    4. Pour in the balsamic vinegar, allowing the livers to simmer slowly. Stir occasionally, and add more vinegar if necessary to keep the mixture moist.
    5. Once the livers are cooked through and tender, season with salt and pepper to taste.
    6. Arrange a bed of Boston lettuce on a serving platter, and spoon the warm liver mixture over the top.
    7. Serve immediately, ensuring each plate has a generous portion of both liver mixture and lettuce.

    Tips

    For the best results, use fresh chicken livers and make sure to clean them thoroughly before cooking. If you’re not a fan of balsamic vinegar, you can substitute it with red wine vinegar for a slightly different flavor profile. Make sure to taste as you go, adjusting the seasoning according to your preference. To add an extra layer of texture, consider topping the salad with toasted nuts, such as walnuts or pine nuts.

    Variations & Substitutions

    There are numerous ways to tweak this recipe to better suit your palate or dietary needs:

    • Vegetarian Option: Replace chicken livers with grilled portobello mushrooms for a vegetarian-friendly version.
    • Different Greens: Swap Boston lettuce for arugula or spinach for a peppery or more robust flavor.
    • Additional Vegetables: Incorporate roasted red peppers or cherry tomatoes for a burst of color and sweetness.
    • Herbs: Add fresh herbs like thyme or rosemary to enhance the aromatic profile of the dish.

    Storage

    If you have leftovers, store the chicken liver mixture separately from the lettuce to prevent it from becoming soggy. Place the liver mixture in an airtight container and refrigerate for up to two days. Reheat gently in a skillet before serving over fresh lettuce. Note that the texture of the liver might change slightly upon reheating, but the flavors will remain delightful.

    FAQ

    Can I prepare this dish in advance?

    While you can prepare the liver mixture a day ahead, it’s best to serve the salad fresh to retain the crispness of the lettuce. Reheat the liver mixture just before serving.

    Is chicken liver healthy?

    Yes, chicken liver is a rich source of protein, iron, and various vitamins, including vitamin A and B12. It can be a nutritious addition to your diet when consumed in moderation.

    Nutrition

    Chicken Liver Salad is a nutrient-dense dish, offering a substantial amount of protein and essential vitamins. A serving provides approximately:

    • Calories: 250
    • Protein: 20g
    • Fat: 15g
    • Carbohydrates: 8g
    • Iron: 10mg

    Please note that these values are estimates and can vary based on specific brands and preparation methods.

    Final Thoughts

    This Chicken Liver Salad is more than just a meal; it’s a journey back to simpler times filled with love, laughter, and delicious food. It’s a testament to how traditional recipes can still hold a special place in our modern lives. Whether you’re a fan of chicken livers or looking to try something new, this salad is a delightful way to enjoy a nutritious and flavorful meal. Gather your loved ones, share stories, and enjoy this comforting dish together.

    Related update: Chicken Liver Salad

    Related update: Crab Cakes Rockefeller

    Related update: Easy Tabouleh

  • Roasted Broccoli with Lemon and Garlic | Made by Meaghan Moineau

    Roasted Broccoli with Lemon and Garlic | Made by Meaghan Moineau

    Roasted Broccoli with Lemon and Garlic

    There’s something magical about the simple yet profound combination of roasted vegetables with citrus and herbs. This Roasted Broccoli with Lemon and Garlic recipe brings a burst of flavor and a delightful crisp texture to your table. Let me take you on a journey of flavors that will transform a humble vegetable into a dish that stands out on its own.

    Why You’ll Love It

    This roasted broccoli recipe is one you’ll want to make over and over again. It’s not just about the taste; it’s about the experience it brings to the table. Growing up, I remember my grandmother’s kitchen filled with the aroma of roasted vegetables. She had a knack for making the simplest ingredients extraordinary. That nostalgic memory is what inspired this recipe. You’ll love it for its simplicity, quick preparation, and the way it elevates broccoli into something truly special.

    Ingredients

    • 1 pound of broccoli florets
    • 2 tablespoons extra virgin olive oil
    • 3 cloves of garlic, minced
    • 1/2 teaspoon black ground pepper
    • 2 tablespoons lemon juice
    • Salt to taste

    Instructions

    1. Preheat your oven to 400 degrees Fahrenheit (200 degrees Celsius).
    2. In a large mixing bowl, combine the broccoli florets, olive oil, minced garlic, salt, and black ground pepper. Toss well to ensure the broccoli is evenly coated.
    3. Spread the broccoli out in an even layer on a baking sheet. Ensure they are not overlapping to allow even roasting.
    4. Bake in the preheated oven until the broccoli is tender enough to pierce the stems with a fork, about 15 to 20 minutes.
    5. Remove the broccoli from the oven and place it in a serving bowl. Drizzle with fresh lemon juice and give it a gentle toss to combine.
    6. Serve immediately and enjoy the vibrant flavors.

    Tips

    For the best results, make sure your broccoli florets are similar in size. This ensures even cooking. Always use fresh lemon juice for that zesty punch, and feel free to adjust the garlic to your preference if you’re a garlic lover like me.

    Variations & Substitutions

    If you want to add a little heat, sprinkle some red pepper flakes before roasting. For a touch of umami, add a tablespoon of grated Parmesan cheese just before serving. If you’re out of fresh garlic, garlic powder is a feasible substitute, though fresh will always give you the best flavor.

    Storage

    Store any leftover roasted broccoli in an airtight container in the refrigerator for up to 3 days. Reheat it in an oven or air fryer to regain its crispness. Avoid microwaving as it can make the broccoli soggy.

    FAQ

    Can I use frozen broccoli instead of fresh?

    Yes, you can use frozen broccoli. Just be sure to thaw and pat it dry thoroughly to remove excess moisture before roasting. This will help achieve a crispy texture.

    What can I serve with roasted broccoli?

    Roasted broccoli is versatile and pairs well with a variety of main courses. Try it alongside grilled chicken, salmon, or a hearty pasta dish. It also works beautifully as a topping for salads or grain bowls.

    How do I prevent the broccoli from becoming too soft?

    To keep the broccoli from getting too soft, make sure not to overcrowd the pan. This allows the hot air to circulate and roast the broccoli rather than steam it.

    Nutrition

    This dish is not only delicious but also nutritious. Broccoli is a powerhouse of vitamins K and C, fiber, and numerous antioxidants. With minimal olive oil and fresh lemon juice, this recipe keeps the calorie count low while delivering maximum flavor.

    Final Thoughts

    This Roasted Broccoli with Lemon and Garlic is more than just a side dish; it’s a celebration of simple ingredients coming together to create something wonderful. Whether you’re looking to add more greens to your diet or searching for an easy weeknight side, this recipe fits the bill. Happy cooking!

    Related update: Roasted Broccoli with Lemon and Garlic

  • Strawberry Pretzel Salad | Made by Meaghan Moineau

    Strawberry Pretzel Salad | Made by Meaghan Moineau

    Strawberry Pretzel Salad

    Welcome to a delightful world of flavors with our Strawberry Pretzel Salad—a refreshing and vibrant dish that combines sweet, salty, and savory in a way that is sure to become your new favorite. This salad is not only delicious but also brings a touch of nostalgia with every bite. Let me take you on a journey back to my childhood summers at my grandmother’s house, where I first tasted the magic of strawberries and pretzels together. I remember sitting on her porch, the sun warming my face, as I enjoyed this unique combination that seemed to capture the essence of summer. Now, I am thrilled to share this cherished recipe with you.

    Why You’ll Love It

    This Strawberry Pretzel Salad is a symphony of flavors and textures. Here are a few reasons why you’ll fall in love with it:

    • Sweet and Savory Balance: The sweetness of strawberries paired with the salty crunch of pretzels creates a perfect harmony.
    • Texture Delight: Crisp cucumbers, creamy avocado, and crunchy pretzels make every bite exciting.
    • Healthy and Nutritious: Packed with greens, healthy fats, and fresh ingredients, this salad is as wholesome as it is delicious.
    • Easy to Make: With simple steps and readily available ingredients, this salad comes together in no time.
    • Versatile: Perfect as a light lunch, a side dish, or a beautiful addition to your dinner table.

    Ingredients

    • 2 cups arugula
    • 1 avocado, sliced
    • 6 slices bacon
    • 2 tablespoons balsamic vinegar
    • 1 cucumber, sliced
    • 2 tablespoons flax seed oil
    • 4 cups mixed spring greens
    • 1 red bell pepper, sliced
    • 1 cup pretzels, crushed
    • Salt and pepper to taste
    • 1 cup strawberries, sliced
    • 1 tablespoon whole grain mustard

    Instructions

    1. Preheat your oven to 300°F (150°C).
    2. Arrange the bacon slices on a baking sheet lined with tin foil.
    3. Bake the bacon for 30 minutes, turning once halfway through. Set aside and let cool.
    4. In a small bowl, combine flax seed oil, balsamic vinegar, whole grain mustard, salt, and pepper. Mix well and set aside.
    5. In a large salad bowl, place strawberries, cucumber, mixed greens, arugula, and bacon. Toss lightly to combine.
    6. Add the prepared dressing to the salad and toss to coat evenly.
    7. Divide the salad among four plates and serve topped with sliced avocado and crushed pretzels.

    Tips

    • Choose Fresh Ingredients: For the best flavor, select ripe strawberries and fresh greens.
    • Prepare Ahead: You can pre-cook the bacon and mix the dressing ahead of time to save on prep work.
    • Serving Suggestion: Pair this salad with grilled chicken or fish for a more substantial meal.

    Variations & Substitutions

    Feel free to get creative with this recipe:

    • Nuts for Crunch: Substitute pretzels with toasted almonds or pecans for a different kind of crunch.
    • Vegan Option: Omit the bacon and add grilled tofu or chickpeas for protein.
    • Seasonal Fruits: Swap strawberries for other seasonal fruits like peaches or blueberries.

    Storage

    To store leftovers, keep the salad and dressing separate in airtight containers in the refrigerator. The salad can be stored for up to 2 days. Add the dressing and pretzels just before serving to maintain freshness and crunch.

    FAQ

    Can I make this salad ahead of time?

    Yes, you can prepare the components like the bacon and dressing in advance. However, for the freshest taste, it’s best to assemble the salad just before serving.

    What can I use instead of flax seed oil?

    If you don’t have flax seed oil, you can substitute it with extra virgin olive oil or avocado oil for a similar flavor profile.

    Nutrition

    This salad is a nutritious choice, offering a good balance of healthy fats, vitamins, and fiber. The combination of greens, avocado, and strawberries provides a wealth of nutrients, while the bacon and pretzels add protein and carbohydrates to keep you satisfied.

    Final Thoughts

    This Strawberry Pretzel Salad is more than just a dish; it’s a celebration of flavors and memories. Whether you’re serving it at a family gathering or enjoying it as a rewarding meal for yourself, it is sure to bring joy and satisfaction. I hope this recipe becomes a staple in your kitchen, as it has in mine. Enjoy the delightful crunch, the burst of fruity sweetness, and the comforting savory notes in every bite. Happy cooking!

    Related update: Strawberry Pretzel Salad

    Related update: Roasted Broccoli with Lemon and Garlic

    Related update: Chicken Liver Salad

  • Pennsylvania Dutch Pickled Eggs | Made by Meaghan Moineau

    Pennsylvania Dutch Pickled Eggs | Made by Meaghan Moineau

    Pennsylvania Dutch Pickled Eggs

    Why You’ll Love It

    Pickled eggs are a delightful and tangy treat that will transport you to the heart of Pennsylvania Dutch country. Not only are they visually striking with their vibrant pink hue, but they also pack a punch of flavor that is both sweet and tangy. These pickled eggs are a testament to the simplicity and resourcefulness of traditional cooking, using basic pantry staples to create something truly special. Whether you’re a fan of traditional pickling or looking to try something new, these eggs are sure to become a favorite in your household.

    I remember the first time I encountered pickled eggs at a small family gathering in rural Pennsylvania. My great-aunt Martha would bring a large jar of these beautifully colored eggs, and they were always the first to disappear from the table. To this day, the taste of these pickled eggs brings back cherished memories of family, laughter, and the warm kitchen where we gathered to share stories and food.

    Ingredients

    • 1 can of beets, drained (reserve the liquid)
    • 1 cup cider vinegar
    • 12 hard-boiled eggs, peeled
    • 1/2 cup granulated sugar
    • 1 onion, thinly sliced
    • 1 teaspoon table salt

    Instructions

    1. Drain the liquid from the beets into a medium saucepan. Set the beets aside for later use.
    2. In a large bowl or jar, layer the beets, sliced onions, and hard-boiled eggs.
    3. Add the granulated sugar and cider vinegar to the saucepan with the beet liquid and stir well.
    4. Bring the mixture to a boil over medium heat, stirring occasionally to ensure the sugar dissolves completely.
    5. Once boiling, reduce the heat to low and let the mixture simmer for 15 minutes.
    6. Carefully pour the hot beet juice mixture over the beets, eggs, and onions in the bowl or jar.
    7. Seal the bowl or jar tightly with a lid.
    8. Refrigerate the pickled eggs for at least one day before serving. The longer the eggs sit, the more flavorful they will become.

    Tips

    For the best results, ensure that the eggs are completely submerged in the pickling liquid. If necessary, you can weigh them down with a small plate or a clean object that fits inside the jar. Allowing the eggs to sit for at least three days will enhance the flavor and color even more. Always use freshly boiled eggs for easier peeling, and make sure they are completely cooled before pickling.

    Variations & Substitutions

    The beauty of this recipe lies in its versatility. Here are some variations and substitutions you can try to suit your taste preferences:

    • Spice it up: Add whole cloves, peppercorns, or a cinnamon stick to the pickling liquid for a spicier kick.
    • Sweeter touch: Increase the granulated sugar by a few tablespoons if you prefer a sweeter pickled egg.
    • Alternative vinegar: White vinegar or red wine vinegar can be used in place of cider vinegar for a slightly different flavor profile.
    • Vegetarian option: Omit the eggs and use only beets and onions for a vibrant pickled veggie side dish.

    Storage

    Store the pickled eggs in the refrigerator in a sealed jar or airtight container. They will keep for up to two weeks, but are best enjoyed within the first week for optimal flavor and texture. Always ensure the eggs are covered completely by the pickling liquid to prevent spoilage.

    FAQ

    Can I use fresh beets instead of canned?

    Yes, you can use fresh beets. Simply boil them until tender, peel, and slice. Use the cooking water as part of your beet liquid for the pickling process.

    Why did my eggs turn rubbery?

    If your eggs turned rubbery, they may have been overcooked during the boiling process. Ensure that you cook the eggs just until the yolks are set and immediately cool them in ice water to stop the cooking process.

    Can I reuse the pickling liquid?

    Reusing pickling liquid is not recommended as it loses potency and may harbor bacteria after the initial use. It’s best to make a fresh batch for each new set of pickled eggs.

    Nutrition

    Each pickled egg contains approximately:

    • Calories: 80
    • Protein: 6g
    • Fat: 5g
    • Carbohydrates: 5g
    • Sugar: 4g
    • Sodium: 200mg

    Final Thoughts

    Pennsylvania Dutch Pickled Eggs are a delightful way to bring a touch of tradition into your kitchen. Their vibrant color and unique flavor make them a standout addition to any meal, whether it’s a picnic, a holiday gathering, or simply a snack on a lazy afternoon. As you savor each bite, may it bring you comfort and nostalgia, just as it has for generations of families before. Enjoy the taste of history and the love that goes into every jar of these pickled treasures.

    Related update: Pennsylvania Dutch Pickled Eggs

    Related update: Oven-Baked Feta Cheese Dip