Category: lunch

  • Masala-Tofu Burger | Made by Meaghan Moineau

    Masala-Tofu Burger | Made by Meaghan Moineau

    Masala-Tofu Burger

    Introduction

    Imagine a family gathering on a warm summer evening, the aroma of spices wafting through the air as laughter echoes in the backyard. This memory always takes me back to the first time I tasted a Masala-Tofu Burger, a delightful fusion of Indian spices and a beloved Western classic. Growing up in a multicultural family, food was always a bridge that connected us, blending flavors and traditions into something special. Today, I’m excited to share this delicious recipe with you, hoping it brings warmth and joy to your own family gatherings.

    Why You’ll Love It

    This Masala-Tofu Burger is a game-changer for anyone looking to add a flavorful twist to their burger repertoire. The combination of aromatic spices, crunchy veggies, and creamy tofu creates a mouthwatering experience that’s both satisfying and healthy. Whether you’re a vegetarian or simply exploring new flavors, this burger is a fantastic option. It’s easy to make, customizable, and perfect for any occasion.

    Ingredients

    • 1 white onion, diced
    • 1 red, orange, or green bell pepper, diced
    • 1 cup frozen peas-carrots mix
    • 2 green chillies, chopped
    • 1 block of tofu, cubed
    • 1 potato, boiled and diced
    • 3 cloves garlic, minced
    • 1 teaspoon black mustard seeds
    • 1 sprig curry leaves
    • A pinch of hing (asafoetida)
    • 1 teaspoon cumin powder
    • 1/2 teaspoon turmeric
    • 1 lemon, juiced
    • Salt to taste
    • 1/4 cup cilantro, finely chopped
    • 1/2 cup Indian breadcrumbs
    • Vegetable oil
    • PAM Original Flavor Spray
    • 1 red or white onion, thickly sliced
    • 2 beefsteak tomatoes, sliced
    • Mint-cilantro chutney spread
    • 4 Portuguese rolls

    Instructions

    1. In a large skillet over medium-high heat, spray a generous amount of PAM and add some oil. Add mustard seeds and saute for 30 seconds until you hear popping noises.
    2. Add the curry leaves carefully as they may pop in hot oil. Then add the onions and peppers, and sweat for about 30 seconds.
    3. Stir in the minced garlic, chopped chilies, and turmeric. Saute for 5-7 minutes until the onions and peppers are soft.
    4. Add the peas-carrots mix, cumin powder, and salt. Continue to saute for 7-10 minutes until all the veggies are cooked through.
    5. In a small bowl, mix cubed tofu with a pinch of turmeric, cumin powder, coarse black pepper, and optional cayenne pepper. Set aside to marinate briefly.
    6. Add the marinated tofu to the skillet and saute until it is slightly browned and crumbly.
    7. Add juice from half a lemon and half of the chopped cilantro. Mix well, then add the diced, boiled potato and toss until everything is coated. Adjust salt and spices to taste.
    8. Mash the mixture with a masher until mushy and the veggies are small. Set aside to cool.
    9. Once cooled, mix in some breadcrumbs with your hands. Form the mixture into four thick patties. Add more breadcrumbs if needed.
    10. Place the patties on a plate, cover with plastic wrap, and refrigerate until ready to cook.
    11. In a small skillet sprayed with PAM over medium-high heat, cook each patty for about 2 minutes on each side until browned and crispy.
    12. Simultaneously, saute the thick onion slices until charred and slightly soft.
    13. Spread a generous amount of mint-cilantro chutney on each side of the Portuguese rolls, then assemble the burger with the patty, onions, tomatoes, and cilantro leaves.
    14. Serve with a slice of lemon and reduced-fat chips on the side.

    Tips

    • Make sure to press the tofu well before marinating to remove excess moisture for a better texture.
    • If you like it spicy, feel free to add more green chilies or cayenne pepper to the mix.
    • For a gluten-free option, use gluten-free breadcrumbs or crushed cornflakes.

    Variations & Substitutions

    Feel free to get creative with this recipe by adding your favorite veggies to the mix, such as mushrooms or spinach. You can also swap tofu for paneer or chickpeas for a different protein source. If you prefer a different type of bread, whole-grain buns or lettuce wraps are excellent alternatives.

    Storage

    These Masala-Tofu Patties can be made ahead of time and stored in the refrigerator for up to 3 days. Alternatively, you can freeze them for up to a month. When ready to enjoy, simply thaw and reheat them in a skillet or oven.

    FAQ

    Can I make these burgers vegan?

    Absolutely! This recipe is already vegan as it uses tofu as the main protein source and skips any dairy or eggs. Just ensure your chutney spread is also vegan-friendly.

    Can I grill these patties instead of pan-frying?

    Yes, you can grill the patties for a smokier flavor. Just make sure to brush them with some oil to prevent sticking and handle them carefully as they can be more delicate than regular meat patties.

    What can I serve with these burgers?

    A fresh green salad, sweet potato fries, or roasted vegetables make excellent sides. You can also pair it with a refreshing yogurt dip or mango chutney for an extra burst of flavor.

    Nutrition

    While I don’t have exact nutritional information for this recipe, it’s packed with healthy ingredients. Tofu provides protein, while the variety of vegetables offers vitamins and minerals. Using a whole-grain bun can increase the fiber content, making this meal as nutritious as it is delicious.

    Final Thoughts

    The Masala-Tofu Burger is a wonderful way to explore new flavors while enjoying a comforting classic. It’s a tribute to the fusion of cultures and the joy of shared meals. I hope this recipe becomes a favorite in your home, bringing smiles and satisfaction to your table. Happy cooking!

    Related update: Masala-Tofu Burger

    Related update: Indian Butter Chicken

  • Steamed Clams In Wine and Chorizo | Made by Meaghan Moineau

    Steamed Clams In Wine and Chorizo | Made by Meaghan Moineau

    Steamed Clams in Wine and Chorizo

    Welcome to my kitchen! Today, I’m excited to share with you a recipe that carries a special place in my heart: Steamed Clams in Wine and Chorizo. This dish is a delightful fusion of flavors that brings back fond memories of summer evenings spent by the seaside. I remember the first time I enjoyed this dish was during a family vacation in Spain. We gathered around a big table, the sea breeze gently brushing against our faces, as we eagerly dipped crusty bread into the rich, savory broth. It was an experience that made me fall in love with the simplicity and charm of this meal. Now, I’m thrilled to recreate this dish with you, bringing a taste of the coast into your home.

    Why You’ll Love It

    This recipe is a magnificent blend of simplicity and flavor that captures the essence of coastal dining. The savory chorizo complements the briny clams perfectly, while the hint of cumin and the vibrant freshness of cilantro add depth and complexity. Plus, it’s a one-pot dish, making it both convenient and quick to prepare. Whether you’re hosting a dinner party or enjoying a cozy night in, this dish is sure to impress and delight your guests.

    Ingredients

    • 1 Spanish chorizo, cut into slices
    • 1 teaspoon cumin seeds
    • 1 cup dry white wine
    • 1/4 cup fresh cilantro, chopped
    • 1 garlic clove, minced
    • 2 pounds little neck clams, scrubbed
    • 2 tablespoons olive oil
    • 1 onion, diced
    • 1/2 teaspoon salt
    • 1 yellow bell pepper, diced

    Instructions

    1. Heat the olive oil in a deep pot over moderate heat. Add the onion, yellow bell pepper, garlic, cumin seeds, and salt. Cook, stirring occasionally, until the vegetables are softened, about 7 to 9 minutes.
    2. Stir in the dry white wine and bring the mixture to a boil.
    3. Add the clams and chorizo to the pot. Cover and boil until the clams open, approximately 7 to 8 minutes. Discard any clams that do not open.
    4. Season the dish with freshly cracked pepper and stir in the chopped cilantro.
    5. Serve the clams with some crusty bread to sop up the delicious sauce.

    Tips

    For the best results, ensure your clams are fresh. They should have a pleasant, briny smell and be tightly closed. If any are open, give them a tap; they should close. If not, discard them. Additionally, don’t skip the crusty bread! It’s perfect for soaking up the flavorful broth and makes the meal truly satisfying.

    Variations & Substitutions

    If you’re not a fan of cilantro, you can swap it for fresh parsley, which will also add a nice herbaceous note. Feel free to experiment with different types of chorizo or even replace it with another smoked sausage if you prefer a milder flavor. For a spicier kick, add a pinch of red pepper flakes to the pot along with the cumin seeds.

    Storage

    If you have leftovers, store them in an airtight container in the refrigerator for up to two days. To reheat, gently warm them in a saucepan over low heat, adding a splash of water or broth if needed to restore the sauce’s consistency. However, this dish is best enjoyed fresh, as reheating can sometimes affect the texture of the clams.

    FAQ

    Can I use frozen clams?

    While fresh clams are recommended for the best flavor and texture, you can use frozen clams in a pinch. Just make sure they’re fully thawed before cooking, and adjust the cooking time as needed.

    What type of white wine should I use?

    A dry white wine like Sauvignon Blanc or Pinot Grigio works wonderfully in this recipe, adding a crisp acidity that pairs beautifully with the briny clams and rich chorizo.

    Nutrition

    This dish is not only delicious but also a good source of protein and essential nutrients. Clams are high in iron and vitamin B12, while chorizo adds flavorful fats and proteins. Just be mindful of the sodium content, especially if you’re watching your salt intake.

    Final Thoughts

    Steamed Clams in Wine and Chorizo is more than just a dish; it’s an invitation to experience the flavors of the sea, the warmth of the chorizo, and the comfort of a home-cooked meal. I hope that as you prepare and share this recipe with your loved ones, it brings as much joy and fond memories to your table as it has to mine. Bon appétit!

    Related update: Steamed Clams In Wine and Chorizo

    Related update: Masala-Tofu Burger

    Related update: Steak with lemon and capers

  • Minestrone | Made by Meaghan Moineau

    Minestrone | Made by Meaghan Moineau

    Minestrone: A Comforting Bowl of Italian Tradition

    There’s something magical about a steaming bowl of minestrone soup that’s hard to put into words. It’s more than just a meal; it’s a nostalgic embrace on a chilly evening, a celebration of fresh vegetables in every spoonful, and a testament to the simplicity of good cooking. I remember my grandmother simmering this hearty soup on the stove, her kitchen filled with the rich aroma of herbs and simmering tomatoes. Those memories of gathering around her table, slurping the warm broth alongside chunks of crusty bread, are treasured moments of comfort and joy.

    Why You’ll Love It

    Minestrone is a versatile and comforting dish that warms the soul. It’s packed with nutritious vegetables, making it not only delicious but also healthy. This recipe is perfect for those who love to experiment with flavors and textures, as it is easily adaptable to whatever ingredients you have on hand. Whether you’re a veteran cook or a kitchen novice, you’ll appreciate how straightforward and rewarding this dish is to make.

    • Nutritious and Filling: Packed with a variety of vegetables, it’s a nutrient-dense meal.
    • Comfort in a Bowl: Perfect for chilly days or when you need a comforting meal.
    • Customizable: You can easily adjust the ingredients to suit your taste or dietary needs.
    • Easy to Make: Simple steps lead to a delicious result, making it perfect for weeknight dinners.

    Ingredients

    • 2 tablespoons butter
    • 2 cups carrots, diced
    • 2 cups celery, diced
    • 2 cups onions, chopped
    • 4 cloves garlic, minced
    • 2 cups cabbage, shredded
    • 1 can (28 ounces) canned tomatoes
    • 6 cups water
    • 1 cup brown rice
    • 2 teaspoons salt
    • 1 teaspoon Worcestershire sauce
    • 1 tablespoon Italian mixed seasoning
    • 1/2 teaspoon pepper
    • 2 cups potatoes, diced
    • 2 beef bouillon cubes
    • 2 cups zucchini, sliced
    • 1 can (15 ounces) canned kidney beans, drained and rinsed
    • 1 cup frozen spinach
    • 1/2 cup Parmesan cheese, grated

    Instructions

    1. Melt butter in a large soup kettle over medium heat.
    2. Add carrots, celery, onions, garlic, and cabbage. Sauté for about 20 minutes, stirring often, until the vegetables are tender.
    3. Stir in canned tomatoes, water, brown rice, salt, Worcestershire sauce, Italian seasoning, pepper, potatoes, bouillon cubes, and zucchini.
    4. Bring the mixture to a boil, then reduce the heat and simmer covered for at least 30 minutes.
    5. Add the kidney beans and frozen spinach. Return the soup to a boil and cook over medium heat until the spinach is cooked through. Add more water if needed to reach your desired consistency.
    6. Serve hot, garnished with grated Parmesan cheese. Enjoy!

    Tips

    • Prep Ahead: Chop your vegetables in advance to make the cooking process quicker and smoother.
    • Consistent Size: Dice your vegetables to a similar size to ensure even cooking.
    • Stir Often: Stir the pot frequently, especially during the initial sauté step, to prevent sticking.

    Variations & Substitutions

    This minestrone soup is highly adaptable. Here are a few ideas to make it your own:

    • Vegetable Substitutions: Feel free to swap in other vegetables such as green beans, peas, or bell peppers.
    • Grain Alternatives: If you’re not a fan of brown rice, try using pasta, quinoa, or barley.
    • Protein Boost: Add cooked chicken or sausage for extra protein.
    • Vegan Version: Use vegetable bouillon cubes and omit the Parmesan cheese.

    Storage

    Minestrone soup stores exceptionally well, making it perfect for meal prep:

    • Refrigerator: Store in an airtight container for up to 5 days.
    • Freezer: Freeze in portioned containers for up to 3 months. Thaw overnight in the refrigerator before reheating.
    • Reheating: Gently reheat on the stovetop over medium heat, adding a splash of water if the soup has thickened too much.

    FAQ

    Can I make this soup in a slow cooker?

    Yes, you can! Simply add all the ingredients except for the kidney beans, spinach, and Parmesan cheese to your slow cooker. Cook on low for 6-8 hours or on high for 3-4 hours. Stir in the beans and spinach in the last 30 minutes of cooking, and garnish with Parmesan before serving.

    What can I serve with minestrone?

    Minestrone is delightful on its own but pairs beautifully with a side of crusty bread, a fresh green salad, or even a cheesy garlic bread for a bit of indulgence.

    Nutrition

    This minestrone soup is not only tasty but also nutritious, packed with vitamins, minerals, and fiber from a variety of vegetables. Each serving (without Parmesan cheese) contains approximately:

    • Calories: 150
    • Protein: 6g
    • Carbohydrates: 30g
    • Fat: 3g
    • Fiber: 7g

    Final Thoughts

    Minestrone is more than just a soup; it’s a warm hug in a bowl. Whether you’re cooking for family, friends, or just yourself, this recipe is sure to bring comfort and satisfaction. Its adaptability and ease of preparation make it a staple in any kitchen, and its rich flavors are bound to make it a favorite in your household. So, gather around the table and enjoy the simple pleasure of a homemade meal that speaks to the heart and soul.

    Related update: Minestrone

    Related update: 
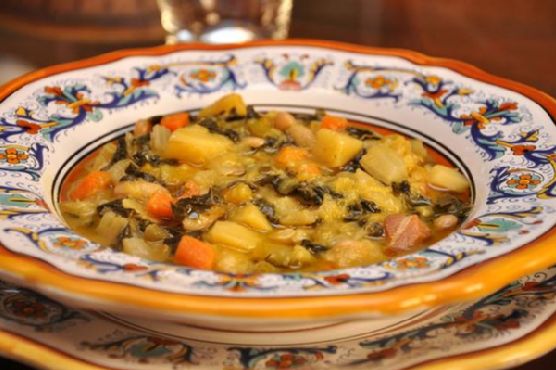
Kale and Chickpea Soup with Lemon

  • Chicken Cordon Bleu | Made by Meaghan Moineau

    Chicken Cordon Bleu | Made by Meaghan Moineau

    Chicken Cordon Bleu: A Classic Dish with a Twist

    Welcome to my kitchen! Today, I’m sharing a recipe that brings back fond memories of family gatherings and cozy dinners: Chicken Cordon Bleu. This classic dish, with its crispy exterior and gooey, savory filling, never fails to impress. Whether you’re cooking to impress guests or simply treating yourself to something special, you’ll find this recipe both delightful and rewarding.

    Why You’ll Love It

    Chicken Cordon Bleu is a dish that combines the best of flavors and textures. Imagine tender chicken encasing a melty layer of Swiss cheese and savory ham—it’s pure comfort on a plate. What makes this recipe particularly special is its simplicity and adaptability. No need for complex techniques or obscure ingredients; just straightforward cooking that yields fantastic results. Plus, the satisfaction of slicing into the perfectly cooked roulade is truly unparalleled.

    Ingredients

    • 4 skinless boneless chicken breasts
    • 8 slices of Swiss cheese
    • 8 slices of deli ham
    • 1/2 cup flour
    • 2 eggs
    • 2 tablespoons water
    • 1 cup panko bread crumbs
    • 1 tablespoon fresh thyme leaves
    • 1 teaspoon kosher salt
    • 1/2 teaspoon black pepper
    • 2 tablespoons olive oil

    Instructions

    1. Preheat your oven to 350°F (175°C).
    2. Butterfly the chicken breasts by slicing them in half lengthwise, but do not cut all the way through.
    3. Place each breast between two pieces of plastic wrap. Using the flat side of a meat mallet, gently pound to about 1/4-inch thick, being careful not to tear the meat.
    4. Lay 2 slices of Swiss cheese on each chicken breast, followed by 2 slices of ham, and another 2 slices of cheese, leaving a half-inch margin around the edges.
    5. Tuck in the sides of the chicken and roll it tightly like a jellyroll. Gently squeeze the roll to help seal it.
    6. Season the flour with salt and pepper and spread it on wax paper or a flat dish.
    7. Mix the breadcrumbs with thyme, kosher salt, pepper, and olive oil to help the crust brown nicely.
    8. Beat together the eggs and water until fluid.
    9. Lightly dust each chicken roll with the seasoned flour, dip it into the egg mixture, and then gently coat it with the breadcrumb mixture.
    10. Carefully transfer the rolls to a baking pan and bake for about 20 minutes, or until browned and cooked through.
    11. Serve whole or slice into pinwheels for a beautiful presentation.

    Tips

    To ensure your Chicken Cordon Bleu turns out perfectly, here are a few tips:

    • Even Pounding: Make sure the chicken is evenly pounded to ensure uniform cooking.
    • Sealing the Roll: Tucking in the sides and rolling tightly help keep the cheese and ham contained.
    • Crust Perfection: The olive oil in the breadcrumb mixture is key for a golden crust.

    Variations & Substitutions

    This classic dish is versatile and can be customized to your liking:

    • Cheese: Swap Swiss cheese for Gruyère or mozzarella for a different flavor profile.
    • Ham: Prosciutto is a fantastic alternative, offering a slightly saltier taste.
    • Seasoning: Feel free to add garlic powder or paprika to the breadcrumb mix for an extra kick.

    Storage

    Leftover Chicken Cordon Bleu can be stored in an airtight container in the refrigerator for up to 3 days. To reheat, place it in a preheated oven at 325°F until warmed through. Avoid microwaving as it might make the breadcrumb coating soggy.

    FAQ

    Can I prepare Chicken Cordon Bleu in advance?

    Absolutely! You can prepare the chicken rolls up to the breadcrumb coating step and refrigerate them for up to 24 hours before baking.

    What should I serve with Chicken Cordon Bleu?

    This dish pairs beautifully with a fresh green salad, roasted vegetables, or creamy mashed potatoes.

    Is it possible to make this dish gluten-free?

    Yes, simply substitute the flour and panko bread crumbs with gluten-free alternatives.

    Nutrition

    While Chicken Cordon Bleu is indulgent, it’s also a good source of protein. To make it a bit lighter, you can use reduced-fat cheese and leaner cuts of deli meat.

    Final Thoughts

    Chicken Cordon Bleu is more than just a dish; it’s an experience. From the moment you start preparing it to the first bite, it promises comfort and satisfaction. I hope this recipe brings as much joy to your table as it has to mine. Happy cooking!

    Related update: Chicken Cordon Bleu

  • Curry and Sage Roast Chicken | Made by Meaghan Moineau

    Curry and Sage Roast Chicken | Made by Meaghan Moineau

    Curry and Sage Roast Chicken

    There’s something incredibly heartwarming about the aroma of a roast chicken wafting through the house. It takes me back to Sunday afternoons at my grandmother’s, where the kitchen was a realm of delightful scents and warm embraces. Her roast chicken, seasoned with a blend of herbs and spices, was always the centerpiece of our family gatherings. Inspired by those cherished memories, I’ve created this Curry and Sage Roast Chicken recipe. It’s a dish that not only fills the belly but also warms the soul. Whether you’re cooking for a family dinner or a special occasion, this recipe promises to be a crowd-pleaser.

    Why You’ll Love It

    This Curry and Sage Roast Chicken is a flavorful twist on the classic roast. The combination of curry and fresh sage creates a unique and aromatic profile. Here’s why you’ll fall in love with this dish:

    • Flavorful: The curry adds a mild kick, while the sage provides an earthy balance.
    • Simple Ingredients: Made with pantry staples and fresh herbs.
    • Easy Preparation: A straightforward recipe that requires minimal prep time.
    • Juicy and Tender: The citrus juices keep the chicken moist and succulent.
    • Versatile: Perfect for any occasion, from weeknight dinners to festive gatherings.

    Ingredients

    • 1 whole chicken, cleaned and patted dry
    • 3 tablespoons olive oil
    • Juice of 1 lemon
    • Juice of 1 orange
    • 4 cloves garlic, minced
    • 2 tablespoons honey
    • 1 tablespoon fresh sage, chopped
    • 2 teaspoons curry powder
    • 1 teaspoon black pepper
    • 1/2 teaspoon turmeric

    Instructions

    1. Preheat your oven to 350°F (175°C).
    2. In a small bowl, combine olive oil, lemon juice, orange juice, minced garlic, honey, chopped sage, curry powder, black pepper, and turmeric. Mix well to create a marinade.
    3. Rub the chicken thoroughly with the marinade, ensuring it’s evenly coated. Carefully lift the skin and stuff some of the garlic and sage under it for added flavor.
    4. Place the chicken in a baking pan.
    5. Bake in the preheated oven. The baking time will vary based on the size of your chicken; generally, it takes about 20 minutes per pound. Keep an eye on the chicken and let the skin become golden and crispy.
    6. Once cooked, allow the chicken to rest for about 10 minutes before carving. This helps the juices redistribute, ensuring each bite is juicy.

    Tips

    • Use a Meat Thermometer: Ensure the chicken is cooked through by checking that the internal temperature reaches 165°F (74°C).
    • Resting Time: Allow the chicken to rest after roasting to ensure it remains juicy.
    • Even Coating: Make sure to rub the marinade evenly for consistent flavor.

    Variations & Substitutions

    Feel free to experiment with this recipe to suit your taste:

    • Herbs: If you’re not a fan of sage, rosemary or thyme make excellent alternatives.
    • Spices: Add a pinch of cayenne pepper for a spicier kick.
    • Honey Substitute: Maple syrup or agave nectar can be used if you prefer.

    Storage

    Leftover roast chicken can be stored in an airtight container in the refrigerator for up to 3 days. For longer storage, you can freeze the chicken for up to 3 months. Be sure to defrost thoroughly in the refrigerator before reheating.

    FAQ

    Can I use chicken pieces instead of a whole chicken?

    Absolutely! You can use chicken thighs or breasts if you prefer. Adjust the cooking time accordingly, as pieces will cook faster than a whole chicken.

    What can I serve with this Curry and Sage Roast Chicken?

    This dish pairs beautifully with a variety of sides. Consider serving it with roasted vegetables, a fresh green salad, or buttery mashed potatoes.

    Do I need to cover the chicken while roasting?

    It’s not necessary to cover the chicken. Roasting it uncovered allows the skin to become beautifully golden and crispy. However, if it starts to brown too quickly, you can tent it with foil.

    Nutrition

    This recipe is a balanced meal rich in protein and flavor. It’s low in carbs and provides essential vitamins and minerals from the herbs and spices. The use of olive oil and fresh citrus juices adds healthy fats and a refreshing taste.

    Final Thoughts

    This Curry and Sage Roast Chicken is a delightful dish that brings a touch of nostalgia and warmth to any meal. The combination of spices and citrus creates a harmony of flavors that is both comforting and invigorating. Whether you’re an experienced cook or just starting out, this recipe is simple to follow and results in a deliciously satisfying meal. I hope you enjoy making and sharing this dish as much as I do. Happy cooking!

    Related update: Curry and Sage Roast Chicken

    Related update: Chicken Cordon Bleu

  • Spare Ribs | Made by Meaghan Moineau

    Spare Ribs | Made by Meaghan Moineau

    Deliciously Sticky Spare Ribs

    There’s something truly magical about the aroma of spare ribs roasting in the oven, filling the house with warmth and mouthwatering scents. As a child, I remember visiting my grandmother’s house during the holidays, eagerly anticipating the moment when she’d open the oven door, revealing a tray of perfectly glazed ribs. The rich, savory sauce and tender meat were always the highlight of our family gatherings, a tradition I’ve lovingly continued with my own family. Today, I’m excited to share this cherished recipe with you, adding a touch of nostalgia to your kitchen and hopefully creating new memories for you and your loved ones.

    Why You’ll Love It

    This spare ribs recipe is the perfect balance of sweet and savory, with a sticky glaze that will have everyone licking their fingers clean. It’s surprisingly simple to prepare, yet it delivers restaurant-quality flavor that will impress any guest. Whether you’re hosting a barbecue, a casual dinner, or a festive celebration, these ribs are sure to be a hit. Plus, with the option to marinate overnight, you can save time on the day of your event, making it a stress-free addition to your menu.

    Ingredients

    • 2 tablespoons oil
    • 1/4 cup clear honey
    • 1 tablespoon fresh ginger root, grated
    • 1/4 cup dark soy sauce
    • 2 tablespoons hoisin sauce
    • 1 teaspoon five-spice powder
    • 2 garlic cloves, minced
    • 3 pounds of spare ribs

    Instructions

    1. Preheat your oven to 400 degrees Fahrenheit (200 degrees Celsius).
    2. In a jug, combine the oil, honey, ginger, soy sauce, hoisin sauce, five-spice powder, and garlic. Mix well to create a marinade.
    3. Place the spare ribs in a large dish and pour the marinade over them. Ensure the ribs are well coated, then cover and leave to marinate for as long as possible, ideally overnight in the refrigerator.
    4. Once marinated, place the ribs on a rack in a roasting pan.
    5. Cook the ribs in the preheated oven for about 45 minutes, turning them over halfway through the cooking time to ensure even glazing.
    6. After cooking, allow the ribs to cool slightly. Serve them cold or warm, as desired.

    Tips

    • For best results, marinate the ribs overnight. This allows the flavors to fully penetrate the meat, resulting in more flavorful ribs.
    • When turning the ribs halfway through cooking, baste them with the leftover marinade for an extra sticky glaze.
    • For a smokier flavor, consider finishing the ribs on a grill for a few minutes after roasting.

    Variations & Substitutions

    If you want to switch things up, here are a few variations and substitutions you can try:

    • Spicier Ribs: Add a teaspoon of chili flakes or a dash of hot sauce to the marinade for a spicy kick.
    • Alternative Sweeteners: Swap honey for maple syrup or brown sugar for a different type of sweetness.
    • Gluten-Free: Use tamari instead of soy sauce to make the dish gluten-free.
    • Different Protein: You can use the same marinade for chicken wings or pork chops if you prefer.

    Storage

    Store any leftover ribs in an airtight container in the refrigerator for up to 3 days. For longer storage, you can freeze the ribs for up to 3 months. To reheat, allow the ribs to thaw completely in the refrigerator, then warm them in the oven at 350 degrees Fahrenheit until heated through.

    FAQ

    Can I use a slow cooker for this recipe?

    Yes, you can! Simply place the marinated ribs in a slow cooker and cook on low for 6-8 hours or on high for 3-4 hours. Finish them off in the oven or on a grill to achieve a sticky glaze.

    What side dishes pair well with spare ribs?

    Spare ribs pair beautifully with a variety of side dishes, such as coleslaw, cornbread, baked beans, or roasted vegetables. For a refreshing contrast, consider serving a crisp salad with a tangy vinaigrette.

    Can I make the marinade in advance?

    Absolutely! You can prepare the marinade up to 3 days in advance and store it in an airtight container in the refrigerator. This can be a great time-saver for busy schedules.

    Nutrition (per serving)

    While the nutritional values can vary based on portion sizes and specific ingredients used, a general estimate for a serving of these spare ribs is approximately:

    • Calories: 450
    • Protein: 30g
    • Carbohydrates: 15g
    • Fat: 30g
    • Sugar: 10g

    Final Thoughts

    These sticky spare ribs are truly a labor of love, a recipe that brings fond memories and joy to any table. Whether you’re cooking for family or friends, this dish is sure to become a favorite in your home, just as it has in mine. With its simple preparation and irresistible taste, you’ll find yourself returning to this recipe time and time again. Enjoy the process, savor the results, and most importantly, cherish the moments shared with those around you. Happy cooking!

    Related update: Spare Ribs

    Related update: avarakkai paruppu curry recipe

  • Kohlrabi Salad With Apple, Bacon, and Snow Peas | Made by Meaghan Moineau

    Kohlrabi Salad With Apple, Bacon, and Snow Peas | Made by Meaghan Moineau

    Kohlrabi Salad With Apple, Bacon, and Snow Peas

    Welcome to a delightful journey of flavors and textures that will elevate your salad game to a whole new level. This Kohlrabi Salad with Apple, Bacon, and Snow Peas is not just a dish; it’s a symphony of crisp, sweet, and savory notes that come together harmoniously. Join me as we explore this refreshing recipe that’s perfect for any occasion.

    Why You’ll Love It

    There’s something magical about combining fresh, crunchy vegetables with the smoky, rich flavors of bacon. This salad offers a delightful contrast between the sweet and tart notes of Fuji apples and the creamy, tangy dressing. It’s a testament to how simplicity can yield extraordinary results.

    Growing up, I remember summers at my grandmother’s house where the garden was always brimming with fresh produce. The smell of freshly picked kohlrabi always brings back fond memories of helping her in the kitchen, where she taught me the art of creating dishes that celebrate each ingredient. This recipe is an ode to those warm summer days, sharing a meal with loved ones, and the joy of cooking from the heart.

    Ingredients

    • 1 kohlrabi bulb, peeled
    • 1 Fuji apple, chopped
    • 1 cup snow peas
    • 1/4 cup sunflower seeds
    • 4 slices of bacon, cooked and crumbled
    • 1/2 cup heavy cream
    • 2 tablespoons apple cider vinegar
    • 1 tablespoon honey

    Instructions

    1. Using a mandolin, slice the kohlrabi bulb paper thin.
    2. Mix the sliced kohlrabi with the chopped Fuji apple in a large bowl.
    3. Shell the snow peas (though I personally love eating the shell).
    4. Add the snow peas and sunflower seeds to the bowl.
    5. Crumble the cooked bacon finely and mix it into the salad.
    6. Refrigerate the salad while preparing the dressing.
    7. In a separate bowl, mix the apple cider vinegar into the heavy cream and let it sit at room temperature for 10 minutes until it thickens.
    8. Add the honey to the thickened cream and mix well.
    9. Gradually add the dressing to the salad, tossing gently to ensure everything is thinly coated.

    Tips

    For the best results, use fresh and high-quality ingredients. The sweetness of a Fuji apple complements the kohlrabi beautifully, but feel free to experiment with other apple varieties. A mandolin is essential for achieving paper-thin kohlrabi slices, but you can use a sharp knife if needed. Make sure to refrigerate the salad for at least 15 minutes before serving to allow the flavors to meld together.

    Variations & Substitutions

    If you’re looking for a vegetarian option, simply omit the bacon. To add more protein, consider topping the salad with grilled chicken or shrimp. You can also substitute the sunflower seeds with toasted almonds or walnuts for a different nutty flavor. If you prefer a lighter dressing, swap the heavy cream for Greek yogurt or buttermilk.

    Storage

    This salad is best enjoyed fresh, but you can store leftovers in an airtight container in the refrigerator for up to 2 days. The dressing may separate slightly, so give it a gentle stir before serving again.

    FAQ

    Can I prepare this salad in advance?

    Absolutely! You can prepare the salad components a day in advance, but I recommend adding the dressing just before serving to maintain the salad’s freshness and crunch.

    What if I don’t have a mandolin?

    No worries! While a mandolin helps achieve uniform slices, a sharp knife will work just fine. Just take your time to slice the kohlrabi as thinly as possible.

    Nutrition

    This salad is not only delicious but also nutritious. It’s packed with vitamins and minerals from the fresh vegetables and apples, healthy fats from the sunflower seeds and bacon, and a touch of sweetness from the honey. It’s a balanced dish that can fit into most dietary plans.

    Final Thoughts

    Whether you’re hosting a summer barbecue or looking for a refreshing lunch option, this Kohlrabi Salad with Apple, Bacon, and Snow Peas is sure to impress. It’s a dish that celebrates the beauty of fresh ingredients, simple preparation, and the joy of sharing a meal with those you love. I hope you enjoy it as much as I do. Happy cooking!

    Related update: Kohlrabi Salad With Apple, Bacon, and Snow Peas

    Related update: Noodle Kugel with Pineapple-Gluten free, Dairy Free

    Related update: Crab Cakes Rockefeller

  • Tuscan White Bean Soup with Olive Oil and Rosemary | Made by Meaghan Moineau

    Tuscan White Bean Soup with Olive Oil and Rosemary | Made by Meaghan Moineau

    Tuscan White Bean Soup with Olive Oil and Rosemary

    Introduction

    As the leaves start to change and the air becomes crisp, my kitchen transforms into a haven of warmth and comfort. One of my fondest memories is coming home on a chilly autumn day to the soothing aroma of my grandmother’s Tuscan White Bean Soup simmering on the stove. This recipe, passed down through generations, is not just a meal; it’s a heartfelt embrace, a reminder of home and love. Today, I’m sharing this cherished recipe with you, hoping it brings as much joy and warmth to your home as it does to mine.

    Why You’ll Love It

    This Tuscan White Bean Soup is a celebration of simplicity and flavor. Here’s why you’ll fall in love with it:

    • Easy to Make: With minimal ingredients and hands-off cooking in a slow cooker, this recipe is perfect for busy days.
    • Comforting and Nutritious: Packed with protein and fiber from the beans, this soup is both satisfying and nourishing.
    • Rich in Flavor: The olive oil and rosemary add a delightful fragrance and depth of flavor that elevates this humble soup.
    • Versatile: It can easily be adapted to suit your preferences or dietary needs.

    Ingredients

    • 1 bay leaf
    • 1 sprig of fresh rosemary
    • 3 cloves of garlic, minced
    • 2 tablespoons of olive oil
    • 1 large onion, chopped
    • 1 teaspoon of salt, or to taste
    • 8 cups of water
    • 2 cups of dried white beans, rinsed

    Instructions

    1. Rinse the beans thoroughly and place them in a 7-quart slow cooker.
    2. Add the water, onion, garlic, and bay leaf to the slow cooker.
    3. Cover and cook on LOW for about 8 hours, or until the beans are tender.
    4. Remove the bay leaf.
    5. Using a handheld immersion blender, puree the remaining ingredients to the desired texture.
    6. Add salt to taste.
    7. Ladle the soup into bowls.
    8. Drizzle with olive oil, sprinkle with rosemary, and serve.

    Tips

    • Soak the Beans: For even cooking, consider soaking the beans overnight. This can also reduce cooking time slightly.
    • Adjust Consistency: If you prefer a chunkier soup, blend just half of the beans and leave the rest whole.
    • Fresh Is Best: Use fresh rosemary and high-quality olive oil for the best flavor.

    Variations & Substitutions

    This soup is wonderfully adaptable:

    • Meat Lovers: Add cooked Italian sausage or pancetta for a heartier version.
    • Vegetables: Incorporate chopped spinach or kale for added greens.
    • Herb Substitutions: If rosemary isn’t your favorite, try thyme or sage for a different flavor profile.
    • Vegan Option: Ensure your toppings are vegan-friendly by skipping any cheese garnishes.

    Storage

    This soup stores beautifully, making it perfect for meal prep:

    • Refrigerator: Store in an airtight container for up to 5 days.
    • Freezer: Freeze in individual portions for up to 3 months. Thaw in the refrigerator overnight before reheating.

    FAQ

    Can I use canned beans instead of dried beans?

    Yes, you can use canned beans to save time. Use about 4 cups of drained and rinsed canned beans, and reduce the cooking time to about 2 hours on LOW. Adjust the liquid accordingly, as canned beans are already cooked.

    What can I use if I don’t have an immersion blender?

    If you don’t have an immersion blender, you can transfer the soup in batches to a regular blender. Be sure to hold the lid down with a kitchen towel to prevent hot splashes.

    Nutrition

    Each serving of this Tuscan White Bean Soup is packed with nutrients:

    • Calories: Approximately 220
    • Protein: 12g
    • Fiber: 8g
    • Fat: 6g (primarily from healthy olive oil)
    • Sodium: Varies based on the amount of salt added

    Final Thoughts

    There’s something truly magical about a bowl of homemade soup. This Tuscan White Bean Soup is more than just a recipe; it’s a connection to cherished memories and a testament to the power of simple ingredients. Whether you’re gathering around the table with family or enjoying a quiet moment to yourself, this soup promises warmth and contentment. I hope it becomes a beloved staple in your household, just as it has in mine. Enjoy!

    Related update: Tuscan White Bean Soup with Olive Oil and Rosemary

    Related update: Spare Ribs

    Related update: Minestrone

  • Venison Stew | Made by Meaghan Moineau

    Venison Stew | Made by Meaghan Moineau

    Hearty Venison Stew

    Welcome to a journey of flavor and warmth with this classic Venison Stew recipe. As the weather turns crisp and the leaves begin to fall, there’s nothing quite like a stew simmering on the stove to bring comfort and joy. This recipe is not just a dish; it’s a memory. I remember, as a child, visiting my grandparents’ cabin nestled in the woods. My grandfather would often return from a morning hunt with venison, and my grandmother would transform it into the most delicious stew. The aroma would fill the cabin, mingling with the scent of pine and the crackling wood fire. It’s a memory that has stayed with me, and I’m thrilled to share this special recipe with you.

    Why You’ll Love It

    This venison stew is a celebration of rich, earthy flavors and tender meat. Here’s why you’ll fall head over heels for it:

    • Flavorful and Hearty: Each bite is packed with the robust flavors of venison and vegetables, simmered to perfection.
    • Nutritious: Venison is a lean protein source that’s rich in vitamins and minerals.
    • Perfect for Any Occasion: Whether it’s a family dinner or a cozy night in, this stew is a crowd-pleaser.
    • Memorable: It’s a dish that brings people together, creating cherished memories around the table.

    Ingredients

    • 2 pounds venison stew meat
    • 1 cup flour, plus 3 tablespoons for thickening
    • 2 tablespoons vegetable oil
    • 4 cups water
    • 2 beef bouillon cubes
    • 4 large potatoes, peeled and diced
    • 1 large onion, chopped
    • 1 cup baby carrots, sliced
    • 4 stalks celery, sliced
    • 1 can mushrooms, drained
    • 1 green bell pepper, chopped
    • Salt and pepper to taste

    Instructions

    1. Cut the venison, potatoes, onion, baby carrots, celery, mushrooms, and green bell pepper into 1-inch pieces.
    2. In a large bowl, mix the venison with 1 cup of flour, salt, and pepper to coat evenly.
    3. In a large pot, heat the vegetable oil over medium-high heat. Brown the venison on all sides.
    4. Add the water and beef bouillon cubes to the pot. Bring to a boil, then reduce the heat and let it simmer for 2 hours.
    5. After 2 hours, add the potatoes, onion, carrots, celery, mushrooms, and green bell pepper to the pot. Simmer for an additional 30 minutes.
    6. In a small bowl, mix the remaining 3 tablespoons of flour with 1 cup of cold water. Stir this mixture into the stew to thicken.
    7. Continue to simmer for another 5-10 minutes until the stew has thickened to your desired consistency. Adjust seasoning with salt and pepper if needed.

    Tips

    • Be Patient: Allowing the venison to slowly cook over a couple of hours ensures it becomes tender and flavorful.
    • Consistent Cuts: Cutting the vegetables and meat into uniform sizes ensures even cooking.
    • Thickening Tips: If you prefer a thicker stew, add an additional tablespoon of flour to the thickening mixture.

    Variations & Substitutions

    • Meat Alternatives: If venison is not available, you can substitute it with beef or lamb for a different but equally delicious experience.
    • Vegetables: Feel free to add or substitute other vegetables such as parsnips or turnips for added depth and flavor.
    • Spices: Enhance the flavor with herbs like thyme, rosemary, or bay leaves.

    Storage

    Leftover venison stew can be stored in an airtight container in the refrigerator for up to 3 days. It also freezes well; simply place it in a freezer-safe container, where it can be stored for up to 3 months. To reheat, thaw overnight in the refrigerator and warm on the stove over medium heat until heated through.

    FAQ

    Can I use a slow cooker for this recipe?

    Absolutely! After browning the venison, transfer it along with all the other ingredients into a slow cooker. Cook on low for 6-8 hours or until the meat is tender.

    What can I serve with venison stew?

    This stew pairs wonderfully with crusty bread or a side of mashed potatoes. A fresh green salad also complements the hearty flavors beautifully.

    Nutrition

    Venison is a lean protein source that’s low in fat and calories, making this stew a nutritious option. It provides essential nutrients such as iron, zinc, and B vitamins. Combined with a medley of vegetables, this dish is both satisfying and wholesome.

    Final Thoughts

    This venison stew is more than just a meal; it’s an experience of warmth, nostalgia, and community. Whether you’re reminiscing about family gatherings or creating new memories, this stew is sure to become a treasured recipe in your collection. I hope you enjoy making and sharing it as much as I do. Bon appétit!

    Related update: Venison Stew

    Related update: Cavatappi pasta with salmon crab surimi

  • Dairy Free Chicken Salad | Made by Meaghan Moineau

    Dairy Free Chicken Salad | Made by Meaghan Moineau

    Dairy Free Chicken Salad

    Welcome to a delightful culinary journey with our Dairy Free Chicken Salad! This dish is a nostalgic nod to family picnics in the park. I remember those sunny days when my mom would whip up this comforting salad, and we’d enjoy it under the sprawling oak tree in our local park. The savory aroma of seasoned chicken mixed with the tangy zest of pickles and lemon would tantalize our senses, making each bite a moment to cherish. Now, I’m excited to share this recipe with you, hoping it brings as much joy to your table as it did to ours.

    Why You’ll Love It

    This Dairy Free Chicken Salad is a perfect blend of flavors and textures, making it a crowd-pleaser for any occasion. Whether you’re looking for a quick lunch, a picnic staple, or a dish for a potluck, this recipe has got you covered. It’s not only delicious and satisfying but also healthy, as it’s dairy-free and packed with protein. The combination of tender chicken with crunchy pickles and creamy Veganaise creates a perfect harmony that will leave your taste buds dancing. Plus, it’s incredibly easy to make, requiring minimal prep time so you can spend more time enjoying the company of your loved ones.

    Ingredients

    • 2 tablespoons olive oil
    • 1 pound skinless boneless chicken tenderloins
    • 1 teaspoon pepper
    • 1 teaspoon salt
    • 1 teaspoon paprika
    • 3 cooked whole eggs
    • 1/2 cup chopped dill pickles
    • 1/2 cup Veganaise
    • 1 tablespoon lemon juice
    • 1 teaspoon seasoned salt

    Instructions

    1. Thaw the chicken if needed.
    2. Add the olive oil to a large skillet and bring to medium heat.
    3. Add the chicken to the skillet and season with paprika, salt, and pepper.
    4. Turn every few minutes and cook until chicken is cooked through and juices run clear.
    5. Remove the chicken and place on a large cutting board.
    6. Using two forks, shred the chicken and place in a large bowl.
    7. If you haven’t already, boil the eggs. Cover the eggs with cold water in a large pot. Place pot over medium-high heat. As soon as it starts boiling, set your timer for 7 minutes. Done!
    8. Peel and chop up your eggs, then place them in the bowl with your shredded chicken.
    9. Chop up your dill pickles and add them to the bowl.
    10. Add the Veganaise, lemon juice, and seasoned salt.
    11. Toss to combine. Serve with your favorite bread.

    Tips

    For the best results, use fresh chicken tenderloins and cook them just until done to ensure they stay juicy. When shredding the chicken, don’t worry about making the pieces too small, as a bit of texture adds to the salad’s appeal. If you’re in a hurry, you can use pre-cooked rotisserie chicken as a time-saving alternative. And remember, the key to a perfect salad is tasting as you go, so feel free to adjust the seasoning to your liking.

    Variations & Substitutions

    This recipe is wonderfully adaptable. If you prefer a bit of sweetness, try adding a handful of dried cranberries or grapes. For a touch of crunch, toss in some chopped celery or nuts such as almonds or walnuts. If you don’t have Veganaise, regular mayonnaise or Greek yogurt can be used as substitutes, keeping in mind the latter will add dairy. For a spicier kick, a dash of hot sauce or a sprinkle of cayenne pepper works wonders.

    Storage

    Store any leftover chicken salad in an airtight container in the refrigerator. It will keep well for up to three days, making it a convenient option for meal prep. When ready to eat, give it a good stir and adjust the seasoning if necessary. Unfortunately, this dish doesn’t freeze well due to the mayonnaise-based dressing, so it’s best enjoyed fresh.

    FAQ

    Can I make this salad in advance?

    Absolutely! In fact, making it a day ahead allows the flavors to meld together beautifully. Just store it in the fridge and give it a good stir before serving.

    Is this recipe gluten-free?

    Yes, the salad itself is gluten-free. However, if you’re serving it with bread, make sure to choose a gluten-free variety if needed.

    Can I add fruits to this salad?

    Yes, adding fruits like grapes or diced apples can add a nice sweetness and additional texture to the salad. Just be sure to add them right before serving to maintain their freshness.

    Nutrition

    This Dairy Free Chicken Salad is a nutritious choice, packed with protein from the chicken and eggs. It’s also a good source of healthy fats from the olive oil and Veganaise. While exact nutritional values will vary based on portion sizes, you can rest assured that this dish is both satisfying and nourishing.

    Final thoughts

    Our Dairy Free Chicken Salad is a versatile dish that fits seamlessly into any meal plan. Its delightful combination of flavors and textures is sure to please even the pickiest eaters. Whether you’re making it for a family gathering, a picnic, or just a quick meal, it’s bound to become a household favorite. So gather your ingredients, follow the simple steps, and enjoy a taste of nostalgia with every bite. Happy cooking!

    Related update: Dairy Free Chicken Salad

    Related update: Lentil Salad With Vegetables