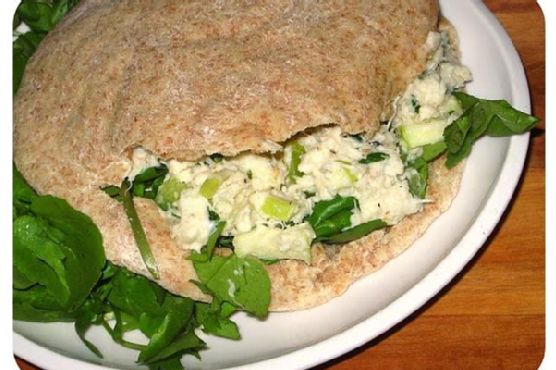
Category: lunch

  • Mediterranean Swiss Chard Wraps with Spicy Citrus Tahini | Made by Meaghan Moineau

    Mediterranean Swiss Chard Wraps with Spicy Citrus Tahini | Made by Meaghan Moineau

    Mediterranean Swiss Chard Wraps with Spicy Citrus Tahini

    Imagine biting into a wrap that bursts with the vibrant flavors of the Mediterranean — sun-dried tomatoes, tangy feta cheese, and a spicy citrus tahini dressing that dances on your taste buds. These Mediterranean Swiss Chard Wraps with Spicy Citrus Tahini aren’t just a meal; they’re an experience, a sunlit escape draped in emerald greens and golden hues.

    Personal Story

    It was a balmy Saturday afternoon when I first stumbled upon the idea of using swiss chard as a wrap. My weekly farmer’s market stroll had led me to a stand full of lush, leafy greens. As I held a bunch of swiss chard in my hands, a childhood memory of my grandmother’s garden rushed back — the way she’d pick fresh greens and infuse them with love and simple seasonings.

    Back in her cozy kitchen, she’d lovingly prepare dishes that were both nourishing and bursting with flavor. Though swiss chard wasn’t commonly on the menu, she always encouraged me to experiment with new ingredients. So, with a nostalgic nod to her adventurous spirit, I decided to embrace swiss chard as my wrap star.

    The first attempt was admittedly a kitchen disaster. I had underestimated the sheer size and unruliness of the leaves, which led to a messy yet delicious meal. But with each trial, I honed my technique, learning to balance the structural integrity of the leaves with the flavorful fillings inside.

    After several iterations, I crafted a version that not only held together beautifully but also packed a Mediterranean punch with sun-dried tomatoes, feta cheese, and a spicy citrus tahini dressing. My grandmother would be proud, I thought, as I took a triumphant bite of my creation.

    What Makes This Version Special

    What sets these Mediterranean Swiss Chard Wraps apart is the infusion of vibrant Mediterranean flavors. Instead of conventional fillings, I’ve opted for **sun-dried tomatoes** and **feta cheese**, which add a depth of flavor and a delightful tanginess. The **spicy citrus tahini dressing** is the heart of this dish, bringing together the nutty richness of tahini with the zesty punch of fresh lemon juice and a hint of cayenne pepper. It’s an invigorating twist that elevates the wraps from ordinary to extraordinary.

    Flavor Profile

    Imagine a savory blend of earthy greens meeting the zesty zing of citrus, all tied together with a nutty, spicy kick. The swiss chard brings a subtle bitterness, perfectly countered by the sweetness of **red bell pepper** and the creaminess of **avocado**. The **toasted pine nuts** add an aromatic crunch, while the **feta cheese** offers a briny tang. As you take a bite, the spicy citrus tahini dressing envelops your palate, leaving a lasting impression of vibrant flavors.

    Ingredients

    • 8 large swiss chard leaves
    • 1 small head of orange cauliflower
    • 2 tablespoons olive oil
    • 2 cloves of garlic, minced
    • Pinch of salt
    • 1/4 cup fresh basil, chopped
    • 1 zucchini, spiralized
    • 1 **red bell pepper**, thinly sliced
    • 1 **avocado**, sliced
    • 2 tablespoons Trader Joe’s spicy peanut vinaigrette
    • 1/4 cup **sun-dried tomatoes**, chopped
    • 1/4 cup **feta cheese**, crumbled
    • 2 tablespoons **fresh lemon juice**
    • 1/4 cup **tahini**
    • 1/2 teaspoon **cayenne pepper**
    • 1/4 cup **toasted pine nuts**

    Instructions

    1. Chop off the stems of the swiss chard at the point where it meets the leaf. You could stem the swiss chard entirely, but I like leaving a bit of stem with the leaves to give better structure to the wraps.
    2. Chop the cauliflower into small pieces and pulse them in a food processor until it looks like rice. I usually pulse the cauliflower florets and the stalk together.
    3. Place the olive oil in a sauté pan over medium-high heat. Once the pan is hot, add the garlic and let it fry for about a minute or two, or until the garlic starts to brown.
    4. Add the pulsed cauliflower rice and cook it for about 2-3 minutes. The cauliflower should turn into a vibrant yellow-orange color when it is cooked. Add a pinch of salt and chopped basil to the cauliflower and stir.
    5. Spiralize the zucchini with Blade B to create zucchini noodles. If you do not have a spiralizer, just create zucchini ribbons with a vegetable peeler.
    6. Toast the pine nuts in the pan until golden and aromatic before sautéing the garlic.
    7. Create a spicy citrus tahini dressing by blending tahini, fresh lemon juice, and cayenne pepper with a splash of water until smooth.
    8. To assemble the wraps, place a large leaf flat down. Add a bit of sautéed cauliflower, zucchini noodles, red pepper, and avocado along the swiss chard stalk. Drizzle a bit of vinaigrette on top of the vegetables and wrap everything up.
    9. Enjoy these wraps as a side to your favorite protein! Feel free to dip these wraps in more sauce.

    Pro Tips from Meaghan’s Kitchen

    • When selecting swiss chard, look for vibrant, crisp leaves with no signs of wilting.
    • If your swiss chard leaves are too stiff, blanch them quickly in boiling water for 20 seconds to make them more pliable.
    • To prevent your wraps from falling apart, don’t overfill them. Less is more!
    • For a smoother dressing, use a high-powered blender to combine the tahini, lemon juice, and cayenne pepper.
    • Try adding a splash of rice vinegar to the dressing for an extra tangy twist.

    Variations & Dietary Swaps

    • Vegetarian Swap: Replace the feta cheese with a vegan cheese or omit it altogether for a fully plant-based meal.
    • Spice-It-Up Version: Add a teaspoon of sriracha to the tahini dressing for an extra kick.
    • Kids-Friendly Version: Skip the cayenne pepper in the dressing and add a touch of honey for a sweeter flavor.

    What to Serve With It

    Pair these Mediterranean Swiss Chard Wraps with a chilled glass of Sauvignon Blanc or a side of tabbouleh salad. The light citrus notes in the wine complement the spicy citrus tahini dressing, while the tabbouleh adds a refreshing, herby contrast.

    Storage & Meal Prep

    These wraps are best consumed when they are freshly made. However, if you have leftovers, refrigerate them in an airtight container for up to two days. To reheat, unwrap the fillings and warm them in a pan before reassembling. If freezing, store the fillings separately and thaw in the fridge overnight before use.

    FAQ

    Can I use a different type of leaf for the wraps?

    Absolutely! Collard greens or large lettuce leaves can be a great alternative to swiss chard.

    How can I make these wraps more filling?

    Consider adding grilled chicken or chickpeas for added protein and satiety.

    Is there a substitute for tahini in the dressing?

    If you don’t have tahini, you can use almond butter or sunflower seed butter for a similar creamy texture.

    Can I make the dressing in advance?

    Yes, the dressing can be made up to three days in advance. Store it in the fridge in a sealed jar and shake well before using.

    What if I don’t have a food processor?

    You can finely chop the cauliflower by hand or use a box grater to achieve a similar rice-like texture.

    Final Thoughts

    These Mediterranean Swiss Chard Wraps with Spicy Citrus Tahini are a delightful way to savor the vibrant flavors of the Mediterranean right in your kitchen. I hope you enjoy making and eating them as much as I do. Please share your creations and any twists you add in the comments below. Let’s keep the conversation and inspiration flowing! Happy cooking!

    Related update: Mediterranean Swiss Chard Wraps with Spicy Citrus Tahini

  • Spicy Black Bean and Quinoa Burgers with Pineapple-Jalapeño Salsa | Made by Meaghan Moineau

    Spicy Black Bean and Quinoa Burgers with Pineapple-Jalapeño Salsa

    Imagine the savory aroma of smoky black beans mingling with the tropical sweetness of grilled pineapple, all encased in a golden-brown crust. These Spicy Black Bean and Quinoa Burgers with Pineapple-Jalapeño Salsa are more than just a meal; they’re an experience for your senses, right from the first sizzling bite.

    Personal Story

    I first stumbled upon the idea of using quinoa in burgers during a summer barbecue when my vegetarian friend challenged me to create a dish that would satisfy her plant-based lifestyle. I have to admit, I was skeptical at first. Could these little grains actually hold up in a burger? It was a culinary experiment that needed just the right balance of flavors and textures.

    As I rummaged through my pantry that day, the idea of adding a sweet-spicy twist to the standard veggie burger hit me like a flash of inspiration. I had some fresh pineapple and jalapeños in the fridge, and the rest, as they say, is history. The combination of smoky black beans and nutty quinoa, paired with a zesty pineapple-jalapeño salsa, turned out to be a game-changer. My friend, along with everyone else at the barbecue, was hooked on these Spicy Black Bean and Quinoa Burgers.

    Since then, this recipe has become a staple in my kitchen. It reminds me of that sunny afternoon, full of laughter and good company. Every time I make these burgers, it’s like having a little piece of that day right in my home. Sharing this recipe with you feels like inviting you to that very barbecue, where every bite is a celebration of flavors.

    What Makes This Version Special

    The unique twist in these Spicy Black Bean and Quinoa Burgers lies in the addition of quinoa and a sweet-spicy pineapple twist to the salsa. Quinoa isn’t just a trendy grain; it’s the secret to achieving that hearty yet fluffy texture that makes these burgers stand out. Toasting the quinoa before cooking enhances its nutty flavor, adding depth to the burger base.

    Moreover, the Pineapple-Jalapeño Salsa is where the magic truly happens. Grilling the pineapple slices before dicing them infuses a smoky sweetness that complements the jalapeño’s heat, creating a delightful contrast of flavors. This salsa isn’t just a topping; it’s a transformative element that elevates these veggie burgers to a whole new level.

    Flavor Profile

    Biting into these Spicy Black Bean and Quinoa Burgers is a multi-sensory experience. The patties are smoky and spicy, thanks to the smoked paprika and jalapeños, with a hint of tropical sweetness from the pineapple. Each bite delivers a hearty texture from the toasted quinoa, balanced by the freshness of the cilantro and the tanginess of lime. It’s a culinary dance of flavors that keeps your taste buds engaged from start to finish.

    Ingredients

    • 1 can black beans, drained and rinsed
    • **1 cup cooked quinoa**
    • 1 carrot, diced and microwaved
    • 1 stalk celery, diced
    • **1/2 cup diced fresh pineapple**
    • 1/2 cup canned corn, drained
    • 1 jalapeño, diced
    • 1/2 cup diced tomatoes
    • 2 green onions, diced
    • 1-2 garlic cloves, minced
    • 1/4 cup fresh parsley, chopped
    • Juice of 1 lime
    • 1 tsp creole seasoning
    • 1 tsp smoked paprika
    • 1 tsp cumin
    • 1/2 cup oatmeal
    • 1/2 cup panko breadcrumbs
    • 1/4 cup flour
    • Salt and pepper, to taste

    Instructions

    1. Preheat your oven to 425 degrees F. Lightly spray two baking sheets with nonstick spray and set aside.
    2. Toast the **quinoa** in a dry pan over medium heat for about 5 minutes or until you hear popping, and it turns golden-brown. Cook the quinoa according to package instructions.
    3. In a large bowl, mash the drained black beans until they reach a chunky consistency. Add the microwaved diced carrot and mix.
    4. Add the diced celery, smoked paprika, cumin, oatmeal, panko breadcrumbs, and creole seasoning to the bean mixture. Stir to combine.
    5. If the mixture is too moist, add more flour a tablespoon at a time until you can form patties without them falling apart.
    6. Form the mixture into patties, about 1/2 inch thick, and place them on the prepared baking sheets. Bake for 20 minutes, flipping halfway through until they are firm and golden-brown.
    7. While the burgers are baking, prepare the salsa. Grill the pineapple slices on a grill pan over medium-high heat until they have char marks, about 3 minutes per side. Dice the grilled pineapple and combine with canned corn, jalapeño, tomatoes, green onions, garlic, parsley, lime juice, salt, and pepper. Mix well and chill for about an hour before serving.
    8. Serve the burgers hot off the oven, topped with a generous spoonful of Pineapple-Jalapeño Salsa.

    Pro Tips from Meaghan’s Kitchen

    • For extra crispy edges, run a tablespoon of oil around the patties before baking.
    • To prevent the patties from sticking, let them rest for a minute before trying to flip them.
    • Chill the salsa for at least an hour to allow the flavors to meld together beautifully.
    • Use a potato masher for a quick and uniform mash of the black beans.

    Variations & Dietary Swaps

    • To make it gluten-free, swap the panko breadcrumbs for a gluten-free alternative.
    • For a spicier version, add an extra jalapeño to the salsa or sprinkle red pepper flakes into the burger mix.
    • Make it kid-friendly by replacing the jalapeño with a small, mild sweet bell pepper in the salsa.

    What to Serve With It

    These Spicy Black Bean and Quinoa Burgers pair perfectly with a chilled mango-lime agua fresca for a refreshing contrast. A side of crispy sweet potato fries complements the meal beautifully. If you’re feeling indulgent, add a slice of creamy avocado on top of your burger — it’s the perfect cool counterpart to the spicy salsa.

    Storage & Meal Prep

    Store cooked burger patties in an airtight container in the refrigerator for up to 3 days. For longer storage, freeze the patties on a baking sheet until solid, then transfer to a freezer-safe bag for up to 2 months. Reheat from frozen in a 350 degrees F oven for about 15 minutes or until heated through. The salsa, however, is best consumed fresh, as the texture changes over time.

    FAQ

    Can I use canned pineapple instead of fresh?

    While fresh pineapple is preferable for its vibrant flavor, canned pineapple can be used in a pinch. Ensure to drain it well before grilling.

    How can I make the burgers firmer?

    If your patties aren’t firm enough, try adding more panko breadcrumbs or flour to the mixture until you achieve the desired consistency.

    Can these burgers be grilled?

    Yes, these burgers can be grilled. Just be sure to oil the grill grates to prevent sticking, and handle the patties gently as they can be more fragile than meat-based burgers.

    Is there a way to make the salsa less spicy?

    To make the salsa milder, reduce the number of jalapeños or remove the seeds and membranes before dicing.

    What can I use instead of black beans?

    If you’re out of black beans, kidney beans or chickpeas make excellent substitutes in this recipe.

    Final Thoughts

    There you have it, friends — a recipe that brings a touch of tropical summers into your kitchen, with every bite of these Spicy Black Bean and Quinoa Burgers with Pineapple-Jalapeño Salsa bursting with flavor and heartiness. I hope you feel inspired to bring this dish to your next meal, and if you do, I’d love to hear all about it! Share your experiences, tweaks, and photos in the comments below. Happy cooking!

    Related update: Spicy Black Bean and Quinoa Burgers with Pineapple-Jalapeño Salsa

    Related update: Mediterranean Swiss Chard Wraps with Spicy Citrus Tahini

  • Madras Beef Curry | Made by Meaghan Moineau

    Madras Beef Curry | Made by Meaghan Moineau

    Madras Beef Curry

    Welcome to a journey into the warmth and spice of Indian cuisine with our Madras Beef Curry. This dish, filled with the aromatic flavors of garam masala and the heat of cayenne pepper, is bound to become a favorite in your household. Growing up, Sunday evenings at my grandmother’s house were always dedicated to exploring different cuisines, and the delightful aroma of curry simmering in the kitchen was my favorite. This Madras Beef Curry recipe brings back those cherished memories and is sure to create new ones for your family as well.

    Why You’ll Love It

    This Madras Beef Curry is a vibrant and hearty dish that will tantalize your taste buds. Here are a few reasons why you’ll fall in love with it:

    • Flavor Explosion: The combination of garam masala, cinnamon, and curry powder creates a symphony of flavors that dances on the palate.
    • Customizable Heat: Whether you like it mild or spicy, you can adjust the cayenne pepper to suit your taste.
    • Perfect for Meal Prep: This curry stores well and tastes even better the next day, making it ideal for meal prepping.
    • Comforting and Satisfying: Served over warm basmati rice, this curry provides a comforting meal that’s perfect for any occasion.

    Ingredients

    • 2 tsp garam masala
    • 1/2 tsp ground cinnamon
    • 2 tbsp curry powder
    • 1/2 tsp black pepper
    • 1 tsp salt
    • 1/4 tsp cayenne pepper
    • 1 tbsp light brown sugar
    • 4 garlic cloves, minced
    • 1-inch piece of ginger, grated
    • 2 tbsp lemon juice
    • 2 tbsp vegetable oil
    • 1.5 lbs beef, thinly sliced
    • 1 can (14 oz) diced tomatoes
    • 2 green onions, chopped
    • Cooked basmati rice, for serving

    Instructions

    1. Slice the beef thinly (as for a stir fry) and place it in a medium bowl.
    2. Add all of the other ingredients, except the tomatoes, green onions, and rice, and combine to coat the meat well.
    3. Let sit for 10-15 minutes to allow the flavors to infuse into the meat.
    4. Heat a medium pan with a lid over medium heat. Add the meat and brown well, stirring occasionally.
    5. Continue to cook over medium heat until all of the meat juices have evaporated and only oil remains in the bottom of the pan with the meat.
    6. Add the tomatoes, stir to combine, and lower the heat to medium low. Cover and simmer, stirring occasionally, until the meat is tender and most of the moisture from the tomatoes has been absorbed by the meat, about 30 minutes.
    7. If the sauce becomes too thick before the beef is tender, add 1/4 cup water and continue to simmer with the lid on.
    8. Taste and adjust the seasoning, adding additional salt if needed. For a spicier curry, additional cayenne pepper may be added at this point.
    9. Serve over steamed basmati rice with chopped green onions on top.

    Tips

    To ensure the best results, here are some tips:

    • Beef Selection: Choose a cut of beef that is suitable for quick cooking, such as sirloin or flank steak, to keep it tender.
    • Marinating Time: If you have extra time, marinate the beef longer for deeper flavors.
    • Consistent Slicing: Slice the beef evenly for uniform cooking.

    Variations & Substitutions

    This recipe is flexible and can be adapted to suit your preferences:

    • Protein Swap: Substitute chicken or lamb for beef. Adjust cooking time as needed.
    • Vegetarian Option: Use tofu or chickpeas in place of beef for a plant-based version.
    • Spice Level: Adjust the cayenne pepper to make it as mild or spicy as you like.

    Storage

    Leftover Madras Beef Curry can be stored in an airtight container in the refrigerator for up to 3 days. For longer storage, freeze in a freezer-safe container for up to 3 months. Reheat gently on the stovetop or in the microwave before serving.

    FAQ

    Can I make this curry ahead of time?

    Absolutely! This curry actually tastes better the next day as the flavors continue to develop. Just store it in the refrigerator and reheat before serving.

    What can I serve with Madras Beef Curry?

    This curry is traditionally served with basmati rice, but it also pairs well with naan bread or a side of steamed vegetables.

    Nutrition

    This Madras Beef Curry is not only delicious but also packed with protein and spices that may boost metabolism. For a lighter option, you can serve it with brown rice or quinoa.

    Final Thoughts

    Madras Beef Curry is more than just a meal; it’s an experience. Each bite invites you into a world of rich aromas and bold flavors, reminiscent of a cozy family dinner filled with laughter and good conversation. Whether you’re cooking for yourself, your family, or entertaining guests, this recipe is sure to impress. Enjoy the process of creating this dish and the warmth it brings to your table. Happy cooking!

    Related update: Madras Beef Curry

    Related update: Spicy Black Bean and Quinoa Burgers with Pineapple-Jalapeño Salsa

  • Sweet and Spicy Country-Style Ribs | Made by Meaghan Moineau

    Sweet and Spicy Country-Style Ribs | Made by Meaghan Moineau

    Sweet and Spicy Country-Style Ribs

    There’s something incredibly comforting about the aroma of ribs slowly cooking in a rich, spicy sauce. This recipe for Sweet and Spicy Country-Style Ribs brings back memories of long summer evenings spent with family in the backyard, the air filled with laughter and the tantalizing smell of barbecue wafting through the air. When I was a child, my grandfather would often prepare ribs for our family gatherings, and I remember watching him patiently tend to the grill, basting the ribs with a secret sauce he had perfected over the years. This recipe is inspired by those cherished memories, with a modern twist that adds a little extra kick.

    Why You’ll Love It

    These Sweet and Spicy Country-Style Ribs are a perfect blend of flavors that will satisfy both your sweet and savory cravings. The rich tomato sauce is balanced with the sweetness of honey and the tang of apple cider vinegar, while a touch of cayenne pepper and hot sauce adds just the right amount of heat. This dish is perfect for any occasion, whether you’re hosting a barbecue, enjoying a Sunday family dinner, or simply looking to treat yourself to a delicious homemade meal.

    Ingredients

    • 2 lbs beef short ribs
    • 2 tablespoons vegetable oil
    • 1 large yellow onion, diced
    • 2 cloves garlic, minced
    • 2 tablespoons unsalted butter
    • 1 cup tomato sauce
    • 1/4 cup apple cider vinegar
    • 3 tablespoons honey
    • 2 tablespoons hot sauce
    • 1/2 teaspoon cayenne pepper
    • 1 tablespoon ancho chili powder
    • 1 teaspoon salt
    • 1 teaspoon dry mustard
    • Vegetable scraps – carrot, celery, etc.
    • 3 cups beef stock
    • Water, as needed

    Instructions

    1. Heat the vegetable oil in a 6-quart enameled Dutch oven over medium-high heat. Brown the ribs on all sides.
    2. Pour in the beef stock; add water to cover if necessary. Add the vegetable scraps and bring to a boil. Lower the heat to a simmer, cover, and cook for 45 minutes to an hour, or until the ribs are tender.
    3. While the ribs are braising, melt the unsalted butter in a large cast-iron skillet over medium-low heat. Sauté the onions until soft, then add the garlic and sauté for another minute more.
    4. Stir in the tomato sauce, apple cider vinegar, honey, hot sauce, cayenne pepper, ancho chili powder, salt, and dry mustard. Bring the mixture to a boil, then reduce the heat and simmer uncovered for 25 minutes, stirring occasionally.
    5. When the ribs are tender, remove them from the braising liquid and add them to the spicy tomato sauce in the skillet.
    6. Raise the heat and cook, stirring frequently, until the sauce has glazed the ribs, about 10 minutes.
    7. Serve the ribs with the remaining sauce on the side, if desired.

    Tips

    To ensure the ribs are perfectly tender, make sure to simmer them gently and check for doneness by inserting a fork; it should slide in easily. If you find the ribs are tough, allow them to simmer a bit longer. Also, don’t rush the sauce; letting it simmer slowly allows the flavors to meld beautifully.

    Variations & Substitutions

    If you prefer a milder flavor, you can reduce the amount of cayenne pepper or omit the hot sauce altogether. For a different twist, try using maple syrup instead of honey for a deeper sweetness, or substitute red wine vinegar for apple cider vinegar for a more robust flavor. If you don’t have beef short ribs, pork ribs can be an excellent alternative.

    Storage

    Leftover ribs can be stored in an airtight container in the refrigerator for up to 3 days. To reheat, place the ribs in a baking dish, cover with foil, and warm them in a preheated oven at 350°F (175°C) until heated through. You can also freeze the ribs for up to 2 months; just make sure to thaw them in the refrigerator before reheating.

    FAQ

    Can I make these ribs in advance?

    Absolutely! You can prepare the ribs and sauce a day ahead, then store them separately in the refrigerator. When you’re ready to serve, simply reheat the ribs, combine them with the sauce, and let them cook together until the sauce is perfectly glazed.

    What side dishes go well with these ribs?

    These Sweet and Spicy Country-Style Ribs pair wonderfully with classic barbecue sides like coleslaw, cornbread, or baked beans. For a lighter option, a simple green salad or roasted vegetables would also complement the flavors nicely.

    Nutrition

    While specific nutritional values can vary based on the exact ingredients and serving sizes, a general serving of these ribs provides a hearty amount of protein, along with essential vitamins and minerals from the vegetables and spices. If you’re watching your sodium intake, you may wish to reduce the added salt or choose a low-sodium beef stock.

    Final Thoughts

    These Sweet and Spicy Country-Style Ribs are more than just a meal; they’re a way to bring people together. Whether you’re reminiscing about family gatherings or creating new memories, this dish offers a delightful blend of flavors that are sure to impress. So gather your loved ones, roll up your sleeves, and dive into these delicious ribs. Enjoy every sticky, savory-sweet bite!

    Related update: Sweet and Spicy Country-Style Ribs

  • Mixed Paella | Made by Meaghan Moineau

    Mixed Paella | Made by Meaghan Moineau

    Delicious Mixed Paella: A Taste of Spain in Your Kitchen

    Remember those long summer evenings when the family would gather around a large, vibrant dish, the aroma of saffron filling the air? Mixed Paella has always been a dish of celebration for me. Growing up, my family would often host get-togethers, and my mother would prepare this dish with love and enthusiasm. The sizzle of chorizo in the pan and the vibrant colors of fresh vegetables and seafood always created a symphony of flavors that we couldn’t resist. Today, I’m excited to share this cherished recipe with you, hoping it will bring as much joy to your table as it has to mine.

    Why You’ll Love It

    This Mixed Paella recipe is an ideal blend of land and sea, bringing together a rich tapestry of flavors and textures. The rice soaks up the robust taste of saffron and broth, while the seafood adds a delightful freshness. The crispy chorizo introduces a smoky depth that ties the dish together perfectly. Whether you’re a novice cook or a seasoned chef, this dish is both accessible and impressive, making it perfect for family dinners and special occasions alike.

    Ingredients

    • Bay leaf
    • Chicken broth
    • Chorizo sausage
    • Extra virgin olive oil
    • White fish
    • Garlic
    • Lemon
    • Lemon zest
    • Mussels
    • Spanish onion
    • Parsley
    • Peas
    • Red bell pepper
    • Crushed red pepper flakes
    • Dry rice
    • Saffron threads
    • Shrimp
    • Thyme

    Instructions

    1. In a very large non-stick skillet or paella pan preheated over medium-high heat, add 2 teaspoons of your olive oil (you will need more oil if you’re not using non-stick), garlic, red pepper flakes, and rice. Sauté for about 3 minutes.
    2. Add saffron, thyme, bay leaf, and chicken broth and bring to a boil. Cover and reduce the heat to a simmer. Leave covered, do not stir.
    3. In another non-stick skillet, heat to medium-high. Add chorizo and crumble as you sauté. When the sausage is cooked through, add red pepper and onion. Salt and pepper to taste if needed. Sauté until the onion is tender, then remove from heat and set aside.
    4. When the rice is nearly done (about 15 minutes), add fish and shrimp and press into the rice. Add mussels, peas, and sprinkle with lemon zest. Cover and continue to simmer until the rice is done and the mussels have opened. Discard any that do not open.
    5. Top with the chorizo mixture and parsley. Serve with lemon wedges and crusty bread.

    Tips

    For the best results, use a paella pan if you have one, as its wide and shallow shape allows the rice to cook evenly. Remember not to stir the rice once the liquid has been added; this ensures the classic paella texture. Use fresh seafood for the best flavor, and don’t skimp on the saffron—it truly is the soul of this dish.

    Variations & Substitutions

    If you’re looking to customize your paella, consider these variations:

    • Vegetarian Option: Replace the seafood and chorizo with a variety of mushrooms and artichokes for a hearty vegetarian version.
    • Meat Lovers: Add some diced chicken thighs or rabbit for a more traditional take on paella Valenciana.
    • Spice It Up: If you enjoy a kick of heat, increase the amount of crushed red pepper flakes or add a splash of hot sauce.

    Storage

    Leftover paella can be stored in an airtight container in the refrigerator for up to 3 days. To reheat, add a splash of water or broth and warm slowly over low heat to maintain the dish’s moist texture. Avoid using the microwave as it can dry out the rice.

    FAQ

    Can I make paella in advance?

    Yes, you can prepare the components in advance, such as cooking the chorizo and chopping the vegetables. However, for the best flavor and texture, it’s recommended to cook the rice and assemble the dish just before serving.

    What type of rice should I use for paella?

    Short-grain rice, such as Bomba or Arborio, is ideal for paella as it absorbs the liquid well without becoming mushy. Avoid using long-grain rice as it doesn’t provide the traditional paella texture.

    Can I use frozen seafood?

    While fresh seafood is preferred for the best flavor, you can use frozen seafood in a pinch. Just ensure it is fully thawed and drained before adding to the paella to avoid excess moisture.

    Nutrition

    This Mixed Paella is a balanced dish, providing a good source of protein from the seafood and chorizo, and plenty of vitamins and minerals from the vegetables. Saffron is known for its antioxidant properties, and the olive oil adds heart-healthy fats.

    Final Thoughts

    Mixed Paella is more than just a dish; it’s a celebration of flavors and cultures, a reminder of family gatherings and joyous occasions. With its vibrant colors and rich flavors, it’s sure to become a favorite in your household. I hope this recipe brings warmth and happiness to your table, just as it has to mine. Bon appétit!

    Related update: Mixed Paella

    Related update: Sweet and Spicy Country-Style Ribs

  • Strawberry Pretzel Salad | Made by Meaghan Moineau

    Strawberry Pretzel Salad | Made by Meaghan Moineau

    Strawberry Pretzel Salad

    Welcome to a delightful world of flavors with our Strawberry Pretzel Salad—a refreshing and vibrant dish that combines sweet, salty, and savory in a way that is sure to become your new favorite. This salad is not only delicious but also brings a touch of nostalgia with every bite. Let me take you on a journey back to my childhood summers at my grandmother’s house, where I first tasted the magic of strawberries and pretzels together. I remember sitting on her porch, the sun warming my face, as I enjoyed this unique combination that seemed to capture the essence of summer. Now, I am thrilled to share this cherished recipe with you.

    Why You’ll Love It

    This Strawberry Pretzel Salad is a symphony of flavors and textures. Here are a few reasons why you’ll fall in love with it:

    • Sweet and Savory Balance: The sweetness of strawberries paired with the salty crunch of pretzels creates a perfect harmony.
    • Texture Delight: Crisp cucumbers, creamy avocado, and crunchy pretzels make every bite exciting.
    • Healthy and Nutritious: Packed with greens, healthy fats, and fresh ingredients, this salad is as wholesome as it is delicious.
    • Easy to Make: With simple steps and readily available ingredients, this salad comes together in no time.
    • Versatile: Perfect as a light lunch, a side dish, or a beautiful addition to your dinner table.

    Ingredients

    • 2 cups arugula
    • 1 avocado, sliced
    • 6 slices bacon
    • 2 tablespoons balsamic vinegar
    • 1 cucumber, sliced
    • 2 tablespoons flax seed oil
    • 4 cups mixed spring greens
    • 1 red bell pepper, sliced
    • 1 cup pretzels, crushed
    • Salt and pepper to taste
    • 1 cup strawberries, sliced
    • 1 tablespoon whole grain mustard

    Instructions

    1. Preheat your oven to 300°F (150°C).
    2. Arrange the bacon slices on a baking sheet lined with tin foil.
    3. Bake the bacon for 30 minutes, turning once halfway through. Set aside and let cool.
    4. In a small bowl, combine flax seed oil, balsamic vinegar, whole grain mustard, salt, and pepper. Mix well and set aside.
    5. In a large salad bowl, place strawberries, cucumber, mixed greens, arugula, and bacon. Toss lightly to combine.
    6. Add the prepared dressing to the salad and toss to coat evenly.
    7. Divide the salad among four plates and serve topped with sliced avocado and crushed pretzels.

    Tips

    • Choose Fresh Ingredients: For the best flavor, select ripe strawberries and fresh greens.
    • Prepare Ahead: You can pre-cook the bacon and mix the dressing ahead of time to save on prep work.
    • Serving Suggestion: Pair this salad with grilled chicken or fish for a more substantial meal.

    Variations & Substitutions

    Feel free to get creative with this recipe:

    • Nuts for Crunch: Substitute pretzels with toasted almonds or pecans for a different kind of crunch.
    • Vegan Option: Omit the bacon and add grilled tofu or chickpeas for protein.
    • Seasonal Fruits: Swap strawberries for other seasonal fruits like peaches or blueberries.

    Storage

    To store leftovers, keep the salad and dressing separate in airtight containers in the refrigerator. The salad can be stored for up to 2 days. Add the dressing and pretzels just before serving to maintain freshness and crunch.

    FAQ

    Can I make this salad ahead of time?

    Yes, you can prepare the components like the bacon and dressing in advance. However, for the freshest taste, it’s best to assemble the salad just before serving.

    What can I use instead of flax seed oil?

    If you don’t have flax seed oil, you can substitute it with extra virgin olive oil or avocado oil for a similar flavor profile.

    Nutrition

    This salad is a nutritious choice, offering a good balance of healthy fats, vitamins, and fiber. The combination of greens, avocado, and strawberries provides a wealth of nutrients, while the bacon and pretzels add protein and carbohydrates to keep you satisfied.

    Final Thoughts

    This Strawberry Pretzel Salad is more than just a dish; it’s a celebration of flavors and memories. Whether you’re serving it at a family gathering or enjoying it as a rewarding meal for yourself, it is sure to bring joy and satisfaction. I hope this recipe becomes a staple in your kitchen, as it has in mine. Enjoy the delightful crunch, the burst of fruity sweetness, and the comforting savory notes in every bite. Happy cooking!

    Related update: Strawberry Pretzel Salad

    Related update: Roasted Broccoli with Lemon and Garlic

    Related update: Chicken Liver Salad

  • Azteca Soup | Made by Meaghan Moineau

    Azteca Soup | Made by Meaghan Moineau

    Azteca Soup: A Warm Embrace of Flavor

    Why You’ll Love It

    Azteca Soup is not just a recipe; it’s a journey to the heart of Mesoamerican culinary tradition. This soup is a delightful fusion of fresh ingredients and bold flavors, perfect for warming up on a chilly day. I remember the first time I tasted this soup at a small family gathering. The aroma filled the room, and the vibrant colors of the ingredients were a feast for the eyes. My grandmother, with her apron slightly dusted with flour, ladled the soup into our bowls while sharing stories of her childhood in the bustling markets of Mexico City. The soup was a hit, and the warmth of that moment still lingers whenever I make it today.

    Ingredients

    • 2 tablespoons olive oil
    • 2 garlic cloves, minced
    • 1 onion, chopped
    • 1 jalapeño pepper, chopped
    • 2 celery stalks, chopped
    • 1 can (14 oz) canned tomatoes, with juice
    • 2 teaspoons chili powder
    • 1 teaspoon cumin
    • 1 cup fresh corn, cut from the cob
    • 1 handful fresh basil, cut into ribbons
    • 4 cups vegetable stock
    • 2 tablespoons lime juice
    • 1 avocado, diced
    • 1 cup nacho chips
    • 1/2 cup sour cream
    • Fresh basil shreds for garnish

    Instructions

    1. In a medium saucepan, heat the olive oil over medium heat. Add the garlic, onions, jalapeño pepper, and celery. Sauté for about 5 minutes until the onions become translucent.
    2. Add the canned tomatoes, chili powder, and cumin. Cook down over medium heat for about 10 minutes, stirring often to prevent sticking.
    3. Stir in the fresh corn, basil ribbons, reserved tomato juice, and vegetable stock. Bring the mixture to a boil, then reduce the heat and let it simmer for 15 minutes.
    4. When ready to serve, remove the soup from heat and stir in the lime juice and diced avocado.
    5. To serve, break several nacho chips into each bowl, ladle in the soup, then top each with a spoonful of sour cream. Garnish with a few fresh basil shreds and a whole nacho chip on top.

    Serve hot, and enjoy as a complete lunch or a substantial first course. This recipe serves 6 people.

    Tips

    For the best flavor, use fresh, ripe avocados and sweet corn. If you prefer a spicier soup, leave the seeds in the jalapeño pepper. Make sure to stir the soup frequently to prevent the ingredients from sticking to the bottom of the pot.

    Variations & Substitutions

    If you’re looking to add some protein, consider adding grilled chicken or shrimp. For a vegetarian version, you can substitute the sour cream with a vegan alternative. Feel free to experiment with different herbs like cilantro for a unique twist on the flavor profile.

    Storage

    Azteca Soup can be stored in an airtight container in the refrigerator for up to 3 days. To reheat, simply warm it on the stove over medium heat, stirring occasionally. The soup may thicken as it cools, so you might need to add a splash of vegetable stock when reheating.

    FAQ

    Can I use canned corn instead of fresh corn?

    Yes, canned corn can be used as a substitute for fresh corn. Just be sure to drain and rinse it before adding it to the soup.

    What can I use instead of jalapeño pepper?

    If you prefer a milder soup, you can substitute the jalapeño with a green bell pepper, or add a pinch of smoked paprika for a different kind of warmth without the heat.

    Nutrition

    This soup is a low-calorie, nutrient-rich option. It’s packed with vitamins from the fresh vegetables and offers heart-healthy fats from the avocado. Ideal for those seeking a wholesome meal without the extra calories.

    Final Thoughts

    Azteca Soup is more than just a dish; it’s an experience that brings people together. Whether you’re enjoying it with family around the dinner table or serving it at a gathering, this soup is sure to bring warmth and joy to your meal. With its vibrant flavors and comforting aroma, Azteca Soup is a testament to the rich culinary traditions that have been passed down through generations. I hope you enjoy making and sharing this recipe as much as I have. Bon appétit!

    Related update: Azteca Soup

    Related update: Mixed Paella

  • Vegetable Cheddar Quiche | Made by Meaghan Moineau

    Vegetable Cheddar Quiche | Made by Meaghan Moineau

    Vegetable Cheddar Quiche: A Comforting Classic

    There’s something magical about the aroma of a freshly baked quiche wafting through the house. Growing up, my grandmother’s kitchen was always filled with the comforting scent of baking, and her vegetable cheddar quiche was a family favorite. I remember sitting at her kitchen table, eagerly waiting for the quiche to cool just enough to savor that first warm, cheesy bite. Today, I’m sharing her recipe with you, hoping it brings the same warmth and joy to your home.

    Why You’ll Love It

    This vegetable cheddar quiche is perfect for any meal of the day. Whether you’re enjoying it as a savory breakfast, a light lunch, or a satisfying dinner, it’s a versatile dish that’s packed with flavor and nutrition. Here’s why you’ll fall in love with this recipe:

    • Simple Ingredients: Made with everyday ingredients you likely have on hand.
    • Customizable: Easily adapt the recipe to suit your taste preferences or dietary needs.
    • Deliciously Comforting: Rich, cheesy, and full of hearty vegetables.
    • Perfect for Leftovers: Enjoy warm or cold, making it ideal for meal prep.

    Ingredients

    • 1 refrigerated pie crust
    • 1 tablespoon olive oil
    • 1 cup broccoli florets, chopped
    • 1 cup fresh mushrooms, sliced
    • 1 cup fresh spinach, chopped
    • 1 medium onion, diced
    • 2 cloves garlic, minced
    • 1/2 teaspoon salt
    • 1/4 teaspoon pepper
    • 1/4 teaspoon cayenne pepper
    • 3 large eggs
    • 1/2 cup mayonnaise
    • 1/2 cup milk
    • 1 cup shredded sharp cheddar cheese
    • 3 tablespoons grated parmesan cheese
    • Fresh cilantro for garnish

    Instructions

    1. Preheat your oven to 375°F (190°C).
    2. Unroll the refrigerated pie crust and place it into a pie plate. Crimp the edges and set aside.
    3. In a frying pan, heat olive oil over medium heat. Add broccoli, mushrooms, spinach, onion, and garlic. Cook for about 5 minutes until the vegetables are tender, stirring occasionally. Season with salt, pepper, and cayenne pepper while cooking.
    4. Once vegetables are tender, remove the pan from the heat and set aside to cool.
    5. In a large bowl, beat the eggs, mayonnaise, and milk with a whisk until smooth and well-blended.
    6. Add the cooled vegetable mixture to the egg mixture, stirring until combined. Mix in the shredded cheddar cheese.
    7. Pour the mixture into the prepared pie crust. Sprinkle the top with the grated parmesan cheese.
    8. Bake in the preheated oven for 40-45 minutes, or until the center of the quiche is set and the top is golden brown.
    9. Let the quiche stand for 10 minutes before slicing. Garnish with fresh cilantro before serving.

    Tips

    • For a crispier crust, pre-bake the pie crust for 5-7 minutes before adding the filling.
    • Ensure your vegetables are well-drained to prevent the quiche from becoming soggy.
    • Use a sharp cheddar for a more pronounced cheesy flavor.

    Variations & Substitutions

    This quiche is wonderfully adaptable. Here are some ideas to make it your own:

    • Cheese: Try swapping cheddar for Swiss or Gruyère for a different flavor profile.
    • Vegetables: Substitute or add vegetables like bell peppers, zucchini, or asparagus.
    • Spices: Add herbs like thyme, basil, or chives for extra aromatic notes.
    • Crust: Make it crustless for a low-carb option by skipping the pie crust and pouring the egg mixture directly into a greased pie plate.

    Storage

    Once cooled, store any leftover quiche in an airtight container in the refrigerator for up to 3 days. Reheat slices in the oven at 350°F (175°C) for about 10 minutes or enjoy cold straight from the fridge.

    FAQ

    Can I freeze this quiche?

    Yes, you can freeze the baked quiche. Allow it to cool completely, then wrap it tightly in plastic wrap and aluminum foil before placing it in the freezer. It can be stored for up to 2 months. Thaw overnight in the refrigerator before reheating in the oven.

    Can I make this quiche without mayonnaise?

    Absolutely! If you prefer not to use mayonnaise, substitute with an equal amount of sour cream or Greek yogurt for a similar creamy texture.

    How can I make this quiche dairy-free?

    For a dairy-free version, use a dairy-free milk alternative such as almond milk and a plant-based cheese substitute. Ensure your pie crust is also dairy-free if you’re not making it from scratch.

    Nutrition

    This quiche is not only delicious but also a nutritious choice. Packed with vegetables, it provides a good source of vitamins and minerals. The eggs and cheese offer a boost of protein, making it a satisfying meal option.

    Final Thoughts

    This vegetable cheddar quiche is more than just a meal; it’s a slice of nostalgia and comfort. Whether you’re sharing it with family or savoring it solo, each bite is a reminder of simpler times and the joy of homemade cooking. I hope this recipe becomes a beloved part of your family’s culinary tradition, just as it is in mine. Enjoy your quiche-making journey!

    Related update: Vegetable Cheddar Quiche

    Related update: Rich Jelly Scones

    Related update: Beef Cottage Pie

  • How Sweet It Is Sweet Potato Lasagne | Made by Meaghan Moineau

    How Sweet It Is Sweet Potato Lasagne | Made by Meaghan Moineau

    How Sweet It Is Sweet Potato Lasagne

    There’s something truly magical about the combination of sweet and savory, and this Sweet Potato Lasagne is a delightful testament to that. This dish takes me back to chilly autumn evenings spent in my grandmother’s kitchen, where the warmth of the oven and the rich aroma of spices filled the air. It’s a comforting, hearty meal that brings people together, just like those cherished family dinners of my childhood.

    Why You’ll Love It

    This Sweet Potato Lasagne is not just another lasagne; it’s a celebration of flavors and textures. The sweetness of the potatoes perfectly balances with the savory notes of the mushrooms and spinach. The hint of curry powder adds a unique twist, making this dish an exciting adventure for your taste buds. It’s a fantastic vegetarian option that’s both satisfying and nutritious, making it a perfect choice for family dinners or potlucks.

    Ingredients

    • Baby portabella mushrooms
    • Dry curry powder
    • Dried basil leaves
    • Eggplants
    • Frozen spinach
    • Heavy cream
    • Monterey Jack & cheddar cheese mix
    • Jalapenos
    • Marinara sauce
    • Salt & pepper
    • Sweet potatoes
    • Vegetable cooking oil

    Instructions

    1. Slice the sweet potatoes into 1/4 inch thick slices. Boil them until semi-cooked, which should take about 10 minutes.
    2. Mix dry curry powder with olive oil (1 cup) and rub this mixture over the sweet potato slices. Set aside and let marinate for at least 10 minutes.
    3. Slice eggplants into 1/4 inch thick slices and rub all over with an olive oil (1 cup), dried basil, salt, and pepper mix. Set aside and let marinate for at least 15 minutes.
    4. In a pan, pour canola or vegetable cooking oil and sauté spinach and mushrooms for about 3-5 minutes. Add jalapenos and salt & pepper to taste.
    5. Reduce the heat and add heavy cream and about half of the Monterey Jack & cheddar cheese mix until the mixture is creamy but not watery.
    6. Start layering the lasagne in the following order: sweet potatoes, spinach/mushroom mix, eggplants, marinara sauce, sweet potatoes, spinach/mushroom mix, eggplants.
    7. Finally, sprinkle the remaining Monterey Jack & cheddar cheese blend on top.
    8. Bake at 350-375°F for about 35-45 minutes, depending on your oven. You’ll know it’s ready when you can easily pass a fork through all the layers.
    9. Devour with passion!

    Tips

    To ensure the sweet potato slices cook evenly, cut them as uniformly as possible. If you prefer a spicier kick, feel free to add more jalapenos or even a sprinkle of red pepper flakes. Allow the lasagne to cool slightly before serving; this will make it easier to cut and serve intact slices.

    Variations & Substitutions

    If you’re a fan of heat, consider adding some crushed red pepper flakes to the marinara sauce. For a vegan version, substitute the heavy cream with coconut cream and use a dairy-free cheese alternative. If eggplants aren’t your favorite, zucchini makes a great substitute in this recipe.

    Storage

    This Sweet Potato Lasagne stores beautifully. Place any leftovers in an airtight container and refrigerate for up to 3 days. You can also freeze portions for up to 2 months. To reheat, simply thaw overnight in the fridge and bake at 350°F until heated through.

    FAQ

    Can I make this lasagne ahead of time?

    Absolutely! You can prepare the lasagne a day in advance. Just assemble it, cover it tightly, and refrigerate. When you’re ready to enjoy, bake it as instructed.

    What can I serve with Sweet Potato Lasagne?

    This dish pairs wonderfully with a fresh green salad or some crusty garlic bread. A glass of red wine would complement the flavors beautifully as well.

    Nutrition

    While the exact nutritional values will depend on the specific brands and quantities of ingredients used, this Sweet Potato Lasagne is a good source of vitamins A and C from the sweet potatoes, iron from the spinach, and calcium from the cheese.

    Final Thoughts

    Whether you’re looking to try something new or searching for a tasty vegetarian dish, this Sweet Potato Lasagne is a must-try. It’s a dish that embodies warmth, love, and nostalgia, much like the family gatherings it reminds me of. I hope it brings as much joy to your table as it does to mine. Happy cooking!

    Related update: How Sweet It Is Sweet Potato Lasagne

  • Classic Greek Moussaka | Made by Meaghan Moineau

    Classic Greek Moussaka

    There’s something inherently comforting about a dish that has been passed down through generations, and Classic Greek Moussaka is no exception. I still remember the first time I tasted my grandmother’s moussaka as a child during a family reunion in her sunlit kitchen overlooking the Aegean Sea. The aroma of cinnamon and nutmeg filled the room, and the flavors were like nothing I had experienced before. Now, every time I prepare this dish, it brings back those cherished memories, and I’m delighted to share this recipe with you.

    Why You’ll Love It

    This Classic Greek Moussaka is a hearty and satisfying meal that combines layers of savory eggplants, rich meat sauce, and creamy béchamel topping. It’s perfect for family gatherings or a special dinner. The combination of flavors and textures will transport you to a sun-drenched Greek island, even if just for a meal. Whether you’re a fan of Greek cuisine or trying it for the first time, this dish is sure to become a beloved favorite.

    Ingredients

    • Eggplants
    • Sea salt
    • Olive oil
    • Onions
    • Lean beef
    • Canned tomatoes
    • Garlic
    • Ground cinnamon
    • Ground allspice
    • White salt and ground pepper
    • Tomato paste
    • Butter
    • Flour
    • Warm milk
    • Ground nutmeg
    • Egg yolks
    • Feta cheese
    • Bread crumbs

    Instructions

    1. Sprinkle the eggplant slices with sea salt and let them stand for 45 minutes to draw out the bitterness. Then rinse thoroughly to remove excess salt.
    2. Thinly brush each slice with olive oil and bake in a preheated grill pan for several minutes on each side. Set aside. Repeat until all slices are grilled.
    3. For the meat sauce, lightly sauté the onions in olive oil until tender. Add the ground beef and sauté, stirring frequently to break up the clumps of meat, until the meat is no longer pink.
    4. Stir in canned tomatoes, garlic, cinnamon, allspice, salt, and pepper and simmer briefly on low heat. Add in tomato paste and a little water if the sauce is too thick. Remove from heat and set aside.
    5. For the béchamel sauce, add flour to the melted butter, stirring constantly. When the mixture is evenly thick, gradually whisk in warm milk. Gently bring to a boil, then remove from heat, season with pepper and nutmeg. Whisk in the egg yolks vigorously. Set aside.
    6. Thinly coat with olive oil a suitable ovenproof baking dish, sprinkle the bottom with homemade bread crumbs. Place a layer of eggplant, cover with some meat sauce and feta cheese, and repeat this until the pan is almost full. Finish with a layer of feta cheese.
    7. Top with béchamel sauce. Cover with tin foil and bake in a preheated oven at 180°C for 1 hour.
    8. Remove moussaka from the oven and let it set at room temperature for 45 minutes before serving.

    Tips

    To achieve the perfect moussaka, make sure to let the eggplant slices sit with salt for the full 45 minutes to remove any bitterness. When preparing the béchamel sauce, stir continuously to avoid lumps and ensure a smooth consistency. Lastly, giving the moussaka time to set before serving helps the layers hold together better when sliced.

    Variations & Substitutions

    If you prefer a vegetarian version, you can replace the ground beef with lentils or a plant-based meat substitute. For a slightly different flavor profile, try using ground lamb instead of beef. You can also experiment with different cheeses, such as Parmesan or Ricotta, to suit your taste preferences.

    Storage

    Leftover moussaka can be stored in an airtight container in the refrigerator for up to three days. For longer storage, freeze individual portions in airtight containers for up to three months. To reheat, thaw overnight in the refrigerator and bake in a preheated oven at 175°C until heated through.

    FAQ

    Can I prepare Moussaka ahead of time?

    Yes, you can assemble the moussaka a day in advance and store it in the refrigerator. When ready to bake, allow it to come to room temperature before placing it in the oven.

    What should I serve with Moussaka?

    Moussaka pairs beautifully with a fresh Greek salad and some crusty bread. A glass of red wine complements the flavors wonderfully.

    Nutrition

    Moussaka is a rich and hearty dish, so it is best enjoyed as an occasional treat. It provides a good source of protein from the beef and egg yolks, as well as essential vitamins and minerals from the eggplants and tomatoes. For a lighter option, consider serving with a side of steamed vegetables.

    Final Thoughts

    Classic Greek Moussaka is more than just a dish; it’s a culinary journey that tells a story with every bite. Whether you’re sharing it with family or savoring it on a quiet evening at home, its warmth and richness are sure to bring comfort and joy. I hope this recipe becomes as beloved in your home as it is in mine. Happy cooking!

    Related update: Classic Greek Moussaka

    Related update: How Sweet It Is Sweet Potato Lasagne