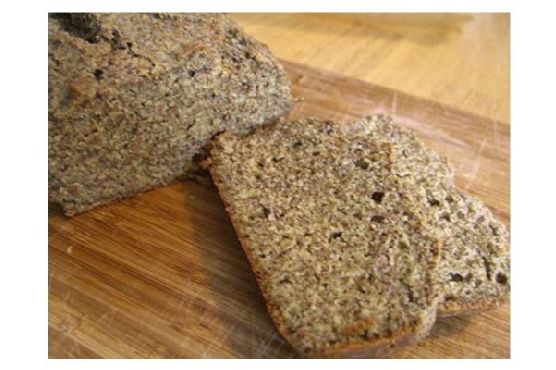
Flax, Quinoa, and Almond Meal Bread
Why You’ll Love It
There’s something incredibly heartwarming about the aroma of freshly baked bread wafting through your home. This Flax, Quinoa, and Almond Meal Bread is a perfect blend of wholesome ingredients that not only fills your kitchen with a delightful scent but also fills your heart with nostalgia. I remember my grandmother’s kitchen, where baking was a weekend ritual. The sound of her soft humming and the flour dust that seemed to settle everywhere in the room bring back memories each time I bake this bread. Not only is this recipe gluten-free and nutritious, but it also captures the essence of family traditions and warmth.
You’ll love this bread because it’s incredibly versatile and can be paired with both sweet and savory toppings. Its nutty flavor and slightly crumbly texture make it a delightful companion for your morning coffee or your evening tea. Plus, with its simple preparation, you don’t need to be a seasoned baker to pull this off beautifully.
Ingredients
- 1 cup milled flax seed
- 1 cup blanched almond meal
- 1 cup quinoa flour
- 2 teaspoons baking powder
- 1/2 teaspoon salt
- 1/2 teaspoon baking soda
- 1/4 cup olive oil
- 3 large eggs
- Water, as needed for desired texture
Instructions
- Preheat your oven to 375°F (190°C).
- In a large mixing bowl, combine the milled flax seed, almond meal, quinoa flour, baking powder, salt, and baking soda.
- In a separate bowl, gently beat the eggs together. This will make it easier to incorporate them into the dry mixture.
- Gradually add the beaten eggs to the dry ingredients, stirring continuously to form a cohesive mixture.
- Add the olive oil to the mixture. Be cautious if your eggs are cold, as it may cause the oil to solidify. If this happens, gently warm the mixture until the oil liquefies.
- Slowly add water to the mixture, a little at a time, until you achieve a thick batter consistency that can be poured into a loaf pan.
- Line a Pyrex bread pan with parchment paper and pour the batter in. Smooth the top with a spatula.
- Bake in the preheated oven for 40 minutes. If using a metal pan, you may need to adjust the baking time slightly.
- Once baked, remove from the oven and let the bread cool in the pan for about 10 minutes before transferring it to a wire rack to cool completely.
Tips
For best results, ensure all your ingredients are at room temperature before you begin mixing. This helps in achieving a smoother batter. If you find that the batter is too thick, add water a teaspoon at a time to avoid making it too runny. Also, lining your loaf pan with parchment paper ensures that the bread doesn’t stick and makes cleanup a breeze.
Variations & Substitutions
This bread is a canvas for your creativity. You can substitute the quinoa flour with oat flour for a different flavor profile. To add some sweetness, consider incorporating a tablespoon of honey or maple syrup into the batter. For an extra crunch, toss in a handful of your favorite nuts or seeds like sunflower seeds or chopped walnuts.
Storage
Once completely cooled, store your flax, quinoa, and almond meal bread in an airtight container. It will keep well at room temperature for up to three days. For longer storage, wrap the loaf tightly in plastic wrap and freeze for up to a month. To enjoy, simply thaw at room temperature or warm it up in the oven for a fresh-baked taste.
FAQ
Can I make this bread vegan?
Yes, you can make this recipe vegan by replacing the eggs with flax eggs. To make flax eggs, mix 3 tablespoons of milled flax seed with 9 tablespoons of water and let it sit for a few minutes until it forms a gel-like consistency.
What can I use instead of almond meal?
If you have a nut allergy or simply prefer a different flavor, sunflower seed flour or coconut flour can be used as a substitute. Keep in mind that coconut flour is highly absorbent, so you may need to adjust the amount of liquid in the recipe.
Can I add spices to this bread?
Absolutely! Adding spices can elevate the flavor of your bread. Try incorporating a teaspoon of cinnamon or nutmeg for a warm, aromatic touch. For a savory twist, consider adding herbs like rosemary or thyme.
Nutrition
This bread is a nutrient-dense option, rich in fiber and healthy fats from the flax seed and almond meal. It’s a great source of plant-based protein thanks to the quinoa flour, making it an excellent choice for those looking to maintain a balanced diet.
Final Thoughts
Baking this Flax, Quinoa, and Almond Meal Bread is more than just a culinary endeavor—it’s a journey into the comforting world of homemade goodness. Whether you’re embracing a gluten-free lifestyle or simply looking for a wholesome, delicious bread to enjoy, this recipe is sure to become a staple in your home. Remember, the best part about baking is making it your own, so don’t hesitate to experiment with flavors and ingredients. Happy baking!
Related update: Flax, Quinoa, and Almond Meal Bread