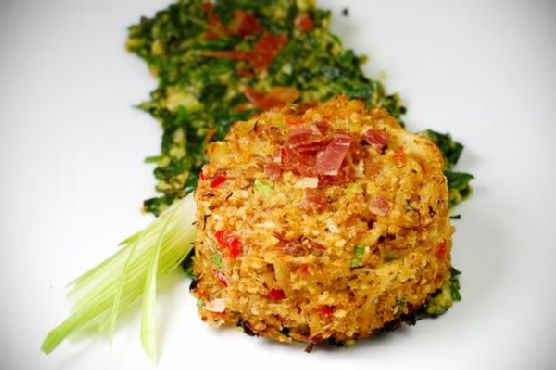
Crab Cakes Rockefeller
Growing up near the coast, seafood has always held a special place in my heart. The smell of fresh crab being cooked would waft through our home, bringing with it memories of family gatherings and laughter. My grandmother used to make a version of this dish every summer, and now, I’m thrilled to share my take on it with you. This Crab Cakes Rockefeller recipe combines the classic flavors of crab cakes with the rich, savory notes of spinach, bacon, and watercress, making it a dish that’s both nostalgic and delightfully modern.
Why You’ll Love It
This Crab Cakes Rockefeller recipe is a celebration of flavors and textures. You’ll love it for its:
- Deliciously Rich Flavor: The combination of crab, bacon, and sautéed greens creates a harmonious blend of sweet and savory.
- Easy Preparation: With simple steps and readily available ingredients, you can whip up this dish without any fuss.
- Versatility: Perfect for a fancy dinner party or a casual weeknight meal, this dish suits any occasion.
- Impressive Presentation: The vibrant colors make for an eye-catching plate that will wow your family and guests.
Ingredients
- 1 can lump crab claw meat
- 1 red bell pepper, diced
- 2 green onions, diced and divided
- 1 cup bread crumbs, divided
- 1 tablespoon honey
- 1 teaspoon chili powder
- Salt and black pepper, to taste
- 2 tablespoons unsalted butter
- 4 slices of bacon
- 2 cups baby spinach, finely chopped
- 1 cup watercress stems, finely chopped
- 2 cloves garlic, minced
- Olive oil for drizzling
Instructions
- Preheat your oven to 375°F and set the top rack to the middle position. Line a baking sheet with aluminum foil or a nonstick cooking mat.
- In a large bowl, combine the crab meat, diced red bell pepper, half of the diced green onion, and half of the bread crumbs. Mix in the honey and chili powder, then season to taste with salt and pepper.
- Form the crab mixture into cakes using a 1/2 cup measure, pressing tightly to hold their shape. Arrange the crab cakes on the lined baking sheet, leaving at least 1 inch between each.
- Lightly coat the outside of each crab cake with olive oil to help with browning and forming a crust.
- Bake for 25 minutes, or until golden brown.
- Meanwhile, fry the bacon in a large skillet until crispy. Set aside to drain, then crumble into small pieces.
- In the same skillet, melt the butter over medium heat. Add the garlic and sauté for 1 minute.
- Add the remaining green onion, bread crumbs, and watercress stems. Sauté for another minute.
- Finally, add the chopped spinach and cook until wilted, about 1-2 minutes. Season with salt and pepper to taste.
- To serve, plate a crab cake atop a smear of the spinach mixture, then sprinkle the whole plate with crumbled bacon.
Tips
- Shape Matters: Use a measuring cup to ensure each crab cake is uniform in size, which helps them cook evenly.
- Don’t Skip the Oil: A light coating of olive oil ensures your crab cakes develop a crispy, golden crust.
- Adjust Seasoning: Always taste and adjust the seasoning of your crab mixture and spinach before serving.
Variations & Substitutions
- Protein Choice: Replace crab with salmon or shrimp for a different seafood twist.
- Greens Swap: Substitute kale or Swiss chard for spinach if desired.
- Bacon Alternatives: Use prosciutto or turkey bacon for a lighter option.
Storage
These crab cakes can be stored in the refrigerator in an airtight container for up to two days. Reheat them in a toaster oven or regular oven at 350°F until they’re warmed through. For longer storage, freeze them for up to three months. Defrost in the fridge overnight before reheating.
FAQ
Can I use fresh crab meat instead of canned?
Yes, fresh crab meat can be used in place of canned. Just ensure that it’s properly cooked and drained to avoid excess moisture in the crab cakes.
Is there a way to make this dish gluten-free?
Absolutely! Simply substitute the bread crumbs with gluten-free bread crumbs or crushed gluten-free crackers.
What can I serve with Crab Cakes Rockefeller?
This dish pairs beautifully with a side salad, roasted vegetables, or even a light pasta dish for a complete meal.
Nutrition
While the nutritional content will vary based on exact portions and ingredients, each crab cake is roughly estimated to contain:
- Calories: 250
- Protein: 15g
- Fat: 10g
- Carbohydrates: 20g
Final Thoughts
Crab Cakes Rockefeller is a dish that brings a touch of elegance and comfort to your dining table. Whether you’re reminiscing about coastal summers or simply seeking a delicious meal, this recipe is sure to please. Share it with loved ones or enjoy it as a personal treat; it’s a culinary experience that delights the senses and warms the soul. Happy cooking!
Related update: Crab Cakes Rockefeller