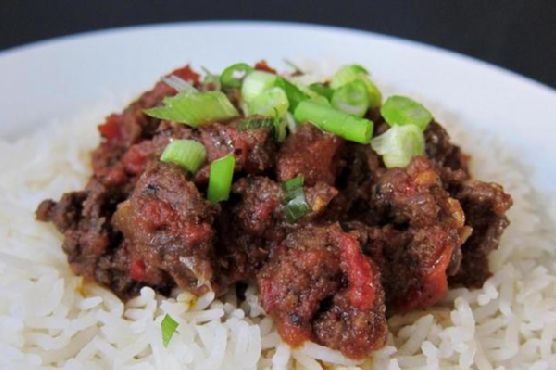
Tag: Spicy

  • Azteca Soup | Made by Meaghan Moineau

    Azteca Soup | Made by Meaghan Moineau

    Azteca Soup: A Warm Embrace of Flavor

    Why You’ll Love It

    Azteca Soup is not just a recipe; it’s a journey to the heart of Mesoamerican culinary tradition. This soup is a delightful fusion of fresh ingredients and bold flavors, perfect for warming up on a chilly day. I remember the first time I tasted this soup at a small family gathering. The aroma filled the room, and the vibrant colors of the ingredients were a feast for the eyes. My grandmother, with her apron slightly dusted with flour, ladled the soup into our bowls while sharing stories of her childhood in the bustling markets of Mexico City. The soup was a hit, and the warmth of that moment still lingers whenever I make it today.

    Ingredients

    • 2 tablespoons olive oil
    • 2 garlic cloves, minced
    • 1 onion, chopped
    • 1 jalapeño pepper, chopped
    • 2 celery stalks, chopped
    • 1 can (14 oz) canned tomatoes, with juice
    • 2 teaspoons chili powder
    • 1 teaspoon cumin
    • 1 cup fresh corn, cut from the cob
    • 1 handful fresh basil, cut into ribbons
    • 4 cups vegetable stock
    • 2 tablespoons lime juice
    • 1 avocado, diced
    • 1 cup nacho chips
    • 1/2 cup sour cream
    • Fresh basil shreds for garnish

    Instructions

    1. In a medium saucepan, heat the olive oil over medium heat. Add the garlic, onions, jalapeño pepper, and celery. Sauté for about 5 minutes until the onions become translucent.
    2. Add the canned tomatoes, chili powder, and cumin. Cook down over medium heat for about 10 minutes, stirring often to prevent sticking.
    3. Stir in the fresh corn, basil ribbons, reserved tomato juice, and vegetable stock. Bring the mixture to a boil, then reduce the heat and let it simmer for 15 minutes.
    4. When ready to serve, remove the soup from heat and stir in the lime juice and diced avocado.
    5. To serve, break several nacho chips into each bowl, ladle in the soup, then top each with a spoonful of sour cream. Garnish with a few fresh basil shreds and a whole nacho chip on top.

    Serve hot, and enjoy as a complete lunch or a substantial first course. This recipe serves 6 people.

    Tips

    For the best flavor, use fresh, ripe avocados and sweet corn. If you prefer a spicier soup, leave the seeds in the jalapeño pepper. Make sure to stir the soup frequently to prevent the ingredients from sticking to the bottom of the pot.

    Variations & Substitutions

    If you’re looking to add some protein, consider adding grilled chicken or shrimp. For a vegetarian version, you can substitute the sour cream with a vegan alternative. Feel free to experiment with different herbs like cilantro for a unique twist on the flavor profile.

    Storage

    Azteca Soup can be stored in an airtight container in the refrigerator for up to 3 days. To reheat, simply warm it on the stove over medium heat, stirring occasionally. The soup may thicken as it cools, so you might need to add a splash of vegetable stock when reheating.

    FAQ

    Can I use canned corn instead of fresh corn?

    Yes, canned corn can be used as a substitute for fresh corn. Just be sure to drain and rinse it before adding it to the soup.

    What can I use instead of jalapeño pepper?

    If you prefer a milder soup, you can substitute the jalapeño with a green bell pepper, or add a pinch of smoked paprika for a different kind of warmth without the heat.

    Nutrition

    This soup is a low-calorie, nutrient-rich option. It’s packed with vitamins from the fresh vegetables and offers heart-healthy fats from the avocado. Ideal for those seeking a wholesome meal without the extra calories.

    Final Thoughts

    Azteca Soup is more than just a dish; it’s an experience that brings people together. Whether you’re enjoying it with family around the dinner table or serving it at a gathering, this soup is sure to bring warmth and joy to your meal. With its vibrant flavors and comforting aroma, Azteca Soup is a testament to the rich culinary traditions that have been passed down through generations. I hope you enjoy making and sharing this recipe as much as I have. Bon appétit!

    Related update: Azteca Soup

    Related update: Mixed Paella

  • North Carolina-Style BBQ Pulled Pork | Made by Meaghan Moineau

    North Carolina-Style BBQ Pulled Pork | Made by Meaghan Moineau

    North Carolina-Style BBQ Pulled Pork

    Welcome to our cozy corner of barbecue heaven! Today, we’re diving into a classic recipe that brings the flavors of North Carolina right to your kitchen. Picture a gathering in the backyard, the air filled with laughter, and the irresistible aroma of slow-cooked pork mingling with tangy vinegar-based sauce. This dish takes me back to family reunions where we’d gather around a long picnic table, savoring every bite, sharing stories, and creating memories. Let’s recreate that magic with this North Carolina-Style BBQ Pulled Pork recipe!

    Why You’ll Love It

    This North Carolina-Style BBQ Pulled Pork is a true labor of love, but it’s worth every moment spent in the kitchen. Here’s why you’ll adore this recipe:

    • Authentic Flavor: This recipe captures the essence of North Carolina barbecue with its vinegar-based sauce, offering a tangy, spicy, and slightly sweet profile.
    • Perfect for Gatherings: Whether you’re hosting a summer barbecue or a cozy winter dinner, this pulled pork is always a crowd-pleaser.
    • Versatile: Enjoy it in sandwiches, tacos, or as a main dish with your favorite sides.
    • Easy to Follow: While the cooking time is lengthy, the steps are straightforward, ensuring a stress-free cooking experience.

    Ingredients

    • 3 tablespoons paprika
    • 1 tablespoon light brown sugar
    • 1 teaspoon celery salt
    • 1 teaspoon garlic salt
    • 1 teaspoon dry mustard
    • 1 teaspoon black ground pepper
    • 1 teaspoon onion powder
    • 1 teaspoon salt
    • 1 (5 to 6 pounds) boneless pork shoulder roast
    • 1/4 cup melted butter
    • 1 teaspoon liquid hickory smoke
    • 2 cups apple cider vinegar
    • 1 cup water
    • 1 cup ketchup
    • 1 tablespoon dark firmly-packed brown sugar
    • 1/2 teaspoon crushed red pepper flakes

    Instructions

    1. Mix paprika, light brown sugar, celery salt, garlic salt, dry mustard, black pepper, onion powder, and salt in a small bowl.
    2. Season the entire pork roast with the spice mixture and cover it. Leave it in the refrigerator overnight.
    3. Preheat the oven to 325°F (165°C). Place the pork roast in a large, disposable aluminum roasting pan.
    4. In a small bowl, mix together the melted butter and liquid hickory smoke to create the basting marinade.
    5. Pour the basting marinade over the pork and cover with aluminum foil. Cook for approximately 4 1/2 hours, turning the pork every hour and basting every 30 minutes. Alternatively, cook over white hot coals, covered, for 3-3 1/2 hours, basting and turning frequently.
    6. Transfer the pork roast to a cutting board. Drain the excess juices from the pan.
    7. Slice the pork roast and pull apart the meat, trimming the fat, and place back into the roasting pan.
    8. Prepare the BBQ sauce by mixing the cider vinegar, water, ketchup, dark brown sugar, salt, and red pepper flakes in a large bowl. Pour over the pulled pork, stirring to ensure all pork is covered. Cover with aluminum foil.
    9. Place the pulled pork back into the oven (still at 325°F) or in a pan on the grill and cook for 1 1/2 hours, stirring every 30 minutes.

    Tips

    • Choose the Right Cut: A boneless pork shoulder works best for this recipe, offering the right balance of fat and tenderness.
    • Plan Ahead: Marinating the pork overnight is crucial for deep flavor penetration.
    • Temperature Check: Ensure your oven or grill maintains a steady temperature for even cooking.

    Variations & Substitutions

    While this recipe is a classic, here are some variations and substitutions you can try:

    • Smokier Flavor: Add more liquid smoke to the basting marinade for an intensified smoky taste.
    • Spicier Kick: Increase the amount of crushed red pepper flakes or add cayenne pepper to the spice mix.
    • Sweet Twist: Substitute dark brown sugar with honey or molasses for a different kind of sweetness.

    Storage

    Store any leftover pulled pork in an airtight container in the refrigerator for up to 3 days. For longer storage, freeze the pulled pork in a freezer-safe container for up to 3 months. Reheat thoroughly before serving.

    FAQ

    Can I use a slow cooker for this recipe?

    Absolutely! You can follow the same steps for seasoning and marinating the pork, then transfer it to a slow cooker. Cook on low for 8-10 hours or on high for 4-6 hours, until the pork is tender enough to pull apart.

    What sides pair well with North Carolina-Style BBQ Pulled Pork?

    Classic sides include coleslaw, cornbread, baked beans, and potato salad. Freshly baked rolls or buns make for delicious pulled pork sandwiches.

    Nutrition

    While exact nutritional content will vary based on portion sizes, a typical serving of this pulled pork is rich in protein and flavor. It’s moderately high in calories due to the pork and sugars, so enjoy in moderation as part of a balanced diet.

    Final Thoughts

    I hope this North Carolina-Style BBQ Pulled Pork brings as much joy to your table as it has to mine. It’s a dish that embodies the spirit of togetherness and celebration. Whether you’re a barbecue novice or a seasoned pitmaster, this recipe is sure to become a beloved staple in your culinary repertoire. Enjoy every savory, tangy bite, and don’t forget to share it with those you love!

    Related update: North Carolina-Style BBQ Pulled Pork

  • Chicken and Mango Skewer | Made by Meaghan Moineau

    Chicken and Mango Skewer | Made by Meaghan Moineau

    Chicken and Mango Skewers

    There’s something magical about the sweet and savory combination of chicken and mangoes, especially when grilled to perfection. This recipe for Chicken and Mango Skewers is a delightful treat that’s perfect for barbecues or a cozy family dinner. As I prepare these skewers, I often find myself reminiscing about summer afternoons spent in my grandmother’s backyard, where the scent of grilled meats blended with the laughter of family and friends. These skewers capture those cherished memories and bring a taste of sunshine to your plate, no matter the season.

    Why You’ll Love It

    This Chicken and Mango Skewer recipe is a crowd-pleaser for several reasons:

    • Simplicity: With just a handful of ingredients, it’s incredibly easy to prepare, making it perfect for busy weeknights.
    • Flavor-packed: The suya seasoning mix adds a spicy kick that complements the sweetness of the mangoes beautifully.
    • Versatile: Serve it as an appetizer, a main dish with rice, or even as part of a vibrant salad.
    • Healthy: Using skinless chicken breast and a moderate amount of vegetable oil keeps this dish light and nutritious.

    Ingredients

    • 2 skinless chicken breasts
    • 1 chicken stock cube
    • 1 can of mangos (or 2 fresh mangos, peeled and cubed)
    • 1 teaspoon dry pepper
    • 2 tablespoons suya seasoning mix
    • 1 cooking spoon of vegetable oil

    Instructions

    1. Chop the chicken breasts into cubes and thread them onto skewers.
    2. Preheat your grill or oven to a medium-high heat.
    3. Place the chicken skewers on the grill to sear slightly.
    4. In a bowl, mix the chicken stock cube, dry pepper, suya seasoning, and vegetable oil to form a marinade.
    5. Using a brush, generously coat the chicken skewers with the marinade on both sides.
    6. Continue grilling, flipping occasionally, until the chicken is browned and cooked through.
    7. Once the chicken is cooked, thread the mango pieces onto the skewers. If using firm mangoes, grill them briefly for a caramelized touch.
    8. Serve the skewers on their own as an appetizer or alongside rice for a complete meal.

    Tips

    • If using wooden skewers, soak them in water for at least 30 minutes before grilling to prevent burning.
    • For an extra burst of flavor, let the chicken marinate in the seasoning mix for a few hours before grilling.
    • If you prefer spicier skewers, increase the amount of dry pepper in the marinade.

    Variations & Substitutions

    Feel free to customize this recipe to suit your taste or dietary needs:

    • Protein Swap: Substitute chicken with shrimp or tofu for a different twist.
    • Fruit Options: Pineapple or peaches can be used in place of mangoes for a different fruity flavor.
    • Vegetarian Option: Omit the chicken and use a selection of bell peppers, zucchini, and mushrooms for a hearty vegetarian skewer.

    Storage

    Leftover skewers can be stored in an airtight container in the refrigerator for up to 3 days. To reheat, place them in a preheated oven or on a grill until warmed through. Avoid microwaving, as it may make the chicken rubbery.

    FAQ

    Can I use fresh mangoes instead of canned?

    Absolutely! Fresh mangoes work perfectly in this recipe. Just make sure they are ripe but firm enough to hold their shape on the skewer.

    What is suya seasoning mix?

    Suya seasoning is a West African spice blend typically made from ground peanuts, ginger, garlic, paprika, and cayenne pepper. It gives the skewers a unique and savory flavor.

    Can I bake these skewers instead of grilling?

    Yes, you can bake the skewers in a preheated oven at 400°F (200°C) for about 20-25 minutes, flipping halfway through, until the chicken is cooked through.

    Nutrition

    This dish is a balanced combination of protein, healthy fats, and carbohydrates. Each serving provides approximately:

    • Calories: 300
    • Protein: 25g
    • Carbohydrates: 20g
    • Fat: 10g

    Final Thoughts

    These Chicken and Mango Skewers are a delightful way to bring a taste of the tropics to your table. Whether you’re enjoying them with family or sharing them at a barbecue, they’re sure to be a hit. The combination of tender chicken and sweet mango, all wrapped up in a spicy, flavorful seasoning, is irresistible. So, fire up your grill and enjoy a bite of sunshine!

    Related update: Chicken and Mango Skewer

    Related update: Sausage & Pepperoni Stromboli

  • Jambalaya Stew | Made by Meaghan Moineau

    Jambalaya Stew | Made by Meaghan Moineau

    Jambalaya Stew: A Cozy, Flavor-Packed Delight

    There’s something about a hearty stew that feels like a warm hug on a chilly day. Jambalaya Stew, with its rich flavors and comforting ingredients, is one of those dishes that transports you straight to the vibrant heart of Louisiana. I remember my first taste of Jambalaya during a family trip to New Orleans. The bustling streets, soulful music, and the aroma of spices in the air made it an unforgettable experience. This recipe is my homage to that memory, bringing a taste of the bayou to your kitchen.

    Why You’ll Love It

    Jambalaya Stew is not just a meal; it’s an experience. Here’s why you’ll fall in love with this dish:

    • Flavor Explosion: The blend of Italian sweet chicken sausage, shrimp, and Cajun spices creates a symphony of flavors that dance on your taste buds.
    • Wholesome Ingredients: Packed with vegetables, lean meats, and whole grains, this stew is as nutritious as it is delicious.
    • Simple and Satisfying: With an easy one-pot preparation, you’ll spend less time cooking and more time savoring the rich, hearty goodness.
    • Versatile Comfort: Perfect for a family dinner, a cozy night in, or entertaining guests with a dish that captures the essence of Southern hospitality.

    Ingredients

    • 2 cooked Italian sweet chicken sausage links, sliced
    • 1 can (14.5 oz) diced tomatoes
    • 1 medium onion, chopped
    • 1 yellow bell pepper, diced
    • 1 green bell pepper, diced
    • 2 stalks celery, chopped
    • 4 cups low sodium chicken broth
    • 1 cup brown rice
    • 3 cloves garlic, minced
    • 2 tablespoons Cajun seasoning
    • 1 tablespoon hot sauce (plus more to taste)
    • 1 teaspoon dried oregano
    • 1 teaspoon dried thyme
    • 1 pound raw shrimp, peeled and deveined

    Instructions

    1. Add all ingredients except the shrimp to a large pot on the stove. Mix thoroughly to combine.
    2. Bring the mixture to a boil over medium-high heat.
    3. Once boiling, reduce the heat to medium-low. Cover the pot and let it simmer until the vegetables are tender and the rice is fluffy, about 35 minutes.
    4. Add the shrimp and re-cover the pot. Continue to cook until the shrimp are tender and cooked through, about 6 minutes.
    5. If desired, season the stew to taste with salt, black pepper, and additional hot sauce.
    6. Serve hot and enjoy the comforting flavors of this Southern classic!

    Tips

    • Prep Ahead: Chop the vegetables and sausage the night before to save time during the cooking process.
    • Flavor Boost: For an extra kick, add a splash of Worcestershire sauce or a squeeze of fresh lemon juice before serving.
    • Adjust the Heat: Control the spiciness by adjusting the amount of Cajun seasoning and hot sauce to suit your taste.

    Variations & Substitutions

    This Jambalaya Stew is wonderfully versatile. Here are some ideas to make it your own:

    • Protein Swap: Substitute chicken or andouille sausage for the Italian sweet chicken sausage for a more traditional flavor.
    • Vegetarian Version: Omit the sausage and shrimp, and add more vegetables like zucchini or mushrooms for a vegetarian-friendly dish.
    • Rice Alternatives: Use white rice, quinoa, or even cauliflower rice for different textures and nutritional profiles.

    Storage

    Store any leftover Jambalaya Stew in an airtight container in the refrigerator for up to 3 days. Reheat gently on the stove or in the microwave, adding a splash of broth or water if needed to maintain the desired consistency.

    FAQ

    Can I make this stew in advance?

    Absolutely! Jambalaya Stew is an excellent make-ahead meal. The flavors meld beautifully when allowed to rest, making it even more delicious the next day.

    Can I freeze Jambalaya Stew?

    Yes, you can freeze the stew for up to 3 months. Allow it to cool completely before transferring it to freezer-safe containers. Thaw in the refrigerator overnight before reheating.

    What can I serve with Jambalaya Stew?

    This stew is a hearty meal on its own, but you can serve it with crusty bread, cornbread, or a simple side salad for a complete feast.

    Nutrition

    While exact nutrition can vary based on specific ingredients and serving sizes, this Jambalaya Stew is a balanced meal, rich in protein from the sausage and shrimp, fiber from the vegetables and brown rice, and packed with essential vitamins and minerals. It’s a wholesome choice for a satisfying dinner.

    Final Thoughts

    Jambalaya Stew is a dish that brings people together, much like the vibrant culture from which it originates. It’s a celebration of flavors and a reminder of the warmth and joy that comes from sharing a meal with loved ones. Whether you’re a seasoned cook or a kitchen novice, this recipe is approachable and rewarding, ensuring a delightful dining experience every time. So gather your ingredients, let the spices fill your kitchen, and enjoy the cozy embrace of Jambalaya Stew.

    Related update: Jambalaya Stew

  • Thai Savory Brown Fried Rice | Made by Meaghan Moineau

    Thai Savory Brown Fried Rice | Made by Meaghan Moineau

    Thai Savory Brown Fried Rice

    There’s something comforting about the aroma of garlic and chili sizzling in a hot pan, transporting me back to my childhood kitchen where my grandmother often prepared her special fried rice. Her infectious laughter and the clinking of her bangles as she cooked made the experience truly unforgettable. It’s from her that I learned the beauty of combining simple, wholesome ingredients to create a dish brimming with flavors. Today, I’m excited to share a recipe that echoes those cherished memories with a modern twist: Thai Savory Brown Fried Rice.

    Why You’ll Love It

    This dish is not only a delightful amalgamation of flavors but also a nutritional powerhouse. The nuttiness of brown rice complements the rich, savory notes of garlic and soy, while the spicy kick from fresh chili peppers wakes up your taste buds. Cashew nuts add a satisfying crunch, and the coconut lends a sweet, tropical aroma. Whether you’re a seasoned cook or a beginner, this recipe is straightforward and rewarding, perfect for a quick weeknight meal or a weekend indulgence.

    Ingredients

    • 2 tablespoons extra virgin olive oil
    • 3 garlic cloves, minced
    • 2 red fresh chili peppers, sliced
    • 1 cup raw cashew nuts
    • 1/2 cup dry unsweetened shredded coconut
    • 1 teaspoon stevia powder
    • 2 tablespoons Bragg Liquid Aminos
    • 1 tablespoon apple cider vinegar
    • 1 flax egg (1 tablespoon flaxseed meal + 3 tablespoons water)
    • 1 cup fresh green beans, trimmed
    • 2 cups shredded regular bok choy
    • 3 cups cooked brown rice
    • Lime wedges for serving

    Instructions

    1. Prepare the brown rice using my Perfect Brown Rice recipe. In a saucepan, cook 1 cup of uncooked brown rice in 1 teaspoon of olive oil until lightly browned. Place 2 basil leaves on top, add 2 cups of filtered water, cover, and bring to a boil. Reduce heat to a simmer and cook until all the water has evaporated, about 40 minutes.
    2. While the rice is cooking, heat the remaining olive oil in a wok or large frying pan over medium heat. Add minced garlic and cook until lightly golden, being careful not to burn it.
    3. Add the sliced red chili peppers, raw cashew nuts, and shredded coconut to the pan. Stir and cook for about 2 minutes.
    4. In a small bowl, mix together the stevia powder, Bragg Liquid Aminos, and apple cider vinegar. Pour this mixture into the pan and cook for another minute.
    5. Push the stir-fry to one side of the pan and pour in the flax egg on the opposite side. Cook and stir the flax egg for about a minute, then incorporate it into the stir-fry mixture.
    6. Add the fresh green beans, shredded bok choy, and cooked brown rice to the pan. Cook and stir for another minute until the bok choy is wilted but the green beans remain slightly crunchy.
    7. Spoon the stir-fry into a serving dish and serve with lime wedges on the side for squeezing over the rice.

    Tips

    For a more robust flavor, consider toasting the shredded coconut before adding it to the stir-fry. Keep a close eye on the garlic as it cooks to prevent it from burning, which can result in a bitter taste. If you prefer a milder dish, reduce the amount of chili peppers, or remove the seeds.

    Variations & Substitutions

    Feel free to customize this recipe to suit your dietary needs or preferences. Substitute Bragg Liquid Aminos with soy sauce or tamari. Swap green beans with sugar snap peas or bell peppers for a different texture. For a nut-free version, replace cashews with sunflower seeds. If you’re not a fan of flax eggs, a regular egg can be used instead.

    Storage

    Store any leftovers in an airtight container in the refrigerator for up to 3 days. Reheat in a pan over medium heat for best results. Avoid microwaving as it can change the texture of the ingredients.

    FAQ

    Can I use white rice instead of brown rice?

    Yes, you can substitute white rice for brown rice, but keep in mind that brown rice offers more fiber and nutrients. If using white rice, adjust the cooking time accordingly as it cooks faster than brown rice.

    Is there a way to make this dish spicier?

    To increase the spice level, you can add more chili peppers or include a dash of cayenne pepper. Alternatively, serve the dish with a side of chili sauce for those who prefer extra heat.

    How do I make a flax egg?

    A flax egg is a vegan substitute for a regular egg. To make one, mix 1 tablespoon of flaxseed meal with 3 tablespoons of water. Let it sit for about 5 minutes until it thickens and becomes gelatinous.

    Nutrition

    This recipe is packed with nutrients. Brown rice provides complex carbohydrates and fiber, while bok choy and green beans add vitamins and minerals. Cashew nuts offer healthy fats and protein, making this dish both satisfying and nutritious. Each serving is approximately 350 calories, depending on portion size and specific ingredient brands used.

    Final Thoughts

    Thai Savory Brown Fried Rice is more than just a meal; it’s a delightful blend of flavors and textures that brings the essence of Thai cuisine into your home. Whether you’re reminiscing about the past or creating new memories, this dish is sure to bring warmth and satisfaction to your table. Enjoy the vibrant taste and the joy it brings, just as it did for me in my grandmother’s kitchen.

    Related update: Thai Savory Brown Fried Rice

    Related update: Jambalaya Stew

    Related update: Yorkshire Pudding

  • Indian Butter Chicken | Made by Meaghan Moineau

    Indian Butter Chicken | Made by Meaghan Moineau

    Indian Butter Chicken

    There’s something about the rich, creamy flavors of Indian Butter Chicken that transports me back to my childhood. I remember the sweet aroma that would fill our kitchen as my mother prepared this delightful dish. It was a staple for our family dinners, and its warmth and comforting flavors always brought us together. Now, I’m thrilled to share this cherished recipe with you, hoping it becomes a part of your family gatherings too.

    Why You’ll Love It

    Indian Butter Chicken is a dish that’s sure to win over even the pickiest eaters. Its luscious, creamy sauce envelops tender pieces of chicken, creating a harmonious blend of spices that’s both bold and soothing. Whether you’re a fan of spicy food or prefer something milder, this recipe can be adapted to suit your taste. It’s perfect for a cozy night in, a family dinner, or even a special occasion. Plus, it’s surprisingly easy to make, allowing you to enjoy the taste of a restaurant-quality meal right at home.

    Ingredients

    • 2 tablespoons oil
    • 1 pound chicken breasts, chopped
    • 3 cloves garlic, minced
    • 2 tablespoons garam masala
    • 1 onion, chopped
    • 1 tablespoon ginger, grated
    • Juice of 1 lemon
    • 2 tablespoons butter
    • 1 cup diced tomatoes
    • 1 cup chicken broth
    • 1/2 cup plain yogurt
    • 1/2 cup sour cream
    • Salt and pepper to taste

    Instructions

    1. Start out by adding the oil to your pan and heating it up on medium-high heat.
    2. Add in your chopped chicken, garlic, and garam masala. Swirl it together and cook for about two to three minutes.
    3. Next, add in your onion and ginger. Continue cooking until the chicken is cooked through.
    4. Turn your heat down to medium and add in your lemon juice and butter.
    5. Let the butter melt completely, then add in the tomatoes and broth.
    6. Give the dish a minute or two to heat back up, then stir in the yogurt and sour cream.
    7. Mix it all together and add salt and pepper to taste.
    8. Serve over rice.

    Tips

    For the best results, marinate your chicken in yogurt and spices overnight. This will enhance the flavors and make the chicken even more tender. Additionally, if you prefer a spicier dish, consider adding a pinch of cayenne pepper or a small chopped chili to the recipe.

    Variations & Substitutions

    If you’re looking to switch things up, try using chicken thighs instead of breasts for a richer flavor. You can also substitute coconut milk for sour cream if you prefer a dairy-free version. For a vegetarian option, replace the chicken with paneer or tofu, and use vegetable broth instead of chicken broth.

    Storage

    Leftovers can be stored in an airtight container in the refrigerator for up to 3 days. To reheat, simply warm it on the stove over low heat, stirring occasionally. You can also freeze the dish for up to 2 months. Just make sure to thaw it in the refrigerator overnight before reheating.

    FAQ

    Can I use pre-cooked chicken?

    Yes, you can use pre-cooked chicken. Simply add it to the pan when you add the lemon juice and butter. This will save you some time and still give you the delicious flavor you’re looking for.

    Is this dish very spicy?

    Indian Butter Chicken is typically mild, but you can adjust the heat level to your preference. If you want it spicier, add more garam masala or a pinch of cayenne pepper. For a milder taste, reduce the amount of spices used.

    Nutrition

    This dish is rich in protein, thanks to the chicken and yogurt, and offers a good balance of carbohydrates when served with rice. It’s a hearty meal that provides essential nutrients, but keep in mind that it can be high in calories due to the butter and sour cream. For a lighter version, consider using reduced-fat yogurt and sour cream.

    Final Thoughts

    Indian Butter Chicken is more than just a meal; it’s an experience. It’s a dish that embodies warmth, flavor, and tradition, making it perfect for creating lasting memories with your loved ones. I hope this recipe brings as much joy to your home as it has to mine. So, gather your ingredients, embrace the aromas, and indulge in the delightful taste of Indian Butter Chicken.

    Related update: Indian Butter Chicken

  • Masala-Tofu Burger | Made by Meaghan Moineau

    Masala-Tofu Burger | Made by Meaghan Moineau

    Masala-Tofu Burger

    Introduction

    Imagine a family gathering on a warm summer evening, the aroma of spices wafting through the air as laughter echoes in the backyard. This memory always takes me back to the first time I tasted a Masala-Tofu Burger, a delightful fusion of Indian spices and a beloved Western classic. Growing up in a multicultural family, food was always a bridge that connected us, blending flavors and traditions into something special. Today, I’m excited to share this delicious recipe with you, hoping it brings warmth and joy to your own family gatherings.

    Why You’ll Love It

    This Masala-Tofu Burger is a game-changer for anyone looking to add a flavorful twist to their burger repertoire. The combination of aromatic spices, crunchy veggies, and creamy tofu creates a mouthwatering experience that’s both satisfying and healthy. Whether you’re a vegetarian or simply exploring new flavors, this burger is a fantastic option. It’s easy to make, customizable, and perfect for any occasion.

    Ingredients

    • 1 white onion, diced
    • 1 red, orange, or green bell pepper, diced
    • 1 cup frozen peas-carrots mix
    • 2 green chillies, chopped
    • 1 block of tofu, cubed
    • 1 potato, boiled and diced
    • 3 cloves garlic, minced
    • 1 teaspoon black mustard seeds
    • 1 sprig curry leaves
    • A pinch of hing (asafoetida)
    • 1 teaspoon cumin powder
    • 1/2 teaspoon turmeric
    • 1 lemon, juiced
    • Salt to taste
    • 1/4 cup cilantro, finely chopped
    • 1/2 cup Indian breadcrumbs
    • Vegetable oil
    • PAM Original Flavor Spray
    • 1 red or white onion, thickly sliced
    • 2 beefsteak tomatoes, sliced
    • Mint-cilantro chutney spread
    • 4 Portuguese rolls

    Instructions

    1. In a large skillet over medium-high heat, spray a generous amount of PAM and add some oil. Add mustard seeds and saute for 30 seconds until you hear popping noises.
    2. Add the curry leaves carefully as they may pop in hot oil. Then add the onions and peppers, and sweat for about 30 seconds.
    3. Stir in the minced garlic, chopped chilies, and turmeric. Saute for 5-7 minutes until the onions and peppers are soft.
    4. Add the peas-carrots mix, cumin powder, and salt. Continue to saute for 7-10 minutes until all the veggies are cooked through.
    5. In a small bowl, mix cubed tofu with a pinch of turmeric, cumin powder, coarse black pepper, and optional cayenne pepper. Set aside to marinate briefly.
    6. Add the marinated tofu to the skillet and saute until it is slightly browned and crumbly.
    7. Add juice from half a lemon and half of the chopped cilantro. Mix well, then add the diced, boiled potato and toss until everything is coated. Adjust salt and spices to taste.
    8. Mash the mixture with a masher until mushy and the veggies are small. Set aside to cool.
    9. Once cooled, mix in some breadcrumbs with your hands. Form the mixture into four thick patties. Add more breadcrumbs if needed.
    10. Place the patties on a plate, cover with plastic wrap, and refrigerate until ready to cook.
    11. In a small skillet sprayed with PAM over medium-high heat, cook each patty for about 2 minutes on each side until browned and crispy.
    12. Simultaneously, saute the thick onion slices until charred and slightly soft.
    13. Spread a generous amount of mint-cilantro chutney on each side of the Portuguese rolls, then assemble the burger with the patty, onions, tomatoes, and cilantro leaves.
    14. Serve with a slice of lemon and reduced-fat chips on the side.

    Tips

    • Make sure to press the tofu well before marinating to remove excess moisture for a better texture.
    • If you like it spicy, feel free to add more green chilies or cayenne pepper to the mix.
    • For a gluten-free option, use gluten-free breadcrumbs or crushed cornflakes.

    Variations & Substitutions

    Feel free to get creative with this recipe by adding your favorite veggies to the mix, such as mushrooms or spinach. You can also swap tofu for paneer or chickpeas for a different protein source. If you prefer a different type of bread, whole-grain buns or lettuce wraps are excellent alternatives.

    Storage

    These Masala-Tofu Patties can be made ahead of time and stored in the refrigerator for up to 3 days. Alternatively, you can freeze them for up to a month. When ready to enjoy, simply thaw and reheat them in a skillet or oven.

    FAQ

    Can I make these burgers vegan?

    Absolutely! This recipe is already vegan as it uses tofu as the main protein source and skips any dairy or eggs. Just ensure your chutney spread is also vegan-friendly.

    Can I grill these patties instead of pan-frying?

    Yes, you can grill the patties for a smokier flavor. Just make sure to brush them with some oil to prevent sticking and handle them carefully as they can be more delicate than regular meat patties.

    What can I serve with these burgers?

    A fresh green salad, sweet potato fries, or roasted vegetables make excellent sides. You can also pair it with a refreshing yogurt dip or mango chutney for an extra burst of flavor.

    Nutrition

    While I don’t have exact nutritional information for this recipe, it’s packed with healthy ingredients. Tofu provides protein, while the variety of vegetables offers vitamins and minerals. Using a whole-grain bun can increase the fiber content, making this meal as nutritious as it is delicious.

    Final Thoughts

    The Masala-Tofu Burger is a wonderful way to explore new flavors while enjoying a comforting classic. It’s a tribute to the fusion of cultures and the joy of shared meals. I hope this recipe becomes a favorite in your home, bringing smiles and satisfaction to your table. Happy cooking!

    Related update: Masala-Tofu Burger

    Related update: Indian Butter Chicken

  • Hot Charlotte Cocktail | Made by Meaghan Moineau

    Hot Charlotte Cocktail | Made by Meaghan Moineau

    Hot Charlotte Cocktail

    Why You’ll Love It

    There’s something undeniably charming about the Hot Charlotte Cocktail. It’s a delightful blend of refreshing cucumber and a hint of heat, perfect for those who appreciate a cocktail with a bit of character. Whether you’re hosting a summer barbecue or enjoying a cozy evening by yourself, this drink is sure to become a favorite. I remember the first time I tried this cocktail at a small bar tucked away in a bustling city. It was a warm summer evening, and the mix of cucumber and Tobasco was both unexpected and refreshing, leaving a lasting impression. Now, I’m thrilled to share this recipe with you, hoping it brings as much joy to your gatherings as it has to mine.

    Ingredients

    • 2 oz Hendrick’s Gin
    • 0.5 oz St. Germain
    • 0.75 oz Lemon Juice
    • 3 slices Cucumber
    • 2 dashes Tobasco

    Instructions

    1. In a cocktail glass, muddle the cucumber slices with Tobasco until the cucumber is well broken down and the flavors meld together.
    2. Add Hendrick’s Gin, St. Germain, and lemon juice to the glass.
    3. Shake well until the mixture is chilled and properly blended.
    4. Strain the mixture over ice in a fresh cocktail glass.
    5. Garnish with a cucumber wheel.

    Tips

    To bring out the best flavors in your Hot Charlotte Cocktail, use fresh, high-quality cucumbers and lemons. The freshness of these ingredients will enhance the overall taste and aroma of your drink. Don’t be afraid to adjust the amount of Tobasco to suit your heat preference. Remember, the goal is to balance the heat and the refreshing elements.

    Variations & Substitutions

    If you’re looking to experiment, consider substituting the Hendrick’s Gin with another floral gin to see how the flavors change. You might also try adding a splash of soda water for a fizzy twist or using lime juice instead of lemon juice for a slightly different citrusy zing. For those who prefer a milder version, reduce the Tobasco to one dash or substitute it with a milder hot sauce.

    Storage

    The Hot Charlotte Cocktail is best enjoyed fresh. However, if you must prepare it in advance, you can mix the gin, St. Germain, and lemon juice ahead of time and store in the refrigerator. Just remember to add the muddled cucumber and Tobasco fresh when you’re ready to serve.

    FAQ

    Can I make this cocktail non-alcoholic?

    Absolutely! To make a non-alcoholic version, substitute the gin with a non-alcoholic spirit and the St. Germain with an elderflower cordial. The drink will still have the same refreshing and spicy notes.

    What can I use as a garnish if I don’t have cucumber?

    If you’re out of cucumbers, consider using a lemon wheel or a sprig of mint as an alternative garnish. Both will complement the cocktail’s flavors beautifully.

    Nutrition

    While cocktails aren’t typically consumed for their nutritional value, the Hot Charlotte brings some freshness with cucumber, which is low in calories and contains a lot of water, helping with hydration. Be mindful, though, that alcohol can contribute to your daily calorie intake.

    Final Thoughts

    The Hot Charlotte Cocktail is a delightful blend of spice and refreshment, perfect for any occasion. Its unique combination of flavors offers something a bit different from the usual cocktail repertoire, making it a standout choice for adventurous cocktail lovers. Whether you’re reminiscing about a summer evening or creating new memories, this cocktail is sure to become a beloved staple in your drink rotation. Enjoy the process of making it, and feel free to tweak the recipe to suit your personal taste. Cheers to good company and great cocktails!

    Related update: Hot Charlotte Cocktail

    Related update: Fresh Peach Margarita With Lime Sugar

  • Ginger Snap and Pumpkin Ice Cream Sandwiches | Made by Meaghan Moineau

    Ginger Snap and Pumpkin Ice Cream Sandwiches

    There’s something enchantingly nostalgic about ice cream sandwiches. They remind me of warm summer evenings spent on my grandmother’s porch, where the world seemed to pause for a moment. With a gentle breeze and the laughter of family in the background, we would savor every bite, letting the creamy goodness melt away the day’s worries. As autumn rolls in, I find myself craving that same delightful treat, reimagined with the rich, spicy flavors of the season. Enter Ginger Snap and Pumpkin Ice Cream Sandwiches—a perfect fusion of summer nostalgia and autumn warmth.

    Why You’ll Love It

    This recipe is the epitome of seasonal indulgence, combining the creamy richness of homemade pumpkin ice cream with the spicy crunch of ginger snap cookies. It’s the best of both worlds: a cool treat for those sunny fall days and a comforting spice for the crisp evenings. Each bite is a sensory delight, offering a harmonious blend of flavors and textures that will leave you and your loved ones reaching for seconds.

    Ingredients

    • Whole milk
    • Heavy cream
    • Granulated sugar
    • Ground cinnamon
    • Nutmeg
    • Ground ginger
    • Whole cinnamon stick
    • Kosher salt
    • Egg yolks
    • Canned pumpkin puree
    • Vanilla
    • All-purpose flour
    • Baking soda
    • Ground pepper
    • Unsalted butter
    • Molasses
    • Egg

    Instructions

    1. In a medium saucepan over medium heat, combine the milk, cream, granulated sugar, ginger, ground cinnamon, cinnamon stick, nutmeg, and salt. Heat the mixture until steaming and it begins to foam. Remove from the heat.
    2. In a small bowl, whisk the egg yolks until pale yellow. Gradually whisk in one cup of the warm cream mixture, whisking constantly.
    3. Pour the yolks and cream mixture back into the saucepan and cook over low heat, stirring constantly. Continue cooking until the mixture thickens and coats the back of a spoon.
    4. Place some ice and water into a large bowl and place a smaller bowl inside. Pour the cream mixture through a mesh strainer into the bowl. Stir in the pumpkin and vanilla, add the cinnamon stick back to the mixture. Chill thoroughly, preferably overnight.
    5. Pour the mixture into the freezer can of an electric ice cream maker and freeze according to the manufacturer’s instructions.
    6. In a small bowl, whisk together the dry ingredients for the cookies.
    7. In the bowl of an electric mixer, beat the butter until soft. Add the sugar and continue beating until smooth and creamy, occasionally scraping down the sides of the bowl.
    8. Stir in the vanilla, molasses, and egg; combine thoroughly. Mix in the dry ingredients gradually until the dough is smooth.
    9. Turn the dough out onto a lightly floured surface and divide in half. Roll each half into a log about 2 inches around. Wrap each log in plastic wrap and roll them lightly to smooth them out. Refrigerate or freeze until firm.
    10. Preheat the oven to 350 degrees and line two baking sheets with parchment.
    11. Slice the dough into 1/4 inch rounds with a serrated knife, being careful to keep their shape. Place the rounds on the baking sheet and sprinkle with granulated or coarse sugar.
    12. Bake for 10-13 minutes, rotating the pans halfway through. Let the cookies cool in the pan for about 2 minutes and then transfer to a wire cooling rack. Dough can be refrigerated for up to five days or frozen for up to three months. Baked cookies can be stored in an air-tight container for approximately a week.

    Tips

    For best results, make sure all your ingredients are at room temperature before starting. This helps everything blend smoothly and evenly. If you’re short on time, the cookies can be prepared ahead and stored, as mentioned, which will make assembling the sandwiches a breeze when your ice cream is ready!

    Variations & Substitutions

    If you’re not a fan of ginger, you can substitute the ginger snap cookies with chocolate chip cookies for a different but equally delightful flavor combination. For a dairy-free version, substitute coconut milk and cream for the whole milk and heavy cream, and use a dairy-free butter alternative for the cookies.

    Storage

    Store any leftover ice cream sandwiches in an airtight container in the freezer. If you want to avoid them sticking together, place a small piece of parchment paper between each sandwich. They should keep well for up to a month, though they’re so delicious they probably won’t last that long!

    FAQ

    Can I make the ice cream without an ice cream maker?

    Yes, you can! Simply pour the chilled mixture into a shallow dish and freeze. Stir the mixture every 30 minutes to break up ice crystals until it’s fully frozen. This method might result in a slightly less creamy texture, but it’s still delicious!

    What can I use instead of canned pumpkin puree?

    If you prefer fresh, you can roast and puree your own pumpkin. Make sure it’s well-drained to avoid excess moisture, which can affect the texture of the ice cream.

    Nutrition

    While these indulgent treats are meant to be enjoyed without too much concern for calories, it’s good to know that they contain wholesome ingredients. Each sandwich offers a balanced mix of carbohydrates, fats, and proteins, along with a dose of dietary fiber from the pumpkin. Plus, the spices bring antioxidants, aiding in overall health. Enjoy them as an occasional treat and savor each delightful bite!

    Final Thoughts

    Ginger Snap and Pumpkin Ice Cream Sandwiches are more than just a dessert; they’re a tribute to cherished memories and the comforting flavors of fall. Whether you’re sharing them with family on a cozy evening or surprising guests at a festive gathering, these sandwiches are sure to bring smiles and spark joy. So, gather your ingredients, embrace the process, and enjoy the delicious rewards of your labor. Happy indulging!

    Related update: Ginger Snap and Pumpkin Ice Cream Sandwiches

    Related update: Apple Dumplings In Fanta Sauce

  • Salmon In Banana Leaf | Made by Meaghan Moineau

    Salmon In Banana Leaf: A Flavorful Island Experience

    Intro

    Salmon in banana leaf is a dish that transports me back to my childhood summers spent on the tropical islands of Southeast Asia. I remember the vibrant markets filled with the aroma of freshly caught fish and the earthy scent of banana leaves. My grandmother would lovingly prepare this dish, infusing each bite with flavors that spoke of her heritage and our family’s history. Today, I’m thrilled to share this recipe with you, so you can create your own flavorful memories around the dinner table.

    Why You’ll Love It

    This dish is a culinary adventure wrapped in the simplicity of banana leaves. The salmon is marinated to perfection, absorbing the savory, sweet, and slightly spicy flavors of the marinade. Steaming in banana leaves adds an earthy aroma and keeps the fish perfectly moist. It’s a healthy, gluten-free meal that’s also visually stunning, perfect for impressing guests or treating yourself to an exotic dinner at home.

    Ingredients

    • Banana leaves
    • 1 teaspoon cinnamon
    • 1 teaspoon fennel seed
    • 2 tablespoons fish sauce
    • 2 cloves garlic, minced
    • 1 tablespoon ginger, minced
    • 3 tablespoons peach preserves
    • 2 red chiles, sliced
    • 1 cup rice
    • 1/4 cup rice wine vinegar
    • 2 salmon steaks
    • 2 scallions, chopped
    • 1 tablespoon sesame oil
    • 2 tablespoons soy sauce
    • 1 star anise
    • 2 tablespoons tahini
    • 2 tablespoons vegetable oil

    Instructions

    1. Mix all marinade ingredients: fish sauce, garlic, ginger, peach preserves, red chiles, rice wine vinegar, sesame oil, soy sauce, and tahini in a bowl.
    2. Place salmon steaks in a large resealable bag or container and pour the marinade over them. Seal and refrigerate for at least 30 minutes, up to 2 hours.
    3. Meanwhile, prepare your scented rice powder by grinding rice, cinnamon, fennel seed, and star anise in a spice grinder until coarsely ground. Leave some larger crumbles for texture.
    4. Remove salmon from the marinade (discard any leftover marinade) and coat each fillet with the scented rice powder. Reserve some powder for future use.
    5. Lay banana leaves flat. Place one salmon fillet in the center of each leaf. Fold one side over the salmon, then the opposite side, followed by folding both ends to create a package.
    6. Place the salmon packets in a steamer basket over boiling water. Steam for about 10-13 minutes until the salmon is cooked through.
    7. For the dipping sauce, heat the remaining marinade ingredients in a small saucepot or microwave-safe dish. Whisk together until warm and blended.
    8. To serve, make a slit in the banana leaves to reveal the salmon. Serve with steamed rice or noodles, corn, and the dipping sauce on the side.

    Tips

    Ensure your banana leaves are pliable by briefly passing them over an open flame or soaking them in hot water. This prevents them from cracking when folding. If you can’t find fresh banana leaves, parchment paper can be a substitute, though it won’t provide the same aromatic quality.

    Variations & Substitutions

    If you prefer a milder flavor, omit the red chiles or reduce the amount. For a different twist, substitute the salmon with your favorite fish, such as tilapia or cod. Vegetarians can replace the fish with thick slices of tofu, adjusting the marinating time to allow the flavors to penetrate fully. For a nutty flavor, add a sprinkle of ground peanuts to the marinade.

    Storage

    Leftover salmon can be stored in the refrigerator for up to 2 days. Keep it wrapped in the banana leaf to retain moisture and flavor. Reheat gently in a steamer or microwave to prevent drying out. The scented rice powder can be stored in an airtight container for up to a month, ready to use for your next culinary creation.

    FAQ

    Can I use frozen salmon for this recipe?

    Yes, frozen salmon can be used, but make sure it is fully thawed before marinating to ensure the flavors are absorbed properly.

    Where can I find banana leaves?

    Banana leaves are often available at Asian grocery stores or specialty markets. They are typically sold fresh or frozen. If using frozen, allow them to thaw before use.

    How can I tell when the salmon is fully cooked?

    The salmon is done when it flakes easily with a fork and has a light pink color throughout. Cooking times may vary slightly depending on the thickness of the fillets.

    Nutrition

    This dish is rich in omega-3 fatty acids, thanks to the salmon, and it offers a balanced profile of protein and healthy fats. The aromatic spices add flavor without the need for excessive salt or sugars, making it a heart-healthy choice. Adjust the oil and soy sauce quantities if you are monitoring your sodium or fat intake.

    Conclusion

    Salmon in banana leaf is more than just a meal—it’s an experience. With its rich flavors and aromatic presentation, it brings a touch of tropical paradise to your dining table. Whether you’re reminiscing about past travels or dreaming of future adventures, this dish is sure to delight your senses and warm your heart. Enjoy preparing and savoring this special recipe, and don’t forget to share it with those you love, creating new memories one delicious bite at a time.

    Related update: Salmon In Banana Leaf

    Related update: Wild Salmon Cakes