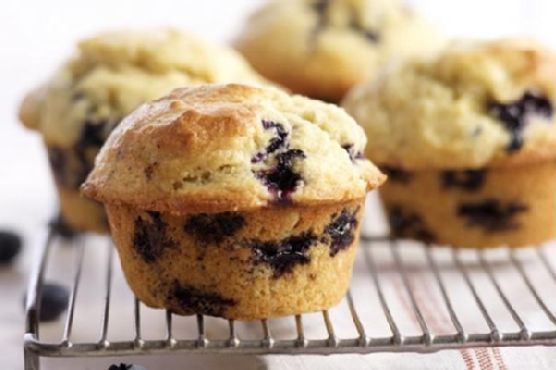
Tag: Medium

  • Spicy Black Bean and Quinoa Burgers with Pineapple-Jalapeño Salsa | Made by Meaghan Moineau

    Spicy Black Bean and Quinoa Burgers with Pineapple-Jalapeño Salsa

    Imagine the savory aroma of smoky black beans mingling with the tropical sweetness of grilled pineapple, all encased in a golden-brown crust. These Spicy Black Bean and Quinoa Burgers with Pineapple-Jalapeño Salsa are more than just a meal; they’re an experience for your senses, right from the first sizzling bite.

    Personal Story

    I first stumbled upon the idea of using quinoa in burgers during a summer barbecue when my vegetarian friend challenged me to create a dish that would satisfy her plant-based lifestyle. I have to admit, I was skeptical at first. Could these little grains actually hold up in a burger? It was a culinary experiment that needed just the right balance of flavors and textures.

    As I rummaged through my pantry that day, the idea of adding a sweet-spicy twist to the standard veggie burger hit me like a flash of inspiration. I had some fresh pineapple and jalapeños in the fridge, and the rest, as they say, is history. The combination of smoky black beans and nutty quinoa, paired with a zesty pineapple-jalapeño salsa, turned out to be a game-changer. My friend, along with everyone else at the barbecue, was hooked on these Spicy Black Bean and Quinoa Burgers.

    Since then, this recipe has become a staple in my kitchen. It reminds me of that sunny afternoon, full of laughter and good company. Every time I make these burgers, it’s like having a little piece of that day right in my home. Sharing this recipe with you feels like inviting you to that very barbecue, where every bite is a celebration of flavors.

    What Makes This Version Special

    The unique twist in these Spicy Black Bean and Quinoa Burgers lies in the addition of quinoa and a sweet-spicy pineapple twist to the salsa. Quinoa isn’t just a trendy grain; it’s the secret to achieving that hearty yet fluffy texture that makes these burgers stand out. Toasting the quinoa before cooking enhances its nutty flavor, adding depth to the burger base.

    Moreover, the Pineapple-Jalapeño Salsa is where the magic truly happens. Grilling the pineapple slices before dicing them infuses a smoky sweetness that complements the jalapeño’s heat, creating a delightful contrast of flavors. This salsa isn’t just a topping; it’s a transformative element that elevates these veggie burgers to a whole new level.

    Flavor Profile

    Biting into these Spicy Black Bean and Quinoa Burgers is a multi-sensory experience. The patties are smoky and spicy, thanks to the smoked paprika and jalapeños, with a hint of tropical sweetness from the pineapple. Each bite delivers a hearty texture from the toasted quinoa, balanced by the freshness of the cilantro and the tanginess of lime. It’s a culinary dance of flavors that keeps your taste buds engaged from start to finish.

    Ingredients

    • 1 can black beans, drained and rinsed
    • **1 cup cooked quinoa**
    • 1 carrot, diced and microwaved
    • 1 stalk celery, diced
    • **1/2 cup diced fresh pineapple**
    • 1/2 cup canned corn, drained
    • 1 jalapeño, diced
    • 1/2 cup diced tomatoes
    • 2 green onions, diced
    • 1-2 garlic cloves, minced
    • 1/4 cup fresh parsley, chopped
    • Juice of 1 lime
    • 1 tsp creole seasoning
    • 1 tsp smoked paprika
    • 1 tsp cumin
    • 1/2 cup oatmeal
    • 1/2 cup panko breadcrumbs
    • 1/4 cup flour
    • Salt and pepper, to taste

    Instructions

    1. Preheat your oven to 425 degrees F. Lightly spray two baking sheets with nonstick spray and set aside.
    2. Toast the **quinoa** in a dry pan over medium heat for about 5 minutes or until you hear popping, and it turns golden-brown. Cook the quinoa according to package instructions.
    3. In a large bowl, mash the drained black beans until they reach a chunky consistency. Add the microwaved diced carrot and mix.
    4. Add the diced celery, smoked paprika, cumin, oatmeal, panko breadcrumbs, and creole seasoning to the bean mixture. Stir to combine.
    5. If the mixture is too moist, add more flour a tablespoon at a time until you can form patties without them falling apart.
    6. Form the mixture into patties, about 1/2 inch thick, and place them on the prepared baking sheets. Bake for 20 minutes, flipping halfway through until they are firm and golden-brown.
    7. While the burgers are baking, prepare the salsa. Grill the pineapple slices on a grill pan over medium-high heat until they have char marks, about 3 minutes per side. Dice the grilled pineapple and combine with canned corn, jalapeño, tomatoes, green onions, garlic, parsley, lime juice, salt, and pepper. Mix well and chill for about an hour before serving.
    8. Serve the burgers hot off the oven, topped with a generous spoonful of Pineapple-Jalapeño Salsa.

    Pro Tips from Meaghan’s Kitchen

    • For extra crispy edges, run a tablespoon of oil around the patties before baking.
    • To prevent the patties from sticking, let them rest for a minute before trying to flip them.
    • Chill the salsa for at least an hour to allow the flavors to meld together beautifully.
    • Use a potato masher for a quick and uniform mash of the black beans.

    Variations & Dietary Swaps

    • To make it gluten-free, swap the panko breadcrumbs for a gluten-free alternative.
    • For a spicier version, add an extra jalapeño to the salsa or sprinkle red pepper flakes into the burger mix.
    • Make it kid-friendly by replacing the jalapeño with a small, mild sweet bell pepper in the salsa.

    What to Serve With It

    These Spicy Black Bean and Quinoa Burgers pair perfectly with a chilled mango-lime agua fresca for a refreshing contrast. A side of crispy sweet potato fries complements the meal beautifully. If you’re feeling indulgent, add a slice of creamy avocado on top of your burger — it’s the perfect cool counterpart to the spicy salsa.

    Storage & Meal Prep

    Store cooked burger patties in an airtight container in the refrigerator for up to 3 days. For longer storage, freeze the patties on a baking sheet until solid, then transfer to a freezer-safe bag for up to 2 months. Reheat from frozen in a 350 degrees F oven for about 15 minutes or until heated through. The salsa, however, is best consumed fresh, as the texture changes over time.

    FAQ

    Can I use canned pineapple instead of fresh?

    While fresh pineapple is preferable for its vibrant flavor, canned pineapple can be used in a pinch. Ensure to drain it well before grilling.

    How can I make the burgers firmer?

    If your patties aren’t firm enough, try adding more panko breadcrumbs or flour to the mixture until you achieve the desired consistency.

    Can these burgers be grilled?

    Yes, these burgers can be grilled. Just be sure to oil the grill grates to prevent sticking, and handle the patties gently as they can be more fragile than meat-based burgers.

    Is there a way to make the salsa less spicy?

    To make the salsa milder, reduce the number of jalapeños or remove the seeds and membranes before dicing.

    What can I use instead of black beans?

    If you’re out of black beans, kidney beans or chickpeas make excellent substitutes in this recipe.

    Final Thoughts

    There you have it, friends — a recipe that brings a touch of tropical summers into your kitchen, with every bite of these Spicy Black Bean and Quinoa Burgers with Pineapple-Jalapeño Salsa bursting with flavor and heartiness. I hope you feel inspired to bring this dish to your next meal, and if you do, I’d love to hear all about it! Share your experiences, tweaks, and photos in the comments below. Happy cooking!

    Related update: Spicy Black Bean and Quinoa Burgers with Pineapple-Jalapeño Salsa

    Related update: Mediterranean Swiss Chard Wraps with Spicy Citrus Tahini

  • Almond Amaretto Cloud Cake with Rosewater Marzipan Glaze | Made by Meaghan Moineau

    Almond Amaretto Cloud Cake with Rosewater Marzipan Glaze | Made by Meaghan Moineau

    Almond Amaretto Cloud Cake with Rosewater Marzipan Glaze

    Imagine slicing through a pillowy-soft cake, the knife gliding like a whisper, releasing a sweet, floral fragrance that fills your kitchen with a sense of serenity. The Almond Amaretto Cloud Cake with Rosewater Marzipan Glaze is not just a dessert; it’s an experience, a delicate dance of flavors that brings elegance to the everyday.

    Personal Story

    The first time I encountered the ethereal combination of almonds and rosewater was during a quaint summer trip to Provence. Wandering through a bustling market, I was drawn to a small patisserie by the wafting scent of freshly baked confections. I stood in awe as the baker, a charming elderly man with flour-dusted hands, handed me a slice of their signature almond cake drizzled with a mysterious glaze. Each bite was like a revelation — a perfect harmony of nutty richness and floral grace that lingered long after the last crumb disappeared.

    Back home, inspired and determined, I set out to recreate that magical moment in my own kitchen. My initial attempts were far from perfect, mind you. I remember one particular instance when the glaze turned into a gloopy mess because I underestimated the power of rosewater. But with each trial, I inched closer to that memory, learning to respect the delicate balance of flavors.

    Eventually, I crafted my own interpretation, the Almond Amaretto Cloud Cake with Rosewater Marzipan Glaze. This cake has since become my go-to for celebrations and quiet afternoons alike, a shared joy among friends and family. It captures the essence of that enchanting patisserie and infuses it with my personal culinary journey.

    What Makes This Version Special

    My version of the Almond Amaretto Cloud Cake is elevated by a few key elements that set it apart from traditional recipes. Infusing the cake with the delicate aroma of rosewater adds an ethereal twist, making each bite a fragrant journey. The rosewater isn’t just in the cake; it’s also in the glistening marzipan glaze that crowns the top, turning a simple cake into a masterpiece of flavor and presentation.

    This isn’t your standard almond cake. By incorporating amaretto liqueur, we deepen the almond flavor, creating a richer, more complex taste profile. The marzipan glaze adds a luxurious finish, its silky texture enhanced with powdered sugar and just a hint of rosewater. This cake is not only a treat for the palate but also a delight for the senses, offering a floral, citrus-kissed finish that is simply unforgettable.

    Flavor Profile

    The taste of the Almond Amaretto Cloud Cake is delightfully fragrant, a sensory journey that begins with the soft, nutty foundation of almonds. As you savor each bite, the floral notes of rosewater unfold, dancing alongside a subtle citrus warmth from the lemon zest. The amaretto liqueur adds depth, weaving through the flavor tapestry with its own unique sweetness. Topped with a rosewater marzipan glaze, every slice is a delicate balance of floral, nutty, and sweet, offering a culinary escape that is both sophisticated and comforting.

    Ingredients

    • 1 cup almond flour
    • 2 tablespoons **amaretto liqueur**
    • 1 teaspoon baking powder
    • 1/2 cup unsalted butter, melted
    • 1 tablespoon **cornstarch**
    • 4 large egg whites
    • 3/4 cup sugar, divided
    • 1 cup all-purpose flour
    • 1/2 cup **marzipan**, divided
    • 1 tablespoon **rosewater**, divided
    • 1/4 cup powdered sugar
    • Zest of 1 **lemon**
    • 1/4 cup sliced almonds

    Instructions

    1. Preheat your oven to 180°C (350°F). Prepare a silicon mold or a regular round cake pan by greasing it lightly and sprinkling it with breadcrumbs for easy release.
    2. In a small bowl, combine the lemon zest with 1/2 tablespoon of rosewater. Let it sit for a few minutes to bloom, enhancing the fragrance.
    3. In a large mixing bowl, beat the egg whites until they form stiff peaks, then gradually add 2 tablespoons of sugar, continuing to beat until glossy.
    4. In a separate bowl, whisk together the remaining sugar, all-purpose flour, almond flour, cornstarch, and baking powder. Sift this mixture gently into the egg whites, folding carefully to maintain the airy texture.
    5. Stir in the melted butter, followed by the bloomed rosewater and lemon zest mixture. Add half of the marzipan and the amaretto liqueur, mixing until just combined.
    6. Pour the batter into the prepared pan, smoothing the top. Sprinkle with the remaining marzipan and sliced almonds.
    7. Bake for 30-40 minutes, or until a toothpick inserted into the center comes out clean. The top should be golden-brown and slightly springy to the touch.
    8. While the cake cools in the pan, create the marzipan glaze. In a small saucepan, combine the remaining marzipan with powdered sugar and 1/2 tablespoon of rosewater. Melt over low heat, stirring until silky smooth.
    9. Once the cake has completely cooled, turn it onto a serving plate and drizzle with the marzipan glaze, letting it cascade down the sides for a beautiful finish.

    Pro Tips from Meaghan’s Kitchen

    • Room temperature egg whites whip up to stiff peaks more easily, giving your cake the airy texture it needs.
    • Blooming the rosewater with lemon zest not only intensifies the flavor but also prevents it from overpowering the cake.
    • For an even almond flavor throughout, consider lightly toasting the sliced almonds before sprinkling them on top.
    • When melting marzipan for the glaze, patience is key. Melt it slowly on low heat to prevent any lumps from forming.
    • If you prefer a stronger floral note, you can add an extra teaspoon of rosewater to the glaze, but proceed with caution; a little goes a long way.

    Variations & Dietary Swaps

    • Gluten-Free Option: Substitute the all-purpose flour with a high-quality gluten-free flour blend to accommodate dietary needs without compromising on taste.
    • Spice It Up: For an added depth of flavor, incorporate a teaspoon of cardamom into the dry ingredients. It pairs wonderfully with the almond and rosewater notes.
    • Kid-Friendly Version: Skip the amaretto and add a splash of vanilla extract instead, making it a delightful treat for the whole family.

    What to Serve With It

    The Almond Amaretto Cloud Cake pairs beautifully with a glass of chilled Moscato, offering a refreshing contrast to the cake’s sweet and floral notes. For a non-alcoholic option, a cup of fragrant Earl Grey tea complements the rosewater and almond flavors exquisitely. Serve with fresh berries or a dollop of whipped cream for an extra touch of indulgence.

    Storage & Meal Prep

    To store, wrap the cake tightly in plastic wrap and keep it in the refrigerator for up to 5 days. For longer storage, you can freeze the cake (without the glaze) for up to 3 months; thaw overnight in the refrigerator before glazing. To reheat, let the slices come to room temperature naturally. Avoid microwaving as it can alter the cake’s delicate texture.

    FAQ

    Can I make this cake in advance?

    Absolutely! The flavors meld beautifully over time, so feel free to bake the cake a day ahead. Just add the glaze before serving for the best presentation.

    Is marzipan necessary for the glaze?

    While marzipan adds a unique texture and flavor to the glaze, you can substitute it with almond paste for a similar effect. Just adjust the sweetness to your liking.

    Can I use fresh rose petals as a garnish?

    Yes, fresh rose petals make a stunning and edible garnish. Ensure they are pesticide-free and rinse them gently before use.

    What can I do if I don’t have amaretto?

    If you don’t have amaretto, almond extract can be used as a substitute. Use it sparingly to avoid overpowering the other flavors.

    Final Thoughts

    There you have it, my dear friends — a culinary masterpiece that is both easy and rewarding to make. I hope this Almond Amaretto Cloud Cake with Rosewater Marzipan Glaze brings a touch of elegance and a burst of flavor to your table. Don’t forget to share your creations with me in the comments below or tag me on social media. Happy baking, and may your kitchen be filled with delicious aromas and joyful moments!

    Related update: Almond Amaretto Cloud Cake with Rosewater Marzipan Glaze

    Related update: Decadent Oreo-Banana Cheesecake with Salted Caramel Swirl

  • Decadent Caramel Bourbon Apple Brown Betty | Made by Meaghan Moineau

    Decadent Caramel Bourbon Apple Brown Betty | Made by Meaghan Moineau

    Decadent Caramel Bourbon Apple Brown Betty

    Picture this: a cozy kitchen filled with the warm, inviting aroma of sweet spiced apples mingling with the rich, buttery scent of freshly toasted bread. As the apples soften and release their juices, the air becomes heavy with notes of caramel and a whisper of bourbon. It’s an olfactory delight that promises comfort and indulgence in every bite.

    My Journey with Apple Brown Betty

    My love affair with Apple Brown Betty began in my grandmother’s sun-dappled kitchen. Every fall, she would orchestrate a symphony of flavors with the simplest of ingredients: apples picked from the backyard, day-old bread, and a dusting of brown sugar and cinnamon. It was a humble dessert, but to me, it was magic. I remember the way the top layer would turn irresistibly crispy, giving way to the tender, spiced apples beneath. Each spoonful was a taste of nostalgia, a reminder of her warm embrace and endless love.

    But let me share a little secret: not all my adventures with Apple Brown Betty were seamless. There was the time I ambitiously tried to make it for a Thanksgiving potluck, only to discover I’d forgotten to buy apples. I had to improvise with pears and, though delicious, it just wasn’t the same. It taught me an important lesson about the integrity of ingredients and the stories they carry. The apples were more than a flavor — they were a bridge to my past.

    Years later, as I grew more confident in my culinary skills, I decided to give this classic dessert an adult twist. Inspired by a bottle of bourbon gifted by a dear friend and a craving for something a little more decadent, I embarked on a mission to elevate my beloved Apple Brown Betty. The result? A rich caramel bourbon sauce that transforms each layer of apples into something truly luxurious. And for a touch of crunch, a sprinkle of candied pecans that adds a delightful contrast to the soft, spiced filling.

    What Makes This Version Special

    This version of Apple Brown Betty takes a beloved classic and infuses it with a touch of indulgence that feels both familiar and exciting. The addition of a **caramel bourbon sauce** brings an elevated richness, enhancing the natural sweetness of the apples while adding a smoky depth that’s utterly irresistible. But that’s not all. The **candied pecans** I use for this recipe add a delightful crunch, offering a nutty counterpoint that pairs perfectly with the soft, buttery bread cubes.

    By toasting the bread cubes before layering them with the apples, we enhance their texture and flavor, ensuring that the final dessert has a satisfying crispness that contrasts beautifully with the tender apple layers. This upgraded version is not just an Apple Brown Betty, but an experience — one that marries tradition with a modern twist, creating a dessert that’s perfect for cozy evenings and special occasions alike.

    Flavor Profile

    Prepare your senses for a journey through layers of warm, rich flavors with this Decadent Caramel Bourbon Apple Brown Betty. The first bite greets you with the buttery crunch of toasted bread, mingled with the toasty sweetness of caramel. As you delve deeper, the apples reveal themselves — tender and juicy, infused with the aromatic spice of cinnamon and the sophisticated warmth of bourbon. The candied pecans punctuate the experience, adding a nutty sweetness that lingers on your palate, making each spoonful a harmonious blend of textures and tastes.

    Ingredients

    • 5 cups of diced apples, peeled and cored
    • 3 cups of cubed bread (preferably day-old)
    • **1/2 cup of butter, melted**
    • 1/2 cup of white sugar
    • 1 teaspoon of cinnamon
    • 1 teaspoon of nutmeg
    • Juice of 1 lemon
    • **1/2 cup of caramel sauce**
    • **1/4 cup of bourbon**
    • **1/2 cup of candied pecans**

    Instructions

    1. Preheat your oven to 375°F (190°C). Butter a soufflé dish that holds 1-1/2 quarts to ensure the dessert doesn’t stick.
    2. In a large bowl, mix the diced apples with the white sugar, cinnamon, and nutmeg until well combined. Add the lemon juice and toss to coat, which helps to prevent the apples from browning and enhances their flavor.
    3. On a baking sheet, spread the cubed bread and toast in the oven for about 10 minutes, or until lightly golden-brown. This step not only intensifies the bread’s flavor but also helps it absorb the delicious apple juices without becoming soggy.
    4. In a small saucepan over medium heat, combine the **caramel sauce** with the **bourbon**, stirring until the mixture is smooth and aromatic. This will be our luscious drizzle that ties all the flavors together.
    5. Begin layering in the prepared soufflé dish: start with a base layer of toasted bread cubes. Add a layer of the apple mixture, followed by a drizzle of the caramel bourbon sauce. Dot with some of the melted butter.
    6. Repeat the layering process, ending with a top layer of bread cubes. Make sure the dish is well-heaped, as the ingredients will settle as they bake.
    7. Cover the dish with foil and bake in the preheated oven for 30 minutes.
    8. Remove the foil and continue baking for an additional 30 minutes, or until the apples are tender and the top is a beautiful golden-brown.
    9. Once out of the oven, sprinkle the **candied pecans** over the top for a finishing touch.

    Pro Tips from Meaghan’s Kitchen

    • Choose apples that hold up well during baking, like Granny Smith or Honeycrisp, for the best texture.
    • If your caramel sauce is too thick, gently warm it before mixing with the bourbon to ensure a smooth consistency.
    • For extra depth of flavor, consider adding a pinch of salt to the caramel bourbon mixture.
    • You can prepare the bread cubes and apple mixture a day ahead, saving you time on the day of baking.
    • If you prefer a less sweet dessert, reduce the sugar to 1/3 cup and let the natural sweetness of the apples shine.

    Variations & Dietary Swaps

    • Vegetarian Swap: Use a plant-based butter alternative and ensure your caramel sauce contains no dairy for a vegan-friendly dessert.
    • Spice-It-Up Version: Add a pinch of ground cloves or ginger to the apple mixture for a spicier kick.
    • Kids-Friendly Version: Omit the bourbon and use a splash of apple juice instead for a family-friendly treat.

    What to Serve With It

    This Decadent Caramel Bourbon Apple Brown Betty pairs beautifully with a scoop of vanilla bean ice cream, allowing the cold, creamy texture to balance the warm, spiced flavors of the dessert. For a cozy beverage pairing, consider a glass of spiced cider — the subtle warmth of the spices will complement the dessert wonderfully.

    Storage & Meal Prep

    Any leftovers can be stored in an airtight container in the fridge for up to three days. For longer storage, wrap portions individually and freeze for up to a month. When you’re ready to enjoy your Apple Brown Betty again, simply reheat in a 350°F (175°C) oven until warmed through, or microwave on medium power to maintain the dessert’s delightful texture.

    FAQ

    Can I use a different type of bread?

    Absolutely! While day-old white bread works well, you can experiment with brioche or challah for a richer flavor, or even whole wheat if you prefer a heartier texture.

    What can I use if I don’t have bourbon?

    If bourbon isn’t available, you can substitute it with a similar spirit like rum or omit it altogether for a non-alcoholic version.

    How can I make this gluten-free?

    Simply replace the bread cubes with a gluten-free bread variety. Make sure all other ingredients, like the caramel sauce, are also gluten-free.

    Does the alcohol cook out?

    Yes, most of the alcohol in the bourbon will cook off during baking, leaving behind just the rich, complex flavors.

    Can I prepare this dish in advance?

    Yes! You can assemble the dish a day in advance and store it in the fridge. Bake it fresh before serving for the best results.

    Final Thoughts

    There you have it — a sumptuous twist on the classic Apple Brown Betty, perfect for impressing guests or simply indulging yourself. I hope you find as much joy in making and eating this dessert as I do. If you try it, I’d love to hear your thoughts and see your creations! Share your experiences in the comments below, and don’t hesitate to pass this recipe along to fellow dessert lovers.

    Related update: Decadent Caramel Bourbon Apple Brown Betty

    Related update: Almond Amaretto Cloud Cake with Rosewater Marzipan Glaze

  • Bourbon-Infused Mini Cherry Pies with Pecan Streusel | Made by Meaghan Moineau

    Bourbon-Infused Mini Cherry Pies with Pecan Streusel | Made by Meaghan Moineau

    Bourbon-Infused Mini Cherry Pies with Pecan Streusel

    Imagine a warm summer evening, the air thick with the fragrance of ripe cherries mingling with a hint of vanilla and the subtle allure of bourbon. These mini cherry pies, crowned with a delightful pecan streusel, promise to be the star of any dessert table. Each bite offers a rich tapestry of flavors, leaving you longing for more.

    My Cherry Pie Love Affair

    There’s something about cherry pies that always takes me back to my childhood. Growing up, summer weekends meant visits to my grandmother’s house. Her kitchen was a sanctuary filled with the sweet and tangy aroma of freshly baked pies cooling by the window. I remember her laughing as I tried to sneak a cherry from the bowl while she wasn’t looking, always failing to escape her watchful eye. Those moments sparked my love for baking and the magic of turning simple ingredients into something extraordinary.

    Fast forward a few years, and I’m in my own kitchen, trying to recreate those memories. I soon discovered that while I could replicate the basics, I had a desire to make the recipe my own. I wanted to elevate the classic cherry pie with a twist that would resonate with my adult palate. After a few kitchen experiments, I found that a splash of bourbon in the filling, paired with a crunchy pecan streusel, brought out an intriguing depth and complexity to the pies.

    However, it wasn’t always smooth sailing. There was a time I miscalculated the amount of bourbon, and let’s just say the pies were more suited for a cocktail party than a family gathering! But with each attempt, I fine-tuned the recipe until it became a cherished favorite that I’m thrilled to share with you today.

    What Makes This Version Special

    Our Bourbon-Infused Mini Cherry Pies with Pecan Streusel are not your grandmother’s cherry pies — they’re a bold, grown-up take on the classic. The addition of bourbon adds a smoky undertone that beautifully complements the tart cherries. Meanwhile, the pecan streusel topping provides a delightful crunch that contrasts with the soft, juicy filling. This unique twist transforms a traditional dessert into an unforgettable treat that’s perfect for any occasion.

    Flavor Profile

    These mini pies offer a symphony of flavors and textures that dance on your taste buds. The filling is rich and fruity, with the cherries providing a natural sweetness that’s enhanced by the hint of smokiness from the bourbon. The pecan streusel topping adds a satisfying crunch and a nutty warmth, while the buttery crust holds it all together. Each bite is a complex, satisfying experience that leaves a lingering taste of nostalgia and innovation.

    Ingredients

    • 2 cups fresh or frozen sour cherries, pitted
    • **2 tablespoons bourbon**
    • 1/4 cup granulated sugar
    • 1 tablespoon cornstarch
    • 1 tablespoon fresh lemon juice
    • 1 teaspoon vanilla extract
    • 1 1/2 cups all-purpose flour
    • 1/4 cup **brown sugar**
    • 1/2 teaspoon ground cinnamon
    • 1/2 cup **chopped pecans**
    • 1/2 cup (1 stick) unsalted butter, cold and cut into cubes
    • 2/3 cup cold water
    • 1 tablespoon heavy whipping cream
    • 2 teaspoons turbinado sugar
    • 1/2 teaspoon salt

    Instructions

    1. Start by preparing the pie crust. In a food processor, combine flour and salt. Add butter to the mixture, pulsing until the mixture resembles coarse crumbs, approximately 30 seconds.
    2. With the processor running, gradually add 2/3 cup cold water in a slow, steady stream through the lid opening until the mixture forms a ball. Divide the dough into two disks, wrap in plastic wrap, and refrigerate for 1 hour.
    3. Preheat your oven to 350°F (175°C). On a lightly floured surface, roll one pastry disk to a 1/8-inch thickness. Fit the dough into 12 (2-1/2-inch) mini pie plates. Trim the dough around the edges and freeze until firm, about 10 minutes.
    4. Prick the bottoms and sides of the dough with a fork and bake until golden, about 6 to 8 minutes. Remove from the oven and let cool.
    5. In a small bowl, mix cornstarch with 2 tablespoons cold water until blended. In a large saucepan, combine cherries, bourbon, cornstarch mixture, sugar, and salt. Cook over medium heat until cherries are soft and the mixture is thickened. Stir in lemon juice and vanilla extract, then set aside to cool slightly.
    6. For the pecan streusel topping, mix chopped pecans, brown sugar, flour, and cinnamon in a bowl. Make sure it’s well-combined and set aside.
    7. Roll the remaining pastry disk to a 1/8-inch thickness. Cut into thin strips for lattice topping. Weave strips over each pie to create a lattice pattern. Carefully transfer lattice tops to prepared pie plates and seal the edges.
    8. Brush the tops and edges with cream and sprinkle each pie with turbinado sugar.
    9. Bake until the crusts are golden and the streusel is crisp, about 18 to 24 minutes. Serve warm, perhaps with a scoop of bourbon vanilla ice cream for the perfect finishing touch.

    Pro Tips from Meaghan’s Kitchen

    • For the best crust, keep your butter and water as cold as possible. This ensures a flaky, tender pastry.
    • When weaving your lattice, use a ruler to keep your strips even and straight for a professional-looking finish.
    • If using frozen cherries, thaw and drain them well to prevent a soggy filling.
    • Enhance the streusel by toasting the pecans before adding them for a deeper nutty flavor.
    • Let the pies cool slightly before serving to allow the filling to set, making slicing easier.

    Variations & Dietary Swaps

    • Vegetarian Swap: The original recipe is vegetarian, but ensure your bourbon is vegetarian-friendly by checking for any animal-derived clarifiers.
    • Gluten-Free Version: Use a gluten-free flour blend for the crust and streusel topping to make these pies celiac-friendly.
    • Kid-Friendly Version: Skip the bourbon and add an extra tablespoon of vanilla extract to keep the flavor rich without the alcohol.

    What to Serve With It

    These mini cherry pies are a delight on their own, but pairing them with a glass of chilled dessert wine elevates the experience. Alternatively, a scoop of bourbon vanilla ice cream perfectly complements the smoky undertones of the pie, creating a harmonious dessert duo that will undoubtedly impress your guests.

    Storage & Meal Prep

    To store leftovers, cover the pies with plastic wrap or place them in an airtight container in the refrigerator for up to 3 days. For longer storage, freeze the baked pies in a single layer on a baking sheet, then transfer them to a freezer-safe container for up to 1 month. To reheat, place frozen pies in a preheated 350°F (175°C) oven for about 10-15 minutes or until warmed through.

    FAQ

    Can I make the pie dough ahead of time?

    Absolutely! The dough can be made and refrigerated for up to two days in advance. Just be sure to let it sit at room temperature for about 10 minutes before rolling it out.

    What if I don’t have mini pie plates?

    No mini pie plates? No problem. You can use a muffin tin as an alternative. Simply adjust the dough circle size to fit each muffin cup.

    Can I use canned cherries instead of fresh or frozen?

    Yes, canned cherries can work. Just make sure to drain them well and adjust the sugar in the filling since canned cherries are often in syrup.

    Is there a non-alcoholic substitute for bourbon?

    If you’d prefer to avoid alcohol, replace the bourbon with an equal amount of apple juice or cherry juice for a similar depth of flavor without the booze.

    How do I prevent my pie filling from being too runny?

    Ensure your cornstarch mixture is well combined and cooked until thick before adding it to the pie. If your cherries are particularly juicy, you may need to increase the cornstarch slightly.

    Final Thoughts

    These Bourbon-Infused Mini Cherry Pies with Pecan Streusel are a testament to how a classic can be reimagined with a touch of creativity and a dash of bold flavors. I hope this recipe brings as much joy to your table as it has to mine. I’d love to hear about your baking adventures and any tweaks you make to the recipe. Please feel free to share your experiences or any questions in the comments below. Happy baking, my friends!

    Related update: Bourbon-Infused Mini Cherry Pies with Pecan Streusel

    Related update: Decadent Caramel Bourbon Apple Brown Betty