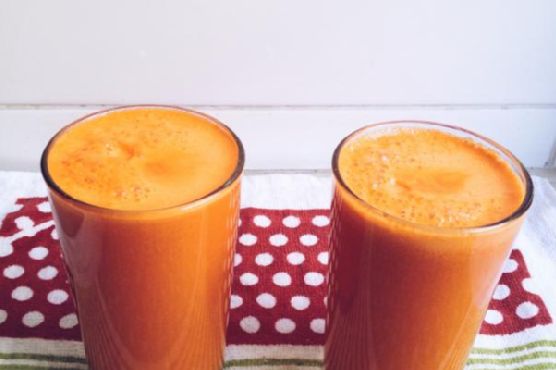
Tag: Meaghan Moineau

  • Salsa Verde By Mommie Cooks | Made by Meaghan Moineau

    Salsa Verde By Mommie Cooks | Made by Meaghan Moineau

    Salsa Verde By Mommie Cooks

    Why You’ll Love It

    There’s something magical about the zesty taste of homemade salsa verde. This recipe, handed down from my dear mother, has been a family favorite for as long as I can remember. Growing up, I would watch her expertly blend the ingredients, filling our kitchen with the fresh, invigorating aroma of tomatillos and cilantro. Each time I make it, I’m transported back to those sun-drenched afternoons in the kitchen, eagerly awaiting a taste of the vibrant green salsa. This is more than just a condiment; it’s a cherished memory, and I’m delighted to share it with you.

    You’ll love this salsa because it’s incredibly versatile, bursting with flavor, and simple to prepare. Whether you’re a seasoned cook or a kitchen novice, this recipe will quickly become a staple in your culinary repertoire. Perfect for dipping, drizzling over tacos, or topping grilled meats, this salsa verde is a refreshing addition to any meal.

    Ingredients

    • 1 pound of tomatillos, husked
    • 1/2 cup vegetable broth
    • 1 teaspoon cumin
    • 1 teaspoon coriander
    • Juice of one lime
    • 2 garlic cloves
    • 1 can of green diced chiles
    • 1 small onion, chopped
    • 1/2 cup fresh cilantro
    • 1/2 teaspoon pepper
    • Salt to taste

    Instructions

    1. Remove the husks from the tomatillos and rinse them under warm water to remove any sticky residue.
    2. Place the tomatillos in a pot of boiling water and cook for about 5-7 minutes until they are tender.
    3. Carefully remove the tomatillos from the pot and transfer them to a blender.
    4. To the blender, add the vegetable broth, cumin, coriander, lime juice, garlic cloves, green diced chiles, chopped onion, fresh cilantro, and pepper.
    5. Blend the ingredients until smooth and well combined.
    6. Taste the salsa and add salt as needed.
    7. Transfer the salsa to a bowl and chill in the fridge until you’re ready to serve.

    Tips

    For the best flavor, use fresh tomatillos that are firm and vibrant green. When selecting cilantro, look for bright, unwilted leaves. If you like your salsa with a bit more heat, consider adding a jalapeño or two to the mix. Be sure to taste your salsa as you go and adjust the seasonings to fit your preference. Remember, the key to a great salsa is balancing the acidity, heat, and saltiness to create a harmonious blend of flavors.

    Variations & Substitutions

    If you’re looking to switch things up, here are a few variations you might enjoy:

    • Roasted Tomatillos: For a deeper, smokier flavor, try roasting the tomatillos under a broiler until they are charred before blending.
    • Avocado Salsa Verde: Add a ripe avocado to the blender for a creamy twist that pairs beautifully with the tangy tomatillos.
    • Herb Substitutions: If cilantro isn’t your favorite, you can substitute with parsley or a mix of parsley and mint for a different herbal note.

    Storage

    This salsa verde can be stored in an airtight container in the refrigerator for up to a week. If you find yourself with extra, you can also freeze it. Pour the salsa into a freezer-safe container, leaving a bit of space at the top to allow for expansion, and freeze for up to three months. Thaw in the refrigerator before serving.

    FAQ

    Can I use canned tomatillos?

    While fresh tomatillos yield the best flavor and texture, you can use canned tomatillos in a pinch. Be sure to drain them well before blending.

    Is salsa verde spicy?

    This salsa verde has a mild heat thanks to the green chiles. If you prefer a spicier salsa, feel free to add more chiles or include a jalapeño or serrano pepper.

    What dishes pair well with salsa verde?

    Salsa verde is incredibly versatile and pairs well with a variety of dishes. Try it over grilled chicken, fish, or pork. It’s also delicious as a topping for tacos, enchiladas, or nachos.

    Nutrition

    This recipe is not only delicious but also a healthy choice. Packed with vitamins from the tomatillos and cilantro, and low in calories, it’s a guilt-free addition to any meal. Each serving is rich in antioxidants and offers a good dose of vitamin C, making it a nutritious and flavorful option.

    Final Thoughts

    There’s a certain joy in crafting a recipe that has been passed down through generations. This salsa verde is more than just a condiment; it’s a connection to the past, a reminder of family gatherings, and a celebration of fresh, vibrant flavors. I hope you enjoy making and sharing this recipe as much as I do. Whether you’re scooping it with a crispy tortilla chip or drizzling it over your favorite dish, may it bring you as much joy and satisfaction as it has brought to my family for years. Bon appétit!

    Related update: Salsa Verde By Mommie Cooks

  • Chocolate Almond Bark | Made by Meaghan Moineau

    Chocolate Almond Bark | Made by Meaghan Moineau

    Chocolate Almond Bark

    Chocolate Almond Bark is a delightful treat that combines the rich, smooth flavor of chocolate with the crunchy, savory goodness of almonds. This recipe is a favorite in my family, especially around the holidays. I remember my grandmother making a similar version of this bark every Christmas. The aroma of roasted almonds mingling with chocolate would fill the house, and it was the ultimate signal that the festive season had truly begun. Now, I carry on the tradition, adding a few modern twists to the classic recipe.

    Why You’ll Love It

    Chocolate Almond Bark is incredibly easy to make and requires only a handful of ingredients. It’s a perfect balance of sweet and savory, with a hint of spice from the cayenne pepper. This treat makes for a great homemade gift or a delightful snack to enjoy anytime. Plus, it’s a wonderful recipe to make with kids or friends, as it doesn’t require any special culinary skills.

    Ingredients

    • 1 cup raw almonds, chopped
    • 1/4 teaspoon cayenne pepper
    • 12 ounces candy making chocolate
    • 1/2 teaspoon sea salt
    • 1 tablespoon Worcestershire sauce

    Instructions

    1. Preheat your oven to 160 degrees.
    2. In a medium bowl, combine the chopped almonds with the Worcestershire sauce, cayenne pepper, and half of the sea salt. Mix well to ensure the almonds are evenly coated.
    3. Spread the almond mixture onto a baking sheet in a single layer. Roast in the preheated oven for 20 minutes, stirring halfway through to ensure even roasting. Let the almonds cool completely.
    4. While the almonds are cooling, melt the candy making chocolate using a double boiler or in the microwave. If using a microwave, heat the chocolate on low power, stirring every 30 seconds, until smooth.
    5. Once the almonds have cooled, mix them into the melted chocolate until thoroughly combined.
    6. Line an 8 x 8 inch baking pan with wax paper. Pour the chocolate almond mixture into the pan and spread it evenly.
    7. Sprinkle a pinch of the remaining sea salt on top of the chocolate mixture.
    8. Let the chocolate cool and harden at room temperature or in the refrigerator for faster results.
    9. Once set, break the chocolate almond bark into bite-size pieces and enjoy!

    Tips

    To ensure the best results, use high-quality candy making chocolate, as it will melt smoother and provide a richer flavor. When roasting the almonds, keep a close eye on them to prevent burning. If you don’t have a double boiler, a heatproof bowl over a saucepan of simmering water works just as well for melting chocolate.

    Variations & Substitutions

    Feel free to customize this chocolate almond bark to suit your taste preferences. You can substitute the raw almonds with your favorite nuts, such as pecans or walnuts. If you’re not a fan of cayenne pepper, you can omit it, or replace it with a milder spice like cinnamon. For a more indulgent treat, consider adding dried fruits like cranberries or raisins to the mix.

    Storage

    Store your chocolate almond bark in an airtight container at room temperature for up to two weeks. If you prefer your chocolate to be on the firmer side, you can keep it in the refrigerator. Just be sure to let it come to room temperature before serving for the best texture and flavor.

    FAQ

    Can I use dark chocolate instead of candy making chocolate?

    Absolutely! Dark chocolate is a great alternative and will provide a more intense chocolate flavor. Just make sure to use high-quality chocolate for the best results.

    Is it possible to make this recipe vegan?

    Yes, you can make this recipe vegan by substituting the Worcestershire sauce with a vegan version and using a dairy-free chocolate. Ensure that all other ingredients are vegan-friendly as well.

    Nutrition

    While I don’t have the exact nutritional breakdown for this recipe, it’s important to note that almonds are a great source of healthy fats, fiber, and protein. Chocolate, especially dark chocolate, contains antioxidants. However, this is a treat and should be enjoyed in moderation as part of a balanced diet.

    Final Thoughts

    Chocolate Almond Bark is a versatile and delectable treat that’s sure to impress anyone who tries it. With its simple ingredients and straightforward instructions, it’s an easy recipe to whip up for any occasion. Whether you’re indulging on your own or sharing with loved ones, this bark is a delightful way to satisfy your sweet tooth. I hope you enjoy making and tasting this recipe as much as my family and I do. Happy cooking!

    Related update: Chocolate Almond Bark

    Related update: Smokey Rainbow Chili

  • Minestrone | Made by Meaghan Moineau

    Minestrone | Made by Meaghan Moineau

    Minestrone: A Comforting Bowl of Italian Tradition

    There’s something magical about a steaming bowl of minestrone soup that’s hard to put into words. It’s more than just a meal; it’s a nostalgic embrace on a chilly evening, a celebration of fresh vegetables in every spoonful, and a testament to the simplicity of good cooking. I remember my grandmother simmering this hearty soup on the stove, her kitchen filled with the rich aroma of herbs and simmering tomatoes. Those memories of gathering around her table, slurping the warm broth alongside chunks of crusty bread, are treasured moments of comfort and joy.

    Why You’ll Love It

    Minestrone is a versatile and comforting dish that warms the soul. It’s packed with nutritious vegetables, making it not only delicious but also healthy. This recipe is perfect for those who love to experiment with flavors and textures, as it is easily adaptable to whatever ingredients you have on hand. Whether you’re a veteran cook or a kitchen novice, you’ll appreciate how straightforward and rewarding this dish is to make.

    • Nutritious and Filling: Packed with a variety of vegetables, it’s a nutrient-dense meal.
    • Comfort in a Bowl: Perfect for chilly days or when you need a comforting meal.
    • Customizable: You can easily adjust the ingredients to suit your taste or dietary needs.
    • Easy to Make: Simple steps lead to a delicious result, making it perfect for weeknight dinners.

    Ingredients

    • 2 tablespoons butter
    • 2 cups carrots, diced
    • 2 cups celery, diced
    • 2 cups onions, chopped
    • 4 cloves garlic, minced
    • 2 cups cabbage, shredded
    • 1 can (28 ounces) canned tomatoes
    • 6 cups water
    • 1 cup brown rice
    • 2 teaspoons salt
    • 1 teaspoon Worcestershire sauce
    • 1 tablespoon Italian mixed seasoning
    • 1/2 teaspoon pepper
    • 2 cups potatoes, diced
    • 2 beef bouillon cubes
    • 2 cups zucchini, sliced
    • 1 can (15 ounces) canned kidney beans, drained and rinsed
    • 1 cup frozen spinach
    • 1/2 cup Parmesan cheese, grated

    Instructions

    1. Melt butter in a large soup kettle over medium heat.
    2. Add carrots, celery, onions, garlic, and cabbage. Sauté for about 20 minutes, stirring often, until the vegetables are tender.
    3. Stir in canned tomatoes, water, brown rice, salt, Worcestershire sauce, Italian seasoning, pepper, potatoes, bouillon cubes, and zucchini.
    4. Bring the mixture to a boil, then reduce the heat and simmer covered for at least 30 minutes.
    5. Add the kidney beans and frozen spinach. Return the soup to a boil and cook over medium heat until the spinach is cooked through. Add more water if needed to reach your desired consistency.
    6. Serve hot, garnished with grated Parmesan cheese. Enjoy!

    Tips

    • Prep Ahead: Chop your vegetables in advance to make the cooking process quicker and smoother.
    • Consistent Size: Dice your vegetables to a similar size to ensure even cooking.
    • Stir Often: Stir the pot frequently, especially during the initial sauté step, to prevent sticking.

    Variations & Substitutions

    This minestrone soup is highly adaptable. Here are a few ideas to make it your own:

    • Vegetable Substitutions: Feel free to swap in other vegetables such as green beans, peas, or bell peppers.
    • Grain Alternatives: If you’re not a fan of brown rice, try using pasta, quinoa, or barley.
    • Protein Boost: Add cooked chicken or sausage for extra protein.
    • Vegan Version: Use vegetable bouillon cubes and omit the Parmesan cheese.

    Storage

    Minestrone soup stores exceptionally well, making it perfect for meal prep:

    • Refrigerator: Store in an airtight container for up to 5 days.
    • Freezer: Freeze in portioned containers for up to 3 months. Thaw overnight in the refrigerator before reheating.
    • Reheating: Gently reheat on the stovetop over medium heat, adding a splash of water if the soup has thickened too much.

    FAQ

    Can I make this soup in a slow cooker?

    Yes, you can! Simply add all the ingredients except for the kidney beans, spinach, and Parmesan cheese to your slow cooker. Cook on low for 6-8 hours or on high for 3-4 hours. Stir in the beans and spinach in the last 30 minutes of cooking, and garnish with Parmesan before serving.

    What can I serve with minestrone?

    Minestrone is delightful on its own but pairs beautifully with a side of crusty bread, a fresh green salad, or even a cheesy garlic bread for a bit of indulgence.

    Nutrition

    This minestrone soup is not only tasty but also nutritious, packed with vitamins, minerals, and fiber from a variety of vegetables. Each serving (without Parmesan cheese) contains approximately:

    • Calories: 150
    • Protein: 6g
    • Carbohydrates: 30g
    • Fat: 3g
    • Fiber: 7g

    Final Thoughts

    Minestrone is more than just a soup; it’s a warm hug in a bowl. Whether you’re cooking for family, friends, or just yourself, this recipe is sure to bring comfort and satisfaction. Its adaptability and ease of preparation make it a staple in any kitchen, and its rich flavors are bound to make it a favorite in your household. So, gather around the table and enjoy the simple pleasure of a homemade meal that speaks to the heart and soul.

    Related update: Minestrone

    Related update: Kale and Chickpea Soup with Lemon

  • Damn Good Corn Pudding ~from 12 Bones Smokehouse | Made by Meaghan Moineau

    Damn Good Corn Pudding ~from 12 Bones Smokehouse | Made by Meaghan Moineau

    Damn Good Corn Pudding from 12 Bones Smokehouse

    Welcome to another delightful culinary adventure! Today, we’re diving into the soul-satisfying world of corn pudding, a dish that embodies comfort and warmth. Originating from the renowned 12 Bones Smokehouse, this Damn Good Corn Pudding is a crowd-pleaser that combines the sweetness of corn with a subtle spicy kick, creating a perfect harmony of flavors. As we embark on this journey, I’ll also share a cherished memory of how this dish became a staple in my family gatherings.

    Why You’ll Love It

    This corn pudding is not just another side dish; it’s an experience. Here’s why you’ll fall head over heels for it:

    • Perfect Balance: The combination of sweet corn and spicy poblanos ensures every bite is a burst of flavor.
    • Texture Delight: With a texture akin to a moist cake, it’s hearty enough to be a standalone dish yet versatile enough to accompany any meal.
    • Easy to Make: With simple ingredients and straightforward instructions, this dish is beginner-friendly and forgiving.
    • Customizable: You can easily adapt it to suit your taste preferences or dietary needs.
    • Memorable: It’s one of those dishes that sparks conversation and leaves a lasting impression on your taste buds.

    I remember the first time I tasted this corn pudding was at a family reunion. My grandmother, known for her Southern cooking prowess, brought it out as a surprise. The moment she placed it on the table, the room was filled with an inviting aroma that transported us back to our roots. Ever since, it’s been a beloved tradition to have this dish at our gatherings, each time bringing with it a wave of nostalgia and joy.

    Ingredients

    • 1 cup flour
    • 1/2 cup sugar
    • 2 teaspoons baking powder
    • 1/2 teaspoon salt
    • 1/2 teaspoon red pepper flakes
    • 1/2 teaspoon cumin
    • 1/2 teaspoon coriander
    • 3 large eggs
    • 1 stick butter, melted
    • 1 cup heavy cream
    • 2 cans (14.75 oz each) creamed corn
    • 2 diced fresh poblano peppers
    • 1 cup fresh corn kernels

    Instructions

    1. Preheat your oven to 350 degrees F (175 degrees C).
    2. In a mixing bowl, combine the flour, sugar, baking powder, salt, red pepper flakes, cumin, and coriander. Set aside.
    3. In an electric mixer, blend together the eggs, melted butter, heavy cream, and creamed corn until smooth.
    4. Stir in the diced poblano peppers and fresh corn kernels.
    5. Gradually add the dry ingredients to the wet mixture, mixing until just combined. The consistency should resemble cake batter.
    6. Grease a large 11 x 15-inch rimmed baking dish (or two smaller dishes) and pour the pudding mixture into it.
    7. Lightly tent the dish with foil and bake for 1 hour, or until the center is just set. If using smaller pans, bake for 30-40 minutes.
    8. For a golden top, remove the foil in the last 10-15 minutes of baking.
    9. Once done, allow it to cool slightly before serving. Enjoy as a main dish or a side!

    Tips

    • Consistency Check: Ensure your batter is not too thick; it should pour easily but not be runny.
    • Foil Tent: The foil prevents the top from browning too quickly while ensuring the center cooks evenly.
    • Testing Doneness: The pudding should have a slight jiggle in the center when done. It will continue to firm up as it cools.

    Variations & Substitutions

    Feel free to make this recipe your own with these variations:

    • Cheese Lover’s Delight: Add shredded cheddar cheese to the batter for a cheesy twist.
    • Spice It Up: Swap the poblano peppers for jalapeños if you prefer more heat.
    • Vegan Version: Use plant-based butter, coconut cream, and flax eggs for a vegan-friendly option.

    Storage

    To store your corn pudding:

    • Let it cool to room temperature before transferring to an airtight container.
    • Store in the refrigerator for up to 3-4 days.
    • Reheat in the oven at 300 degrees F until warm, or microwave individual portions as needed.

    FAQ

    Can I make this corn pudding ahead of time?

    Absolutely! You can prepare the batter a day in advance and store it in the refrigerator. Just give it a good stir before baking. Alternatively, bake it fully and store it, reheating before serving.

    What can I serve with corn pudding?

    Corn pudding pairs wonderfully with grilled meats, barbecue dishes, or a fresh green salad. It’s versatile enough to complement a wide range of main courses.

    Is it possible to freeze corn pudding?

    Yes, you can freeze corn pudding. Wrap it tightly in plastic wrap and aluminum foil, then store it in the freezer for up to two months. Thaw in the refrigerator overnight before reheating.

    Nutrition

    This recipe serves 8-10 people, depending on portion size. Each serving contains approximately:

    • Calories: 320
    • Fat: 18g
    • Carbohydrates: 35g
    • Protein: 5g
    • Fiber: 2g
    • Sugar: 9g

    Final Thoughts

    This Damn Good Corn Pudding is more than just a recipe; it’s a cherished tradition that brings people together. Whether you’re making it for a holiday feast or a simple family dinner, it’s sure to become a beloved staple in your home too. Feel free to experiment with it and tailor it to your preferences. Happy cooking, and may every bite bring warmth and joy to your table!

    Related update: Damn Good Corn Pudding ~from 12 Bones Smokehouse

  • Chicken Cordon Bleu | Made by Meaghan Moineau

    Chicken Cordon Bleu | Made by Meaghan Moineau

    Chicken Cordon Bleu: A Classic Dish with a Twist

    Welcome to my kitchen! Today, I’m sharing a recipe that brings back fond memories of family gatherings and cozy dinners: Chicken Cordon Bleu. This classic dish, with its crispy exterior and gooey, savory filling, never fails to impress. Whether you’re cooking to impress guests or simply treating yourself to something special, you’ll find this recipe both delightful and rewarding.

    Why You’ll Love It

    Chicken Cordon Bleu is a dish that combines the best of flavors and textures. Imagine tender chicken encasing a melty layer of Swiss cheese and savory ham—it’s pure comfort on a plate. What makes this recipe particularly special is its simplicity and adaptability. No need for complex techniques or obscure ingredients; just straightforward cooking that yields fantastic results. Plus, the satisfaction of slicing into the perfectly cooked roulade is truly unparalleled.

    Ingredients

    • 4 skinless boneless chicken breasts
    • 8 slices of Swiss cheese
    • 8 slices of deli ham
    • 1/2 cup flour
    • 2 eggs
    • 2 tablespoons water
    • 1 cup panko bread crumbs
    • 1 tablespoon fresh thyme leaves
    • 1 teaspoon kosher salt
    • 1/2 teaspoon black pepper
    • 2 tablespoons olive oil

    Instructions

    1. Preheat your oven to 350°F (175°C).
    2. Butterfly the chicken breasts by slicing them in half lengthwise, but do not cut all the way through.
    3. Place each breast between two pieces of plastic wrap. Using the flat side of a meat mallet, gently pound to about 1/4-inch thick, being careful not to tear the meat.
    4. Lay 2 slices of Swiss cheese on each chicken breast, followed by 2 slices of ham, and another 2 slices of cheese, leaving a half-inch margin around the edges.
    5. Tuck in the sides of the chicken and roll it tightly like a jellyroll. Gently squeeze the roll to help seal it.
    6. Season the flour with salt and pepper and spread it on wax paper or a flat dish.
    7. Mix the breadcrumbs with thyme, kosher salt, pepper, and olive oil to help the crust brown nicely.
    8. Beat together the eggs and water until fluid.
    9. Lightly dust each chicken roll with the seasoned flour, dip it into the egg mixture, and then gently coat it with the breadcrumb mixture.
    10. Carefully transfer the rolls to a baking pan and bake for about 20 minutes, or until browned and cooked through.
    11. Serve whole or slice into pinwheels for a beautiful presentation.

    Tips

    To ensure your Chicken Cordon Bleu turns out perfectly, here are a few tips:

    • Even Pounding: Make sure the chicken is evenly pounded to ensure uniform cooking.
    • Sealing the Roll: Tucking in the sides and rolling tightly help keep the cheese and ham contained.
    • Crust Perfection: The olive oil in the breadcrumb mixture is key for a golden crust.

    Variations & Substitutions

    This classic dish is versatile and can be customized to your liking:

    • Cheese: Swap Swiss cheese for Gruyère or mozzarella for a different flavor profile.
    • Ham: Prosciutto is a fantastic alternative, offering a slightly saltier taste.
    • Seasoning: Feel free to add garlic powder or paprika to the breadcrumb mix for an extra kick.

    Storage

    Leftover Chicken Cordon Bleu can be stored in an airtight container in the refrigerator for up to 3 days. To reheat, place it in a preheated oven at 325°F until warmed through. Avoid microwaving as it might make the breadcrumb coating soggy.

    FAQ

    Can I prepare Chicken Cordon Bleu in advance?

    Absolutely! You can prepare the chicken rolls up to the breadcrumb coating step and refrigerate them for up to 24 hours before baking.

    What should I serve with Chicken Cordon Bleu?

    This dish pairs beautifully with a fresh green salad, roasted vegetables, or creamy mashed potatoes.

    Is it possible to make this dish gluten-free?

    Yes, simply substitute the flour and panko bread crumbs with gluten-free alternatives.

    Nutrition

    While Chicken Cordon Bleu is indulgent, it’s also a good source of protein. To make it a bit lighter, you can use reduced-fat cheese and leaner cuts of deli meat.

    Final Thoughts

    Chicken Cordon Bleu is more than just a dish; it’s an experience. From the moment you start preparing it to the first bite, it promises comfort and satisfaction. I hope this recipe brings as much joy to your table as it has to mine. Happy cooking!

    Related update: Chicken Cordon Bleu

  • Curry and Sage Roast Chicken | Made by Meaghan Moineau

    Curry and Sage Roast Chicken | Made by Meaghan Moineau

    Curry and Sage Roast Chicken

    There’s something incredibly heartwarming about the aroma of a roast chicken wafting through the house. It takes me back to Sunday afternoons at my grandmother’s, where the kitchen was a realm of delightful scents and warm embraces. Her roast chicken, seasoned with a blend of herbs and spices, was always the centerpiece of our family gatherings. Inspired by those cherished memories, I’ve created this Curry and Sage Roast Chicken recipe. It’s a dish that not only fills the belly but also warms the soul. Whether you’re cooking for a family dinner or a special occasion, this recipe promises to be a crowd-pleaser.

    Why You’ll Love It

    This Curry and Sage Roast Chicken is a flavorful twist on the classic roast. The combination of curry and fresh sage creates a unique and aromatic profile. Here’s why you’ll fall in love with this dish:

    • Flavorful: The curry adds a mild kick, while the sage provides an earthy balance.
    • Simple Ingredients: Made with pantry staples and fresh herbs.
    • Easy Preparation: A straightforward recipe that requires minimal prep time.
    • Juicy and Tender: The citrus juices keep the chicken moist and succulent.
    • Versatile: Perfect for any occasion, from weeknight dinners to festive gatherings.

    Ingredients

    • 1 whole chicken, cleaned and patted dry
    • 3 tablespoons olive oil
    • Juice of 1 lemon
    • Juice of 1 orange
    • 4 cloves garlic, minced
    • 2 tablespoons honey
    • 1 tablespoon fresh sage, chopped
    • 2 teaspoons curry powder
    • 1 teaspoon black pepper
    • 1/2 teaspoon turmeric

    Instructions

    1. Preheat your oven to 350°F (175°C).
    2. In a small bowl, combine olive oil, lemon juice, orange juice, minced garlic, honey, chopped sage, curry powder, black pepper, and turmeric. Mix well to create a marinade.
    3. Rub the chicken thoroughly with the marinade, ensuring it’s evenly coated. Carefully lift the skin and stuff some of the garlic and sage under it for added flavor.
    4. Place the chicken in a baking pan.
    5. Bake in the preheated oven. The baking time will vary based on the size of your chicken; generally, it takes about 20 minutes per pound. Keep an eye on the chicken and let the skin become golden and crispy.
    6. Once cooked, allow the chicken to rest for about 10 minutes before carving. This helps the juices redistribute, ensuring each bite is juicy.

    Tips

    • Use a Meat Thermometer: Ensure the chicken is cooked through by checking that the internal temperature reaches 165°F (74°C).
    • Resting Time: Allow the chicken to rest after roasting to ensure it remains juicy.
    • Even Coating: Make sure to rub the marinade evenly for consistent flavor.

    Variations & Substitutions

    Feel free to experiment with this recipe to suit your taste:

    • Herbs: If you’re not a fan of sage, rosemary or thyme make excellent alternatives.
    • Spices: Add a pinch of cayenne pepper for a spicier kick.
    • Honey Substitute: Maple syrup or agave nectar can be used if you prefer.

    Storage

    Leftover roast chicken can be stored in an airtight container in the refrigerator for up to 3 days. For longer storage, you can freeze the chicken for up to 3 months. Be sure to defrost thoroughly in the refrigerator before reheating.

    FAQ

    Can I use chicken pieces instead of a whole chicken?

    Absolutely! You can use chicken thighs or breasts if you prefer. Adjust the cooking time accordingly, as pieces will cook faster than a whole chicken.

    What can I serve with this Curry and Sage Roast Chicken?

    This dish pairs beautifully with a variety of sides. Consider serving it with roasted vegetables, a fresh green salad, or buttery mashed potatoes.

    Do I need to cover the chicken while roasting?

    It’s not necessary to cover the chicken. Roasting it uncovered allows the skin to become beautifully golden and crispy. However, if it starts to brown too quickly, you can tent it with foil.

    Nutrition

    This recipe is a balanced meal rich in protein and flavor. It’s low in carbs and provides essential vitamins and minerals from the herbs and spices. The use of olive oil and fresh citrus juices adds healthy fats and a refreshing taste.

    Final Thoughts

    This Curry and Sage Roast Chicken is a delightful dish that brings a touch of nostalgia and warmth to any meal. The combination of spices and citrus creates a harmony of flavors that is both comforting and invigorating. Whether you’re an experienced cook or just starting out, this recipe is simple to follow and results in a deliciously satisfying meal. I hope you enjoy making and sharing this dish as much as I do. Happy cooking!

    Related update: Curry and Sage Roast Chicken

    Related update: Chicken Cordon Bleu

  • Hot Charlotte Cocktail | Made by Meaghan Moineau

    Hot Charlotte Cocktail | Made by Meaghan Moineau

    Hot Charlotte Cocktail

    Why You’ll Love It

    There’s something undeniably charming about the Hot Charlotte Cocktail. It’s a delightful blend of refreshing cucumber and a hint of heat, perfect for those who appreciate a cocktail with a bit of character. Whether you’re hosting a summer barbecue or enjoying a cozy evening by yourself, this drink is sure to become a favorite. I remember the first time I tried this cocktail at a small bar tucked away in a bustling city. It was a warm summer evening, and the mix of cucumber and Tobasco was both unexpected and refreshing, leaving a lasting impression. Now, I’m thrilled to share this recipe with you, hoping it brings as much joy to your gatherings as it has to mine.

    Ingredients

    • 2 oz Hendrick’s Gin
    • 0.5 oz St. Germain
    • 0.75 oz Lemon Juice
    • 3 slices Cucumber
    • 2 dashes Tobasco

    Instructions

    1. In a cocktail glass, muddle the cucumber slices with Tobasco until the cucumber is well broken down and the flavors meld together.
    2. Add Hendrick’s Gin, St. Germain, and lemon juice to the glass.
    3. Shake well until the mixture is chilled and properly blended.
    4. Strain the mixture over ice in a fresh cocktail glass.
    5. Garnish with a cucumber wheel.

    Tips

    To bring out the best flavors in your Hot Charlotte Cocktail, use fresh, high-quality cucumbers and lemons. The freshness of these ingredients will enhance the overall taste and aroma of your drink. Don’t be afraid to adjust the amount of Tobasco to suit your heat preference. Remember, the goal is to balance the heat and the refreshing elements.

    Variations & Substitutions

    If you’re looking to experiment, consider substituting the Hendrick’s Gin with another floral gin to see how the flavors change. You might also try adding a splash of soda water for a fizzy twist or using lime juice instead of lemon juice for a slightly different citrusy zing. For those who prefer a milder version, reduce the Tobasco to one dash or substitute it with a milder hot sauce.

    Storage

    The Hot Charlotte Cocktail is best enjoyed fresh. However, if you must prepare it in advance, you can mix the gin, St. Germain, and lemon juice ahead of time and store in the refrigerator. Just remember to add the muddled cucumber and Tobasco fresh when you’re ready to serve.

    FAQ

    Can I make this cocktail non-alcoholic?

    Absolutely! To make a non-alcoholic version, substitute the gin with a non-alcoholic spirit and the St. Germain with an elderflower cordial. The drink will still have the same refreshing and spicy notes.

    What can I use as a garnish if I don’t have cucumber?

    If you’re out of cucumbers, consider using a lemon wheel or a sprig of mint as an alternative garnish. Both will complement the cocktail’s flavors beautifully.

    Nutrition

    While cocktails aren’t typically consumed for their nutritional value, the Hot Charlotte brings some freshness with cucumber, which is low in calories and contains a lot of water, helping with hydration. Be mindful, though, that alcohol can contribute to your daily calorie intake.

    Final Thoughts

    The Hot Charlotte Cocktail is a delightful blend of spice and refreshment, perfect for any occasion. Its unique combination of flavors offers something a bit different from the usual cocktail repertoire, making it a standout choice for adventurous cocktail lovers. Whether you’re reminiscing about a summer evening or creating new memories, this cocktail is sure to become a beloved staple in your drink rotation. Enjoy the process of making it, and feel free to tweak the recipe to suit your personal taste. Cheers to good company and great cocktails!

    Related update: Hot Charlotte Cocktail

    Related update: Fresh Peach Margarita With Lime Sugar

  • Meyer Lemon Cheesecake | Made by Meaghan Moineau

    Meyer Lemon Cheesecake | Made by Meaghan Moineau

    Meyer Lemon Cheesecake: A Zesty Delight

    There’s something magical about a cheesecake that perfectly balances creamy richness and zesty freshness. Meyer Lemon Cheesecake does just that, offering a delightful dance of flavors that transport you to sunlit lemon orchards with every bite. This recipe holds a special place in my heart, reminding me of summer afternoons spent at my grandmother’s house, where we’d bake together, the scent of lemon filling the air.

    Why You’ll Love It

    Meyer Lemon Cheesecake is not only a feast for the taste buds but also a joy to create. Whether you’re a seasoned baker or a novice in the kitchen, this recipe is approachable and rewarding. The gingersnap crust adds a spicy twist that complements the tangy lemon filling beautifully. It’s a perfect dessert for special occasions or whenever you need a little sunshine in your life.

    Ingredients

    • 2 cups gingersnaps, crushed
    • 1/2 cup unsalted butter, melted
    • 24 oz cream cheese, softened
    • 1 cup sugar
    • 1/4 teaspoon salt
    • 3 large eggs
    • 1 cup sour cream
    • 1/2 cup Meyer lemon juice (about 4-5 lemons)
    • 2 tablespoons Meyer lemon zest
    • Cooking spray

    Instructions

    1. Preheat your oven to 300°F (150°C).
    2. In a Ninja Blender or food processor, combine the gingersnaps and melted butter until the gingersnaps are crumbly.
    3. Press the mixture firmly into the bottom of two 6-inch Springform pans coated with cooking spray. Bake for 15 minutes, then cool on a wire rack.
    4. Using an electric mixer, beat the cream cheese until smooth. Gradually add the sugar and salt, mixing well.
    5. Add the eggs one at a time, beating after each addition. Then incorporate the sour cream, lemon juice, and zest, mixing until thoroughly combined. Ensure all cream cheese from the bottom of the mixing bowl is integrated.
    6. Pour the filling into the prepared pans, leaving some space at the top as the mixture will expand slightly.
    7. If there is extra filling, bake it in a small baking dish.
    8. Place an 11×13-inch pan filled with water on a lower oven rack. Position the Springform pans on the middle rack above the water pan.
    9. Bake for 1 hour and 10 minutes. After 35 minutes, switch the positions of the pans if necessary to ensure even baking.
    10. Turn off the oven and allow the cheesecakes to rest inside for another hour.
    11. Remove from the oven and cool to room temperature on a wire rack.
    12. Refrigerate for 8 hours or overnight.
    13. Before serving, run a knife around the edges of the pans to loosen the cheesecakes. Release the Springform clasp and transfer the cheesecakes to a serving plate.

    Tips

    For the best results, use room temperature ingredients, especially the cream cheese, which ensures a smooth and creamy filling. Also, make sure to mix the batter thoroughly to avoid lumps. If you find your cheesecake cracking, don’t fret; a little sour cream or lemon curd can be a delightful topping to cover any imperfections.

    Variations & Substitutions

    If Meyer lemons are unavailable, regular lemons can be used, though the flavor will be slightly more tart. For a different crust experience, try using graham crackers or digestive biscuits instead of gingersnaps. You can also add a teaspoon of vanilla extract for a subtle flavor enhancement.

    Storage

    Store any leftovers in an airtight container in the refrigerator for up to 5 days. You can also freeze the cheesecake for up to 2 months. To freeze, wrap the cheesecake tightly in plastic wrap and foil, then place it in a freezer-safe container.

    FAQ

    Can I use low-fat cream cheese?

    While you can use low-fat cream cheese, the texture and richness of the cheesecake may be affected. For the best results, I recommend using full-fat cream cheese.

    How do I prevent my cheesecake from cracking?

    To avoid cracks, ensure the ingredients are at room temperature for smooth mixing. Baking the cheesecake in a water bath and allowing it to cool gradually in the oven also help prevent cracking.

    Can I make this cheesecake ahead of time?

    Absolutely! This cheesecake is perfect for making ahead. Prepare it a day in advance and store it in the refrigerator until you’re ready to serve.

    Nutrition

    This cheesecake is an indulgent dessert, so it’s best enjoyed in moderation. Each slice (based on 12 servings) contains approximately 350 calories, with 25 grams of fat, 28 grams of carbohydrates, and 6 grams of protein.

    Final Thoughts

    Meyer Lemon Cheesecake is a testament to the beauty of combining classic flavors with a modern twist. Whether you’re an ardent lemon lover or simply searching for a dessert that impresses, this cheesecake is sure to delight. I hope it brings as much joy to your table as it does to mine, evoking cherished memories and creating new ones with every bite.

    Related update: Meyer Lemon Cheesecake

    Related update: Chocolate Almond Bark

  • Noodle Kugel with Pineapple-Gluten free, Dairy Free | Made by Meaghan Moineau

    Noodle Kugel with Pineapple-Gluten free, Dairy Free | Made by Meaghan Moineau

    Noodle Kugel with Pineapple: Gluten-Free, Dairy-Free Delight

    There are few things as comforting as a warm noodle kugel, and this version brings a delightful twist with the addition of pineapple, all while being gluten-free and dairy-free. Growing up, noodle kugel was a staple at family gatherings, a dish that brought everyone to the table with eager anticipation. The sweet, cinnamon-spiced aroma would fill the house, creating an inviting atmosphere that promised delicious memories. This recipe is my gluten-free, dairy-free adaptation, perfect for those who want to indulge in nostalgic flavors without compromising on dietary needs.

    Why You’ll Love It

    This Noodle Kugel with Pineapple is a unique blend of sweet and savory, perfect for any occasion. Here’s why this dish will become a favorite in your home:

    • It’s gluten-free and dairy-free, making it suitable for those with dietary restrictions.
    • The pineapple adds a refreshing twist that brightens the classic kugel flavor.
    • Made in cupcake form, it’s perfect for portion control and easy serving.
    • It’s a versatile dish that works as a side, dessert, or even a breakfast treat!

    Ingredients

    • Gluten-free spiral rice pasta
    • Canned pineapple chunks
    • Unsweetened vanilla coconut milk or coconut creamer
    • Sunflower oil
    • Egg yolks
    • Xylitol or sugar
    • Evaporated cane sugar
    • Ground cinnamon
    • Ground nutmeg
    • Kosher salt
    • Cupcake liners
    • Cinnamon
    • Evaporated cane sugar
    • Earth Balance soy-free margarine
    • Red brown rice flour

    Instructions

    1. Preheat your oven to 350 degrees F.
    2. Fill a medium stockpot with water and set it over high heat. Once the water boils, add 2 tablespoons of kosher salt, then the pasta. Stir well to prevent sticking.
    3. Stir occasionally and cook the pasta for 8-10 minutes. Let it sit in the water for a few minutes before transferring it to a large glass or heatproof bowl to cool slightly.
    4. While the pasta cools, prepare the other ingredients. In a large mixing bowl, combine the coconut milk, creamer, pineapple, sugar, xylitol, cinnamon, nutmeg, and sunflower oil. Mix well.
    5. Add the egg yolks to the mixture and stir to combine thoroughly.
    6. Prepare the crumble topping by mixing together a small amount of cinnamon and evaporated cane sugar with the red brown rice flour and margarine.
    7. Line two cupcake pans with cupcake liners.
    8. Using a dry 1/4 cup measuring spoon, fill each cupcake liner with the noodle mixture, filling over the top. Distribute any remaining liquid to each kugel that looks dry.
    9. Sprinkle the crumble over each kugel, using about 1/2 teaspoon per cupcake.
    10. Bake for 40-45 minutes, until golden brown.
    11. Cool for 10 minutes before removing from the cupcake pans. Serve hot or warm, with or without the liners.

    Tips

    • Ensure the pasta is cooked al dente to maintain a pleasant texture.
    • Feel free to adjust the sweetness by adding more or less sugar according to your taste.
    • Using cupcake liners makes cleanup easy and helps the kugel hold its shape.

    Variations & Substitutions

    • Fruit Variations: Swap the pineapple for apples or pears for a different fruity twist.
    • Nutty Additions: Add chopped nuts such as pecans or walnuts to the crumble for added crunch.
    • Sugar Alternatives: Substitute xylitol with maple syrup or agave nectar for a different sweetness profile.

    Storage

    Store leftover kugels in an airtight container in the refrigerator for up to 4 days. To reheat, simply place them in the oven at 300 degrees F for about 10 minutes or until warmed through. These kugels can also be frozen for up to 2 months; thaw in the refrigerator overnight before reheating.

    FAQ

    Can I make this recipe ahead of time?

    Yes, you can prepare the noodle mixture and fill the cupcake liners a day in advance. Cover and store them in the refrigerator, then bake the next day.

    Is there a substitute for coconut milk or creamer?

    If coconut milk isn’t available, almond milk or soy milk can be used as alternatives, although it may slightly alter the flavor.

    Nutrition

    This noodle kugel offers a balanced treat with a touch of sweetness and fruit, making it a delightful addition to any meal. It’s a gluten-free and dairy-free option that can fit into many dietary plans. Always check specific brands for nutritional content, especially regarding sugar and calorie counts.

    Final Thoughts

    This Noodle Kugel with Pineapple brings a modern twist to a beloved classic. The tropical notes of pineapple paired with the warm spices of cinnamon and nutmeg create a delightful harmony of flavors. Whether it’s for a holiday gathering or a weekend brunch, this dish is sure to impress. Enjoy the comfort and nostalgia of noodle kugel, reimagined for today’s dietary preferences, without sacrificing any of the flavors that make it a favorite. Happy cooking!

    Related update: Noodle Kugel with Pineapple-Gluten free, Dairy Free

    Related update: Meyer Lemon Cheesecake

    Related update: Damn Good Corn Pudding ~from 12 Bones Smokehouse

    Related update: Vegetable Cheddar Quiche

  • Almond Cookie Bar | Made by Meaghan Moineau

    Almond Cookie Bar | Made by Meaghan Moineau

    Almond Cookie Bar

    Welcome to the delightful world of homemade almond cookie bars! These delectable treats have been a family favorite for generations. I vividly remember my grandmother preparing these bars during the festive seasons, the kitchen filled with the warm, inviting aroma of baking dough and sweet apricot jam. Today, I’m excited to share this cherished recipe with you, hoping it brings as much joy to your home as it has to ours.

    Why You’ll Love It

    These almond cookie bars are a perfect blend of texture and flavor. The crunchy base is complemented by a luscious apricot layer, topped with a nutty, sweet almond and oatmeal mixture. They’re not only delicious but also incredibly satisfying, making them a hit at parties or as an afternoon snack. Plus, with ingredients like wholemeal flour and oatmeal cornflakes, you can feel a bit better about indulging in these treats.

    Ingredients

    • Almond flakes
    • Apricot gel/jam
    • Brown sugar
    • Butter
    • Cookie base
    • Fresh milk
    • Oatmeal cornflakes
    • Plain flour
    • Wholemeal flour

    Instructions

    1. Beat butter and sugar until light and fluffy.
    2. In a bowl, combine wholemeal flour and plain flour together, then mix in the butter mixture with a rubber spatula and knead gently to form a soft dough.
    3. Turn out the dough onto a floured surface or line with a plastic sheet below and with another plastic sheet on top. Then roll into a square. Chill for at least 1 hour.
    4. Transfer the dough onto non-grease paper and cover with a plastic sheet on top, then roll the dough to about 3mm thick.
    5. Prick the dough with a fork and bake for about 15-18 minutes until brown in a preheated oven at 180°C. Leave the biscuit to cool.
    6. Spread the apricot jam over the top of the biscuit and set aside.
    7. Mix topping ingredients and spread evenly on the biscuit with a palette knife.
    8. Bake for 15 minutes until golden.
    9. Remove the cooked biscuit from the oven and leave to cool completely, then cut into bars.

    Tips

    To ensure the dough is easy to work with, make sure the butter is at room temperature before you start. Chilling the dough is crucial as it helps in maintaining the shape while baking. When spreading the apricot jam, ensure the base has cooled completely to prevent the jam from melting and becoming runny.

    Variations & Substitutions

    These almond cookie bars are quite versatile. If you’re not a fan of apricot, try substituting with raspberry or strawberry jam for a different twist. For a healthier version, you can replace brown sugar with coconut sugar or a sugar substitute of your choice. If you prefer, add a sprinkle of cinnamon to the almond mixture for a warm, spicy note.

    Storage

    Store your almond cookie bars in an airtight container at room temperature for up to a week. For longer storage, you can freeze them for up to three months. Just ensure they are well wrapped to prevent freezer burn.

    FAQ

    Can I make these bars gluten-free?

    Yes, you can substitute the plain and wholemeal flours with a gluten-free baking blend. Make sure it contains xanthan gum to help bind the dough.

    What if I don’t have oatmeal cornflakes?

    If oatmeal cornflakes are not available, you can use regular rolled oats or crushed cornflakes as an alternative. They will provide a similar texture to the topping.

    Nutrition

    Each almond cookie bar contains approximately 150 calories, with a balance of carbohydrates, fats, and protein. The wholemeal flour and oatmeal add dietary fiber, making this a more wholesome treat.

    Final Thoughts

    These almond cookie bars are more than just a treat; they’re a piece of nostalgia and comfort. Whether you’re enjoying them with a cup of tea or sharing them with loved ones, they’re sure to bring a smile to your face. I hope this recipe becomes a beloved part of your baking repertoire, just as it has been in my family for years. Happy baking!

    Related update: Almond Cookie Bar