Tag: Honey-Roasted Peanuts

  • Spiced Egyptian Roasted Cauliflower Salad with Tahini Drizzle | Made by Meaghan Moineau

    Spiced Egyptian Roasted Cauliflower Salad with Tahini Drizzle | Made by Meaghan Moineau

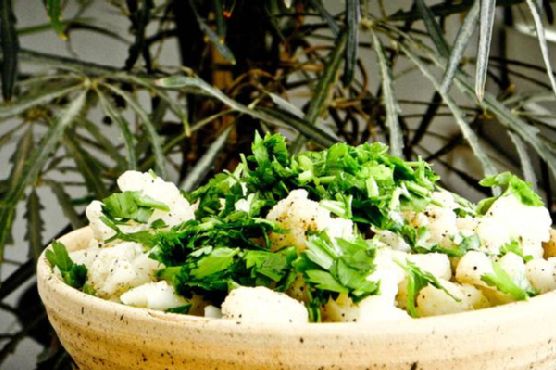
    Spiced Egyptian Roasted Cauliflower Salad with Tahini Drizzle

    Imagine the sizzle of cauliflower roasting to a perfect golden-brown, enveloped in a fragrant cloud of smoky paprika and garlic. The anticipation builds as the creamy tahini drizzle awaits its turn to dance on top, promising a meal that’s as visually stunning as it is delicious.

    Personal Story

    Ah, cauliflower. It’s one of those humble vegetables that I used to overlook in my kitchen adventures. That is, until a trip to Cairo a few years back changed everything. I remember meandering through the bustling streets, where the air was filled with exotic spices and the scent of roasting vegetables from roadside stalls. I stumbled upon a small eatery tucked away in an alley, offering a simple yet transformative dish: a roasted cauliflower salad that was a revelation.

    Back home, I couldn’t shake the memory of that salad. The cauliflower was roasted to perfection, with a smoky depth that I couldn’t quite replicate with just plain ol’ steaming. So, I began experimenting in my kitchen, determined to recreate that unforgettable flavor. My first attempts were a bit of a kitchen mishap—too much spice here, not enough there—but eventually, I found my groove. The secret lay in a careful balance of smoked paprika, garlic powder, and the creamy tang of tahini.

    Now, whenever I prepare my Spiced Egyptian Roasted Cauliflower Salad, I’m transported back to that vibrant Cairo street corner. It’s a dish steeped in personal discovery and culinary triumph, and I’m thrilled to share it with you.

    What Makes This Version Special

    This isn’t your average roasted cauliflower salad. My version elevates the humble vegetable by roasting it with a medley of spices that imbue a smoky depth, then topping it with a luxurious creamy tahini drizzle. The magic happens in the roasting process, where the spices create a caramelized crust that’s simply irresistible. What sets this recipe apart is the interplay of textures and flavors: the silky tahini meets the nutty crunch of toasted pine nuts, and everything is brightened with a squeeze of fresh lemon juice.

    Flavor Profile

    Prepare for a taste journey that is smoky, nutty, and oh-so satisfying. The smoked paprika and garlic powder give the cauliflower a bold, earthy flavor, while the tahini drizzle adds a creamy, tangy finish. The roasted bell peppers bring a touch of sweetness, contrasting beautifully with the savory notes. Each bite is an experience, from the warm spices to the cool, refreshing mint that finishes the dish.

    Ingredients

    • 1 large cauliflower, cut into medium-sized florets
    • 2 tablespoons olive oil
    • 1 teaspoon smoked paprika
    • 1 teaspoon garlic powder
    • 1 teaspoon cumin
    • Salt, to taste
    • Freshly ground black pepper, to taste
    • 1 red bell pepper, diced
    • 2 tablespoons lemon juice
    • 1/4 cup tahini
    • 2 tablespoons water (to thin the tahini)
    • 1/4 cup toasted pine nuts
    • 1/4 cup chopped fresh parsley
    • 1/4 cup fresh mint leaves, torn

    Instructions

    1. Preheat your oven to 425°F (220°C). While the oven heats, separate the cauliflower into medium-sized florets. If you have a steamer, steam the cauliflower for 5 minutes until slightly tender. If not, you can boil the whole cauliflower for 5 minutes, then cut it into pieces once it cools slightly.
    2. In a large mixing bowl, toss the steamed cauliflower with olive oil, smoked paprika, garlic powder, cumin, and a generous pinch of salt and pepper. Spread the cauliflower in a single layer on a baking sheet lined with parchment paper.
    3. Roast in the oven for 20-25 minutes, or until the cauliflower is golden-brown and slightly crisp around the edges. The aroma will be irresistible!
    4. While the cauliflower is roasting, dice the bell pepper and toast the pine nuts in a dry skillet over medium heat until they are golden and fragrant. Be sure to stir frequently to prevent burning.
    5. In a small bowl, mix the tahini with lemon juice and water until smooth and slightly runny. Adjust the water amount if necessary to reach your desired consistency.
    6. Once the cauliflower is done, remove it from the oven and let it cool for a few minutes. Combine it with the diced bell pepper in a serving bowl.
    7. Drizzle the tahini mixture over the cauliflower and bell pepper. Sprinkle with toasted pine nuts, chopped parsley, and fresh mint leaves for a burst of flavor and color.

    Pro Tips from Meaghan’s Kitchen

    • Spice it up: Add a pinch of cayenne pepper to the spice mix for a touch of heat.
    • Crispy Cauliflower: Make sure the cauliflower is well-drained before roasting to achieve the perfect crispiness.
    • Tahini Tips: If your tahini is too thick, warm it slightly in the microwave to make it easier to mix.
    • Extra Crunch: Don’t skip the toasting step for the pine nuts; it enhances their flavor and adds an irresistible crunch.
    • Herbaceous Finish: Add a sprinkle of sumac for a tangy, lemony finish.

    Variations & Dietary Swaps

    • Vegetarian Delight: Add roasted chickpeas for added protein and texture.
    • Spice-it-up Version: Incorporate a teaspoon of harissa paste into the tahini drizzle for an extra kick.
    • Kids-Friendly Version: Swap smoked paprika with sweet paprika and omit the cumin for a milder flavor.

    What to Serve With It

    This Spiced Egyptian Roasted Cauliflower Salad pairs beautifully with a chilled glass of Sauvignon Blanc or a side of warm pita bread. For a heartier meal, serve it alongside grilled chicken or lamb kebabs. The salad’s vibrant flavors and textures also complement a simple bowl of couscous or quinoa, allowing the dish to shine as a centerpiece.

    Storage & Meal Prep

    This salad is best enjoyed fresh, but it can be stored in the refrigerator for up to 2 days in an airtight container. If you plan to make it ahead, keep the tahini drizzle and pine nuts separate until just before serving to maintain their texture. Reheat the salad gently in the oven at a low temperature, or enjoy it cold as a refreshing lunch option.

    FAQ

    Can I use frozen cauliflower?

    Yes, you can use frozen cauliflower. Just be sure to thaw and drain it well before roasting to prevent sogginess.

    What’s the best way to toast pine nuts?

    Toast pine nuts in a dry skillet over medium heat, stirring frequently, until they are golden and fragrant. This usually takes about 3-5 minutes.

    Is there a substitute for tahini?

    If tahini isn’t available, you can use almond butter or sunflower seed butter for a similar creamy texture, though the flavor will be different.

    Can I make this salad vegan?

    Absolutely! This recipe is already vegan-friendly as it is free from animal products.

    How can I add more protein to the salad?

    Consider adding roasted chickpeas or grilled tofu for an added protein boost.

    Final Thoughts

    I hope this Spiced Egyptian Roasted Cauliflower Salad with Tahini Drizzle finds its way into your kitchen and becomes a beloved part of your culinary repertoire. Its unique combination of flavors and textures is sure to impress at any gathering or simply elevate a weekday dinner. I’d love to hear how it turns out for you, so please share your thoughts or variations in the comments below. Happy cooking, my friends!

    Related update: Spiced Egyptian Roasted Cauliflower Salad with Tahini Drizzle

    Related update: Garlicky Kale with Toasted Pine Nuts and Sun-Dried Tomatoes

  • Herb-Crusted Lemon Roast Chicken with Truffle-Infused Potatoes | Made by Meaghan Moineau

    Herb-Crusted Lemon Roast Chicken with Truffle-Infused Potatoes | Made by Meaghan Moineau

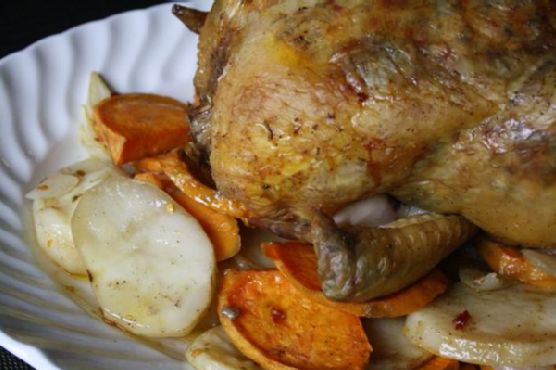
    Herb-Crusted Lemon Roast Chicken with Truffle-Infused Potatoes

    The moment your kitchen fills with the aroma of roasting chicken mingling with fresh herbs and a whisper of citrus, you know dinner is going to be special. Picture this: crispy, golden-brown skin enveloping juicy, savory meat, with herbaceous notes dancing around your taste buds, all complemented by the earthy allure of truffle-oil-kissed potatoes. This is not just any roast chicken—it’s an experience.

    Personal Story

    My love affair with roast chicken started in my grandmother’s cozy kitchen, where Sundays were synonymous with her iconic roast dinners. I’d spend the mornings eagerly peeling potatoes, mesmerized by the alchemy of simple ingredients transforming into something extraordinary. Her secret, she whispered, was all about the seasoning—and a little bit of love.

    Years later, I found myself in a tiny Parisian bistro with the smell of rotisserie chicken wafting through the air, reigniting those cherished memories. The French, I discovered, had perfected the art of marrying simplicity with sophistication, creating dishes that were both comforting and refined. Inspired, I returned home determined to recreate that magic.

    After countless experiments (and a few crispy mishaps), I crafted my version of the perfect roast chicken. By adding a fragrant herb crust and finishing my potatoes with a touch of truffle oil, I found that I could evoke those nostalgic flavors while bringing a modern twist to the table. Every time I make this dish, I’m reminded that cooking is a delicious journey, full of stories waiting to be told.

    What Makes This Version Special

    This Herb-Crusted Lemon Roast Chicken with Truffle-Infused Potatoes takes the classic roast chicken to new heights. The herb crust—composed of fresh rosemary, thyme, parsley, and a sprinkle of grated parmesan cheese—adds layers of savory goodness that permeate the chicken skin, making it irresistibly crispy and flavorful. The truffle oil drizzled over the potatoes in the last ten minutes of roasting infuses them with a luxurious earthiness, elevating this dish to gourmet status. Unlike the usual roast chicken recipes, this version doesn’t just satisfy; it wows.

    Flavor Profile

    Imagine biting into a piece of chicken where the skin crackles with a herby, crunchy crust, releasing the fragrant oils of rosemary and thyme. The juicy meat underneath is subtly infused with lemony notes, creating a delicate balance of tang and warmth. Now, pair this with Yukon gold and sweet potatoes that are roasted to perfection, their creamy interiors contrasting with a crispy exterior. The final touch of truffle oil adds an earthy aroma that lingers, turning every bite into a sensory delight.

    Ingredients

    • 1 whole chicken, washed and patted dry
    • 2 tablespoons butter, softened
    • 3 cloves garlic, minced
    • Zest of 2 lemons
    • 1 teaspoon chili flakes
    • Salt and pepper to taste
    • 1 lemon, halved
    • 2 pounds Yukon gold potatoes, diced
    • 2 pounds sweet potatoes, diced
    • 1 teaspoon chili flakes
    • 2 tablespoons olive oil
    • **1 tablespoon truffle oil**
    • **2 tablespoons fresh rosemary, finely chopped**
    • **2 tablespoons fresh thyme, finely chopped**
    • **2 tablespoons parsley, finely chopped**
    • **1/2 cup grated parmesan cheese**

    Instructions

    1. Preheat your oven to 400°F (200°C). Ensure the chicken is thoroughly washed and patted dry, as a dry surface ensures crispy skin.
    2. Generously season the chicken inside, outside, and under the skin with salt and pepper. This is crucial for flavor.
    3. In a small bowl, mix softened butter with minced garlic, chili flakes, and lemon zest. Add a pinch of salt and pepper to taste.
    4. Gently lift the skin of the chicken and stuff the flavored butter underneath, spreading it over the breast, legs, and back for maximum flavor.
    5. Stuff half a lemon into the chicken cavity to infuse the meat with citrusy zest as it roasts.
    6. In a large baking pan, toss the diced Yukon gold and sweet potatoes with chili flakes, a pinch of salt and pepper, and olive oil. Spread them evenly across the bottom of the pan.
    7. Place a roasting rack over the potatoes and position the chicken breast-side up on the rack. This allows the potatoes to soak up the delicious drippings.
    8. Roast for the first 15 minutes at 400°F, then reduce the oven temperature to 300°F. Continue roasting for about an hour, basting occasionally with the pan juices.
    9. Halfway through, turn the chicken breast-side down. This helps even cooking and keeps the breast moist.
    10. In the last 10 minutes of roasting, drizzle a small amount of truffle oil over the potatoes for an aromatic finish.
    11. Check for doneness by piercing the thickest part of the chicken, the thigh. If the juices run clear, it’s ready. If not, give it more time.
    12. Once done, let the chicken rest for 10 minutes before carving. Serve it on a platter over the roasted potatoes.

    Pro Tips from Meaghan’s Kitchen

    • Dry your chicken well: A dry surface is key to achieving that crispy, golden-brown skin.
    • Herb crust trick: Press the herb mixture firmly onto the skin to ensure it sticks and crisps up beautifully.
    • Truffle oil timing: Add the truffle oil at the end to prevent it from losing its delicate flavor during cooking.
    • Rest before carving: Allowing the chicken to rest helps the juices redistribute, resulting in tender, juicy meat.
    • Save the pan juices: They make a fantastic gravy or sauce when reduced on the stovetop with a splash of white wine.

    Variations & Dietary Swaps

    • Vegetarian swap: Replace chicken with whole cauliflower. Coat with the same herb crust and roast until tender.
    • Spice-it-up version: Add smoked paprika and cumin to the butter mixture for a smoky kick.
    • Kids-friendly version: Omit chili flakes and add a touch of honey to the butter for a sweeter, milder flavor.

    What to Serve With It

    This dish pairs beautifully with a crisp Chardonnay, whose acidity complements the savory roast chicken and earthy truffle notes. For a fresh, vibrant side, serve with an arugula salad tossed in a lemon vinaigrette. The peppery arugula and zesty dressing cut through the richness, balancing the meal perfectly.

    Storage & Meal Prep

    Leftovers can be a lifesaver! Store any leftover chicken and potatoes in an airtight container in the fridge for up to three days. You can also freeze them for up to two months. To reheat, place in a 350°F oven until warmed through, or microwave for a quick fix, though the oven preserves the texture better.

    FAQ

    Can I use dried herbs instead of fresh ones?

    Yes, but fresh herbs provide a more vibrant flavor and aroma. If using dried herbs, reduce the quantity by about half.

    Is truffle oil necessary?

    While truffle oil adds a luxurious touch, it’s not essential. You can skip it or substitute with a drizzle of high-quality olive oil for a simpler finish.

    How do I know when the chicken is fully cooked?

    Check the internal temperature with a meat thermometer. It should read 165°F at the thickest part of the thigh. Alternatively, when pierced, the juices should run clear.

    What type of potatoes work best?

    Yukon gold and sweet potatoes offer a perfect texture contrast and sweetness. However, russets or red potatoes can also be used if preferred.

    Can I prepare this dish in advance?

    Absolutely! You can season and prepare the chicken a day ahead and store it covered in the fridge. This allows the flavors to meld, and all you need to do is roast it when you’re ready.

    Final Thoughts

    There’s something truly magical about gathering around a table and enjoying a home-cooked meal that’s been crafted with love and care. This Herb-Crusted Lemon Roast Chicken with Truffle-Infused Potatoes brings that magic to life, transforming a weeknight dinner into a culinary celebration. I’d love to hear your thoughts and any personal twists you might add to this recipe. Please share your experiences in the comments, and don’t forget to spread the love by sharing this recipe with friends and family. Happy cooking!

    Related update: Herb-Crusted Lemon Roast Chicken with Truffle-Infused Potatoes

    Related update: Umami-Packed Truffle Veggie Fried Rice with Crispy Shiitake

  • Roasted Squash and Cauliflower Soup with Curried Coconut Twist | Made by Meaghan Moineau

    Roasted Squash and Cauliflower Soup with Curried Coconut Twist | Made by Meaghan Moineau

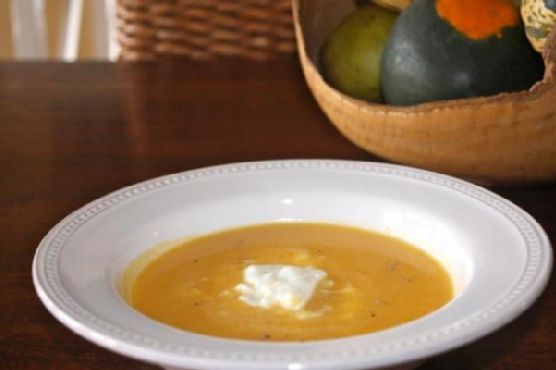
    Roasted Squash and Cauliflower Soup with Curried Coconut Twist

    Picture this: a chilly autumn evening, the kind where the leaves crunch underfoot and the air carries a crisp bite. You come inside, shake off the chill, and the aroma of roasted squash and warm spices wraps around you like a cozy blanket. This isn’t just soup; it’s comfort in a bowl, a hug from the inside out. Welcome to my Roasted Squash and Cauliflower Soup with Curried Coconut Twist, where every spoonful is an invitation to savor the exotic and familiar, all at once.

    Personal Story

    My love affair with soup began when I was just a child. Every Sunday, my grandmother would simmer a pot of something magical on the stove, filling her tiny kitchen with the scent of home. It wasn’t just food; it was tradition, a weekly ritual of warmth and nourishment. Back then, the recipes were simple, the ingredients sometimes plucked straight from her garden. As I grew older, I found myself drawn to this comforting practice, a thread connecting me to my past.

    One winter, during my university days, I decided to recreate that magic in my small apartment kitchen. Eager and slightly overconfident, I dove into a recipe for squash soup, certain it would be a breeze. However, in my haste, I forgot to remove the seeds from the squash before pureeing it. The result was a gritty concoction that even the most forgiving palate would struggle to enjoy. My roommates, bless their hearts, did their best to muster enthusiasm, but it was clear: I had some learning to do.

    Undeterred, I kept experimenting. Over time, I discovered the beauty of combining unexpected flavors, like the creamy richness of coconut milk and the vibrant zing of ginger. This Roasted Squash and Cauliflower Soup with Curried Coconut Twist was born out of those kitchen adventures, a dish that marries my love for tradition with a modern twist. Now, when the weather turns chilly, this soup is my go-to — a tribute to my grandmother’s legacy and my own culinary journey.

    What Makes This Version Special

    What sets this Roasted Squash and Cauliflower Soup with Curried Coconut Twist apart from the standard squash soup is the way it plays with flavors. The addition of coconut milk adds a luxurious creaminess that elevates the texture, making it silky and indulgent. Meanwhile, a hint of fresh ginger and a dash of cayenne pepper introduce an exotic depth that intrigues the palate without overwhelming it. This fusion of flavors turns a humble soup into a culinary adventure.

    Moreover, roasting the squash and cauliflower together enhances their natural sweetness and caramelization, a trick that adds a complex layer of flavor to the dish. Blooming the curry powder and grated ginger in butter before adding the vegetables releases their essential oils, enriching the soup with aromatic depth. These small but significant adjustments transform a classic recipe into something truly special.

    Flavor Profile

    The Roasted Squash and Cauliflower Soup with Curried Coconut Twist is a symphony of flavors. With each spoonful, you’re greeted by the creamy, velvety texture of coconut milk, which carries the roasted, slightly nutty sweetness of the squash. The cauliflower adds a subtle earthiness, while the ginger imparts a gentle warmth that lingers on your palate. The curry powder ties everything together with its aromatic notes, and just when you think you’ve savored it all, a whisper of cayenne pepper leaves a playful tickle of heat. Each bite is a sensory experience, a dance of sweet, spicy, and savory.

    Ingredients

    • 1 medium butternut squash
    • 1 medium delicata squash
    • 1 head of cauliflower, cut into florets
    • 4 cups vegetable stock
    • 1 large yellow onion, diced
    • 3 cloves fresh garlic, minced
    • **3 tablespoons curry powder**
    • **2 tablespoons butter**
    • 1/2 teaspoon cayenne pepper
    • Salt and pepper to taste
    • **1 can (14 oz) coconut milk**
    • 1 tablespoon freshly grated ginger
    • Fresh cilantro, for garnish
    • Lime wedges, for serving

    Instructions

    1. Preheat your oven to 375°F (190°C). Slice the butternut and delicata squash lengthwise and place them cut-side down in a casserole dish with about 1/4 inch of water on the bottom. This will help steam and roast the squash simultaneously. Bake for about 30 minutes, or until the squash is tender and a fork can easily pierce the skin.
    2. While the squash is roasting, spread the cauliflower florets on a baking sheet, drizzle with a bit of oil, and season with salt and pepper. Add to the oven for the last 20 minutes of the squash roasting time, stirring once midway to ensure even caramelization.
    3. Remove the squash from the oven and allow it to cool slightly. When you can handle it, scoop out the seeds and discard them. Scoop the squash flesh into a bowl and set aside.
    4. In a large stockpot, heat the butter over medium heat. Add the diced onion and sauté until translucent and fragrant, about 5 minutes. Add the minced garlic, curry powder, and freshly grated ginger, stirring constantly for about 1 minute to bloom the spices and release their aromas.
    5. Add the roasted squash, cauliflower, cayenne pepper, and vegetable stock to the pot. Season with salt and pepper to taste. Bring the mixture to a simmer and let it cook for about 20 minutes, allowing the flavors to meld together beautifully.
    6. Remove the pot from heat and carefully use an immersion blender to puree the soup until smooth and creamy. Alternatively, you can blend it in batches using a countertop blender. If the soup is too thick for your liking, gradually add more vegetable stock until the desired consistency is reached.
    7. Return the soup to the pot, stir in the **coconut milk**, and gently heat until warmed through. Taste and adjust seasoning as needed.
    8. Ladle the soup into bowls, garnish with fresh cilantro, and serve with lime wedges on the side for a zesty finish. Enjoy!

    Pro Tips from Meaghan’s Kitchen

    • Roast your vegetables: Roasting the squash and cauliflower brings out their natural sweetness and adds a depth of flavor you won’t get from boiling.
    • Bloom your spices: Don’t skip the step of blooming your curry powder and ginger in butter. This process releases the oils in the spices, amplifying their flavors.
    • Use full-fat coconut milk: The creaminess of full-fat coconut milk is unparalleled and will give your soup a luxurious texture.
    • Adjust the spice level: If you prefer a milder soup, reduce the cayenne pepper. For more heat, feel free to add a pinch more or even some chopped fresh chili.
    • Let it rest: If you have the time, let the soup sit for a few hours or overnight. The flavors will deepen and meld together beautifully.

    Variations & Dietary Swaps

    • Vegetarian/Vegan: This soup is naturally vegetarian. To make it vegan, simply ensure the butter is plant-based or replace it with olive oil.
    • Spice-it-up: For a bolder spice kick, add a chopped fresh red chili or an extra teaspoon of cayenne pepper.
    • Kid-friendly version: Reduce the curry powder and omit the cayenne pepper for a milder, more child-friendly version. Consider adding a swirl of plain yogurt for creaminess that kids will love.

    What to Serve With It

    This Roasted Squash and Cauliflower Soup with Curried Coconut Twist pairs beautifully with a chilled Riesling, whose sweetness complements the soup’s aromatic spices. Alternatively, serve it alongside warm, crusty naan bread for dipping. The contrast of the crispy, warm bread with the creamy soup is a match made in culinary heaven.

    Storage & Meal Prep

    To store, let the soup cool to room temperature before transferring it to airtight containers. It will keep in the refrigerator for up to 4 days. For longer storage, freeze the soup in portioned containers for up to 3 months. When ready to enjoy, thaw the soup overnight in the fridge, then reheat gently on the stovetop, stirring occasionally until hot.

    FAQ

    Can I use a different type of squash?

    Absolutely! Feel free to use acorn squash or kabocha if that’s what you have on hand. Each type of squash will slightly alter the flavor and texture but will still be delicious.

    Can I make this soup ahead of time?

    Yes, this soup actually tastes better the next day as the flavors have more time to meld together. Just be sure to store it properly and reheat gently.

    Is there a substitute for coconut milk?

    If you’re not a fan of coconut milk or have an allergy, heavy cream or cashew cream can be used as a substitute. Keep in mind this will alter the flavor slightly.

    How can I make this soup thicker?

    If you prefer a thicker soup, reduce the amount of stock or add a peeled and diced potato to the pot while simmering. The potato will break down and thicken the soup naturally.

    Why roast the vegetables first?

    Roasting caramelizes the natural sugars in the vegetables, adding a richer, deeper flavor that enhances the overall taste of the soup.

    Final Thoughts

    This Roasted Squash and Cauliflower Soup with Curried Coconut Twist is more than just a dish; it’s an experience. Each spoonful is a journey through flavors and memories, from the comforting aroma that fills your kitchen to the vibrant taste that dances on your palate. I hope you enjoy making and savoring this soup as much as I do. If you try it, I’d love to hear about your experience. Feel free to leave a comment or share your own twist on this recipe. Until next time, happy cooking!

    Related update: Roasted Squash and Cauliflower Soup with Curried Coconut Twist

    Related update: Spicy Peach & Golden Tomato Gazpacho with Grilled Corn

    Related update: Tropical Coconut-Curry Chicken Tenders with Spicy Mango Dip

  • Decadent Honey-Roasted Peanut Butter Ice Cream with Dark Chocolate Shards | Made by Meaghan Moineau

    Decadent Honey-Roasted Peanut Butter Ice Cream with Dark Chocolate Shards | Made by Meaghan Moineau

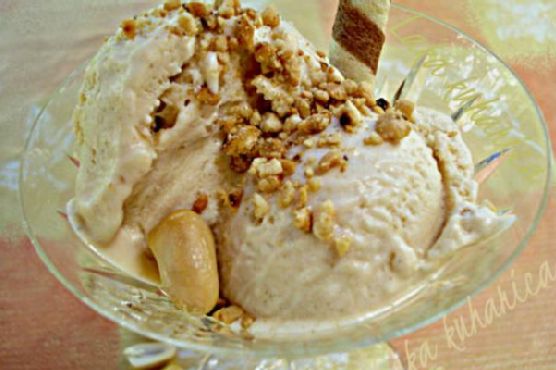
    Decadent Honey-Roasted Peanut Butter Ice Cream with Dark Chocolate Shards

    Imagine the creamy, nutty goodness of peanut butter ice cream taken to new heights with a luxurious swirl of homemade chocolate ganache and the crunch of honey-roasted peanuts. The first spoonful is a revelation, a dance of caramelized sweetness and rich chocolate undertones that lingers long after the last bite.

    Personal Story

    Growing up, peanut butter ice cream was a rare treat, reserved for special Sunday afternoons when my family would pile into our sun-faded station wagon and head to the local ice cream parlor. I remember the thrill of watching the server scoop out my favorite flavor, the peanut butter ribbons weaving through the creamy concoction like golden streams through a lush forest. It was pure joy in a cone.

    Fast forward a few years to my first tiny apartment kitchen, where I decided to recreate this childhood favorite. My initial attempts were, well, let’s just say, more of a learning experience than a triumph. I quickly discovered that achieving the right balance of flavors in homemade ice cream is both an art and a science, one that requires patience—and a bit of courage.

    One day, as I was experimenting with a batch, I decided to add a handful of honey-roasted peanuts that were hiding at the back of my pantry. The resulting flavor was a revelation. The caramelized crunch paired perfectly with the silky peanut butter base, and I knew I had stumbled upon something special. From there, the addition of dark chocolate shards seemed only natural, enhancing the peanut butter’s richness with a sophisticated depth.

    Now, this decadent honey-roasted peanut butter ice cream with dark chocolate shards holds a cherished spot not only in my recipe book but also in my heart. It’s a sweet reminder that sometimes the best things come from unexpected twists and a little bit of kitchen serendipity.

    What Makes This Version Special

    This isn’t your average peanut butter ice cream. What sets this recipe apart is the thoughtful addition of honey-roasted peanuts and a swirl of homemade chocolate ganache. The peanuts are roasted with honey to enhance their natural sweetness, adding a layer of caramelized flavor that complements the rich, nutty base. The chocolate ganache, made by melting dark chocolate with butter and cocoa powder, is carefully swirled into the ice cream during the final stages of churning. This technique creates deep, chocolatey undertones that elevate the classic peanut butter ice cream to something truly extraordinary.

    Flavor Profile

    The taste of this ice cream is a symphony of rich, nutty notes with a hint of caramel sweetness from the honey-roasted peanuts. Each bite delivers a creamy texture that’s punctuated by the satisfying crunch of the peanuts. The chocolate ganache adds a luxurious depth, with its bittersweet flavor cutting through the sweetness and providing a sophisticated twist. It’s a harmonious blend that dances on your palate, leaving a lingering, delectable aftertaste.

    Ingredients

    • 2 cups whole milk
    • 1 cup sugar
    • 1/4 teaspoon salt
    • 2 large eggs
    • 1 cup smooth peanut butter
    • 1 cup heavy cream
    • 1 teaspoon vanilla extract
    • 1 cup unsalted peanuts, roasted with honey
    • 1/2 cup bits of bitter chocolate
    • 1/4 cup honey
    • 1/4 cup cocoa powder
    • 4 ounces dark chocolate (70% cacao)
    • 2 tablespoons butter

    Instructions

    1. Preheat your oven to 350°F (175°C). Spread the unsalted peanuts on a baking sheet and drizzle with honey. Toss to coat, then roast in the oven for 10-15 minutes, or until golden-brown and fragrant. Allow to cool.
    2. In a medium saucepan, combine the milk, sugar, and salt. Cook over medium heat, stirring occasionally, until the mixture is just about to boil. Reduce the heat to low.
    3. In a separate bowl, beat the eggs with a hand mixer or whisk until frothy, about 2 minutes. Gradually stir about 1 cup of the hot milk mixture into the beaten eggs to temper them.
    4. Return the egg mixture to the saucepan with the remaining milk mixture. Cook over low heat, stirring constantly, until the mixture thickens slightly, about 2-3 minutes. Remove from heat.
    5. Whisk in the smooth peanut butter until fully incorporated. Transfer the mixture to a bowl, cover, and refrigerate for at least 3 hours.
    6. To make the chocolate ganache, melt the dark chocolate and butter together in a small saucepan over low heat. Stir in the cocoa powder until smooth and set aside.
    7. In a large bowl, combine the chilled peanut butter mixture with the heavy cream and vanilla extract, stirring with a whisk.
    8. Pour the mixture into an ice cream maker and churn according to the manufacturer’s instructions. In the last few minutes of churning, drizzle in the chocolate ganache to create swirls.
    9. Once churned, fold in the honey-roasted peanuts and chocolate bits. Transfer the ice cream to a plastic container and freeze for at least an hour before serving.
    10. When ready to serve, let the ice cream sit at room temperature for 5-10 minutes before scooping. Enjoy your decadent treat with an extra sprinkle of chopped peanuts and chocolate bits if desired.

    Pro Tips from Meaghan’s Kitchen

    • For the best texture, ensure your ice cream base is thoroughly chilled before churning. This helps achieve that perfect creamy consistency.
    • When roasting the peanuts, keep a close eye on them. The honey can quickly go from caramelized to burnt if left unattended.
    • If you don’t have an ice cream maker, no worries! Pour the mixture into a shallow dish and place it in the freezer. Stir every 30 minutes until it reaches your desired consistency.
    • For neat swirls, pour the ganache into the ice cream maker just moments before finishing the churn. This will create beautiful ribbons of chocolate throughout.
    • Always use high-quality dark chocolate for the ganache. It makes a significant difference in flavor.

    Variations & Dietary Swaps

    • Vegetarian option: Replace the eggs with a plant-based egg substitute, and use coconut cream instead of heavy cream for a vegan-friendly version.
    • Spice-it-up version: Add a pinch of cayenne pepper or a swirl of chili chocolate for an unexpected kick.
    • Kids-friendly version: Substitute the dark chocolate with milk chocolate and reduce the amount of cocoa powder for a sweeter, milder taste.

    What to Serve With It

    This decadent treat pairs beautifully with a glass of cold brew coffee or espresso, which provides a complementary bitter contrast to the ice cream’s rich sweetness. Alternatively, serve it alongside a warm brownie or a slice of banana bread for an indulgent dessert experience.

    Storage & Meal Prep

    Store your homemade ice cream in an airtight container in the freezer for up to two weeks. When ready to enjoy, let it sit at room temperature for 5-10 minutes before scooping to ensure it’s at the perfect creamy consistency. If the ice cream hardens too much in the freezer, a brief zap in the microwave (10-15 seconds) can soften it up for easier scooping.

    FAQ

    How do I prevent my ice cream from becoming too icy?

    Ensuring that your ice cream base is completely chilled before churning and using an ice cream maker will help prevent ice crystals from forming. Additionally, incorporating enough sugar helps achieve a smoother texture.

    Can I use crunchy peanut butter instead of smooth?

    Absolutely! Crunchy peanut butter will add extra texture and peanut bits, enhancing the nutty experience. Just ensure it’s well incorporated into the mixture.

    Is there an alternative to honey for roasting the peanuts?

    Yes, you can use maple syrup or agave nectar as a substitute for honey if you prefer a different flavor or are avoiding honey.

    Can I add more chocolate?

    Of course! Feel free to increase the amount of dark chocolate or add extra chocolate bits on top for an even richer chocolate experience.

    Final Thoughts

    Creating this decadent honey-roasted peanut butter ice cream with dark chocolate shards is a delightful culinary adventure, one that’s sure to impress family and friends. I hope you find as much joy in making and tasting this ice cream as I did in creating it. I’d love to hear about your own twists on this recipe, so feel free to share your comments and experiences below. Happy scooping!

    Related update: Decadent Honey-Roasted Peanut Butter Ice Cream with Dark Chocolate Shards

    Related update: Orange Blossom Amaretto Almond Cookies with Dark Chocolate Drizzle