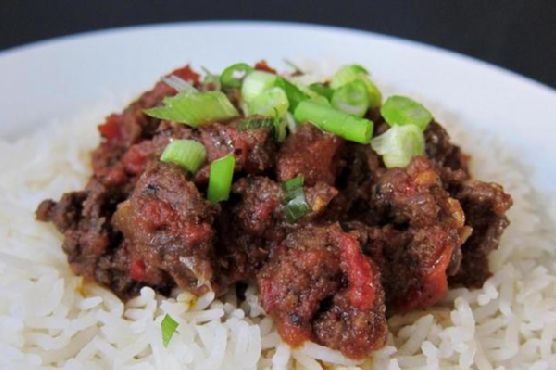
Category: Main Course

  • Madras Beef Curry | Made by Meaghan Moineau

    Madras Beef Curry | Made by Meaghan Moineau

    Madras Beef Curry

    Welcome to a journey into the warmth and spice of Indian cuisine with our Madras Beef Curry. This dish, filled with the aromatic flavors of garam masala and the heat of cayenne pepper, is bound to become a favorite in your household. Growing up, Sunday evenings at my grandmother’s house were always dedicated to exploring different cuisines, and the delightful aroma of curry simmering in the kitchen was my favorite. This Madras Beef Curry recipe brings back those cherished memories and is sure to create new ones for your family as well.

    Why You’ll Love It

    This Madras Beef Curry is a vibrant and hearty dish that will tantalize your taste buds. Here are a few reasons why you’ll fall in love with it:

    • Flavor Explosion: The combination of garam masala, cinnamon, and curry powder creates a symphony of flavors that dances on the palate.
    • Customizable Heat: Whether you like it mild or spicy, you can adjust the cayenne pepper to suit your taste.
    • Perfect for Meal Prep: This curry stores well and tastes even better the next day, making it ideal for meal prepping.
    • Comforting and Satisfying: Served over warm basmati rice, this curry provides a comforting meal that’s perfect for any occasion.

    Ingredients

    • 2 tsp garam masala
    • 1/2 tsp ground cinnamon
    • 2 tbsp curry powder
    • 1/2 tsp black pepper
    • 1 tsp salt
    • 1/4 tsp cayenne pepper
    • 1 tbsp light brown sugar
    • 4 garlic cloves, minced
    • 1-inch piece of ginger, grated
    • 2 tbsp lemon juice
    • 2 tbsp vegetable oil
    • 1.5 lbs beef, thinly sliced
    • 1 can (14 oz) diced tomatoes
    • 2 green onions, chopped
    • Cooked basmati rice, for serving

    Instructions

    1. Slice the beef thinly (as for a stir fry) and place it in a medium bowl.
    2. Add all of the other ingredients, except the tomatoes, green onions, and rice, and combine to coat the meat well.
    3. Let sit for 10-15 minutes to allow the flavors to infuse into the meat.
    4. Heat a medium pan with a lid over medium heat. Add the meat and brown well, stirring occasionally.
    5. Continue to cook over medium heat until all of the meat juices have evaporated and only oil remains in the bottom of the pan with the meat.
    6. Add the tomatoes, stir to combine, and lower the heat to medium low. Cover and simmer, stirring occasionally, until the meat is tender and most of the moisture from the tomatoes has been absorbed by the meat, about 30 minutes.
    7. If the sauce becomes too thick before the beef is tender, add 1/4 cup water and continue to simmer with the lid on.
    8. Taste and adjust the seasoning, adding additional salt if needed. For a spicier curry, additional cayenne pepper may be added at this point.
    9. Serve over steamed basmati rice with chopped green onions on top.

    Tips

    To ensure the best results, here are some tips:

    • Beef Selection: Choose a cut of beef that is suitable for quick cooking, such as sirloin or flank steak, to keep it tender.
    • Marinating Time: If you have extra time, marinate the beef longer for deeper flavors.
    • Consistent Slicing: Slice the beef evenly for uniform cooking.

    Variations & Substitutions

    This recipe is flexible and can be adapted to suit your preferences:

    • Protein Swap: Substitute chicken or lamb for beef. Adjust cooking time as needed.
    • Vegetarian Option: Use tofu or chickpeas in place of beef for a plant-based version.
    • Spice Level: Adjust the cayenne pepper to make it as mild or spicy as you like.

    Storage

    Leftover Madras Beef Curry can be stored in an airtight container in the refrigerator for up to 3 days. For longer storage, freeze in a freezer-safe container for up to 3 months. Reheat gently on the stovetop or in the microwave before serving.

    FAQ

    Can I make this curry ahead of time?

    Absolutely! This curry actually tastes better the next day as the flavors continue to develop. Just store it in the refrigerator and reheat before serving.

    What can I serve with Madras Beef Curry?

    This curry is traditionally served with basmati rice, but it also pairs well with naan bread or a side of steamed vegetables.

    Nutrition

    This Madras Beef Curry is not only delicious but also packed with protein and spices that may boost metabolism. For a lighter option, you can serve it with brown rice or quinoa.

    Final Thoughts

    Madras Beef Curry is more than just a meal; it’s an experience. Each bite invites you into a world of rich aromas and bold flavors, reminiscent of a cozy family dinner filled with laughter and good conversation. Whether you’re cooking for yourself, your family, or entertaining guests, this recipe is sure to impress. Enjoy the process of creating this dish and the warmth it brings to your table. Happy cooking!

    Related update: Madras Beef Curry

    Related update: Spicy Black Bean and Quinoa Burgers with Pineapple-Jalapeño Salsa

  • Bacon & Egg Toast Cups | Made by Meaghan Moineau

    Bacon & Egg Toast Cups | Made by Meaghan Moineau

    Bacon & Egg Toast Cups

    Introduction

    There’s something undeniably comforting about the combination of bacon and eggs, wrapped snugly in a cup of crispy bread. It takes me back to those lazy Sunday mornings at my grandmother’s house, where the aroma of sizzling bacon would gently nudge me awake. We’d gather around the table, and she’d serve her famous bacon and egg toast cups, each one a little parcel of breakfast joy. If you’re looking for a dish that brings warmth and nostalgia to your morning routine, these Bacon & Egg Toast Cups will do just the trick.

    Why You’ll Love It

    This recipe is a delightful twist on the classic bacon and eggs breakfast. It’s perfect for impressing guests at brunch, or for a cozy breakfast in bed. Here are a few reasons you’ll fall in love with this dish:

    • Easy to make: With simple ingredients and straightforward steps, this recipe is accessible even for beginner cooks.
    • Customizable: You can easily adjust the ingredients to suit your taste, making it a versatile addition to your breakfast repertoire.
    • Perfect for meal prep: These cups can be made in advance, saving you time on busy mornings.
    • Kid-friendly: The fun presentation makes it a hit with kids, and they can even help make them!

    Ingredients

    • Unsalted butter
    • 6 slices of sandwich bread
    • 6 slices of bacon
    • 6 eggs
    • Salt & pepper to taste

    Instructions

    1. Preheat your oven to 375°F (190°C).
    2. Lightly butter six standard muffin cups.
    3. Flatten the bread slices slightly with a rolling pin, and with a 4.5-inch cookie cutter, cut into four rounds. Cut each round in half, then press the two halves into each muffin cup, overlapping slightly and making sure bread comes up to the edges. Use extra bread and crusts to patch any holes if necessary. Brush with remaining butter.
    4. In a large skillet, cook the bacon until almost crisp, about four minutes, flipping once. Lay one bacon slice in each bread cup.
    5. Crack an egg over each bacon slice. Season with salt & pepper.
    6. Bake until egg whites are just set, about 25 minutes. The bacon will continue to cook in the oven.
    7. Run a small knife around cups to loosen toast cups before serving.

    Tips

    • Make sure to pre-cook the bacon just until it’s almost crispy; it will continue to cook in the oven.
    • For even cooking, crack the eggs gently to avoid breaking the yolks.
    • For easier removal, allow the cups to cool slightly before running a knife around the edges.

    Variations & Substitutions

    These Bacon & Egg Toast Cups are flexible and can be tailored to suit your preferences:

    • Cheese: Add a sprinkle of shredded cheese on top of the eggs before baking for a cheesy twist.
    • Vegetarian: Omit the bacon and add sautéed spinach or mushrooms for a vegetarian version.
    • Spicy: Sprinkle some red pepper flakes or drizzle a bit of hot sauce for a spicy kick.
    • Bread: Use whole grain or gluten-free bread to cater to dietary needs.

    Storage

    These toast cups can be stored in an airtight container in the refrigerator for up to three days. To reheat, place them in a preheated oven at 350°F (175°C) for about 10 minutes or until warmed through. Avoid microwaving, as it can make the bread soggy.

    FAQ

    Can I make these ahead of time?

    Yes, you can prepare the bread cups and bacon the night before and store them in the refrigerator. In the morning, simply add the eggs and bake.

    Can I freeze Bacon & Egg Toast Cups?

    It’s best to enjoy these fresh or refrigerated. Freezing can alter the texture of the bread and eggs, leading to a less desirable outcome.

    What can I serve with these toast cups?

    These cups are quite filling on their own, but you can pair them with a fresh fruit salad or a side of roasted potatoes for a hearty breakfast.

    Nutrition

    Each Bacon & Egg Toast Cup contains approximately 250 calories, 14g of protein, 18g of fat, and 12g of carbohydrates. This makes them a balanced option for a nutritious start to your day.

    Final Thoughts

    Bacon & Egg Toast Cups are more than just a meal; they’re a comforting reminder of mornings filled with love and warmth. Whether you’re enjoying them solo or sharing with family and friends, they’re sure to bring a smile to your face and a delicious start to your day. Give this recipe a try, and perhaps you’ll find your own nostalgic moment wrapped in these delightful little cups.

    Related update: Bacon & Egg Toast Cups

    Related update: Madras Beef Curry

    Related update: Chocolate Chip Coconut Muffins

  • Crab Cakes Rockefeller | Made by Meaghan Moineau

    Crab Cakes Rockefeller | Made by Meaghan Moineau

    Crab Cakes Rockefeller

    Growing up near the coast, seafood has always held a special place in my heart. The smell of fresh crab being cooked would waft through our home, bringing with it memories of family gatherings and laughter. My grandmother used to make a version of this dish every summer, and now, I’m thrilled to share my take on it with you. This Crab Cakes Rockefeller recipe combines the classic flavors of crab cakes with the rich, savory notes of spinach, bacon, and watercress, making it a dish that’s both nostalgic and delightfully modern.

    Why You’ll Love It

    This Crab Cakes Rockefeller recipe is a celebration of flavors and textures. You’ll love it for its:

    • Deliciously Rich Flavor: The combination of crab, bacon, and sautéed greens creates a harmonious blend of sweet and savory.
    • Easy Preparation: With simple steps and readily available ingredients, you can whip up this dish without any fuss.
    • Versatility: Perfect for a fancy dinner party or a casual weeknight meal, this dish suits any occasion.
    • Impressive Presentation: The vibrant colors make for an eye-catching plate that will wow your family and guests.

    Ingredients

    • 1 can lump crab claw meat
    • 1 red bell pepper, diced
    • 2 green onions, diced and divided
    • 1 cup bread crumbs, divided
    • 1 tablespoon honey
    • 1 teaspoon chili powder
    • Salt and black pepper, to taste
    • 2 tablespoons unsalted butter
    • 4 slices of bacon
    • 2 cups baby spinach, finely chopped
    • 1 cup watercress stems, finely chopped
    • 2 cloves garlic, minced
    • Olive oil for drizzling

    Instructions

    1. Preheat your oven to 375°F and set the top rack to the middle position. Line a baking sheet with aluminum foil or a nonstick cooking mat.
    2. In a large bowl, combine the crab meat, diced red bell pepper, half of the diced green onion, and half of the bread crumbs. Mix in the honey and chili powder, then season to taste with salt and pepper.
    3. Form the crab mixture into cakes using a 1/2 cup measure, pressing tightly to hold their shape. Arrange the crab cakes on the lined baking sheet, leaving at least 1 inch between each.
    4. Lightly coat the outside of each crab cake with olive oil to help with browning and forming a crust.
    5. Bake for 25 minutes, or until golden brown.
    6. Meanwhile, fry the bacon in a large skillet until crispy. Set aside to drain, then crumble into small pieces.
    7. In the same skillet, melt the butter over medium heat. Add the garlic and sauté for 1 minute.
    8. Add the remaining green onion, bread crumbs, and watercress stems. Sauté for another minute.
    9. Finally, add the chopped spinach and cook until wilted, about 1-2 minutes. Season with salt and pepper to taste.
    10. To serve, plate a crab cake atop a smear of the spinach mixture, then sprinkle the whole plate with crumbled bacon.

    Tips

    • Shape Matters: Use a measuring cup to ensure each crab cake is uniform in size, which helps them cook evenly.
    • Don’t Skip the Oil: A light coating of olive oil ensures your crab cakes develop a crispy, golden crust.
    • Adjust Seasoning: Always taste and adjust the seasoning of your crab mixture and spinach before serving.

    Variations & Substitutions

    • Protein Choice: Replace crab with salmon or shrimp for a different seafood twist.
    • Greens Swap: Substitute kale or Swiss chard for spinach if desired.
    • Bacon Alternatives: Use prosciutto or turkey bacon for a lighter option.

    Storage

    These crab cakes can be stored in the refrigerator in an airtight container for up to two days. Reheat them in a toaster oven or regular oven at 350°F until they’re warmed through. For longer storage, freeze them for up to three months. Defrost in the fridge overnight before reheating.

    FAQ

    Can I use fresh crab meat instead of canned?

    Yes, fresh crab meat can be used in place of canned. Just ensure that it’s properly cooked and drained to avoid excess moisture in the crab cakes.

    Is there a way to make this dish gluten-free?

    Absolutely! Simply substitute the bread crumbs with gluten-free bread crumbs or crushed gluten-free crackers.

    What can I serve with Crab Cakes Rockefeller?

    This dish pairs beautifully with a side salad, roasted vegetables, or even a light pasta dish for a complete meal.

    Nutrition

    While the nutritional content will vary based on exact portions and ingredients, each crab cake is roughly estimated to contain:

    • Calories: 250
    • Protein: 15g
    • Fat: 10g
    • Carbohydrates: 20g

    Final Thoughts

    Crab Cakes Rockefeller is a dish that brings a touch of elegance and comfort to your dining table. Whether you’re reminiscing about coastal summers or simply seeking a delicious meal, this recipe is sure to please. Share it with loved ones or enjoy it as a personal treat; it’s a culinary experience that delights the senses and warms the soul. Happy cooking!

    Related update: Crab Cakes Rockefeller

  • Chicken Liver Salad | Made by Meaghan Moineau

    Chicken Liver Salad | Made by Meaghan Moineau

    Chicken Liver Salad: A Warm and Hearty Delight

    There’s something inherently comforting about the aromas wafting through the kitchen as chicken livers sizzle with onions and bacon. This Chicken Liver Salad takes me back to Sunday afternoons at my grandmother’s house. She would whip up a batch of this savory salad while recounting stories from her childhood. The combination of rich, tender chicken livers with the crisp freshness of Boston lettuce was, and still is, my favorite part of those cherished family gatherings.

    Why You’ll Love It

    This Chicken Liver Salad is more than just a dish; it’s a sensory experience. The savory, slightly tangy flavor of the chicken livers, when combined with crispy bacon and balsamic vinegar, creates a taste explosion. Besides its delightful flavors, this salad is also packed with nutrients, making it a wholesome option for those who want to enjoy a hearty meal without compromising on health. It’s simple to make, requiring only a handful of ingredients and minimal preparation time, yet it never fails to impress both family and guests alike.

    Ingredients

    • Bacon
    • Balsamic vinegar
    • Boston lettuce
    • Chicken livers
    • Olive oil
    • Onion
    • Salt and pepper

    Instructions

    1. In a large skillet, heat the olive oil over medium-high heat.
    2. Add the sliced onion and bacon to the skillet, sautéing until the bacon is slightly crisp and the onions are soft.
    3. Add the chicken livers to the skillet, stirring well to combine with the bacon and onions.
    4. Pour in the balsamic vinegar, allowing the livers to simmer slowly. Stir occasionally, and add more vinegar if necessary to keep the mixture moist.
    5. Once the livers are cooked through and tender, season with salt and pepper to taste.
    6. Arrange a bed of Boston lettuce on a serving platter, and spoon the warm liver mixture over the top.
    7. Serve immediately, ensuring each plate has a generous portion of both liver mixture and lettuce.

    Tips

    For the best results, use fresh chicken livers and make sure to clean them thoroughly before cooking. If you’re not a fan of balsamic vinegar, you can substitute it with red wine vinegar for a slightly different flavor profile. Make sure to taste as you go, adjusting the seasoning according to your preference. To add an extra layer of texture, consider topping the salad with toasted nuts, such as walnuts or pine nuts.

    Variations & Substitutions

    There are numerous ways to tweak this recipe to better suit your palate or dietary needs:

    • Vegetarian Option: Replace chicken livers with grilled portobello mushrooms for a vegetarian-friendly version.
    • Different Greens: Swap Boston lettuce for arugula or spinach for a peppery or more robust flavor.
    • Additional Vegetables: Incorporate roasted red peppers or cherry tomatoes for a burst of color and sweetness.
    • Herbs: Add fresh herbs like thyme or rosemary to enhance the aromatic profile of the dish.

    Storage

    If you have leftovers, store the chicken liver mixture separately from the lettuce to prevent it from becoming soggy. Place the liver mixture in an airtight container and refrigerate for up to two days. Reheat gently in a skillet before serving over fresh lettuce. Note that the texture of the liver might change slightly upon reheating, but the flavors will remain delightful.

    FAQ

    Can I prepare this dish in advance?

    While you can prepare the liver mixture a day ahead, it’s best to serve the salad fresh to retain the crispness of the lettuce. Reheat the liver mixture just before serving.

    Is chicken liver healthy?

    Yes, chicken liver is a rich source of protein, iron, and various vitamins, including vitamin A and B12. It can be a nutritious addition to your diet when consumed in moderation.

    Nutrition

    Chicken Liver Salad is a nutrient-dense dish, offering a substantial amount of protein and essential vitamins. A serving provides approximately:

    • Calories: 250
    • Protein: 20g
    • Fat: 15g
    • Carbohydrates: 8g
    • Iron: 10mg

    Please note that these values are estimates and can vary based on specific brands and preparation methods.

    Final Thoughts

    This Chicken Liver Salad is more than just a meal; it’s a journey back to simpler times filled with love, laughter, and delicious food. It’s a testament to how traditional recipes can still hold a special place in our modern lives. Whether you’re a fan of chicken livers or looking to try something new, this salad is a delightful way to enjoy a nutritious and flavorful meal. Gather your loved ones, share stories, and enjoy this comforting dish together.

    Related update: Chicken Liver Salad

    Related update: Crab Cakes Rockefeller

    Related update: Easy Tabouleh

  • Sweet and Spicy Country-Style Ribs | Made by Meaghan Moineau

    Sweet and Spicy Country-Style Ribs | Made by Meaghan Moineau

    Sweet and Spicy Country-Style Ribs

    There’s something incredibly comforting about the aroma of ribs slowly cooking in a rich, spicy sauce. This recipe for Sweet and Spicy Country-Style Ribs brings back memories of long summer evenings spent with family in the backyard, the air filled with laughter and the tantalizing smell of barbecue wafting through the air. When I was a child, my grandfather would often prepare ribs for our family gatherings, and I remember watching him patiently tend to the grill, basting the ribs with a secret sauce he had perfected over the years. This recipe is inspired by those cherished memories, with a modern twist that adds a little extra kick.

    Why You’ll Love It

    These Sweet and Spicy Country-Style Ribs are a perfect blend of flavors that will satisfy both your sweet and savory cravings. The rich tomato sauce is balanced with the sweetness of honey and the tang of apple cider vinegar, while a touch of cayenne pepper and hot sauce adds just the right amount of heat. This dish is perfect for any occasion, whether you’re hosting a barbecue, enjoying a Sunday family dinner, or simply looking to treat yourself to a delicious homemade meal.

    Ingredients

    • 2 lbs beef short ribs
    • 2 tablespoons vegetable oil
    • 1 large yellow onion, diced
    • 2 cloves garlic, minced
    • 2 tablespoons unsalted butter
    • 1 cup tomato sauce
    • 1/4 cup apple cider vinegar
    • 3 tablespoons honey
    • 2 tablespoons hot sauce
    • 1/2 teaspoon cayenne pepper
    • 1 tablespoon ancho chili powder
    • 1 teaspoon salt
    • 1 teaspoon dry mustard
    • Vegetable scraps – carrot, celery, etc.
    • 3 cups beef stock
    • Water, as needed

    Instructions

    1. Heat the vegetable oil in a 6-quart enameled Dutch oven over medium-high heat. Brown the ribs on all sides.
    2. Pour in the beef stock; add water to cover if necessary. Add the vegetable scraps and bring to a boil. Lower the heat to a simmer, cover, and cook for 45 minutes to an hour, or until the ribs are tender.
    3. While the ribs are braising, melt the unsalted butter in a large cast-iron skillet over medium-low heat. Sauté the onions until soft, then add the garlic and sauté for another minute more.
    4. Stir in the tomato sauce, apple cider vinegar, honey, hot sauce, cayenne pepper, ancho chili powder, salt, and dry mustard. Bring the mixture to a boil, then reduce the heat and simmer uncovered for 25 minutes, stirring occasionally.
    5. When the ribs are tender, remove them from the braising liquid and add them to the spicy tomato sauce in the skillet.
    6. Raise the heat and cook, stirring frequently, until the sauce has glazed the ribs, about 10 minutes.
    7. Serve the ribs with the remaining sauce on the side, if desired.

    Tips

    To ensure the ribs are perfectly tender, make sure to simmer them gently and check for doneness by inserting a fork; it should slide in easily. If you find the ribs are tough, allow them to simmer a bit longer. Also, don’t rush the sauce; letting it simmer slowly allows the flavors to meld beautifully.

    Variations & Substitutions

    If you prefer a milder flavor, you can reduce the amount of cayenne pepper or omit the hot sauce altogether. For a different twist, try using maple syrup instead of honey for a deeper sweetness, or substitute red wine vinegar for apple cider vinegar for a more robust flavor. If you don’t have beef short ribs, pork ribs can be an excellent alternative.

    Storage

    Leftover ribs can be stored in an airtight container in the refrigerator for up to 3 days. To reheat, place the ribs in a baking dish, cover with foil, and warm them in a preheated oven at 350°F (175°C) until heated through. You can also freeze the ribs for up to 2 months; just make sure to thaw them in the refrigerator before reheating.

    FAQ

    Can I make these ribs in advance?

    Absolutely! You can prepare the ribs and sauce a day ahead, then store them separately in the refrigerator. When you’re ready to serve, simply reheat the ribs, combine them with the sauce, and let them cook together until the sauce is perfectly glazed.

    What side dishes go well with these ribs?

    These Sweet and Spicy Country-Style Ribs pair wonderfully with classic barbecue sides like coleslaw, cornbread, or baked beans. For a lighter option, a simple green salad or roasted vegetables would also complement the flavors nicely.

    Nutrition

    While specific nutritional values can vary based on the exact ingredients and serving sizes, a general serving of these ribs provides a hearty amount of protein, along with essential vitamins and minerals from the vegetables and spices. If you’re watching your sodium intake, you may wish to reduce the added salt or choose a low-sodium beef stock.

    Final Thoughts

    These Sweet and Spicy Country-Style Ribs are more than just a meal; they’re a way to bring people together. Whether you’re reminiscing about family gatherings or creating new memories, this dish offers a delightful blend of flavors that are sure to impress. So gather your loved ones, roll up your sleeves, and dive into these delicious ribs. Enjoy every sticky, savory-sweet bite!

    Related update: Sweet and Spicy Country-Style Ribs

  • Mixed Paella | Made by Meaghan Moineau

    Mixed Paella | Made by Meaghan Moineau

    Delicious Mixed Paella: A Taste of Spain in Your Kitchen

    Remember those long summer evenings when the family would gather around a large, vibrant dish, the aroma of saffron filling the air? Mixed Paella has always been a dish of celebration for me. Growing up, my family would often host get-togethers, and my mother would prepare this dish with love and enthusiasm. The sizzle of chorizo in the pan and the vibrant colors of fresh vegetables and seafood always created a symphony of flavors that we couldn’t resist. Today, I’m excited to share this cherished recipe with you, hoping it will bring as much joy to your table as it has to mine.

    Why You’ll Love It

    This Mixed Paella recipe is an ideal blend of land and sea, bringing together a rich tapestry of flavors and textures. The rice soaks up the robust taste of saffron and broth, while the seafood adds a delightful freshness. The crispy chorizo introduces a smoky depth that ties the dish together perfectly. Whether you’re a novice cook or a seasoned chef, this dish is both accessible and impressive, making it perfect for family dinners and special occasions alike.

    Ingredients

    • Bay leaf
    • Chicken broth
    • Chorizo sausage
    • Extra virgin olive oil
    • White fish
    • Garlic
    • Lemon
    • Lemon zest
    • Mussels
    • Spanish onion
    • Parsley
    • Peas
    • Red bell pepper
    • Crushed red pepper flakes
    • Dry rice
    • Saffron threads
    • Shrimp
    • Thyme

    Instructions

    1. In a very large non-stick skillet or paella pan preheated over medium-high heat, add 2 teaspoons of your olive oil (you will need more oil if you’re not using non-stick), garlic, red pepper flakes, and rice. Sauté for about 3 minutes.
    2. Add saffron, thyme, bay leaf, and chicken broth and bring to a boil. Cover and reduce the heat to a simmer. Leave covered, do not stir.
    3. In another non-stick skillet, heat to medium-high. Add chorizo and crumble as you sauté. When the sausage is cooked through, add red pepper and onion. Salt and pepper to taste if needed. Sauté until the onion is tender, then remove from heat and set aside.
    4. When the rice is nearly done (about 15 minutes), add fish and shrimp and press into the rice. Add mussels, peas, and sprinkle with lemon zest. Cover and continue to simmer until the rice is done and the mussels have opened. Discard any that do not open.
    5. Top with the chorizo mixture and parsley. Serve with lemon wedges and crusty bread.

    Tips

    For the best results, use a paella pan if you have one, as its wide and shallow shape allows the rice to cook evenly. Remember not to stir the rice once the liquid has been added; this ensures the classic paella texture. Use fresh seafood for the best flavor, and don’t skimp on the saffron—it truly is the soul of this dish.

    Variations & Substitutions

    If you’re looking to customize your paella, consider these variations:

    • Vegetarian Option: Replace the seafood and chorizo with a variety of mushrooms and artichokes for a hearty vegetarian version.
    • Meat Lovers: Add some diced chicken thighs or rabbit for a more traditional take on paella Valenciana.
    • Spice It Up: If you enjoy a kick of heat, increase the amount of crushed red pepper flakes or add a splash of hot sauce.

    Storage

    Leftover paella can be stored in an airtight container in the refrigerator for up to 3 days. To reheat, add a splash of water or broth and warm slowly over low heat to maintain the dish’s moist texture. Avoid using the microwave as it can dry out the rice.

    FAQ

    Can I make paella in advance?

    Yes, you can prepare the components in advance, such as cooking the chorizo and chopping the vegetables. However, for the best flavor and texture, it’s recommended to cook the rice and assemble the dish just before serving.

    What type of rice should I use for paella?

    Short-grain rice, such as Bomba or Arborio, is ideal for paella as it absorbs the liquid well without becoming mushy. Avoid using long-grain rice as it doesn’t provide the traditional paella texture.

    Can I use frozen seafood?

    While fresh seafood is preferred for the best flavor, you can use frozen seafood in a pinch. Just ensure it is fully thawed and drained before adding to the paella to avoid excess moisture.

    Nutrition

    This Mixed Paella is a balanced dish, providing a good source of protein from the seafood and chorizo, and plenty of vitamins and minerals from the vegetables. Saffron is known for its antioxidant properties, and the olive oil adds heart-healthy fats.

    Final Thoughts

    Mixed Paella is more than just a dish; it’s a celebration of flavors and cultures, a reminder of family gatherings and joyous occasions. With its vibrant colors and rich flavors, it’s sure to become a favorite in your household. I hope this recipe brings warmth and happiness to your table, just as it has to mine. Bon appétit!

    Related update: Mixed Paella

    Related update: Sweet and Spicy Country-Style Ribs

  • Azteca Soup | Made by Meaghan Moineau

    Azteca Soup | Made by Meaghan Moineau

    Azteca Soup: A Warm Embrace of Flavor

    Why You’ll Love It

    Azteca Soup is not just a recipe; it’s a journey to the heart of Mesoamerican culinary tradition. This soup is a delightful fusion of fresh ingredients and bold flavors, perfect for warming up on a chilly day. I remember the first time I tasted this soup at a small family gathering. The aroma filled the room, and the vibrant colors of the ingredients were a feast for the eyes. My grandmother, with her apron slightly dusted with flour, ladled the soup into our bowls while sharing stories of her childhood in the bustling markets of Mexico City. The soup was a hit, and the warmth of that moment still lingers whenever I make it today.

    Ingredients

    • 2 tablespoons olive oil
    • 2 garlic cloves, minced
    • 1 onion, chopped
    • 1 jalapeño pepper, chopped
    • 2 celery stalks, chopped
    • 1 can (14 oz) canned tomatoes, with juice
    • 2 teaspoons chili powder
    • 1 teaspoon cumin
    • 1 cup fresh corn, cut from the cob
    • 1 handful fresh basil, cut into ribbons
    • 4 cups vegetable stock
    • 2 tablespoons lime juice
    • 1 avocado, diced
    • 1 cup nacho chips
    • 1/2 cup sour cream
    • Fresh basil shreds for garnish

    Instructions

    1. In a medium saucepan, heat the olive oil over medium heat. Add the garlic, onions, jalapeño pepper, and celery. Sauté for about 5 minutes until the onions become translucent.
    2. Add the canned tomatoes, chili powder, and cumin. Cook down over medium heat for about 10 minutes, stirring often to prevent sticking.
    3. Stir in the fresh corn, basil ribbons, reserved tomato juice, and vegetable stock. Bring the mixture to a boil, then reduce the heat and let it simmer for 15 minutes.
    4. When ready to serve, remove the soup from heat and stir in the lime juice and diced avocado.
    5. To serve, break several nacho chips into each bowl, ladle in the soup, then top each with a spoonful of sour cream. Garnish with a few fresh basil shreds and a whole nacho chip on top.

    Serve hot, and enjoy as a complete lunch or a substantial first course. This recipe serves 6 people.

    Tips

    For the best flavor, use fresh, ripe avocados and sweet corn. If you prefer a spicier soup, leave the seeds in the jalapeño pepper. Make sure to stir the soup frequently to prevent the ingredients from sticking to the bottom of the pot.

    Variations & Substitutions

    If you’re looking to add some protein, consider adding grilled chicken or shrimp. For a vegetarian version, you can substitute the sour cream with a vegan alternative. Feel free to experiment with different herbs like cilantro for a unique twist on the flavor profile.

    Storage

    Azteca Soup can be stored in an airtight container in the refrigerator for up to 3 days. To reheat, simply warm it on the stove over medium heat, stirring occasionally. The soup may thicken as it cools, so you might need to add a splash of vegetable stock when reheating.

    FAQ

    Can I use canned corn instead of fresh corn?

    Yes, canned corn can be used as a substitute for fresh corn. Just be sure to drain and rinse it before adding it to the soup.

    What can I use instead of jalapeño pepper?

    If you prefer a milder soup, you can substitute the jalapeño with a green bell pepper, or add a pinch of smoked paprika for a different kind of warmth without the heat.

    Nutrition

    This soup is a low-calorie, nutrient-rich option. It’s packed with vitamins from the fresh vegetables and offers heart-healthy fats from the avocado. Ideal for those seeking a wholesome meal without the extra calories.

    Final Thoughts

    Azteca Soup is more than just a dish; it’s an experience that brings people together. Whether you’re enjoying it with family around the dinner table or serving it at a gathering, this soup is sure to bring warmth and joy to your meal. With its vibrant flavors and comforting aroma, Azteca Soup is a testament to the rich culinary traditions that have been passed down through generations. I hope you enjoy making and sharing this recipe as much as I have. Bon appétit!

    Related update: Azteca Soup

    Related update: Mixed Paella

  • Delicious Rhubarb Custard Pie | Made by Meaghan Moineau

    Delicious Rhubarb Custard Pie | Made by Meaghan Moineau

    Delicious Rhubarb Custard Pie

    There’s something magical about rhubarb custard pie that takes me back to childhood summers spent in my grandmother’s kitchen. The aroma of fresh rhubarb baking in the oven, combined with the sweet, creamy custard, was a hallmark of those carefree days. This pie is a family tradition, and every bite is a sweet reminder of those warm afternoons, sitting around the table with loved ones, sharing stories and laughter. I’m excited to share this beloved recipe with you, hoping it brings as much joy to your home as it has to mine.

    Why You’ll Love It

    This rhubarb custard pie is a delightful blend of tangy and sweet flavors encased in a flaky, buttery crust. Here are a few reasons why you’re going to love it:

    • Perfect Balance: The tartness of rhubarb perfectly complements the sweet, creamy custard.
    • Simple Ingredients: You likely have most of these ingredients in your kitchen already.
    • Easy to Make: With straightforward steps, even a novice baker can achieve pie perfection.
    • Versatile: Enjoy it as a comforting dessert or a sweet treat with your afternoon tea.

    Ingredients

    • 1 prebaked pie crust
    • 4 cups raw rhubarb, chopped
    • 1 cup granulated sugar
    • 1/4 teaspoon salt
    • 1/4 teaspoon nutmeg
    • 3 large eggs, beaten
    • 2 tablespoons butter, melted

    Instructions

    1. Preheat your oven to 400°F (220°C).
    2. In a large bowl, combine the rhubarb, sugar, salt, and nutmeg. Mix well to ensure the rhubarb is evenly coated.
    3. Place the rhubarb mixture into the prebaked pie crust, spreading it evenly.
    4. Pour the beaten eggs over the rhubarb mixture, making sure to cover all rhubarb pieces.
    5. Drizzle the melted butter over the top of the pie. This will help create a rich, golden crust on the filling.
    6. Tent some aluminum foil around the edges of the crust to prevent over-browning.
    7. Bake for 50 minutes, or until the custard is set and the top is golden brown.
    8. Allow the pie to cool completely before serving, to let the custard firm up.

    Tips

    For the best results, here are a few tips to consider:

    • Prep Ahead: You can chop the rhubarb and prepare the pie crust a day in advance to save time.
    • Crisp Crust: Blind bake your pie crust before adding the filling to ensure it stays crisp and flaky.
    • Even Baking: Rotate the pie halfway through baking for an even golden-brown finish.

    Variations & Substitutions

    This recipe is quite adaptable. Here are some variations and substitutions to try:

    • Sugar Substitutes: Use honey or maple syrup for a different type of sweetness.
    • Spice It Up: Add a pinch of cinnamon or ginger to the filling for a warm spice note.
    • Fruit Mix: Combine rhubarb with strawberries for a classic flavor combination.

    Storage

    Store any leftover pie in the refrigerator wrapped in plastic wrap or stored in an airtight container. It will stay fresh for up to 3 days. For longer storage, you can freeze the pie for up to 3 months. To serve, thaw it in the refrigerator overnight and bring it to room temperature before enjoying.

    FAQ

    Can I use frozen rhubarb instead of fresh?

    Yes, you can use frozen rhubarb. Make sure to thaw it completely and drain excess moisture before using it in the pie.

    What type of pie crust is best for this recipe?

    A homemade buttery pie crust is ideal, but a store-bought prebaked crust works perfectly well to save time.

    How do I know when the custard is set?

    The custard is set when it jiggles slightly in the center but is firm around the edges. It will continue to firm up as it cools.

    Nutrition

    Each slice of this rhubarb custard pie is a delightful indulgence. While exact nutrition facts can vary, a typical slice contains approximately:

    • Calories: 250
    • Fat: 10g
    • Carbohydrates: 35g
    • Protein: 4g
    • Sugar: 20g

    Final Thoughts

    Delicious Rhubarb Custard Pie is more than just a dessert; it’s a piece of nostalgia, a slice of comfort, and a sweet way to bring people together. Whether you’re a seasoned baker or new to the kitchen, this recipe is sure to impress. I hope it fills your home with warmth and joy, just as it has mine. Enjoy every bite!

    Related update: Delicious Rhubarb Custard Pie

    Related update: Azteca Soup

  • Beef Cottage Pie | Made by Meaghan Moineau

    Beef Cottage Pie | Made by Meaghan Moineau

    Beef Cottage Pie: A Comforting Classic

    Why You’ll Love It

    There’s something heartwarming about digging into a Beef Cottage Pie. It’s a dish that wraps you in warmth, much like a cozy blanket on a chilly evening. Growing up, the aroma of this pie baking in the oven meant family time was near. My grandmother, with her loving hands, would prepare it for our Sunday dinners. The rich flavors of beef, vegetables, and creamy mashed potatoes create a harmony that’s simply irresistible. Whether you’re making it for a family gathering or a comforting solo dinner, this dish promises to deliver satisfaction with every bite.

    Ingredients

    • 1 lb lean ground beef
    • 1 cup yellow diced onions
    • 1/2 cup diced celery
    • 3 cloves garlic, minced
    • 2 teaspoons fresh thyme, chopped
    • 2 tablespoons Worcestershire sauce
    • 2 tablespoons vegetable oil
    • 1 cup frozen vegetables (peas, carrots, corn mix)
    • 1 cup beef gravy
    • 4 cups mashed potatoes
    • 1/4 cup parmesan cheese, grated
    • Salt and pepper to taste

    Instructions

    1. Preheat your oven to 375 degrees Fahrenheit.
    2. In a large skillet, heat the vegetable oil over medium heat. Add the onions, celery, and garlic, and cook until they are translucent but not browned, approximately 5-6 minutes. Remove the mixture to a clean dish.
    3. In the same skillet, add the ground beef. Cook until browned, breaking up any large pieces. Using a large spoon, discard any excess fat/grease.
    4. Add the onions, celery, and garlic mixture back to the skillet and stir well. Add the Worcestershire sauce and thyme, and cook for an additional minute.
    5. Mix in the frozen vegetables and gravy. Cook for an additional 2-3 minutes. Season with salt and pepper to taste.
    6. Coat a large casserole dish with cooking spray. Pour the ground beef and vegetable mixture into the dish and spread evenly.
    7. Spoon the mashed potatoes on top of the beef mixture and carefully spread to create an even layer.
    8. Sprinkle parmesan cheese over the top and place the dish in the preheated oven. Bake for 25-30 minutes.
    9. Turn the oven broiler on and brown the top of the cottage pie until it turns an even golden brown color.
    10. Remove from the oven and let the pie set for 5-10 minutes before serving. Enjoy!

    Tips

    For the best results, use freshly mashed potatoes, which are easier to spread and maintain their creamy texture. If you’re short on time, high-quality store-bought mashed potatoes can work in a pinch. Also, for a deeper flavor, consider using a mix of ground beef and ground lamb.

    Variations & Substitutions

    Feel free to get creative with your Beef Cottage Pie. Swap out the ground beef for turkey or chicken if you prefer a lighter version. Vegetarians can use lentils or a plant-based meat substitute. You can also add different herbs like rosemary or basil for a unique twist. For a cheesy delight, mix some cheddar into the mashed potatoes before spreading them over the beef mixture.

    Storage

    Leftovers can be stored in an airtight container in the refrigerator for up to 3 days. For longer storage, freeze individual portions for up to 2 months. Reheat in the oven at 350 degrees Fahrenheit until warmed through.

    FAQ

    Can I make Beef Cottage Pie in advance?

    Absolutely! You can prepare the pie up to the point of baking, cover it tightly, and refrigerate for up to 24 hours. When you’re ready to serve, simply bake it as directed, adding a few extra minutes to the baking time if it’s still cold from the fridge.

    What side dishes go well with Beef Cottage Pie?

    While this dish is a meal on its own, it pairs beautifully with a fresh green salad or steamed vegetables like broccoli or green beans. For a heartier option, serve it alongside a crusty loaf of bread.

    Can I use sweet potatoes instead of regular potatoes?

    Yes, using sweet potatoes can add a delightful sweetness that complements the savory filling. Just prepare them as you would regular mashed potatoes and proceed with the recipe.

    Nutrition

    This Beef Cottage Pie is packed with protein and essential nutrients. Lean ground beef provides iron and B vitamins, while the vegetables add fiber and vitamins. Opting for low-sodium gravy and controlling cheese portions can make it a healthier option without sacrificing flavor.

    Final Thoughts

    Beef Cottage Pie is more than just a meal; it’s a celebration of comfort and tradition. Whether you’re indulging in it for a special occasion or a simple weeknight dinner, it brings a touch of warmth and nostalgia to the table. I hope this recipe becomes a beloved staple in your home, just as it has in mine. Happy cooking!

    Related update: Beef Cottage Pie

  • Vegetable Cheddar Quiche | Made by Meaghan Moineau

    Vegetable Cheddar Quiche | Made by Meaghan Moineau

    Vegetable Cheddar Quiche: A Comforting Classic

    There’s something magical about the aroma of a freshly baked quiche wafting through the house. Growing up, my grandmother’s kitchen was always filled with the comforting scent of baking, and her vegetable cheddar quiche was a family favorite. I remember sitting at her kitchen table, eagerly waiting for the quiche to cool just enough to savor that first warm, cheesy bite. Today, I’m sharing her recipe with you, hoping it brings the same warmth and joy to your home.

    Why You’ll Love It

    This vegetable cheddar quiche is perfect for any meal of the day. Whether you’re enjoying it as a savory breakfast, a light lunch, or a satisfying dinner, it’s a versatile dish that’s packed with flavor and nutrition. Here’s why you’ll fall in love with this recipe:

    • Simple Ingredients: Made with everyday ingredients you likely have on hand.
    • Customizable: Easily adapt the recipe to suit your taste preferences or dietary needs.
    • Deliciously Comforting: Rich, cheesy, and full of hearty vegetables.
    • Perfect for Leftovers: Enjoy warm or cold, making it ideal for meal prep.

    Ingredients

    • 1 refrigerated pie crust
    • 1 tablespoon olive oil
    • 1 cup broccoli florets, chopped
    • 1 cup fresh mushrooms, sliced
    • 1 cup fresh spinach, chopped
    • 1 medium onion, diced
    • 2 cloves garlic, minced
    • 1/2 teaspoon salt
    • 1/4 teaspoon pepper
    • 1/4 teaspoon cayenne pepper
    • 3 large eggs
    • 1/2 cup mayonnaise
    • 1/2 cup milk
    • 1 cup shredded sharp cheddar cheese
    • 3 tablespoons grated parmesan cheese
    • Fresh cilantro for garnish

    Instructions

    1. Preheat your oven to 375°F (190°C).
    2. Unroll the refrigerated pie crust and place it into a pie plate. Crimp the edges and set aside.
    3. In a frying pan, heat olive oil over medium heat. Add broccoli, mushrooms, spinach, onion, and garlic. Cook for about 5 minutes until the vegetables are tender, stirring occasionally. Season with salt, pepper, and cayenne pepper while cooking.
    4. Once vegetables are tender, remove the pan from the heat and set aside to cool.
    5. In a large bowl, beat the eggs, mayonnaise, and milk with a whisk until smooth and well-blended.
    6. Add the cooled vegetable mixture to the egg mixture, stirring until combined. Mix in the shredded cheddar cheese.
    7. Pour the mixture into the prepared pie crust. Sprinkle the top with the grated parmesan cheese.
    8. Bake in the preheated oven for 40-45 minutes, or until the center of the quiche is set and the top is golden brown.
    9. Let the quiche stand for 10 minutes before slicing. Garnish with fresh cilantro before serving.

    Tips

    • For a crispier crust, pre-bake the pie crust for 5-7 minutes before adding the filling.
    • Ensure your vegetables are well-drained to prevent the quiche from becoming soggy.
    • Use a sharp cheddar for a more pronounced cheesy flavor.

    Variations & Substitutions

    This quiche is wonderfully adaptable. Here are some ideas to make it your own:

    • Cheese: Try swapping cheddar for Swiss or Gruyère for a different flavor profile.
    • Vegetables: Substitute or add vegetables like bell peppers, zucchini, or asparagus.
    • Spices: Add herbs like thyme, basil, or chives for extra aromatic notes.
    • Crust: Make it crustless for a low-carb option by skipping the pie crust and pouring the egg mixture directly into a greased pie plate.

    Storage

    Once cooled, store any leftover quiche in an airtight container in the refrigerator for up to 3 days. Reheat slices in the oven at 350°F (175°C) for about 10 minutes or enjoy cold straight from the fridge.

    FAQ

    Can I freeze this quiche?

    Yes, you can freeze the baked quiche. Allow it to cool completely, then wrap it tightly in plastic wrap and aluminum foil before placing it in the freezer. It can be stored for up to 2 months. Thaw overnight in the refrigerator before reheating in the oven.

    Can I make this quiche without mayonnaise?

    Absolutely! If you prefer not to use mayonnaise, substitute with an equal amount of sour cream or Greek yogurt for a similar creamy texture.

    How can I make this quiche dairy-free?

    For a dairy-free version, use a dairy-free milk alternative such as almond milk and a plant-based cheese substitute. Ensure your pie crust is also dairy-free if you’re not making it from scratch.

    Nutrition

    This quiche is not only delicious but also a nutritious choice. Packed with vegetables, it provides a good source of vitamins and minerals. The eggs and cheese offer a boost of protein, making it a satisfying meal option.

    Final Thoughts

    This vegetable cheddar quiche is more than just a meal; it’s a slice of nostalgia and comfort. Whether you’re sharing it with family or savoring it solo, each bite is a reminder of simpler times and the joy of homemade cooking. I hope this recipe becomes a beloved part of your family’s culinary tradition, just as it is in mine. Enjoy your quiche-making journey!

    Related update: Vegetable Cheddar Quiche

    Related update: Rich Jelly Scones

    Related update: Beef Cottage Pie