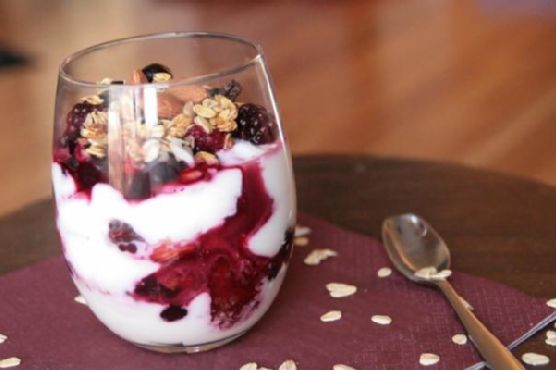
Category: Breakfast

  • Savory Hashbrowns with Spinach, Carrot & Smoked Paprika Aioli | Made by Meaghan Moineau

    Savory Hashbrowns with Spinach, Carrot & Smoked Paprika Aioli | Made by Meaghan Moineau

    Savory Hashbrowns with Spinach, Carrot & Smoked Paprika Aioli

    Imagine the sound of potatoes sizzling away in a hot pan, their surfaces turning a perfect golden-brown, while the air fills with the tantalizing aroma of smoked paprika and fresh dill. These are no ordinary hashbrowns, my friend. This is a breakfast experience, an ode to mornings made extraordinary.

    Personal Story

    Hashbrowns have always held a special place in my heart. I vividly remember my first attempt at making them as a teenager. I was at my grandmother’s quaint little kitchen, the kind of kitchen that felt like a warm hug. My grandmother watched over me with her twinkling eyes, as I awkwardly grated potatoes, leaving a mess that probably took longer to clean than it did to cook.

    Despite the chaos, the first bite was transformative. It was a simple dish, yet it was full of comfort and nostalgia. From that day on, hashbrowns became a staple in my culinary repertoire, a dish I could always rely on to bring a smile to anyone’s face. But, as I evolved as a home cook, so did my hashbrown recipe.

    Fast forward a few years, and I found myself yearning for a little more adventure in my breakfast routine. That’s when inspiration struck: Why not add a smoky aioli and a touch of feta cheese to those classic hashbrowns? This idea was born out of a love for bold flavors and a desire to elevate an already beloved dish.

    Now, with every sizzle of these hashbrowns in the pan, I’m reminded of my grandmother’s influence and the joy of reinventing a classic. Each bite is a journey, a blend of nostalgia and culinary innovation.

    What Makes This Version Special

    This version of hashbrowns takes the classic to a whole new level by introducing a smoky aioli enhanced with smoked paprika and a generous sprinkle of tangy feta cheese. These additions bring a depth and creaminess that you won’t find in your everyday hashbrown recipe. The smoked paprika blooms in oil, releasing its deep, earthy aroma, while the feta cheese introduces a rich, creamy texture that pairs beautifully with the crispy potato exterior.

    By incorporating fresh spinach and carrot into the mixture, these hashbrowns not only become more nutritious but also boast an intriguing blend of flavors and colors. The spinach adds a freshness, while the carrot provides a subtle sweetness, creating a harmonious balance that makes this version stand out from the crowd.

    Flavor Profile

    The flavor profile of these savory hashbrowns is a delightful dance of savory, smoky, and tangy notes, underpinned by creamy undertones. As you take the first bite, the crispy exterior gives way to a tender, flavorful interior, with the fresh spinach and sweet carrot harmonizing beautifully. The smoked paprika aioli adds a layer of complexity, wrapping each bite in a warm, earthy embrace, while the feta cheese provides a tangy, luscious contrast. It’s a multi-sensory experience that leaves you craving more.

    Ingredients

    • 4 medium potatoes, grated
    • 1 cup fresh spinach leaves, chopped
    • 1 medium onion, finely chopped
    • 1 medium carrot, grated
    • 1/2 teaspoon salt, plus more to taste
    • 1/2 teaspoon red chili powder
    • 2 tablespoons cornflour
    • 1/2 cup feta cheese, crumbled
    • 1/2 cup mayonnaise
    • 1 teaspoon smoked paprika
    • 1 tablespoon lemon juice
    • 1 tablespoon fresh dill, chopped
    • Oil for frying

    Instructions

    1. In a large bowl, combine the grated potatoes, chopped spinach, onion, and grated carrot. Add 1/2 teaspoon of salt and mix well. Squeeze the mixture with your hands to remove as much moisture as possible. This step is crucial for achieving that desired crispiness.
    2. Add the red chili powder and cornflour to the potato mixture. Crumble the feta cheese into the bowl for a creamy, tangy twist. Mix until everything is evenly incorporated. Taste and adjust the salt if necessary.
    3. Form the mixture into small, even patties, pressing them firmly to ensure they hold together.
    4. Heat a generous amount of oil in a pan over medium-high heat. Once hot, carefully place the patties into the pan. Allow them to brown for a few minutes on each side, then reduce the heat to medium and continue cooking until they are golden-brown and cooked through, about 10-12 minutes total.
    5. While the hashbrowns are cooking, prepare the smoky aioli. In a small saucepan, heat 1 tablespoon of oil over low heat. Add the smoked paprika and gently stir for about 30 seconds to bloom the spice, releasing its deep flavor. Remove from heat and let it cool slightly.
    6. In a small bowl, combine the mayonnaise, lemon juice, and chopped dill. Stir in the smoked paprika oil, mixing until smooth and well combined.
    7. Serve the hashbrowns hot, drizzled with the smoky aioli.

    Pro Tips from Meaghan’s Kitchen

    • Always squeeze out as much moisture as possible from the potato mixture. It’s the secret to achieving perfectly crispy hashbrowns.
    • If your mixture seems too wet, add a little more cornflour to help bind the patties.
    • For an extra flavorful aioli, let the smoked paprika bloom in the oil for a full minute, but be careful not to burn it.
    • Don’t overcrowd the pan when frying the patties. This ensures even cooking and better browning.
    • Use a non-stick pan for easier flipping and to prevent sticking.

    Variations & Dietary Swaps

    • Vegetarian Delight: Swap the feta cheese with a plant-based feta alternative to make these hashbrowns completely vegetarian.
    • Spice-It-Up Version: Add a pinch of cayenne pepper to the aioli for an extra kick, or fresh jalapeños to the hashbrown mixture for more heat.
    • Kids-Friendly Version: Omit the red chili powder and smoked paprika for a milder flavor that kids will love.

    What to Serve With It

    These savory hashbrowns pair beautifully with a crisp, chilled Chardonnay, bringing out their smoky and tangy notes. For a non-alcoholic option, a lemon-infused sparkling water makes a refreshing accompaniment, cutting through the richness of the dish. You can also serve them alongside a fresh green salad or some grilled vegetables for a balanced meal.

    Storage & Meal Prep

    Leftover hashbrowns can be stored in an airtight container in the fridge for up to 3 days. To reheat, place them in a preheated oven at 350°F (175°C) for about 10 minutes, or until heated through and crispy again. For longer storage, freeze the uncooked patties on a baking sheet until solid, then transfer them to a freezer-safe bag. When ready to cook, fry them directly from frozen, adding a few extra minutes to the cooking time.

    FAQ

    Can I make the hashbrowns ahead of time?

    Yes, you can prepare the patties in advance and store them in the fridge for up to a day before frying. This makes breakfast prep a breeze.

    What if I don’t have smoked paprika?

    If you don’t have smoked paprika, regular paprika can be used, but you’ll miss out on that smoky flavor. You could also try a pinch of chipotle powder for a similar effect.

    How do I prevent the hashbrowns from falling apart?

    Ensure that you’ve squeezed out as much moisture as possible from the mixture and that you press the patties firmly when shaping them. If they’re still falling apart, try adding a bit more cornflour.

    Can I bake these hashbrowns instead of frying?

    Yes, you can bake them! Preheat your oven to 400°F (200°C) and bake on a parchment-lined baking sheet for about 25-30 minutes, flipping halfway through, until golden and crispy.

    Can I substitute dill with another herb?

    Absolutely! Fresh parsley or chives would also work beautifully in the aioli for a different herbal note.

    Final Thoughts

    I hope this recipe for Savory Hashbrowns with Spinach, Carrot & Smoked Paprika Aioli becomes a cherished addition to your breakfast or brunch repertoire. It’s a dish that’s close to my heart and perfect for sharing with loved ones. As always, I’d love to hear how it turns out for you. Please leave a comment below or share your delicious creations on social media. Let’s make mornings a little more magical, one hashbrown at a time!

    Related update: Savory Hashbrowns with Spinach, Carrot & Smoked Paprika Aioli

  • Strawberry-Banana Pancakes with Honey-Almond Drizzle | Made by Meaghan Moineau

    Strawberry-Banana Pancakes with Honey-Almond Drizzle | Made by Meaghan Moineau

    Strawberry-Banana Pancakes with Honey-Almond Drizzle

    The aroma of toasted almonds wafts through the kitchen, mingling with the sweet scent of honey and ripe bananas. Imagine flipping golden-brown pancakes, each one studded with juicy strawberries and ready to be draped in a warm honey-almond drizzle. This isn’t just breakfast; it’s an experience.

    Personal Story

    Growing up, Saturday mornings meant one thing: the smell of pancakes sizzling on the griddle. My dad would flip them with a practiced hand, occasionally tossing chocolate chips or berries into the batter as a surprise. Those mornings were a slice of heaven, where time seemed to stand still, and the only thing that mattered was the perfect stack of pancakes.

    As I grew older, my culinary adventures took me beyond the simple pancake. Yet, no matter how far I wandered, I always found myself drawn back to those comforting stacks. About a year ago, I stumbled upon a quaint café during a trip to San Francisco that offered a unique take on pancakes. Intrigued, I ordered what would become my muse: pancakes with an almond flair.

    The revelation of nutty almond essence combined with classic pancake flavors was nothing short of magical. I knew I had to recreate this at home. My first attempt was a bit too heavy on the almonds, but after a few tweaks and some added honey, I struck gold. Thus, the Strawberry-Banana Pancakes with Honey-Almond Drizzle were born — a nod to tradition with a delicious twist.

    What Makes This Version Special

    This recipe elevates the humble pancake into a gourmet breakfast delight. The key lies in the **nutty almond essence** infused throughout the batter and the **luscious honey-almond drizzle** that graces each stack. Traditional pancakes often rely on syrup for sweetness, but the honey-almond drizzle adds a sophisticated layer of flavor. The addition of whole wheat pastry flour not only boosts the nutritional profile but also adds a subtle nutty undertone that complements the almonds perfectly.

    Flavor Profile

    Expect a symphony of flavors with these pancakes. The base is nutty and rich, thanks to the almond extract and whole wheat pastry flour. Each bite reveals the sweetness of ripe bananas and the juicy tartness of fresh strawberries, balanced by a hint of citrus from the lemon zest. The honey-almond drizzle ties everything together with its warm, sweet, and slightly nutty notes that linger on the palate.

    Ingredients

    • 1/2 cup non-fat Greek yogurt
    • 1/4 cup mashed banana
    • 2 whole egg whites
    • 1 teaspoon vanilla extract
    • 1 cup whole wheat pastry flour
    • 1/2 teaspoon baking soda
    • 1/2 teaspoon sugar
    • 1/4 teaspoon salt
    • 5 whole diced fresh strawberries
    • **1 teaspoon almond extract**
    • **1/4 cup sliced almonds**
    • **1/4 cup honey**
    • Zest of 1 lemon

    Instructions

    1. In a small bowl, mix together the Greek yogurt, mashed banana, egg whites, and vanilla extract until smooth and well combined.
    2. In a separate larger bowl, whisk together the flour, baking soda, sugar, and salt. Gradually add the wet ingredients to the dry, stirring gently until just combined to avoid overmixing.
    3. Fold in the diced strawberries, ensuring they’re evenly distributed throughout the batter.
    4. Heat a non-stick skillet over medium heat and toast the sliced almonds until golden and fragrant, about 3-4 minutes. Set aside.
    5. For the honey-almond drizzle, gently warm the honey in a small saucepan over low heat. Remove from heat and stir in the almond extract and lemon zest. Let it bloom for a minute to intensify its nutty aroma.
    6. Lightly coat the skillet with cooking spray. Pour 1/4 cup of batter per pancake onto the skillet. Cook until bubbles form on the surface, about 2 minutes, then flip and cook an additional 1-2 minutes until golden-brown.
    7. Stack the pancakes on a plate, sprinkle with toasted almonds, and generously drizzle with the honey-almond sauce.

    Pro Tips from Meaghan’s Kitchen

    • For fluffier pancakes, let the batter rest for 5-10 minutes before cooking. This allows the baking soda to activate fully.
    • When folding in the strawberries, do so gently to keep them from breaking apart and turning the batter pink.
    • If you crave an extra almond kick, sprinkle a few chopped almonds directly into the batter before cooking.
    • Adjust the sweetness of the honey drizzle by adding a touch more honey or lemon zest, depending on your preference.
    • Use a good quality non-stick skillet to ensure even cooking and easy flipping of your pancakes.

    Variations & Dietary Swaps

    • For a gluten-free version, substitute the whole wheat pastry flour with a gluten-free all-purpose flour blend.
    • Spice it up by adding a pinch of cinnamon or nutmeg to the batter for a warm, aromatic twist.
    • For a kid-friendly option, create fun pancake shapes with molds and let the kids top them with their favorite fruits.

    What to Serve With It

    Pair these gourmet pancakes with a tall glass of freshly squeezed orange juice for a refreshing citrus balance or enjoy them with a frothy cappuccino to complement the subtle almond notes. A side of crispy bacon or sausage also adds a savory contrast that enhances the overall breakfast experience.

    Storage & Meal Prep

    These pancakes are perfect for meal prep. Store any leftover pancakes in an airtight container in the fridge for up to three days. For longer storage, place them in a single layer on a baking sheet and freeze until solid, then transfer to a freezer-safe bag for up to a month. Reheat in a toaster or oven at 350°F until warmed through. The honey-almond drizzle can be stored in the refrigerator and gently reheated before serving.

    FAQ

    Can I use frozen strawberries instead of fresh?

    Yes, you can use frozen strawberries. Just make sure to thaw and drain them well to prevent excess moisture in the batter.

    Can I make the batter ahead of time?

    It’s best to make the batter fresh, as the baking soda starts reacting once wet. If needed, prepare the dry and wet ingredients separately and combine them just before cooking.

    Is there a substitute for almond extract?

    If you don’t have almond extract, you can use a little extra vanilla extract, though it won’t deliver the same nutty depth.

    What can I use in place of Greek yogurt?

    You can substitute Greek yogurt with plain regular yogurt or even applesauce for a slightly different texture and flavor.

    How do I prevent the pancakes from sticking to the skillet?

    Ensure your skillet is well-heated before adding the batter, and use a light spray of non-stick cooking oil between batches.

    Final Thoughts

    I hope these Strawberry-Banana Pancakes with Honey-Almond Drizzle bring as much joy to your mornings as they have to mine. They are a testament to the beauty of elevating classic flavors with a touch of creativity. If you try this recipe, I’d love to hear how it went — feel free to leave a comment below or share your pancake creations on social media. Happy cooking, and remember, the best dishes are made with love!

    Related update: Strawberry-Banana Pancakes with Honey-Almond Drizzle

    Related update: Savory Hashbrowns with Spinach, Carrot & Smoked Paprika Aioli

  • Lavender-Infused Gluten-Free Blueberry Muffins with Almond Crunch | Made by Meaghan Moineau

    Lavender-Infused Gluten-Free Blueberry Muffins with Almond Crunch | Made by Meaghan Moineau

    Lavender-Infused Gluten-Free Blueberry Muffins with Almond Crunch

    Picture this: the comforting aroma of freshly baked muffins wafting through your kitchen, mingling with the delicate scent of lavender. These aren’t your ordinary blueberry muffins—they’re a symphony of flavors and textures that promise to elevate your morning ritual. With their floral notes and a satisfyingly crunchy almond topping, these muffins are the epitome of breakfast bliss.

    Personal Story

    There’s something magical about baking on a lazy Sunday morning, surrounded by the quiet hum of a waking household. It was on one such morning, as the sunlight streamed through my kitchen window, that I first experimented with adding lavender to my muffin recipe. Inspired by a recent trip to Provence, where I had been captivated by fields of purple blooms and the gentle hum of bees, I decided to bring a hint of that experience into my baking.

    My initial attempts were, quite frankly, a bit too ambitious. I had underestimated the potency of lavender, and my first batch tasted like a soap mishap. It was a humbling experience that reminded me of the delicate balance between flavor and fragrance. But I was determined to make it work, persistently tweaking the quantities until the lavender complemented, rather than overpowered, the other ingredients.

    One day, as I was about to give up, I had an epiphany. The secret to the perfect lavender-infused muffins lay in steeping the dried lavender in warm milk. This method allowed the floral notes to infuse gently into the batter, creating a harmonious blend that paired beautifully with the sweetness of the blueberries.

    Now, each time I bake these Lavender-Infused Gluten-Free Blueberry Muffins with Almond Crunch, I’m transported back to those sun-drenched fields. They’ve become my go-to treat for breakfast gatherings, always sparking conversation and delighting guests with their unique twist on a classic favorite.

    What Makes This Version Special

    These muffins stand out from the crowd due to their unique flavor profile and texture. By adding a floral hint of lavender and a crunchy almond topping, they offer complexity far beyond the standard blueberry muffin. The **dried lavender** lends an aromatic depth that pairs surprisingly well with the juicy bursts of **Driscoll’s blueberries**. Topping the muffins with **sliced almonds** and a touch of honey before baking introduces a delightful crunch and subtle sweetness that completes the experience. These gluten-free treats also cater to those with dietary restrictions, while maintaining a moist and tender crumb, thanks to the smart use of **gluten-free flour** and **xanthan gum**.

    Flavor Profile

    Imagine biting into a muffin that is floral and nutty, with juicy bursts of blueberries and a hint of citrus from **lemon zest**. The lavender is subtle yet distinct, providing a gentle aromatic undertone that doesn’t overpower. The muffin’s texture is perfectly balanced—soft and moist inside with a golden-brown exterior, crowned by the crunchy almond topping. This sensory delight makes these muffins more than just a breakfast item; they’re a journey for your taste buds, leaving you with a lasting impression of culinary creativity.

    Ingredients

    • 1 1/2 cups **gluten-free flour**
    • 1 cup sugar
    • 2 teaspoons baking powder
    • 1/4 teaspoon **xanthan gum**
    • 1/2 teaspoon salt
    • 1/2 cup unsalted butter, melted
    • 1 cup **whole milk**
    • 2 large eggs
    • 1 teaspoon **lemon zest**
    • 1 teaspoon vanilla extract
    • 1 1/2 cups **Driscoll’s blueberries**
    • 1 tablespoon **dried lavender**
    • 1/2 cup **sliced almonds**
    • 2 tablespoons honey

    Instructions

    1. Preheat your oven to 375°F (190°C). Lightly butter or grease a 12-cup muffin pan or line with paper liners.
    2. In a small saucepan, gently heat the **whole milk** and add the **dried lavender**. Allow it to steep for about 10 minutes, letting the milk become infused with the lavender aroma. Strain and set aside to cool slightly.
    3. In a medium bowl, stir together the **gluten-free flour**, sugar, baking powder, **xanthan gum**, and salt until well blended.
    4. In a large bowl, whisk together the melted butter, lavender-infused milk, eggs, **lemon zest**, and vanilla extract until combined.
    5. Gradually stir in the flour mixture into the wet ingredients until partially moistened. The batter will be thick—be careful not to overmix.
    6. Gently fold in the **Driscoll’s blueberries**, ensuring they’re evenly distributed throughout the batter.
    7. Divide the batter evenly between the muffin cups, filling each about three-fourths full.
    8. Top each muffin with a sprinkle of **sliced almonds** and drizzle lightly with honey for added texture and sweetness.
    9. Bake for 10 minutes, then rotate the pan and continue baking for another 10 minutes, or until the muffins are golden brown and a toothpick inserted in the center comes out clean.
    10. Allow the muffins to cool in the pan for about 3 minutes, then transfer them to a wire rack to cool completely or serve warm.

    Pro Tips from Meaghan’s Kitchen

    • Measure Carefully: For the best gluten-free results, measure your flour by spooning it into the measuring cup and leveling it off with a knife.
    • Mind the Lavender: Lavender can be potent, so don’t be tempted to add extra. Trust the process, and let the steeping do its magic.
    • Fresh is Best: Use fresh blueberries if you can. If using frozen, do not thaw them before folding into the batter to prevent excess moisture.
    • Honey Drizzle: If honey isn’t your thing, a light sprinkle of brown sugar over the almond topping can add a similar sweetness and crunch.
    • Cooling Matters: Letting the muffins cool slightly before eating allows the flavors to meld, while serving them warm enhances the aroma.

    Variations & Dietary Swaps

    • Vegan Swap: Replace eggs with flax eggs (1 tablespoon flaxseed meal + 2.5 tablespoons water per egg) and use plant-based milk and vegan butter.
    • Citrus Twist: Add a tablespoon of orange zest for a more pronounced citrus flavor that pairs beautifully with the lavender.
    • Kids-Friendly Version: Omit the lavender for a classic blueberry muffin that’s sure to please picky eaters.

    What to Serve With It

    For a truly soothing breakfast experience, pair these muffins with a cup of chamomile tea. The calming notes of the tea complement the floral lavender, creating a moment of pure tranquility. Alternatively, a glass of freshly squeezed orange juice will enhance the citrus undertones of the muffins, making for a refreshing start to your day.

    Storage & Meal Prep

    Store any leftover muffins in an airtight container at room temperature for up to two days. For longer storage, place them in the refrigerator for up to a week. These muffins also freeze beautifully—simply wrap each one in plastic wrap and store in a freezer-safe bag for up to three months. To reheat, thaw at room temperature or warm in a 300°F oven for about 10 minutes.

    FAQ

    Can I use fresh lavender instead of dried?

    Yes, you can use fresh lavender, but use it sparingly as it’s more potent than dried. Start with half the amount and adjust to taste.

    Do I need to use xanthan gum?

    Xanthan gum provides structure and helps mimic the texture of gluten, but if you’re sensitive to it, you can try substituting with a similar binding agent like guar gum.

    Why did my muffins turn out dense?

    Overmixing the batter can lead to dense muffins. Mix just until the dry ingredients are incorporated for a light, airy texture.

    Can I use almond milk instead of whole milk?

    Absolutely! Almond milk is a great substitute, particularly if you’re looking to enhance the almond flavor in the muffins.

    Are these muffins suitable for someone with a nut allergy?

    To make them nut-free, omit the almond topping or replace it with toasted oats or seeds for a similar crunch.

    Final Thoughts

    And there you have it, a delightful twist on the classic blueberry muffin that promises to transport your senses to a lavender field on a sunny day. Whether you’re enjoying them over a leisurely breakfast or as a sweet afternoon treat, these Lavender-Infused Gluten-Free Blueberry Muffins with Almond Crunch are sure to impress. I’d love to hear how they turn out for you, so please leave a comment below or share your muffin magic with us on social media. Happy baking!

    Related update: Lavender-Infused Gluten-Free Blueberry Muffins with Almond Crunch

    Related update: Strawberry-Banana Pancakes with Honey-Almond Drizzle

  • Truffle-Infused Poached Eggs with Spinach, Tomato, and Crispy Prosciutto | Made by Meaghan Moineau

    Truffle-Infused Poached Eggs with Spinach, Tomato, and Crispy Prosciutto | Made by Meaghan Moineau

    Truffle-Infused Poached Eggs with Spinach, Tomato, and Crispy Prosciutto

    Imagine this: A sunny Sunday morning, the aroma of freshly brewed coffee wafting through the air, and the promise of a breakfast that’s not just a meal, but an experience. The rich, earthy scent of truffle oil mingles with the savory crispness of prosciutto, tantalizing your senses in the most delightful way. This is not just any breakfast; this is truffle-infused poached eggs with spinach, tomato, and crispy prosciutto — a dish that transports you to an Italian piazza with every bite.

    Personal Story

    It was a rainy afternoon in Florence when I first discovered the magic of truffle oil. I was tucked away in a quaint trattoria, the kind where the walls are lined with dusty bottles of Chianti, and the menu is handwritten and slightly smudged. I had ordered a simple dish of poached eggs atop sautéed greens, and the unexpected drizzle of truffle oil elevated the flavors to something heavenly. I knew then and there that I had to recreate this culinary moment in my own kitchen.

    Back home, I was determined to perfect the art of poached eggs — a task that, at first, seemed daunting. My initial attempts were, let’s say, less than successful. There were yolks that broke too soon and whites that spread like wispy clouds in the water. But with perseverance, and a few tips from a seasoned chef friend, I was finally able to achieve that perfect, silky poached egg.

    The addition of crispy prosciutto was a happy accident. While rummaging through my fridge one day, I stumbled upon a few slices leftover from a charcuterie board. A quick sizzle in a hot pan turned them into the perfect crispy garnish. Each bite of this dish became a symphony of textures — the soft, runny yolk, the tender spinach, the crunchy prosciutto, and the subtle, luxurious hint of truffle oil.

    Now, this dish has become a weekend staple in my home, a reminder of my Italian adventure and a testament to the beauty of simple, yet sophisticated flavors. It’s not just breakfast; it’s a celebration of culinary creativity and a little indulgence to start the day.

    What Makes This Version Special

    This version of poached eggs is special because it takes a classic breakfast staple and elevates it with a touch of luxury. The introduction of truffle oil adds a subtle earthy aroma that transports you to the heart of Italy with every bite. But the real showstopper here is the crispy prosciutto. While most brunch dishes might rely solely on bacon for crispiness, the prosciutto offers a delicate, savory crunch that pairs wonderfully with the creamy, runny yolk of the poached egg. The combination of these elements creates a dish that’s not only indulgent but also balanced in flavor and texture.

    Flavor Profile

    The flavor profile of truffle-infused poached eggs with spinach, tomato, and crispy prosciutto is nothing short of a decadent culinary experience. The truffle oil introduces an earthy richness that complements the creamy texture of the perfectly poached eggs. The spinach brings a fresh, slightly bitter note, which is beautifully offset by the sweetness of ripe tomatoes. Add to that the savory, salty crunch of crispy prosciutto and a touch of Parmesan cheese, and you’re left with a dish that’s both indulgent and balanced. The subtle heat from the dried chili flakes adds a whisper of spice that lingers on the palate, making each bite a journey through layers of complex flavors.

    Ingredients

    • 2 slices of whole grain bread
    • 2 large eggs
    • 2 tablespoons white vinegar
    • 1 tablespoon olive oil
    • A few drops of truffle oil
    • 2 cloves garlic, minced
    • 1 teaspoon dried chili flakes
    • 2 cups fresh spinach leaves
    • Salt and pepper, to taste
    • 1 ripe tomato, sliced
    • 4 slices of prosciutto
    • 2 tablespoons grated Parmesan cheese
    • Fresh basil leaves, for garnish

    Instructions

    1. Start by preparing your poaching water. Take a wide skillet and fill it with enough water to submerge the eggs. Bring it up to a steady boil, then reduce the heat to maintain a gentle simmer. Add the white vinegar to the water, which helps the egg whites set more quickly.
    2. Crack one egg into a small bowl. Create a gentle whirlpool in the simmering water using a spoon, then slowly pour the egg into the center of the whirlpool. Repeat with the second egg. Allow the eggs to cook for about 2 to 3 minutes, until the whites are set but the yolks remain runny.
    3. Meanwhile, in a separate frying pan, heat the olive oil over medium heat. Add the minced garlic and dried chili flakes, sautéing for about a minute until fragrant but not browned. Add the fresh spinach leaves, stirring gently to coat them in the aromatic oil. Cover and cook for another minute until wilted, then season with salt and pepper.
    4. For the prosciutto, heat another pan over medium-high heat and add the slices in a single layer. Cook until golden and crispy, about 2-3 minutes per side. Remove from the pan and let them drain on a paper towel.
    5. To assemble, place the toasted whole grain bread on plates. Divide the spinach mixture between the slices, followed by the tomato slices. Carefully top each with a poached egg, then drizzle a few drops of truffle oil over the eggs for an aromatic finish. Season with salt and pepper.
    6. Garnish with crispy prosciutto, a sprinkle of grated Parmesan cheese, and fresh basil leaves. Serve immediately to enjoy the full spectrum of flavors and textures.

    Pro Tips from Meaghan’s Kitchen

    • Use the freshest eggs possible for poaching, as the whites will hold together better.
    • If you’re new to poaching eggs, try using a ramekin or small cup to gently slide the egg into the water.
    • Don’t overcrowd the pan when crisping the prosciutto; they need space to fry evenly.
    • For an extra layer of flavor, rub a cut garlic clove over the toasted bread before adding the toppings.
    • Always add the truffle oil right before serving to preserve its delicate aroma.

    Variations & Dietary Swaps

    • Vegetarian Swap: Omit the prosciutto and add a handful of sautéed mushrooms for a similar umami kick.
    • Spice-It-Up Version: Add a dash of hot sauce or a sprinkle of cayenne pepper for those who like an extra kick.
    • Kids-Friendly Version: Replace the spinach with mild sautéed zucchini and skip the chili flakes to make it more appealing to younger palates.

    What to Serve With It

    This luxurious breakfast pairs beautifully with a glass of freshly squeezed orange juice or, if you’re feeling festive, a light, citrusy mimosa. The bright acidity of the drinks complements the richness of the truffle oil and the salty prosciutto, creating a delightful balance to your meal.

    Storage & Meal Prep

    For meal prep, you can crisp the prosciutto and sauté the spinach in advance, storing them separately in airtight containers in the fridge for up to 2 days. Poached eggs are best served fresh, but you can keep them in cold water in the fridge for up to 24 hours and reheat gently in warm water before serving. Toast the bread fresh for the best texture.

    FAQ

    Can I use a different type of oil instead of truffle oil?

    While truffle oil is what gives the dish its signature aroma, you can use a high-quality extra virgin olive oil as an alternative. It will change the flavor profile slightly, but it will still be delicious.

    What’s the best way to toast the bread?

    A quick toast in the oven or a toaster works well. For an added touch, you can lightly brush the bread with olive oil before toasting for extra flavor.

    Can I make this dish in advance?

    You can prepare most components ahead of time, but poached eggs are best made fresh. You can crisp the prosciutto and sauté the spinach a day in advance.

    What can I use instead of prosciutto?

    Try using turkey bacon or pancetta for a similar crispy texture. For a vegetarian option, consider using crispy fried shallots or roasted red peppers.

    Final Thoughts

    Truffle-infused poached eggs with spinach, tomato, and crispy prosciutto is more than just a breakfast — it’s a culinary experience that transports you straight to the heart of Italy. I hope this recipe inspires you to explore new flavors and techniques in your kitchen. Your feedback and stories are always welcome, so feel free to share your experience in the comments below. Happy cooking, my friends!

    Related update: Truffle-Infused Poached Eggs with Spinach, Tomato, and Crispy Prosciutto

    Related update: Lavender-Infused Gluten-Free Blueberry Muffins with Almond Crunch

  • Meyer Lemon Ricotta Pancakes with Vanilla-Infused Blackberry-Cardamom Compote | Made by Meaghan Moineau

    Meyer Lemon Ricotta Pancakes with Vanilla-Infused Blackberry-Cardamom Compote | Made by Meaghan Moineau

    Meyer Lemon Ricotta Pancakes with Vanilla-Infused Blackberry-Cardamom Compote

    There’s something undeniably magical about the moment when a stack of pancakes hits the table, their golden-brown edges inviting you to dive in. Picture this: delicate, fluffy Meyer lemon ricotta pancakes crowned with a luscious, aromatic blackberry-cardamom compote. The sweet fragrance of vanilla mingles with the tartness of blackberries, creating a breakfast experience you’ll want to savor slowly.

    Personal Story

    I still remember the first time I tasted pancakes that transcended the usual weekend breakfast fare. It was at a quaint little café tucked away in a bustling city, where the chef had a knack for turning simple dishes into culinary works of art. There, amidst the comforting hum of conversations and the intoxicating scent of fresh coffee, I discovered a delightful twist on the classic pancake.

    This discovery inspired me to experiment in my own kitchen, eager to capture that enchanting blend of flavors and make it my own. One Saturday morning, armed with a bowl of fresh blackberries and a few humble pantry staples, I set out to recreate the magic. A few attempts and a couple of kitchen mishaps later — including one memorable incident involving a runaway vanilla bean — I finally perfected my recipe.

    As I whisked together Meyer lemon zest and ricotta, I realized I was crafting something truly special. The tangy brightness of the lemon melded beautifully with the creamy richness of the ricotta. It was the blackberry compote, however, that truly elevated the dish. Infusing it with a hint of cardamom and vanilla gave it an exotic flair that was both unexpected and delightful.

    Now, these Meyer lemon ricotta pancakes with vanilla-infused blackberry-cardamom compote have become a weekend staple in my home, a dish I love sharing with friends and family. They never fail to impress, and I’m thrilled to share the recipe with you today.

    What Makes This Version Special

    This recipe takes traditional pancakes and gives them a luxurious upgrade. By introducing a hint of cardamom and vanilla to the blackberry compote, we’re elevating the classic flavors to a new level. The fragrant and exotic notes of cardamom pair beautifully with the sweet, juicy blackberries, while the vanilla adds a subtle floral depth that harmonizes with the Meyer lemon’s bright acidity.

    What sets these Meyer lemon ricotta pancakes apart is their ability to transform a simple breakfast into an indulgent experience. The richness of ricotta creates an incredibly tender and moist pancake, while the Meyer lemon zest and juice add a refreshing zing. This version is better than the standard recipe because it combines unexpected flavors in a way that is both comforting and sophisticated.

    Flavor Profile

    Imagine biting into a pancake that’s fruity and creamy, with subtle floral notes and a hint of warm spice. The Meyer lemon ricotta pancakes offer a delicate balance of sweet and tangy, while the blackberry-compote enhances each mouthful with its aromatic infusion of cardamom and vanilla. The browned butter in the batter adds a nutty richness that rounds out the flavor profile, making every bite a taste sensation to remember.

    Ingredients

    • 1 cup all-purpose flour
    • 1 cup fresh blackberries
    • **4 tablespoons butter**
    • 2 large eggs, separated
    • 2 tablespoons granulated sugar
    • Zest of 1 Meyer lemon
    • 2 tablespoons Meyer lemon juice
    • 1 cup ricotta
    • Pinch of salt
    • 2 tablespoons water
    • **1 vanilla bean, split**
    • **1/4 teaspoon ground cardamom**
    • Pure maple syrup, for serving

    Instructions

    1. In a small saucepan over medium heat, add the fresh blackberries, Meyer lemon zest, granulated sugar, and water. Stir to combine.
    2. Add the split vanilla bean and a pinch of ground cardamom to the saucepan. Continue cooking until the water starts to thicken and the berries lose their shape, stirring occasionally, about 10 minutes. Remove from heat and set aside.
    3. In a medium bowl, whisk together the ricotta cheese, Meyer lemon zest, Meyer lemon juice, sugar, and egg yolks until smooth.
    4. Gradually stir in the all-purpose flour until just combined, being careful not to overmix.
    5. Using a stand mixer or hand mixer, beat the egg whites with a pinch of salt until stiff peaks form.
    6. Gently fold a large spoonful of the egg whites into the batter to lighten it. Then, fold in half of the remaining egg whites, slowly turning the bowl while you fold. It’s fine if there are some white streaks left in the batter. Fold in the remaining egg whites.
    7. Set the pancake batter aside and heat a griddle or non-stick pan over medium heat. Add a tablespoon of browned butter to the pre-heated pan, swirling to coat.
    8. Pour about 1/4 cup of batter onto the hot pan, spreading it slightly. Cook until bubbles start to form on the surface and the edges begin to brown slightly, about 2-3 minutes.
    9. Flip the pancakes and cook for an additional minute until golden-brown. Remove and keep warm while you repeat with the remaining batter.
    10. Serve the pancakes stacked high, topped with the vanilla-infused blackberry-cardamom compote and a drizzle of pure maple syrup.

    Pro Tips from Meaghan’s Kitchen

    • Use room temperature ingredients for the batter to ensure a smooth, lump-free mixture.
    • Brown the butter carefully, watching closely as it turns golden and releases a nutty aroma. This adds depth to the pancakes.
    • Don’t overmix the pancake batter; a few lumps are perfectly fine and will result in fluffier pancakes.
    • Keep the pancakes warm in a low oven (around 200°F) if you’re making a large batch.
    • If you don’t have a vanilla bean, substitute with 1 teaspoon of pure vanilla extract added to the compote after cooking.

    Variations & Dietary Swaps

    • Vegetarian Swap: These pancakes are already vegetarian-friendly, but for a vegan version, substitute the ricotta with a vegan option and use flax eggs instead of regular eggs.
    • Spice-It-Up Version: Add a pinch of cinnamon to the compote for an extra layer of warmth and spice.
    • Kids-Friendly Version: Skip the cardamom and vanilla for a simpler blackberry compote. Add some chocolate chips to the pancake batter for a fun twist.

    What to Serve With It

    These Meyer lemon ricotta pancakes pair beautifully with a lavender-infused latte, providing a calming floral note to complement the citrusy and fruity flavors. For a brunch-worthy treat, serve them with a chilled glass of prosecco, adding a touch of sparkle to your leisurely morning.

    Storage & Meal Prep

    Store any leftover pancakes in an airtight container in the refrigerator for up to 3 days. To freeze, layer them between sheets of parchment paper and place in a freezer-safe bag for up to 2 months. Reheat in a toaster or warm oven until heated through. The compote can be stored separately in the fridge for up to a week and reheated gently on the stove before serving.

    FAQ

    Can I use frozen blackberries for the compote?

    Yes, you can use frozen blackberries. Just be sure to thaw them first and drain any excess liquid before using.

    What if I can’t find Meyer lemons?

    If Meyer lemons are unavailable, you can substitute with regular lemons. The flavor will be a bit more tart, so you might want to add a touch more sugar to balance it out.

    How do I know when the pancakes are ready to flip?

    Look for bubbles forming on the surface of the pancakes and the edges starting to look set and slightly browned. That’s your cue to flip!

    Can I make the batter ahead of time?

    It’s best to make the batter just before cooking to keep the pancakes light and fluffy. If you need to prep ahead, you can mix the dry and wet ingredients separately and combine them right before cooking.

    What can I use instead of ricotta?

    If you don’t have ricotta, you can try cottage cheese or mascarpone for a similar creamy texture, though the flavor will vary slightly.

    Final Thoughts

    I hope these Meyer lemon ricotta pancakes with vanilla-infused blackberry-cardamom compote bring as much joy to your kitchen as they do to mine. Whether you’re cooking for a special occasion or just want to elevate your weekend breakfast, this recipe is sure to impress. I’d love to hear how your pancakes turn out and any personal twists you might add — feel free to share your thoughts and photos in the comments below!

    Related update: Meyer Lemon Ricotta Pancakes with Vanilla-Infused Blackberry-Cardamom Compote

    Related update: Truffle-Infused Poached Eggs with Spinach, Tomato, and Crispy Prosciutto

  • Spiced Apple Cider Brioche with Maple-Cinnamon Glaze | Made by Meaghan Moineau

    Spiced Apple Cider Brioche with Maple-Cinnamon Glaze | Made by Meaghan Moineau

    Spiced Apple Cider Brioche with Maple-Cinnamon Glaze

    Picture a chilly autumn morning, leaves crunching underfoot, and the air filled with the sweet, spicy aroma of apple cider. Now imagine that fragrance is wafting from your own kitchen as you pull a loaf of Spiced Apple Cider Brioche with Maple-Cinnamon Glaze out of the oven. It’s a sensory delight that wraps you in a warm culinary hug.

    Personal Story

    I still remember the first time I tried to make brioche. My kitchen looked like a flour bomb had gone off, and let’s just say I underestimated the power of yeast. But, like with most of my culinary adventures, it was a learning experience, and eventually, I got the hang of it. That initial attempt, albeit messy, was the springboard for my now beloved Spiced Apple Cider Brioche.

    The inspiration for this recipe came from an autumn visit to an apple orchard. Surrounded by trees heavy with ripe fruit, I sipped on warm cider and knew I needed to capture that essence in a bake. This brioche became my ode to autumn — the perfect blend of cozy spices and the natural sweetness of apples.

    One memorable evening, as the sun set and the kitchen filled with the scent of baking dough and bubbling apples, I knew this recipe was something special. Friends gathered around the table, tearing pieces of the fluffy brioche, still warm from the oven, and dipping them in extra glaze. The room was filled with laughter and full bellies — the true measure of a successful dish.

    From that day on, Spiced Apple Cider Brioche has been a staple in my recipe collection, a reminder of crisp autumn days and the joy of sharing delicious food with loved ones.

    What Makes This Version Special

    What sets this Spiced Apple Cider Brioche apart from your standard brioche recipe is the infusion of warm spices and a touch of autumn. By incorporating ground nutmeg into the dough, you elevate the flavor profile, adding depth and warmth. But the real pièce de résistance is the luxurious maple-cinnamon glaze. Brushed on while the brioche is still warm, it creates a glossy, sweet finish that perfectly complements the spiced dough. This glaze doesn’t just add flavor; it adds a visual allure that makes the brioche look as irresistible as it tastes.

    Flavor Profile

    Biting into this brioche is like a journey through an autumn landscape. The first taste is all about the buttery, tender crumb, laced with the subtle warmth of cinnamon and nutmeg. As you continue, the rich maple sweetness of the glaze comes through, harmonizing beautifully with the soft spiced dough. Each bite offers a hint of tart apple that cuts through the richness, making it a symphony of flavors dancing on your palate.

    Ingredients

    • 3/4 cup warm water
    • 1/4 cup vegetable oil
    • 1/4 cup **runny honey**
    • 2 1/4 teaspoons dried/instant yeast
    • 3 1/2 cups flour
    • 1 teaspoon salt
    • 2 large eggs
    • 1/2 cup **apple cider**
    • 1/2 teaspoon ground nutmeg
    • 1 teaspoon ground cinnamon
    • 1 tablespoon **orange zest**
    • 1 teaspoon vanilla extract
    • 1/2 cup **maple syrup**
    • 2 tablespoons butter, melted
    • 1 cup diced **apples**
    • 1/4 cup sugar
    • 1 cup powdered sugar

    Instructions

    1. Mix the warm (not hot) water with the vegetable oil, runny honey, and yeast. Allow it to foam for 10 minutes.
    2. Meanwhile, bloom the ground cinnamon and nutmeg by melting the butter in a small pan and stirring in the spices. This will deepen their flavor.
    3. Add the foamy yeast mixture, flour, salt, eggs, apple cider, orange zest, and vanilla extract to a large bowl. Stir in the butter-spice mixture.
    4. Mix and knead the dough using a mixer with a bread hook, or by hand, until you have a soft, smooth, and elastic dough (about 8-10 minutes).
    5. Place the dough in an oiled bowl and let it rise, covered, for about 2 hours or until it’s puffy and nearly doubled in size.
    6. While the dough rises, toss the apple chunks with sugar and cinnamon.
    7. Gently deflate the dough, transfer it to a lightly greased work surface, and flatten it into a rough rectangle, about 8 x 10 inches.
    8. Spread half the apple chunks in the center of the dough. Fold a short edge of the dough over the apples, patting firmly to seal them. Spread the remaining apples on top and fold the other side over, sealing well.
    9. Cut the apple-filled dough into 16 pieces, arranging them in a greased 9-inch round cake pan.
    10. Cover the pan with lightly greased plastic wrap or a damp towel and let it rise for about 1-1 1/2 hours, until it’s a generous 2 inches high.
    11. Preheat the oven to 325°F. Bake the brioche in the lower third of the oven for 55 minutes, or until the top is at least light golden brown all over.
    12. Remove from the oven and let cool for 5 minutes. Loosen the edges and carefully transfer to a rack.
    13. Whisk together the maple syrup and powdered sugar. Brush the warm glaze over the brioche, allowing it to drizzle down the sides for a glossy finish.

    Pro Tips from Meaghan’s Kitchen

    • Make sure your yeast is fresh; if it’s not foaming after 10 minutes, start again with a new batch.
    • Blooming spices in butter enhances their natural oils, giving the brioche a more aromatic flavor.
    • Don’t skip the resting period; it’s crucial for developing the dough’s gluten structure.
    • If the top is browning too quickly, tent it with foil during the last 15 minutes of baking.
    • For a slightly sweeter dough, add an extra tablespoon of honey.

    Variations & Dietary Swaps

    Looking to mix things up? Try these variations:

    • Vegetarian Swap: Substitute the honey with agave syrup to make it vegan-friendly.
    • Spice-It-Up Version: Add a pinch of cayenne pepper to the glaze for a subtle kick.
    • Kids-Friendly Version: Leave out the nutmeg and opt for a chocolate glaze instead of maple.

    What to Serve With It

    This brioche is a treat on its own, but if you want to elevate your experience, pair it with a warm mug of chai tea or a creamy vanilla latte. The spices in the chai will complement the brioche beautifully, while the smoothness of a latte will balance the sweetness of the glaze.

    Storage & Meal Prep

    To store, wrap the brioche tightly in plastic wrap and keep it at room temperature for up to 3 days. For longer storage, wrap it in aluminum foil and freeze for up to 2 months. To reheat, thaw at room temperature and warm in a 300°F oven for 10 minutes.

    FAQ

    Can I make this dough ahead of time?

    Yes! You can prepare the dough, let it rise once, then punch it down and refrigerate overnight. Bring it back to room temperature before the second rise.

    What type of apples work best?

    Granny Smith apples are great for their tartness, but you can also use Honeycrisp or Fuji for a sweeter touch.

    How do I know if my dough has risen enough?

    The dough should be puffy and nearly doubled in size. If you gently press it with a finger, the indentation should slowly spring back.

    Why is my glaze not sticking?

    Ensure the brioche is still warm when you brush on the glaze, as this helps it adhere better and creates a glossy finish.

    Can I use whole wheat flour?

    You can replace up to half of the all-purpose flour with whole wheat, but the texture will be denser.

    Final Thoughts

    There you have it — your very own Spiced Apple Cider Brioche with Maple-Cinnamon Glaze, a delightful autumnal treat that’s sure to impress. I hope you enjoy making and sharing this recipe as much as I do. Don’t forget to leave a comment below with your thoughts or share your own variations. Happy baking!

    Related update: Spiced Apple Cider Brioche with Maple-Cinnamon Glaze

    Related update: Meyer Lemon Ricotta Pancakes with Vanilla-Infused Blackberry-Cardamom Compote

  • Spicy Maple Andouille Sausage and Sweet Potato Hash | Made by Meaghan Moineau

    Spicy Maple Andouille Sausage and Sweet Potato Hash | Made by Meaghan Moineau

    Spicy Maple Andouille Sausage and Sweet Potato Hash

    Imagine the sizzle of sausage as it hits a hot pan, mingling with the sweet aroma of caramelized onions and the earthy scent of roasting sweet potatoes. Each bite is a delightful dance of sweet, smoky, and spicy flavors, a cozy culinary hug perfect for any meal of the day. Welcome to Spicy Maple Andouille Sausage and Sweet Potato Hash — a dish that turns any breakfast, brunch, or dinner into a flavor adventure.

    Personal Story

    There’s something about the humble hash that takes me straight back to lazy Sunday mornings in my grandmother’s kitchen. As a child, I remember waking up to the smells of sizzling sausage and sweet onions, drifting into the dining room like an aromatic alarm clock. My grandmother, with her flour-dusted apron and ever-present wooden spoon, would hum to herself as she worked, adding a dash of this or a sprinkle of that, creating magic from simple ingredients.

    One particularly rainy Sunday, the cupboard was bare of regular potatoes, and we were left with only sweet potatoes. My grandmother, never one to be deterred by minor setbacks, decided to improvise. A little spicy, a little sweet, and suddenly our beloved breakfast took on a new life. The sweet potatoes added a depth and warmth to the dish that paired beautifully with the smoky sausage.

    Years later, inspired by her creativity, I decided to take her idea and run with it. I added a spicy maple glaze to the mix, giving the dish a sweet heat that complements the smoky andouille sausage and sweet potatoes. This unique twist has made this hash a go-to favorite in my home — a testament to my grandmother’s legacy of culinary ingenuity and resourcefulness.

    What Makes This Version Special

    This version of the classic hash stands out with its bold use of sweet potatoes instead of the traditional yukon golds, adding natural sweetness and a beautiful color contrast. But the real secret weapon here is the spicy maple glaze. By reducing maple syrup with smoked paprika and cayenne, you get a glaze that envelops the roasted ingredients in a sweet, smoky heat, perfectly balancing the savory andouille sausage.

    The combination of sweet and spicy, with the rich, smoky undertones of the sausage, elevates this dish beyond a simple hash. It’s an unforgettable ensemble of flavors that brings comfort and excitement to the table, making it perfect for both special occasions and everyday meals.

    Flavor Profile

    Biting into this hash is an experience of contrasts and harmony. The sweet potatoes bring a soft, earthy sweetness that is beautifully contrasted by the smoky, robust flavor of the andouille sausage. Meanwhile, the spicy maple glaze adds a layer of complexity, delivering a gentle heat that lingers pleasantly on the palate. The caramelized onions and roasted peppers add a sweetness and aroma that rounds out the dish, while fresh thyme and scallions provide a burst of herbal freshness in every bite.

    Ingredients

    • 1 large Yukon Gold potato, diced
    • 1 large sweet potato, diced
    • 1 red bell pepper, diced
    • 1 yellow bell pepper, diced
    • 1 large red onion, sliced
    • 8 oz smoked pork andouille sausage, sliced
    • 2 teaspoons canola oil
    • 1 teaspoon garlic salt
    • 1/4 teaspoon cayenne pepper
    • 2 tablespoons maple syrup
    • 1 teaspoon smoked paprika
    • 1 tablespoon fresh thyme, chopped
    • 2 scallions, finely chopped, for garnish

    Instructions

    1. Preheat your oven to 425°F (220°C). This high heat is crucial for ensuring the potatoes and peppers develop a lovely golden-brown crispness.
    2. In a large mixing bowl, toss the diced Yukon Gold potato, sweet potato, red bell pepper, yellow bell pepper, and sliced red onion with 1 teaspoon of canola oil. Spread this mixture evenly onto a baking sheet. Sprinkle with garlic salt and a dash of black pepper for seasoning.
    3. Roast in the preheated oven for 10 minutes. This initial roasting helps the vegetables start to caramelize, enhancing their natural sweetness.
    4. While the vegetables are roasting, create the spicy maple glaze. In a small saucepan over medium heat, combine the maple syrup, smoked paprika, and cayenne pepper. Stir frequently, allowing the mixture to reduce slightly, about 5 minutes, until it thickens.
    5. Remove the baking sheet from the oven and add the sliced andouille sausage. Toss everything together, ensuring the sausage is evenly distributed amongst the vegetables. Return to the oven and roast for an additional 10 minutes, or until the sausage is cooked through and the potatoes are fork-tender.
    6. Remove the pan from the oven and drizzle the spicy maple glaze over the roasted hash, tossing to coat all the pieces evenly. This will add a beautiful glossy finish and infuse every bite with flavor.
    7. Sprinkle with fresh thyme and garnish with finely chopped scallions for a pop of green and a touch of freshness. Serve immediately and enjoy the symphony of flavors!

    Pro Tips from Meaghan’s Kitchen

    • Caramelization is Key: Don’t rush the initial roasting. Allowing the vegetables to develop a deep golden-brown color brings out their natural sweetness and adds depth to the hash.
    • Balance the Heat: If you’re sensitive to spice, reduce the cayenne pepper in the glaze. You can always add more to taste after serving.
    • Prep Ahead: Chop all your veggies the night before and store them in airtight containers. This makes the morning prep a breeze!
    • Get Creative with Sausage: If you can’t find andouille, try using chorizo for a similar smoky flavor, or go for a milder sausage if you’re serving a crowd with varied tastes.
    • Use a Heavy Baking Sheet: A sturdy sheet pan ensures even roasting and prevents burning, especially at high temperatures.

    Variations & Dietary Swaps

    • Vegetarian Version: Swap the sausage for a plant-based alternative or roasted chickpeas. The hash remains just as satisfying and flavorful.
    • Spice-It-Up: Add a few dashes of hot sauce right before serving for those who crave extra heat.
    • Kids-Friendly Option: Tone down the spice by omitting the cayenne pepper and smoked paprika, and add a little more maple syrup for sweetness.

    What to Serve With It

    This spicy maple andouille sausage and sweet potato hash pairs beautifully with a crisp apple cider or a cold wheat beer, enhancing the dish’s sweet and smoky notes. For a lighter option, serve with a simple green salad dressed in lemon vinaigrette, or with a side of fluffy scrambled eggs for a complete breakfast spread.

    Storage & Meal Prep

    Store any leftovers in an airtight container in the fridge for up to three days. To reheat, spread the hash on a baking sheet and warm in a preheated oven at 350°F (175°C) until heated through, about 10-15 minutes. To freeze, portion the hash into freezer-safe bags, removing as much air as possible, and freeze for up to two months. Thaw in the refrigerator overnight before reheating.

    FAQ

    Can I make this dish ahead of time?

    Absolutely! You can prepare the vegetables and sausage a day in advance and store them separately in the fridge. Then, assemble and roast on the day you’re serving it. The glaze can also be made ahead and stored in the refrigerator.

    Is there a vegetarian substitute for andouille sausage?

    Yes, there are many plant-based sausages available that mimic the smoky flavor of andouille. Alternatively, roasted chickpeas can add a nice texture and protein to the dish.

    What’s the best way to get the potatoes crispy?

    Ensure your oven is fully preheated before roasting, and don’t overcrowd the baking sheet. This allows the potatoes to roast rather than steam, leading to a crisper texture.

    Can I use different types of peppers?

    Definitely! Feel free to use any combination of bell peppers you have on hand. Green bell peppers will add a slightly more bitter note, while orange or yellow ones will keep the dish sweet.

    How do I adjust the spice level?

    To make it less spicy, reduce or omit the cayenne pepper in the glaze. If you want to increase the heat, add more cayenne or even a pinch of red pepper flakes.

    Final Thoughts

    This Spicy Maple Andouille Sausage and Sweet Potato Hash is more than just a meal — it’s a celebration of flavors that come together in perfect harmony. Whether you’re making it for a weekend brunch or a cozy dinner, this dish is sure to impress and satisfy. I’d love to hear how it turned out for you! Feel free to leave a comment below or share your version on social media. Remember, the best meals are the ones shared with those we love. Happy cooking!

    Related update: Spicy Maple Andouille Sausage and Sweet Potato Hash

    Related update: Truffle-Infused Macaroni and Cheese with Crispy Pancetta Crumble

    Related update: Spiced Apple Cider Brioche with Maple-Cinnamon Glaze

  • Fluffy Buttermilk Pancakes with Vanilla-Cinnamon Swirl | Made by Meaghan Moineau

    Fluffy Buttermilk Pancakes with Vanilla-Cinnamon Swirl | Made by Meaghan Moineau

    Fluffy Buttermilk Pancakes with Vanilla-Cinnamon Swirl

    Picture this: a lazy Sunday morning, sunlight streaming through the kitchen window, and the irresistible aroma of pancakes sizzling on the griddle. These aren’t just any pancakes — these are Fluffy Buttermilk Pancakes with a Vanilla-Cinnamon Swirl. A breakfast classic elevated to pure comfort food bliss.

    Personal Story

    Growing up, pancakes were a Sunday morning staple in our household. I fondly remember the ritual: my mom in her apron, expertly flipping golden-brown pancakes while I eagerly watched, fork and knife in hand. Those moments were filled with laughter, warmth, and the delicious anticipation of that first bite.

    Fast forward a few years to when I first moved into my own apartment. Eager to recreate those cherished memories, I decided to whip up a batch of my childhood favorite. But as a novice cook, I underestimated the complexity of a seemingly simple pancake. My first attempt was a disaster; the pancakes were flat and tough, a far cry from the fluffy clouds I remembered. I was determined to master the perfect pancake.

    After much trial and error — and a few kitchen mishaps involving batter explosions — I discovered the magic ingredient: buttermilk. It was a game-changer, transforming my pancakes into the pillowy delights I craved. But I didn’t stop there. Inspired by a love for both vanilla and cinnamon, I experimented with adding them to the batter, creating a swirl of sweet and spicy goodness that took my pancakes to a whole new level.

    Now, these Fluffy Buttermilk Pancakes with Vanilla-Cinnamon Swirl are a staple in my kitchen, a beloved recipe that brings both nostalgia and newfound joy to my breakfast table.

    What Makes This Version Special

    The secret to these pancakes lies in the blissful blend of flavors and textures. By incorporating buttermilk into the batter, these pancakes achieve an unparalleled fluffiness and subtle tang that plain milk just can’t deliver. The addition of a vanilla-cinnamon swirl weaves an aromatic sweetness through each bite, elevating these pancakes from ordinary to extraordinary.

    While traditional pancakes are delightful, this version offers a deeply satisfying complexity that makes every mouthful a celebration. The warm, cozy notes of cinnamon paired with the rich, creamy vanilla create a symphony of flavors that dance on the palate. It’s like wrapping yourself in a comforting culinary hug.

    Flavor Profile

    The taste experience of these pancakes is nothing short of divine. Imagine biting into a stack of light and airy pancakes, each forkful melting in your mouth, with a lingering hint of buttermilk’s gentle tanginess. As you savor the bite, the swirl of vanilla and cinnamon reveals itself, offering a sweet, aromatic surprise that feels like a warm embrace. These pancakes are a perfect balance of soft, fluffy texture and rich, fragrant flavor — a delightful indulgence for any breakfast or brunch.

    Ingredients

    • 1 cup all-purpose flour
    • 2 tablespoons sugar
    • 1 teaspoon baking powder
    • 1/2 teaspoon salt
    • 1 egg, beaten until fluffy
    • 1 cup buttermilk
    • 2 tablespoons melted margarine
    • 1 teaspoon vanilla extract
    • 1 teaspoon ground cinnamon
    • 1 tablespoon honey

    Instructions

    1. In a large mixing bowl, combine the flour, sugar, baking powder, and salt. Stir to blend the dry ingredients evenly.
    2. In a separate bowl, beat the egg until fluffy. Add the buttermilk and melted margarine, whisking them together until well combined.
    3. Gently pour the wet ingredients into the dry ingredients, stirring just until the batter comes together. Be careful not to overmix; a few lumps are okay.
    4. In a small bowl, mix the vanilla extract, ground cinnamon, and honey to create the swirl mixture.
    5. Fold the cinnamon-vanilla mixture into the batter using a spatula, making sure to create a swirl rather than fully incorporating it into the batter.
    6. Heat a heavy griddle or fry pan over medium heat. Lightly grease with butter on a paper towel.
    7. Test the pan’s readiness by sprinkling a few drops of water on it. If the drops dance and sizzle, it’s hot enough for cooking.
    8. Pour approximately 1/4 cup of batter onto the griddle for each pancake. Use the back of a spoon to spread out the batter if needed.
    9. Cook until bubbles appear on the surface and begin to break, about 2-3 minutes. The edges should look set and slightly dry.
    10. Flip the pancake carefully and cook the other side until golden-brown, about 1-2 minutes more.
    11. Repeat with the remaining batter, adjusting heat as necessary to maintain consistent cooking.

    Pro Tips from Meaghan’s Kitchen

    • If you don’t have buttermilk on hand, make your own by adding a tablespoon of lemon juice or vinegar to one cup of milk. Let it sit for 5 minutes before using.
    • Avoid overmixing the batter to keep the pancakes tender and fluffy. Lumps are your friends in this case!
    • Use a non-stick griddle or well-seasoned cast iron skillet for even cooking and easy flipping.
    • For an extra cinnamon burst, dust the pancakes with a little cinnamon sugar before serving.
    • To keep pancakes warm while cooking the rest, place them on a baking sheet in a low oven (around 200°F).

    Variations & Dietary Swaps

    • Gluten-Free Option: Substitute the all-purpose flour with a gluten-free flour blend. Ensure the blend contains xanthan gum for structure.
    • Spice-It-Up Version: Add a pinch of cayenne pepper to the cinnamon swirl for a subtle kick.
    • Kids-Friendly Version: Top pancakes with a smiley face made from banana slices and chocolate chips for added fun.

    What to Serve With It

    These Fluffy Buttermilk Pancakes with Vanilla-Cinnamon Swirl pair beautifully with a tall glass of freshly squeezed orange juice or a hot chai latte. The citrusy freshness of the orange juice complements the warm notes of cinnamon, while a chai latte adds an extra layer of spice to your breakfast spread. For a hearty meal, consider serving with crispy bacon or a side of seasonal fruit.

    Storage & Meal Prep

    If you have leftovers (though it’s rare!), store the pancakes in an airtight container in the refrigerator for up to 3 days. For longer storage, stack pancakes with parchment paper between each layer and freeze in a zip-top bag for up to 3 months. Reheat in the oven at 350°F until warmed through or pop them in the toaster for a quick refresh.

    FAQ

    Can I make the batter the night before?

    Yes, you can prepare the batter in advance. Store it in the refrigerator and give it a gentle stir before cooking. The buttermilk may thicken the batter slightly overnight, so you might need to add a splash of milk to loosen it.

    Can I use whole wheat flour instead of all-purpose flour?

    Absolutely! Whole wheat flour will give the pancakes a nuttier flavor and denser texture. You might need to add a bit more buttermilk to achieve the desired batter consistency.

    What toppings go well with these pancakes?

    The possibilities are endless! Fresh berries, whipped cream, nuts, and maple syrup are classic choices. For a decadent treat, try a dollop of mascarpone cheese and a drizzle of warm caramel sauce.

    Why are my pancakes not fluffy?

    If your pancakes aren’t as fluffy as expected, check your baking powder’s expiration date — it might have lost its leavening power. Also, avoid overmixing the batter, as this can lead to dense pancakes.

    Final Thoughts

    These Fluffy Buttermilk Pancakes with Vanilla-Cinnamon Swirl are more than just breakfast; they’re a delightful way to start any day with a smile. I hope this recipe brings as much joy to your kitchen as it does to mine. If you give it a try, I’d love to hear how it turned out — feel free to leave a comment below or share your pancake creations on social media. Happy cooking, and may your mornings be full of warmth and deliciousness!

    Related update: Fluffy Buttermilk Pancakes with Vanilla-Cinnamon Swirl

    Related update: Spicy Maple Andouille Sausage and Sweet Potato Hash

  • Banana Blueberry Pancakes with Lemon Ricotta and Almond Crunch | Made by Meaghan Moineau

    Banana Blueberry Pancakes with Lemon Ricotta and Almond Crunch | Made by Meaghan Moineau

    Banana Blueberry Pancakes with Lemon Ricotta and Almond Crunch

    Picture this: a lazy Sunday morning, rays of sunlight streaming through your kitchen window, the air filled with the irresistible aroma of pancakes sizzling on the griddle. These aren’t just any pancakes; these are Banana Blueberry Pancakes with Lemon Ricotta and Almond Crunch — a delightful symphony of flavors and textures that will make your taste buds dance.

    Personal Story

    I still remember the first time I tried to make pancakes from scratch. I was a teenager, determined to surprise my family with a breakfast that would rival the best brunch spots in town. Armed with a basic recipe I found online, I embarked on what I thought would be a simple task. But as it turns out, my youthful confidence didn’t quite match my kitchen skills. The batter was too runny, the pancakes were either overcooked or raw in the middle, and my family graciously ate them with forced smiles. That day taught me a valuable lesson: great pancakes require a little finesse.

    Fast forward a few years, and I’ve become somewhat of a pancake aficionado, constantly tweaking and experimenting until I landed on a recipe that not only works but shines. The inspiration for these Banana Blueberry Pancakes with Lemon Ricotta and Almond Crunch came on a whim. I was at the farmer’s market, surrounded by the bounty of fresh produce, when I spotted some ripe bananas and plump blueberries. Suddenly, I was transported back to the kitchen mishap of my teenage years, but this time, I was armed with experience and a spark of creativity.

    By adding lemon zest and ricotta cheese to the mix, I discovered a way to bring brightness and creaminess to the pancakes. The sliced almonds, toasted with honey and a touch of salt, add a delightful crunch to contrast the pillowy softness of the pancakes. It’s a recipe that feels like a hug on a plate, and it’s become a beloved staple in my home.

    These pancakes aren’t just about satisfying hunger; they’re about creating a moment — a pause in the hustle and bustle of life to savor something truly special. And today, I’m thrilled to share this journey and recipe with you.

    What Makes This Version Special

    This isn’t just your average stack of pancakes. What sets these Banana Blueberry Pancakes apart is the infusion of **zesty lemon ricotta** and a **crunchy almond topping**. The lemon zest and ricotta bring a tangy creaminess that elevates the humble pancake into something utterly irresistible. Meanwhile, the almond crunch, with its honey-kissed golden edges, adds texture and a touch of sophistication. These aren’t just breakfast pancakes; they’re an experience, a delicious departure from the norm.

    Flavor Profile

    Every bite of these pancakes is a delightful journey through layers of flavor and texture. The soft, fluffy pancakes are punctuated with bursts of sweet, juicy blueberries and creamy banana. The lemon ricotta adds a subtle citrusy zing, complementing the natural sweetness of the fruits. And then, there’s the almond crunch — nutty, slightly salty, with a hint of honey that ties everything together. It’s a symphony of taste and texture that dances on your palate, leaving you craving another bite.

    Ingredients

    • 3 whole eggs
    • 1/2 cup water
    • 2 tablespoons liquid coconut oil
    • 1/3 cup coconut flour
    • 1 teaspoon cream of tartar
    • 1/2 teaspoon ground cinnamon
    • 2 ripe bananas, mashed
    • 1 cup frozen blueberries
    • 1 tablespoon **lemon zest**
    • 1/2 cup **ricotta cheese**
    • 1/4 cup **sliced almonds**
    • 1 tablespoon **honey**
    • 1 teaspoon vanilla extract

    Instructions

    1. In a large mixing bowl, beat the eggs for 1 minute until they are fluffy and pale. This helps create a lighter pancake.
    2. Add the water, liquid coconut oil, and coconut flour to the eggs. Whisk together until the mixture is smooth and lump-free. Allow the batter to sit for 5 minutes so the coconut flour can absorb the liquid and expand. This step is crucial for achieving a tender texture.
    3. Mix in the cream of tartar, ground cinnamon, and mashed bananas. Whisk until combined, ensuring the bananas are evenly distributed.
    4. Gently fold in the frozen blueberries with a spatula. Be careful not to over-mix, as this can lead to tough pancakes.
    5. Fold the lemon zest and ricotta cheese into the batter just before cooking. This ensures the fresh lemon flavor stands out.
    6. In a skillet over medium heat, toast the sliced almonds with honey and a pinch of salt, stirring frequently until they’re golden and fragrant. Remove from the skillet and set aside.
    7. Heat a little oil or butter in the same skillet over medium to low heat. Ladle 1/2 cup of batter for each pancake onto the hot skillet. Cook for about 5 minutes on one side, or until bubbles form and the edges look set.
    8. Flip the pancakes and cook the other side until they are golden-brown and cooked through, about 3 more minutes.
    9. Repeat the process until all the batter is used, keeping the cooked pancakes warm in an oven on low heat if desired.
    10. Serve the pancakes topped with the toasted almond crunch and a drizzle of maple syrup if desired.

    Pro Tips from Meaghan’s Kitchen

    • For extra fluffy pancakes, make sure your eggs are at room temperature before you start.
    • Don’t rush the resting phase of the batter; it’s key for the coconut flour to do its magic.
    • If you find your batter too thick after resting, add a splash more water to reach your desired consistency.
    • Use a non-stick skillet and a light hand with the oil to ensure perfectly golden pancakes every time.
    • Experiment with different nut toppings like pecans or walnuts for a twist on the almond crunch.

    Variations & Dietary Swaps

    If you’re looking to make these Banana Blueberry Pancakes with Lemon Ricotta and Almond Crunch your own, here are a few ideas:

    • Vegetarian Swap: Substitute the honey in the almond crunch with maple syrup or agave nectar.
    • Spice-It-Up Version: Add a pinch of nutmeg or cardamom to the batter for a warming spice note.
    • Kids-Friendly Version: Top the pancakes with a dollop of whipped cream and rainbow sprinkles for a fun twist that kids will love.

    What to Serve With It

    These pancakes are a meal in themselves, but why not make breakfast even more special? Serve them with a frothy cappuccino for a classic pairing, or try an iced matcha latte for a refreshing contrast. Fresh fruit or a side of crispy bacon would also complement the pancakes beautifully.

    Storage & Meal Prep

    If you find yourself with leftovers (a rare occurrence, I assure you), these pancakes store beautifully. Stack them with parchment paper in between each pancake and store in an airtight container in the fridge for up to 3 days. For longer storage, freeze them in a single layer before transferring to a freezer bag. To reheat, simply pop them in the toaster or a warm oven until heated through.

    FAQ

    Can I use fresh blueberries instead of frozen?

    Absolutely! Fresh blueberries work just as well. Just be gentle when folding them into the batter to avoid bursting them.

    Can I make the batter ahead of time?

    It’s best to prepare the batter fresh, but you can mix the dry ingredients a day ahead. Add wet ingredients just before cooking for optimal texture.

    What if I don’t have coconut flour?

    You can substitute with all-purpose flour or almond flour, but you’ll need to adjust the liquid amounts as coconut flour is more absorbent.

    How do I prevent pancakes from sticking?

    Ensure your skillet is hot before adding the batter and use a non-stick pan or a well-greased surface to prevent sticking.

    Can I skip the almond crunch?

    While the almond crunch adds a delightful texture, you can skip it or substitute with another nut or seed topping for a different crunch.

    Final Thoughts

    Cooking is about more than just following a recipe; it’s about creating memories and savoring moments. These Banana Blueberry Pancakes with Lemon Ricotta and Almond Crunch are not just a delicious breakfast treat — they’re an invitation to pause, enjoy, and share with those you love. I hope you’ll give this recipe a try, and I’d love to hear your thoughts. Did you add your own twist? Let me know in the comments below or share your pancake creations on social media. Happy cooking!

    Related update: Banana Blueberry Pancakes with Lemon Ricotta and Almond Crunch

    Related update: Fluffy Buttermilk Pancakes with Vanilla-Cinnamon Swirl

  • Chocolate Chip Coconut Muffins | Made by Meaghan Moineau

    Chocolate Chip Coconut Muffins | Made by Meaghan Moineau

    Chocolate Chip Coconut Muffins

    There’s something utterly magical about the combination of chocolate and coconut. It takes me back to my childhood, where weekend mornings meant waking up to the smell of freshly baked goods. My mom would often whip up a batch of her famous muffins, the aroma wafting through the house and luring sleepy-eyed kids to the kitchen. These Chocolate Chip Coconut Muffins capture that essence perfectly, offering a delightful blend of flavors that are both comforting and indulgent.

    Why You’ll Love It

    These muffins are designed to be loved by everyone, from kids to adults. The combination of dark chocolate chips and coconut flakes provides a rich and decadent taste, while the coconut butter adds a moistness that can’t be beaten. They’re gluten-free, using almond milk and a delicate blend of gluten-free flour, making them suitable for those with dietary restrictions without sacrificing flavor or texture. Plus, they are surprisingly easy to whip up, making them perfect for a quick morning treat or an afternoon snack.

    Ingredients

    • Coconut butter
    • Eggs
    • Almond milk
    • Vanilla extract
    • Gluten-free flour
    • Sucanat
    • Baking powder
    • Sea salt
    • Dark chocolate chips
    • Coconut flakes

    Instructions

    1. Preheat your oven to 350°F (175°C) and line a muffin tin with paper liners.
    2. In a large bowl, mix coconut butter and sucanat until smooth.
    3. Add eggs, almond milk, and vanilla extract, and beat until well combined.
    4. In another bowl, whisk gluten-free flour, baking powder, and sea salt.
    5. Gradually add the dry ingredients to the wet mixture, stirring until just combined.
    6. Fold in the dark chocolate chips and coconut flakes.
    7. Spoon the batter into the prepared muffin tin, filling each cup about two-thirds full.
    8. Bake for 18-22 minutes or until a toothpick inserted into the center of a muffin comes out clean.
    9. Let the muffins cool in the tin for a few minutes, then transfer to a wire rack to cool completely.

    For detailed step-by-step instructions, visit my blog.

    Tips

    For the best results, make sure your coconut butter is at room temperature. This will help it blend more easily with the other ingredients. If you want a more intense coconut flavor, lightly toast the coconut flakes before folding them into the batter. Additionally, using high-quality dark chocolate chips will enhance the overall flavor of the muffins.

    Variations & Substitutions

    If you’re looking to mix things up, try adding a handful of chopped nuts, like almonds or pecans, for added crunch. For a lower sugar option, you can replace sucanat with your preferred sugar alternative, such as coconut sugar or a sugar-free sweetener. If you don’t have almond milk, any other plant-based milk will work just as well.

    Storage

    These muffins are best enjoyed fresh, but they can be stored in an airtight container at room temperature for up to three days. For longer storage, you can freeze them for up to three months. To defrost, simply leave them at room temperature or warm them up in the oven for a few minutes.

    FAQ

    Can I use regular flour instead of gluten-free flour?

    Yes, you can substitute all-purpose flour for gluten-free flour in this recipe if gluten is not a concern for you. The muffins will still turn out delicious!

    Is there an egg substitute for this recipe?

    If you’re looking for an egg-free version, you can try using flax eggs. Mix one tablespoon of ground flaxseed with three tablespoons of water for each egg, let it sit until it becomes gelatinous, and use it as a direct substitute for the eggs in the recipe.

    Can I use sweetened coconut flakes?

    While you can use sweetened coconut flakes, it will make the muffins sweeter. If you prefer a less sweet muffin, stick with unsweetened coconut flakes or adjust the amount of sucanat used in the batter.

    Nutrition

    These muffins are a delightful treat with a healthy twist. They are packed with healthy fats from the coconut butter and almond milk, and they provide a good dose of fiber and antioxidants from the dark chocolate. Each muffin offers a balance of carbohydrates, protein, and fat, making it a satisfying snack or breakfast option.

    Final Thoughts

    Chocolate Chip Coconut Muffins are a testament to how simple ingredients can create something truly special. Whether you’re making them for a family gathering, a casual brunch, or just because, these muffins are sure to bring smiles and a bit of nostalgia to your table. I hope this recipe brings you as much joy as it has brought me and my family. Happy baking!

    Related update: Chocolate Chip Coconut Muffins

    Related update: Bourbon-Infused Mini Cherry Pies with Pecan Streusel

    Related update: Banana Blueberry Pancakes with Lemon Ricotta and Almond Crunch