Author: Meaghan Moineau

  • Steamed Clams In Wine and Chorizo | Made by Meaghan Moineau

    Steamed Clams In Wine and Chorizo | Made by Meaghan Moineau

    Steamed Clams in Wine and Chorizo

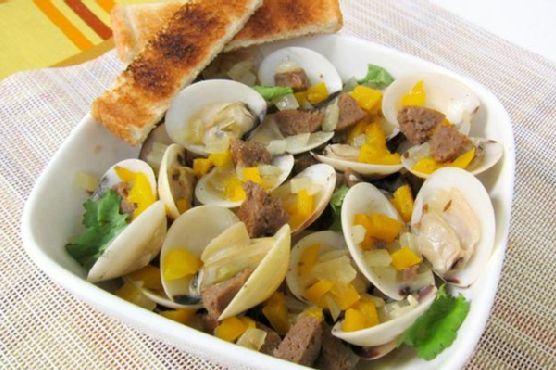
    Welcome to my kitchen! Today, I’m excited to share with you a recipe that carries a special place in my heart: Steamed Clams in Wine and Chorizo. This dish is a delightful fusion of flavors that brings back fond memories of summer evenings spent by the seaside. I remember the first time I enjoyed this dish was during a family vacation in Spain. We gathered around a big table, the sea breeze gently brushing against our faces, as we eagerly dipped crusty bread into the rich, savory broth. It was an experience that made me fall in love with the simplicity and charm of this meal. Now, I’m thrilled to recreate this dish with you, bringing a taste of the coast into your home.

    Why You’ll Love It

    This recipe is a magnificent blend of simplicity and flavor that captures the essence of coastal dining. The savory chorizo complements the briny clams perfectly, while the hint of cumin and the vibrant freshness of cilantro add depth and complexity. Plus, it’s a one-pot dish, making it both convenient and quick to prepare. Whether you’re hosting a dinner party or enjoying a cozy night in, this dish is sure to impress and delight your guests.

    Ingredients

    • 1 Spanish chorizo, cut into slices
    • 1 teaspoon cumin seeds
    • 1 cup dry white wine
    • 1/4 cup fresh cilantro, chopped
    • 1 garlic clove, minced
    • 2 pounds little neck clams, scrubbed
    • 2 tablespoons olive oil
    • 1 onion, diced
    • 1/2 teaspoon salt
    • 1 yellow bell pepper, diced

    Instructions

    1. Heat the olive oil in a deep pot over moderate heat. Add the onion, yellow bell pepper, garlic, cumin seeds, and salt. Cook, stirring occasionally, until the vegetables are softened, about 7 to 9 minutes.
    2. Stir in the dry white wine and bring the mixture to a boil.
    3. Add the clams and chorizo to the pot. Cover and boil until the clams open, approximately 7 to 8 minutes. Discard any clams that do not open.
    4. Season the dish with freshly cracked pepper and stir in the chopped cilantro.
    5. Serve the clams with some crusty bread to sop up the delicious sauce.

    Tips

    For the best results, ensure your clams are fresh. They should have a pleasant, briny smell and be tightly closed. If any are open, give them a tap; they should close. If not, discard them. Additionally, don’t skip the crusty bread! It’s perfect for soaking up the flavorful broth and makes the meal truly satisfying.

    Variations & Substitutions

    If you’re not a fan of cilantro, you can swap it for fresh parsley, which will also add a nice herbaceous note. Feel free to experiment with different types of chorizo or even replace it with another smoked sausage if you prefer a milder flavor. For a spicier kick, add a pinch of red pepper flakes to the pot along with the cumin seeds.

    Storage

    If you have leftovers, store them in an airtight container in the refrigerator for up to two days. To reheat, gently warm them in a saucepan over low heat, adding a splash of water or broth if needed to restore the sauce’s consistency. However, this dish is best enjoyed fresh, as reheating can sometimes affect the texture of the clams.

    FAQ

    Can I use frozen clams?

    While fresh clams are recommended for the best flavor and texture, you can use frozen clams in a pinch. Just make sure they’re fully thawed before cooking, and adjust the cooking time as needed.

    What type of white wine should I use?

    A dry white wine like Sauvignon Blanc or Pinot Grigio works wonderfully in this recipe, adding a crisp acidity that pairs beautifully with the briny clams and rich chorizo.

    Nutrition

    This dish is not only delicious but also a good source of protein and essential nutrients. Clams are high in iron and vitamin B12, while chorizo adds flavorful fats and proteins. Just be mindful of the sodium content, especially if you’re watching your salt intake.

    Final Thoughts

    Steamed Clams in Wine and Chorizo is more than just a dish; it’s an invitation to experience the flavors of the sea, the warmth of the chorizo, and the comfort of a home-cooked meal. I hope that as you prepare and share this recipe with your loved ones, it brings as much joy and fond memories to your table as it has to mine. Bon appétit!

    Related update: Steamed Clams In Wine and Chorizo

    Related update: Masala-Tofu Burger

    Related update: Steak with lemon and capers
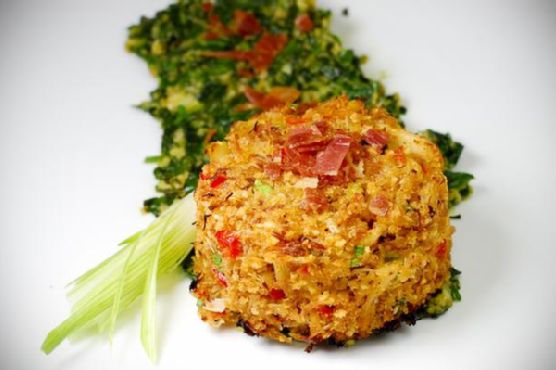
  • Crab Cakes Rockefeller | Made by Meaghan Moineau

    Crab Cakes Rockefeller | Made by Meaghan Moineau

    Crab Cakes Rockefeller

    There’s something inherently special about the combination of flavors in a classic dish like Crab Cakes Rockefeller. I remember the very first time I tasted crab cakes during a summer vacation at the coast with my family. The crispy exterior and tender, savory interior were a revelation to my taste buds. Years later, I decided to recreate that magic at home, adding my own twist by merging it with the robust, green flavors of Rockefeller-style toppings. The result? A dish that brings back fond memories and creates new ones every time I serve it.

    Why You’ll Love It

    This Crab Cakes Rockefeller recipe is a delightful fusion of textures and flavors. The crab cakes themselves are tender with a hint of sweetness from honey and heat from chili powder, while the Rockefeller topping adds a savory, garlicky depth. Each bite is a harmonious blend of crispy, creamy, and green, reminiscent of a coastal getaway. Plus, it’s a versatile dish that works as an appetizer, main course, or even a fancy brunch option. You’ll love how easy it is to prepare and how impressive it looks on the plate!

    Ingredients

    • Canned lump crab claw meat
    • Red diced bell pepper
    • Diced green onions
    • Bread crumbs
    • Honey
    • Chili powder
    • Unsalted butter
    • Bacon
    • Baby spinach
    • Watercress stems
    • Garlic
    • Black salt & pepper

    Instructions

    1. Preheat your oven to 375°F and set the top rack to the middle position. This recipe is a great toaster oven candidate as well.
    2. Line a baking sheet with aluminum foil or a nonstick cooking mat.
    3. In a large bowl, combine the crab meat, diced red bell pepper, half of the diced green onion (reserving the other half), and half of the bread crumbs (reserving the other half).
    4. Mix in the honey and chili powder, then season to taste with salt and pepper.
    5. Form the crab cakes by pressing them into a 1/2 cup measure, squeezing tightly so they hold their shape. You can also mold them with your hands, but be sure to press them together tightly.
    6. Arrange the crab cakes on the lined baking sheet, leaving at least 1 inch between each crab cake.
    7. Using an olive oil sprayer (or by drizzling olive oil), lightly coat the outside of each crab cake. This will help with browning and forming an outer crust.
    8. Bake at 375°F for 25 minutes, or until golden brown.
    9. Meanwhile, fry the bacon in a large skillet until crispy. Set aside to drain, then crumble into small pieces using a sharp knife.
    10. Finely chop the spinach and watercress stems.
    11. In a large skillet, melt the butter over medium heat. Add the garlic and sauté for 1 minute.
    12. Add the remaining green onion, bread crumbs, and watercress stems. Sauté for 1 minute more.
    13. Finally, add the chopped spinach and cook until wilted, 1-2 minutes. Season to taste with salt and pepper.
    14. To serve, plate a crab cake atop a smear of the spinach mixture, then sprinkle the whole plate with crumbled bacon.

    Tips

    For best results, ensure your crab meat is well-drained to prevent the mixture from becoming too wet. When forming the crab cakes, pressing them tightly helps them hold together better during cooking. If you’re using fresh crab meat, give it a gentle squeeze to remove excess moisture. Additionally, resist the temptation to flip the crab cakes while baking; this ensures they develop a beautiful golden crust.

    Variations & Substitutions

    If you want to switch things up, consider using prosciutto instead of bacon for a slightly different flavor profile. You can also substitute arugula for watercress if you’re looking for a milder taste. For a gluten-free version, use gluten-free bread crumbs. Feel free to adjust the level of heat by adding more or less chili powder according to your preference.

    Storage

    Leftover crab cakes can be stored in an airtight container in the refrigerator for up to 3 days. To reheat, place them in a preheated oven at 350°F for about 10 minutes or until warmed through. Alternatively, you can freeze the crab cakes before baking. Just form the cakes, place them on a baking sheet, and freeze until solid. Then, transfer them to a freezer bag. Bake from frozen, adding an additional 5 minutes to the cooking time.

    FAQ

    Can I use fresh crab meat instead of canned?

    Absolutely! Fresh crab meat will work beautifully in this recipe. Just be sure to pick through it to remove any shell fragments and drain any excess liquid to avoid a soggy mixture.

    What can I serve with Crab Cakes Rockefeller?

    These crab cakes pair wonderfully with a simple green salad or roasted vegetables. For a heartier meal, consider serving them alongside a creamy risotto or buttery mashed potatoes. A crisp white wine or a light, refreshing cocktail makes for a perfect beverage companion.

    Nutrition (if applicable)

    Each serving of Crab Cakes Rockefeller (assuming 4 servings) contains approximately:

    • Calories: 450
    • Protein: 15g
    • Carbohydrates: 20g
    • Fat: 32g
    • Fiber: 3g
    • Sugar: 6g
    • Sodium: 560mg

    Final Thoughts

    Crab Cakes Rockefeller is a recipe that effortlessly combines elegance with comfort, making it a wonderful choice for both special occasions and everyday indulgence. Whether you’re reminiscing about past seaside adventures or creating new culinary traditions, this dish is sure to bring joy to your table. I hope you enjoy making and sharing it with those you love as much as I do. Bon appétit!

    Related update: Crab Cakes Rockefeller

    Related update: Steamed Clams In Wine and Chorizo

    Related update: Fava Crostini

  • Smokey Rainbow Chili | Made by Meaghan Moineau

    Smokey Rainbow Chili | Made by Meaghan Moineau

    Smokey Rainbow Chili

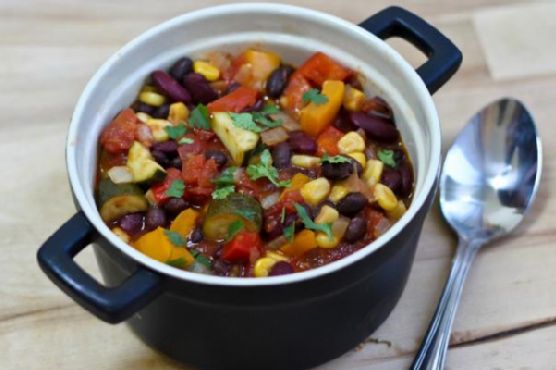
    Welcome to a warming bowl of Smokey Rainbow Chili, a dish that brings together the vibrant hues of a rainbow with the comforting smokiness of paprika. Whether you’re new to cooking or a seasoned chef, this chili is bound to become a staple in your culinary repertoire. Let me take you through why you’ll love it, and how you can make it your own.

    Why You’ll Love It

    Growing up, chili was the dish my family turned to on cool autumn evenings. I still vividly remember the aroma wafting through the house, enticing everyone to gather around the table. This Smokey Rainbow Chili captures the essence of those heartwarming moments, but with a modern twist. The addition of smoked paprika and an array of colorful vegetables makes this dish not only visually appealing but also incredibly flavorful.

    You’ll love this recipe because it’s:

    • Colorful: The vibrant mix of vegetables creates a feast for the eyes.
    • Flavorful: Smoked paprika and chili powder add depth and warmth.
    • Flexible: Easily adapted for meat lovers or kept vegetarian.
    • Nutritious: Packed with fiber and protein, it’s a wholesome meal in a bowl.

    Ingredients

    • Olive oil
    • Zucchini
    • Red bell pepper
    • Orange bell pepper
    • Diced fresh jalapeno pepper
    • Garlic
    • Onion
    • Canned stewed tomatoes
    • Canned tomato paste
    • Canned black beans
    • Canned whole kernel corn
    • Canned red kidney beans
    • Smoked paprika
    • Chili powder
    • Dried oregano
    • Black ground pepper
    • Cayenne pepper

    Instructions

    1. If using meat, brown the meat really well in the heated oil, remove and set aside. Add the meat after sautéing the veggies.
    2. Heat oil in a large pot over medium-high heat.
    3. Stir in zucchini, red bell pepper, orange bell pepper, jalapeno, garlic, and onion. Cook for 5 minutes, just until tender.
    4. Add tomatoes with liquid, tomato paste, black beans, corn, and kidney beans into the pot.
    5. Season with smoked paprika, chili powder, oregano, black pepper, and cayenne pepper.
    6. Bring to a boil. Reduce heat to low and simmer for 1 hour, stirring occasionally. Depending on how big you cut the veggies, you may want to let it simmer a little longer.

    Tips

    Here are some tips to ensure your Smokey Rainbow Chili turns out perfect every time:

    • Prep Ahead: Chop all your vegetables beforehand to make the cooking process smoother.
    • Adjust Spice Level: Control the heat by adjusting the amount of jalapeno and cayenne pepper.
    • Simmer Longer: If you have time, let the chili simmer longer for an even richer flavor.

    Variations & Substitutions

    This recipe is incredibly adaptable. Here are some ideas for variations and substitutions:

    • Add Meat: Include browned ground beef or turkey for a meatier version.
    • Go Vegan: Ensure ingredients like tomato paste are vegan-friendly, and add more vegetables like mushrooms or carrots.
    • Swap Beans: Use chickpeas or pinto beans if you prefer.
    • Extra Smokiness: Add a pinch of liquid smoke for an intensified smokey flavor.

    Storage

    Store your Smokey Rainbow Chili in an airtight container in the fridge for up to 4 days. It also freezes well; just portion it into freezer-safe containers and freeze for up to 3 months. Reheat gently on the stove or in the microwave until piping hot throughout.

    FAQ

    Can I make this chili in advance?

    Absolutely! In fact, chili often tastes better the next day as the flavors meld together. Simply reheat it on the stove or in the microwave before serving.

    What can I serve with Smokey Rainbow Chili?

    This chili pairs wonderfully with crusty bread, over rice, or topped with avocado and cheese for extra creaminess.

    Is this recipe suitable for meal prep?

    Yes, it’s perfect for meal prep. Divide into portions and store in the fridge or freezer for quick, nutritious meals throughout the week.

    Nutrition

    This Smokey Rainbow Chili is a nutritious powerhouse. Each serving is rich in fiber and protein, thanks to the variety of vegetables and beans. It’s a great choice for those seeking a balanced, wholesome meal.

    Final Thoughts

    Smokey Rainbow Chili is more than just a dish; it’s a comforting embrace in a bowl, filled with vibrant colors and rich flavors. Whether you’re sharing it with family or enjoying it solo, this chili is sure to bring warmth to your table. I hope this recipe becomes a beloved part of your culinary adventures just as it has in mine. Enjoy the journey of cooking and savoring each spoonful!

    Related update: Smokey Rainbow Chili

  • Salsa Verde By Mommie Cooks | Made by Meaghan Moineau

    Salsa Verde By Mommie Cooks | Made by Meaghan Moineau

    Salsa Verde By Mommie Cooks

    Why You’ll Love It

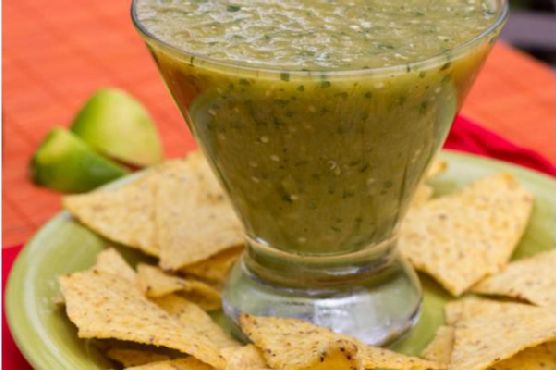
    There’s something magical about the zesty taste of homemade salsa verde. This recipe, handed down from my dear mother, has been a family favorite for as long as I can remember. Growing up, I would watch her expertly blend the ingredients, filling our kitchen with the fresh, invigorating aroma of tomatillos and cilantro. Each time I make it, I’m transported back to those sun-drenched afternoons in the kitchen, eagerly awaiting a taste of the vibrant green salsa. This is more than just a condiment; it’s a cherished memory, and I’m delighted to share it with you.

    You’ll love this salsa because it’s incredibly versatile, bursting with flavor, and simple to prepare. Whether you’re a seasoned cook or a kitchen novice, this recipe will quickly become a staple in your culinary repertoire. Perfect for dipping, drizzling over tacos, or topping grilled meats, this salsa verde is a refreshing addition to any meal.

    Ingredients

    • 1 pound of tomatillos, husked
    • 1/2 cup vegetable broth
    • 1 teaspoon cumin
    • 1 teaspoon coriander
    • Juice of one lime
    • 2 garlic cloves
    • 1 can of green diced chiles
    • 1 small onion, chopped
    • 1/2 cup fresh cilantro
    • 1/2 teaspoon pepper
    • Salt to taste

    Instructions

    1. Remove the husks from the tomatillos and rinse them under warm water to remove any sticky residue.
    2. Place the tomatillos in a pot of boiling water and cook for about 5-7 minutes until they are tender.
    3. Carefully remove the tomatillos from the pot and transfer them to a blender.
    4. To the blender, add the vegetable broth, cumin, coriander, lime juice, garlic cloves, green diced chiles, chopped onion, fresh cilantro, and pepper.
    5. Blend the ingredients until smooth and well combined.
    6. Taste the salsa and add salt as needed.
    7. Transfer the salsa to a bowl and chill in the fridge until you’re ready to serve.

    Tips

    For the best flavor, use fresh tomatillos that are firm and vibrant green. When selecting cilantro, look for bright, unwilted leaves. If you like your salsa with a bit more heat, consider adding a jalapeño or two to the mix. Be sure to taste your salsa as you go and adjust the seasonings to fit your preference. Remember, the key to a great salsa is balancing the acidity, heat, and saltiness to create a harmonious blend of flavors.

    Variations & Substitutions

    If you’re looking to switch things up, here are a few variations you might enjoy:

    • Roasted Tomatillos: For a deeper, smokier flavor, try roasting the tomatillos under a broiler until they are charred before blending.
    • Avocado Salsa Verde: Add a ripe avocado to the blender for a creamy twist that pairs beautifully with the tangy tomatillos.
    • Herb Substitutions: If cilantro isn’t your favorite, you can substitute with parsley or a mix of parsley and mint for a different herbal note.

    Storage

    This salsa verde can be stored in an airtight container in the refrigerator for up to a week. If you find yourself with extra, you can also freeze it. Pour the salsa into a freezer-safe container, leaving a bit of space at the top to allow for expansion, and freeze for up to three months. Thaw in the refrigerator before serving.

    FAQ

    Can I use canned tomatillos?

    While fresh tomatillos yield the best flavor and texture, you can use canned tomatillos in a pinch. Be sure to drain them well before blending.

    Is salsa verde spicy?

    This salsa verde has a mild heat thanks to the green chiles. If you prefer a spicier salsa, feel free to add more chiles or include a jalapeño or serrano pepper.

    What dishes pair well with salsa verde?

    Salsa verde is incredibly versatile and pairs well with a variety of dishes. Try it over grilled chicken, fish, or pork. It’s also delicious as a topping for tacos, enchiladas, or nachos.

    Nutrition

    This recipe is not only delicious but also a healthy choice. Packed with vitamins from the tomatillos and cilantro, and low in calories, it’s a guilt-free addition to any meal. Each serving is rich in antioxidants and offers a good dose of vitamin C, making it a nutritious and flavorful option.

    Final Thoughts

    There’s a certain joy in crafting a recipe that has been passed down through generations. This salsa verde is more than just a condiment; it’s a connection to the past, a reminder of family gatherings, and a celebration of fresh, vibrant flavors. I hope you enjoy making and sharing this recipe as much as I do. Whether you’re scooping it with a crispy tortilla chip or drizzling it over your favorite dish, may it bring you as much joy and satisfaction as it has brought to my family for years. Bon appétit!

    Related update: Salsa Verde By Mommie Cooks

  • Chocolate Almond Bark | Made by Meaghan Moineau

    Chocolate Almond Bark | Made by Meaghan Moineau

    Chocolate Almond Bark

    Chocolate Almond Bark is a delightful treat that combines the rich, smooth flavor of chocolate with the crunchy, savory goodness of almonds. This recipe is a favorite in my family, especially around the holidays. I remember my grandmother making a similar version of this bark every Christmas. The aroma of roasted almonds mingling with chocolate would fill the house, and it was the ultimate signal that the festive season had truly begun. Now, I carry on the tradition, adding a few modern twists to the classic recipe.

    Why You’ll Love It

    Chocolate Almond Bark is incredibly easy to make and requires only a handful of ingredients. It’s a perfect balance of sweet and savory, with a hint of spice from the cayenne pepper. This treat makes for a great homemade gift or a delightful snack to enjoy anytime. Plus, it’s a wonderful recipe to make with kids or friends, as it doesn’t require any special culinary skills.

    Ingredients

    • 1 cup raw almonds, chopped
    • 1/4 teaspoon cayenne pepper
    • 12 ounces candy making chocolate
    • 1/2 teaspoon sea salt
    • 1 tablespoon Worcestershire sauce

    Instructions

    1. Preheat your oven to 160 degrees.
    2. In a medium bowl, combine the chopped almonds with the Worcestershire sauce, cayenne pepper, and half of the sea salt. Mix well to ensure the almonds are evenly coated.
    3. Spread the almond mixture onto a baking sheet in a single layer. Roast in the preheated oven for 20 minutes, stirring halfway through to ensure even roasting. Let the almonds cool completely.
    4. While the almonds are cooling, melt the candy making chocolate using a double boiler or in the microwave. If using a microwave, heat the chocolate on low power, stirring every 30 seconds, until smooth.
    5. Once the almonds have cooled, mix them into the melted chocolate until thoroughly combined.
    6. Line an 8 x 8 inch baking pan with wax paper. Pour the chocolate almond mixture into the pan and spread it evenly.
    7. Sprinkle a pinch of the remaining sea salt on top of the chocolate mixture.
    8. Let the chocolate cool and harden at room temperature or in the refrigerator for faster results.
    9. Once set, break the chocolate almond bark into bite-size pieces and enjoy!

    Tips

    To ensure the best results, use high-quality candy making chocolate, as it will melt smoother and provide a richer flavor. When roasting the almonds, keep a close eye on them to prevent burning. If you don’t have a double boiler, a heatproof bowl over a saucepan of simmering water works just as well for melting chocolate.

    Variations & Substitutions

    Feel free to customize this chocolate almond bark to suit your taste preferences. You can substitute the raw almonds with your favorite nuts, such as pecans or walnuts. If you’re not a fan of cayenne pepper, you can omit it, or replace it with a milder spice like cinnamon. For a more indulgent treat, consider adding dried fruits like cranberries or raisins to the mix.

    Storage

    Store your chocolate almond bark in an airtight container at room temperature for up to two weeks. If you prefer your chocolate to be on the firmer side, you can keep it in the refrigerator. Just be sure to let it come to room temperature before serving for the best texture and flavor.

    FAQ

    Can I use dark chocolate instead of candy making chocolate?

    Absolutely! Dark chocolate is a great alternative and will provide a more intense chocolate flavor. Just make sure to use high-quality chocolate for the best results.

    Is it possible to make this recipe vegan?

    Yes, you can make this recipe vegan by substituting the Worcestershire sauce with a vegan version and using a dairy-free chocolate. Ensure that all other ingredients are vegan-friendly as well.

    Nutrition

    While I don’t have the exact nutritional breakdown for this recipe, it’s important to note that almonds are a great source of healthy fats, fiber, and protein. Chocolate, especially dark chocolate, contains antioxidants. However, this is a treat and should be enjoyed in moderation as part of a balanced diet.

    Final Thoughts

    Chocolate Almond Bark is a versatile and delectable treat that’s sure to impress anyone who tries it. With its simple ingredients and straightforward instructions, it’s an easy recipe to whip up for any occasion. Whether you’re indulging on your own or sharing with loved ones, this bark is a delightful way to satisfy your sweet tooth. I hope you enjoy making and tasting this recipe as much as my family and I do. Happy cooking!

    Related update: Chocolate Almond Bark

    Related update: Smokey Rainbow Chili

  • Minestrone | Made by Meaghan Moineau

    Minestrone | Made by Meaghan Moineau

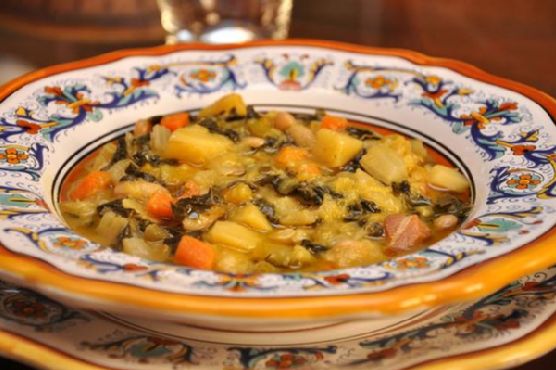
    Minestrone: A Comforting Bowl of Italian Tradition

    There’s something magical about a steaming bowl of minestrone soup that’s hard to put into words. It’s more than just a meal; it’s a nostalgic embrace on a chilly evening, a celebration of fresh vegetables in every spoonful, and a testament to the simplicity of good cooking. I remember my grandmother simmering this hearty soup on the stove, her kitchen filled with the rich aroma of herbs and simmering tomatoes. Those memories of gathering around her table, slurping the warm broth alongside chunks of crusty bread, are treasured moments of comfort and joy.

    Why You’ll Love It

    Minestrone is a versatile and comforting dish that warms the soul. It’s packed with nutritious vegetables, making it not only delicious but also healthy. This recipe is perfect for those who love to experiment with flavors and textures, as it is easily adaptable to whatever ingredients you have on hand. Whether you’re a veteran cook or a kitchen novice, you’ll appreciate how straightforward and rewarding this dish is to make.

    • Nutritious and Filling: Packed with a variety of vegetables, it’s a nutrient-dense meal.
    • Comfort in a Bowl: Perfect for chilly days or when you need a comforting meal.
    • Customizable: You can easily adjust the ingredients to suit your taste or dietary needs.
    • Easy to Make: Simple steps lead to a delicious result, making it perfect for weeknight dinners.

    Ingredients

    • 2 tablespoons butter
    • 2 cups carrots, diced
    • 2 cups celery, diced
    • 2 cups onions, chopped
    • 4 cloves garlic, minced
    • 2 cups cabbage, shredded
    • 1 can (28 ounces) canned tomatoes
    • 6 cups water
    • 1 cup brown rice
    • 2 teaspoons salt
    • 1 teaspoon Worcestershire sauce
    • 1 tablespoon Italian mixed seasoning
    • 1/2 teaspoon pepper
    • 2 cups potatoes, diced
    • 2 beef bouillon cubes
    • 2 cups zucchini, sliced
    • 1 can (15 ounces) canned kidney beans, drained and rinsed
    • 1 cup frozen spinach
    • 1/2 cup Parmesan cheese, grated

    Instructions

    1. Melt butter in a large soup kettle over medium heat.
    2. Add carrots, celery, onions, garlic, and cabbage. Sauté for about 20 minutes, stirring often, until the vegetables are tender.
    3. Stir in canned tomatoes, water, brown rice, salt, Worcestershire sauce, Italian seasoning, pepper, potatoes, bouillon cubes, and zucchini.
    4. Bring the mixture to a boil, then reduce the heat and simmer covered for at least 30 minutes.
    5. Add the kidney beans and frozen spinach. Return the soup to a boil and cook over medium heat until the spinach is cooked through. Add more water if needed to reach your desired consistency.
    6. Serve hot, garnished with grated Parmesan cheese. Enjoy!

    Tips

    • Prep Ahead: Chop your vegetables in advance to make the cooking process quicker and smoother.
    • Consistent Size: Dice your vegetables to a similar size to ensure even cooking.
    • Stir Often: Stir the pot frequently, especially during the initial sauté step, to prevent sticking.

    Variations & Substitutions

    This minestrone soup is highly adaptable. Here are a few ideas to make it your own:

    • Vegetable Substitutions: Feel free to swap in other vegetables such as green beans, peas, or bell peppers.
    • Grain Alternatives: If you’re not a fan of brown rice, try using pasta, quinoa, or barley.
    • Protein Boost: Add cooked chicken or sausage for extra protein.
    • Vegan Version: Use vegetable bouillon cubes and omit the Parmesan cheese.

    Storage

    Minestrone soup stores exceptionally well, making it perfect for meal prep:

    • Refrigerator: Store in an airtight container for up to 5 days.
    • Freezer: Freeze in portioned containers for up to 3 months. Thaw overnight in the refrigerator before reheating.
    • Reheating: Gently reheat on the stovetop over medium heat, adding a splash of water if the soup has thickened too much.

    FAQ

    Can I make this soup in a slow cooker?

    Yes, you can! Simply add all the ingredients except for the kidney beans, spinach, and Parmesan cheese to your slow cooker. Cook on low for 6-8 hours or on high for 3-4 hours. Stir in the beans and spinach in the last 30 minutes of cooking, and garnish with Parmesan before serving.

    What can I serve with minestrone?

    Minestrone is delightful on its own but pairs beautifully with a side of crusty bread, a fresh green salad, or even a cheesy garlic bread for a bit of indulgence.

    Nutrition

    This minestrone soup is not only tasty but also nutritious, packed with vitamins, minerals, and fiber from a variety of vegetables. Each serving (without Parmesan cheese) contains approximately:

    • Calories: 150
    • Protein: 6g
    • Carbohydrates: 30g
    • Fat: 3g
    • Fiber: 7g

    Final Thoughts

    Minestrone is more than just a soup; it’s a warm hug in a bowl. Whether you’re cooking for family, friends, or just yourself, this recipe is sure to bring comfort and satisfaction. Its adaptability and ease of preparation make it a staple in any kitchen, and its rich flavors are bound to make it a favorite in your household. So, gather around the table and enjoy the simple pleasure of a homemade meal that speaks to the heart and soul.

    Related update: Minestrone

    Related update: Kale and Chickpea Soup with Lemon

  • Damn Good Corn Pudding ~from 12 Bones Smokehouse | Made by Meaghan Moineau

    Damn Good Corn Pudding ~from 12 Bones Smokehouse | Made by Meaghan Moineau

    Damn Good Corn Pudding from 12 Bones Smokehouse

    Welcome to another delightful culinary adventure! Today, we’re diving into the soul-satisfying world of corn pudding, a dish that embodies comfort and warmth. Originating from the renowned 12 Bones Smokehouse, this Damn Good Corn Pudding is a crowd-pleaser that combines the sweetness of corn with a subtle spicy kick, creating a perfect harmony of flavors. As we embark on this journey, I’ll also share a cherished memory of how this dish became a staple in my family gatherings.

    Why You’ll Love It

    This corn pudding is not just another side dish; it’s an experience. Here’s why you’ll fall head over heels for it:

    • Perfect Balance: The combination of sweet corn and spicy poblanos ensures every bite is a burst of flavor.
    • Texture Delight: With a texture akin to a moist cake, it’s hearty enough to be a standalone dish yet versatile enough to accompany any meal.
    • Easy to Make: With simple ingredients and straightforward instructions, this dish is beginner-friendly and forgiving.
    • Customizable: You can easily adapt it to suit your taste preferences or dietary needs.
    • Memorable: It’s one of those dishes that sparks conversation and leaves a lasting impression on your taste buds.

    I remember the first time I tasted this corn pudding was at a family reunion. My grandmother, known for her Southern cooking prowess, brought it out as a surprise. The moment she placed it on the table, the room was filled with an inviting aroma that transported us back to our roots. Ever since, it’s been a beloved tradition to have this dish at our gatherings, each time bringing with it a wave of nostalgia and joy.

    Ingredients

    • 1 cup flour
    • 1/2 cup sugar
    • 2 teaspoons baking powder
    • 1/2 teaspoon salt
    • 1/2 teaspoon red pepper flakes
    • 1/2 teaspoon cumin
    • 1/2 teaspoon coriander
    • 3 large eggs
    • 1 stick butter, melted
    • 1 cup heavy cream
    • 2 cans (14.75 oz each) creamed corn
    • 2 diced fresh poblano peppers
    • 1 cup fresh corn kernels

    Instructions

    1. Preheat your oven to 350 degrees F (175 degrees C).
    2. In a mixing bowl, combine the flour, sugar, baking powder, salt, red pepper flakes, cumin, and coriander. Set aside.
    3. In an electric mixer, blend together the eggs, melted butter, heavy cream, and creamed corn until smooth.
    4. Stir in the diced poblano peppers and fresh corn kernels.
    5. Gradually add the dry ingredients to the wet mixture, mixing until just combined. The consistency should resemble cake batter.
    6. Grease a large 11 x 15-inch rimmed baking dish (or two smaller dishes) and pour the pudding mixture into it.
    7. Lightly tent the dish with foil and bake for 1 hour, or until the center is just set. If using smaller pans, bake for 30-40 minutes.
    8. For a golden top, remove the foil in the last 10-15 minutes of baking.
    9. Once done, allow it to cool slightly before serving. Enjoy as a main dish or a side!

    Tips

    • Consistency Check: Ensure your batter is not too thick; it should pour easily but not be runny.
    • Foil Tent: The foil prevents the top from browning too quickly while ensuring the center cooks evenly.
    • Testing Doneness: The pudding should have a slight jiggle in the center when done. It will continue to firm up as it cools.

    Variations & Substitutions

    Feel free to make this recipe your own with these variations:

    • Cheese Lover’s Delight: Add shredded cheddar cheese to the batter for a cheesy twist.
    • Spice It Up: Swap the poblano peppers for jalapeños if you prefer more heat.
    • Vegan Version: Use plant-based butter, coconut cream, and flax eggs for a vegan-friendly option.

    Storage

    To store your corn pudding:

    • Let it cool to room temperature before transferring to an airtight container.
    • Store in the refrigerator for up to 3-4 days.
    • Reheat in the oven at 300 degrees F until warm, or microwave individual portions as needed.

    FAQ

    Can I make this corn pudding ahead of time?

    Absolutely! You can prepare the batter a day in advance and store it in the refrigerator. Just give it a good stir before baking. Alternatively, bake it fully and store it, reheating before serving.

    What can I serve with corn pudding?

    Corn pudding pairs wonderfully with grilled meats, barbecue dishes, or a fresh green salad. It’s versatile enough to complement a wide range of main courses.

    Is it possible to freeze corn pudding?

    Yes, you can freeze corn pudding. Wrap it tightly in plastic wrap and aluminum foil, then store it in the freezer for up to two months. Thaw in the refrigerator overnight before reheating.

    Nutrition

    This recipe serves 8-10 people, depending on portion size. Each serving contains approximately:

    • Calories: 320
    • Fat: 18g
    • Carbohydrates: 35g
    • Protein: 5g
    • Fiber: 2g
    • Sugar: 9g

    Final Thoughts

    This Damn Good Corn Pudding is more than just a recipe; it’s a cherished tradition that brings people together. Whether you’re making it for a holiday feast or a simple family dinner, it’s sure to become a beloved staple in your home too. Feel free to experiment with it and tailor it to your preferences. Happy cooking, and may every bite bring warmth and joy to your table!

    Related update: Damn Good Corn Pudding ~from 12 Bones Smokehouse

  • Chicken Cordon Bleu | Made by Meaghan Moineau

    Chicken Cordon Bleu | Made by Meaghan Moineau

    Chicken Cordon Bleu: A Classic Dish with a Twist

    Welcome to my kitchen! Today, I’m sharing a recipe that brings back fond memories of family gatherings and cozy dinners: Chicken Cordon Bleu. This classic dish, with its crispy exterior and gooey, savory filling, never fails to impress. Whether you’re cooking to impress guests or simply treating yourself to something special, you’ll find this recipe both delightful and rewarding.

    Why You’ll Love It

    Chicken Cordon Bleu is a dish that combines the best of flavors and textures. Imagine tender chicken encasing a melty layer of Swiss cheese and savory ham—it’s pure comfort on a plate. What makes this recipe particularly special is its simplicity and adaptability. No need for complex techniques or obscure ingredients; just straightforward cooking that yields fantastic results. Plus, the satisfaction of slicing into the perfectly cooked roulade is truly unparalleled.

    Ingredients

    • 4 skinless boneless chicken breasts
    • 8 slices of Swiss cheese
    • 8 slices of deli ham
    • 1/2 cup flour
    • 2 eggs
    • 2 tablespoons water
    • 1 cup panko bread crumbs
    • 1 tablespoon fresh thyme leaves
    • 1 teaspoon kosher salt
    • 1/2 teaspoon black pepper
    • 2 tablespoons olive oil

    Instructions

    1. Preheat your oven to 350°F (175°C).
    2. Butterfly the chicken breasts by slicing them in half lengthwise, but do not cut all the way through.
    3. Place each breast between two pieces of plastic wrap. Using the flat side of a meat mallet, gently pound to about 1/4-inch thick, being careful not to tear the meat.
    4. Lay 2 slices of Swiss cheese on each chicken breast, followed by 2 slices of ham, and another 2 slices of cheese, leaving a half-inch margin around the edges.
    5. Tuck in the sides of the chicken and roll it tightly like a jellyroll. Gently squeeze the roll to help seal it.
    6. Season the flour with salt and pepper and spread it on wax paper or a flat dish.
    7. Mix the breadcrumbs with thyme, kosher salt, pepper, and olive oil to help the crust brown nicely.
    8. Beat together the eggs and water until fluid.
    9. Lightly dust each chicken roll with the seasoned flour, dip it into the egg mixture, and then gently coat it with the breadcrumb mixture.
    10. Carefully transfer the rolls to a baking pan and bake for about 20 minutes, or until browned and cooked through.
    11. Serve whole or slice into pinwheels for a beautiful presentation.

    Tips

    To ensure your Chicken Cordon Bleu turns out perfectly, here are a few tips:

    • Even Pounding: Make sure the chicken is evenly pounded to ensure uniform cooking.
    • Sealing the Roll: Tucking in the sides and rolling tightly help keep the cheese and ham contained.
    • Crust Perfection: The olive oil in the breadcrumb mixture is key for a golden crust.

    Variations & Substitutions

    This classic dish is versatile and can be customized to your liking:

    • Cheese: Swap Swiss cheese for Gruyère or mozzarella for a different flavor profile.
    • Ham: Prosciutto is a fantastic alternative, offering a slightly saltier taste.
    • Seasoning: Feel free to add garlic powder or paprika to the breadcrumb mix for an extra kick.

    Storage

    Leftover Chicken Cordon Bleu can be stored in an airtight container in the refrigerator for up to 3 days. To reheat, place it in a preheated oven at 325°F until warmed through. Avoid microwaving as it might make the breadcrumb coating soggy.

    FAQ

    Can I prepare Chicken Cordon Bleu in advance?

    Absolutely! You can prepare the chicken rolls up to the breadcrumb coating step and refrigerate them for up to 24 hours before baking.

    What should I serve with Chicken Cordon Bleu?

    This dish pairs beautifully with a fresh green salad, roasted vegetables, or creamy mashed potatoes.

    Is it possible to make this dish gluten-free?

    Yes, simply substitute the flour and panko bread crumbs with gluten-free alternatives.

    Nutrition

    While Chicken Cordon Bleu is indulgent, it’s also a good source of protein. To make it a bit lighter, you can use reduced-fat cheese and leaner cuts of deli meat.

    Final Thoughts

    Chicken Cordon Bleu is more than just a dish; it’s an experience. From the moment you start preparing it to the first bite, it promises comfort and satisfaction. I hope this recipe brings as much joy to your table as it has to mine. Happy cooking!

    Related update: Chicken Cordon Bleu

  • Curry and Sage Roast Chicken | Made by Meaghan Moineau

    Curry and Sage Roast Chicken | Made by Meaghan Moineau

    Curry and Sage Roast Chicken

    There’s something incredibly heartwarming about the aroma of a roast chicken wafting through the house. It takes me back to Sunday afternoons at my grandmother’s, where the kitchen was a realm of delightful scents and warm embraces. Her roast chicken, seasoned with a blend of herbs and spices, was always the centerpiece of our family gatherings. Inspired by those cherished memories, I’ve created this Curry and Sage Roast Chicken recipe. It’s a dish that not only fills the belly but also warms the soul. Whether you’re cooking for a family dinner or a special occasion, this recipe promises to be a crowd-pleaser.

    Why You’ll Love It

    This Curry and Sage Roast Chicken is a flavorful twist on the classic roast. The combination of curry and fresh sage creates a unique and aromatic profile. Here’s why you’ll fall in love with this dish:

    • Flavorful: The curry adds a mild kick, while the sage provides an earthy balance.
    • Simple Ingredients: Made with pantry staples and fresh herbs.
    • Easy Preparation: A straightforward recipe that requires minimal prep time.
    • Juicy and Tender: The citrus juices keep the chicken moist and succulent.
    • Versatile: Perfect for any occasion, from weeknight dinners to festive gatherings.

    Ingredients

    • 1 whole chicken, cleaned and patted dry
    • 3 tablespoons olive oil
    • Juice of 1 lemon
    • Juice of 1 orange
    • 4 cloves garlic, minced
    • 2 tablespoons honey
    • 1 tablespoon fresh sage, chopped
    • 2 teaspoons curry powder
    • 1 teaspoon black pepper
    • 1/2 teaspoon turmeric

    Instructions

    1. Preheat your oven to 350°F (175°C).
    2. In a small bowl, combine olive oil, lemon juice, orange juice, minced garlic, honey, chopped sage, curry powder, black pepper, and turmeric. Mix well to create a marinade.
    3. Rub the chicken thoroughly with the marinade, ensuring it’s evenly coated. Carefully lift the skin and stuff some of the garlic and sage under it for added flavor.
    4. Place the chicken in a baking pan.
    5. Bake in the preheated oven. The baking time will vary based on the size of your chicken; generally, it takes about 20 minutes per pound. Keep an eye on the chicken and let the skin become golden and crispy.
    6. Once cooked, allow the chicken to rest for about 10 minutes before carving. This helps the juices redistribute, ensuring each bite is juicy.

    Tips

    • Use a Meat Thermometer: Ensure the chicken is cooked through by checking that the internal temperature reaches 165°F (74°C).
    • Resting Time: Allow the chicken to rest after roasting to ensure it remains juicy.
    • Even Coating: Make sure to rub the marinade evenly for consistent flavor.

    Variations & Substitutions

    Feel free to experiment with this recipe to suit your taste:

    • Herbs: If you’re not a fan of sage, rosemary or thyme make excellent alternatives.
    • Spices: Add a pinch of cayenne pepper for a spicier kick.
    • Honey Substitute: Maple syrup or agave nectar can be used if you prefer.

    Storage

    Leftover roast chicken can be stored in an airtight container in the refrigerator for up to 3 days. For longer storage, you can freeze the chicken for up to 3 months. Be sure to defrost thoroughly in the refrigerator before reheating.

    FAQ

    Can I use chicken pieces instead of a whole chicken?

    Absolutely! You can use chicken thighs or breasts if you prefer. Adjust the cooking time accordingly, as pieces will cook faster than a whole chicken.

    What can I serve with this Curry and Sage Roast Chicken?

    This dish pairs beautifully with a variety of sides. Consider serving it with roasted vegetables, a fresh green salad, or buttery mashed potatoes.

    Do I need to cover the chicken while roasting?

    It’s not necessary to cover the chicken. Roasting it uncovered allows the skin to become beautifully golden and crispy. However, if it starts to brown too quickly, you can tent it with foil.

    Nutrition

    This recipe is a balanced meal rich in protein and flavor. It’s low in carbs and provides essential vitamins and minerals from the herbs and spices. The use of olive oil and fresh citrus juices adds healthy fats and a refreshing taste.

    Final Thoughts

    This Curry and Sage Roast Chicken is a delightful dish that brings a touch of nostalgia and warmth to any meal. The combination of spices and citrus creates a harmony of flavors that is both comforting and invigorating. Whether you’re an experienced cook or just starting out, this recipe is simple to follow and results in a deliciously satisfying meal. I hope you enjoy making and sharing this dish as much as I do. Happy cooking!

    Related update: Curry and Sage Roast Chicken

    Related update: Chicken Cordon Bleu

  • Hot Charlotte Cocktail | Made by Meaghan Moineau

    Hot Charlotte Cocktail | Made by Meaghan Moineau

    Hot Charlotte Cocktail

    Why You’ll Love It

    There’s something undeniably charming about the Hot Charlotte Cocktail. It’s a delightful blend of refreshing cucumber and a hint of heat, perfect for those who appreciate a cocktail with a bit of character. Whether you’re hosting a summer barbecue or enjoying a cozy evening by yourself, this drink is sure to become a favorite. I remember the first time I tried this cocktail at a small bar tucked away in a bustling city. It was a warm summer evening, and the mix of cucumber and Tobasco was both unexpected and refreshing, leaving a lasting impression. Now, I’m thrilled to share this recipe with you, hoping it brings as much joy to your gatherings as it has to mine.

    Ingredients

    • 2 oz Hendrick’s Gin
    • 0.5 oz St. Germain
    • 0.75 oz Lemon Juice
    • 3 slices Cucumber
    • 2 dashes Tobasco

    Instructions

    1. In a cocktail glass, muddle the cucumber slices with Tobasco until the cucumber is well broken down and the flavors meld together.
    2. Add Hendrick’s Gin, St. Germain, and lemon juice to the glass.
    3. Shake well until the mixture is chilled and properly blended.
    4. Strain the mixture over ice in a fresh cocktail glass.
    5. Garnish with a cucumber wheel.

    Tips

    To bring out the best flavors in your Hot Charlotte Cocktail, use fresh, high-quality cucumbers and lemons. The freshness of these ingredients will enhance the overall taste and aroma of your drink. Don’t be afraid to adjust the amount of Tobasco to suit your heat preference. Remember, the goal is to balance the heat and the refreshing elements.

    Variations & Substitutions

    If you’re looking to experiment, consider substituting the Hendrick’s Gin with another floral gin to see how the flavors change. You might also try adding a splash of soda water for a fizzy twist or using lime juice instead of lemon juice for a slightly different citrusy zing. For those who prefer a milder version, reduce the Tobasco to one dash or substitute it with a milder hot sauce.

    Storage

    The Hot Charlotte Cocktail is best enjoyed fresh. However, if you must prepare it in advance, you can mix the gin, St. Germain, and lemon juice ahead of time and store in the refrigerator. Just remember to add the muddled cucumber and Tobasco fresh when you’re ready to serve.

    FAQ

    Can I make this cocktail non-alcoholic?

    Absolutely! To make a non-alcoholic version, substitute the gin with a non-alcoholic spirit and the St. Germain with an elderflower cordial. The drink will still have the same refreshing and spicy notes.

    What can I use as a garnish if I don’t have cucumber?

    If you’re out of cucumbers, consider using a lemon wheel or a sprig of mint as an alternative garnish. Both will complement the cocktail’s flavors beautifully.

    Nutrition

    While cocktails aren’t typically consumed for their nutritional value, the Hot Charlotte brings some freshness with cucumber, which is low in calories and contains a lot of water, helping with hydration. Be mindful, though, that alcohol can contribute to your daily calorie intake.

    Final Thoughts

    The Hot Charlotte Cocktail is a delightful blend of spice and refreshment, perfect for any occasion. Its unique combination of flavors offers something a bit different from the usual cocktail repertoire, making it a standout choice for adventurous cocktail lovers. Whether you’re reminiscing about a summer evening or creating new memories, this cocktail is sure to become a beloved staple in your drink rotation. Enjoy the process of making it, and feel free to tweak the recipe to suit your personal taste. Cheers to good company and great cocktails!

    Related update: Hot Charlotte Cocktail

    Related update: Fresh Peach Margarita With Lime Sugar