Author: Meaghan Moineau

  • Sausage & Pepperoni Stromboli | Made by Meaghan Moineau

    Sausage & Pepperoni Stromboli | Made by Meaghan Moineau

    Sausage & Pepperoni Stromboli

    Welcome to our cozy kitchen, where today we’re going to dive into a classic, mouthwatering recipe: Sausage & Pepperoni Stromboli. This dish brings back fond memories of family gatherings at my grandmother’s house, where the rich aromas of freshly baked bread and sizzling sausage would fill the air. As a child, I remember eagerly waiting for the moment we could slice into the golden crust to reveal the cheesy, savory filling inside. Now, I’m excited to share this beloved recipe with you!

    Why You’ll Love It

    This Sausage & Pepperoni Stromboli is a delightful twist on traditional pizza, featuring a flaky, golden crust wrapped around a hearty, cheesy filling. It’s perfect for a cozy dinner, a game day snack, or even a potluck dish. Here are a few reasons why you’ll fall in love with this recipe:

    • Simple and Satisfying: With just a few ingredients, this stromboli is easy to assemble yet incredibly satisfying.
    • Versatile: Perfect as an appetizer, main dish, or even a lunchbox treat.
    • Family-Friendly: Kids and adults alike will enjoy customizing their slices with extra pizza sauce or toppings.
    • Make-Ahead: Prepare it in advance and pop it in the oven when you’re ready to enjoy!

    Ingredients

    • 1 egg
    • 1/2 pound Italian sausage
    • 1 cup shredded Parmesan cheese
    • 1/2 cup pepperoni slices
    • 1 roll of pizza dough
    • 1/2 cup pizza sauce, plus more for serving
    • 1 cup shredded mozzarella cheese

    Instructions

    1. Preheat your oven to 450 degrees F. Cook the Italian sausage in a medium skillet over medium heat until browned. Drain on paper towels and crumble into small pieces.
    2. Line a baking pan with parchment paper and lightly flour the surface. Roll out the pizza dough to form a large rectangle.
    3. Brush a thin layer of pizza sauce over the dough, leaving a small border around the edges.
    4. Evenly spread the crumbled sausage over the sauce, followed by the shredded mozzarella cheese.
    5. Layer the pepperoni slices on top of the cheese, then sprinkle 3/4 cup of the Parmesan cheese over the top.
    6. Gently fold in the short sides of the dough to form a seal around the filling.
    7. Starting from one long side, carefully roll the dough into about one third of the stromboli. Using the parchment paper to assist, continue rolling until you reach the opposite end. Pinch the seam to seal and place the stromboli seam-side down on the baking pan.
    8. In a small bowl, mix the egg with 1 tablespoon of water. Brush the egg mixture over the stromboli and sprinkle with the remaining 1/4 cup of Parmesan cheese.
    9. Place in the oven and immediately turn the temperature down to 350 degrees F. Bake for approximately 18 minutes.
    10. Remove from the oven and let the stromboli rest for 10 minutes. Check the center to ensure the dough is fully cooked. If needed, slice the stromboli in half and bake for an additional 5-8 minutes.
    11. Slice and serve with warm pizza sauce for dipping.

    Tips

    • Ensure your dough is at room temperature before rolling it out to prevent it from shrinking back.
    • For a crispier crust, use a pizza stone preheated in the oven.
    • Let the stromboli rest before slicing to allow the cheese to set slightly, making it easier to cut.

    Variations & Substitutions

    Feel free to get creative with your stromboli filling! Here are some ideas to customize your dish:

    • Vegetarian: Swap the sausage and pepperoni for mushrooms, bell peppers, and spinach.
    • Extra Spicy: Add sliced jalapeños or a sprinkle of red pepper flakes for a kick.
    • Different Cheeses: Experiment with provolone or cheddar cheese for a different flavor profile.

    Storage

    Store any leftover stromboli in an airtight container in the refrigerator for up to 3 days. To reheat, place slices in a preheated oven at 350 degrees F for about 10 minutes or until heated through. You can also freeze the baked stromboli for up to 3 months. Thaw overnight in the refrigerator before reheating.

    FAQ

    Can I use store-bought dough?

    Absolutely! Store-bought pizza dough works wonderfully for this recipe and saves time. Just ensure it’s at room temperature before rolling it out.

    How can I prevent the filling from leaking?

    Be sure to seal the edges of the dough well and avoid overfilling. Gently pinching the seams and tucking the ends will help contain the delicious filling.

    Nutrition

    This stromboli is a hearty dish that provides protein from the sausage and cheese, along with carbohydrates from the dough. While it’s a treat best enjoyed occasionally, you can balance it with a side salad or roasted vegetables for a well-rounded meal.

    Final Thoughts

    This Sausage & Pepperoni Stromboli is a delightful way to enjoy the flavors of pizza in a new, exciting form. Whether you’re serving it for a family dinner or a casual get-together, it’s sure to be a hit. I hope this recipe brings as much joy to your table as it has to mine. Happy cooking!

    Related update: Sausage & Pepperoni Stromboli

    Related update: North Carolina-Style BBQ Pulled Pork

  • Yorkshire Pudding | Made by Meaghan Moineau

    Yorkshire Pudding | Made by Meaghan Moineau

    Yorkshire Pudding: A Classic British Delight

    There’s something magical about the aroma of Yorkshire puddings baking in the oven, reminiscent of Sunday family dinners and festive holiday gatherings. I remember as a child, eagerly waiting by the kitchen door, peeking through the oven window to watch these golden puffs rise to perfection. This classic British side dish is the perfect complement to a roast beef dinner, and today, I’m thrilled to share with you my family’s cherished recipe.

    Why You’ll Love It

    Yorkshire pudding is a versatile and delectable addition to any meal. Its crispy exterior and soft, airy interior make it the perfect vehicle for soaking up savory sauces and gravies. Whether you’re serving it alongside a traditional roast beef or experimenting with other dishes, Yorkshire pudding is sure to impress your guests with its delightful texture and rich flavor. Plus, it’s made with just a few simple ingredients you likely have on hand.

    Ingredients

    • 3 large eggs
    • 1 cup all-purpose flour
    • 1 cup milk
    • 2-3 tablespoons pan drippings from roast beef (or vegetable oil)
    • 1/2 teaspoon salt

    Instructions

    1. Preheat your oven to between 400-450°F (200-230°C). The exact temperature can vary depending on your oven, so once you’ve made these a few times, you’ll be able to fine-tune it to your liking.
    2. Sift the flour and salt together into a large mixing bowl.
    3. In a separate bowl, beat the eggs and milk together until well combined.
    4. Gradually add the flour mixture to the wet ingredients, stirring continuously to avoid lumps. The batter should be smooth and slightly runny.
    5. Pour the pan drippings into your Yorkshire pudding tray. A muffin or cupcake tray works well too. Place the tray in the oven to heat the oil until it’s nice and hot.
    6. Once the oil is heated, carefully remove the tray from the oven. Quickly spoon a couple of tablespoons of batter into each section of your tray.
    7. Return the tray to the oven and bake for about 20 minutes or until the puddings are golden brown and puffed up. It’s crucial not to open the oven during this time, as it will cause the puddings to deflate.

    Tips

    For the best Yorkshire puddings, make sure your batter is smooth and your oil is sizzling hot before adding the batter. This will ensure they rise beautifully. Additionally, resist the urge to open the oven door while they’re baking, as the sudden change in temperature can cause them to collapse.

    Variations & Substitutions

    If you don’t have pan drippings, you can substitute with vegetable oil or melted butter. For a fun twist, try adding a pinch of herbs like rosemary or thyme to the batter for an aromatic flair. You can also experiment with different types of flour, such as whole wheat or gluten-free blends, to suit dietary preferences.

    Storage

    Yorkshire puddings are best enjoyed fresh out of the oven, but if you have leftovers, store them in an airtight container in the refrigerator for up to two days. To reheat, place them in a preheated oven at 350°F (175°C) for about 5-8 minutes until warmed through and crispy again.

    FAQ

    Why did my Yorkshire puddings not rise?

    If your Yorkshire puddings didn’t rise, it could be due to a few reasons. Ensure your oven is preheated to the correct temperature, and your oil is hot before adding the batter. Also, avoid opening the oven door during baking, as this can cause them to deflate.

    Can I make Yorkshire pudding without eggs?

    Eggs are crucial for the structure and texture of Yorkshire puddings, but you can try using an egg substitute if you have dietary restrictions. Keep in mind that the texture may vary slightly.

    Nutrition

    Yorkshire puddings are relatively low in calories, with each pudding containing around 80-100 calories. They provide a modest amount of protein from the eggs and are a good source of carbohydrates. However, their nutritional content can vary based on the type of oil or drippings used.

    Final Thoughts

    Yorkshire pudding is a beloved classic that brings warmth and comfort to any meal. With its simple ingredients and easy preparation, it’s a dish that allows you to focus on spending time with loved ones rather than fussing in the kitchen. Whether you’re new to making Yorkshire pudding or a seasoned pro, I hope this recipe finds a special place at your table, evoking cherished memories and creating new ones. Happy cooking!

    Related update: Yorkshire Pudding

  • Make Olive Garden’s Delicious Pasta Fagioli At Home | Made by Meaghan Moineau

    Make Olive Garden’s Delicious Pasta Fagioli At Home | Made by Meaghan Moineau

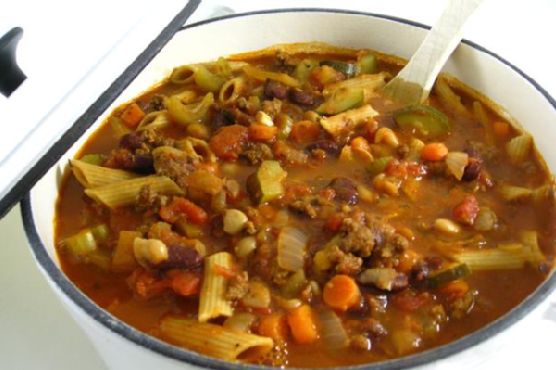
    Make Olive Garden’s Delicious Pasta Fagioli At Home

    There’s something incredibly comforting about a steaming bowl of soup, especially when it’s inspired by a beloved restaurant favorite. Olive Garden’s Pasta Fagioli has always been a dish that evokes warmth and a sense of home. I remember the first time I tasted it; I was dining out with my family, and the rich, hearty flavors made me feel like I was wrapped in a cozy blanket. It’s been a staple in my kitchen ever since, and today, I’m excited to share how you can recreate this delicious soup at home.

    Why You’ll Love It

    This homemade version of Olive Garden’s Pasta Fagioli is not only delicious and hearty but also incredibly easy to make. It brings together healthy ingredients in a way that feels indulgent without being heavy. Here’s why you’ll fall in love with making this soup at home:

    • Hearty and Filling: Packed with protein-rich beans and lean ground turkey, this soup is a meal in itself.
    • Nutritious: Loaded with vegetables like carrots, celery, and zucchini, it’s a great way to get your daily dose of veggies.
    • Easy to Prepare: With simple steps and common ingredients, it’s a dish that fits into any busy schedule.
    • Family Favorite: It’s a crowd-pleaser that’s perfect for family dinners or gatherings with friends.
    • Customizable: Easily tweak the recipe to suit your dietary preferences or what you have on hand.

    Ingredients

    • 1 pound lean ground turkey
    • 2 tablespoons olive oil
    • 1 cup chopped onions
    • 1 cup chopped carrots
    • 1 cup chopped celery stalks
    • 3 garlic cloves, minced
    • 2 cans (14.5 oz each) diced tomatoes, undrained
    • 1 can (15 oz) red kidney beans, drained and rinsed
    • 1 can (15 oz) white kidney beans, drained and rinsed
    • 1 can (15 oz) great northern beans, drained and rinsed
    • 4 cups canned beef broth
    • 1 jar (24 oz) pasta sauce
    • 1 medium zucchini, chopped
    • 2 teaspoons Italian seasoning blend
    • Fresh ground pepper to taste
    • 1 cup whole wheat penne pasta
    • Grated Parmesan cheese (optional, for serving)

    Instructions

    1. In a large soup pot, brown the ground turkey over medium heat. Once cooked, drain the turkey in a colander and set aside.
    2. In the same pot, heat the olive oil over medium heat. Add the onions, carrots, celery, and garlic, and cook for about 2 minutes, stirring often to prevent sticking.
    3. Return the drained turkey to the pot. Add the canned tomatoes, red kidney beans, white kidney beans, great northern beans, beef broth, pasta sauce, chopped zucchini, Italian seasoning, and fresh ground pepper. Stir well to combine.
    4. Bring the soup to a boil. Then, reduce the heat to a simmer, cover the pot, and let it cook for 50 minutes, allowing the flavors to meld together.
    5. Add the whole wheat penne pasta to the soup. Cover the pot again and cook for about 10 minutes or until the pasta is tender.
    6. Ladle the soup into bowls and top with grated Parmesan cheese if desired. Serve hot and enjoy!

    Tips

    • For a richer flavor, consider browning the turkey with a little garlic and onion powder.
    • Ensure you stir the soup occasionally as it simmers to prevent the ingredients from sticking to the bottom of the pot.
    • If you prefer a thicker soup, reduce the amount of broth or simmer uncovered for the last 10 minutes of cooking.

    Variations & Substitutions

    • Meat Substitutes: Replace ground turkey with ground beef, chicken, or even a plant-based meat alternative for a vegetarian version.
    • Bean Choices: If you don’t have the specified beans, feel free to use any combination of beans you have on hand.
    • Gluten-Free Option: Use gluten-free pasta to make this dish suitable for those with gluten sensitivities.
    • Spice it Up: Add a pinch of red pepper flakes for some heat, or use spicy Italian sausage instead of turkey.

    Storage

    This Pasta Fagioli soup stores well, making it perfect for meal prep. Here’s how to store it:

    • Refrigerator: Store leftovers in an airtight container in the refrigerator for up to 4 days. Reheat on the stove or in the microwave.
    • Freezer: This soup freezes beautifully. Allow it to cool completely, then transfer to freezer-safe containers. It will keep for up to 3 months. Thaw overnight in the refrigerator before reheating.

    FAQ

    Can I use fresh tomatoes instead of canned?

    Yes, you can use fresh tomatoes if desired. Use about 4 cups of chopped fresh tomatoes. You may need to add an extra cup of broth to maintain the soup’s consistency.

    Is it necessary to use beef broth?

    While beef broth adds depth to the soup, you can substitute chicken broth or vegetable broth if preferred. Each will slightly alter the flavor profile, but the soup will still be delicious.

    How can I make this soup vegetarian?

    To make a vegetarian version, simply omit the ground turkey and use vegetable broth instead of beef broth. You can also add extra beans or vegetables for additional texture and flavor.

    Nutrition

    This soup is a hearty meal that provides an excellent balance of protein, fiber, and essential nutrients. Here’s a rough estimate of the nutritional information per serving (without Parmesan cheese):

    • Calories: 250
    • Protein: 18g
    • Carbohydrates: 35g
    • Fat: 6g
    • Fiber: 8g
    • Sodium: 600mg

    Final Thoughts

    Making Olive Garden’s Pasta Fagioli at home is not just about recreating a favorite restaurant dish; it’s about bringing a bit of comfort and warmth to your table. This recipe is straightforward, adaptable, and sure to become a staple in your meal rotation. Whether you’re enjoying it on a chilly evening or sharing it with family and friends, it’s a dish that brings people together. I hope you enjoy making and eating it as much as I do!

    Related update: Make Olive Garden’s Delicious Pasta Fagioli At Home

    Related update: Curried Chicken Roll-Ups

    Related update: Truffle-Infused Mushroom Soup with Parmesan Crisps & Tarragon Creme Fraiche

  • Steak with lemon and capers | Made by Meaghan Moineau

    Steak with lemon and capers | Made by Meaghan Moineau

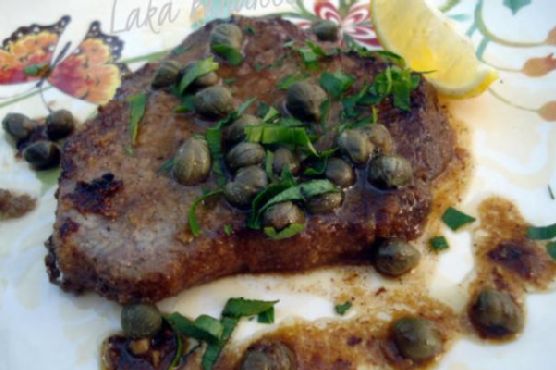
    Steak with Lemon and Capers

    There’s something truly magical about the aroma of sizzling steak mingling with the zesty freshness of lemon and the briny pop of capers. This recipe for Steak with Lemon and Capers not only delivers a mouthwatering dining experience but also carries with it a memory of warm family gatherings, where laughter and delicious food went hand in hand.

    Why You’ll Love It

    Imagine a tender, juicy steak infused with the tang of lemon and the unique flavor of capers. This recipe is a delightful blend of simplicity and sophistication. You’ll love how quickly it comes together, making it perfect for both weekday dinners and special occasions. The ingredients are straightforward, yet they combine to create a dish that feels both luxurious and comforting. Plus, the sauce is absolutely divine when drizzled over the steak—or anything else on your plate!

    Ingredients

    • Beef steak
    • Butter
    • Capers
    • Dry white wine
    • Flour
    • Garlic
    • Black ground pepper
    • Lemon juice
    • Lemon wedges
    • Olive oil
    • Parsley
    • Salt

    Instructions

    1. Flatten the steaks lightly with a meat mallet.
    2. In a shallow dish, combine flour, salt, and pepper. Dip the steaks into the mixture, ensuring both sides are well-coated.
    3. Heat a mixture of butter and olive oil in a pan over medium heat. Sauté the steaks for about 4 minutes on each side until they are browned to your liking. Remove from the pan and set aside.
    4. In the same pan, sauté the garlic for about 1 minute, stirring continuously to avoid burning.
    5. Add the wine and lemon juice to the pan, stir, and let it simmer for 5 minutes to slightly reduce the liquid.
    6. Add the capers and give everything a good stir.
    7. Return the steaks to the pan, cover, and simmer over low heat for 4 minutes to allow the flavors to meld.
    8. Garnish with chopped parsley and serve with lemon wedges on the side.

    Tips

    For the best results, make sure your steaks are at room temperature before cooking. This ensures even cooking throughout. When flattening the steaks, be gentle to maintain their structure. Lastly, don’t skip the resting part after cooking; it allows the juices to redistribute, making each bite as juicy as possible.

    Variations & Substitutions

    If you’re looking to switch things up, consider using chicken or pork cutlets instead of beef. Both proteins work wonderfully with the lemon and capers. For a bit of heat, add a pinch of red pepper flakes to the sauce. You can also substitute white wine with chicken broth if you prefer an alcohol-free version.

    Storage

    Leftovers can be a delightful treat. Store any remaining steak and sauce in an airtight container in the refrigerator for up to three days. To reheat, gently warm the steak in a pan over low heat until it’s heated through. Avoid microwaving as it can toughen the meat.

    FAQ

    What can I serve with Steak with Lemon and Capers?

    This dish pairs beautifully with a variety of sides. Consider serving it with creamy mashed potatoes, steamed asparagus, or a fresh arugula salad. The sauce is also fantastic when soaked up with crusty bread.

    Can I use a different type of steak?

    Absolutely! This recipe is quite versatile. Ribeye, sirloin, or even filet mignon would be excellent choices. Just be mindful of cooking times as they may vary depending on the thickness of the steak.

    Nutrition (if applicable)

    This dish is rich in protein and offers a good balance of flavors from healthy fats like olive oil and butter. If you’re mindful of sodium intake, consider rinsing the capers to reduce their saltiness. Adjusting the amount of butter and oil can also help manage caloric content.

    Final Thoughts

    Steak with Lemon and Capers is more than just a meal; it’s an experience. The bright, bold flavors are sure to impress family and guests alike. Whether it’s a casual dinner or a special celebration, this dish delivers a taste of elegance with every bite. Give it a try, and let it become a new favorite in your culinary repertoire!

    Related update: Steak with lemon and capers

  • Chicken and Mango Skewer | Made by Meaghan Moineau

    Chicken and Mango Skewer | Made by Meaghan Moineau

    Chicken and Mango Skewers

    There’s something magical about the sweet and savory combination of chicken and mangoes, especially when grilled to perfection. This recipe for Chicken and Mango Skewers is a delightful treat that’s perfect for barbecues or a cozy family dinner. As I prepare these skewers, I often find myself reminiscing about summer afternoons spent in my grandmother’s backyard, where the scent of grilled meats blended with the laughter of family and friends. These skewers capture those cherished memories and bring a taste of sunshine to your plate, no matter the season.

    Why You’ll Love It

    This Chicken and Mango Skewer recipe is a crowd-pleaser for several reasons:

    • Simplicity: With just a handful of ingredients, it’s incredibly easy to prepare, making it perfect for busy weeknights.
    • Flavor-packed: The suya seasoning mix adds a spicy kick that complements the sweetness of the mangoes beautifully.
    • Versatile: Serve it as an appetizer, a main dish with rice, or even as part of a vibrant salad.
    • Healthy: Using skinless chicken breast and a moderate amount of vegetable oil keeps this dish light and nutritious.

    Ingredients

    • 2 skinless chicken breasts
    • 1 chicken stock cube
    • 1 can of mangos (or 2 fresh mangos, peeled and cubed)
    • 1 teaspoon dry pepper
    • 2 tablespoons suya seasoning mix
    • 1 cooking spoon of vegetable oil

    Instructions

    1. Chop the chicken breasts into cubes and thread them onto skewers.
    2. Preheat your grill or oven to a medium-high heat.
    3. Place the chicken skewers on the grill to sear slightly.
    4. In a bowl, mix the chicken stock cube, dry pepper, suya seasoning, and vegetable oil to form a marinade.
    5. Using a brush, generously coat the chicken skewers with the marinade on both sides.
    6. Continue grilling, flipping occasionally, until the chicken is browned and cooked through.
    7. Once the chicken is cooked, thread the mango pieces onto the skewers. If using firm mangoes, grill them briefly for a caramelized touch.
    8. Serve the skewers on their own as an appetizer or alongside rice for a complete meal.

    Tips

    • If using wooden skewers, soak them in water for at least 30 minutes before grilling to prevent burning.
    • For an extra burst of flavor, let the chicken marinate in the seasoning mix for a few hours before grilling.
    • If you prefer spicier skewers, increase the amount of dry pepper in the marinade.

    Variations & Substitutions

    Feel free to customize this recipe to suit your taste or dietary needs:

    • Protein Swap: Substitute chicken with shrimp or tofu for a different twist.
    • Fruit Options: Pineapple or peaches can be used in place of mangoes for a different fruity flavor.
    • Vegetarian Option: Omit the chicken and use a selection of bell peppers, zucchini, and mushrooms for a hearty vegetarian skewer.

    Storage

    Leftover skewers can be stored in an airtight container in the refrigerator for up to 3 days. To reheat, place them in a preheated oven or on a grill until warmed through. Avoid microwaving, as it may make the chicken rubbery.

    FAQ

    Can I use fresh mangoes instead of canned?

    Absolutely! Fresh mangoes work perfectly in this recipe. Just make sure they are ripe but firm enough to hold their shape on the skewer.

    What is suya seasoning mix?

    Suya seasoning is a West African spice blend typically made from ground peanuts, ginger, garlic, paprika, and cayenne pepper. It gives the skewers a unique and savory flavor.

    Can I bake these skewers instead of grilling?

    Yes, you can bake the skewers in a preheated oven at 400°F (200°C) for about 20-25 minutes, flipping halfway through, until the chicken is cooked through.

    Nutrition

    This dish is a balanced combination of protein, healthy fats, and carbohydrates. Each serving provides approximately:

    • Calories: 300
    • Protein: 25g
    • Carbohydrates: 20g
    • Fat: 10g

    Final Thoughts

    These Chicken and Mango Skewers are a delightful way to bring a taste of the tropics to your table. Whether you’re enjoying them with family or sharing them at a barbecue, they’re sure to be a hit. The combination of tender chicken and sweet mango, all wrapped up in a spicy, flavorful seasoning, is irresistible. So, fire up your grill and enjoy a bite of sunshine!

    Related update: Chicken and Mango Skewer

    Related update: Sausage & Pepperoni Stromboli

  • Creme Brulee | Made by Meaghan Moineau

    Creme Brulee | Made by Meaghan Moineau

    Creme Brulee: A Classic Dessert to Savor

    There’s something truly magical about cracking through the burnt sugar crust of a perfectly made creme brulee. This quintessential French dessert, with its silky custard and tantalizing caramelized top, has been a staple in gourmet kitchens around the world. I remember my first encounter with creme brulee at a quaint Parisian cafe; the rich vanilla aroma and the satisfying crack of the sugar captivated my senses. Today, I’m excited to share this timeless recipe with you, so you can recreate that enchanting experience at home.

    Why You’ll Love It

    Creme brulee is more than just a dessert; it’s an experience. Here are a few reasons why you’ll fall in love with this classic treat:

    • Elegant Simplicity: With just a handful of ingredients, creme brulee is a testament to simple, refined flavors.
    • Textural Delight: The contrast between the creamy custard and the crisp, caramelized sugar is a textural masterpiece.
    • Versatile: Perfect for any occasion, creme brulee can be served as a romantic dessert for two or the centerpiece of a dinner party.
    • Make-Ahead Friendly: Prepare it in advance and caramelize the top just before serving, making it both convenient and impressive.

    Ingredients

    • 1 whole egg
    • 5 egg yolks
    • 500ml fresh milk
    • 150g caster sugar, plus extra for topping
    • 1 vanilla bean pod
    • 250ml whipping cream

    Instructions

    1. Preheat your oven to 150°C (300°F).
    2. Pour the fresh milk and whipping cream into a saucepan.
    3. Slice the vanilla bean pod lengthwise and scrape the seeds into the cream mixture. Chop the empty pod into small pieces and add them to the cream as well.
    4. Bring the cream mixture to a boiling point, then reduce the heat and simmer gently for 3 minutes, allowing the flavors to meld.
    5. In a large bowl, lightly beat the sugar and eggs together until the mixture is pale and smooth.
    6. Strain the cream mixture through a fine sieve and return it to the heat, bringing it back to a boil.
    7. Gradually add the hot cream to the egg mixture, whisking vigorously to temper the eggs and prevent curdling.
    8. After incorporating all the cream, strain the mixture again for a smooth texture.
    9. Pour the custard into 7-8 ramekins, depending on their size.
    10. Place the ramekins in a large cake pan or roasting pan. Pour enough hot water into the pan to come halfway up the sides of the ramekins.
    11. Bake in the center of the oven for 30-40 minutes, or until the custards are just set but still slightly wobbly in the middle.
    12. Remove the ramekins from the water bath and allow them to cool to room temperature. Refrigerate for at least 3 hours or overnight.
    13. Just before serving, sprinkle an even layer of caster sugar over the top of each custard. Use a kitchen blowtorch to caramelize the sugar until golden and crisp.

    Tips

    • Quality Ingredients: Use fresh and high-quality ingredients, especially the vanilla, to ensure the best flavor.
    • Water Bath: The water bath is crucial for even cooking. Ensure the water level is consistent and avoid splashing water into the custard.
    • Sugar Layer: For a perfect sugar crust, use fine caster sugar and ensure an even layer before caramelizing.

    Variations & Substitutions

    While the classic creme brulee is made with vanilla, there are plenty of ways to add your own twist:

    • Flavored Creme Brulee: Infuse the cream with coffee beans, citrus zest, or spices like cinnamon or cardamom for a different flavor profile.
    • Non-Dairy Option: Substitute the milk and cream with coconut milk for a dairy-free version that adds a tropical flair.
    • Liqueur Addition: Add a splash of your favorite liqueur, like Grand Marnier or Amaretto, into the custard for an adult twist.

    Storage

    Creme brulee can be stored in the refrigerator, covered with plastic wrap, for up to 3 days. Caramelize the sugar topping just before serving to maintain the crisp texture.

    FAQ

    Can I make creme brulee without a blowtorch?

    Yes! If you don’t have a blowtorch, you can caramelize the sugar under a hot grill (broiler) for a few minutes. Keep a close watch to prevent burning and rotate the ramekins if necessary for even caramelization.

    Why did my creme brulee curdle?

    Curdling usually occurs when the eggs cook too quickly. To prevent this, make sure to gradually add the hot cream to the eggs while whisking constantly. Also, baking in a water bath helps regulate the temperature and prevent overcooking.

    Nutrition

    Each serving of creme brulee (based on 8 servings) provides approximately:

    • Calories: 320
    • Protein: 5g
    • Fat: 22g
    • Carbohydrates: 25g
    • Sugar: 24g

    Final Thoughts

    Creme brulee is a testament to the beauty of simplicity and elegance in the culinary world. Its rich flavor and delightful texture make it a cherished dessert, perfect for impressing guests or indulging yourself. Whether you’re making it for the first time or the hundredth, this classic recipe is sure to leave a lasting impression. Enjoy the process, savor the flavors, and revel in the joy of creating something truly special in your kitchen.

    Related update: Creme Brulee

  • Fava Crostini | Made by Meaghan Moineau

    Fava Crostini | Made by Meaghan Moineau

    Fava Crostini: A Delicious and Simple Appetizer

    There’s something truly magical about sitting around a rustic wooden table with friends, sharing stories and laughter over a spread of homemade delicacies. One such memorable moment for me was on a sun-drenched afternoon in Tuscany, where I first discovered the delightful simplicity of Fava Crostini. The creamy texture of the fava beans paired with the crunch of toasted bread left an indelible mark on my taste buds and my heart. This recipe, inspired by that unforgettable day, brings a piece of Tuscany to your home and is perfect for any gathering.

    Why You’ll Love It

    Fava Crostini is not just an appetizer; it’s an experience. Here’s why you and your guests will fall in love with this dish:

    • Simple Ingredients: With just a handful of basic ingredients, you can create a dish that bursts with flavor.
    • Quick and Easy: This recipe is straightforward and can be prepared in under 30 minutes.
    • Versatile: Whether you’re hosting a formal dinner or a casual get-together, Fava Crostini fits right in.
    • Nutritious: Packed with protein and fiber, fava beans are a healthy addition to any meal.

    Ingredients

    • Fresh broad beans (fava beans)
    • Glugs of olive oil
    • Whole garlic clove
    • Lemon, for squeezing
    • Water
    • Parmesan, for shaving
    • Salt & pepper to taste
    • Crusty bread (sliced)

    Instructions

    1. Throw the fava in a pan and cover with water and a little salt. Bring to a boil and then lower to a simmer.
    2. Cook for a couple of minutes until the fava beans are tender. Drain them thoroughly.
    3. Return the pan to the heat and pour in a couple of glugs of olive oil along with the whole garlic clove.
    4. Fry the garlic until it is browned and aromatic, then discard the garlic.
    5. Toss the fava beans into the pan and sauté for a minute or two.
    6. Begin mashing the fava beans with the back of a wooden spoon until you form a paste. Add a bit of water if necessary for consistency.
    7. Remove the fava paste from heat and season with salt, pepper, and a squeeze of lemon.
    8. Toast slices of good crusty bread.
    9. Rub the warm fava mixture onto the toasted bread and top with shaved parmesan.
    10. Optionally, drizzle a little extra virgin olive oil over the top for added richness.

    Tips

    • Quality Olive Oil: Use the best quality olive oil you can find, as it adds depth and richness to the dish.
    • Garlic Flavor: If you love garlic, feel free to mince it and incorporate it into the fava paste instead of discarding after frying.
    • Perfect Toast: Make sure your bread is toasted to golden perfection to provide the perfect crunch against the creamy fava spread.

    Variations & Substitutions

    Here are some creative ways to make this dish your own:

    • Add Herbs: Incorporate fresh herbs like mint or basil into the fava paste for a burst of flavor.
    • Cheese Options: Instead of parmesan, try using pecorino romano or even a creamy goat cheese for a different taste.
    • Gluten-Free: Use gluten-free bread or crackers to make this dish suitable for gluten-sensitive guests.

    Storage

    If you have leftovers, store the fava paste in an airtight container in the refrigerator for up to three days. Reheat gently on the stove before serving again. It’s best to toast fresh bread when ready to serve, as the texture can change if stored.

    FAQ

    Can I use frozen fava beans?

    Yes, you can use frozen fava beans if fresh ones are not available. Just make sure they are fully thawed before you start cooking, and adjust the cooking time as needed since they may already be partially cooked.

    What can I use instead of fava beans?

    If fava beans are hard to come by, you can substitute with edamame or even peas for a slightly different flavor profile but similar texture.

    Is this dish vegan?

    To make this dish vegan, simply omit the parmesan or replace it with a vegan cheese alternative that you enjoy.

    Nutrition

    Fava beans are rich in vitamins and minerals, particularly folate and magnesium. They are also a great source of plant-based protein and fiber, making this dish both delicious and nutritious. Just be mindful of the olive oil and cheese if you are watching your calorie intake.

    Final Thoughts

    Fava Crostini is a testament to the beauty of uncomplicated cooking. With each bite, you’ll be transported to a sunlit afternoon in the Italian countryside, sharing good food and good company. Whether you’re a seasoned chef or a kitchen novice, this recipe is sure to impress. Enjoy creating and savoring this delightful dish with those you love.

    Related update: Fava Crostini

    Related update: Chicken and Mango Skewer

  • Jambalaya Stew | Made by Meaghan Moineau

    Jambalaya Stew | Made by Meaghan Moineau

    Jambalaya Stew: A Cozy, Flavor-Packed Delight

    There’s something about a hearty stew that feels like a warm hug on a chilly day. Jambalaya Stew, with its rich flavors and comforting ingredients, is one of those dishes that transports you straight to the vibrant heart of Louisiana. I remember my first taste of Jambalaya during a family trip to New Orleans. The bustling streets, soulful music, and the aroma of spices in the air made it an unforgettable experience. This recipe is my homage to that memory, bringing a taste of the bayou to your kitchen.

    Why You’ll Love It

    Jambalaya Stew is not just a meal; it’s an experience. Here’s why you’ll fall in love with this dish:

    • Flavor Explosion: The blend of Italian sweet chicken sausage, shrimp, and Cajun spices creates a symphony of flavors that dance on your taste buds.
    • Wholesome Ingredients: Packed with vegetables, lean meats, and whole grains, this stew is as nutritious as it is delicious.
    • Simple and Satisfying: With an easy one-pot preparation, you’ll spend less time cooking and more time savoring the rich, hearty goodness.
    • Versatile Comfort: Perfect for a family dinner, a cozy night in, or entertaining guests with a dish that captures the essence of Southern hospitality.

    Ingredients

    • 2 cooked Italian sweet chicken sausage links, sliced
    • 1 can (14.5 oz) diced tomatoes
    • 1 medium onion, chopped
    • 1 yellow bell pepper, diced
    • 1 green bell pepper, diced
    • 2 stalks celery, chopped
    • 4 cups low sodium chicken broth
    • 1 cup brown rice
    • 3 cloves garlic, minced
    • 2 tablespoons Cajun seasoning
    • 1 tablespoon hot sauce (plus more to taste)
    • 1 teaspoon dried oregano
    • 1 teaspoon dried thyme
    • 1 pound raw shrimp, peeled and deveined

    Instructions

    1. Add all ingredients except the shrimp to a large pot on the stove. Mix thoroughly to combine.
    2. Bring the mixture to a boil over medium-high heat.
    3. Once boiling, reduce the heat to medium-low. Cover the pot and let it simmer until the vegetables are tender and the rice is fluffy, about 35 minutes.
    4. Add the shrimp and re-cover the pot. Continue to cook until the shrimp are tender and cooked through, about 6 minutes.
    5. If desired, season the stew to taste with salt, black pepper, and additional hot sauce.
    6. Serve hot and enjoy the comforting flavors of this Southern classic!

    Tips

    • Prep Ahead: Chop the vegetables and sausage the night before to save time during the cooking process.
    • Flavor Boost: For an extra kick, add a splash of Worcestershire sauce or a squeeze of fresh lemon juice before serving.
    • Adjust the Heat: Control the spiciness by adjusting the amount of Cajun seasoning and hot sauce to suit your taste.

    Variations & Substitutions

    This Jambalaya Stew is wonderfully versatile. Here are some ideas to make it your own:

    • Protein Swap: Substitute chicken or andouille sausage for the Italian sweet chicken sausage for a more traditional flavor.
    • Vegetarian Version: Omit the sausage and shrimp, and add more vegetables like zucchini or mushrooms for a vegetarian-friendly dish.
    • Rice Alternatives: Use white rice, quinoa, or even cauliflower rice for different textures and nutritional profiles.

    Storage

    Store any leftover Jambalaya Stew in an airtight container in the refrigerator for up to 3 days. Reheat gently on the stove or in the microwave, adding a splash of broth or water if needed to maintain the desired consistency.

    FAQ

    Can I make this stew in advance?

    Absolutely! Jambalaya Stew is an excellent make-ahead meal. The flavors meld beautifully when allowed to rest, making it even more delicious the next day.

    Can I freeze Jambalaya Stew?

    Yes, you can freeze the stew for up to 3 months. Allow it to cool completely before transferring it to freezer-safe containers. Thaw in the refrigerator overnight before reheating.

    What can I serve with Jambalaya Stew?

    This stew is a hearty meal on its own, but you can serve it with crusty bread, cornbread, or a simple side salad for a complete feast.

    Nutrition

    While exact nutrition can vary based on specific ingredients and serving sizes, this Jambalaya Stew is a balanced meal, rich in protein from the sausage and shrimp, fiber from the vegetables and brown rice, and packed with essential vitamins and minerals. It’s a wholesome choice for a satisfying dinner.

    Final Thoughts

    Jambalaya Stew is a dish that brings people together, much like the vibrant culture from which it originates. It’s a celebration of flavors and a reminder of the warmth and joy that comes from sharing a meal with loved ones. Whether you’re a seasoned cook or a kitchen novice, this recipe is approachable and rewarding, ensuring a delightful dining experience every time. So gather your ingredients, let the spices fill your kitchen, and enjoy the cozy embrace of Jambalaya Stew.

    Related update: Jambalaya Stew

  • Cyndee’s Neiman Marcus Cake | Made by Meaghan Moineau

    Cyndee’s Neiman Marcus Cake | Made by Meaghan Moineau

    Cyndee’s Neiman Marcus Cake

    There’s something magical about baking a cake that fills the air with warmth and nostalgia. I distinctly remember the first time I tasted Cyndee’s Neiman Marcus Cake—it was at a family gathering, and each bite was a comforting reminder of the love and care that goes into homemade treats. This cake, with its rich, buttery flavor and a hint of lemon zest, quickly became a family favorite. Today, I’m excited to share this treasured recipe with you, so you can create your own sweet memories.

    Why You’ll Love It

    This Neiman Marcus Cake is the epitome of comfort food, combining simplicity with indulgence. Here’s why you and your loved ones will adore it:

    • Rich and Creamy: The combination of cream cheese and butter creates a luscious, rich texture that melts in your mouth.
    • Easy to Make: With straightforward steps and everyday ingredients, this cake is perfect for both novice bakers and seasoned pros.
    • Versatile: Perfect for any occasion—from birthdays to casual get-togethers.
    • A Touch of Nostalgia: Each bite brings a sense of warmth and familiarity, reminiscent of cherished family gatherings.

    Ingredients

    • Baking soda
    • Butter
    • Cornstarch
    • Cream cheese
    • Eggs
    • Flour
    • Kosher salt
    • Lemon zest
    • Sour cream
    • Sugar
    • Vanilla extract

    Instructions

    1. Preheat your oven to 350°F (175°C) and grease a 9 by 13 inch baking pan.
    2. To make the cake layer from scratch, cream the butter and sugar on medium-high speed in the bowl of an electric mixer fitted with a paddle attachment until light and fluffy, about 5 minutes.
    3. On medium speed, add the eggs, one at a time, then the sour cream, vanilla, and lemon zest, scraping down the bowl as needed. Mix well.
    4. Sift together the flour, cornstarch, salt, and baking soda.
    5. With the mixer on low speed, slowly add the flour mixture to the butter mixture and stir just until smooth. Finish mixing by hand to ensure the batter is well mixed.
    6. Pour the batter evenly into the prepared baking pan.
    7. Mix the ingredients for the topping and spread evenly on top of the batter.
    8. Bake for about 30-35 minutes and let the cake cool before removing it from the pan.

    Tips

    • Ensure all ingredients are at room temperature before starting. This helps in achieving a smooth and well-incorporated batter.
    • When mixing the batter, avoid over-mixing once you add the flour to maintain a tender crumb.
    • Let the cake cool completely in the pan to prevent it from breaking apart when removed.

    Variations & Substitutions

    While the original recipe is delightful, here are a few ideas to tailor it to your taste:

    • Flavor Boost: Add a teaspoon of almond extract for a nutty flavor or swap lemon zest with orange zest for a citrus twist.
    • Texture Variations: Fold in a handful of chopped nuts or chocolate chips into the batter for added texture.
    • Gluten-Free Option: Use a 1:1 gluten-free flour blend instead of regular flour.

    Storage

    To keep your Neiman Marcus Cake fresh, store it in an airtight container at room temperature for up to 3 days. For longer storage, refrigerate it for up to a week. You can also freeze the cake for up to 3 months. Just make sure to wrap it tightly in plastic wrap and foil before freezing. Thaw it in the refrigerator overnight before serving.

    FAQ

    Can I make this cake ahead of time?

    Absolutely! This cake holds up well, so feel free to bake it a day or two in advance. Store it in an airtight container to ensure it stays moist and delicious.

    What can I use as a substitute for sour cream?

    If you don’t have sour cream on hand, you can use Greek yogurt or buttermilk as a substitute. Both will maintain the cake’s moisture and tangy flavor.

    Can I use salted butter instead of unsalted?

    Yes, you can use salted butter, but be sure to reduce the added kosher salt in the recipe to balance the flavors.

    Nutrition

    While I don’t have exact nutritional information, this cake is a delightful indulgence meant to be enjoyed in moderation. To make it a tad healthier, consider using less sugar or substituting some with a natural sweetener like honey or maple syrup.

    Final Thoughts

    Cyndee’s Neiman Marcus Cake is more than just a dessert; it’s a slice of love and tradition. Whether you’re sharing it at family gatherings or enjoying a quiet moment with a cup of tea, this cake is sure to bring joy and a sense of comfort. I hope you find as much pleasure in baking and savoring this cake as my family has over the years. Happy baking!

    Related update: Cyndee’s Neiman Marcus Cake

    Related update: Creme Brulee

  • Thai Savory Brown Fried Rice | Made by Meaghan Moineau

    Thai Savory Brown Fried Rice | Made by Meaghan Moineau

    Thai Savory Brown Fried Rice

    There’s something comforting about the aroma of garlic and chili sizzling in a hot pan, transporting me back to my childhood kitchen where my grandmother often prepared her special fried rice. Her infectious laughter and the clinking of her bangles as she cooked made the experience truly unforgettable. It’s from her that I learned the beauty of combining simple, wholesome ingredients to create a dish brimming with flavors. Today, I’m excited to share a recipe that echoes those cherished memories with a modern twist: Thai Savory Brown Fried Rice.

    Why You’ll Love It

    This dish is not only a delightful amalgamation of flavors but also a nutritional powerhouse. The nuttiness of brown rice complements the rich, savory notes of garlic and soy, while the spicy kick from fresh chili peppers wakes up your taste buds. Cashew nuts add a satisfying crunch, and the coconut lends a sweet, tropical aroma. Whether you’re a seasoned cook or a beginner, this recipe is straightforward and rewarding, perfect for a quick weeknight meal or a weekend indulgence.

    Ingredients

    • 2 tablespoons extra virgin olive oil
    • 3 garlic cloves, minced
    • 2 red fresh chili peppers, sliced
    • 1 cup raw cashew nuts
    • 1/2 cup dry unsweetened shredded coconut
    • 1 teaspoon stevia powder
    • 2 tablespoons Bragg Liquid Aminos
    • 1 tablespoon apple cider vinegar
    • 1 flax egg (1 tablespoon flaxseed meal + 3 tablespoons water)
    • 1 cup fresh green beans, trimmed
    • 2 cups shredded regular bok choy
    • 3 cups cooked brown rice
    • Lime wedges for serving

    Instructions

    1. Prepare the brown rice using my Perfect Brown Rice recipe. In a saucepan, cook 1 cup of uncooked brown rice in 1 teaspoon of olive oil until lightly browned. Place 2 basil leaves on top, add 2 cups of filtered water, cover, and bring to a boil. Reduce heat to a simmer and cook until all the water has evaporated, about 40 minutes.
    2. While the rice is cooking, heat the remaining olive oil in a wok or large frying pan over medium heat. Add minced garlic and cook until lightly golden, being careful not to burn it.
    3. Add the sliced red chili peppers, raw cashew nuts, and shredded coconut to the pan. Stir and cook for about 2 minutes.
    4. In a small bowl, mix together the stevia powder, Bragg Liquid Aminos, and apple cider vinegar. Pour this mixture into the pan and cook for another minute.
    5. Push the stir-fry to one side of the pan and pour in the flax egg on the opposite side. Cook and stir the flax egg for about a minute, then incorporate it into the stir-fry mixture.
    6. Add the fresh green beans, shredded bok choy, and cooked brown rice to the pan. Cook and stir for another minute until the bok choy is wilted but the green beans remain slightly crunchy.
    7. Spoon the stir-fry into a serving dish and serve with lime wedges on the side for squeezing over the rice.

    Tips

    For a more robust flavor, consider toasting the shredded coconut before adding it to the stir-fry. Keep a close eye on the garlic as it cooks to prevent it from burning, which can result in a bitter taste. If you prefer a milder dish, reduce the amount of chili peppers, or remove the seeds.

    Variations & Substitutions

    Feel free to customize this recipe to suit your dietary needs or preferences. Substitute Bragg Liquid Aminos with soy sauce or tamari. Swap green beans with sugar snap peas or bell peppers for a different texture. For a nut-free version, replace cashews with sunflower seeds. If you’re not a fan of flax eggs, a regular egg can be used instead.

    Storage

    Store any leftovers in an airtight container in the refrigerator for up to 3 days. Reheat in a pan over medium heat for best results. Avoid microwaving as it can change the texture of the ingredients.

    FAQ

    Can I use white rice instead of brown rice?

    Yes, you can substitute white rice for brown rice, but keep in mind that brown rice offers more fiber and nutrients. If using white rice, adjust the cooking time accordingly as it cooks faster than brown rice.

    Is there a way to make this dish spicier?

    To increase the spice level, you can add more chili peppers or include a dash of cayenne pepper. Alternatively, serve the dish with a side of chili sauce for those who prefer extra heat.

    How do I make a flax egg?

    A flax egg is a vegan substitute for a regular egg. To make one, mix 1 tablespoon of flaxseed meal with 3 tablespoons of water. Let it sit for about 5 minutes until it thickens and becomes gelatinous.

    Nutrition

    This recipe is packed with nutrients. Brown rice provides complex carbohydrates and fiber, while bok choy and green beans add vitamins and minerals. Cashew nuts offer healthy fats and protein, making this dish both satisfying and nutritious. Each serving is approximately 350 calories, depending on portion size and specific ingredient brands used.

    Final Thoughts

    Thai Savory Brown Fried Rice is more than just a meal; it’s a delightful blend of flavors and textures that brings the essence of Thai cuisine into your home. Whether you’re reminiscing about the past or creating new memories, this dish is sure to bring warmth and satisfaction to your table. Enjoy the vibrant taste and the joy it brings, just as it did for me in my grandmother’s kitchen.

    Related update: Thai Savory Brown Fried Rice

    Related update: Jambalaya Stew

    Related update: Yorkshire Pudding