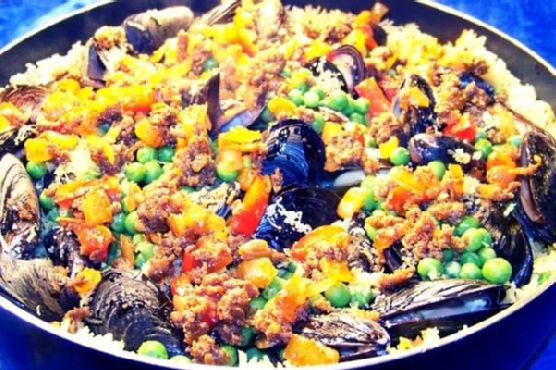
Author: Meaghan Moineau

  • How Sweet It Is Sweet Potato Lasagne | Made by Meaghan Moineau

    How Sweet It Is Sweet Potato Lasagne | Made by Meaghan Moineau

    How Sweet It Is Sweet Potato Lasagne

    There’s something truly magical about the combination of sweet and savory, and this Sweet Potato Lasagne is a delightful testament to that. This dish takes me back to chilly autumn evenings spent in my grandmother’s kitchen, where the warmth of the oven and the rich aroma of spices filled the air. It’s a comforting, hearty meal that brings people together, just like those cherished family dinners of my childhood.

    Why You’ll Love It

    This Sweet Potato Lasagne is not just another lasagne; it’s a celebration of flavors and textures. The sweetness of the potatoes perfectly balances with the savory notes of the mushrooms and spinach. The hint of curry powder adds a unique twist, making this dish an exciting adventure for your taste buds. It’s a fantastic vegetarian option that’s both satisfying and nutritious, making it a perfect choice for family dinners or potlucks.

    Ingredients

    • Baby portabella mushrooms
    • Dry curry powder
    • Dried basil leaves
    • Eggplants
    • Frozen spinach
    • Heavy cream
    • Monterey Jack & cheddar cheese mix
    • Jalapenos
    • Marinara sauce
    • Salt & pepper
    • Sweet potatoes
    • Vegetable cooking oil

    Instructions

    1. Slice the sweet potatoes into 1/4 inch thick slices. Boil them until semi-cooked, which should take about 10 minutes.
    2. Mix dry curry powder with olive oil (1 cup) and rub this mixture over the sweet potato slices. Set aside and let marinate for at least 10 minutes.
    3. Slice eggplants into 1/4 inch thick slices and rub all over with an olive oil (1 cup), dried basil, salt, and pepper mix. Set aside and let marinate for at least 15 minutes.
    4. In a pan, pour canola or vegetable cooking oil and sauté spinach and mushrooms for about 3-5 minutes. Add jalapenos and salt & pepper to taste.
    5. Reduce the heat and add heavy cream and about half of the Monterey Jack & cheddar cheese mix until the mixture is creamy but not watery.
    6. Start layering the lasagne in the following order: sweet potatoes, spinach/mushroom mix, eggplants, marinara sauce, sweet potatoes, spinach/mushroom mix, eggplants.
    7. Finally, sprinkle the remaining Monterey Jack & cheddar cheese blend on top.
    8. Bake at 350-375°F for about 35-45 minutes, depending on your oven. You’ll know it’s ready when you can easily pass a fork through all the layers.
    9. Devour with passion!

    Tips

    To ensure the sweet potato slices cook evenly, cut them as uniformly as possible. If you prefer a spicier kick, feel free to add more jalapenos or even a sprinkle of red pepper flakes. Allow the lasagne to cool slightly before serving; this will make it easier to cut and serve intact slices.

    Variations & Substitutions

    If you’re a fan of heat, consider adding some crushed red pepper flakes to the marinara sauce. For a vegan version, substitute the heavy cream with coconut cream and use a dairy-free cheese alternative. If eggplants aren’t your favorite, zucchini makes a great substitute in this recipe.

    Storage

    This Sweet Potato Lasagne stores beautifully. Place any leftovers in an airtight container and refrigerate for up to 3 days. You can also freeze portions for up to 2 months. To reheat, simply thaw overnight in the fridge and bake at 350°F until heated through.

    FAQ

    Can I make this lasagne ahead of time?

    Absolutely! You can prepare the lasagne a day in advance. Just assemble it, cover it tightly, and refrigerate. When you’re ready to enjoy, bake it as instructed.

    What can I serve with Sweet Potato Lasagne?

    This dish pairs wonderfully with a fresh green salad or some crusty garlic bread. A glass of red wine would complement the flavors beautifully as well.

    Nutrition

    While the exact nutritional values will depend on the specific brands and quantities of ingredients used, this Sweet Potato Lasagne is a good source of vitamins A and C from the sweet potatoes, iron from the spinach, and calcium from the cheese.

    Final Thoughts

    Whether you’re looking to try something new or searching for a tasty vegetarian dish, this Sweet Potato Lasagne is a must-try. It’s a dish that embodies warmth, love, and nostalgia, much like the family gatherings it reminds me of. I hope it brings as much joy to your table as it does to mine. Happy cooking!

    Related update: How Sweet It Is Sweet Potato Lasagne

  • Classic Greek Moussaka | Made by Meaghan Moineau

    Classic Greek Moussaka

    There’s something inherently comforting about a dish that has been passed down through generations, and Classic Greek Moussaka is no exception. I still remember the first time I tasted my grandmother’s moussaka as a child during a family reunion in her sunlit kitchen overlooking the Aegean Sea. The aroma of cinnamon and nutmeg filled the room, and the flavors were like nothing I had experienced before. Now, every time I prepare this dish, it brings back those cherished memories, and I’m delighted to share this recipe with you.

    Why You’ll Love It

    This Classic Greek Moussaka is a hearty and satisfying meal that combines layers of savory eggplants, rich meat sauce, and creamy béchamel topping. It’s perfect for family gatherings or a special dinner. The combination of flavors and textures will transport you to a sun-drenched Greek island, even if just for a meal. Whether you’re a fan of Greek cuisine or trying it for the first time, this dish is sure to become a beloved favorite.

    Ingredients

    • Eggplants
    • Sea salt
    • Olive oil
    • Onions
    • Lean beef
    • Canned tomatoes
    • Garlic
    • Ground cinnamon
    • Ground allspice
    • White salt and ground pepper
    • Tomato paste
    • Butter
    • Flour
    • Warm milk
    • Ground nutmeg
    • Egg yolks
    • Feta cheese
    • Bread crumbs

    Instructions

    1. Sprinkle the eggplant slices with sea salt and let them stand for 45 minutes to draw out the bitterness. Then rinse thoroughly to remove excess salt.
    2. Thinly brush each slice with olive oil and bake in a preheated grill pan for several minutes on each side. Set aside. Repeat until all slices are grilled.
    3. For the meat sauce, lightly sauté the onions in olive oil until tender. Add the ground beef and sauté, stirring frequently to break up the clumps of meat, until the meat is no longer pink.
    4. Stir in canned tomatoes, garlic, cinnamon, allspice, salt, and pepper and simmer briefly on low heat. Add in tomato paste and a little water if the sauce is too thick. Remove from heat and set aside.
    5. For the béchamel sauce, add flour to the melted butter, stirring constantly. When the mixture is evenly thick, gradually whisk in warm milk. Gently bring to a boil, then remove from heat, season with pepper and nutmeg. Whisk in the egg yolks vigorously. Set aside.
    6. Thinly coat with olive oil a suitable ovenproof baking dish, sprinkle the bottom with homemade bread crumbs. Place a layer of eggplant, cover with some meat sauce and feta cheese, and repeat this until the pan is almost full. Finish with a layer of feta cheese.
    7. Top with béchamel sauce. Cover with tin foil and bake in a preheated oven at 180°C for 1 hour.
    8. Remove moussaka from the oven and let it set at room temperature for 45 minutes before serving.

    Tips

    To achieve the perfect moussaka, make sure to let the eggplant slices sit with salt for the full 45 minutes to remove any bitterness. When preparing the béchamel sauce, stir continuously to avoid lumps and ensure a smooth consistency. Lastly, giving the moussaka time to set before serving helps the layers hold together better when sliced.

    Variations & Substitutions

    If you prefer a vegetarian version, you can replace the ground beef with lentils or a plant-based meat substitute. For a slightly different flavor profile, try using ground lamb instead of beef. You can also experiment with different cheeses, such as Parmesan or Ricotta, to suit your taste preferences.

    Storage

    Leftover moussaka can be stored in an airtight container in the refrigerator for up to three days. For longer storage, freeze individual portions in airtight containers for up to three months. To reheat, thaw overnight in the refrigerator and bake in a preheated oven at 175°C until heated through.

    FAQ

    Can I prepare Moussaka ahead of time?

    Yes, you can assemble the moussaka a day in advance and store it in the refrigerator. When ready to bake, allow it to come to room temperature before placing it in the oven.

    What should I serve with Moussaka?

    Moussaka pairs beautifully with a fresh Greek salad and some crusty bread. A glass of red wine complements the flavors wonderfully.

    Nutrition

    Moussaka is a rich and hearty dish, so it is best enjoyed as an occasional treat. It provides a good source of protein from the beef and egg yolks, as well as essential vitamins and minerals from the eggplants and tomatoes. For a lighter option, consider serving with a side of steamed vegetables.

    Final Thoughts

    Classic Greek Moussaka is more than just a dish; it’s a culinary journey that tells a story with every bite. Whether you’re sharing it with family or savoring it on a quiet evening at home, its warmth and richness are sure to bring comfort and joy. I hope this recipe becomes as beloved in your home as it is in mine. Happy cooking!

    Related update: Classic Greek Moussaka

    Related update: How Sweet It Is Sweet Potato Lasagne

  • Sauteed Chicken With Mushrooms and Cream | Made by Meaghan Moineau

    Sauteed Chicken With Mushrooms and Cream | Made by Meaghan Moineau

    Sauteed Chicken With Mushrooms and Cream

    Welcome to a dish that brings warmth and comfort to your table, Sauteed Chicken With Mushrooms and Cream. This recipe has been a beloved staple in my family for generations, often gracing our tables during special gatherings and Sunday dinners. I fondly remember my grandmother preparing this dish with such love and care, her kitchen filled with the rich aroma of sautéed mushrooms and creamy sauce. Today, I share this cherished recipe with you, hoping it brings as much joy to your family as it has to mine.

    Why You’ll Love It

    This Sauteed Chicken With Mushrooms and Cream is a culinary delight that you’ll find yourself returning to again and again. Here’s why:

    • Rich and Flavorful: The combination of tender chicken, earthy mushrooms, and a creamy wine sauce creates a depth of flavor that’s simply irresistible.
    • Easy to Prepare: Despite its gourmet taste, this dish is straightforward to make, requiring just a few steps to bring it all together.
    • Perfect for Any Occasion: Whether it’s a weeknight dinner or a special occasion, this dish fits the bill, impressing family and friends alike.

    Ingredients

    • Frying chicken parts
    • Mushrooms
    • Butter
    • Olive oil
    • Salt
    • Black fresh ground pepper
    • Dry white wine
    • Heavy cream

    Instructions

    1. Rinse the chicken in cool water, then pat dry with clean paper towels.
    2. Set a heavy-bottomed frying pan over moderately-high heat. Add 2 tablespoons of butter and 1 tablespoon of olive oil to the pan.
    3. When very hot (but not smoking), place the chicken pieces skin-side down and season with salt and pepper.
    4. Saute for 5-6 minutes, basting with the juices and fat, until the underside is browned. Turn pieces over, season again with salt and pepper, and saute the same way for an additional 5-6 minutes, or until juices run clear.
    5. While the chicken is cooking, in a separate pan, saute the mushrooms in 1 tablespoon of butter. Remove to a plate when finished browning.
    6. When chicken is finished cooking, remove to a warm plate.
    7. Rapidly spoon all but a tablespoon of fat out of the pan. Add 1/2 cup of wine to deglaze the pan, scraping the sides and bottom to incorporate all the seasoning into the liquid. Deglaze until the alcohol has burned off.
    8. Add cream and mushrooms to the deglazing sauce and incorporate; boil down rapidly for a minute or two, or until the sauce starts to thicken.
    9. Add the chicken and baste with the sauce and mushrooms. Cover and simmer 2-3 minutes to bring the chicken back up to a hot temperature. Season again if necessary with salt and pepper.

    Tips

    • Use Fresh Ingredients: Fresh mushrooms and quality chicken make a significant difference in flavor.
    • Patience is Key: Allow the sauce to thicken naturally by simmering, enhancing its richness.
    • Season to Taste: Remember to taste the sauce before serving and adjust the seasoning as needed.

    Variations & Substitutions

    This recipe is versatile and can be adapted to suit your preferences:

    • Swap the Mushrooms: Try using a mix of mushrooms like cremini, shiitake, or portobello for added texture and flavor.
    • Wine Alternatives: If you prefer not to use wine, chicken broth makes a good substitute, though you might lose some of the depth that wine provides.
    • Herb Additions: Adding herbs like thyme or rosemary can enhance the dish’s aromatic profile.

    Storage

    Store any leftovers in an airtight container in the refrigerator for up to 3 days. To reheat, gently warm the chicken and sauce in a pan over low heat, adding a splash of cream if the sauce has thickened too much.

    FAQ

    Can I use chicken breasts instead of parts?

    Yes, boneless chicken breasts can be used. Adjust the cooking time accordingly to ensure they don’t dry out. Chicken thighs are also a great option for added juiciness.

    What is the best type of white wine to use?

    A dry white wine, such as Sauvignon Blanc or Chardonnay, works best for deglazing and complements the creamy sauce beautifully.

    Can I make this dish dairy-free?

    For a dairy-free version, substitute the butter with olive oil and use coconut cream in place of heavy cream. Note that the flavor will change slightly, but it will still be delicious.

    Nutrition

    This dish, rich in protein and healthy fats, can be part of a balanced meal. However, due to the cream and butter, it’s higher in calories and fat. Adjust portion sizes or pair with a light side salad to balance your meal.

    Final Thoughts

    Sauteed Chicken With Mushrooms and Cream is more than just a meal; it’s a comforting embrace on a plate, carrying with it the essence of family gatherings and cherished memories. Whether you’re recreating a nostalgic dish or trying it for the first time, I hope this recipe finds a special place in your heart and home. Enjoy every bite!

    Related update: Sauteed Chicken With Mushrooms and Cream

    Related update: Classic Greek Moussaka

  • Lentil Salad With Vegetables | Made by Meaghan Moineau

    Lentil Salad With Vegetables | Made by Meaghan Moineau

    Lentil Salad With Vegetables

    Welcome to our kitchen! Today, we’re diving into a dish that not only satisfies the taste buds but also brings a delightful burst of nutrition to your table. Lentil Salad with Vegetables is a recipe that has been passed down in our family for generations, and I’m thrilled to share it with you today. I still remember the warm summer evenings spent at my grandmother’s house, where this salad was a staple. The vibrant colors and fresh flavors were always a highlight of our meals, and now I hope it becomes a cherished part of your family dinners too.

    Why You’ll Love It

    This Lentil Salad with Vegetables is a delightful medley of flavors and textures that will elevate any meal. Whether you’re looking for a refreshing side dish, a nutritious lunch, or a light dinner, this salad fits the bill. Here’s why you’ll fall in love with this recipe:

    • Nutritious: Packed with protein-rich lentils and a variety of vegetables, this salad is a nutrient powerhouse.
    • Flavorful: The combination of balsamic and red wine vinegar gives a tangy kick, while rosemary adds a fragrant touch.
    • Versatile: Perfect for summer picnics, potlucks, or a cozy dinner at home.
    • Easy to Make: With simple ingredients and straightforward steps, this salad is quick to prepare.

    Ingredients

    • 2 tablespoons balsamic vinegar
    • 3 tablespoons extra virgin olive oil
    • 2 green onions, chopped
    • 1 cup lentils
    • 1 bell pepper, diced
    • 1 red bell pepper, diced
    • 1 tablespoon red wine vinegar
    • 1 teaspoon fresh rosemary, chopped
    • Salt, to taste
    • 2 tomatoes, diced
    • 1 white onion, diced

    Instructions

    1. Heat the extra virgin olive oil in a saucepan over medium-high heat and add the diced white onion.
    2. Cook the onion until just translucent, stirring occasionally to ensure even cooking.
    3. Add the lentils to the saucepan and pour in enough water to cover them. Cook according to the package directions until tender.
    4. Once cooked, drain the lentils and let them cool to room temperature.
    5. In a large mixing bowl, combine the cooled lentils with the diced tomatoes, bell peppers, and green onions.
    6. Add the chopped rosemary, balsamic vinegar, and red wine vinegar to the vegetable mixture.
    7. Season with salt to taste. You can also add more olive oil or vinegar according to your preference.
    8. Toss everything together until well combined.
    9. Serve the salad cold or at room temperature, and enjoy!

    Tips

    To make the most out of your Lentil Salad with Vegetables, here are some tips to keep in mind:

    • Choose Fresh Ingredients: Fresh vegetables make a big difference in flavor and texture.
    • Cook Lentils Properly: Ensure the lentils are cooked just right – they should be tender but not mushy.
    • Adjust Seasoning: Feel free to adjust the amount of vinegar and olive oil based on your taste preferences.

    Variations & Substitutions

    This salad is incredibly adaptable. Here are a few variations and substitutions you might consider:

    • Add Cheese: Crumble some feta or goat cheese on top for added creaminess.
    • Include Nuts: Toss in some toasted walnuts or almonds for extra crunch.
    • Use Different Vinegars: Try apple cider vinegar or white wine vinegar for a different flavor profile.
    • Herbs: Swap rosemary with thyme or parsley for a different herbal touch.

    Storage

    This salad can be stored in an airtight container in the refrigerator for up to 3 days. It’s a great make-ahead dish for busy weeks, and the flavors only deepen over time. Just give it a good toss before serving to redistribute the dressing.

    FAQ

    Can I use canned lentils for this recipe?

    Yes, you can use canned lentils to save time. Just make sure to rinse and drain them well before adding them to the salad.

    Is this salad vegan?

    Yes, this Lentil Salad with Vegetables is completely vegan, making it a great option for those following a plant-based diet.

    What can I serve with this salad?

    This salad pairs well with grilled chicken, fish, or tofu. It also makes a great accompaniment to hearty soups or stews.

    Nutrition

    This salad is not only delicious but also nutritious. Packed with protein, fiber, and vitamins, it’s a wholesome addition to any meal. Lentils are an excellent source of plant-based protein, while the assortment of vegetables provides a rainbow of nutrients.

    Final Thoughts

    I hope this Lentil Salad with Vegetables becomes as beloved in your home as it is in ours. It’s a simple yet flavorful dish that brings people together around the table. Whether you’re enjoying it as a light lunch or serving it as a side at a family gathering, it’s sure to bring smiles and satisfaction. Don’t forget to share your own twists and experiences with this recipe in the comments below. Happy cooking!

    Related update: Lentil Salad With Vegetables

    Related update: Pennsylvania Dutch Pickled Eggs

    Related update: Strawberry Pretzel Salad

  • Strawberry Shortcake Pancakes | Made by Meaghan Moineau

    Strawberry Shortcake Pancakes | Made by Meaghan Moineau

    Strawberry Shortcake Pancakes

    Why You’ll Love It

    There’s something undeniably comforting about the combination of strawberries and cream, a nostalgic pairing that takes many of us back to summers filled with sunshine and laughter. Growing up, I remember spending warm afternoons in my grandmother’s kitchen, delighting in her signature strawberry shortcake. Those cherished moments inspired this Strawberry Shortcake Pancakes recipe, which brings a modern twist to a classic favorite. These pancakes are fluffy, flavorful, and filled with the sweet essence of strawberries, perfect for a weekend brunch or a special breakfast treat.

    Ingredients

    • 1 cup Greek yogurt
    • 2 egg whites
    • 1 teaspoon almond extract
    • 1 cup whole-wheat flour
    • 1 teaspoon baking soda
    • 2 tablespoons sugar
    • 1/4 teaspoon salt
    • 1/2 cup dried freeze strawberries
    • 1 cup fresh strawberries
    • 1 teaspoon sugar (for strawberry sauce)
    • Fat-free whip cream
    • Maple syrup (optional)

    Instructions

    1. In a small bowl, mix the Greek yogurt, egg whites, and almond extract until smooth and creamy.
    2. In a separate bowl, combine the whole-wheat flour, baking soda, sugar, and salt. Stir well to ensure the dry ingredients are thoroughly mixed.
    3. Pour the wet ingredients into the bowl of dry ingredients and whisk until the batter is smooth and evenly mixed.
    4. Gently fold in the dried freeze strawberries, ensuring they are evenly distributed throughout the batter.
    5. For the strawberry sauce, place the fresh strawberries and 1 teaspoon of sugar in a saucepan or small pot. Cook on medium heat until the strawberries are thawed and juicy, about 5-7 minutes, stirring occasionally.
    6. Spray a skillet with cooking spray and place it over medium heat. Pour 1/4-cup of the batter onto the skillet for each pancake.
    7. Cook until bubbles start appearing on the surface of the pancakes, then flip. NOTE: Flatten out the batter with a spatula to ensure even cooking. Cook each side for about 1-2 minutes.
    8. Once cooked, top the pancakes with the strawberry sauce, a drizzle of maple syrup (if desired), and a dollop of fat-free whip cream.

    Tips

    For the best results, make sure your skillet is well-heated before adding the batter. This helps the pancakes rise and cook evenly. Also, if you prefer a sweeter pancake, you can add an extra tablespoon of sugar to the batter. Use fresh strawberries for the sauce for a more vibrant and fresh flavor.

    Variations & Substitutions

    If you’re looking for a gluten-free option, you can substitute the whole-wheat flour with a 1:1 gluten-free flour blend. To add extra protein, consider adding a scoop of vanilla protein powder to the batter. For a vegan version, replace the Greek yogurt with a plant-based yogurt and use a flax egg instead of egg whites.

    Storage

    These pancakes are best enjoyed fresh, but they can be stored in an airtight container in the refrigerator for up to 2 days. To reheat, simply warm them in a skillet over low heat or pop them in the toaster for a quick breakfast on the go.

    FAQ

    Can I make the batter in advance?

    Yes, you can prepare the batter the night before and store it in the refrigerator. Just make sure to give it a good stir before cooking, as the ingredients may settle overnight.

    What can I use instead of almond extract?

    If you don’t have almond extract on hand, vanilla extract is a great alternative. It provides a similar sweetness and aroma that complements the strawberries beautifully.

    Are these pancakes kid-friendly?

    Absolutely! These pancakes are a hit with kids, thanks to their sweet flavor and fun color. You can even make mini pancakes for smaller appetites or to serve as a delightful finger food for little ones.

    Nutrition

    Each serving of 4 pancakes, including strawberry sauce and whip cream, contains approximately 320 calories, 8g of fat, 15g of protein, and 45g of carbohydrates. Please note that adding maple syrup will increase the calorie and sugar content.

    Final Thoughts

    Strawberry Shortcake Pancakes are a delightful way to start your day with a touch of nostalgia and a burst of flavor. Whether you’re enjoying them on a lazy Sunday morning or serving them up for a special occasion, these pancakes are sure to bring smiles to the table. Don’t forget to share this recipe with friends and family, so they too can indulge in this modern twist on a classic treat. Happy cooking!

    Related update: Strawberry Shortcake Pancakes

  • Curried Chicken Roll-Ups | Made by Meaghan Moineau

    Curried Chicken Roll-Ups | Made by Meaghan Moineau

    Curried Chicken Roll-Ups

    Introduction

    There’s something undeniably comforting about recipes that remind us of home and family gatherings. Curried Chicken Roll-Ups hold a special place in my heart. I vividly recall the first time I tasted these delicious wraps at a summer picnic with my family. My grandmother had prepared them with her signature touch, and ever since, they’ve been a staple at our family reunions. The combination of tender chicken, fresh vegetables, and the warm spices of curry makes this dish unforgettable. Now, I’m thrilled to share this recipe with you, hoping it becomes a cherished favorite in your home too.

    Why You’ll Love It

    This Curried Chicken Roll-Ups recipe is a delightful blend of flavors and textures that will tantalize your taste buds. It’s perfect for a quick lunch, a picnic, or even a light dinner. Here’s why you’ll love it:

    • Quick and Easy: With minimal prep work, you can have these roll-ups ready in no time.
    • Flavorful: The combination of curry paste, lime juice, and fresh vegetables creates a burst of flavor in every bite.
    • Healthy: Made with whole grain tortillas and light ingredients, it’s a guilt-free meal.
    • Customizable: Adapt the recipe with your favorite veggies or spices to make it your own.

    Ingredients

    • 1 can of chicken breast, drained
    • 1/2 cup diced cucumber
    • 1/2 cup diced red bell pepper
    • 1 diced celery stalk
    • 2 green onions, chopped
    • 1/4 cup light mayonnaise
    • 1 tablespoon lime juice
    • 1 tablespoon red curry paste
    • 1/2 teaspoon garlic powder
    • 1/2 teaspoon paprika
    • 1/4 teaspoon chili powder
    • Salt and pepper to taste
    • 4 whole grain tortillas
    • 1 cup shredded lettuce

    Instructions

    1. Place all ingredients (except tortillas, lettuce) into a bowl. Stir well, until everything is nicely mixed and the larger chicken pieces have pulled apart.
    2. Lightly toast or warm your tortillas on the stove top.
    3. Scoop out a quarter of your chicken salad mixture and evenly spread it over the top of the tortilla.
    4. Sprinkle a quarter of your lettuce over the chicken salad.
    5. Now gently, and tightly, roll up your tortilla.
    6. Use a good serrated knife to gently slice the roll into 4 or 6 pieces.

    Tips

    • Chill the Filling: Letting the chicken salad sit in the fridge for about 30 minutes can enhance the flavors.
    • Knife Skills: Use a serrated knife with a gentle sawing motion to prevent the roll-ups from squishing when cutting.
    • Serving: Serve immediately after slicing to keep the tortillas from becoming soggy.

    Variations & Substitutions

    One of the best things about this recipe is its adaptability. Here are some variations and substitutions to try:

    • Protein Swap: Use shredded rotisserie chicken or turkey for a different flavor profile.
    • Vegan Version: Substitute the chicken with chickpeas and use vegan mayonnaise.
    • Spice Level: Adjust the amount of red curry paste and chili powder to suit your spice preference.
    • Extra Veggies: Add shredded carrots or sliced avocado for more crunch and nutrition.

    Storage

    If you have leftovers, wrap them tightly in plastic wrap or store in an airtight container. They can be kept in the refrigerator for up to 2 days. However, note that the tortillas may become slightly soggy over time. For the best texture, consume them fresh.

    FAQ

    Can I make these roll-ups in advance?

    Yes, you can prepare the chicken salad mixture a day in advance and store it in the refrigerator. Assemble the roll-ups shortly before serving to ensure the tortillas remain fresh and firm.

    Can I freeze the roll-ups?

    It’s not recommended to freeze these roll-ups, as the fresh vegetables can lose their crispness and the tortillas can become soggy upon thawing. They are best enjoyed fresh.

    Nutrition

    Each serving of Curried Chicken Roll-Ups (assuming 4 servings total) contains approximately:

    • Calories: 250
    • Protein: 15g
    • Carbohydrates: 28g
    • Fat: 10g
    • Fiber: 6g
    • Sugar: 3g

    These values are estimates and can vary based on specific ingredient brands and quantities used.

    Final Thoughts

    Curried Chicken Roll-Ups are a versatile and flavorful meal that can brighten up any table. Whether you’re making them for a quick family lunch or a picnic, they are sure to be a hit. The ease of preparation and the delightful taste make it a go-to recipe in my household, and I hope it becomes one in yours too. Enjoy the delightful crunch and the warm spices, and don’t forget to share this recipe with friends and family!

    Related update: Curried Chicken Roll-Ups

    Related update: Sauteed Chicken With Mushrooms and Cream

  • North Carolina-Style BBQ Pulled Pork | Made by Meaghan Moineau

    North Carolina-Style BBQ Pulled Pork | Made by Meaghan Moineau

    North Carolina-Style BBQ Pulled Pork

    Welcome to our cozy corner of barbecue heaven! Today, we’re diving into a classic recipe that brings the flavors of North Carolina right to your kitchen. Picture a gathering in the backyard, the air filled with laughter, and the irresistible aroma of slow-cooked pork mingling with tangy vinegar-based sauce. This dish takes me back to family reunions where we’d gather around a long picnic table, savoring every bite, sharing stories, and creating memories. Let’s recreate that magic with this North Carolina-Style BBQ Pulled Pork recipe!

    Why You’ll Love It

    This North Carolina-Style BBQ Pulled Pork is a true labor of love, but it’s worth every moment spent in the kitchen. Here’s why you’ll adore this recipe:

    • Authentic Flavor: This recipe captures the essence of North Carolina barbecue with its vinegar-based sauce, offering a tangy, spicy, and slightly sweet profile.
    • Perfect for Gatherings: Whether you’re hosting a summer barbecue or a cozy winter dinner, this pulled pork is always a crowd-pleaser.
    • Versatile: Enjoy it in sandwiches, tacos, or as a main dish with your favorite sides.
    • Easy to Follow: While the cooking time is lengthy, the steps are straightforward, ensuring a stress-free cooking experience.

    Ingredients

    • 3 tablespoons paprika
    • 1 tablespoon light brown sugar
    • 1 teaspoon celery salt
    • 1 teaspoon garlic salt
    • 1 teaspoon dry mustard
    • 1 teaspoon black ground pepper
    • 1 teaspoon onion powder
    • 1 teaspoon salt
    • 1 (5 to 6 pounds) boneless pork shoulder roast
    • 1/4 cup melted butter
    • 1 teaspoon liquid hickory smoke
    • 2 cups apple cider vinegar
    • 1 cup water
    • 1 cup ketchup
    • 1 tablespoon dark firmly-packed brown sugar
    • 1/2 teaspoon crushed red pepper flakes

    Instructions

    1. Mix paprika, light brown sugar, celery salt, garlic salt, dry mustard, black pepper, onion powder, and salt in a small bowl.
    2. Season the entire pork roast with the spice mixture and cover it. Leave it in the refrigerator overnight.
    3. Preheat the oven to 325°F (165°C). Place the pork roast in a large, disposable aluminum roasting pan.
    4. In a small bowl, mix together the melted butter and liquid hickory smoke to create the basting marinade.
    5. Pour the basting marinade over the pork and cover with aluminum foil. Cook for approximately 4 1/2 hours, turning the pork every hour and basting every 30 minutes. Alternatively, cook over white hot coals, covered, for 3-3 1/2 hours, basting and turning frequently.
    6. Transfer the pork roast to a cutting board. Drain the excess juices from the pan.
    7. Slice the pork roast and pull apart the meat, trimming the fat, and place back into the roasting pan.
    8. Prepare the BBQ sauce by mixing the cider vinegar, water, ketchup, dark brown sugar, salt, and red pepper flakes in a large bowl. Pour over the pulled pork, stirring to ensure all pork is covered. Cover with aluminum foil.
    9. Place the pulled pork back into the oven (still at 325°F) or in a pan on the grill and cook for 1 1/2 hours, stirring every 30 minutes.

    Tips

    • Choose the Right Cut: A boneless pork shoulder works best for this recipe, offering the right balance of fat and tenderness.
    • Plan Ahead: Marinating the pork overnight is crucial for deep flavor penetration.
    • Temperature Check: Ensure your oven or grill maintains a steady temperature for even cooking.

    Variations & Substitutions

    While this recipe is a classic, here are some variations and substitutions you can try:

    • Smokier Flavor: Add more liquid smoke to the basting marinade for an intensified smoky taste.
    • Spicier Kick: Increase the amount of crushed red pepper flakes or add cayenne pepper to the spice mix.
    • Sweet Twist: Substitute dark brown sugar with honey or molasses for a different kind of sweetness.

    Storage

    Store any leftover pulled pork in an airtight container in the refrigerator for up to 3 days. For longer storage, freeze the pulled pork in a freezer-safe container for up to 3 months. Reheat thoroughly before serving.

    FAQ

    Can I use a slow cooker for this recipe?

    Absolutely! You can follow the same steps for seasoning and marinating the pork, then transfer it to a slow cooker. Cook on low for 8-10 hours or on high for 4-6 hours, until the pork is tender enough to pull apart.

    What sides pair well with North Carolina-Style BBQ Pulled Pork?

    Classic sides include coleslaw, cornbread, baked beans, and potato salad. Freshly baked rolls or buns make for delicious pulled pork sandwiches.

    Nutrition

    While exact nutritional content will vary based on portion sizes, a typical serving of this pulled pork is rich in protein and flavor. It’s moderately high in calories due to the pork and sugars, so enjoy in moderation as part of a balanced diet.

    Final Thoughts

    I hope this North Carolina-Style BBQ Pulled Pork brings as much joy to your table as it has to mine. It’s a dish that embodies the spirit of togetherness and celebration. Whether you’re a barbecue novice or a seasoned pitmaster, this recipe is sure to become a beloved staple in your culinary repertoire. Enjoy every savory, tangy bite, and don’t forget to share it with those you love!

    Related update: North Carolina-Style BBQ Pulled Pork

  • Sausage & Pepperoni Stromboli | Made by Meaghan Moineau

    Sausage & Pepperoni Stromboli | Made by Meaghan Moineau

    Sausage & Pepperoni Stromboli

    Welcome to our cozy kitchen, where today we’re going to dive into a classic, mouthwatering recipe: Sausage & Pepperoni Stromboli. This dish brings back fond memories of family gatherings at my grandmother’s house, where the rich aromas of freshly baked bread and sizzling sausage would fill the air. As a child, I remember eagerly waiting for the moment we could slice into the golden crust to reveal the cheesy, savory filling inside. Now, I’m excited to share this beloved recipe with you!

    Why You’ll Love It

    This Sausage & Pepperoni Stromboli is a delightful twist on traditional pizza, featuring a flaky, golden crust wrapped around a hearty, cheesy filling. It’s perfect for a cozy dinner, a game day snack, or even a potluck dish. Here are a few reasons why you’ll fall in love with this recipe:

    • Simple and Satisfying: With just a few ingredients, this stromboli is easy to assemble yet incredibly satisfying.
    • Versatile: Perfect as an appetizer, main dish, or even a lunchbox treat.
    • Family-Friendly: Kids and adults alike will enjoy customizing their slices with extra pizza sauce or toppings.
    • Make-Ahead: Prepare it in advance and pop it in the oven when you’re ready to enjoy!

    Ingredients

    • 1 egg
    • 1/2 pound Italian sausage
    • 1 cup shredded Parmesan cheese
    • 1/2 cup pepperoni slices
    • 1 roll of pizza dough
    • 1/2 cup pizza sauce, plus more for serving
    • 1 cup shredded mozzarella cheese

    Instructions

    1. Preheat your oven to 450 degrees F. Cook the Italian sausage in a medium skillet over medium heat until browned. Drain on paper towels and crumble into small pieces.
    2. Line a baking pan with parchment paper and lightly flour the surface. Roll out the pizza dough to form a large rectangle.
    3. Brush a thin layer of pizza sauce over the dough, leaving a small border around the edges.
    4. Evenly spread the crumbled sausage over the sauce, followed by the shredded mozzarella cheese.
    5. Layer the pepperoni slices on top of the cheese, then sprinkle 3/4 cup of the Parmesan cheese over the top.
    6. Gently fold in the short sides of the dough to form a seal around the filling.
    7. Starting from one long side, carefully roll the dough into about one third of the stromboli. Using the parchment paper to assist, continue rolling until you reach the opposite end. Pinch the seam to seal and place the stromboli seam-side down on the baking pan.
    8. In a small bowl, mix the egg with 1 tablespoon of water. Brush the egg mixture over the stromboli and sprinkle with the remaining 1/4 cup of Parmesan cheese.
    9. Place in the oven and immediately turn the temperature down to 350 degrees F. Bake for approximately 18 minutes.
    10. Remove from the oven and let the stromboli rest for 10 minutes. Check the center to ensure the dough is fully cooked. If needed, slice the stromboli in half and bake for an additional 5-8 minutes.
    11. Slice and serve with warm pizza sauce for dipping.

    Tips

    • Ensure your dough is at room temperature before rolling it out to prevent it from shrinking back.
    • For a crispier crust, use a pizza stone preheated in the oven.
    • Let the stromboli rest before slicing to allow the cheese to set slightly, making it easier to cut.

    Variations & Substitutions

    Feel free to get creative with your stromboli filling! Here are some ideas to customize your dish:

    • Vegetarian: Swap the sausage and pepperoni for mushrooms, bell peppers, and spinach.
    • Extra Spicy: Add sliced jalapeños or a sprinkle of red pepper flakes for a kick.
    • Different Cheeses: Experiment with provolone or cheddar cheese for a different flavor profile.

    Storage

    Store any leftover stromboli in an airtight container in the refrigerator for up to 3 days. To reheat, place slices in a preheated oven at 350 degrees F for about 10 minutes or until heated through. You can also freeze the baked stromboli for up to 3 months. Thaw overnight in the refrigerator before reheating.

    FAQ

    Can I use store-bought dough?

    Absolutely! Store-bought pizza dough works wonderfully for this recipe and saves time. Just ensure it’s at room temperature before rolling it out.

    How can I prevent the filling from leaking?

    Be sure to seal the edges of the dough well and avoid overfilling. Gently pinching the seams and tucking the ends will help contain the delicious filling.

    Nutrition

    This stromboli is a hearty dish that provides protein from the sausage and cheese, along with carbohydrates from the dough. While it’s a treat best enjoyed occasionally, you can balance it with a side salad or roasted vegetables for a well-rounded meal.

    Final Thoughts

    This Sausage & Pepperoni Stromboli is a delightful way to enjoy the flavors of pizza in a new, exciting form. Whether you’re serving it for a family dinner or a casual get-together, it’s sure to be a hit. I hope this recipe brings as much joy to your table as it has to mine. Happy cooking!

    Related update: Sausage & Pepperoni Stromboli

    Related update: North Carolina-Style BBQ Pulled Pork

  • Yorkshire Pudding | Made by Meaghan Moineau

    Yorkshire Pudding | Made by Meaghan Moineau

    Yorkshire Pudding: A Classic British Delight

    There’s something magical about the aroma of Yorkshire puddings baking in the oven, reminiscent of Sunday family dinners and festive holiday gatherings. I remember as a child, eagerly waiting by the kitchen door, peeking through the oven window to watch these golden puffs rise to perfection. This classic British side dish is the perfect complement to a roast beef dinner, and today, I’m thrilled to share with you my family’s cherished recipe.

    Why You’ll Love It

    Yorkshire pudding is a versatile and delectable addition to any meal. Its crispy exterior and soft, airy interior make it the perfect vehicle for soaking up savory sauces and gravies. Whether you’re serving it alongside a traditional roast beef or experimenting with other dishes, Yorkshire pudding is sure to impress your guests with its delightful texture and rich flavor. Plus, it’s made with just a few simple ingredients you likely have on hand.

    Ingredients

    • 3 large eggs
    • 1 cup all-purpose flour
    • 1 cup milk
    • 2-3 tablespoons pan drippings from roast beef (or vegetable oil)
    • 1/2 teaspoon salt

    Instructions

    1. Preheat your oven to between 400-450°F (200-230°C). The exact temperature can vary depending on your oven, so once you’ve made these a few times, you’ll be able to fine-tune it to your liking.
    2. Sift the flour and salt together into a large mixing bowl.
    3. In a separate bowl, beat the eggs and milk together until well combined.
    4. Gradually add the flour mixture to the wet ingredients, stirring continuously to avoid lumps. The batter should be smooth and slightly runny.
    5. Pour the pan drippings into your Yorkshire pudding tray. A muffin or cupcake tray works well too. Place the tray in the oven to heat the oil until it’s nice and hot.
    6. Once the oil is heated, carefully remove the tray from the oven. Quickly spoon a couple of tablespoons of batter into each section of your tray.
    7. Return the tray to the oven and bake for about 20 minutes or until the puddings are golden brown and puffed up. It’s crucial not to open the oven during this time, as it will cause the puddings to deflate.

    Tips

    For the best Yorkshire puddings, make sure your batter is smooth and your oil is sizzling hot before adding the batter. This will ensure they rise beautifully. Additionally, resist the urge to open the oven door while they’re baking, as the sudden change in temperature can cause them to collapse.

    Variations & Substitutions

    If you don’t have pan drippings, you can substitute with vegetable oil or melted butter. For a fun twist, try adding a pinch of herbs like rosemary or thyme to the batter for an aromatic flair. You can also experiment with different types of flour, such as whole wheat or gluten-free blends, to suit dietary preferences.

    Storage

    Yorkshire puddings are best enjoyed fresh out of the oven, but if you have leftovers, store them in an airtight container in the refrigerator for up to two days. To reheat, place them in a preheated oven at 350°F (175°C) for about 5-8 minutes until warmed through and crispy again.

    FAQ

    Why did my Yorkshire puddings not rise?

    If your Yorkshire puddings didn’t rise, it could be due to a few reasons. Ensure your oven is preheated to the correct temperature, and your oil is hot before adding the batter. Also, avoid opening the oven door during baking, as this can cause them to deflate.

    Can I make Yorkshire pudding without eggs?

    Eggs are crucial for the structure and texture of Yorkshire puddings, but you can try using an egg substitute if you have dietary restrictions. Keep in mind that the texture may vary slightly.

    Nutrition

    Yorkshire puddings are relatively low in calories, with each pudding containing around 80-100 calories. They provide a modest amount of protein from the eggs and are a good source of carbohydrates. However, their nutritional content can vary based on the type of oil or drippings used.

    Final Thoughts

    Yorkshire pudding is a beloved classic that brings warmth and comfort to any meal. With its simple ingredients and easy preparation, it’s a dish that allows you to focus on spending time with loved ones rather than fussing in the kitchen. Whether you’re new to making Yorkshire pudding or a seasoned pro, I hope this recipe finds a special place at your table, evoking cherished memories and creating new ones. Happy cooking!

    Related update: Yorkshire Pudding

  • Make Olive Garden’s Delicious Pasta Fagioli At Home | Made by Meaghan Moineau

    Make Olive Garden’s Delicious Pasta Fagioli At Home | Made by Meaghan Moineau

    Make Olive Garden’s Delicious Pasta Fagioli At Home

    There’s something incredibly comforting about a steaming bowl of soup, especially when it’s inspired by a beloved restaurant favorite. Olive Garden’s Pasta Fagioli has always been a dish that evokes warmth and a sense of home. I remember the first time I tasted it; I was dining out with my family, and the rich, hearty flavors made me feel like I was wrapped in a cozy blanket. It’s been a staple in my kitchen ever since, and today, I’m excited to share how you can recreate this delicious soup at home.

    Why You’ll Love It

    This homemade version of Olive Garden’s Pasta Fagioli is not only delicious and hearty but also incredibly easy to make. It brings together healthy ingredients in a way that feels indulgent without being heavy. Here’s why you’ll fall in love with making this soup at home:

    • Hearty and Filling: Packed with protein-rich beans and lean ground turkey, this soup is a meal in itself.
    • Nutritious: Loaded with vegetables like carrots, celery, and zucchini, it’s a great way to get your daily dose of veggies.
    • Easy to Prepare: With simple steps and common ingredients, it’s a dish that fits into any busy schedule.
    • Family Favorite: It’s a crowd-pleaser that’s perfect for family dinners or gatherings with friends.
    • Customizable: Easily tweak the recipe to suit your dietary preferences or what you have on hand.

    Ingredients

    • 1 pound lean ground turkey
    • 2 tablespoons olive oil
    • 1 cup chopped onions
    • 1 cup chopped carrots
    • 1 cup chopped celery stalks
    • 3 garlic cloves, minced
    • 2 cans (14.5 oz each) diced tomatoes, undrained
    • 1 can (15 oz) red kidney beans, drained and rinsed
    • 1 can (15 oz) white kidney beans, drained and rinsed
    • 1 can (15 oz) great northern beans, drained and rinsed
    • 4 cups canned beef broth
    • 1 jar (24 oz) pasta sauce
    • 1 medium zucchini, chopped
    • 2 teaspoons Italian seasoning blend
    • Fresh ground pepper to taste
    • 1 cup whole wheat penne pasta
    • Grated Parmesan cheese (optional, for serving)

    Instructions

    1. In a large soup pot, brown the ground turkey over medium heat. Once cooked, drain the turkey in a colander and set aside.
    2. In the same pot, heat the olive oil over medium heat. Add the onions, carrots, celery, and garlic, and cook for about 2 minutes, stirring often to prevent sticking.
    3. Return the drained turkey to the pot. Add the canned tomatoes, red kidney beans, white kidney beans, great northern beans, beef broth, pasta sauce, chopped zucchini, Italian seasoning, and fresh ground pepper. Stir well to combine.
    4. Bring the soup to a boil. Then, reduce the heat to a simmer, cover the pot, and let it cook for 50 minutes, allowing the flavors to meld together.
    5. Add the whole wheat penne pasta to the soup. Cover the pot again and cook for about 10 minutes or until the pasta is tender.
    6. Ladle the soup into bowls and top with grated Parmesan cheese if desired. Serve hot and enjoy!

    Tips

    • For a richer flavor, consider browning the turkey with a little garlic and onion powder.
    • Ensure you stir the soup occasionally as it simmers to prevent the ingredients from sticking to the bottom of the pot.
    • If you prefer a thicker soup, reduce the amount of broth or simmer uncovered for the last 10 minutes of cooking.

    Variations & Substitutions

    • Meat Substitutes: Replace ground turkey with ground beef, chicken, or even a plant-based meat alternative for a vegetarian version.
    • Bean Choices: If you don’t have the specified beans, feel free to use any combination of beans you have on hand.
    • Gluten-Free Option: Use gluten-free pasta to make this dish suitable for those with gluten sensitivities.
    • Spice it Up: Add a pinch of red pepper flakes for some heat, or use spicy Italian sausage instead of turkey.

    Storage

    This Pasta Fagioli soup stores well, making it perfect for meal prep. Here’s how to store it:

    • Refrigerator: Store leftovers in an airtight container in the refrigerator for up to 4 days. Reheat on the stove or in the microwave.
    • Freezer: This soup freezes beautifully. Allow it to cool completely, then transfer to freezer-safe containers. It will keep for up to 3 months. Thaw overnight in the refrigerator before reheating.

    FAQ

    Can I use fresh tomatoes instead of canned?

    Yes, you can use fresh tomatoes if desired. Use about 4 cups of chopped fresh tomatoes. You may need to add an extra cup of broth to maintain the soup’s consistency.

    Is it necessary to use beef broth?

    While beef broth adds depth to the soup, you can substitute chicken broth or vegetable broth if preferred. Each will slightly alter the flavor profile, but the soup will still be delicious.

    How can I make this soup vegetarian?

    To make a vegetarian version, simply omit the ground turkey and use vegetable broth instead of beef broth. You can also add extra beans or vegetables for additional texture and flavor.

    Nutrition

    This soup is a hearty meal that provides an excellent balance of protein, fiber, and essential nutrients. Here’s a rough estimate of the nutritional information per serving (without Parmesan cheese):

    • Calories: 250
    • Protein: 18g
    • Carbohydrates: 35g
    • Fat: 6g
    • Fiber: 8g
    • Sodium: 600mg

    Final Thoughts

    Making Olive Garden’s Pasta Fagioli at home is not just about recreating a favorite restaurant dish; it’s about bringing a bit of comfort and warmth to your table. This recipe is straightforward, adaptable, and sure to become a staple in your meal rotation. Whether you’re enjoying it on a chilly evening or sharing it with family and friends, it’s a dish that brings people together. I hope you enjoy making and eating it as much as I do!

    Related update: Make Olive Garden’s Delicious Pasta Fagioli At Home

    Related update: Curried Chicken Roll-Ups

    Related update: Truffle-Infused Mushroom Soup with Parmesan Crisps & Tarragon Creme Fraiche