Tag: White Chocolate

  • Chocolate Spelt Cake | Made by Meaghan Moineau

    Chocolate Spelt Cake | Made by Meaghan Moineau

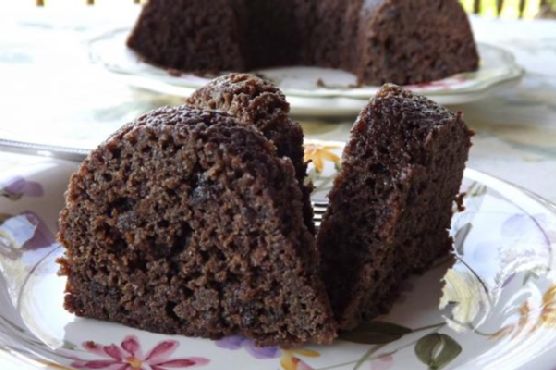
    Chocolate Spelt Cake: A Nostalgic Delight

    There’s something truly magical about baking a cake that fills your home with warmth and the tantalizing aroma of chocolate. This Chocolate Spelt Cake is more than just a dessert; it’s a heartfelt journey back to simpler times, where every bite brings a flood of cherished memories. I remember my grandmother baking this delightful cake for family gatherings, her kitchen brimming with laughter and the irresistible scent of cocoa. Today, I’m thrilled to share this beloved recipe with you, so you too can create beautiful memories with your loved ones.

    Why You’ll Love It

    This Chocolate Spelt Cake is a must-try for several reasons. First, it offers a healthier twist on a classic chocolate cake by using spelt flour, which is rich in nutrients and adds a slightly nutty flavor. The combination of rich cocoa and warm coffee creates a depth of flavor that is both indulgent and comforting. Plus, the addition of currants provides a delightful burst of sweetness in every bite. Whether you’re a seasoned baker or a novice, this cake is simple to make and guaranteed to impress your family and friends.

    Ingredients

    • 1 1/2 cups spelt flour
    • 1 cup unsalted butter, room temperature
    • 1 cup warm coffee
    • 1 tablespoon instant coffee
    • 1 teaspoon vanilla extract
    • 1 teaspoon baking soda
    • 1/2 teaspoon salt
    • 1 cup brown sugar
    • 1/2 cup white sugar
    • 2 large eggs
    • 3/4 cup cocoa powder
    • 1/2 cup sour cream
    • 1/2 cup currants

    Instructions

    1. Preheat your oven to 350°F (175°C).
    2. Add the tablespoon of instant coffee to the warm coffee along with the vanilla, baking soda, and currants. Stir until frothy.
    3. In a medium bowl, combine the spelt flour, cocoa powder, and salt.
    4. In a mix-master, beat the butter, brown sugar, and white sugar until smooth and creamy.
    5. Add the eggs, one at a time, mixing well after each addition.
    6. Slowly add the coffee mixture to the butter mixture, continuing to mix until well combined.
    7. While mixing on low speed, gradually add the spelt flour mixture and mix until just combined.
    8. Prepare a bundt pan by greasing it with butter and dusting with cocoa powder.
    9. Pour the batter into the prepared bundt pan and smooth the top.
    10. Bake for 50-55 minutes, or until a toothpick inserted into the center comes out clean.
    11. Let the cake cool slightly before removing it from the pan.

    Tips

    • Ensure all ingredients are at room temperature before you start mixing. This helps the batter to mix evenly and results in a perfectly textured cake.
    • For a more intense chocolate flavor, consider using a high-quality cocoa powder.
    • Be cautious not to overmix the batter once the flour is added, as this can result in a dense cake.

    Variations & Substitutions

    Feel free to get creative with this recipe:

    • Flour: If you don’t have spelt flour, you can substitute with whole wheat flour or all-purpose flour, though the texture and flavor will slightly differ.
    • Sugar: For a deeper flavor, replace white sugar with coconut sugar or muscovado sugar.
    • Add-ins: Try adding chopped nuts like walnuts or pecans for extra crunch.
    • Frosting: This cake pairs beautifully with a simple chocolate ganache or a dusting of powdered sugar.

    Storage

    Store the Chocolate Spelt Cake in an airtight container at room temperature for up to three days. For longer storage, you can refrigerate it for up to a week. To enjoy it warm, simply microwave a slice for a few seconds before serving.

    FAQ

    Can I use regular flour instead of spelt flour?

    Yes, you can substitute spelt flour with all-purpose flour. However, keep in mind that spelt flour provides a unique nutty flavor and a slightly different texture.

    How can I make this cake dairy-free?

    To make this cake dairy-free, substitute the butter with a plant-based butter and use a dairy-free sour cream alternative or yogurt.

    Can I freeze this cake?

    Absolutely! Wrap the cooled cake tightly in plastic wrap and then in aluminum foil before placing it in the freezer. It can be frozen for up to three months. Thaw overnight in the refrigerator before serving.

    Nutrition

    This Chocolate Spelt Cake offers a balanced indulgence. Each slice (assuming 12 slices per cake) provides approximately:

    • Calories: 280
    • Fat: 14g
    • Carbohydrates: 38g
    • Protein: 4g
    • Fiber: 3g
    • Sugar: 22g

    Final Thoughts

    This Chocolate Spelt Cake is more than just a dessert; it’s a way to create lasting memories with your loved ones. Whether you’re enjoying it as a cozy treat on a rainy afternoon or serving it at a festive gathering, this cake is sure to bring joy and warmth to any occasion. So, gather your ingredients, preheat your oven, and embrace the simple pleasure of baking. I hope this recipe becomes a cherished favorite in your home, just as it has been in mine.

    Related update: Chocolate Spelt Cake

    Related update: Mangolicious Upside Down Cake

  • Chocolate and Szechuan Peppercorn Brownies | Made by Meaghan Moineau

    Chocolate and Szechuan Peppercorn Brownies | Made by Meaghan Moineau

    Chocolate and Szechuan Peppercorn Brownies

    Welcome to a delicious and adventurous twist on a classic dessert recipe! These Chocolate and Szechuan Peppercorn Brownies are not just any brownies—they’re a bold combination of rich chocolate and a hint of spice, taking your taste buds on a journey they won’t forget. This recipe is a personal favorite, inspired by a childhood memory of my grandmother’s kitchen, where the smell of chocolate always meant something special was baking. I remember one chilly winter afternoon when she surprised us with a batch of brownies infused with spices, and I’ve been hooked on the combination ever since. Today, I share a modern take on that nostalgic treat.

    Why You’ll Love It

    These brownies are a delightful fusion of sweet and spicy, perfect for chocolate lovers looking to explore new flavors. The Szechuan peppercorns add a subtle, tingly spice that complements the deep chocolate richness beautifully. Not only are they unique, but they also have a gorgeous, fudgy texture that melts in your mouth. Whether you’re sharing them at a gathering or enjoying a quiet night in, these brownies are sure to impress.

    Ingredients

    • 1 cup brown sugar
    • 1/2 cup butter
    • 1 cinnamon stick
    • 2 large eggs
    • 1 tablespoon espresso
    • 3/4 cup all-purpose flour
    • 1/2 cup granulated sugar
    • 1/2 cup heavy cream
    • 1 teaspoon kosher salt
    • 1/4 cup milk
    • 1 tablespoon Szechuan peppercorns
    • 1 cup semisweet chocolate chips
    • 4 ounces unsweetened chocolate
    • 1/4 cup unsweetened cocoa powder
    • 1 teaspoon vanilla extract

    Instructions

    1. Preheat your oven to 350°F (175°C). Grease an 8×8 inch baking dish and set aside.
    2. In a large sauté pan over medium heat, melt the butter. Add the Szechuan peppercorns and the cinnamon stick.
    3. Meanwhile, in a double boiler or microwave, melt the unsweetened chocolate and semisweet chocolate together.
    4. Stir the espresso into the melted chocolate.
    5. Once the butter stops foaming and you can see browned bits at the bottom of the pan (about 5 minutes), take it off the heat and remove the peppercorns and cinnamon stick. It may be easier to strain the contents of the pan and then return just the butter to it.
    6. Stir the brown sugar, granulated sugar, milk, vanilla, and salt into the butter in the pan.
    7. Then stir in the cocoa powder and chocolate and espresso mixture.
    8. Beat in the eggs, and then lastly, stir in the flour until just combined.
    9. Pour the batter into the greased pan and bake for about 25-30 minutes, until a tester comes out clean. Feel free to underbake them a bit for a fudgy texture.
    10. Once the brownies are cooled, spread the ganache over the top. I like to put them in the refrigerator to firm up the ganache.
    11. To make the ganache, bring the heavy cream and peppercorns to a simmer in a small pot. Strain the peppercorns and stir in the semisweet chocolate chips until smooth.

    Tips

    For the best results, ensure all your ingredients are at room temperature before starting. This will help them blend together more smoothly. Also, be sure to watch the butter closely as it browns; the nutty flavor it develops is crucial to the depth of the brownie flavor. Finally, don’t skip on straining the peppercorns—they add flavor but are not pleasant to bite into directly.

    Variations & Substitutions

    If you’re not a fan of Szechuan peppercorns or can’t find them, you can substitute with a pinch of cayenne pepper for a different kind of heat. For a nutty twist, consider adding a handful of toasted walnuts or pecans to the batter before baking. For a more indulgent dessert, serve the brownies warm with a scoop of vanilla ice cream on top.

    Storage

    Store these brownies in an airtight container at room temperature for up to 3 days. For longer storage, you can refrigerate them for up to a week or freeze them for up to 3 months. If freezing, wrap them tightly in plastic wrap and place them in a freezer-safe bag.

    FAQ

    Can I make these brownies gluten-free?

    Yes! You can substitute the all-purpose flour with a 1:1 gluten-free baking blend. Ensure the blend you choose is designed to replace regular flour in baking.

    What can I use if I don’t have a double boiler?

    If you don’t have a double boiler, you can melt the chocolate in a microwave-safe bowl. Heat in short bursts of 20-30 seconds, stirring in between until smooth and melted.

    How can I make these brownies vegan?

    To make these brownies vegan, substitute the butter with a plant-based alternative, use a flax egg in place of regular eggs, and ensure your chocolate is dairy-free.

    Nutrition

    Each brownie (based on 12 servings) is approximately 250 calories, with 15g of fat, 30g of carbohydrates, and 4g of protein. Please note that these values are approximate and can vary depending on the specific ingredients used.

    Final Thoughts

    These Chocolate and Szechuan Peppercorn Brownies are a delightful and unique treat that will surely become a favorite for adventurous dessert lovers. The combination of rich chocolate with a hint of spicy warmth is irresistible and perfect for any occasion. I hope you enjoy baking and sharing these brownies as much as I do. Let me know how they turned out for you, and feel free to share your own variations in the comments!

    Related update: Chocolate and Szechuan Peppercorn Brownies

    Related update: Almond and cranberry shortbread

  • Brownie Cupcakes | Made by Meaghan Moineau

    Brownie Cupcakes | Made by Meaghan Moineau

    Brownie Cupcakes Recipe

    There’s something magical about the smell of chocolate wafting through the house. It takes me back to my childhood, where every family gathering was an excuse for my grandmother to whip up a batch of her famous brownies. She’d serve them warm, with a scoop of vanilla ice cream on top. Inspired by those memories, I’ve crafted a delightful twist on her classic recipe: Brownie Cupcakes. These cupcakes are rich, fudgy, and incredibly satisfying. Perfect for any occasion, they offer the indulgence of a brownie with the convenience of a cupcake.

    Why You’ll Love It

    These brownie cupcakes are a chocolate lover’s dream. They combine the dense, rich texture of a brownie with the fun, single-serving format of a cupcake. Here are a few reasons why you’ll fall head over heels for this recipe:

    • Rich and Chocolatey: Made with unsweetened chocolate, these cupcakes are intensely chocolate-flavored.
    • Easy to Make: Whip up a batch in no time with simple ingredients you probably already have in your pantry.
    • Perfect for Any Occasion: Whether it’s a birthday party or a simple family dinner, these cupcakes fit right in.
    • Customizable: Easily adapt them to satisfy any dietary preferences or flavor cravings.

    Ingredients

    • 4 oz unsweetened chocolate, chopped
    • 1/2 cup unsalted butter
    • 1 cup white granulated sugar
    • 1 teaspoon vanilla extract
    • 3 large eggs
    • 3/4 cup all-purpose flour
    • 1/4 teaspoon salt

    Instructions

    1. Preheat your oven to 325 degrees F (170 degrees C). If using a turbo broiler, set it to 150 degrees C.
    2. Melt the chopped chocolate and butter in a stainless steel bowl placed over a saucepan of simmering water. Stir until smooth and then remove from heat. Let it cool for a few minutes.
    3. Stir in the sugar using a spoon or a hand mixer.
    4. Add the vanilla extract. Then incorporate the eggs one at a time, mixing well after each addition.
    5. Mix in the flour and salt until the batter is well blended.
    6. Evenly divide the batter between the muffin cups.
    7. Place in the preheated oven and bake for about 20-25 minutes. If using a turbo broiler, bake for 13-15 minutes.
    8. Remove from the oven and let cool on a wire rack. Once completely cooled, frost with icing.

    Tips

    Achieving the perfect brownie cupcake is easy with these tips:

    • Use Quality Chocolate: The better the chocolate, the richer the flavor.
    • Don’t Overmix: Mix just until combined to keep the cupcakes tender.
    • Check for Doneness: Insert a toothpick into the center; it should come out with a few moist crumbs for a fudgy texture.

    Variations & Substitutions

    Make this recipe your own with these variations:

    • Nutty Delight: Add chopped walnuts or pecans to the batter for a delightful crunch.
    • Gluten-Free: Substitute all-purpose flour with a gluten-free flour blend.
    • Dairy-Free: Use dairy-free butter and chocolate for a lactose-free treat.
    • Mint Chocolate: Add a few drops of peppermint extract for a minty twist.

    Storage

    Store your brownie cupcakes in an airtight container at room temperature for up to 3 days. For longer storage, keep them in the refrigerator for up to a week. They can also be frozen for up to 3 months. Thaw at room temperature before serving.

    FAQ

    Can I use milk chocolate instead of unsweetened chocolate?

    Yes, you can use milk chocolate, but the cupcakes will be sweeter. Consider reducing the sugar by half to balance the sweetness.

    How do I make these cupcakes more cake-like?

    To achieve a more cake-like texture, you can add an additional 1/4 cup of flour to the batter. This will make the cupcakes less dense and more airy.

    Can I add frosting to these cupcakes?

    Absolutely! These cupcakes pair wonderfully with vanilla or chocolate buttercream frosting. Feel free to get creative with your favorite icing.

    Nutrition

    Each brownie cupcake provides approximately:

    • Calories: 180
    • Fat: 10g
    • Carbohydrates: 24g
    • Protein: 3g
    • Sugar: 15g

    Final Thoughts

    Brownie cupcakes are a delightful treat that combines the best aspects of brownies and cupcakes into one delicious package. Whether you’re a seasoned baker or a novice in the kitchen, this recipe is straightforward and rewarding. With the tips and variations provided, you can easily adapt the recipe to suit your taste and dietary needs. So go ahead, embrace the nostalgia, and enjoy the rich, chocolatey goodness of these brownie cupcakes with your loved ones!

    Related update: Brownie Cupcakes

    Related update: Delicious Rhubarb Custard Pie

    Related update: Grandma Inez’s Pineapple Pie

  • Bacon Brownie Cupcakes | Made by Meaghan Moineau

    Bacon Brownie Cupcakes | Made by Meaghan Moineau

    Bacon Brownie Cupcakes

    Why You’ll Love It

    Picture this: a cozy Sunday afternoon where the enticing aroma of chocolate intermingles with the savory scent of bacon wafting through your home. This is the magic of Bacon Brownie Cupcakes. They are the perfect fusion of two beloved American classics: brownies and bacon. The rich, fudgy texture of the brownie, combined with the salty, crispy bits of bacon, creates a unique treat that hits all the right notes. These cupcakes are a delightful surprise for anyone who thinks they’ve tasted it all. Perfect for potlucks, family gatherings, or just a scrumptious indulgence, these cupcakes will quickly become a favorite.

    When I was a child, my grandmother had a knack for creating the most unexpected yet delightful combinations in her little kitchen. One of my fondest memories is of her introducing me to the combination of chocolate and bacon. It seemed peculiar at first, but the taste was unforgettable. Inspired by her culinary adventures, I’ve taken her concept and turned it into these Bacon Brownie Cupcakes, ensuring that each bite is a nod to her creative spirit and love for family gatherings.

    Ingredients

    • 4 ounces unsweetened chocolate
    • 8 ounces sweetened chocolate
    • 1 cup butter
    • 2 cups sugar
    • 1/2 teaspoon salt
    • 4 large eggs
    • 1 cup all-purpose flour
    • 1/4 cup cocoa powder
    • 6 strips bacon, cooked and crumbled

    Instructions

    1. Preheat your oven to 350°F (175°C). Grease a standard muffin pan. We recommend using a standard size rather than mini or jumbo, as they bake to the perfect consistency in this size.
    2. Fry the bacon until crispy, but avoid letting it char. Once cooked, let it cool on a paper towel to absorb excess grease. Discard any large white chunks of fat.
    3. In a double boiler, melt the unsweetened chocolate and butter together until smooth. Remove from heat and allow to cool slightly.
    4. Whisk in the sugar and salt into the chocolate mixture. Then add the eggs, one at a time, ensuring each is fully incorporated before adding the next.
    5. Sift the all-purpose flour and cocoa powder together to remove any lumps.
    6. Gently fold the flour mixture into the chocolate mixture until just combined. Be careful not to overmix.
    7. Stir in the crumbled bacon and sweetened chocolate pieces, distributing them evenly throughout the batter.
    8. Fill each cup of the muffin pan about two-thirds full with batter.
    9. Bake in the preheated oven for approximately 30 minutes, or until a toothpick inserted into the center comes out with a few moist crumbs.
    10. Allow the brownie cupcakes to cool in the pan for 10 minutes before transferring them to a wire rack to cool completely.

    Tips

    For best results, use high-quality chocolate and bacon. The quality of these ingredients will significantly affect the flavor of your cupcakes. Additionally, make sure to thoroughly cool the melted chocolate mixture before adding the eggs to prevent them from cooking.

    Variations & Substitutions

    Feel free to experiment with different types of bacon, such as maple-glazed or peppered bacon, to add another layer of flavor. For those who prefer a less sweet treat, you can reduce the amount of sweetened chocolate or use dark chocolate instead. If you’re looking to add a bit of crunch, consider folding in a handful of chopped nuts, such as pecans or walnuts.

    Storage

    Store any leftover cupcakes in an airtight container at room temperature for up to three days. For longer storage, you can refrigerate them for up to a week, although they may lose some of their fudginess. Alternatively, freeze the cupcakes for up to three months, and thaw them at room temperature before serving.

    FAQ

    Can I use turkey bacon instead of regular bacon?

    Yes, you can substitute turkey bacon for pork bacon. However, keep in mind that turkey bacon tends to be leaner and may not have the same crispy texture and rich flavor as pork bacon. Adjust the cooking time accordingly to ensure it’s crispy but not overcooked.

    Can I make these cupcakes gluten-free?

    Absolutely! Simply replace the all-purpose flour with a gluten-free flour blend that is suitable for baking. Ensure that the blend contains xanthan gum or another binder to maintain the texture of the cupcakes.

    Can I make this recipe without eggs?

    Yes, you can use egg substitutes such as flaxseed meal or applesauce in equal amounts to replace the eggs. The texture might be slightly different, but it will still be delicious!

    Nutrition

    While indulgent, each Bacon Brownie Cupcake is approximately 250 calories. They also contain an estimated 15g of fat, 25g of carbohydrates, and 5g of protein. Keep in mind these values can vary depending on the specific brands and types of ingredients used.

    Final Thoughts

    Bacon Brownie Cupcakes are a testament to the magic that happens when sweet and savory collide. These cupcakes are sure to be a conversation starter and a delightful surprise for your friends and family. Whether you’re reminiscing about fond childhood memories or creating new ones, this recipe is bound to become a beloved favorite. Remember, the heart of baking lies in experimentation and joy, so don’t hesitate to make this recipe your own. Happy baking!

    Related update: Bacon Brownie Cupcakes

    Related update: Delicious Sausage & Peppers

    Related update: Cyndee’s Neiman Marcus Cake

  • Eggless Blueberry and White Chocolate Baked Cheesecake | Made by Meaghan Moineau

    Eggless Blueberry and White Chocolate Baked Cheesecake | Made by Meaghan Moineau

    Eggless Blueberry and White Chocolate Baked Cheesecake

    There are few things more comforting than a slice of cheesecake, and this Eggless Blueberry and White Chocolate Baked Cheesecake is no exception. I remember the first time I tried cheesecake. It was a chilly autumn day, and my grandmother had just pulled a golden, creamy cheesecake out of the oven. The smell alone was enough to make my mouth water. This recipe is inspired by those cherished moments, blending the tangy taste of blueberries with the decadent richness of white chocolate—all without eggs.

    Why You’ll Love It

    This cheesecake is a delightful fusion of flavors and textures. The buttery biscuit crust provides a perfect foundation for the creamy filling, while the blueberries add a burst of freshness, and the white chocolate enhances the dessert’s richness. Whether you’re catering to those with egg allergies or simply looking for a unique twist on the classic cheesecake, this recipe is sure to become a favorite.

    Ingredients

    • 200g digestive biscuits, crushed
    • 100g butter, melted
    • 200g white chocolate, melted
    • 500g cream cheese
    • 250g ricotta cheese
    • 200ml double cream
    • 150g granulated sugar
    • 2 tablespoons cornflour
    • 1 teaspoon vanilla extract
    • 1 tablespoon lemon juice
    • 200g plain blueberries

    Instructions

    1. Preheat your oven to 180 degrees Celsius.
    2. Combine the crushed digestive biscuits with the melted butter. Mix thoroughly to ensure the butter is evenly distributed.
    3. Firmly press the mixture into the base of a greased 10-inch springform tin, creating an even crust.
    4. In a large mixing bowl, beat together the cream cheese, ricotta cheese, double cream, granulated sugar, cornflour, vanilla extract, lemon juice, and melted white chocolate until the mixture is smooth and thickened. Avoid overmixing.
    5. Pour half of the cheese mixture over the prepared crust.
    6. Scatter the blueberries evenly over the cheese mixture.
    7. Pour the remaining cheese mixture over the blueberries, gently spreading it to cover all the berries.
    8. Bake the cheesecake in the oven for 1 to 1 1/4 hours until set. Adjust the time if using a fan oven.
    9. Allow the cheesecake to cool at room temperature, then refrigerate for at least 8 hours or overnight for best results.
    10. Cut into large wedges and serve chilled.

    Tips

    For the best texture, ensure all ingredients are at room temperature before mixing. This will help everything blend smoothly and create a creamier cheesecake. When pressing the crust into the tin, use the bottom of a glass to get an even, compact layer.

    Variations & Substitutions

    If you prefer a gluten-free version, swap the digestive biscuits for a gluten-free alternative. You can also experiment with different berries if blueberries aren’t in season—raspberries or blackberries make excellent substitutes. For a dairy-free twist, use a plant-based cream cheese and coconut cream in place of double cream.

    Storage

    Store the cheesecake in an airtight container in the refrigerator for up to five days. You can also freeze individual slices wrapped in cling film and foil for up to three months. Defrost in the fridge overnight before serving.

    FAQ

    Can I make this cheesecake in advance?

    Absolutely! This cheesecake actually tastes better after it’s had time to set, making it perfect for preparing a day or two ahead of serving.

    How can I tell when the cheesecake is done baking?

    You’ll know the cheesecake is ready when the edges are set, but the center still has a slight wobble. It will firm up as it cools.

    What can I use instead of a springform tin?

    If you don’t have a springform tin, a regular cake tin will work. Just line it with parchment paper for easy removal.

    Nutrition

    This cheesecake is a rich and indulgent dessert, perfect for special occasions. While exact nutritional values can vary, each slice is estimated to contain around 450 calories, 30g of fat, and 35g of sugar, depending on portion size and specific ingredients used.

    Final Thoughts

    Baking can be a beautiful journey of creativity and nostalgia, and this Eggless Blueberry and White Chocolate Baked Cheesecake is a testament to that. Whether you’re baking for loved ones or treating yourself, this recipe is a comforting reminder of how food can be both a sensory delight and a heartfelt hug. Enjoy every bite, and maybe even share a slice with someone special.

    Related update: Eggless Blueberry and White Chocolate Baked Cheesecake

    Related update: Mascarpone & Ricotta Cheese Cake