Tag: Traditional

  • Mixed Paella | Made by Meaghan Moineau

    Mixed Paella | Made by Meaghan Moineau

    Delicious Mixed Paella: A Taste of Spain in Your Kitchen

    Remember those long summer evenings when the family would gather around a large, vibrant dish, the aroma of saffron filling the air? Mixed Paella has always been a dish of celebration for me. Growing up, my family would often host get-togethers, and my mother would prepare this dish with love and enthusiasm. The sizzle of chorizo in the pan and the vibrant colors of fresh vegetables and seafood always created a symphony of flavors that we couldn’t resist. Today, I’m excited to share this cherished recipe with you, hoping it will bring as much joy to your table as it has to mine.

    Why You’ll Love It

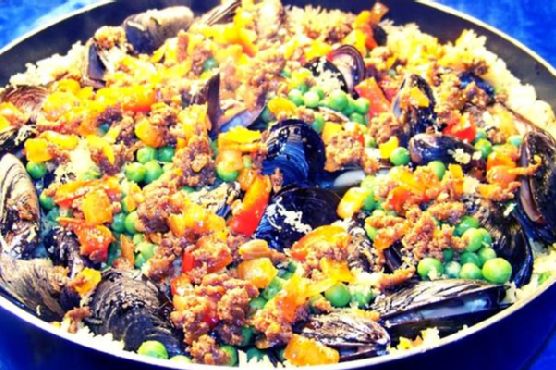
    This Mixed Paella recipe is an ideal blend of land and sea, bringing together a rich tapestry of flavors and textures. The rice soaks up the robust taste of saffron and broth, while the seafood adds a delightful freshness. The crispy chorizo introduces a smoky depth that ties the dish together perfectly. Whether you’re a novice cook or a seasoned chef, this dish is both accessible and impressive, making it perfect for family dinners and special occasions alike.

    Ingredients

    • Bay leaf
    • Chicken broth
    • Chorizo sausage
    • Extra virgin olive oil
    • White fish
    • Garlic
    • Lemon
    • Lemon zest
    • Mussels
    • Spanish onion
    • Parsley
    • Peas
    • Red bell pepper
    • Crushed red pepper flakes
    • Dry rice
    • Saffron threads
    • Shrimp
    • Thyme

    Instructions

    1. In a very large non-stick skillet or paella pan preheated over medium-high heat, add 2 teaspoons of your olive oil (you will need more oil if you’re not using non-stick), garlic, red pepper flakes, and rice. Sauté for about 3 minutes.
    2. Add saffron, thyme, bay leaf, and chicken broth and bring to a boil. Cover and reduce the heat to a simmer. Leave covered, do not stir.
    3. In another non-stick skillet, heat to medium-high. Add chorizo and crumble as you sauté. When the sausage is cooked through, add red pepper and onion. Salt and pepper to taste if needed. Sauté until the onion is tender, then remove from heat and set aside.
    4. When the rice is nearly done (about 15 minutes), add fish and shrimp and press into the rice. Add mussels, peas, and sprinkle with lemon zest. Cover and continue to simmer until the rice is done and the mussels have opened. Discard any that do not open.
    5. Top with the chorizo mixture and parsley. Serve with lemon wedges and crusty bread.

    Tips

    For the best results, use a paella pan if you have one, as its wide and shallow shape allows the rice to cook evenly. Remember not to stir the rice once the liquid has been added; this ensures the classic paella texture. Use fresh seafood for the best flavor, and don’t skimp on the saffron—it truly is the soul of this dish.

    Variations & Substitutions

    If you’re looking to customize your paella, consider these variations:

    • Vegetarian Option: Replace the seafood and chorizo with a variety of mushrooms and artichokes for a hearty vegetarian version.
    • Meat Lovers: Add some diced chicken thighs or rabbit for a more traditional take on paella Valenciana.
    • Spice It Up: If you enjoy a kick of heat, increase the amount of crushed red pepper flakes or add a splash of hot sauce.

    Storage

    Leftover paella can be stored in an airtight container in the refrigerator for up to 3 days. To reheat, add a splash of water or broth and warm slowly over low heat to maintain the dish’s moist texture. Avoid using the microwave as it can dry out the rice.

    FAQ

    Can I make paella in advance?

    Yes, you can prepare the components in advance, such as cooking the chorizo and chopping the vegetables. However, for the best flavor and texture, it’s recommended to cook the rice and assemble the dish just before serving.

    What type of rice should I use for paella?

    Short-grain rice, such as Bomba or Arborio, is ideal for paella as it absorbs the liquid well without becoming mushy. Avoid using long-grain rice as it doesn’t provide the traditional paella texture.

    Can I use frozen seafood?

    While fresh seafood is preferred for the best flavor, you can use frozen seafood in a pinch. Just ensure it is fully thawed and drained before adding to the paella to avoid excess moisture.

    Nutrition

    This Mixed Paella is a balanced dish, providing a good source of protein from the seafood and chorizo, and plenty of vitamins and minerals from the vegetables. Saffron is known for its antioxidant properties, and the olive oil adds heart-healthy fats.

    Final Thoughts

    Mixed Paella is more than just a dish; it’s a celebration of flavors and cultures, a reminder of family gatherings and joyous occasions. With its vibrant colors and rich flavors, it’s sure to become a favorite in your household. I hope this recipe brings warmth and happiness to your table, just as it has to mine. Bon appétit!

    Related update: Mixed Paella

    Related update: Sweet and Spicy Country-Style Ribs

  • Pennsylvania Dutch Pickled Eggs | Made by Meaghan Moineau

    Pennsylvania Dutch Pickled Eggs | Made by Meaghan Moineau

    Pennsylvania Dutch Pickled Eggs

    Why You’ll Love It

    Pickled eggs are a delightful and tangy treat that will transport you to the heart of Pennsylvania Dutch country. Not only are they visually striking with their vibrant pink hue, but they also pack a punch of flavor that is both sweet and tangy. These pickled eggs are a testament to the simplicity and resourcefulness of traditional cooking, using basic pantry staples to create something truly special. Whether you’re a fan of traditional pickling or looking to try something new, these eggs are sure to become a favorite in your household.

    I remember the first time I encountered pickled eggs at a small family gathering in rural Pennsylvania. My great-aunt Martha would bring a large jar of these beautifully colored eggs, and they were always the first to disappear from the table. To this day, the taste of these pickled eggs brings back cherished memories of family, laughter, and the warm kitchen where we gathered to share stories and food.

    Ingredients

    • 1 can of beets, drained (reserve the liquid)
    • 1 cup cider vinegar
    • 12 hard-boiled eggs, peeled
    • 1/2 cup granulated sugar
    • 1 onion, thinly sliced
    • 1 teaspoon table salt

    Instructions

    1. Drain the liquid from the beets into a medium saucepan. Set the beets aside for later use.
    2. In a large bowl or jar, layer the beets, sliced onions, and hard-boiled eggs.
    3. Add the granulated sugar and cider vinegar to the saucepan with the beet liquid and stir well.
    4. Bring the mixture to a boil over medium heat, stirring occasionally to ensure the sugar dissolves completely.
    5. Once boiling, reduce the heat to low and let the mixture simmer for 15 minutes.
    6. Carefully pour the hot beet juice mixture over the beets, eggs, and onions in the bowl or jar.
    7. Seal the bowl or jar tightly with a lid.
    8. Refrigerate the pickled eggs for at least one day before serving. The longer the eggs sit, the more flavorful they will become.

    Tips

    For the best results, ensure that the eggs are completely submerged in the pickling liquid. If necessary, you can weigh them down with a small plate or a clean object that fits inside the jar. Allowing the eggs to sit for at least three days will enhance the flavor and color even more. Always use freshly boiled eggs for easier peeling, and make sure they are completely cooled before pickling.

    Variations & Substitutions

    The beauty of this recipe lies in its versatility. Here are some variations and substitutions you can try to suit your taste preferences:

    • Spice it up: Add whole cloves, peppercorns, or a cinnamon stick to the pickling liquid for a spicier kick.
    • Sweeter touch: Increase the granulated sugar by a few tablespoons if you prefer a sweeter pickled egg.
    • Alternative vinegar: White vinegar or red wine vinegar can be used in place of cider vinegar for a slightly different flavor profile.
    • Vegetarian option: Omit the eggs and use only beets and onions for a vibrant pickled veggie side dish.

    Storage

    Store the pickled eggs in the refrigerator in a sealed jar or airtight container. They will keep for up to two weeks, but are best enjoyed within the first week for optimal flavor and texture. Always ensure the eggs are covered completely by the pickling liquid to prevent spoilage.

    FAQ

    Can I use fresh beets instead of canned?

    Yes, you can use fresh beets. Simply boil them until tender, peel, and slice. Use the cooking water as part of your beet liquid for the pickling process.

    Why did my eggs turn rubbery?

    If your eggs turned rubbery, they may have been overcooked during the boiling process. Ensure that you cook the eggs just until the yolks are set and immediately cool them in ice water to stop the cooking process.

    Can I reuse the pickling liquid?

    Reusing pickling liquid is not recommended as it loses potency and may harbor bacteria after the initial use. It’s best to make a fresh batch for each new set of pickled eggs.

    Nutrition

    Each pickled egg contains approximately:

    • Calories: 80
    • Protein: 6g
    • Fat: 5g
    • Carbohydrates: 5g
    • Sugar: 4g
    • Sodium: 200mg

    Final Thoughts

    Pennsylvania Dutch Pickled Eggs are a delightful way to bring a touch of tradition into your kitchen. Their vibrant color and unique flavor make them a standout addition to any meal, whether it’s a picnic, a holiday gathering, or simply a snack on a lazy afternoon. As you savor each bite, may it bring you comfort and nostalgia, just as it has for generations of families before. Enjoy the taste of history and the love that goes into every jar of these pickled treasures.

    Related update: Pennsylvania Dutch Pickled Eggs

    Related update: Oven-Baked Feta Cheese Dip

  • Classic Greek Moussaka | Made by Meaghan Moineau

    Classic Greek Moussaka

    There’s something inherently comforting about a dish that has been passed down through generations, and Classic Greek Moussaka is no exception. I still remember the first time I tasted my grandmother’s moussaka as a child during a family reunion in her sunlit kitchen overlooking the Aegean Sea. The aroma of cinnamon and nutmeg filled the room, and the flavors were like nothing I had experienced before. Now, every time I prepare this dish, it brings back those cherished memories, and I’m delighted to share this recipe with you.

    Why You’ll Love It

    This Classic Greek Moussaka is a hearty and satisfying meal that combines layers of savory eggplants, rich meat sauce, and creamy béchamel topping. It’s perfect for family gatherings or a special dinner. The combination of flavors and textures will transport you to a sun-drenched Greek island, even if just for a meal. Whether you’re a fan of Greek cuisine or trying it for the first time, this dish is sure to become a beloved favorite.

    Ingredients

    • Eggplants
    • Sea salt
    • Olive oil
    • Onions
    • Lean beef
    • Canned tomatoes
    • Garlic
    • Ground cinnamon
    • Ground allspice
    • White salt and ground pepper
    • Tomato paste
    • Butter
    • Flour
    • Warm milk
    • Ground nutmeg
    • Egg yolks
    • Feta cheese
    • Bread crumbs

    Instructions

    1. Sprinkle the eggplant slices with sea salt and let them stand for 45 minutes to draw out the bitterness. Then rinse thoroughly to remove excess salt.
    2. Thinly brush each slice with olive oil and bake in a preheated grill pan for several minutes on each side. Set aside. Repeat until all slices are grilled.
    3. For the meat sauce, lightly sauté the onions in olive oil until tender. Add the ground beef and sauté, stirring frequently to break up the clumps of meat, until the meat is no longer pink.
    4. Stir in canned tomatoes, garlic, cinnamon, allspice, salt, and pepper and simmer briefly on low heat. Add in tomato paste and a little water if the sauce is too thick. Remove from heat and set aside.
    5. For the béchamel sauce, add flour to the melted butter, stirring constantly. When the mixture is evenly thick, gradually whisk in warm milk. Gently bring to a boil, then remove from heat, season with pepper and nutmeg. Whisk in the egg yolks vigorously. Set aside.
    6. Thinly coat with olive oil a suitable ovenproof baking dish, sprinkle the bottom with homemade bread crumbs. Place a layer of eggplant, cover with some meat sauce and feta cheese, and repeat this until the pan is almost full. Finish with a layer of feta cheese.
    7. Top with béchamel sauce. Cover with tin foil and bake in a preheated oven at 180°C for 1 hour.
    8. Remove moussaka from the oven and let it set at room temperature for 45 minutes before serving.

    Tips

    To achieve the perfect moussaka, make sure to let the eggplant slices sit with salt for the full 45 minutes to remove any bitterness. When preparing the béchamel sauce, stir continuously to avoid lumps and ensure a smooth consistency. Lastly, giving the moussaka time to set before serving helps the layers hold together better when sliced.

    Variations & Substitutions

    If you prefer a vegetarian version, you can replace the ground beef with lentils or a plant-based meat substitute. For a slightly different flavor profile, try using ground lamb instead of beef. You can also experiment with different cheeses, such as Parmesan or Ricotta, to suit your taste preferences.

    Storage

    Leftover moussaka can be stored in an airtight container in the refrigerator for up to three days. For longer storage, freeze individual portions in airtight containers for up to three months. To reheat, thaw overnight in the refrigerator and bake in a preheated oven at 175°C until heated through.

    FAQ

    Can I prepare Moussaka ahead of time?

    Yes, you can assemble the moussaka a day in advance and store it in the refrigerator. When ready to bake, allow it to come to room temperature before placing it in the oven.

    What should I serve with Moussaka?

    Moussaka pairs beautifully with a fresh Greek salad and some crusty bread. A glass of red wine complements the flavors wonderfully.

    Nutrition

    Moussaka is a rich and hearty dish, so it is best enjoyed as an occasional treat. It provides a good source of protein from the beef and egg yolks, as well as essential vitamins and minerals from the eggplants and tomatoes. For a lighter option, consider serving with a side of steamed vegetables.

    Final Thoughts

    Classic Greek Moussaka is more than just a dish; it’s a culinary journey that tells a story with every bite. Whether you’re sharing it with family or savoring it on a quiet evening at home, its warmth and richness are sure to bring comfort and joy. I hope this recipe becomes as beloved in your home as it is in mine. Happy cooking!

    Related update: Classic Greek Moussaka

    Related update: How Sweet It Is Sweet Potato Lasagne

  • Spare Ribs | Made by Meaghan Moineau

    Spare Ribs | Made by Meaghan Moineau

    Deliciously Sticky Spare Ribs

    There’s something truly magical about the aroma of spare ribs roasting in the oven, filling the house with warmth and mouthwatering scents. As a child, I remember visiting my grandmother’s house during the holidays, eagerly anticipating the moment when she’d open the oven door, revealing a tray of perfectly glazed ribs. The rich, savory sauce and tender meat were always the highlight of our family gatherings, a tradition I’ve lovingly continued with my own family. Today, I’m excited to share this cherished recipe with you, adding a touch of nostalgia to your kitchen and hopefully creating new memories for you and your loved ones.

    Why You’ll Love It

    This spare ribs recipe is the perfect balance of sweet and savory, with a sticky glaze that will have everyone licking their fingers clean. It’s surprisingly simple to prepare, yet it delivers restaurant-quality flavor that will impress any guest. Whether you’re hosting a barbecue, a casual dinner, or a festive celebration, these ribs are sure to be a hit. Plus, with the option to marinate overnight, you can save time on the day of your event, making it a stress-free addition to your menu.

    Ingredients

    • 2 tablespoons oil
    • 1/4 cup clear honey
    • 1 tablespoon fresh ginger root, grated
    • 1/4 cup dark soy sauce
    • 2 tablespoons hoisin sauce
    • 1 teaspoon five-spice powder
    • 2 garlic cloves, minced
    • 3 pounds of spare ribs

    Instructions

    1. Preheat your oven to 400 degrees Fahrenheit (200 degrees Celsius).
    2. In a jug, combine the oil, honey, ginger, soy sauce, hoisin sauce, five-spice powder, and garlic. Mix well to create a marinade.
    3. Place the spare ribs in a large dish and pour the marinade over them. Ensure the ribs are well coated, then cover and leave to marinate for as long as possible, ideally overnight in the refrigerator.
    4. Once marinated, place the ribs on a rack in a roasting pan.
    5. Cook the ribs in the preheated oven for about 45 minutes, turning them over halfway through the cooking time to ensure even glazing.
    6. After cooking, allow the ribs to cool slightly. Serve them cold or warm, as desired.

    Tips

    • For best results, marinate the ribs overnight. This allows the flavors to fully penetrate the meat, resulting in more flavorful ribs.
    • When turning the ribs halfway through cooking, baste them with the leftover marinade for an extra sticky glaze.
    • For a smokier flavor, consider finishing the ribs on a grill for a few minutes after roasting.

    Variations & Substitutions

    If you want to switch things up, here are a few variations and substitutions you can try:

    • Spicier Ribs: Add a teaspoon of chili flakes or a dash of hot sauce to the marinade for a spicy kick.
    • Alternative Sweeteners: Swap honey for maple syrup or brown sugar for a different type of sweetness.
    • Gluten-Free: Use tamari instead of soy sauce to make the dish gluten-free.
    • Different Protein: You can use the same marinade for chicken wings or pork chops if you prefer.

    Storage

    Store any leftover ribs in an airtight container in the refrigerator for up to 3 days. For longer storage, you can freeze the ribs for up to 3 months. To reheat, allow the ribs to thaw completely in the refrigerator, then warm them in the oven at 350 degrees Fahrenheit until heated through.

    FAQ

    Can I use a slow cooker for this recipe?

    Yes, you can! Simply place the marinated ribs in a slow cooker and cook on low for 6-8 hours or on high for 3-4 hours. Finish them off in the oven or on a grill to achieve a sticky glaze.

    What side dishes pair well with spare ribs?

    Spare ribs pair beautifully with a variety of side dishes, such as coleslaw, cornbread, baked beans, or roasted vegetables. For a refreshing contrast, consider serving a crisp salad with a tangy vinaigrette.

    Can I make the marinade in advance?

    Absolutely! You can prepare the marinade up to 3 days in advance and store it in an airtight container in the refrigerator. This can be a great time-saver for busy schedules.

    Nutrition (per serving)

    While the nutritional values can vary based on portion sizes and specific ingredients used, a general estimate for a serving of these spare ribs is approximately:

    • Calories: 450
    • Protein: 30g
    • Carbohydrates: 15g
    • Fat: 30g
    • Sugar: 10g

    Final Thoughts

    These sticky spare ribs are truly a labor of love, a recipe that brings fond memories and joy to any table. Whether you’re cooking for family or friends, this dish is sure to become a favorite in your home, just as it has in mine. With its simple preparation and irresistible taste, you’ll find yourself returning to this recipe time and time again. Enjoy the process, savor the results, and most importantly, cherish the moments shared with those around you. Happy cooking!

    Related update: Spare Ribs

    Related update: avarakkai paruppu curry recipe

  • Rugelach | Made by Meaghan Moineau

    Rugelach | Made by Meaghan Moineau

    Delightful Rugelach: A Comforting Classic

    There’s something magical about the aroma of freshly baked rugelach wafting through the house. It takes me back to my grandmother’s cozy kitchen, where I first learned how to roll these delicate pastries. I remember the way she would hum softly, her hands expertly folding the dough around sweet preserves and crunchy walnuts. These moments, filled with warmth and love, are the essence of why I adore baking rugelach. Now, I’m excited to share this beloved recipe with you, hoping it brings the same joy and comfort to your home.

    Why You’ll Love It

    Rugelach is a delightful pastry that combines a tender, buttery dough with a sweet and nutty filling. It’s perfect for any occasion, whether you’re hosting a tea party, celebrating a holiday, or simply enjoying a quiet moment with a cup of coffee. Here’s why you’ll fall in love with this recipe:

    • Easy to make: With simple ingredients and clear instructions, this recipe is accessible for bakers of all levels.
    • Irresistible flavor: The combination of buttery dough, fruity preserves, and spiced cinnamon-sugar is simply divine.
    • Versatile: You can easily adapt the filling to suit your preferences or what you have on hand.

    Ingredients

    • Salted butter
    • Block of cream cheese
    • Salt
    • Plain flour
    • Egg yolks
    • Vanilla extract
    • Caster sugar
    • Fruit preserves
    • Walnuts
    • Butter (for brushing)
    • Ground cinnamon

    Instructions

    1. Leave butter and cream cheese in a warm place for a couple of hours to soften. They have to be soft and cannot be used straight out of the fridge.
    2. Pre-heat oven to 180°C.
    3. Place softened butter in a large mixing bowl. Add a block of cream cheese. Use block cream cheese, not cream cheese in a tub.
    4. Set the beater to medium speed and beat the butter and cream cheese until combined and light and fluffy.
    5. Add 2 large egg yolks, 1 teaspoon of vanilla extract, 1/2 cup of caster sugar, a pinch of salt, and 2.5 cups of plain flour. Mix all the ingredients together in the mixer on medium speed until the dough comes together.
    6. While the dough is being mixed, chop 1/2 cup of walnuts into fine pieces and set aside.
    7. When the dough is ready, scatter some flour on the table or countertop. Knead the dough and gently form it into a large block. Add more flour if the dough is too sticky. The dough should be a nice elastic block.
    8. Cut the dough into 4 equal pieces. Set 3 pieces of dough aside, covering them with a slightly damp cloth to prevent them from drying out.
    9. Roll the 4th piece of dough into a ball. Using a floured rolling pin, roll out the ball of dough into a flat circle about 2 to 3 mm thick.
    10. Cut the rolled dough into 8 triangles.
    11. Prepare some fruit preserves. If the preserves are thick and difficult to spread, whisk them with a fork for a minute.
    12. Place one teaspoon of preserves on the long end of each triangular piece of dough. Lightly spread it towards the other end, keeping most of the preserves on the long end.
    13. Scatter some chopped walnuts on the preserves at the long end.
    14. To roll the rugelach, tuck in the sides of the triangle slightly to hold the preserves and nuts in. Roll towards the third corner of the triangle.
    15. Repeat for all the blocks of dough until the rugelach are prepared.
    16. Place all the prepared rugelach on a sheet of baking paper on a baking tray.
    17. Mix 1/4 cup of caster sugar and 1 teaspoon of ground cinnamon in a small bowl.
    18. Melt 50g of butter. Gently brush each rugelach with melted butter and sprinkle with the cinnamon-sugar mixture. You can also roll the rugelach in the mixture.
    19. Place the rugelach in the pre-heated oven and bake at 180°C for about 35 minutes or until they are a dark golden brown.
    20. Leave the rugelach to cool before storing them.

    Tips

    • Softening: Make sure the butter and cream cheese are softened before you start. This ensures a smooth, cohesive dough.
    • Rolling: Keep your rolling pin and surface lightly floured to prevent sticking.
    • Filling: Be generous with the preserves and walnuts for a more flavorful pastry.

    Variations & Substitutions

    Rugelach is wonderfully adaptable, so feel free to experiment with different flavors:

    • Preserves: Try raspberry, apricot, or fig preserves for a different twist.
    • Nuts: Substitute pecans or almonds for walnuts if you prefer.
    • Spices: Add a pinch of nutmeg or cardamom to the cinnamon-sugar mix for an extra layer of flavor.

    Storage

    Store your rugelach in an airtight container at room temperature for up to a week. For longer storage, place them in a freezer-safe bag and freeze for up to three months. Just thaw them at room temperature before serving.

    FAQ

    Can I prepare the dough in advance?

    Absolutely! You can prepare the dough up to two days in advance. Just wrap it tightly in plastic wrap and store it in the refrigerator. Let it come to room temperature before rolling it out.

    Is it possible to use low-fat cream cheese?

    While you can use low-fat cream cheese, the texture and flavor may not be as rich. For the best results, I recommend using full-fat block cream cheese.

    Nutrition

    Each rugelach contains approximately 150 calories, 10g of fat, 15g of carbohydrates, and 2g of protein. Keep in mind that these values can vary based on the specific ingredients and portion sizes you use.

    Final Thoughts

    Baking rugelach is a beautiful way to connect with tradition while creating new memories with loved ones. Whether you’re savoring them fresh from the oven or sharing them with friends over tea, these delightful pastries are sure to bring happiness and warmth to your table. I hope this recipe becomes a cherished part of your baking repertoire, just as it has been for me.

    Related update: Rugelach

    Related update: Almond Cookie Bar

  • Classic Matzo Ball Soup | Made by Meaghan Moineau

    Classic Matzo Ball Soup | Made by Meaghan Moineau

    Classic Matzo Ball Soup

    Why You’ll Love It

    There’s something truly magical about a steaming bowl of matzo ball soup, a dish that’s not just a meal but also a comforting hug in a bowl. This classic recipe has been a staple in my family for generations. As a child, I remember sitting at my grandmother’s table, eagerly waiting for her to serve her famous matzo ball soup. The aroma filled the house, teasing the senses and wrapping us in warmth. It’s not just the taste that makes this soup special; it’s the tradition, the love, and the memories that come with every spoonful.

    Ingredients

    • 1 whole chicken
    • 2 celery stalks, chopped
    • 3 carrots, peeled and chopped
    • 1 onion, peeled and quartered
    • Fresh dill (optional)
    • Fresh parsley
    • Salt and pepper, to taste
    • 4 eggs
    • 4 tablespoons chicken fat (or vegetable oil)
    • 1 cup matzo meal
    • 1/4 cup seltzer water

    Instructions

    1. Wash the chicken with cold water and place it in a large pot. Cover with water and bring to a simmer. Avoid boiling to ensure a clear broth.
    2. Skim off any bubbling foam that forms on the surface.
    3. Add the celery, carrots, onion, fresh herbs, salt, and pepper. Continue to simmer for about 45 minutes.
    4. Pour the soup through a strainer and let it cool. Once the broth has completely cooled, remove the chicken meat and skim off the fat. Save this fat for the matzo balls.
    5. In a mixing bowl, beat together 4 eggs and 4 tablespoons of chicken fat (or vegetable oil).
    6. Stir in the matzo meal and a pinch of salt. Add the seltzer water and mix until combined. Cover and refrigerate the mixture for at least 1 hour.
    7. Form the matzo dough into teaspoon-sized balls.
    8. Bring the chicken broth to a boil. Add the matzo balls, cover, and cook for 20 minutes.
    9. Serve immediately, garnished with fresh dill or parsley.

    Tips

    For perfectly fluffy matzo balls, it’s crucial to let the matzo meal mixture rest in the refrigerator. This resting period allows the matzo meal to absorb the liquid and helps the balls hold their shape. Additionally, using seltzer water is a little secret that adds lightness to the matzo balls, ensuring they are tender and airy.

    Variations & Substitutions

    If you’re looking to mix things up, you can add a variety of vegetables to the broth, such as parsnips or turnips, for additional flavor. For those who prefer a vegetarian version, replace the chicken and chicken fat with vegetable broth and olive oil. You can also experiment with different herbs, like thyme or rosemary, to create a unique taste profile that suits your palate.

    Storage

    Leftover soup can be stored in an airtight container in the refrigerator for up to 3 days. If you want to keep it longer, it freezes beautifully. Just make sure to store the matzo balls separately from the broth to maintain their texture. When ready to enjoy, simply defrost the soup and matzo balls in the refrigerator overnight and reheat gently on the stove.

    FAQ

    Can I make matzo ball soup ahead of time?

    Absolutely! Matzo ball soup is a fantastic make-ahead meal. Prepare the broth and matzo balls separately and store them in the refrigerator. When you’re ready to serve, reheat the broth and add the matzo balls to warm through before serving.

    Why is my matzo ball soup cloudy?

    A cloudy broth is often the result of boiling the soup too vigorously. To ensure a clear broth, keep the soup at a gentle simmer and avoid stirring too much. Skimming off the foam as it forms will also help maintain clarity.

    Nutrition

    While the exact nutritional content can vary based on specific ingredients and portion sizes, a serving of matzo ball soup is generally rich in protein and fiber, thanks to the chicken and vegetables. It’s a hearty, nourishing dish that’s also relatively low in calories, making it a comforting yet healthy option for any meal.

    Final Thoughts

    Classic matzo ball soup is more than just a recipe; it’s a cherished tradition that brings people together. Whether you’re seeking comfort on a chilly evening or sharing a meal with family and friends, this beloved dish offers warmth and solace with every spoonful. I hope this recipe brings as much joy and comfort to your table as it has to mine. Happy cooking!

    Related update: Classic Matzo Ball Soup

    Related update: Venison Stew

    Related update: Tuscan White Bean Soup with Olive Oil and Rosemary