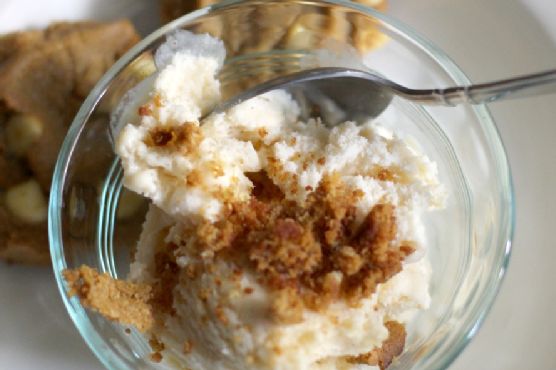
Pumpkin Spice Cookie Ice Cream with Spiced Caramel Swirl
Imagine the creamy, dreamy fusion of your favorite pumpkin spice cookie with a luscious, velvety ice cream. Now add a spiced caramel swirl that dances on your taste buds like falling leaves in a crisp autumn breeze. That’s exactly what awaits you with my Pumpkin Spice Cookie Ice Cream with Spiced Caramel Swirl.
Personal Story
Every fall, as the leaves begin to paint the world in hues of orange and gold, I find myself irresistibly drawn to the kitchen, eager to capture the essence of autumn in a single bite. This particular recipe was born out of a serendipitous kitchen mishap. I had ambitiously decided to bake a batch of pumpkin spice cookies while simultaneously attempting a caramel sauce for a separate dessert. The chaos of juggling both led to an unexpected merger of flavors.
As I absentmindedly stirred the caramel, the intoxicating aroma of butter and sugar mingled with the warm spices from the cookie dough across the counter. It was an olfactory revelation, a moment of pure culinary serendipity. I knew then that these two components belonged together, not just side-by-side but intertwined in a harmonious dance of flavors and textures.
After a few experimental batches, each more promising than the last, I landed on what has become one of my most requested desserts. Friends and family now eagerly anticipate the first frost of fall, not just for the seasonal shift, but for the first batch of my pumpkin spice cookie ice cream. It’s a treat that embodies the comfort and coziness of autumn, capturing the nostalgia of childhood pumpkin patches and the warmth of family gatherings.
Creating this ice cream has taught me the beauty of embracing the unexpected and the magic of letting flavors lead the way. This recipe doesn’t just satisfy a sweet tooth; it tells a story of adventure, mishaps, and ultimately, delicious discoveries.
What Makes This Version Special
What sets my Pumpkin Spice Cookie Ice Cream with Spiced Caramel Swirl apart is the addition of a rich, spiced caramel swirl. This isn’t just any caramel; it’s a carefully crafted blend of brown sugar, butter, heavy cream, and a medley of spices like cinnamon, nutmeg, and cloves. When swirled into the creamy ice cream base, it creates a ribbon of flavor that complements the earthy warmth of the pumpkin spice cookies.
The caramel swirl adds an extra layer of flavor and texture, making each bite an indulgent experience. The traditional cookie ice cream might offer a pleasant crunch, but the spiced caramel elevates the taste profile to new heights. It’s a symphony of sweet, spicy, and creamy that feels like a warm hug in a bowl.
Flavor Profile
The first spoonful of this ice cream delivers a creamy and sweet embrace, with warm autumn spices tickling your palate. The cinnamon, nutmeg, and cloves provide a cozy warmth that perfectly complements the sweet, buttery richness of the spiced caramel swirl. The pumpkin spice cookies add a delightful texture, offering a satisfying crunch amidst the velvety ice cream. With each bite, you’ll discover layers of flavor that unfold like the pages of a cherished novel, transporting you to a world of autumnal bliss.
Ingredients
- 2 cups heavy cream
- 1 cup whole milk
- **1 cup pumpkin spice cookies**, crushed
- 1/2 cup sugar
- 1/2 teaspoon salt
- 1 teaspoon vanilla extract
- 1 teaspoon cinnamon
- 1/2 teaspoon nutmeg
- 1/4 teaspoon cloves
- **1/2 cup brown sugar** (for caramel swirl)
- **1/4 cup butter** (for caramel swirl)
- **1/4 cup heavy cream** (for caramel swirl)
Instructions
- In a medium saucepan, melt 1/4 cup of butter over medium heat. Add the cinnamon, nutmeg, and cloves, stirring to bloom the spices until fragrant, about 1 minute.
- Add 2 cups of heavy cream, 1 cup of whole milk, 1/2 cup of sugar, and 1/2 teaspoon of salt to the saucepan. Whisk continuously until the sugar dissolves and the mixture is just heated through, ensuring the cream doesn’t boil.
- Remove the mixture from the heat and stir in 1 teaspoon of vanilla extract. Allow it to cool to room temperature, then refrigerate for at least 2 hours, or until completely chilled.
- While the ice cream base chills, prepare the spiced caramel swirl. In a separate saucepan, combine 1/2 cup of brown sugar and 1/4 cup of butter over medium heat. Stir continuously until the butter melts and the sugar dissolves, achieving a smooth consistency.
- Slowly whisk in 1/4 cup of heavy cream and a sprinkle of cinnamon, nutmeg, and cloves. Continue to stir until the mixture thickens slightly, about 3-5 minutes. Remove from heat and let it cool completely.
- Once the ice cream base is chilled, pour it into your ice cream machine and churn according to the manufacturer’s instructions. During the last few minutes of churning, gradually add the crushed pumpkin spice cookies, allowing them to mix evenly.
- Transfer the churned ice cream into a freezer-safe container. Gently swirl in the cooled spiced caramel using a knife or spatula, creating a marbled effect.
- Cover the container and freeze the ice cream for at least 4 hours, or until firm. Serve garnished with a pumpkin spice cookie for that extra touch of indulgence.
Pro Tips from Meaghan’s Kitchen
- Bloom the spices: Don’t skip the step of blooming the spices in butter. This technique enhances their flavors and prevents any raw spice taste in the final product.
- Chill thoroughly: Ensure the ice cream base is completely chilled before churning. This step is crucial for achieving a creamy texture.
- Caramel consistency: For a perfectly smooth caramel swirl, be patient and let it cool completely before swirling into the ice cream. This prevents it from melting into the base.
- Layer the caramel: When swirling the caramel, try creating layers for a more pronounced visual and taste effect. You can do this by adding a layer of ice cream, then caramel, and repeating.
- Cookie texture: Crush the cookies just enough for a good mix of chunks and crumbs. This will give your ice cream a delightful texture contrast.
Variations & Dietary Swaps
- Vegetarian swap: This recipe is already vegetarian-friendly as it utilizes dairy products and does not involve any gelatin or animal-based thickeners.
- Spice-it-up version: Add a pinch of cayenne pepper or ginger to the caramel for a bit of a kick that enhances the spicy flavor profile.
- Kids-friendly version: For a milder taste, reduce the amount of cloves, and use chocolate chip cookies instead of pumpkin spice cookies to cater to a child’s palate.
What to Serve With It
The Pumpkin Spice Cookie Ice Cream with Spiced Caramel Swirl pairs beautifully with a warm mug of spiced chai tea, which further complements the autumnal spices in the dessert. Alternatively, serve it with a slice of freshly baked apple pie or a dollop of whipped cream for an extra layer of indulgence. A handful of toasted pecans or walnuts can also add a nice nutty crunch that contrasts with the creamy texture of the ice cream.
Storage & Meal Prep
Store the ice cream in an airtight container in the freezer for up to two weeks. To prevent ice crystals from forming, place a piece of plastic wrap directly on the surface of the ice cream before sealing the container. When ready to serve, let the ice cream sit at room temperature for a few minutes to soften slightly, making it easier to scoop. Avoid reheating in a microwave as it can alter the texture of the ice cream.
FAQ
Can I make this ice cream without an ice cream maker?
Yes, you can! Simply pour the chilled ice cream base into a shallow dish and freeze, stirring every 30 minutes until it reaches the desired consistency. Swirl in the caramel once it starts to thicken.
How can I prevent my ice cream from becoming too icy?
Ensuring your ice cream base is thoroughly chilled before churning is key. Also, using the right ratio of cream to milk helps maintain a creamy texture.
What if my caramel hardens before I swirl it into the ice cream?
If the caramel becomes too firm, gently reheat it over low heat until it loosens up, then let it cool again before swirling it into the ice cream.
Can I use store-bought caramel instead of making my own?
Absolutely! However, making your own caramel allows you to infuse it with spices, adding a personalized touch to the ice cream.
How do I crush the cookies without making a mess?
Place the cookies in a resealable plastic bag and use a rolling pin to crush them. This method keeps crumbs contained and allows you to control the size of the pieces.
Final Thoughts
Crafting this Pumpkin Spice Cookie Ice Cream with Spiced Caramel Swirl is more than just making a dessert; it’s about creating a moment, a memory, and a little piece of autumn magic. Whether you’re enjoying it on a cool evening or sharing it with friends, this ice cream is sure to bring smiles and warm hearts. I’d love to hear how your version turns out or any creative twists you add! Don’t forget to leave a comment below or share your delicious creations using #MeaghansKitchen. Happy scooping!
Related update: Pumpkin Spice Cookie Ice Cream with Spiced Caramel Swirl
Related update: Tropical Gluten-Free Coconut Lime Cake with Pineapple Frosting