Tag: Snack

  • Nutty Banana-Peanut Butter Breakfast Cookies with Dark Chocolate and Sea Salt | Made by Meaghan Moineau

    Nutty Banana-Peanut Butter Breakfast Cookies with Dark Chocolate and Sea Salt | Made by Meaghan Moineau

    Nutty Banana-Peanut Butter Breakfast Cookies with Dark Chocolate and Sea Salt

    Picture this: the comforting aroma of warm peanut butter wafting through your kitchen, mingling with the irresistible scent of melting dark chocolate, as you anticipate a sweet, nutty bite of goodness. These Nutty Banana-Peanut Butter Breakfast Cookies with Dark Chocolate and Sea Salt are about to become your new morning obsession.

    Personal Story

    There was a time when breakfast in my house was a hurried affair, where a quick slice of toast or a bowl of cereal had to suffice before dashing out the door. But everything changed the morning I discovered the joy of breakfast cookies. It was a chilly autumn day, and I was craving something warm and comforting that I could enjoy leisurely with my cup of chai tea. That was the day these Nutty Banana-Peanut Butter Breakfast Cookies were born.

    The inspiration came from a kitchen mishap, believe it or not. I had intended to make banana bread, but with a toddler tugging at my apron strings, I misjudged the batter’s consistency and ended up with dough instead. With a quick pivot, I decided to scoop the mixture onto a baking sheet, and, voilà, breakfast cookies emerged from the oven.

    As I took my first bite, the sweet nuttiness combined with the rich chocolate finish and a hint of sea salt danced on my palate. It was a revelation. These cookies offered the comfort of a homemade breakfast with the portability of a grab-and-go snack, making them perfect for busy mornings.

    Since that serendipitous kitchen experiment, these cookies have become a staple in my family. I love making them ahead of a busy week, knowing that I have a delicious and wholesome option ready to go. Plus, they’re a hit with my little one, who loves to help me mix the ingredients and sprinkle the sea salt. It’s these simple, joyful moments that make cooking such a cherished part of my day.

    What Makes This Version Special

    What sets my Nutty Banana-Peanut Butter Breakfast Cookies apart is the luxurious touch of pure maple syrup and the strategic sprinkle of sea salt. The maple syrup adds a layer of richness that complements the creamy peanut butter and sweet bananas, creating a flavor profile that’s both familiar and elevated. Meanwhile, a sprinkle of sea salt on top of the cookies right after baking enhances the sweetness while balancing the nutty, chocolatey notes, offering a delightful contrast that keeps you reaching for just one more.

    Flavor Profile

    These breakfast cookies deliver a sweet, nutty, and slightly salty flavor experience. Imagine biting into a cookie where the warmth of creamy peanut butter meets the tropical sweetness of bananas, all underscored by the crunch of toasted mixed nuts. The dark chocolate chips melt into pockets of rich, velvety goodness, while the sea salt brightens each bite, making the flavors pop. It’s a harmonious blend that satisfies both sweet and savory cravings.

    Ingredients

    • 3 ripe bananas, mashed
    • 1/2 cup butter flavor shortening
    • **1 cup dark chocolate chips**
    • **1/2 cup creamy peanut butter**
    • 1 cup mixed nuts, lightly toasted
    • 2 cups oatmeal
    • 1/2 cup unsweetened applesauce
    • 1 teaspoon vanilla extract
    • 1 scoop vanilla protein powder
    • **1/4 cup pure maple syrup**
    • **Sea salt**, for sprinkling

    Instructions

    1. Preheat your oven to 350°F (175°C).
    2. In a large mixing bowl, combine the mashed bananas and creamy peanut butter until smooth and fully integrated.
    3. Add the unsweetened applesauce, vanilla protein powder, and vanilla extract to the banana mixture. Stir until all ingredients are well combined.
    4. Introduce the oatmeal and toasted mixed nuts to the bowl, and fold them into the banana mixture. If you prefer the chocolate chips mixed throughout, add them at this stage. Let the dough rest for 10 minutes to allow the oats to absorb moisture.
    5. Line a baking sheet with parchment paper. Drop spoonfuls of cookie dough onto the sheet, flattening each spoonful into a circle.
    6. For cookies with chocolate chips on top, sprinkle them now, pressing gently so they adhere.
    7. Bake in the preheated oven for 20-30 minutes, adjusting the time based on your preference for softer or crisper cookies. Look for a golden-brown color as a visual cue for doneness.
    8. Upon removing from the oven, sprinkle a pinch of sea salt over the warm cookies to enhance the sweetness and balance the flavors.
    9. Allow the cookies to rest on the baking sheet for 5 minutes before transferring to a cooling rack. If desired, use a pizza cutter or sharp knife to score the tops for a traditional look.
    10. Once completely cool, store the cookies in an airtight container. Enjoy them fresh or with your favorite cup of tea.

    Pro Tips from Meaghan’s Kitchen

    • Toasting the nuts: Lightly toasting the mixed nuts in a dry pan before incorporating them into the dough intensifies their flavor and adds a satisfying crunch.
    • Optimal banana ripeness: Use bananas that are ripe but not overly mushy for the best sweetness and texture.
    • Protein boost: Adjust the protein powder amount to suit your dietary needs, or substitute with almond flour for a different texture.
    • Sea salt timing: Sprinkle the sea salt immediately after baking while the cookies are still warm to ensure it adheres properly and enhances flavors.
    • Batch baking: Double the recipe and freeze half the dough for a quick, fresh batch later.

    Variations & Dietary Swaps

    • Vegetarian Swap: Ensure your vanilla protein powder is plant-based to maintain a vegetarian-friendly cookie.
    • Spice-it-up Version: Add a teaspoon of cinnamon or nutmeg to the dough for a warming spice twist.
    • Kids-Friendly Version: Substitute the dark chocolate chips with mini chocolate chips, and involve the kids in shaping the cookies for a fun family activity.

    What to Serve With It

    These Nutty Banana-Peanut Butter Breakfast Cookies are perfectly complemented by a steaming cup of chai tea, which enhances the warm spices and nuttiness. Alternatively, an almond milk latte offers a creamy, nutty counterpart to the rich chocolate finish of the cookies.

    Storage & Meal Prep

    For optimal freshness, store the cookies in an airtight container at room temperature for up to three days. For longer storage, place them in the refrigerator for up to a week. To freeze, lay the cookies flat in a single layer on a baking sheet, freeze until solid, then transfer to a freezer-safe bag or container. Reheat frozen cookies in a preheated oven at 300°F (150°C) for 5-8 minutes or until warm.

    FAQ

    Can I use a different type of nut butter?

    Absolutely! Almond butter or cashew butter would work wonderfully and bring their own unique flavors to the cookies.

    How can I make these cookies gluten-free?

    Simply substitute gluten-free oats into the recipe, ensuring all other ingredients are certified gluten-free as well.

    What if I don’t have vanilla protein powder?

    No problem! You can omit the protein powder or replace it with almond flour or additional oatmeal to maintain the texture.

    Can I use honey instead of maple syrup?

    Yes, honey can be used as a substitute for maple syrup, but note that it may slightly alter the flavor profile.

    How do I know when the cookies are fully baked?

    The cookies are done when they achieve a lovely golden-brown color. If you prefer them softer, aim for a lighter golden hue.

    Final Thoughts

    These Nutty Banana-Peanut Butter Breakfast Cookies with Dark Chocolate and Sea Salt are a delightful way to start your day or enjoy as a midday snack. Their balanced flavor profile and wholesome ingredients make them a favorite in my household, and I hope they become a staple in yours as well. I’d love to hear how they turned out for you, so feel free to leave a comment or share your own twists on the recipe. Happy baking!

    Related update: Nutty Banana-Peanut Butter Breakfast Cookies with Dark Chocolate and Sea Salt
  • Pennsylvania Dutch Pickled Eggs | Made by Meaghan Moineau

    Pennsylvania Dutch Pickled Eggs | Made by Meaghan Moineau

    Pennsylvania Dutch Pickled Eggs

    Why You’ll Love It

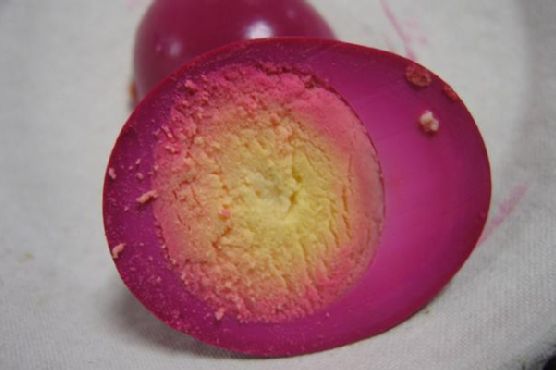
    Pickled eggs are a delightful and tangy treat that will transport you to the heart of Pennsylvania Dutch country. Not only are they visually striking with their vibrant pink hue, but they also pack a punch of flavor that is both sweet and tangy. These pickled eggs are a testament to the simplicity and resourcefulness of traditional cooking, using basic pantry staples to create something truly special. Whether you’re a fan of traditional pickling or looking to try something new, these eggs are sure to become a favorite in your household.

    I remember the first time I encountered pickled eggs at a small family gathering in rural Pennsylvania. My great-aunt Martha would bring a large jar of these beautifully colored eggs, and they were always the first to disappear from the table. To this day, the taste of these pickled eggs brings back cherished memories of family, laughter, and the warm kitchen where we gathered to share stories and food.

    Ingredients

    • 1 can of beets, drained (reserve the liquid)
    • 1 cup cider vinegar
    • 12 hard-boiled eggs, peeled
    • 1/2 cup granulated sugar
    • 1 onion, thinly sliced
    • 1 teaspoon table salt

    Instructions

    1. Drain the liquid from the beets into a medium saucepan. Set the beets aside for later use.
    2. In a large bowl or jar, layer the beets, sliced onions, and hard-boiled eggs.
    3. Add the granulated sugar and cider vinegar to the saucepan with the beet liquid and stir well.
    4. Bring the mixture to a boil over medium heat, stirring occasionally to ensure the sugar dissolves completely.
    5. Once boiling, reduce the heat to low and let the mixture simmer for 15 minutes.
    6. Carefully pour the hot beet juice mixture over the beets, eggs, and onions in the bowl or jar.
    7. Seal the bowl or jar tightly with a lid.
    8. Refrigerate the pickled eggs for at least one day before serving. The longer the eggs sit, the more flavorful they will become.

    Tips

    For the best results, ensure that the eggs are completely submerged in the pickling liquid. If necessary, you can weigh them down with a small plate or a clean object that fits inside the jar. Allowing the eggs to sit for at least three days will enhance the flavor and color even more. Always use freshly boiled eggs for easier peeling, and make sure they are completely cooled before pickling.

    Variations & Substitutions

    The beauty of this recipe lies in its versatility. Here are some variations and substitutions you can try to suit your taste preferences:

    • Spice it up: Add whole cloves, peppercorns, or a cinnamon stick to the pickling liquid for a spicier kick.
    • Sweeter touch: Increase the granulated sugar by a few tablespoons if you prefer a sweeter pickled egg.
    • Alternative vinegar: White vinegar or red wine vinegar can be used in place of cider vinegar for a slightly different flavor profile.
    • Vegetarian option: Omit the eggs and use only beets and onions for a vibrant pickled veggie side dish.

    Storage

    Store the pickled eggs in the refrigerator in a sealed jar or airtight container. They will keep for up to two weeks, but are best enjoyed within the first week for optimal flavor and texture. Always ensure the eggs are covered completely by the pickling liquid to prevent spoilage.

    FAQ

    Can I use fresh beets instead of canned?

    Yes, you can use fresh beets. Simply boil them until tender, peel, and slice. Use the cooking water as part of your beet liquid for the pickling process.

    Why did my eggs turn rubbery?

    If your eggs turned rubbery, they may have been overcooked during the boiling process. Ensure that you cook the eggs just until the yolks are set and immediately cool them in ice water to stop the cooking process.

    Can I reuse the pickling liquid?

    Reusing pickling liquid is not recommended as it loses potency and may harbor bacteria after the initial use. It’s best to make a fresh batch for each new set of pickled eggs.

    Nutrition

    Each pickled egg contains approximately:

    • Calories: 80
    • Protein: 6g
    • Fat: 5g
    • Carbohydrates: 5g
    • Sugar: 4g
    • Sodium: 200mg

    Final Thoughts

    Pennsylvania Dutch Pickled Eggs are a delightful way to bring a touch of tradition into your kitchen. Their vibrant color and unique flavor make them a standout addition to any meal, whether it’s a picnic, a holiday gathering, or simply a snack on a lazy afternoon. As you savor each bite, may it bring you comfort and nostalgia, just as it has for generations of families before. Enjoy the taste of history and the love that goes into every jar of these pickled treasures.

    Related update: Pennsylvania Dutch Pickled Eggs

    Related update: Oven-Baked Feta Cheese Dip

  • Chocolate Almond Bark | Made by Meaghan Moineau

    Chocolate Almond Bark | Made by Meaghan Moineau

    Chocolate Almond Bark

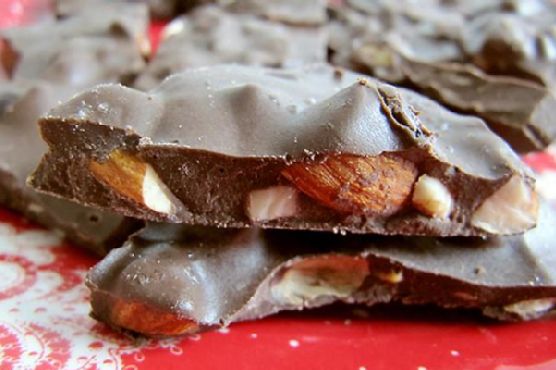
    Chocolate Almond Bark is a delightful treat that combines the rich, smooth flavor of chocolate with the crunchy, savory goodness of almonds. This recipe is a favorite in my family, especially around the holidays. I remember my grandmother making a similar version of this bark every Christmas. The aroma of roasted almonds mingling with chocolate would fill the house, and it was the ultimate signal that the festive season had truly begun. Now, I carry on the tradition, adding a few modern twists to the classic recipe.

    Why You’ll Love It

    Chocolate Almond Bark is incredibly easy to make and requires only a handful of ingredients. It’s a perfect balance of sweet and savory, with a hint of spice from the cayenne pepper. This treat makes for a great homemade gift or a delightful snack to enjoy anytime. Plus, it’s a wonderful recipe to make with kids or friends, as it doesn’t require any special culinary skills.

    Ingredients

    • 1 cup raw almonds, chopped
    • 1/4 teaspoon cayenne pepper
    • 12 ounces candy making chocolate
    • 1/2 teaspoon sea salt
    • 1 tablespoon Worcestershire sauce

    Instructions

    1. Preheat your oven to 160 degrees.
    2. In a medium bowl, combine the chopped almonds with the Worcestershire sauce, cayenne pepper, and half of the sea salt. Mix well to ensure the almonds are evenly coated.
    3. Spread the almond mixture onto a baking sheet in a single layer. Roast in the preheated oven for 20 minutes, stirring halfway through to ensure even roasting. Let the almonds cool completely.
    4. While the almonds are cooling, melt the candy making chocolate using a double boiler or in the microwave. If using a microwave, heat the chocolate on low power, stirring every 30 seconds, until smooth.
    5. Once the almonds have cooled, mix them into the melted chocolate until thoroughly combined.
    6. Line an 8 x 8 inch baking pan with wax paper. Pour the chocolate almond mixture into the pan and spread it evenly.
    7. Sprinkle a pinch of the remaining sea salt on top of the chocolate mixture.
    8. Let the chocolate cool and harden at room temperature or in the refrigerator for faster results.
    9. Once set, break the chocolate almond bark into bite-size pieces and enjoy!

    Tips

    To ensure the best results, use high-quality candy making chocolate, as it will melt smoother and provide a richer flavor. When roasting the almonds, keep a close eye on them to prevent burning. If you don’t have a double boiler, a heatproof bowl over a saucepan of simmering water works just as well for melting chocolate.

    Variations & Substitutions

    Feel free to customize this chocolate almond bark to suit your taste preferences. You can substitute the raw almonds with your favorite nuts, such as pecans or walnuts. If you’re not a fan of cayenne pepper, you can omit it, or replace it with a milder spice like cinnamon. For a more indulgent treat, consider adding dried fruits like cranberries or raisins to the mix.

    Storage

    Store your chocolate almond bark in an airtight container at room temperature for up to two weeks. If you prefer your chocolate to be on the firmer side, you can keep it in the refrigerator. Just be sure to let it come to room temperature before serving for the best texture and flavor.

    FAQ

    Can I use dark chocolate instead of candy making chocolate?

    Absolutely! Dark chocolate is a great alternative and will provide a more intense chocolate flavor. Just make sure to use high-quality chocolate for the best results.

    Is it possible to make this recipe vegan?

    Yes, you can make this recipe vegan by substituting the Worcestershire sauce with a vegan version and using a dairy-free chocolate. Ensure that all other ingredients are vegan-friendly as well.

    Nutrition

    While I don’t have the exact nutritional breakdown for this recipe, it’s important to note that almonds are a great source of healthy fats, fiber, and protein. Chocolate, especially dark chocolate, contains antioxidants. However, this is a treat and should be enjoyed in moderation as part of a balanced diet.

    Final Thoughts

    Chocolate Almond Bark is a versatile and delectable treat that’s sure to impress anyone who tries it. With its simple ingredients and straightforward instructions, it’s an easy recipe to whip up for any occasion. Whether you’re indulging on your own or sharing with loved ones, this bark is a delightful way to satisfy your sweet tooth. I hope you enjoy making and tasting this recipe as much as my family and I do. Happy cooking!

    Related update: Chocolate Almond Bark

    Related update: Smokey Rainbow Chili