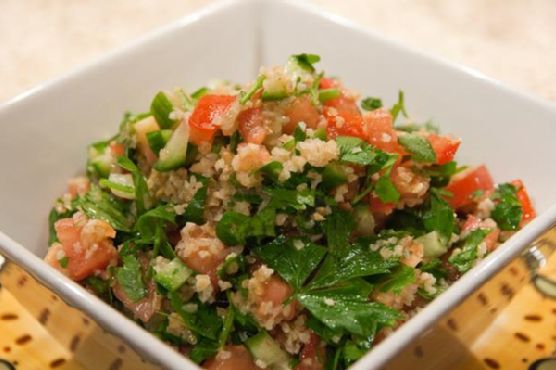
Tag: Simple Ingredients

  • Easy Tabouleh | Made by Meaghan Moineau

    Easy Tabouleh | Made by Meaghan Moineau

    Easy Tabouleh

    Welcome to my kitchen! Today, I’m thrilled to share a recipe that is close to my heart—Easy Tabouleh. This vibrant and refreshing salad has been a staple in my family for generations. I vividly remember summers at my grandmother’s house, where she would prepare a massive bowl of tabouleh for our family gatherings. The aroma of freshly chopped parsley and the tang of lemon juice would fill the air, signaling that something delicious was on its way. I’m excited to bring that same joy to your table with this simple and delightful recipe.

    Why You’ll Love It

    Tabouleh is more than just a salad; it’s a celebration of fresh ingredients and bold flavors. Here’s why you’ll love this easy tabouleh recipe:

    • Quick and Simple: With only a handful of ingredients and minimal prep time, you can whip up this dish in no time.
    • Nutritious and Healthy: Packed with fresh vegetables and herbs, this dish is a nutritious powerhouse that is both satisfying and light.
    • Perfect for Any Occasion: Whether it’s a family picnic, a potluck, or a simple weeknight dinner, tabouleh is a versatile dish that fits any occasion.
    • Flavorful and Refreshing: The combination of lemon juice and fresh herbs makes every bite a burst of refreshing flavor.

    Ingredients

    • 1 cup bulgur
    • 2 cucumbers, finely chopped
    • 1 bunch of flat leaf parsley, finely chopped
    • Juice from 1 lemon
    • 3 tablespoons olive oil
    • Salt, to taste
    • 2 tomatoes, finely chopped

    Instructions

    1. Start by preparing the bulgur. Place it in a fine mesh sieve and rinse under cold water. Allow it to drain thoroughly.
    2. Finely chop the cucumbers, parsley, and tomatoes. The key is to keep the vegetables diced fairly small to stay true to the traditional tabouleh texture.
    3. In a large bowl, combine the rinsed bulgur, chopped cucumbers, parsley, and tomatoes.
    4. Add the lemon juice and olive oil to the bowl. Mix everything together gently to ensure the ingredients are well combined.
    5. Season with salt to taste. Start with a small amount, and add more if needed as you mix and taste.
    6. Let the salad sit for at least 30 minutes before serving. This allows the flavors to meld together beautifully.

    Tips

    • Chill for Flavor: For the best flavor, let the tabouleh chill in the refrigerator for an hour before serving. This gives the bulgur time to absorb the lemon juice and olive oil.
    • Use Fresh Ingredients: Fresh parsley and ripe tomatoes make a huge difference in the taste, so opt for the freshest produce you can find.
    • Adjust to Taste: Feel free to adjust the amount of lemon juice and salt to your liking. Some prefer a tangier salad, while others enjoy a milder version.

    Variations & Substitutions

    Tabouleh is a versatile salad with room for creativity. Here are some variations and substitutions you can try:

    • Quinoa Substitute: For a gluten-free version, substitute the bulgur with cooked quinoa. It offers a similar texture and absorbs the flavors wonderfully.
    • Add Mint: Incorporating a handful of finely chopped mint leaves adds an extra layer of freshness to the dish.
    • Additional Veggies: Feel free to add other vegetables such as bell peppers or red onions for added crunch and color.

    Storage

    Tabouleh can be stored in an airtight container in the refrigerator for up to 3 days. The flavors will continue to develop, making it even more delicious the next day. However, the texture of the vegetables might soften over time, so it’s best enjoyed fresh.

    FAQ

    Can I make tabouleh ahead of time?

    Absolutely! Making tabouleh ahead of time is a great idea as it allows the flavors to meld. Prepare it a few hours before serving and let it chill in the refrigerator. Just give it a good stir before serving to redistribute the dressing.

    Is tabouleh served cold or warm?

    Tabouleh is traditionally served cold or at room temperature. Chilling it enhances its refreshing qualities and makes it a perfect dish for warm weather.

    Nutrition

    This easy tabouleh is not only delicious but also nutritious. It is rich in vitamins from the fresh vegetables and herbs, and the bulgur provides a good source of fiber. The olive oil adds healthy fats, while the lemon juice offers a boost of vitamin C. It’s a wholesome dish that fits well into a balanced diet.

    Final Thoughts

    Thank you for joining me in making this easy tabouleh recipe. I hope it brings as much joy to your table as it has to mine. Whether you’re enjoying it as a side dish, a light lunch, or a part of a larger meal, tabouleh is a delightful way to embrace fresh, simple ingredients. I’d love to hear how it turns out for you, so feel free to share your experiences and any personal twists you add to the recipe. Bon appétit!

    Related update: Easy Tabouleh

    Related update: Maple Pecan Honey Cornbread with Orange Zest

    Related update: Zesty Tropical Lump Crab and Avocado Salad with Mango-Lime Dressing

  • Chicken Liver Salad | Made by Meaghan Moineau

    Chicken Liver Salad | Made by Meaghan Moineau

    Chicken Liver Salad: A Warm and Hearty Delight

    There’s something inherently comforting about the aromas wafting through the kitchen as chicken livers sizzle with onions and bacon. This Chicken Liver Salad takes me back to Sunday afternoons at my grandmother’s house. She would whip up a batch of this savory salad while recounting stories from her childhood. The combination of rich, tender chicken livers with the crisp freshness of Boston lettuce was, and still is, my favorite part of those cherished family gatherings.

    Why You’ll Love It

    This Chicken Liver Salad is more than just a dish; it’s a sensory experience. The savory, slightly tangy flavor of the chicken livers, when combined with crispy bacon and balsamic vinegar, creates a taste explosion. Besides its delightful flavors, this salad is also packed with nutrients, making it a wholesome option for those who want to enjoy a hearty meal without compromising on health. It’s simple to make, requiring only a handful of ingredients and minimal preparation time, yet it never fails to impress both family and guests alike.

    Ingredients

    • Bacon
    • Balsamic vinegar
    • Boston lettuce
    • Chicken livers
    • Olive oil
    • Onion
    • Salt and pepper

    Instructions

    1. In a large skillet, heat the olive oil over medium-high heat.
    2. Add the sliced onion and bacon to the skillet, sautéing until the bacon is slightly crisp and the onions are soft.
    3. Add the chicken livers to the skillet, stirring well to combine with the bacon and onions.
    4. Pour in the balsamic vinegar, allowing the livers to simmer slowly. Stir occasionally, and add more vinegar if necessary to keep the mixture moist.
    5. Once the livers are cooked through and tender, season with salt and pepper to taste.
    6. Arrange a bed of Boston lettuce on a serving platter, and spoon the warm liver mixture over the top.
    7. Serve immediately, ensuring each plate has a generous portion of both liver mixture and lettuce.

    Tips

    For the best results, use fresh chicken livers and make sure to clean them thoroughly before cooking. If you’re not a fan of balsamic vinegar, you can substitute it with red wine vinegar for a slightly different flavor profile. Make sure to taste as you go, adjusting the seasoning according to your preference. To add an extra layer of texture, consider topping the salad with toasted nuts, such as walnuts or pine nuts.

    Variations & Substitutions

    There are numerous ways to tweak this recipe to better suit your palate or dietary needs:

    • Vegetarian Option: Replace chicken livers with grilled portobello mushrooms for a vegetarian-friendly version.
    • Different Greens: Swap Boston lettuce for arugula or spinach for a peppery or more robust flavor.
    • Additional Vegetables: Incorporate roasted red peppers or cherry tomatoes for a burst of color and sweetness.
    • Herbs: Add fresh herbs like thyme or rosemary to enhance the aromatic profile of the dish.

    Storage

    If you have leftovers, store the chicken liver mixture separately from the lettuce to prevent it from becoming soggy. Place the liver mixture in an airtight container and refrigerate for up to two days. Reheat gently in a skillet before serving over fresh lettuce. Note that the texture of the liver might change slightly upon reheating, but the flavors will remain delightful.

    FAQ

    Can I prepare this dish in advance?

    While you can prepare the liver mixture a day ahead, it’s best to serve the salad fresh to retain the crispness of the lettuce. Reheat the liver mixture just before serving.

    Is chicken liver healthy?

    Yes, chicken liver is a rich source of protein, iron, and various vitamins, including vitamin A and B12. It can be a nutritious addition to your diet when consumed in moderation.

    Nutrition

    Chicken Liver Salad is a nutrient-dense dish, offering a substantial amount of protein and essential vitamins. A serving provides approximately:

    • Calories: 250
    • Protein: 20g
    • Fat: 15g
    • Carbohydrates: 8g
    • Iron: 10mg

    Please note that these values are estimates and can vary based on specific brands and preparation methods.

    Final Thoughts

    This Chicken Liver Salad is more than just a meal; it’s a journey back to simpler times filled with love, laughter, and delicious food. It’s a testament to how traditional recipes can still hold a special place in our modern lives. Whether you’re a fan of chicken livers or looking to try something new, this salad is a delightful way to enjoy a nutritious and flavorful meal. Gather your loved ones, share stories, and enjoy this comforting dish together.

    Related update: Chicken Liver Salad

    Related update: Crab Cakes Rockefeller

    Related update: Easy Tabouleh

  • Roasted Broccoli with Lemon and Garlic | Made by Meaghan Moineau

    Roasted Broccoli with Lemon and Garlic | Made by Meaghan Moineau

    Roasted Broccoli with Lemon and Garlic

    There’s something magical about the simple yet profound combination of roasted vegetables with citrus and herbs. This Roasted Broccoli with Lemon and Garlic recipe brings a burst of flavor and a delightful crisp texture to your table. Let me take you on a journey of flavors that will transform a humble vegetable into a dish that stands out on its own.

    Why You’ll Love It

    This roasted broccoli recipe is one you’ll want to make over and over again. It’s not just about the taste; it’s about the experience it brings to the table. Growing up, I remember my grandmother’s kitchen filled with the aroma of roasted vegetables. She had a knack for making the simplest ingredients extraordinary. That nostalgic memory is what inspired this recipe. You’ll love it for its simplicity, quick preparation, and the way it elevates broccoli into something truly special.

    Ingredients

    • 1 pound of broccoli florets
    • 2 tablespoons extra virgin olive oil
    • 3 cloves of garlic, minced
    • 1/2 teaspoon black ground pepper
    • 2 tablespoons lemon juice
    • Salt to taste

    Instructions

    1. Preheat your oven to 400 degrees Fahrenheit (200 degrees Celsius).
    2. In a large mixing bowl, combine the broccoli florets, olive oil, minced garlic, salt, and black ground pepper. Toss well to ensure the broccoli is evenly coated.
    3. Spread the broccoli out in an even layer on a baking sheet. Ensure they are not overlapping to allow even roasting.
    4. Bake in the preheated oven until the broccoli is tender enough to pierce the stems with a fork, about 15 to 20 minutes.
    5. Remove the broccoli from the oven and place it in a serving bowl. Drizzle with fresh lemon juice and give it a gentle toss to combine.
    6. Serve immediately and enjoy the vibrant flavors.

    Tips

    For the best results, make sure your broccoli florets are similar in size. This ensures even cooking. Always use fresh lemon juice for that zesty punch, and feel free to adjust the garlic to your preference if you’re a garlic lover like me.

    Variations & Substitutions

    If you want to add a little heat, sprinkle some red pepper flakes before roasting. For a touch of umami, add a tablespoon of grated Parmesan cheese just before serving. If you’re out of fresh garlic, garlic powder is a feasible substitute, though fresh will always give you the best flavor.

    Storage

    Store any leftover roasted broccoli in an airtight container in the refrigerator for up to 3 days. Reheat it in an oven or air fryer to regain its crispness. Avoid microwaving as it can make the broccoli soggy.

    FAQ

    Can I use frozen broccoli instead of fresh?

    Yes, you can use frozen broccoli. Just be sure to thaw and pat it dry thoroughly to remove excess moisture before roasting. This will help achieve a crispy texture.

    What can I serve with roasted broccoli?

    Roasted broccoli is versatile and pairs well with a variety of main courses. Try it alongside grilled chicken, salmon, or a hearty pasta dish. It also works beautifully as a topping for salads or grain bowls.

    How do I prevent the broccoli from becoming too soft?

    To keep the broccoli from getting too soft, make sure not to overcrowd the pan. This allows the hot air to circulate and roast the broccoli rather than steam it.

    Nutrition

    This dish is not only delicious but also nutritious. Broccoli is a powerhouse of vitamins K and C, fiber, and numerous antioxidants. With minimal olive oil and fresh lemon juice, this recipe keeps the calorie count low while delivering maximum flavor.

    Final Thoughts

    This Roasted Broccoli with Lemon and Garlic is more than just a side dish; it’s a celebration of simple ingredients coming together to create something wonderful. Whether you’re looking to add more greens to your diet or searching for an easy weeknight side, this recipe fits the bill. Happy cooking!

    Related update: Roasted Broccoli with Lemon and Garlic

  • Steak with lemon and capers | Made by Meaghan Moineau

    Steak with lemon and capers | Made by Meaghan Moineau

    Steak with Lemon and Capers

    There’s something truly magical about the aroma of sizzling steak mingling with the zesty freshness of lemon and the briny pop of capers. This recipe for Steak with Lemon and Capers not only delivers a mouthwatering dining experience but also carries with it a memory of warm family gatherings, where laughter and delicious food went hand in hand.

    Why You’ll Love It

    Imagine a tender, juicy steak infused with the tang of lemon and the unique flavor of capers. This recipe is a delightful blend of simplicity and sophistication. You’ll love how quickly it comes together, making it perfect for both weekday dinners and special occasions. The ingredients are straightforward, yet they combine to create a dish that feels both luxurious and comforting. Plus, the sauce is absolutely divine when drizzled over the steak—or anything else on your plate!

    Ingredients

    • Beef steak
    • Butter
    • Capers
    • Dry white wine
    • Flour
    • Garlic
    • Black ground pepper
    • Lemon juice
    • Lemon wedges
    • Olive oil
    • Parsley
    • Salt

    Instructions

    1. Flatten the steaks lightly with a meat mallet.
    2. In a shallow dish, combine flour, salt, and pepper. Dip the steaks into the mixture, ensuring both sides are well-coated.
    3. Heat a mixture of butter and olive oil in a pan over medium heat. Sauté the steaks for about 4 minutes on each side until they are browned to your liking. Remove from the pan and set aside.
    4. In the same pan, sauté the garlic for about 1 minute, stirring continuously to avoid burning.
    5. Add the wine and lemon juice to the pan, stir, and let it simmer for 5 minutes to slightly reduce the liquid.
    6. Add the capers and give everything a good stir.
    7. Return the steaks to the pan, cover, and simmer over low heat for 4 minutes to allow the flavors to meld.
    8. Garnish with chopped parsley and serve with lemon wedges on the side.

    Tips

    For the best results, make sure your steaks are at room temperature before cooking. This ensures even cooking throughout. When flattening the steaks, be gentle to maintain their structure. Lastly, don’t skip the resting part after cooking; it allows the juices to redistribute, making each bite as juicy as possible.

    Variations & Substitutions

    If you’re looking to switch things up, consider using chicken or pork cutlets instead of beef. Both proteins work wonderfully with the lemon and capers. For a bit of heat, add a pinch of red pepper flakes to the sauce. You can also substitute white wine with chicken broth if you prefer an alcohol-free version.

    Storage

    Leftovers can be a delightful treat. Store any remaining steak and sauce in an airtight container in the refrigerator for up to three days. To reheat, gently warm the steak in a pan over low heat until it’s heated through. Avoid microwaving as it can toughen the meat.

    FAQ

    What can I serve with Steak with Lemon and Capers?

    This dish pairs beautifully with a variety of sides. Consider serving it with creamy mashed potatoes, steamed asparagus, or a fresh arugula salad. The sauce is also fantastic when soaked up with crusty bread.

    Can I use a different type of steak?

    Absolutely! This recipe is quite versatile. Ribeye, sirloin, or even filet mignon would be excellent choices. Just be mindful of cooking times as they may vary depending on the thickness of the steak.

    Nutrition (if applicable)

    This dish is rich in protein and offers a good balance of flavors from healthy fats like olive oil and butter. If you’re mindful of sodium intake, consider rinsing the capers to reduce their saltiness. Adjusting the amount of butter and oil can also help manage caloric content.

    Final Thoughts

    Steak with Lemon and Capers is more than just a meal; it’s an experience. The bright, bold flavors are sure to impress family and guests alike. Whether it’s a casual dinner or a special celebration, this dish delivers a taste of elegance with every bite. Give it a try, and let it become a new favorite in your culinary repertoire!

    Related update: Steak with lemon and capers

  • Creme Brulee | Made by Meaghan Moineau

    Creme Brulee | Made by Meaghan Moineau

    Creme Brulee: A Classic Dessert to Savor

    There’s something truly magical about cracking through the burnt sugar crust of a perfectly made creme brulee. This quintessential French dessert, with its silky custard and tantalizing caramelized top, has been a staple in gourmet kitchens around the world. I remember my first encounter with creme brulee at a quaint Parisian cafe; the rich vanilla aroma and the satisfying crack of the sugar captivated my senses. Today, I’m excited to share this timeless recipe with you, so you can recreate that enchanting experience at home.

    Why You’ll Love It

    Creme brulee is more than just a dessert; it’s an experience. Here are a few reasons why you’ll fall in love with this classic treat:

    • Elegant Simplicity: With just a handful of ingredients, creme brulee is a testament to simple, refined flavors.
    • Textural Delight: The contrast between the creamy custard and the crisp, caramelized sugar is a textural masterpiece.
    • Versatile: Perfect for any occasion, creme brulee can be served as a romantic dessert for two or the centerpiece of a dinner party.
    • Make-Ahead Friendly: Prepare it in advance and caramelize the top just before serving, making it both convenient and impressive.

    Ingredients

    • 1 whole egg
    • 5 egg yolks
    • 500ml fresh milk
    • 150g caster sugar, plus extra for topping
    • 1 vanilla bean pod
    • 250ml whipping cream

    Instructions

    1. Preheat your oven to 150°C (300°F).
    2. Pour the fresh milk and whipping cream into a saucepan.
    3. Slice the vanilla bean pod lengthwise and scrape the seeds into the cream mixture. Chop the empty pod into small pieces and add them to the cream as well.
    4. Bring the cream mixture to a boiling point, then reduce the heat and simmer gently for 3 minutes, allowing the flavors to meld.
    5. In a large bowl, lightly beat the sugar and eggs together until the mixture is pale and smooth.
    6. Strain the cream mixture through a fine sieve and return it to the heat, bringing it back to a boil.
    7. Gradually add the hot cream to the egg mixture, whisking vigorously to temper the eggs and prevent curdling.
    8. After incorporating all the cream, strain the mixture again for a smooth texture.
    9. Pour the custard into 7-8 ramekins, depending on their size.
    10. Place the ramekins in a large cake pan or roasting pan. Pour enough hot water into the pan to come halfway up the sides of the ramekins.
    11. Bake in the center of the oven for 30-40 minutes, or until the custards are just set but still slightly wobbly in the middle.
    12. Remove the ramekins from the water bath and allow them to cool to room temperature. Refrigerate for at least 3 hours or overnight.
    13. Just before serving, sprinkle an even layer of caster sugar over the top of each custard. Use a kitchen blowtorch to caramelize the sugar until golden and crisp.

    Tips

    • Quality Ingredients: Use fresh and high-quality ingredients, especially the vanilla, to ensure the best flavor.
    • Water Bath: The water bath is crucial for even cooking. Ensure the water level is consistent and avoid splashing water into the custard.
    • Sugar Layer: For a perfect sugar crust, use fine caster sugar and ensure an even layer before caramelizing.

    Variations & Substitutions

    While the classic creme brulee is made with vanilla, there are plenty of ways to add your own twist:

    • Flavored Creme Brulee: Infuse the cream with coffee beans, citrus zest, or spices like cinnamon or cardamom for a different flavor profile.
    • Non-Dairy Option: Substitute the milk and cream with coconut milk for a dairy-free version that adds a tropical flair.
    • Liqueur Addition: Add a splash of your favorite liqueur, like Grand Marnier or Amaretto, into the custard for an adult twist.

    Storage

    Creme brulee can be stored in the refrigerator, covered with plastic wrap, for up to 3 days. Caramelize the sugar topping just before serving to maintain the crisp texture.

    FAQ

    Can I make creme brulee without a blowtorch?

    Yes! If you don’t have a blowtorch, you can caramelize the sugar under a hot grill (broiler) for a few minutes. Keep a close watch to prevent burning and rotate the ramekins if necessary for even caramelization.

    Why did my creme brulee curdle?

    Curdling usually occurs when the eggs cook too quickly. To prevent this, make sure to gradually add the hot cream to the eggs while whisking constantly. Also, baking in a water bath helps regulate the temperature and prevent overcooking.

    Nutrition

    Each serving of creme brulee (based on 8 servings) provides approximately:

    • Calories: 320
    • Protein: 5g
    • Fat: 22g
    • Carbohydrates: 25g
    • Sugar: 24g

    Final Thoughts

    Creme brulee is a testament to the beauty of simplicity and elegance in the culinary world. Its rich flavor and delightful texture make it a cherished dessert, perfect for impressing guests or indulging yourself. Whether you’re making it for the first time or the hundredth, this classic recipe is sure to leave a lasting impression. Enjoy the process, savor the flavors, and revel in the joy of creating something truly special in your kitchen.

    Related update: Creme Brulee

  • Curry and Sage Roast Chicken | Made by Meaghan Moineau

    Curry and Sage Roast Chicken | Made by Meaghan Moineau

    Curry and Sage Roast Chicken

    There’s something incredibly heartwarming about the aroma of a roast chicken wafting through the house. It takes me back to Sunday afternoons at my grandmother’s, where the kitchen was a realm of delightful scents and warm embraces. Her roast chicken, seasoned with a blend of herbs and spices, was always the centerpiece of our family gatherings. Inspired by those cherished memories, I’ve created this Curry and Sage Roast Chicken recipe. It’s a dish that not only fills the belly but also warms the soul. Whether you’re cooking for a family dinner or a special occasion, this recipe promises to be a crowd-pleaser.

    Why You’ll Love It

    This Curry and Sage Roast Chicken is a flavorful twist on the classic roast. The combination of curry and fresh sage creates a unique and aromatic profile. Here’s why you’ll fall in love with this dish:

    • Flavorful: The curry adds a mild kick, while the sage provides an earthy balance.
    • Simple Ingredients: Made with pantry staples and fresh herbs.
    • Easy Preparation: A straightforward recipe that requires minimal prep time.
    • Juicy and Tender: The citrus juices keep the chicken moist and succulent.
    • Versatile: Perfect for any occasion, from weeknight dinners to festive gatherings.

    Ingredients

    • 1 whole chicken, cleaned and patted dry
    • 3 tablespoons olive oil
    • Juice of 1 lemon
    • Juice of 1 orange
    • 4 cloves garlic, minced
    • 2 tablespoons honey
    • 1 tablespoon fresh sage, chopped
    • 2 teaspoons curry powder
    • 1 teaspoon black pepper
    • 1/2 teaspoon turmeric

    Instructions

    1. Preheat your oven to 350°F (175°C).
    2. In a small bowl, combine olive oil, lemon juice, orange juice, minced garlic, honey, chopped sage, curry powder, black pepper, and turmeric. Mix well to create a marinade.
    3. Rub the chicken thoroughly with the marinade, ensuring it’s evenly coated. Carefully lift the skin and stuff some of the garlic and sage under it for added flavor.
    4. Place the chicken in a baking pan.
    5. Bake in the preheated oven. The baking time will vary based on the size of your chicken; generally, it takes about 20 minutes per pound. Keep an eye on the chicken and let the skin become golden and crispy.
    6. Once cooked, allow the chicken to rest for about 10 minutes before carving. This helps the juices redistribute, ensuring each bite is juicy.

    Tips

    • Use a Meat Thermometer: Ensure the chicken is cooked through by checking that the internal temperature reaches 165°F (74°C).
    • Resting Time: Allow the chicken to rest after roasting to ensure it remains juicy.
    • Even Coating: Make sure to rub the marinade evenly for consistent flavor.

    Variations & Substitutions

    Feel free to experiment with this recipe to suit your taste:

    • Herbs: If you’re not a fan of sage, rosemary or thyme make excellent alternatives.
    • Spices: Add a pinch of cayenne pepper for a spicier kick.
    • Honey Substitute: Maple syrup or agave nectar can be used if you prefer.

    Storage

    Leftover roast chicken can be stored in an airtight container in the refrigerator for up to 3 days. For longer storage, you can freeze the chicken for up to 3 months. Be sure to defrost thoroughly in the refrigerator before reheating.

    FAQ

    Can I use chicken pieces instead of a whole chicken?

    Absolutely! You can use chicken thighs or breasts if you prefer. Adjust the cooking time accordingly, as pieces will cook faster than a whole chicken.

    What can I serve with this Curry and Sage Roast Chicken?

    This dish pairs beautifully with a variety of sides. Consider serving it with roasted vegetables, a fresh green salad, or buttery mashed potatoes.

    Do I need to cover the chicken while roasting?

    It’s not necessary to cover the chicken. Roasting it uncovered allows the skin to become beautifully golden and crispy. However, if it starts to brown too quickly, you can tent it with foil.

    Nutrition

    This recipe is a balanced meal rich in protein and flavor. It’s low in carbs and provides essential vitamins and minerals from the herbs and spices. The use of olive oil and fresh citrus juices adds healthy fats and a refreshing taste.

    Final Thoughts

    This Curry and Sage Roast Chicken is a delightful dish that brings a touch of nostalgia and warmth to any meal. The combination of spices and citrus creates a harmony of flavors that is both comforting and invigorating. Whether you’re an experienced cook or just starting out, this recipe is simple to follow and results in a deliciously satisfying meal. I hope you enjoy making and sharing this dish as much as I do. Happy cooking!

    Related update: Curry and Sage Roast Chicken

    Related update: Chicken Cordon Bleu