Tag: Peanut Butter

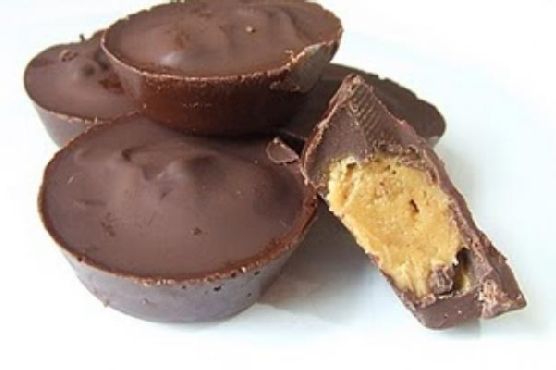
  • Spiced Double-Layered Peanut Butter Cups with Sea Salt Crystals | Made by Meaghan Moineau

    Spiced Double-Layered Peanut Butter Cups with Sea Salt Crystals | Made by Meaghan Moineau

    Spiced Double-Layered Peanut Butter Cups with Sea Salt Crystals

    Imagine biting into a velvety, rich peanut butter cup that whispers of exotic lands, where warm spices linger on your palate and a sprinkle of sea salt punctuates the sweetness. These are not your ordinary peanut butter cups; they are a journey of flavors, a little unexpected, and utterly irresistible.

    Personal Story

    I remember the first time I attempted to make my own peanut butter cups at home. It was a chilly autumn afternoon, the scent of falling leaves mingling with the warm aroma of melting chocolate in my tiny kitchen. My first batch was a humble attempt, delicious but missing a certain something — that extra oomph that would elevate them from good to unforgettable.

    One day, while rummaging through my spice cabinet, inspiration struck. A forgotten jar of ground cardamom called my name, a fragrant reminder of the chai lattes I adored. Could this be the secret ingredient my peanut butter cups had been waiting for? I decided to give it a whirl, adding a sprinkle of cinnamon for good measure. The result was magical: each bite carried a hint of warmth, a whisper of far-off places, and a balance of flavors that danced on my tongue.

    That day, I shared these spiced double-layered peanut butter cups with friends. The look of surprise and delight on their faces confirmed it — this was the version that deserved to be shared with the world. These treats became my signature dessert, the perfect ending to a cozy dinner or a sweet surprise at a gathering.

    What Makes This Version Special

    This version of peanut butter cups stands out because of its unique twist on a classic favorite. The addition of **ground cinnamon** and **ground cardamom** imbues the creamy filling with a warming spice profile that contrasts beautifully with the sweetness of the chocolate. The sprinkle of **flaky sea salt** on top offers a delightful contrast, balancing the sweetness perfectly and elevating the entire taste experience.

    Unlike standard recipes, this one isn’t just about sweetness; it’s about depth and complexity. The **vanilla extract** enhances the peanut butter’s natural nuttiness, while the careful blooming of spices in melted **non-hydrogenated shortening** with the chocolate enriches every bite. It’s a treat that feels both familiar and exotic, making it an exciting addition to any dessert repertoire.

    Flavor Profile

    Each bite of these spiced double-layered peanut butter cups offers a rich, creamy experience. The chocolate shell is smooth and melts in your mouth, while the spiced peanut butter filling surprises with its warm, aromatic blend of cinnamon and cardamom. The sea salt crystals on top provide a delightful crunch and a burst of salinity that heightens the sweetness and creaminess, making every mouthful a balanced and luxurious treat.

    Ingredients

    • 1 cup **Enjoy Life semi-sweet chocolate chips**
    • 2 tablespoons **non-hydrogenated shortening**
    • 3/4 cup creamy peanut butter
    • 2 tablespoons agave nectar
    • 1/4 teaspoon salt
    • 1/2 teaspoon **ground cinnamon**
    • 1/4 teaspoon **ground cardamom**
    • 1 teaspoon **vanilla extract**
    • 1 tablespoon **flaky sea salt**

    Instructions

    1. Begin by lining a mini muffin tin with paper liners or spraying it with a thin coat of cooking oil. This will ensure the peanut butter cups release easily once set.
    2. In a small bowl, mix together the creamy peanut butter, agave nectar, salt, and vanilla extract. Set this filling mixture aside.
    3. In a heatproof bowl, combine the chocolate chips and shortening. Place this bowl over a pot of simmering water, ensuring the bottom of the bowl does not touch the water. Stir continuously until the chocolate is completely melted and smooth.
    4. Sprinkle the ground cinnamon and cardamom over the melted chocolate and shortening. Allow the spices to bloom in the heat, stirring gently until they’re fully incorporated and aromatic.
    5. Spoon about one teaspoon of the melted chocolate mixture into each of the prepared muffin cups. Gently tap the tin on the counter to settle the chocolate evenly.
    6. Top the chocolate layer with a scant teaspoon of the peanut butter mixture, spreading it slightly to cover the chocolate.
    7. Finish by topping each cup with another teaspoon of the melted chocolate, ensuring the peanut butter layer is completely covered.
    8. Sprinkle a pinch of flaky sea salt crystals over each cup.
    9. Refrigerate the peanut butter cups for at least 30 minutes, or until they are fully set.
    10. Once set, store the spiced double-layered peanut butter cups in an airtight container in the refrigerator to maintain their firm texture.

    Pro Tips from Meaghan’s Kitchen

    • Use a double boiler technique for melting the chocolate to prevent scorching. If you don’t have one, a heatproof bowl over a pot works wonders.
    • For a smoother filling, make sure the peanut butter is at room temperature before mixing with other ingredients.
    • Don’t skip the step of blooming the spices in the chocolate. This simple technique maximizes their flavors, making a significant difference.
    • Adjust the amount of sea salt to your liking. A little goes a long way, but it can really enhance the overall taste.
    • If you’re short on time, these can also be set in the freezer for about 10-15 minutes to speed up the process.

    Variations & Dietary Swaps

    • Vegetarian Swap: Replace the non-hydrogenated shortening with coconut oil for a plant-based twist.
    • Spice-It-Up Version: Add a pinch of cayenne pepper to the chocolate for a subtle heat that complements the spices.
    • Kids-Friendly Version: Omit the spices for a classic peanut butter cup that kids will love, and use milk chocolate instead of semi-sweet.

    What to Serve With It

    These spiced double-layered peanut butter cups pair beautifully with a chai-spiced almond milk latte, enhancing the warming spices with each sip. For a refreshing contrast, a glass of cold almond milk also makes for a classic and satisfying combination. If you’re hosting a dinner party, consider serving them alongside a scoop of vanilla bean ice cream for an indulgent dessert duo.

    Storage & Meal Prep

    Once your peanut butter cups are set, store them in an airtight container in the refrigerator where they’ll stay fresh for up to two weeks. If you prefer to make a larger batch, they freeze beautifully — simply layer them between sheets of parchment paper in a freezer-safe container for up to three months. When you’re ready to enjoy them, just let them thaw in the fridge or at room temperature for a few minutes. To reheat and slightly soften, you can pop them in the microwave for about 10 seconds, but be careful not to overheat as this can alter the texture.

    FAQ

    Can I use other nut butters instead of peanut butter?

    Absolutely! Almond butter or cashew butter would be delicious alternatives that still pair well with the spices and chocolate.

    What if I don’t have agave nectar?

    No worries! You can substitute agave nectar with honey or maple syrup for a similar sweetness and consistency.

    How do I prevent the chocolate from seizing?

    Ensure that no water gets into the chocolate while melting. Keep the heat low and stir continuously for smooth results.

    Can I make these in a regular muffin tin?

    Yes, but you’ll need to adjust the amount of filling and chocolate layers accordingly. They may take a bit longer to set, too.

    Final Thoughts

    There’s something truly special about creating a dessert that’s both familiar and adventurous, and these spiced double-layered peanut butter cups with sea salt crystals achieve just that. I hope this recipe brings as much joy to your kitchen as it does to mine. I’d love to hear how yours turn out — feel free to leave a comment or share your own variations. Happy cooking, and may your culinary adventures be as sweet and exciting as these little treats!

    Related update: Spiced Double-Layered Peanut Butter Cups with Sea Salt Crystals

    Related update: Caramelized Banana Rum Ice Cream with Toasted Coconut and Spiced Maple Drizzle
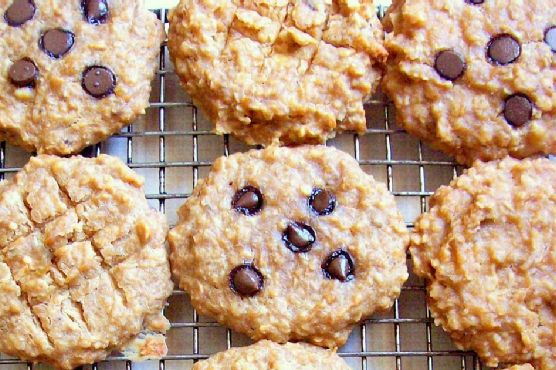
  • Nutty Banana-Peanut Butter Breakfast Cookies with Dark Chocolate and Sea Salt | Made by Meaghan Moineau

    Nutty Banana-Peanut Butter Breakfast Cookies with Dark Chocolate and Sea Salt | Made by Meaghan Moineau

    Nutty Banana-Peanut Butter Breakfast Cookies with Dark Chocolate and Sea Salt

    Picture this: the comforting aroma of warm peanut butter wafting through your kitchen, mingling with the irresistible scent of melting dark chocolate, as you anticipate a sweet, nutty bite of goodness. These Nutty Banana-Peanut Butter Breakfast Cookies with Dark Chocolate and Sea Salt are about to become your new morning obsession.

    Personal Story

    There was a time when breakfast in my house was a hurried affair, where a quick slice of toast or a bowl of cereal had to suffice before dashing out the door. But everything changed the morning I discovered the joy of breakfast cookies. It was a chilly autumn day, and I was craving something warm and comforting that I could enjoy leisurely with my cup of chai tea. That was the day these Nutty Banana-Peanut Butter Breakfast Cookies were born.

    The inspiration came from a kitchen mishap, believe it or not. I had intended to make banana bread, but with a toddler tugging at my apron strings, I misjudged the batter’s consistency and ended up with dough instead. With a quick pivot, I decided to scoop the mixture onto a baking sheet, and, voilà, breakfast cookies emerged from the oven.

    As I took my first bite, the sweet nuttiness combined with the rich chocolate finish and a hint of sea salt danced on my palate. It was a revelation. These cookies offered the comfort of a homemade breakfast with the portability of a grab-and-go snack, making them perfect for busy mornings.

    Since that serendipitous kitchen experiment, these cookies have become a staple in my family. I love making them ahead of a busy week, knowing that I have a delicious and wholesome option ready to go. Plus, they’re a hit with my little one, who loves to help me mix the ingredients and sprinkle the sea salt. It’s these simple, joyful moments that make cooking such a cherished part of my day.

    What Makes This Version Special

    What sets my Nutty Banana-Peanut Butter Breakfast Cookies apart is the luxurious touch of pure maple syrup and the strategic sprinkle of sea salt. The maple syrup adds a layer of richness that complements the creamy peanut butter and sweet bananas, creating a flavor profile that’s both familiar and elevated. Meanwhile, a sprinkle of sea salt on top of the cookies right after baking enhances the sweetness while balancing the nutty, chocolatey notes, offering a delightful contrast that keeps you reaching for just one more.

    Flavor Profile

    These breakfast cookies deliver a sweet, nutty, and slightly salty flavor experience. Imagine biting into a cookie where the warmth of creamy peanut butter meets the tropical sweetness of bananas, all underscored by the crunch of toasted mixed nuts. The dark chocolate chips melt into pockets of rich, velvety goodness, while the sea salt brightens each bite, making the flavors pop. It’s a harmonious blend that satisfies both sweet and savory cravings.

    Ingredients

    • 3 ripe bananas, mashed
    • 1/2 cup butter flavor shortening
    • **1 cup dark chocolate chips**
    • **1/2 cup creamy peanut butter**
    • 1 cup mixed nuts, lightly toasted
    • 2 cups oatmeal
    • 1/2 cup unsweetened applesauce
    • 1 teaspoon vanilla extract
    • 1 scoop vanilla protein powder
    • **1/4 cup pure maple syrup**
    • **Sea salt**, for sprinkling

    Instructions

    1. Preheat your oven to 350°F (175°C).
    2. In a large mixing bowl, combine the mashed bananas and creamy peanut butter until smooth and fully integrated.
    3. Add the unsweetened applesauce, vanilla protein powder, and vanilla extract to the banana mixture. Stir until all ingredients are well combined.
    4. Introduce the oatmeal and toasted mixed nuts to the bowl, and fold them into the banana mixture. If you prefer the chocolate chips mixed throughout, add them at this stage. Let the dough rest for 10 minutes to allow the oats to absorb moisture.
    5. Line a baking sheet with parchment paper. Drop spoonfuls of cookie dough onto the sheet, flattening each spoonful into a circle.
    6. For cookies with chocolate chips on top, sprinkle them now, pressing gently so they adhere.
    7. Bake in the preheated oven for 20-30 minutes, adjusting the time based on your preference for softer or crisper cookies. Look for a golden-brown color as a visual cue for doneness.
    8. Upon removing from the oven, sprinkle a pinch of sea salt over the warm cookies to enhance the sweetness and balance the flavors.
    9. Allow the cookies to rest on the baking sheet for 5 minutes before transferring to a cooling rack. If desired, use a pizza cutter or sharp knife to score the tops for a traditional look.
    10. Once completely cool, store the cookies in an airtight container. Enjoy them fresh or with your favorite cup of tea.

    Pro Tips from Meaghan’s Kitchen

    • Toasting the nuts: Lightly toasting the mixed nuts in a dry pan before incorporating them into the dough intensifies their flavor and adds a satisfying crunch.
    • Optimal banana ripeness: Use bananas that are ripe but not overly mushy for the best sweetness and texture.
    • Protein boost: Adjust the protein powder amount to suit your dietary needs, or substitute with almond flour for a different texture.
    • Sea salt timing: Sprinkle the sea salt immediately after baking while the cookies are still warm to ensure it adheres properly and enhances flavors.
    • Batch baking: Double the recipe and freeze half the dough for a quick, fresh batch later.

    Variations & Dietary Swaps

    • Vegetarian Swap: Ensure your vanilla protein powder is plant-based to maintain a vegetarian-friendly cookie.
    • Spice-it-up Version: Add a teaspoon of cinnamon or nutmeg to the dough for a warming spice twist.
    • Kids-Friendly Version: Substitute the dark chocolate chips with mini chocolate chips, and involve the kids in shaping the cookies for a fun family activity.

    What to Serve With It

    These Nutty Banana-Peanut Butter Breakfast Cookies are perfectly complemented by a steaming cup of chai tea, which enhances the warm spices and nuttiness. Alternatively, an almond milk latte offers a creamy, nutty counterpart to the rich chocolate finish of the cookies.

    Storage & Meal Prep

    For optimal freshness, store the cookies in an airtight container at room temperature for up to three days. For longer storage, place them in the refrigerator for up to a week. To freeze, lay the cookies flat in a single layer on a baking sheet, freeze until solid, then transfer to a freezer-safe bag or container. Reheat frozen cookies in a preheated oven at 300°F (150°C) for 5-8 minutes or until warm.

    FAQ

    Can I use a different type of nut butter?

    Absolutely! Almond butter or cashew butter would work wonderfully and bring their own unique flavors to the cookies.

    How can I make these cookies gluten-free?

    Simply substitute gluten-free oats into the recipe, ensuring all other ingredients are certified gluten-free as well.

    What if I don’t have vanilla protein powder?

    No problem! You can omit the protein powder or replace it with almond flour or additional oatmeal to maintain the texture.

    Can I use honey instead of maple syrup?

    Yes, honey can be used as a substitute for maple syrup, but note that it may slightly alter the flavor profile.

    How do I know when the cookies are fully baked?

    The cookies are done when they achieve a lovely golden-brown color. If you prefer them softer, aim for a lighter golden hue.

    Final Thoughts

    These Nutty Banana-Peanut Butter Breakfast Cookies with Dark Chocolate and Sea Salt are a delightful way to start your day or enjoy as a midday snack. Their balanced flavor profile and wholesome ingredients make them a favorite in my household, and I hope they become a staple in yours as well. I’d love to hear how they turned out for you, so feel free to leave a comment or share your own twists on the recipe. Happy baking!

    Related update: Nutty Banana-Peanut Butter Breakfast Cookies with Dark Chocolate and Sea Salt

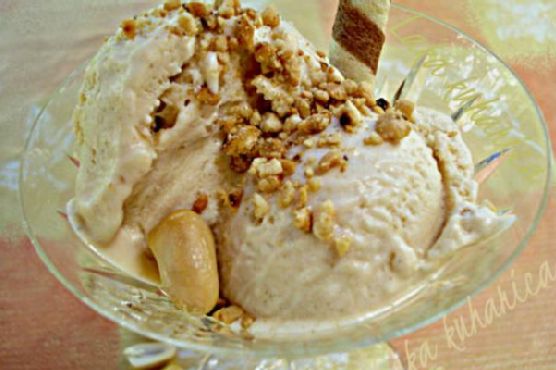
  • Decadent Honey-Roasted Peanut Butter Ice Cream with Dark Chocolate Shards | Made by Meaghan Moineau

    Decadent Honey-Roasted Peanut Butter Ice Cream with Dark Chocolate Shards | Made by Meaghan Moineau

    Decadent Honey-Roasted Peanut Butter Ice Cream with Dark Chocolate Shards

    Imagine the creamy, nutty goodness of peanut butter ice cream taken to new heights with a luxurious swirl of homemade chocolate ganache and the crunch of honey-roasted peanuts. The first spoonful is a revelation, a dance of caramelized sweetness and rich chocolate undertones that lingers long after the last bite.

    Personal Story

    Growing up, peanut butter ice cream was a rare treat, reserved for special Sunday afternoons when my family would pile into our sun-faded station wagon and head to the local ice cream parlor. I remember the thrill of watching the server scoop out my favorite flavor, the peanut butter ribbons weaving through the creamy concoction like golden streams through a lush forest. It was pure joy in a cone.

    Fast forward a few years to my first tiny apartment kitchen, where I decided to recreate this childhood favorite. My initial attempts were, well, let’s just say, more of a learning experience than a triumph. I quickly discovered that achieving the right balance of flavors in homemade ice cream is both an art and a science, one that requires patience—and a bit of courage.

    One day, as I was experimenting with a batch, I decided to add a handful of honey-roasted peanuts that were hiding at the back of my pantry. The resulting flavor was a revelation. The caramelized crunch paired perfectly with the silky peanut butter base, and I knew I had stumbled upon something special. From there, the addition of dark chocolate shards seemed only natural, enhancing the peanut butter’s richness with a sophisticated depth.

    Now, this decadent honey-roasted peanut butter ice cream with dark chocolate shards holds a cherished spot not only in my recipe book but also in my heart. It’s a sweet reminder that sometimes the best things come from unexpected twists and a little bit of kitchen serendipity.

    What Makes This Version Special

    This isn’t your average peanut butter ice cream. What sets this recipe apart is the thoughtful addition of honey-roasted peanuts and a swirl of homemade chocolate ganache. The peanuts are roasted with honey to enhance their natural sweetness, adding a layer of caramelized flavor that complements the rich, nutty base. The chocolate ganache, made by melting dark chocolate with butter and cocoa powder, is carefully swirled into the ice cream during the final stages of churning. This technique creates deep, chocolatey undertones that elevate the classic peanut butter ice cream to something truly extraordinary.

    Flavor Profile

    The taste of this ice cream is a symphony of rich, nutty notes with a hint of caramel sweetness from the honey-roasted peanuts. Each bite delivers a creamy texture that’s punctuated by the satisfying crunch of the peanuts. The chocolate ganache adds a luxurious depth, with its bittersweet flavor cutting through the sweetness and providing a sophisticated twist. It’s a harmonious blend that dances on your palate, leaving a lingering, delectable aftertaste.

    Ingredients

    • 2 cups whole milk
    • 1 cup sugar
    • 1/4 teaspoon salt
    • 2 large eggs
    • 1 cup smooth peanut butter
    • 1 cup heavy cream
    • 1 teaspoon vanilla extract
    • 1 cup unsalted peanuts, roasted with honey
    • 1/2 cup bits of bitter chocolate
    • 1/4 cup honey
    • 1/4 cup cocoa powder
    • 4 ounces dark chocolate (70% cacao)
    • 2 tablespoons butter

    Instructions

    1. Preheat your oven to 350°F (175°C). Spread the unsalted peanuts on a baking sheet and drizzle with honey. Toss to coat, then roast in the oven for 10-15 minutes, or until golden-brown and fragrant. Allow to cool.
    2. In a medium saucepan, combine the milk, sugar, and salt. Cook over medium heat, stirring occasionally, until the mixture is just about to boil. Reduce the heat to low.
    3. In a separate bowl, beat the eggs with a hand mixer or whisk until frothy, about 2 minutes. Gradually stir about 1 cup of the hot milk mixture into the beaten eggs to temper them.
    4. Return the egg mixture to the saucepan with the remaining milk mixture. Cook over low heat, stirring constantly, until the mixture thickens slightly, about 2-3 minutes. Remove from heat.
    5. Whisk in the smooth peanut butter until fully incorporated. Transfer the mixture to a bowl, cover, and refrigerate for at least 3 hours.
    6. To make the chocolate ganache, melt the dark chocolate and butter together in a small saucepan over low heat. Stir in the cocoa powder until smooth and set aside.
    7. In a large bowl, combine the chilled peanut butter mixture with the heavy cream and vanilla extract, stirring with a whisk.
    8. Pour the mixture into an ice cream maker and churn according to the manufacturer’s instructions. In the last few minutes of churning, drizzle in the chocolate ganache to create swirls.
    9. Once churned, fold in the honey-roasted peanuts and chocolate bits. Transfer the ice cream to a plastic container and freeze for at least an hour before serving.
    10. When ready to serve, let the ice cream sit at room temperature for 5-10 minutes before scooping. Enjoy your decadent treat with an extra sprinkle of chopped peanuts and chocolate bits if desired.

    Pro Tips from Meaghan’s Kitchen

    • For the best texture, ensure your ice cream base is thoroughly chilled before churning. This helps achieve that perfect creamy consistency.
    • When roasting the peanuts, keep a close eye on them. The honey can quickly go from caramelized to burnt if left unattended.
    • If you don’t have an ice cream maker, no worries! Pour the mixture into a shallow dish and place it in the freezer. Stir every 30 minutes until it reaches your desired consistency.
    • For neat swirls, pour the ganache into the ice cream maker just moments before finishing the churn. This will create beautiful ribbons of chocolate throughout.
    • Always use high-quality dark chocolate for the ganache. It makes a significant difference in flavor.

    Variations & Dietary Swaps

    • Vegetarian option: Replace the eggs with a plant-based egg substitute, and use coconut cream instead of heavy cream for a vegan-friendly version.
    • Spice-it-up version: Add a pinch of cayenne pepper or a swirl of chili chocolate for an unexpected kick.
    • Kids-friendly version: Substitute the dark chocolate with milk chocolate and reduce the amount of cocoa powder for a sweeter, milder taste.

    What to Serve With It

    This decadent treat pairs beautifully with a glass of cold brew coffee or espresso, which provides a complementary bitter contrast to the ice cream’s rich sweetness. Alternatively, serve it alongside a warm brownie or a slice of banana bread for an indulgent dessert experience.

    Storage & Meal Prep

    Store your homemade ice cream in an airtight container in the freezer for up to two weeks. When ready to enjoy, let it sit at room temperature for 5-10 minutes before scooping to ensure it’s at the perfect creamy consistency. If the ice cream hardens too much in the freezer, a brief zap in the microwave (10-15 seconds) can soften it up for easier scooping.

    FAQ

    How do I prevent my ice cream from becoming too icy?

    Ensuring that your ice cream base is completely chilled before churning and using an ice cream maker will help prevent ice crystals from forming. Additionally, incorporating enough sugar helps achieve a smoother texture.

    Can I use crunchy peanut butter instead of smooth?

    Absolutely! Crunchy peanut butter will add extra texture and peanut bits, enhancing the nutty experience. Just ensure it’s well incorporated into the mixture.

    Is there an alternative to honey for roasting the peanuts?

    Yes, you can use maple syrup or agave nectar as a substitute for honey if you prefer a different flavor or are avoiding honey.

    Can I add more chocolate?

    Of course! Feel free to increase the amount of dark chocolate or add extra chocolate bits on top for an even richer chocolate experience.

    Final Thoughts

    Creating this decadent honey-roasted peanut butter ice cream with dark chocolate shards is a delightful culinary adventure, one that’s sure to impress family and friends. I hope you find as much joy in making and tasting this ice cream as I did in creating it. I’d love to hear about your own twists on this recipe, so feel free to share your comments and experiences below. Happy scooping!

    Related update: Decadent Honey-Roasted Peanut Butter Ice Cream with Dark Chocolate Shards

    Related update: Orange Blossom Amaretto Almond Cookies with Dark Chocolate Drizzle