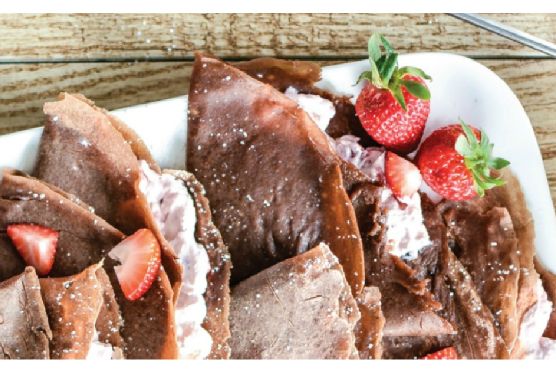
Tag: Medium

  • Decadent Spiced Chocolate Mousse in Hazelnut Chocolate Shells | Made by Meaghan Moineau

    Decadent Spiced Chocolate Mousse in Hazelnut Chocolate Shells | Made by Meaghan Moineau

    Decadent Spiced Chocolate Mousse in Hazelnut Chocolate Shells

    Imagine the moment you break through a perfectly crisp chocolate shell, revealing a velvety, spiced chocolate mousse that caresses your taste buds with warmth and richness. The nutty aroma of toasted hazelnuts mingles with the sweet scent of cinnamon and cardamom, creating an unforgettable dessert experience. This is not just any chocolate mousse — it’s an indulgence that elevates the classic French dessert to new heights.

    Personal Story

    My first encounter with chocolate mousse was a revelation. I was a teenager on a family trip to Paris, where I experienced the magic of French pâtisserie for the first time. The mousse was served in a quaint café tucked away in a cobblestone alley, and it was love at first bite. The lightness, the richness — it was a delicate balance I had never tasted before. Fast forward a few years, and my love for this dessert led me to experiment in my own kitchen, determined to recreate that Parisian magic.

    But, as many of us know, not all kitchen experiments go according to plan. My first attempt was more of a chocolate soup than a mousse. Undeterred, I delved into research, learning about the chemistry of chocolate and the art of creating that perfect airy texture. It was during one of these trials that I accidentally added a pinch of cinnamon and cardamom into the mix. What might have been a mishap turned into a serendipitous discovery.

    Infused with warming spices and encased in a delightful hazelnut chocolate shell, my version of the chocolate mousse was born. It was a hit at family gatherings and quickly became a requested favorite. The spices added warmth and depth, while the hazelnut shell provided a delightful crunch — a combination that was both nostalgic and refreshingly new.

    What Makes This Version Special

    This isn’t your typical chocolate mousse. Infused with warming spices and encased in a delightful hazelnut chocolate shell, this mousse elevates the classic dessert with a nutty and aromatic touch. By blooming spices in melted butter, we release their essential oils, enhancing the depth of flavor. The crunchy hazelnut shell provides a delightful contrast to the rich, creamy mousse inside. It’s a dessert that’s both sophisticated and approachable — a tribute to the beloved classic with a modern twist.

    Flavor Profile

    The first thing you’ll notice with this decadent spiced chocolate mousse is the aroma — the hazelnuts toasted to perfection, mingling with the sweet, exotic scents of cinnamon and cardamom. Upon tasting, the mousse reveals its rich, chocolatey core, elevated by the subtle warmth of the spices. The nutty crunch of the hazelnut shell adds texture, while the chocolate melts luxuriously on the tongue. It’s a symphony of flavors and textures, each bite more indulgent than the last.

    Ingredients

    • 1 3/4 cups whipping cream, divided
    • 8 oz quality semi-sweet chocolate chips
    • 1/4 cup strong coffee
    • 2 tbsp dark rum
    • 2 tbsp butter
    • 1 tsp gelatin
    • 1/2 tsp ground cinnamon
    • 1/4 tsp ground cardamom
    • 1 tsp vanilla extract
    • 1/2 cup hazelnuts
    • 6 oz extra semi-sweet chocolate chips for shell

    Instructions

    1. Chill 1 1/2 cups of whipping cream in the refrigerator while placing a metal mixing bowl and mixer beaters in the freezer.
    2. In a dry skillet, toast the hazelnuts over medium heat until aromatic, about 5-7 minutes. Allow them to cool slightly before grinding them finely in a food processor.
    3. In a double boiler, combine the 8 oz of chocolate chips, coffee, rum, and butter. Melt over barely simmering water, stirring constantly, until smooth. Remove from heat while a couple of chunks are still visible to prevent scorching.
    4. Bloom the spices by melting butter in a small pan over low heat. Add the ground cinnamon and cardamom, stirring until fragrant, then mix this into the melted chocolate. Allow the mixture to cool to just above body temperature, stirring occasionally.
    5. Pour the remaining 1/4 cup of whipping cream into a metal measuring cup and sprinkle in the gelatin. Let it bloom for 10 minutes, then carefully heat by swirling the cup over a low flame until the gelatin dissolves. Avoid boiling.
    6. Stir the gelatin mixture into the cooled chocolate, then set aside.
    7. Beat the chilled cream in the prepared mixing bowl to medium peaks. Stir 1/4 of the whipped cream into the chocolate mixture to lighten it, then fold in the remaining whipped cream in two additions. It’s okay if there are streaks of whipped cream; do not overwork the mousse.
    8. For the chocolate shells, melt the extra semi-sweet chocolate chips over a double boiler, then stir in the finely ground hazelnuts. Use this mixture to coat the inside of molds or bowls, creating a shell. Allow to set.
    9. Spoon the mousse into the prepared chocolate shells and chill for at least 1 hour before serving. Garnish with fruit if desired.

    Pro Tips from Meaghan’s Kitchen

    • For ultra-smooth mousse, ensure your chocolate mixture is just above body temperature before adding the gelatin. If it’s too hot, it can deflate the whipped cream.
    • Toasting the hazelnuts is key. It intensifies their flavor and adds a wonderful depth to the chocolate shell.
    • When folding the whipped cream into the chocolate, use a gentle hand. This step requires patience to maintain the mousse’s airy texture.
    • If you don’t have a double boiler, a heatproof bowl over a pot of simmering water works just as well. Just make sure the bottom of the bowl doesn’t touch the water.
    • For a glossy finish on your chocolate shells, temper the chocolate by cooling it to 82°F after melting, then gently reheating it to 88°F before forming the shells.

    Variations & Dietary Swaps

    • Vegetarian Version: Substitute the gelatin with agar-agar in equal amounts to make this dessert vegetarian-friendly.
    • Spice-it-Up: For an extra kick, add a pinch of cayenne pepper to the spice mix for a chocolate mousse with a hint of heat.
    • Kids-Friendly Version: Omit the dark rum and substitute the coffee with milk or a milk alternative for a non-caffeinated version.

    What to Serve With It

    This decadent spiced chocolate mousse shines on its own, but it becomes an elevated experience when paired with a glass of tawny port or a shot of espresso. The port’s sweet, nutty flavors complement the mousse perfectly, while the espresso provides a delightful contrast to the dessert’s richness.

    Storage & Meal Prep

    Store any leftover mousse in the refrigerator, covered with plastic wrap to prevent the surface from drying out. It will keep for up to three days. If you wish to freeze it, transfer the mousse into an airtight container and freeze for up to a month. To enjoy, let the mousse thaw in the refrigerator overnight. When reheating the chocolate shells, do so gently over a double boiler to maintain their structure.

    FAQ

    Can I use milk chocolate instead of semi-sweet chocolate?

    Yes, but keep in mind that milk chocolate is sweeter and will alter the flavor profile of the mousse. You might want to reduce the amount of added sugar in other components to balance the sweetness.

    How can I tell if the mousse is properly set?

    When properly set, the mousse should hold its shape when scooped and have a light, airy texture. If it feels too liquid, it may need more chilling time.

    What if my chocolate seizes while melting?

    If your chocolate seizes, add a teaspoon of warm water at a time and stir gently until it becomes smooth again. Ensure that your equipment is completely dry before starting to avoid this issue.

    Can I make this mousse without alcohol?

    Absolutely! Simply omit the dark rum and replace it with additional coffee or a coffee-flavored syrup for added depth without the alcohol content.

    Are there alternatives to hazelnuts for the shell?

    Yes, you can use almonds or pecans as a substitute, though each will impart a slightly different flavor and texture to the shell.

    Final Thoughts

    As you savor this decadent spiced chocolate mousse encased in a hazelnut chocolate shell, I hope it brings you a moment of pure indulgence and joy. Whether you’re crafting it for a special occasion or enjoying it as a luxurious treat for yourself, this mousse is all about the experience. I invite you to share your creations and stories in the comments below — let’s keep the conversation (and the chocolate) flowing!

    Related update: Decadent Spiced Chocolate Mousse in Hazelnut Chocolate Shells

    Related update: Gourmet Candy Cane Cookies with Dark Chocolate Drizzle

  • Spicy Garlic-Curry Leaf Crunch Potatoes with Tamarind Chutney | Made by Meaghan Moineau

    Spicy Garlic-Curry Leaf Crunch Potatoes with Tamarind Chutney | Made by Meaghan Moineau

    Spicy Garlic-Curry Leaf Crunch Potatoes with Tamarind Chutney

    Imagine walking into a kitchen where the aromas of warm spices, crispy garlic, and a tangy tamarind chutney envelop you like a cozy culinary hug. The sizzle of potatoes frying to a perfect golden-brown is music to your ears, promising a dish that’s both familiar and exciting. Welcome to the world of Spicy Garlic-Curry Leaf Crunch Potatoes with Tamarind Chutney, where each bite is a journey through layers of flavor.

    Personal Story

    Let me take you back to a lazy Sunday afternoon in my childhood home, where the kitchen was always bustling with activity. My mother, the maestro of culinary artistry, would whip up dishes that could make anyone feel right at home. One of my fondest memories is of her preparing a version of these spicy potatoes, their aroma wafting through the house and drawing everyone towards the kitchen.

    However, it wasn’t always smooth sailing. I remember the day I first tried to recreate her masterpiece. I was a novice in the kitchen, eagerly tossing potatoes into hot oil, only to find them sticking to the pan and refusing to reach that coveted golden-brown hue. My mother, with her soft chuckle, stepped in to teach me the art of patience and the magic of the right heat. It was a lesson in humility and a pivotal moment in my culinary journey.

    Fast forward a few years, and those kitchen mishaps are now cherished memories. The dish evolved as I experimented with flavors and textures, especially after a trip to India where I discovered the transformative power of tamarind. That tangy delight became the perfect partner to my crispy potatoes, adding a refreshing twist that made the dish my own.

    And that’s how these Spicy Garlic-Curry Leaf Crunch Potatoes with Tamarind Chutney came into being — a harmonious blend of nostalgia, discovery, and innovation. Now, I’m thrilled to share this recipe with you, hoping it brings as much joy to your table as it has to mine.

    What Makes This Version Special

    This isn’t just any potato dish; it’s a symphony of flavors that dance on your palate. The addition of a tangy tamarind chutney and crispy garlic chips sets this version apart from traditional recipes. The chutney’s sweet and sour notes perfectly complement the spicy, aromatic potatoes, while the garlic chips add an irresistible crunch.

    Blooming the mustard and coriander seeds in oil amplifies their aroma, creating a foundation that elevates the dish from the first bite. This recipe is a testament to the power of thoughtful enhancements — each ingredient playing its role to perfection, making this version an experience rather than just a meal.

    Flavor Profile

    Prepare your taste buds for a vibrant flavor journey. The Spicy Garlic-Curry Leaf Crunch Potatoes with Tamarind Chutney offer a spicy and aromatic adventure with a tangy undertone. The hint of sweetness from the tamarind chutney balances the spice, while the fried garlic chips add a savory depth. As you enjoy this dish, the warmth of cinnamon and the freshness of cilantro will envelop you, leaving a lasting impression that beckons you to savor each bite.

    Ingredients

    • 2 lbs cooked par potatoes, cut into wedges
    • **Oil** for frying
    • 1 tsp mustard seeds
    • 1 tsp coriander seeds
    • 1 **cinnamon stick**
    • 15-20 **curry leaves**
    • 1 large onion, sliced
    • 1/2 tsp turmeric
    • 1 tsp salt (adjust to taste)
    • 1 tsp red dried chilli flakes
    • 4-5 garlic cloves, thinly sliced
    • 1/4 cup tamarind pulp
    • 2 tbsp jaggery
    • Fresh cilantro for garnish

    Instructions

    1. Begin by heating oil in a large pan over medium-high heat for deep frying. Once hot, carefully add the potato wedges. Fry them until they achieve a slight golden-brown color, about 5-7 minutes. Remove with a slotted spoon and set aside on paper towels to drain excess oil.
    2. In a separate non-stick pan, add 1 1/2 tablespoons of oil over medium heat. Once hot, add mustard seeds and coriander seeds, and let them bloom until the mustard seeds start to pop. This should take about 30 seconds.
    3. Add the cinnamon stick and curry leaves, stirring gently to release their aromas. This step should take another 30 seconds.
    4. Introduce the sliced onions to the pan, cooking for about 1 minute until they begin to soften.
    5. Return the fried potatoes to the pan, along with turmeric and salt. Stir everything together, letting the potatoes absorb the flavors for about 5 minutes on low heat. Keep an eye out for the onions turning a slightly golden-brown.
    6. Add the red dried chilli flakes and give it one final stir, cooking for an additional minute. Turn off the heat and transfer the potatoes to a serving dish.
    7. In the same pan, heat a bit more oil and fry the thinly sliced garlic until golden and crispy, about 2-3 minutes. Be careful not to burn them. Set aside.
    8. For the tamarind chutney, mix tamarind pulp and jaggery in a small saucepan over low heat until the jaggery dissolves completely. Let it simmer for a few minutes until slightly thickened. Drizzle over the potatoes.
    9. Top the dish with crispy garlic chips and a generous sprinkle of fresh cilantro. Serve warm and enjoy!

    Pro Tips from Meaghan’s Kitchen

    • To prevent the potatoes from sticking to the pan, make sure they’re completely dry before frying. Moisture on the surface can lead to sticking.
    • For an even more intense flavor, marinate the potatoes with turmeric and salt before frying. This allows the spices to penetrate deeper.
    • When frying the garlic, keep a close eye on it. Garlic turns from golden to burnt in seconds, and you want that perfect crispy texture.
    • If you find the tamarind chutney too tangy, adjust with more jaggery. It’s all about balancing the flavors to your liking.
    • Let the mustard seeds pop completely when blooming. If they don’t, they might add a bitter note to your dish.

    Variations & Dietary Swaps

    • Vegetarian Delight: This dish is already vegetarian, but for a vegan version, ensure your jaggery is plant-based, as some may contain animal by-products.
    • Spice-It-Up: For those who crave more heat, add finely chopped green chilies alongside the red dried chilli flakes.
    • Kids-Friendly: Tone down the spices by reducing the chilli flakes and skipping the green chilies. Serve with a side of ketchup if they prefer it a bit sweeter.

    What to Serve With It

    This dish pairs wonderfully with a chilled mango lassi, offering a cooling counterpoint to the spice. Alternatively, a side of cucumber raita can do wonders to mellow out the heat. If you’re looking for a fuller meal, serve these Spicy Garlic-Curry Leaf Crunch Potatoes with warm naan or freshly cooked basmati rice.

    Storage & Meal Prep

    These potatoes are best enjoyed fresh, but if you have leftovers, they can be stored in an airtight container in the fridge for up to three days. Reheat them in a dry pan over medium heat to revive their crispiness. For longer storage, freeze the fried potatoes without the chutney and garlic chips. When ready to enjoy, reheat in the oven and prepare the chutney and garlic fresh.

    FAQ

    Can I use sweet potatoes instead of regular potatoes?

    Absolutely! Sweet potatoes add a lovely sweetness that pairs well with the tangy chutney.

    What can I use as a substitute for jaggery?

    If you can’t find jaggery, brown sugar or palm sugar can work as substitutes, though the flavor profile will vary slightly.

    Why is my garlic burning before it gets crispy?

    Garlic burns quickly due to its high sugar content. Make sure the oil is not too hot and keep stirring constantly while frying.

    Can I make the tamarind chutney ahead of time?

    Yes, you can prepare the tamarind chutney up to a week in advance and store it in the fridge. It actually allows the flavors to meld and deepen over time.

    Is there a way to make this dish less spicy?

    To reduce the spice level, simply cut back on the red dried chilli flakes and avoid adding green chilies. You can also serve it with more cooling sides like raita.

    Final Thoughts

    I hope this Spicy Garlic-Curry Leaf Crunch Potatoes with Tamarind Chutney recipe becomes a favorite at your table. It’s a dish that embodies warmth, nostalgia, and a touch of adventure — perfect for sharing with loved ones or savoring alone on a quiet evening. I’d love to hear how it turned out for you. Feel free to leave a comment or share your version with me on social media. Bon appétit and happy cooking!

    Related update: Spicy Garlic-Curry Leaf Crunch Potatoes with Tamarind Chutney

    Related update: Smoky Maple Chipotle Grilled Sweet Potatoes

  • Decadent Dark Chocolate Raspberry S’mores Bars with Salted Caramel Drizzle | Made by Meaghan Moineau

    Decadent Dark Chocolate Raspberry S’mores Bars with Salted Caramel Drizzle | Made by Meaghan Moineau

    Decadent Dark Chocolate Raspberry S’mores Bars with Salted Caramel Drizzle

    Imagine biting into a decadent bar that brings together all the best parts of your favorite campfire treat — the gooey marshmallow, the sweet yet savory graham cracker, and of course, the rich chocolate. But wait, there’s a twist: a tart raspberry burst and a silky, salted caramel drizzle. These aren’t just any s’mores bars; they’re an elevated experience, a symphony of flavors that dance on your palate. Welcome to the world of Decadent Dark Chocolate Raspberry S’mores Bars with Salted Caramel Drizzle.

    Personal Story

    It was a crisp autumn evening when I first fell in love with the combination of chocolate and raspberry. I was at a small family gathering, and my aunt had brought along a rich chocolate cake sprinkled with fresh raspberries. The moment I took a bite, I was transported — the tartness of the raspberries cutting through the luscious chocolate was nothing short of perfection. That experience lingered with me, inspiring me to explore this magical pairing in other dishes.

    Fast forward a few years, and I found myself experimenting in my own kitchen, determined to recreate that flavor harmony. My goal was to bring a touch of sophistication to the classic s’mores, a dessert that has always held a nostalgic place in my heart. I wanted to craft a recipe that could be cherished at both campfires and dinner parties.

    The first batch of s’mores bars was good but lacked the depth I remembered. That’s when I decided to incorporate not just raspberries but dark chocolate chunks and a salted caramel drizzle. I had a vision of layers upon layers of flavor, each element enhancing the others.

    The result? A decadent dessert that not only takes you back to childhood memories of sticky fingers and melted marshmallows but also elevates your taste experience to new heights. Every bite is a journey through rich dark chocolate, tart raspberries, and the sophisticated sweetness of salted caramel.

    What Makes This Version Special

    What truly sets these Decadent Dark Chocolate Raspberry S’mores Bars with Salted Caramel Drizzle apart is the luxurious combination of flavors and textures. By incorporating **decadent dark chocolate** and a **luscious salted caramel drizzle**, this recipe adds a depth and complexity that takes the classic s’mores to an entirely new level. The dark chocolate chunks melt into the brownie, creating a moist, chocolaty experience, while the salted caramel plays brilliantly against the sweetness of the marshmallows and graham crackers. It’s a sophisticated twist that makes each bite a moment to savor.

    Flavor Profile

    Prepare for a taste adventure that starts with the rich, velvety embrace of dark chocolate. As you chew, you’ll encounter the vibrant pop of **tart raspberry notes**, a surprise element that cuts through the sweetness like a refreshing breeze. The salted caramel drizzle weaves throughout, providing a salty-sweet finish that lingers deliciously on your palate. These bars are a symphony of contrasting yet complementary flavors that will have your taste buds singing.

    Ingredients

    • 1 box cooked brownie mix
    • 1 large egg
    • 1 cup graham cracker crumbs
    • 2 whole graham crackers
    • 1 cup mini marshmallows
    • **1/2 cup fresh dried raspberries**
    • 1/4 cup sugar
    • 1/2 cup unsalted butter, melted
    • 1/4 cup vegetable oil
    • 1/4 cup water
    • **1 cup dark chocolate chunks**
    • **1/2 teaspoon sea salt**
    • **1/4 cup caramel sauce**

    Instructions

    1. Preheat your oven to 325 degrees F. Line an 8-inch-square baking pan with foil so that it hangs over the edges, and spray it with nonstick cooking spray for easy removal later.
    2. In a medium-sized bowl, mix together the melted butter, graham cracker crumbs, and sugar until the mixture has the texture of wet sand.
    3. Press the crumb mixture evenly on the bottom of the prepared pan. Bake until golden, or for about 20 minutes. The base should be set and slightly firm to the touch. Remove and set aside.
    4. Raise the oven temperature to 350 degrees F. Meanwhile, prepare the brownie mix according to package instructions in a medium-sized bowl. Gently fold in the fresh dried raspberries and dark chocolate chunks, being careful not to overmix.
    5. Pour the batter over the graham cracker crust, spreading it evenly. Bake the brownie mixture for about 25 minutes, or until a toothpick inserted in the middle of the brownie comes out clean. The top should be slightly cracked and the edges set.
    6. Remove the brownie from the oven and set your oven to broil. Be cautious, as the broiler can quickly burn your topping.
    7. Break the two graham crackers into small pieces and arrange them in a single layer on top of the brownie.
    8. Evenly arrange the mini marshmallows over the top of the graham crackers. Place the pan back in the oven for just a few minutes, watching closely, until the marshmallows are golden brown.
    9. Remove from the oven immediately and drizzle the salted caramel sauce over the marshmallows for an added layer of flavor. Allow the bars to cool completely in the pan.
    10. Once cool, use the overhanging foil to lift the bars from the pan and onto a cutting board. Cut into squares and serve.

    Pro Tips from Meaghan’s Kitchen

    • Use a high-quality dark chocolate for the best flavor payoff. Trust me, it makes a world of difference!
    • If your caramel sauce is too thick to drizzle, warm it gently in the microwave for about 10 seconds to make it more pourable.
    • For the best marshmallow topping, use a broiler-safe dish and keep an eye on the marshmallows as they can go from golden to burnt very quickly.
    • Let the bars cool completely before cutting to ensure clean slices. This patience pays off with picture-perfect bars!
    • To intensify the raspberry flavor, consider adding a teaspoon of raspberry extract to the brownie batter.

    Variations & Dietary Swaps

    • Vegetarian Swap: Use vegetarian marshmallows to make this recipe suitable for a vegetarian diet.
    • Extra Spicy Version: Add a pinch of cayenne pepper to the brownie mix for a spicy kick that pairs surprisingly well with the chocolate and raspberries.
    • Kid-Friendly Version: Omit the salted caramel drizzle and instead add a layer of milk chocolate chips for a sweeter treat that kids will love.

    What to Serve With It

    These Decadent Dark Chocolate Raspberry S’mores Bars with Salted Caramel Drizzle are incredibly rich, making them perfect for pairing with a chilled glass of milk to balance the flavors. Alternatively, serve them with a robust cup of coffee to enhance the chocolatey notes and offset the sweetness.

    Storage & Meal Prep

    Store these s’mores bars in an airtight container at room temperature for up to three days. If you prefer to keep them longer, they freeze beautifully — wrap each bar individually in plastic wrap, then place in a freezer-safe bag or container for up to three months. To enjoy, simply thaw at room temperature and, if desired, reheat in a warm oven for a few minutes to restore their gooey texture.

    FAQ

    Can I make these bars gluten-free?

    Absolutely! Simply swap the graham crackers and crumbs for your favorite gluten-free variety. Ensure all other ingredients are certified gluten-free as well.

    What if I don’t have fresh dried raspberries?

    No worries! You can substitute with fresh raspberries, though they might add a bit more moisture to the brownies. Alternatively, use raspberry preserves for a different texture and flavor profile.

    Can I use milk chocolate instead of dark chocolate?

    Yes, you can! However, keep in mind that milk chocolate will result in a sweeter bar, which might alter the balance of flavors with the raspberries and caramel.

    How do I keep the marshmallows from burning?

    The key is to watch them closely under the broiler and remove them as soon as they turn golden brown. If you’re worried, you can lower the broiler rack to give yourself a bit more control over the browning process.

    Can I make the caramel sauce from scratch?

    Of course! A homemade caramel sauce can add a personal touch to your bars. Just ensure it’s salted for that signature sweet-savory balance.

    Final Thoughts

    There you have it, my dear culinary adventurers: a deliciously elevated take on the beloved s’mores. These Decadent Dark Chocolate Raspberry S’mores Bars with Salted Caramel Drizzle are sure to impress at any gathering or satisfy a quiet night in. I’d love to hear how they turn out for you! Feel free to leave your comments and share your own twists on this recipe. Let’s keep the conversation going — because, as always, the best recipes are the ones we create together.

    Related update: Decadent Dark Chocolate Raspberry S’mores Bars with Salted Caramel Drizzle

    Related update: Decadent Spiced Chocolate Mousse in Hazelnut Chocolate Shells

  • Ginger-Sesame Baby Bok Choy Stir Fry with Toasted Almonds | Made by Meaghan Moineau

    Ginger-Sesame Baby Bok Choy Stir Fry with Toasted Almonds | Made by Meaghan Moineau

    Ginger-Sesame Baby Bok Choy Stir Fry with Toasted Almonds

    Imagine the tantalizing aroma of fresh ginger and sesame oil swirling together in a hot pan, mingling with the crisp sweetness of bok choy and the nutty crunch of toasted almonds. This Ginger-Sesame Baby Bok Choy Stir Fry is more than just a dish; it’s an aromatic dance of flavors that will enchant your taste buds and warm your soul.

    Personal Story

    It was a crisp autumn afternoon when I first stumbled upon the charm of baby bok choy. Wandering through an open-air market, I was drawn to their petite and vibrant green bundles, standing out like jewels among the earthy tones of root vegetables and gourds. Until then, my culinary adventures with Asian greens had been limited to the familiar crunch of broccoli and the peppery bite of arugula. But something about these little bok choy bundles beckoned me to explore further.

    Back in my cozy kitchen, I recall the gentle rustle of their leaves as I washed them, a sound reminiscent of a soft breeze stirring through a forest. I was nervous yet excited to experiment with a vegetable that was new to me. My first attempt at a stir fry ended in a delicious disaster — I had underestimated the power of fresh ginger and overdone the soy sauce, creating a saltier dish than anticipated. But every crackle of the pan and fragrant whiff of sesame oil encouraged me to keep trying.

    Through trial and a little error, I refined my approach, adding ingredients that would enhance rather than overpower. That’s when I discovered the magic of adding toasted almonds and a hint of honey, introducing a sweet, nutty balance to the dish. This initial kitchen mishap led to a delightful discovery — a recipe that became a staple in my household, loved by family and friends alike.

    Now, every time I make this Ginger-Sesame Baby Bok Choy Stir Fry with Toasted Almonds, I am transported back to that market day, feeling the crisp autumn air and hearing the chatter of bustling stalls. This dish, with its aromatic warmth and intricate flavors, has become a cherished part of my culinary repertoire, and I’m thrilled to share it with you.

    What Makes This Version Special

    The unique twist in this recipe lies in the incorporation of ginger and sesame seeds, which add an extra layer of aromatic complexity and nutty depth. Many traditional stir fry recipes stick to the basics, but this version elevates the dish to a new level by enhancing the natural sweetness of the bok choy with honey and balancing it with the umami of soy sauce. The **ginger** and **toasted sesame seeds** not only infuse the dish with rich scents but also bring a delightful texture and flavor contrast. By toasting the sesame seeds, we unlock a warm, nutty aroma that complements the leafy green crunch of the bok choy. Each bite is a symphony of textures and flavors, making this stir fry stand out from the standard versions.

    Flavor Profile

    This Ginger-Sesame Baby Bok Choy Stir Fry offers an aromatic explosion of flavors. The dish is delicately balanced with nutty, spicy, and sweet notes that dance on your palate. The **fresh ginger** provides a subtle heat, while the **coconut oil** brings a silky mouthfeel and a hint of tropical flair. The **honey** adds just the right amount of sweetness to counterbalance the savory **soy sauce**. As the stir fry cooks, the **aromas** of garlic and ginger bloom in the pan, weaving together a tapestry of scents that are both comforting and exciting. The **toasted almonds** contribute a satisfying crunch and a toasty flavor that amplifies the nutty profile of the dish.

    Ingredients

    • 1 tablespoon coconut oil
    • 2 shallots, thinly sliced
    • 2 lbs baby bok choy, halved lengthwise
    • 3 cloves garlic, minced
    • 1 tablespoon minced fresh ginger
    • 1 teaspoon salt
    • 1/2 teaspoon black pepper
    • 1/4 teaspoon red pepper flakes
    • 1/3 cup sliced almonds
    • 1 tablespoon sesame oil
    • 1 tablespoon honey
    • 2 tablespoons soy sauce
    • 2 tablespoons toasted sesame seeds

    Instructions

    1. Heat the coconut oil in a large nonstick skillet over medium-high heat until shimmering.
    2. Add the sliced shallots and cook for 3 to 4 minutes until they are soft and translucent.
    3. Introduce the bok choy to the skillet, setting the leafy tops aside for later. Cook for another 3 to 4 minutes, stirring occasionally, until the stalks are crisp-tender and slightly charred.
    4. In a separate small dry pan, toast the sliced almonds over medium heat, stirring frequently, until golden brown and fragrant, about 3 minutes. Be sure to keep an eye on them to prevent burning.
    5. Add the minced garlic and ginger to the bok choy in the skillet, allowing them to bloom in the remaining coconut oil until fragrant, about 30 seconds.
    6. Sprinkle in the salt, black pepper, and red pepper flakes, stirring to coat the bok choy evenly.
    7. Stir in the reserved bok choy leaves, sesame oil, honey, and soy sauce. Toss everything together and let it cook for another 2 minutes until the leaves have wilted slightly.
    8. Finally, top the stir fry with the toasted almonds and toasted sesame seeds before serving warm.

    Pro Tips from Meaghan’s Kitchen

    • Balancing flavors: If you find the dish too sweet or salty, adjust by adding a splash of rice vinegar for acidity.
    • Toasting sesame seeds: Always toast seeds and nuts in a dry pan to bring out their natural oils and enhance their flavor.
    • Timing is key: Add bok choy leaves towards the end of cooking to preserve their color and nutrients.
    • Infusion technique: Blooming garlic and ginger in oil releases their essential oils, maximizing their flavor impact.
    • Ingredient swaps: Feel free to substitute almonds with cashews for a creamier texture or use maple syrup in place of honey for a vegan version.

    Variations & Dietary Swaps

    • Vegetarian Swap: Replace soy sauce with tamari for a gluten-free version, and swap honey with maple syrup for a vegan-friendly dish.
    • Spice It Up: For those who love heat, increase the red pepper flakes to 1/2 teaspoon or add a dash of sriracha for an extra kick.
    • Kids-Friendly Version: Tone down the spice by omitting the red pepper flakes and adding a handful of snap peas or baby corn for added sweetness and color.

    What to Serve With It

    Pair this Ginger-Sesame Baby Bok Choy Stir Fry with a bowl of steamed jasmine rice or quinoa for a complete meal. For a refreshing beverage, serve alongside a chilled glass of Jasmine tea, whose floral notes complement the dish beautifully. Alternatively, a light, crisp Sauvignon Blanc offers a bright acidity that enhances the fresh ginger and sesame flavors.

    Storage & Meal Prep

    Store any leftovers in an airtight container in the refrigerator for up to 3 days. To reheat, gently warm in a skillet over medium heat until heated through, adding a splash of water if necessary to maintain moisture. This stir fry is not recommended for freezing, as the texture of the bok choy may become mushy upon thawing.

    FAQ

    Can I use regular bok choy instead of baby bok choy?

    Yes, regular bok choy can be used, though you may need to slice it into smaller pieces to ensure even cooking. The flavor will be slightly more robust, but still delicious.

    What can I use instead of coconut oil?

    If coconut oil isn’t available, substitute with any neutral oil like vegetable or avocado oil. Keep in mind that coconut oil adds a hint of sweetness that complements the dish.

    Can I make this dish ahead of time?

    While it’s best enjoyed fresh, you can prep the ingredients ahead of time by slicing the shallots and bok choy, and toasting the almonds. Assemble and cook when ready to serve for maximum flavor and texture.

    How do I prevent the garlic and ginger from burning?

    Ensure the garlic and ginger are added when the oil is hot but not smoking, and always keep stirring them in the pan to avoid burning. Adding them just before the liquid ingredients also helps protect them from high heat.

    Final Thoughts

    Creating this Ginger-Sesame Baby Bok Choy Stir Fry with Toasted Almonds is a journey of flavors and textures that transforms simple ingredients into something extraordinary. Whether you’re new to cooking Asian-inspired dishes or a seasoned pro, this recipe offers a delightful challenge with aromatic rewards. I hope you enjoy making and sharing this dish as much as I do. I’d love to hear your thoughts and see your creations — feel free to leave a comment below or share your photos on social media. Let’s keep the conversation and the culinary exploration going!

    Related update: Ginger-Sesame Baby Bok Choy Stir Fry with Toasted Almonds

    Related update: Spicy Garlic-Curry Leaf Crunch Potatoes with Tamarind Chutney

  • Gourmet Turkey Burgers with Roasted Red Pepper and Feta | Made by Meaghan Moineau

    Gourmet Turkey Burgers with Roasted Red Pepper and Feta | Made by Meaghan Moineau

    Gourmet Turkey Burgers with Roasted Red Pepper and Feta

    The warm sizzle of turkey burgers hitting a hot pan, a hint of tangy feta cheese mingling with the fresh aroma of mint, and the smoky allure of roasted red pepper relish – this is not your average cookout fare. Welcome to a Mediterranean-inspired flavor journey that will transform your typical burger night into a gourmet dining experience.

    Personal Story

    Growing up, turkey burgers were a weeknight staple in our home. My mom, ever the culinary magician, would whip them up with whatever we had on hand. It was always a delicious surprise to bite into the latest creation. One summer evening, after a particularly adventurous attempt involving pineapple and a questionable spice mix, I decided it was time to craft my own signature turkey burger recipe.

    Fast forward a few years to a bustling Saturday morning at the local farmer’s market. As I browsed the vibrant stalls, the aroma of freshly roasted red peppers drew me in. That’s when inspiration struck. Why not combine the savory goodness of turkey with the zesty kick of feta and the aromatic freshness of mint? The result was nothing short of extraordinary.

    My first attempt at these gourmet turkey burgers was during a backyard gathering with friends. As the burgers sizzled on the grill, guests began to gather, drawn by the intoxicating smell. The roasted red pepper relish added a layer of depth, complimenting the juicy, herb-infused turkey patties perfectly. It was a hit, and I knew this recipe was a keeper.

    Now, this recipe has become my go-to when I want to impress or simply indulge in something a bit more sophisticated than your average burger night. It’s a dish that carries memories of family dinners and farmer’s market discoveries – a true testament to the beauty of elevating the everyday.

    What Makes This Version Special

    What sets these gourmet turkey burgers apart is the incorporation of **tangy feta cheese** and a hint of **fresh mint**. These ingredients elevate the flavor profile of traditional turkey burgers, transforming them into a Mediterranean delight. Add a rich, smoky **roasted red pepper relish**, and you’ve got a dish that’s bursting with complexity and flavor.

    Most turkey burger recipes stick to the basics, but this version dares to be different. The feta cheese adds a creamy tang that perfectly complements the lean ground turkey, while the fresh mint introduces a delightful contrast of brightness and flavor. The roasted red pepper relish, with its deep, smoky notes, ties everything together, creating a burger that’s anything but ordinary.

    Flavor Profile

    Prepare yourself for a taste sensation with these gourmet turkey burgers. The savory turkey, combined with the **tanginess of feta** and the **freshness of mint**, creates a harmonious balance that delights the palate. As you bite into the juicy patty, the subtle **smokiness from the roasted red pepper relish** adds a layer of depth, making each mouthful a truly memorable experience. It’s a dish that dances between savory, zesty, and slightly sweet – a perfect melody of flavors.

    Ingredients

    • 1 lb lean extra ground turkey
    • 1/2 cup shredded carrots
    • 1 egg, beaten
    • 2 cloves garlic, minced
    • 3 green onions, finely chopped
    • 1/2 cup panko breadcrumbs
    • 1/2 cup crumbled **feta cheese**
    • 1/4 cup finely chopped **fresh mint leaves**
    • 1/2 cup grated zucchini
    • 1/4 cup spinach, chopped
    • 1 tbsp tomato paste
    • 1 tsp smoked paprika
    • Salt and pepper to taste
    • 2 large **red bell peppers**
    • Olive oil for spritzing
    • **Roasted red pepper relish**

    Instructions

    1. Begin by preparing the roasted red peppers. Char the skins of the red bell peppers directly over an open flame until blackened. This step adds a deeper smoky flavor that will penetrate the relish. Once charred, slice the peppers, remove the seeds, and spritz with olive oil. Roast in the oven at 425°F (220°C) for 20 minutes until they become tender and aromatic.
    2. In a large mixing bowl, combine the ground turkey, shredded carrots, egg, minced garlic, green onions, panko breadcrumbs, crumbled **feta cheese**, and chopped **fresh mint leaves**. Add grated zucchini, chopped spinach, tomato paste, and smoked paprika. Season with salt and pepper.
    3. Gently fold the mixture together, being careful not to overwork it. You want all ingredients to be well combined but not overly compacted to ensure juicy burgers.
    4. Divide the mixture into 4-6 equal portions and shape each into a round patty. Aim for uniform thickness to ensure even cooking.
    5. Preheat a grill or skillet to medium-high heat. Cook the patties for about 4-5 minutes per side, or until they reach an internal temperature of 165°F (74°C) and are golden-brown on the outside.
    6. As the burgers cook, prepare the roasted red pepper relish by chopping the roasted peppers and combining them with a drizzle of olive oil, salt, and pepper. The relish should be slightly chunky, adding texture to the burgers.
    7. Serve your gourmet turkey burgers topped with the smoky roasted red pepper relish, and enjoy the symphony of flavors.

    Pro Tips from Meaghan’s Kitchen

    • When forming the patties, create a small indentation in the center of each burger. This helps them cook more evenly and prevents them from puffing up in the middle.
    • If you’re short on time, prepare the roasted red pepper relish a day ahead. It allows the flavors to meld beautifully, enhancing the overall taste.
    • Consider using a combination of fresh herbs such as parsley or cilantro for an added layer of flavor complexity.
    • Make sure your grill or skillet is properly preheated before adding the patties. This ensures a good sear and locks in the juices.
    • For extra flavor, toast the burger buns on the grill for a quick minute before serving.

    Variations & Dietary Swaps

    • Vegetarian Version: Swap out the turkey for a hearty mix of chickpeas and quinoa. Add extra breadcrumbs to bind the mixture.
    • Spice-It-Up: Add a pinch of cayenne pepper or a dash of sriracha sauce to the burger mix for a spicy kick.
    • Kids-Friendly: Skip the mint and smoked paprika, and add a touch of mild cheddar cheese to make the burgers more appealing to younger taste buds.

    What to Serve With It

    Pair these gourmet turkey burgers with a chilled glass of Sauvignon Blanc to complement the tangy feta and fresh mint. For a classic side, serve with crispy sweet potato fries, which naturally balance the savory notes of the burger. A light side salad with a lemon vinaigrette also works beautifully to refresh the palate between bites.

    Storage & Meal Prep

    These turkey burgers are perfect for meal prep. Once cooked, allow the patties to cool completely before storing them in an airtight container in the refrigerator for up to 3 days. To freeze, arrange the patties on a baking sheet lined with parchment paper and place them in the freezer until solid. Transfer to a freezer-safe bag or container and store for up to 3 months. Reheat in the oven at 350°F (175°C) until heated through, being careful not to dry them out.

    FAQ

    Can I use a different cheese instead of feta?

    Absolutely! Goat cheese or a mild blue cheese can make great substitutes, adding their own unique flavors to the mix.

    How can I make the burgers juicier?

    Incorporating ingredients like grated zucchini and carrots not only adds moisture but also boosts the nutritional profile of the burgers.

    What if I don’t have a grill?

    No problem! You can cook these burgers in a skillet on your stovetop. Just ensure it’s heated to medium-high for a good sear.

    Can I make the burgers ahead of time?

    Yes, you can prepare the patties and store them uncooked in the fridge for up to 24 hours. This makes it easy to simply cook them when you’re ready to eat.

    What’s the best way to reheat the burgers?

    For the best results, reheat the burgers in the oven to maintain their juiciness. Avoid microwaving as it can make them rubbery.

    Final Thoughts

    Embrace the flavors of the Mediterranean with these gourmet turkey burgers, a delightful dish that proves healthy eating doesn’t have to be boring. I hope you’ll give this recipe a try and make it your own. Whether you’re grilling for friends or enjoying a quiet night in, these burgers are sure to impress. I’d love to hear how yours turned out or any twists you added, so feel free to drop a comment or share your photos. Happy cooking!

    Related update: Gourmet Turkey Burgers with Roasted Red Pepper and Feta

    Related update: Zesty Citrus-Herb Baked Chicken Wings with Honey-Lime Glaze

  • Spicy Maple-Roasted Autumn Vegetables with Herbed Goat Cheese Drizzle | Made by Meaghan Moineau

    Spicy Maple-Roasted Autumn Vegetables with Herbed Goat Cheese Drizzle | Made by Meaghan Moineau

    Spicy Maple-Roasted Autumn Vegetables with Herbed Goat Cheese Drizzle

    Imagine the rich aroma of butternut squash, beet roots, and potatoes roasting in your kitchen, kissed by a spicy maple glaze that caramelizes to perfection. As the heat transforms these autumn vegetables into golden-brown morsels, a drizzle of creamy, herbed goat cheese awaits, ready to crown the masterpiece with a fragrant finish. This is not just a side dish; it’s a savory-sweet symphony that dances across your taste buds.

    Opening Hook

    There’s nothing quite like the comforting embrace of a kitchen filled with the scent of roasting vegetables. The sizzle of olive oil meeting the skin of vibrant butternut squash, the earthy undertones of beet roots mingling with the sweetness of maple syrup — it’s a sensory experience that transforms a simple dish into something extraordinary. This is where culinary magic happens, blending nostalgia with innovation in every bite.

    Personal Story

    Growing up, autumn was always a season of wonder and warmth. I remember the first time I helped my grandmother in her cozy kitchen, the windows fogged up from the heat of the oven, and the tantalizing aroma of roasting vegetables swirling around us. She taught me the importance of timing and patience, how to know when the vegetables were just right by their golden-brown hue and tender texture.

    It was in her kitchen that I first discovered the magic of maple syrup in savory dishes. I accidentally spilled some into our roasted vegetables — an unintentional twist that received rave reviews from my family. The sweetness intertwined with the earthy flavors, creating a delightful surprise that quickly became a family classic. Since then, I’ve been on a quest to recreate and elevate those beloved flavors.

    Years later, in my own kitchen, I found myself experimenting with spices and textures, determined to craft a dish that would honor my grandmother’s original while adding my personal flair. After numerous trials and some spicy mishaps, I stumbled upon the perfect combination: a spicy maple glaze paired with a creamy, herbed goat cheese drizzle. This version of maple-roasted autumn vegetables has become a staple at my table, always evoking cherished memories with every bite.

    What Makes This Version Special

    This version of Spicy Maple-Roasted Autumn Vegetables stands out with its unforgettable sweet and spicy contrast. The introduction of a **spicy maple glaze** elevates the classic roasted veggies to a new level of flavor complexity, while the **creamy, herbed goat cheese drizzle** adds a luxurious touch. The result is a dish that’s both comforting and exciting, with each element working in harmony to deliver a taste experience that’s both familiar and refreshingly new. The combination of cayenne pepper with the sweetness of maple syrup creates a caramelized, sticky finish that clings to the vegetables, offering a delightful crunch with every bite. The goat cheese drizzle, infused with fresh thyme and chives, provides an herbaceous, creamy counterpoint that balances the heat, making this dish a must-try for those eager to embrace the flavors of fall.

    Flavor Profile

    The Spicy Maple-Roasted Autumn Vegetables with Herbed Goat Cheese Drizzle is a flavor journey that begins with the initial hit of spicy heat, courtesy of the cayenne pepper, followed by the comforting sweetness of maple syrup. As you savor each bite, the creaminess of the goat cheese drizzle melts into the earthy tones of the roasted vegetables, enhanced by the aromatic notes of fresh thyme and chives. This dish is a delightful dance of sweet, spicy, and creamy, with a peppery, herbaceous finish that lingers on your palate — a true celebration of autumn’s bounty.

    Ingredients

    • 1 medium butternut squash, peeled and cut into bite-sized pieces
    • 3 medium beet roots, peeled and cut into bite-sized pieces
    • 4 medium potatoes, cut into bite-sized pieces (peeling optional)
    • 3 tablespoons olive oil
    • 1 tablespoon paprika
    • 1 teaspoon dried basil
    • Salt and pepper to taste
    • **1/4 cup maple syrup**
    • **1/2 teaspoon cayenne pepper**
    • **1/2 cup crumbled goat cheese**
    • **1 tablespoon fresh thyme, chopped**
    • **1 tablespoon fresh chives, chopped**

    Instructions

    1. Preheat your oven to 200 degrees Celsius (fan: 180 degrees Celsius) to ensure an even roast.
    2. In a large bowl, toss the butternut squash, beet roots, and potatoes with olive oil, paprika, dried basil, salt, and pepper until every piece is well-coated.
    3. Add the maple syrup and cayenne pepper to the bowl, mixing until the vegetables are covered in a sticky, spicy glaze.
    4. Spread the glazed vegetables in a single layer on a large baking tray, ensuring even cooking. Bake in the preheated oven for 30 minutes, or until the vegetables are golden-brown and tender but still have a slight bite.
    5. While the vegetables roast, blend the crumbled goat cheese with fresh thyme and chives in a small bowl until smooth and creamy.
    6. Once the vegetables are done, drizzle the herbed goat cheese over them while still warm. Serve immediately for the best texture and flavor.

    Pro Tips from Meaghan’s Kitchen

    • Always preheat your oven fully before roasting to ensure the vegetables cook evenly and achieve that perfect golden-brown finish.
    • When cutting your vegetables, aim for uniform sizes to guarantee even cooking. Smaller pieces tend to crisp up more, adding a delightful texture contrast.
    • For an extra crispy finish, don’t overcrowd your baking tray. A single layer of vegetables is key to achieving the right texture.
    • Adjust the cayenne pepper to suit your spice preference. A little goes a long way, so start small and increase if you enjoy more heat.
    • Save time by preparing the goat cheese drizzle ahead of time and storing it in the fridge until ready to use. Just give it a good stir before serving.

    Variations & Dietary Swaps

    • **Vegetarian version**: Swap the goat cheese for a plant-based cheese alternative to make this dish suitable for vegans.
    • **Spice-it-up version**: Add a pinch of smoked paprika to the glaze for an extra layer of smoky flavor.
    • **Kids-friendly version**: Reduce the cayenne pepper and serve the goat cheese drizzle on the side, allowing kids to add as much or as little as they like.

    What to Serve With It

    This dish pairs beautifully with a chilled glass of Riesling, whose crispness complements the sweetness of the maple syrup. For a heartier meal, serve it alongside warm rosemary focaccia to sop up every last bit of the creamy goat cheese drizzle. Alternatively, a simple green salad with a light lemon vinaigrette can provide a refreshing counterbalance to the rich flavors.

    Storage & Meal Prep

    Store any leftovers in an airtight container in the fridge for up to three days. To reheat, spread the vegetables on a baking tray and warm in a preheated oven at 180 degrees Celsius for 10-12 minutes. The goat cheese drizzle should be added fresh each time for the best texture. This dish is not suitable for freezing, as the texture of the vegetables can become soggy upon thawing.

    FAQ

    Can I use different vegetables?

    Absolutely! Feel free to substitute or add other root vegetables like sweet potatoes or parsnips for a unique twist.

    How can I make the dish less spicy?

    Simply reduce or omit the cayenne pepper in the glaze. The maple syrup will still provide a lovely sweetness.

    Is there a substitute for goat cheese?

    If you’re not a fan of goat cheese, try using feta or ricotta for a different creamy element.

    Can I prepare this dish in advance?

    The vegetables can be prepped and glazed ahead of time, but for the best taste and texture, roast them just before serving.

    What if I don’t have fresh herbs?

    Dried herbs can be used in a pinch, but remember they are more concentrated, so use about a third of the amount specified for fresh herbs.

    Final Thoughts

    Spicy Maple-Roasted Autumn Vegetables with Herbed Goat Cheese Drizzle is more than just a dish; it’s an invitation to savor the flavors of the season with loved ones. Whether you’re gathering around the table for a family dinner or hosting friends for a festive feast, this recipe is sure to impress and delight. I can’t wait for you to try it out and make it your own. Don’t forget to leave a comment below sharing your experience or any creative variations you came up with. Happy cooking, my friends!

    Related update: Spicy Maple-Roasted Autumn Vegetables with Herbed Goat Cheese Drizzle

    Related update: Ginger-Sesame Baby Bok Choy Stir Fry with Toasted Almonds

  • Mediterranean Citrus-Infused Semolina Cake with Spiced Honey Nuts | Made by Meaghan Moineau

    Mediterranean Citrus-Infused Semolina Cake with Spiced Honey Nuts | Made by Meaghan Moineau

    Mediterranean Citrus-Infused Semolina Cake with Spiced Honey Nuts

    Picture this: A sunlit kitchen filled with the intoxicating aroma of citrus and spices, where a golden-brown cake cools on the counter, glistening with a glossy syrup that catches the light just so. This isn’t just any cake; it’s a Mediterranean Citrus-Infused Semolina Cake with Spiced Honey Nuts, a dessert that promises to transport your taste buds straight to a sun-drenched Mediterranean coast.

    Personal Story

    My love affair with semolina cake began on a spontaneous trip to a small Mediterranean village. I was wandering through a bustling food market, where the air was thick with the scent of fresh spices and citrus. A local vendor, with a warm smile and hands that moved with the grace of a seasoned cook, offered me a slice of what I’d later come to know as basbousa—a semolina cake soaked in syrup. It was love at first bite.

    The texture was unlike anything I’d ever tasted — dense yet tender, with a syrup that was both sweet and subtly spiced. I knew then that I had to bring a piece of this culinary magic back home. Of course, my first few attempts in my kitchen were far from perfect. There was a memorable mishap where I mistook salt for sugar, resulting in a cake that was, let’s say, uniquely inedible.

    But with each attempt, I learned something new. I started experimenting with flavors, wanting to incorporate my own twist on the classic. After many trials, I finally landed on a version that felt like me. My Mediterranean Citrus-Infused Semolina Cake with Spiced Honey Nuts was born, and with it, a little piece of my heart.

    Now, whenever I make this cake, I remember that sunlit market and the taste of adventure. It’s a reminder of how food can connect us to places and moments, and how a single slice of cake can hold a world of memories.

    What Makes This Version Special

    This is not your average semolina cake. The magic starts with the cake itself, which is infused with a fragrant blend of cardamom and rose water. These ingredients add a luxurious, aromatic depth that elevates the entire dessert. But the true star? The spiced honey nut syrup. Featuring a hint of cinnamon, it provides a warm, aromatic finish that complements the citrus-forward flavors perfectly.

    Unlike traditional versions, which can be overly sweet, this cake achieves a harmonious balance of flavors. The syrup is not just a sweetener but a complex layer of taste that brings out the best in the semolina’s nutty notes. Trust me, once you’ve had a taste of this version, there’s no going back to the standard recipe.

    Flavor Profile

    The flavor journey begins with a burst of citrus — a vibrant combination of lemon and orange zest that dances on your palate. As you savor each bite, the subtle floral notes of rose water emerge, adding an ethereal quality to the cake. Finally, the warm, spiced finish from the honey nut syrup, infused with a hint of cinnamon, wraps everything in a comforting embrace. It’s a taste experience that’s both refreshing and indulgent.

    Ingredients

    • 1 cup sugar
    • 4 eggs
    • 1 cup yoghurt
    • Zest of 1 lemon
    • Zest of 1 orange
    • 1 cup almond meal
    • 1 cup semolina
    • 2 teaspoons baking powder
    • 1/2 cup **olive oil**
    • 1 teaspoon **cardamom**
    • 1 teaspoon **rose water**
    • 1/2 cup almonds
    • 1/2 cup raisins
    • 1/2 cup dry cranberries
    • 1 cup **honey**
    • Juice of 1 orange
    • 1 **cinnamon stick**
    • 1/4 cup pistachios

    Instructions

    1. Preheat your oven to 180°C (160°C fan). Prepare a 20-23cm round baking tin by lining it with baking paper or using a silicone mold.
    2. In a small pan, heat the olive oil over low heat. Add the **cardamom** and allow it to bloom for about 2 minutes, stirring gently to release its aroma. Set aside to cool slightly.
    3. In a mixer, whisk the eggs and sugar until the mixture is thick and pale in color, about 5 minutes.
    4. Add the yoghurt, lemon zest, and orange zest to the egg mixture. Mix until well combined.
    5. Gradually add the almond meal, semolina, and baking powder. Mix on low speed until just combined.
    6. Incorporate the cardamom-infused olive oil and rose water into the batter. Mix until smooth.
    7. Pour the mixture into the prepared baking tin. Bake for 35 minutes or until the top is golden-brown and a skewer inserted into the center comes out clean.
    8. While the cake bakes, prepare the syrup: In a pot, combine the honey, orange juice, almonds, raisins, cranberries, and the **cinnamon stick**. Bring to a boil, then reduce to a simmer for 1-2 minutes to enhance the aroma.
    9. Remove the cake from the oven and pierce all over with a skewer. Pour the warm syrup evenly over the cake. Allow it to soak and cool slightly before serving.
    10. Garnish with pistachios just before serving for a touch of color and crunch.

    Pro Tips from Meaghan’s Kitchen

    • Use fresh citrus for zesting — it makes all the difference in flavor and aroma.
    • Blooming spices in oil intensifies their flavor, so don’t skip this step!
    • If your syrup is too thick, thin it with a tablespoon of water while simmering.
    • For a moist cake, ensure your yoghurt is at room temperature before mixing.
    • Don’t overmix the batter once dry ingredients are added, to keep the cake tender.

    Variations & Dietary Swaps

    • Gluten-free version: Substitute semolina with gluten-free flour blend and ensure all other ingredients are certified gluten-free.
    • Vegan option: Replace eggs with a flaxseed mixture (1 tablespoon flaxseed meal + 2.5 tablespoons water per egg) and yoghurt with coconut yoghurt.
    • Spice-it-up version: Add a pinch of saffron to the syrup for an extra layer of flavor complexity.

    What to Serve With It

    This Mediterranean Citrus-Infused Semolina Cake pairs beautifully with a cup of freshly brewed mint tea, enhancing the cake’s aromatic notes. If you’re feeling a bit more indulgent, a glass of sweet dessert wine like Moscato complements the citrus and honey flavors exquisitely. For a complete Mediterranean experience, consider serving it alongside a platter of fresh fruits and nuts.

    Storage & Meal Prep

    To store, wrap the cake tightly in plastic wrap and keep it in the fridge for up to 5 days. For longer storage, slice the cake and freeze the pieces in an airtight container for up to 2 months. To reheat, thaw the slices in the fridge overnight and warm in a low oven for a few minutes or enjoy at room temperature.

    FAQ

    Can I make the cake ahead of time?

    Absolutely! This cake actually tastes better the next day as the flavors meld together. Make it a day ahead and store it in the fridge.

    What other nuts can I use?

    If you don’t have almonds or pistachios, walnuts or pecans are great alternatives. They add a wonderful texture and flavor.

    Can I use bottled lemon and orange juice?

    Fresh is best for zest and juice in this recipe, as it provides the most vibrant flavor. But in a pinch, bottled can work for the syrup component.

    How do I know when the syrup is ready?

    You’ll know it’s ready when it has thickened slightly and coats the back of a spoon. The aroma should also be warm and spiced from the cinnamon.

    What if my cake turns out dry?

    If the cake seems dry, it might have been overbaked. Ensure it’s only baked until a skewer comes out clean. Adding more syrup can help salvage moisture.

    Final Thoughts

    There you have it, my dear baking companions — a cake that’s not just a dessert but a journey through flavors and memories. I hope you enjoy making and eating this Mediterranean Citrus-Infused Semolina Cake with Spiced Honey Nuts as much as I do. If you give it a try, I’d love to hear how it turns out or any personal twists you add. Please share your thoughts in the comments, or better yet, snap a picture and tag me in your delicious creations. Happy baking!

    Related update: Mediterranean Citrus-Infused Semolina Cake with Spiced Honey Nuts

    Related update: Decadent Dark Chocolate Raspberry S’mores Bars with Salted Caramel Drizzle

  • Spiced Maple Carrot Cake with Ginger Cream Cheese Frosting | Made by Meaghan Moineau

    Spiced Maple Carrot Cake with Ginger Cream Cheese Frosting | Made by Meaghan Moineau

    Spiced Maple Carrot Cake with Ginger Cream Cheese Frosting

    Picture this: the aroma of spices wafting through your kitchen, the comforting sizzle of butter in a hot pan, and the warm embrace of a freshly baked carrot cake as it cools on the counter. This isn’t just any carrot cake; it’s a fall-inspired masterpiece that combines the earthy sweetness of pure maple syrup with the zing of crystallized ginger. Welcome to a dessert experience that wraps you in cozy feelings and whispers, “stay a while.”

    Personal Story

    Carrot cake holds a special place in my heart. Growing up, it was a staple at family gatherings, a dessert that signaled celebration and togetherness. My grandmother, a woman with a knack for transforming simple ingredients into something magical, would always make her version — moist, cinnamon-laden, and topped with rich cream cheese frosting. I remember standing on a stool beside her, eager to lick the frosting bowl clean while she patiently grated carrots, telling stories of her own childhood.

    Years later, when I found myself in my own kitchen, I realized I wanted to honor her tradition while adding a twist that spoke to my personal culinary journey. It was a chilly autumn afternoon, the kind where leaves dance in the wind, and I was craving something that embodied the season. As I reached for the maple syrup and spotted a jar of crystallized ginger in the pantry, inspiration struck.

    My first attempt was a bit of an experiment — would the spices overpower the cake? Would the ginger be too bold? I held my breath as the cake baked, filling my apartment with an intoxicating scent that promised deliciousness. As soon as it cooled, I iced it with a ginger cream cheese frosting, took a bite, and was transported. The flavors melded beautifully, creating a dessert that wasn’t just about nostalgia but also about embracing new traditions.

    Now, this Spiced Maple Carrot Cake with Ginger Cream Cheese Frosting has become a new family favorite. It’s the cake I bring to gatherings, the one that gets requested by friends who dub it “that unforgettable carrot cake.” It’s my homage to both the past and the present, a dish that bridges generations and seasons in one swoon-worthy bite.

    What Makes This Version Special

    What sets this carrot cake apart from the classic version is the addition of pure maple syrup and crystallized ginger. The syrup introduces a deep, aromatic sweetness that complements the natural sugars of the carrots beautifully. At the same time, the crystallized ginger provides a spicy kick, adding an unexpected twist that elevates the cake from an everyday dessert to a fall-inspired delight.

    The magic doesn’t stop there. By blooming the ground cinnamon, nutmeg, and cloves in butter before adding them to the batter, we unlock their full potential, allowing the spices to infuse every bite with warmth and complexity. This technique brings out the best in each spice, creating a symphony of flavors that dance on your tongue.

    Flavor Profile

    Imagine a warm, aromatic cake with a sweet maple undertone that gently cradles your taste buds, followed by a spicy ginger kick that surprises and delights. The toasted pecans add a nutty crunch, while the fresh orange zest subtly brightens the entire flavor profile. With each bite, you’re taken on a journey — from the comforting familiarity of carrot cake to the exciting depths of its spiced maple evolution.

    Ingredients

    • 2 cups white whole wheat flour
    • 2 teaspoons baking powder
    • 1 teaspoon baking soda
    • 1 teaspoon salt
    • 1 cup granulated sugar
    • 1 cup **brown sugar**
    • 3/4 cup canola oil
    • 1/4 cup **pure maple syrup**
    • 4 large eggs
    • 2 cups grated carrots
    • 1/2 cup finely chopped **crystallized ginger**
    • 1/2 cup **toasted pecans**, chopped
    • 1 teaspoon vanilla extract
    • 1 teaspoon ground cinnamon
    • 1/2 teaspoon ground nutmeg
    • 1/4 teaspoon ground cloves
    • 1 tablespoon butter
    • Zest of 1 orange
    • For the frosting:
    • 1/2 cup butter, softened
    • 8 oz **low fat cream cheese**, softened
    • 4 cups icing sugar
    • 1 teaspoon vanilla extract
    • **Crystallized ginger**, for garnish

    Instructions

    1. Preheat your oven to 350°F (180°C). Grease two 9-inch (23cm) cake pans and line the bottoms with parchment paper.
    2. In a small saucepan, melt the butter over medium heat. Add the ground cinnamon, nutmeg, and cloves. Stir continuously for about 2 minutes until spices are fragrant and the mixture is a beautiful golden-brown. Set aside to cool slightly.
    3. In a large mixing bowl, beat the canola oil, granulated sugar, and brown sugar together until well combined and slightly fluffy.
    4. Beat in the maple syrup and vanilla extract.
    5. Add the eggs one at a time, beating well after each addition until the mixture is smooth and glossy.
    6. In another large bowl, whisk together the flour, baking powder, baking soda, and salt.
    7. Slowly add the dry ingredients to the wet ingredients, mixing just until combined. Be careful not to overmix.
    8. Gently fold in the grated carrots, crystallized ginger, toasted pecans, and orange zest, ensuring they are evenly distributed throughout the batter.
    9. Divide the batter evenly between the prepared cake pans, smoothing the tops with a spatula.
    10. Bake in the preheated oven for 25 to 30 minutes, or until a toothpick inserted in the center comes out clean. The tops should be a lovely golden-brown.
    11. Allow the cakes to cool in the pans for about 20 minutes before transferring them to a wire cooling rack to cool completely.
    12. For the frosting, beat the softened butter and cream cheese together in a medium bowl until smooth and creamy.
    13. Gradually add the icing sugar, one cup at a time, beating well after each addition. Add the vanilla extract and continue to beat until the frosting is fluffy and light. If needed, add a little milk to achieve your desired consistency.
    14. Place one cake layer on a serving dish and spread with a generous layer of frosting. Top with the second cake layer and cover the top and sides with the remaining frosting.
    15. Decorate with extra crystallized ginger and toasted pecans for a delightful finish.

    Pro Tips from Meaghan’s Kitchen

    • Grate your carrots fresh for the best texture and moisture. Pre-packaged grated carrots are often too dry.
    • To prevent your cake from sticking, make sure your cake pans are well-greased and lined with parchment paper.
    • For a smoother frosting, ensure both your cream cheese and butter are at room temperature before mixing.
    • If your cake domes in the middle, use a serrated knife to gently level it before frosting for a more professional-looking finish.
    • Let the flavors meld by storing the cake in the fridge overnight before serving. This also makes the cake easier to slice.

    Variations & Dietary Swaps

    • Vegetarian Swap: Use a flax egg (1 tablespoon flaxseed meal + 2.5 tablespoons water) to replace each egg for a vegetarian-friendly cake.
    • Spice-it-up Version: Add a pinch of cayenne pepper to the spice mix for a subtle heat that pairs beautifully with the sweet elements.
    • Kids-Friendly Version: Omit the ginger for a milder cake that’s more appealing to young palates. Add mini chocolate chips for a fun twist!

    What to Serve With It

    This Spiced Maple Carrot Cake shines when paired with a cup of spiced chai tea, which complements its aromatic profile. If you’re in the mood for something a bit more indulgent, a glass of sweet Riesling is a perfect match, enhancing the cake’s sweet and spicy notes with its own fruity undertones.

    Storage & Meal Prep

    Store any leftover cake in an airtight container in the refrigerator for up to 5 days. If you want to save some for later, wrap individual slices in plastic wrap and store in a freezer bag for up to 3 months. To enjoy, defrost slices in the refrigerator overnight, then let sit at room temperature for about 30 minutes before serving for optimal flavor and texture.

    FAQ

    Can I use all-purpose flour instead of white whole wheat flour?

    Yes, you can substitute all-purpose flour for white whole wheat flour in this recipe. The texture will be a bit lighter, but the flavor will remain delicious.

    What can I use instead of crystallized ginger if I don’t have any?

    If you’re out of crystallized ginger, feel free to use fresh grated ginger or ground ginger. Start with a smaller amount and adjust to taste.

    How can I make this cake more moist?

    This cake is already quite moist, thanks to the oil and freshly grated carrots. However, you can add a tablespoon of Greek yogurt or applesauce to the batter for extra moisture.

    Is it necessary to toast the pecans?

    Toasting the pecans enhances their flavor and adds a delightful crunch. While it’s not necessary, it’s highly recommended for the best taste experience.

    Can I make this cake in advance?

    Absolutely! This cake actually tastes even better the next day as the flavors meld together. Just be sure to store it properly in the fridge.

    Final Thoughts

    There you have it — a Spiced Maple Carrot Cake with Ginger Cream Cheese Frosting that’s sure to become a new favorite in your recipe collection. It’s a cake that celebrates tradition while embracing new flavors, making it the perfect dessert for any occasion. I’d love to hear how this recipe turns out for you, so feel free to leave a comment below or share your cake creations with me on social media. Happy baking, and may your kitchen be filled with warmth and joy!

    Related update: Spiced Maple Carrot Cake with Ginger Cream Cheese Frosting

    Related update: Mediterranean Citrus-Infused Semolina Cake with Spiced Honey Nuts

  • Savory Truffle-Infused Minestrone with Crispy Pancetta | Made by Meaghan Moineau

    Savory Truffle-Infused Minestrone with Crispy Pancetta | Made by Meaghan Moineau

    Savory Truffle-Infused Minestrone with Crispy Pancetta

    Imagine the rich aroma of earthy truffle oil mingling with the savory scent of sizzling pancetta, wafting through your kitchen on a chilly evening. This isn’t just any minestrone soup; it’s a luxurious, flavor-packed journey that promises to delight your senses and warm your soul with every spoonful.

    Personal Story

    The first time I made minestrone, I was in my early twenties, bustling around my tiny apartment kitchen with a recipe card in one hand and a wooden spoon in the other. Like many first attempts, this was a learning experience. I was overly ambitious, trying to cook up a storm for a small gathering of friends who were coming over for dinner. My kitchen was a symphony of clinking pans and bubbling pots, and though I was a novice, I was determined to make something memorable.

    That night, in a fit of inspiration (or maybe it was desperation), I added a splash of truffle oil that had been a gift from a friend who’d recently returned from Italy. The result was a revelation. The truffle oil elevated the humble minestrone to a new level of sophistication. Even my most discerning friends were impressed, and the soup became the talk of the evening.

    Over the years, I’ve refined that recipe, incorporating new techniques and ingredients like crispy pancetta to add depth and texture. Now, every time I make this truffle-infused minestrone, I’m transported back to that cozy apartment kitchen, where a simple soup became a gourmet experience.

    It’s not just a dish for me; it’s a memory that I recreate and savor with every simmering pot.

    What Makes This Version Special

    This isn’t your average minestrone. What sets this version apart is the luxurious touch of truffle oil and the irresistible crunch of crispy pancetta. These ingredients transform a rustic Italian classic into a gourmet masterpiece. The truffle oil adds an earthy richness that lingers on your palate, while the pancetta provides a delightful contrast with its smoky, salty flavor. This combination makes every bite an indulgent pleasure, elevating the soup from a simple starter to the star of any meal.

    Flavor Profile

    Prepare yourself for a taste experience that is both earthy and rich, with a subtle hint of truffle that lingers on the tongue. The crispiness of the pancetta adds a delightful texture, while the hearty mix of vegetables and tender beans creates a soup that is robust and satisfying. The savory notes from the sautéed vegetables are perfectly balanced by the light, umami flavor of the truffle oil, which is added just before serving to maintain its aromatic qualities. This minestrone is a symphony of flavors that dance together harmoniously, leaving a lasting impression.

    Ingredients

    • 2 tablespoons butter
    • 1 cup diced carrots
    • 1 cup diced celery
    • 1 large onion, chopped
    • 3 cloves garlic, minced
    • 2 cups shredded cabbage
    • 1 can (28 oz) canned tomatoes
    • 6 cups water
    • 1 cup brown rice
    • Salt to taste
    • 1 tablespoon Worcestershire sauce
    • 1 tablespoon Italian mixed seasoning
    • 1 teaspoon pepper
    • 2 medium potatoes, diced
    • 2 beef bouillon cubes
    • 1 large zucchini, diced
    • 1 can (15 oz) canned kidney beans, drained and rinsed
    • 1 cup frozen spinach
    • 1/2 cup grated Parmesan cheese
    • 2 tablespoons truffle oil
    • 4 oz pancetta, diced
    • Fresh thyme for garnish

    Instructions

    1. In a large soup kettle, render the diced pancetta over medium heat, stirring occasionally until it’s crispy and golden-brown. Remove the pancetta and set aside, leaving the rendered fat in the kettle.
    2. Add the butter to the kettle. Once melted, sauté the carrots, celery, onions, garlic, and cabbage in the pancetta fat for about 20 minutes, stirring often until the vegetables are tender and fragrant.
    3. Stir in the canned tomatoes, water, brown rice, salt, Worcestershire sauce, Italian mixed seasoning, pepper, diced potatoes, beef bouillon cubes, and zucchini. Bring the mixture to a boil, then reduce the heat and let it simmer, covered, for at least 30 minutes.
    4. Once the vegetables are tender, add the canned kidney beans and frozen spinach. Increase the heat to return the soup to a boil, then reduce to medium heat and cook until the spinach is heated through, about 5 minutes. Add more water if the soup becomes too thick.
    5. Just before serving, drizzle the truffle oil over the soup to maintain its aromatic qualities. Serve hot, garnished with crispy pancetta, grated Parmesan cheese, and fresh thyme.

    Pro Tips from Meaghan’s Kitchen

    • When rendering the pancetta, start with a cold pan to allow the fat to render slowly and thoroughly, enhancing the soup’s flavor profile.
    • For an even richer taste, use homemade beef stock instead of water and bouillon cubes.
    • Drizzle the truffle oil sparingly; a little goes a long way in imparting its unique flavor.
    • For a creamy twist, blend half of the soup before adding the beans and spinach, then mix with the remaining chunky soup.
    • Always taste and adjust the seasoning before serving; the truffle oil can bring out hidden flavors.

    Variations & Dietary Swaps

    • Vegetarian Version: Swap the pancetta for smoked paprika and use vegetable bouillon cubes instead of beef. The smoky paprika will provide a depth of flavor that’s reminiscent of pancetta.
    • Spice-It-Up: Add a pinch of red pepper flakes or a diced jalapeño when sautéing the vegetables for a spicy kick.
    • Kids-Friendly Version: Puree the soup after cooking to create a smooth, creamy texture that’s easier for little ones to enjoy. You can also reduce the garlic and remove the truffle oil for a milder flavor.

    What to Serve With It

    This savory truffle-infused minestrone pairs beautifully with a glass of earthy red wine like a Pinot Noir, enhancing the depth of flavors in the soup. For a complete meal, serve alongside a side of rustic garlic bread, perfect for dipping and soaking up every last drop of the delicious broth.

    Storage & Meal Prep

    To store, allow the soup to cool completely before transferring it to airtight containers. It will keep in the fridge for up to 5 days or can be frozen for up to 3 months. When reheating, do so on the stove over medium heat, stirring occasionally. If you find the soup has thickened, just add a splash of water or broth to achieve the desired consistency.

    FAQ

    Can I use fresh spinach instead of frozen?

    Absolutely! Fresh spinach can be used in place of frozen. Simply add it towards the end of cooking, and it will wilt nicely in the hot soup.

    Is there a substitute for truffle oil?

    If you don’t have truffle oil, you can skip it altogether or use a drizzle of high-quality olive oil for a different, yet delicious finish.

    How can I make this soup gluten-free?

    This recipe is naturally gluten-free. Just ensure your Worcestershire sauce and beef bouillon are certified gluten-free.

    Can I add meat to make it heartier?

    Certainly! Adding cooked Italian sausage or shredded chicken can make the soup even more filling and protein-rich.

    What if I can’t find pancetta?

    Bacon is a great substitute for pancetta. It provides a similar smoky-salty flavor and crisp texture.

    Final Thoughts

    There you have it, my Savory Truffle-Infused Minestrone with Crispy Pancetta, a dish that’s close to my heart and perfect for warming up those chilly nights. I hope you enjoy making and savoring this elevated classic as much as I do. If you try it out, I’d love to hear about your experience or any tweaks you might have made. Feel free to share your thoughts in the comments below. Happy cooking, and may your kitchen be filled with warmth and delicious aromas!

    Related update: Savory Truffle-Infused Minestrone with Crispy Pancetta

  • Sumptuous Mediterranean Moussaka with Pistachio-Crusted Eggplants | Made by Meaghan Moineau

    Sumptuous Mediterranean Moussaka with Pistachio-Crusted Eggplants

    Imagine the scent of roasted eggplant mingling with the warm, spicy aroma of cinnamon and nutmeg. The sizzle of sautéing onions and garlic fills the air, drawing you into the kitchen where a Mediterranean feast is unfolding. This isn’t just any moussaka — it’s a Sumptuous Mediterranean Moussaka with Pistachio-Crusted Eggplants, and it’s about to redefine your culinary expectations.

    Personal Story

    My love affair with moussaka began on a sun-soaked trip to Crete, where the vibrant flavors and hospitable locals made every meal an unforgettable experience. One evening, nestled in a cozy taverna overlooking the Aegean Sea, I was served a slice of moussaka that stopped time. The layers of eggplant, rich meat sauce, and creamy béchamel were perfectly balanced, each bite a harmonious dance of flavors.

    Back home, I was determined to recreate that magical dish. My first few attempts were less than stellar, resulting in soggy eggplant and bland béchamel. But with persistence and a few creative twists, I found a version that not only captured the essence of that Cretan evening but elevated it in unexpected ways.

    One day, while rummaging through my pantry, I stumbled upon a bag of pistachios. A light bulb moment occurred — why not add a nutty crust to the eggplant layers? The result was a delightful crunch that contrasted beautifully with the creamy béchamel. My family, who had been my patient taste-testers, were unanimous in their verdict: this was the best moussaka yet.

    And so, the Sumptuous Mediterranean Moussaka with Pistachio-Crusted Eggplants was born, a dish that now holds a special place in my kitchen and heart. It’s a testament to the power of experimentation and the joy of bringing a taste of the Mediterranean home.

    What Makes This Version Special

    This version of moussaka stands out with its unique pistachio-crusted eggplant layers. The crunch of the pistachios adds a delightful texture that transforms the dish from ordinary to extraordinary. Meanwhile, the béchamel sauce is infused with a hint of lemon zest, offering a refreshing lift that brightens the rich, hearty flavors. These tweaks not only elevate the classic moussaka but also provide a new dimension to every bite.

    Flavor Profile

    The Sumptuous Mediterranean Moussaka with Pistachio-Crusted Eggplants is a feast for the senses. Imagine the rich and hearty flavors of a traditional moussaka, now enhanced by a zesty, nutty undertone. The pistachio crust adds a satisfying crunch that complements the savory meat sauce, while the lemon-infused béchamel provides a light, aromatic finish. It’s a symphony of textures and tastes, with each layer bringing something special to the table.

    Ingredients

    • 4 medium-sized eggplants, cut into 1/4 inch slices
    • **1 cup pistachios, finely chopped**
    • 2 tablespoons olive oil
    • 1 teaspoon sea salt
    • 1 tablespoon butter
    • 1/4 cup flour
    • 2 cups warm milk
    • **Zest of 1 lemon**
    • 1/4 cup fresh mint leaves, chopped
    • 3 egg yolks
    • 1/2 teaspoon ground nutmeg
    • 1 pound lean beef
    • 1 onion, finely chopped
    • 2 cloves garlic, minced
    • 1/2 teaspoon ground cinnamon
    • 1/2 teaspoon ground allspice
    • 1/2 teaspoon white salt
    • 1/2 teaspoon ground pepper
    • 1 can (14 oz) tomatoes, crushed
    • 2 tablespoons tomato paste
    • 1 cup feta cheese, crumbled
    • 1 cup bread crumbs

    Instructions

    1. Sprinkle the eggplant slices with sea salt and let them stand for 45 minutes to draw out excess moisture. Rinse thoroughly and pat dry.
    2. Preheat your oven to 180°C (350°F). Coat each eggplant slice with olive oil and dip them into the **finely chopped pistachios**. Arrange on a baking sheet and bake until golden-brown, about 15 minutes per side. Set aside.
    3. In a large skillet, heat olive oil over medium heat. Sauté the onions until soft, about 5 minutes. Add garlic and cook for another minute.
    4. Add the ground beef, breaking it into small pieces as it cooks. Once browned, stir in the crushed tomatoes, cinnamon, allspice, white salt, and ground pepper. Simmer on low heat for about 10 minutes. Mix in the tomato paste and adjust consistency with a little water if needed. Set aside.
    5. For the béchamel, melt butter in a saucepan over medium heat. Add flour and stir constantly until it forms a smooth paste. Gradually whisk in warm milk, bringing it to a gentle boil. Remove from heat and season with ground nutmeg. Whisk in the egg yolks vigorously until smooth. Stir in the **lemon zest** and fresh mint.
    6. Lightly oil a suitable ovenproof baking dish and sprinkle the base with bread crumbs. Layer with pistachio-crusted eggplants, some meat sauce, and crumbled feta cheese. Repeat these layers until the dish is nearly full, finishing with a layer of feta.
    7. Top everything with the lemon-mint béchamel sauce. Cover with foil and bake in the preheated oven for 1 hour.
    8. Remove the foil and let the moussaka set at room temperature for about 45 minutes before serving. This helps the layers to firm up and blend their flavors beautifully.

    Pro Tips from Meaghan’s Kitchen

    • For an even crunchier pistachio crust, toast the pistachios lightly in a dry pan before chopping.
    • Letting the eggplant sit with salt not only removes bitterness but also makes them absorb less oil during baking.
    • Don’t skip the resting time after baking; it’s crucial for achieving neat, well-defined layers when you cut into the moussaka.
    • To save time, make the meat sauce a day ahead. It allows the flavors to meld and makes your kitchen work more manageable.
    • If you prefer a thicker béchamel, simply add a bit more flour to your roux and adjust the milk accordingly.

    Variations & Dietary Swaps

    • Vegetarian Swap: Replace the beef with a mixture of mushrooms and lentils for a hearty vegetarian option.
    • Spice-It-Up Version: Add a teaspoon of crushed red pepper flakes to the meat sauce for a bit of heat.
    • Kids-Friendly Version: Substitute the eggplant with zucchini to make it more appealing to younger palates.

    What to Serve With It

    This Sumptuous Mediterranean Moussaka pairs wonderfully with a glass of chilled Sauvignon Blanc, whose crisp acidity complements the richness of the dish. For a side, consider a classic Greek salad with olives, cucumbers, and a sprinkle of feta cheese to keep the Mediterranean theme going.

    Storage & Meal Prep

    For leftovers, store the moussaka in an airtight container in the fridge for up to four days. It also freezes exceptionally well; just wrap tightly in foil and place in a freezer-safe container for up to two months. Reheat in the oven at 180°C (350°F) until heated through. This dish is perfect for meal prep, as it often tastes even better the next day!

    FAQ

    Can I make this moussaka ahead of time?

    Yes, you can! Prepare the moussaka up to the baking step, cover it, and refrigerate for up to 24 hours. When you’re ready to bake, simply add an extra 10-15 minutes to the cooking time.

    What is the best way to chop pistachios?

    For a fine chop, use a food processor, pulsing a few times until you reach the desired consistency. Be careful not to over-process, as you want small pieces, not a paste.

    How can I prevent the béchamel sauce from curdling?

    Always add the egg yolks off the heat and whisk vigorously. Slowly tempering the yolks with a bit of the hot milk before adding to the sauce can also help prevent curdling.

    What’s a good substitute for feta cheese?

    If you’re not a fan of feta, ricotta cheese can be a milder alternative, or you can use goat cheese for a slightly tangier flavor.

    Can I use pre-cooked meat for the sauce?

    Absolutely. If you have leftover cooked beef, simply crumble it into the sauce after sautéing the onions and garlic.

    Final Thoughts

    Creating this Sumptuous Mediterranean Moussaka with Pistachio-Crusted Eggplants is more than just making dinner; it’s an exploration of texture and flavor that brings the spirit of the Mediterranean into your home. I hope you’ll find as much joy in making and sharing this dish as I do. If you give it a try, please leave a comment or share your version on social media. Happy cooking, my friends!

    Related update: Sumptuous Mediterranean Moussaka with Pistachio-Crusted Eggplants

    Related update: Gourmet Turkey Burgers with Roasted Red Pepper and Feta