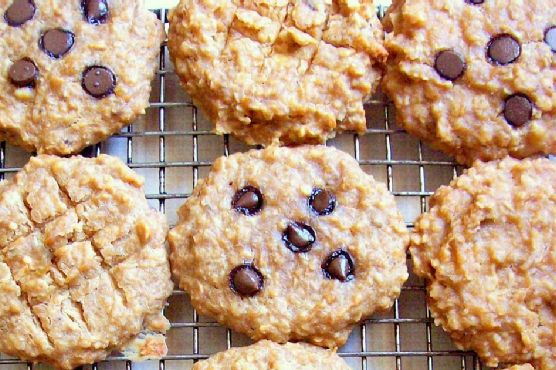
Nutty Banana-Peanut Butter Breakfast Cookies with Dark Chocolate and Sea Salt
Picture this: the comforting aroma of warm peanut butter wafting through your kitchen, mingling with the irresistible scent of melting dark chocolate, as you anticipate a sweet, nutty bite of goodness. These Nutty Banana-Peanut Butter Breakfast Cookies with Dark Chocolate and Sea Salt are about to become your new morning obsession.
Personal Story
There was a time when breakfast in my house was a hurried affair, where a quick slice of toast or a bowl of cereal had to suffice before dashing out the door. But everything changed the morning I discovered the joy of breakfast cookies. It was a chilly autumn day, and I was craving something warm and comforting that I could enjoy leisurely with my cup of chai tea. That was the day these Nutty Banana-Peanut Butter Breakfast Cookies were born.
The inspiration came from a kitchen mishap, believe it or not. I had intended to make banana bread, but with a toddler tugging at my apron strings, I misjudged the batter’s consistency and ended up with dough instead. With a quick pivot, I decided to scoop the mixture onto a baking sheet, and, voilà, breakfast cookies emerged from the oven.
As I took my first bite, the sweet nuttiness combined with the rich chocolate finish and a hint of sea salt danced on my palate. It was a revelation. These cookies offered the comfort of a homemade breakfast with the portability of a grab-and-go snack, making them perfect for busy mornings.
Since that serendipitous kitchen experiment, these cookies have become a staple in my family. I love making them ahead of a busy week, knowing that I have a delicious and wholesome option ready to go. Plus, they’re a hit with my little one, who loves to help me mix the ingredients and sprinkle the sea salt. It’s these simple, joyful moments that make cooking such a cherished part of my day.
What Makes This Version Special
What sets my Nutty Banana-Peanut Butter Breakfast Cookies apart is the luxurious touch of pure maple syrup and the strategic sprinkle of sea salt. The maple syrup adds a layer of richness that complements the creamy peanut butter and sweet bananas, creating a flavor profile that’s both familiar and elevated. Meanwhile, a sprinkle of sea salt on top of the cookies right after baking enhances the sweetness while balancing the nutty, chocolatey notes, offering a delightful contrast that keeps you reaching for just one more.
Flavor Profile
These breakfast cookies deliver a sweet, nutty, and slightly salty flavor experience. Imagine biting into a cookie where the warmth of creamy peanut butter meets the tropical sweetness of bananas, all underscored by the crunch of toasted mixed nuts. The dark chocolate chips melt into pockets of rich, velvety goodness, while the sea salt brightens each bite, making the flavors pop. It’s a harmonious blend that satisfies both sweet and savory cravings.
Ingredients
- 3 ripe bananas, mashed
- 1/2 cup butter flavor shortening
- **1 cup dark chocolate chips**
- **1/2 cup creamy peanut butter**
- 1 cup mixed nuts, lightly toasted
- 2 cups oatmeal
- 1/2 cup unsweetened applesauce
- 1 teaspoon vanilla extract
- 1 scoop vanilla protein powder
- **1/4 cup pure maple syrup**
- **Sea salt**, for sprinkling
Instructions
- Preheat your oven to 350°F (175°C).
- In a large mixing bowl, combine the mashed bananas and creamy peanut butter until smooth and fully integrated.
- Add the unsweetened applesauce, vanilla protein powder, and vanilla extract to the banana mixture. Stir until all ingredients are well combined.
- Introduce the oatmeal and toasted mixed nuts to the bowl, and fold them into the banana mixture. If you prefer the chocolate chips mixed throughout, add them at this stage. Let the dough rest for 10 minutes to allow the oats to absorb moisture.
- Line a baking sheet with parchment paper. Drop spoonfuls of cookie dough onto the sheet, flattening each spoonful into a circle.
- For cookies with chocolate chips on top, sprinkle them now, pressing gently so they adhere.
- Bake in the preheated oven for 20-30 minutes, adjusting the time based on your preference for softer or crisper cookies. Look for a golden-brown color as a visual cue for doneness.
- Upon removing from the oven, sprinkle a pinch of sea salt over the warm cookies to enhance the sweetness and balance the flavors.
- Allow the cookies to rest on the baking sheet for 5 minutes before transferring to a cooling rack. If desired, use a pizza cutter or sharp knife to score the tops for a traditional look.
- Once completely cool, store the cookies in an airtight container. Enjoy them fresh or with your favorite cup of tea.
Pro Tips from Meaghan’s Kitchen
- Toasting the nuts: Lightly toasting the mixed nuts in a dry pan before incorporating them into the dough intensifies their flavor and adds a satisfying crunch.
- Optimal banana ripeness: Use bananas that are ripe but not overly mushy for the best sweetness and texture.
- Protein boost: Adjust the protein powder amount to suit your dietary needs, or substitute with almond flour for a different texture.
- Sea salt timing: Sprinkle the sea salt immediately after baking while the cookies are still warm to ensure it adheres properly and enhances flavors.
- Batch baking: Double the recipe and freeze half the dough for a quick, fresh batch later.
Variations & Dietary Swaps
- Vegetarian Swap: Ensure your vanilla protein powder is plant-based to maintain a vegetarian-friendly cookie.
- Spice-it-up Version: Add a teaspoon of cinnamon or nutmeg to the dough for a warming spice twist.
- Kids-Friendly Version: Substitute the dark chocolate chips with mini chocolate chips, and involve the kids in shaping the cookies for a fun family activity.
What to Serve With It
These Nutty Banana-Peanut Butter Breakfast Cookies are perfectly complemented by a steaming cup of chai tea, which enhances the warm spices and nuttiness. Alternatively, an almond milk latte offers a creamy, nutty counterpart to the rich chocolate finish of the cookies.
Storage & Meal Prep
For optimal freshness, store the cookies in an airtight container at room temperature for up to three days. For longer storage, place them in the refrigerator for up to a week. To freeze, lay the cookies flat in a single layer on a baking sheet, freeze until solid, then transfer to a freezer-safe bag or container. Reheat frozen cookies in a preheated oven at 300°F (150°C) for 5-8 minutes or until warm.
FAQ
Can I use a different type of nut butter?
Absolutely! Almond butter or cashew butter would work wonderfully and bring their own unique flavors to the cookies.
How can I make these cookies gluten-free?
Simply substitute gluten-free oats into the recipe, ensuring all other ingredients are certified gluten-free as well.
What if I don’t have vanilla protein powder?
No problem! You can omit the protein powder or replace it with almond flour or additional oatmeal to maintain the texture.
Can I use honey instead of maple syrup?
Yes, honey can be used as a substitute for maple syrup, but note that it may slightly alter the flavor profile.
How do I know when the cookies are fully baked?
The cookies are done when they achieve a lovely golden-brown color. If you prefer them softer, aim for a lighter golden hue.
Final Thoughts
These Nutty Banana-Peanut Butter Breakfast Cookies with Dark Chocolate and Sea Salt are a delightful way to start your day or enjoy as a midday snack. Their balanced flavor profile and wholesome ingredients make them a favorite in my household, and I hope they become a staple in yours as well. I’d love to hear how they turned out for you, so feel free to leave a comment or share your own twists on the recipe. Happy baking!
Related update: Nutty Banana-Peanut Butter Breakfast Cookies with Dark Chocolate and Sea Salt