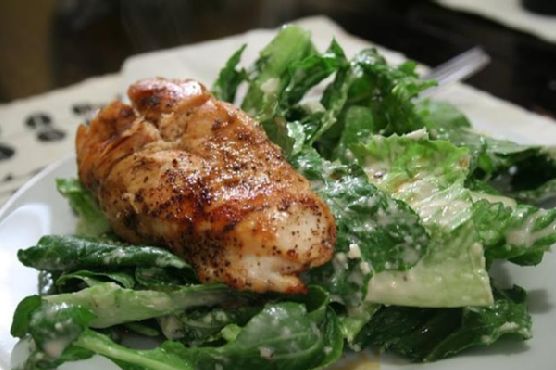
Tag: Maple Syrup

  • Smoky Maple Chipotle Grilled Sweet Potatoes | Made by Meaghan Moineau

    Smoky Maple Chipotle Grilled Sweet Potatoes | Made by Meaghan Moineau

    Smoky Maple Chipotle Grilled Sweet Potatoes

    Imagine the aroma of sweet potatoes sizzling on the grill, their natural sugars caramelizing into golden-brown perfection. The air is filled with a hint of smokiness, a whisper of maple, and a bold, chipotle kick that promises an unforgettable flavor journey. This isn’t just another side dish; it’s a sensory celebration that transforms humble sweet potatoes into the star of your meal.

    Personal Story

    Growing up, sweet potatoes were a staple at our holiday table, usually in the form of my grandmother’s marshmallow-covered casserole. As delightful as that dish was, I always felt there was more to explore in the realm of sweet potatoes. It wasn’t until a summer barbecue a few years back that I discovered the true potential of this versatile root vegetable.

    The day was perfect: sun-drenched and breezy, with the smell of freshly cut grass mingling with the tantalizing aroma of food grilling nearby. I was a guest at a friend’s cookout, where the host casually mentioned a new recipe he was trying: grilled sweet potatoes. Curious and a little skeptical, I watched as he prepared them with a simple glaze of butter and spices. One bite, and I was hooked. The smoky, sweet, and subtly spicy flavors danced together in a way I’d never experienced before.

    Inspired, I began experimenting in my own kitchen, determined to create a version of grilled sweet potatoes that would wow family and friends alike. After several delicious trials and a few not-so-successful attempts, I found the perfect balance. Adding a smoky chipotle kick and a touch of maple syrup elevated the dish beyond my wildest expectations. This recipe has since become a beloved part of our family gatherings, a testament to the magic that happens when you dare to try something new.

    What Makes This Version Special

    The signature twist in my Smoky Maple Chipotle Grilled Sweet Potatoes lies in the unique blend of flavors that elevate this dish from ordinary to extraordinary. The addition of smoky chipotle powder infuses the sweet potatoes with a gentle heat that’s perfectly tempered by the natural sweetness of pure maple syrup. This sweet and savory sensation enhances each bite, making this version far superior to the standard grilled sweet potatoes you’re used to.

    Moreover, the use of smoked paprika provides a depth of flavor that complements the chipotle, creating a rich, robust taste profile. The buttery glaze not only adds a luscious texture but also helps the spices adhere lovingly to every slice. In my book, this is not just an upgrade; it’s a revelation that brings out the best in sweet potatoes.

    Flavor Profile

    From the first bite, you’re greeted with a harmonious blend of sweet and smoky flavors. The sweet potatoes offer a natural sweetness that’s enhanced by the sticky, caramel-like maple syrup. Simultaneously, the chipotle powder introduces a subtle yet satisfying kick, warming your palate without overwhelming it.

    The smoked paprika weaves throughout the dish, adding an earthy undertone that complements the chipotle’s heat. Just when you think it can’t get any better, a refreshing citrus finish from the fresh lime juice cuts through the richness, leaving you ready for the next enticing bite. Each mouthful is a journey, a balancing act of flavors that keeps you coming back for more.

    Ingredients

    • 4 large sweet potatoes
    • 1/4 cup melted butter
    • 1 tablespoon pure maple syrup
    • 1 teaspoon ground cinnamon
    • 1 teaspoon chipotle powder
    • 1 teaspoon smoked paprika
    • 1 teaspoon sea salt
    • Juice of 1 fresh lime
    • 1/4 cup fresh cilantro, chopped (optional)

    Instructions

    1. Preheat your grill to 350 degrees Fahrenheit. While it’s heating up, wash and slice the sweet potatoes into 1-inch rounds. This size ensures they cook evenly and maintain a perfect texture.
    2. In a small bowl, mix the melted butter with the maple syrup, chipotle powder, smoked paprika, and sea salt to create a rich glaze. This mixture will serve as both a flavor bomb and a barrier against sticking.
    3. Spray both sides of the sweet potato slices with additional butter spray and sprinkle with cinnamon. The cinnamon adds a warm, aromatic note that complements the other spices beautifully.
    4. Cover the grill grates with aluminum foil to prevent sticking, then place the sweet potatoes directly onto the foil. Spray the sweet potatoes again lightly with butter spray to ensure they don’t stick.
    5. Close the grill lid and cook for 30 minutes, turning and flipping the sweet potatoes every 10 minutes. This ensures even cooking and those desirable grill marks. Add more butter spray as needed to prevent sticking and promote caramelization.
    6. Once the sweet potatoes are tender and slightly charred, remove them from the grill. Drizzle with fresh lime juice and sprinkle with chopped cilantro for a fresh finish that brightens the dish.

    Pro Tips from Meaghan’s Kitchen

    • Choose the right sweet potatoes: Opt for firm, evenly sized sweet potatoes to ensure even cooking.
    • Sweetness balance: If you prefer a less sweet version, you can reduce the maple syrup to 1/2 tablespoon.
    • Grill maintenance: Regularly check your grill’s temperature to maintain consistent heat, which is key for even cooking.
    • Glaze application: Brush the glaze on the sweet potatoes just before serving to maintain its vibrancy and prevent the sugars from burning.
    • Avoid crowding: Give each slice enough space on the grill to ensure they cook evenly and develop a good char.

    Variations & Dietary Swaps

    • Vegetarian Swap: Use a plant-based butter alternative for a vegan-friendly version.
    • Spice-it-up Version: Add a pinch of cayenne pepper to the glaze for extra heat.
    • Kid-Friendly Version: Omit the chipotle powder and smoked paprika, and add a touch more cinnamon for a sweeter, milder flavor.

    What to Serve With It

    These Smoky Maple Chipotle Grilled Sweet Potatoes are a versatile side dish that pairs beautifully with a range of mains. Serve them alongside grilled chicken or steak for a hearty meal. They also complement a fresh, vibrant grilled corn salad wonderfully. For a refreshing beverage pairing, consider a chilled glass of Riesling, whose subtle sweetness and acidity will balance the dish’s smoky-spicy notes perfectly.

    Storage & Meal Prep

    To store any leftovers, place the sweet potatoes in an airtight container and refrigerate for up to 3 days. They can also be frozen for up to 3 months; just ensure they are completely cooled before freezing. For reheating, use an oven at 350 degrees Fahrenheit for about 10-15 minutes to maintain their texture. Avoid microwaving, as this can make them soggy.

    FAQ

    Can I make this recipe without a grill?

    Yes, you can use a grill pan on your stovetop or bake the sweet potatoes in the oven at 400 degrees Fahrenheit for 25-30 minutes, flipping halfway through.

    What if I don’t have chipotle powder?

    You can substitute with a combination of smoked paprika and cayenne pepper, adjusting the heat level to your preference.

    Can I prepare the glaze in advance?

    Absolutely! You can mix the glaze ingredients a day ahead and store it in the fridge. Just give it a good stir before using.

    Is there a substitute for fresh lime juice?

    If you don’t have lime juice, lemon juice can be used instead for a similar citrusy finish.

    How do I know when the sweet potatoes are done?

    They’re done when they are fork-tender and have a nice char on the edges. The interior should be soft, but the exterior should have a slight crisp.

    Final Thoughts

    I hope you find as much joy in making and sharing these Smoky Maple Chipotle Grilled Sweet Potatoes as I do. They’re a testament to how a few bold ingredients can transform a simple vegetable into something spectacular. I’d love to hear how you make this dish your own, so feel free to leave a comment below or share your creations on social media. Here’s to delicious adventures in the kitchen!

    Related update: Smoky Maple Chipotle Grilled Sweet Potatoes

  • Maple-Glazed Bacon Wrapped Pork Tenderloin with Smoked Paprika | Made by Meaghan Moineau

    Maple-Glazed Bacon Wrapped Pork Tenderloin with Smoked Paprika | Made by Meaghan Moineau

    Maple-Glazed Bacon Wrapped Pork Tenderloin with Smoked Paprika

    Imagine the sizzle of bacon meeting the gentle caramelization of maple syrup, enveloping a perfectly seasoned pork tenderloin. This culinary delight tantalizes the senses with its sweet, smoky, and savory symphony, making it an irresistible centerpiece for any meal.

    Personal Story

    Every family has that one dish that always steals the show during gatherings. For mine, it’s always been the classic pork tenderloin. I remember the first time I tried to cook it solo; I was determined to elevate the dish beyond my grandmother’s simple yet delicious recipe. I wanted something that would leave everyone talking, something unforgettable. That’s when I stumbled upon the idea of wrapping it in bacon. But, not just any bacon-wrapped tenderloin — it needed a twist.

    One autumn afternoon, while watching the leaves cascade from the trees in a flurry of reds and golds, inspiration struck. The answer was in the sweet, smoky allure of maple syrup; it was the missing puzzle piece that would elevate the dish from ordinary to extraordinary. Combining it with a hint of smoky paprika and the earthiness of fresh sage seemed like a symphonic blend of flavors destined to come together.

    However, my first attempt was a kitchen disaster. I forgot to preheat the oven and ended up with a chewy mess instead of a tender masterpiece. But with every misstep, I learned. I perfected the maple glaze, discovered the right bacon crispness, and honed my timing to a science. And every time I prepare this dish now, it’s a beautiful reminder of those early culinary adventures.

    Today, the Maple-Glazed Bacon Wrapped Pork Tenderloin with Smoked Paprika has become a signature favorite at our gatherings, always leaving family and friends asking for more. The journey from kitchen mishap to mouthwatering success is a testament to the power of creativity and persistence in the kitchen.

    What Makes This Version Special

    The beauty of this Maple-Glazed Bacon Wrapped Pork Tenderloin with Smoked Paprika lies in its complex layering of flavors. The sweet and smoky maple glaze adds depth to the dish, while the hint of smoked paprika enhances the savory punch from the bacon wrap. This version of the classic pork tenderloin transcends the mundane by infusing a rich tapestry of flavors that awaken the palate. Unlike the standard bacon-wrapped tenderloin, this recipe transforms it into a gourmet experience with its sophisticated glaze and aromatic accompaniments.

    Flavor Profile

    Imagine biting into a succulent piece of pork tenderloin, perfectly cooked and enveloped in crispy bacon. The first taste is a delightful mix of sweetness and smokiness, with the maple syrup providing a caramelized glaze that dances on the taste buds. The smoked paprika adds an earthy depth, while the fresh sage leaves impart a subtle herbaceous note. Together, these flavors create a harmonious balance that’s both comforting and exciting, a true testament to culinary craftsmanship.

    Ingredients

    • Pork tenderloin – 2 pieces
    • **Bacon** – enough slices to wrap tenderloins
    • Black pepper – to taste
    • Coarse salt – to taste
    • **Fresh sage** – about 9-10 leaves
    • Garlic powder – a pinch
    • **2 tablespoons maple syrup**
    • **1 teaspoon smoked paprika**
    • **1 teaspoon Dijon mustard**

    Instructions

    1. Preheat your oven to 425°F (220°C). This step is crucial for achieving that perfect golden-brown crust on your tenderloin.
    2. Remove about an inch off the tapered end of each tenderloin to make a perfect cylinder. This ensures even cooking throughout.
    3. Season the tenderloins generously with coarse salt, black pepper, and a pinch of garlic powder. This foundational seasoning sets the stage for the bold flavors to come.
    4. In a small bowl, mix the maple syrup and Dijon mustard until well combined. Brush this glaze over the surface of the tenderloins, ensuring every nook and cranny is covered.
    5. On a sheet of cling wrap, lay out the bacon strips in an overlapping line. This will form the crispy exterior of your dish.
    6. Sprinkle the smoked paprika over the bacon, embedding a deep smoky flavor into the wrap.
    7. Place the sage leaves all over the bacon, about 9-10 leaves in total, to add a fragrant earthy note.
    8. Position one piece of tenderloin across the short ends of the bacon and roll to cover it completely with the bacon. Repeat for the other tenderloin segment.
    9. Transfer the bacon-wrapped tenderloins to a non-stick pan and sear on all sides over medium-high heat. This step is key to achieving a crispy, golden-brown exterior.
    10. Once seared, transfer the pan to the preheated oven. Cook for 8-10 minutes, turning the pieces after 5 minutes to ensure even cooking. You’re aiming for an internal temperature of 145°F (63°C).
    11. Remove from the oven and let it rest for at least 5 minutes before slicing. This allows the juices to redistribute, ensuring every bite is juicy and flavorful.

    Pro Tips from Meaghan’s Kitchen

    • When brushing the glaze, let it sit for a few minutes to slightly absorb into the meat before wrapping it with bacon.
    • Use a meat thermometer to ensure the tenderloin reaches the perfect internal temperature without overcooking.
    • For a beautiful presentation, slice the tenderloin into 1-inch medallions and serve fanned out on a platter.
    • If you prefer a spicier kick, add a sprinkling of crushed red pepper flakes to the glaze mixture.
    • Wrapping the tenderloins tightly in bacon helps maintain their shape and ensures an even cook.

    Variations & Dietary Swaps

    • Vegetarian Swap: Replace the pork with a thick, firm tofu. Follow the same steps for seasoning and wrapping with vegetarian bacon.
    • Spice-It-Up Version: Add a tablespoon of sriracha or hot sauce to the maple-Dijon glaze for an extra spicy kick.
    • Kids-Friendly Version: Use a honey glaze instead of maple syrup for a sweeter, milder flavor that kids will love.

    What to Serve With It

    This Maple-Glazed Bacon Wrapped Pork Tenderloin pairs beautifully with a glass of medium-bodied Pinot Noir, its acidity balancing the dish’s richness. For sides, roasted Brussels sprouts with a touch of balsamic vinegar or a creamy garlic mashed potato will complement the savory-sweet profile perfectly.

    Storage & Meal Prep

    If you find yourself with leftovers (a rare occurrence with this dish), store them in an airtight container in the fridge for up to three days. To reheat, place in a preheated oven at 350°F (175°C) for about 15 minutes, or until warmed through. This dish also freezes well; wrap the cooked tenderloin in aluminum foil and store it in a freezer-safe bag for up to 2 months. Thaw overnight in the fridge before reheating.

    FAQ

    Can I use turkey bacon instead of regular bacon?

    Absolutely! Turkey bacon will work just as well, though it may not crisp up quite the same way. Keep an eye on it during the searing process.

    What if I don’t have smoked paprika?

    If smoked paprika is unavailable, you can use regular paprika and add a dash of liquid smoke to the glaze for a similar effect.

    How do I know when the pork tenderloin is done?

    The best way to ensure doneness is by using a meat thermometer. The internal temperature should reach 145°F (63°C) for perfectly cooked pork.

    Can I prepare this dish ahead of time?

    Yes, you can prepare the tenderloin up to the searing step and refrigerate it overnight. Allow it to come to room temperature before continuing with the oven cooking process.

    What other herbs can I use instead of sage?

    Rosemary or thyme can be excellent substitutes if sage is not to your liking. They will provide a different but equally aromatic flavor profile.

    Final Thoughts

    Cooking is an adventure, and this Maple-Glazed Bacon Wrapped Pork Tenderloin with Smoked Paprika is a testament to how a little creativity can transform a classic into a show-stopping masterpiece. I’d love to hear how your dish turned out, so feel free to leave a comment or share your own twists on the recipe. Until next time, happy cooking from my kitchen to yours!

    Related update: Maple-Glazed Bacon Wrapped Pork Tenderloin with Smoked Paprika

    Related update: Zesty Citrus-Herb Pork Carnitas Tacos with Pineapple Salsa

  • Spicy Maple-Roasted Autumn Vegetables with Herbed Goat Cheese Drizzle | Made by Meaghan Moineau

    Spicy Maple-Roasted Autumn Vegetables with Herbed Goat Cheese Drizzle | Made by Meaghan Moineau

    Spicy Maple-Roasted Autumn Vegetables with Herbed Goat Cheese Drizzle

    Imagine the rich aroma of butternut squash, beet roots, and potatoes roasting in your kitchen, kissed by a spicy maple glaze that caramelizes to perfection. As the heat transforms these autumn vegetables into golden-brown morsels, a drizzle of creamy, herbed goat cheese awaits, ready to crown the masterpiece with a fragrant finish. This is not just a side dish; it’s a savory-sweet symphony that dances across your taste buds.

    Opening Hook

    There’s nothing quite like the comforting embrace of a kitchen filled with the scent of roasting vegetables. The sizzle of olive oil meeting the skin of vibrant butternut squash, the earthy undertones of beet roots mingling with the sweetness of maple syrup — it’s a sensory experience that transforms a simple dish into something extraordinary. This is where culinary magic happens, blending nostalgia with innovation in every bite.

    Personal Story

    Growing up, autumn was always a season of wonder and warmth. I remember the first time I helped my grandmother in her cozy kitchen, the windows fogged up from the heat of the oven, and the tantalizing aroma of roasting vegetables swirling around us. She taught me the importance of timing and patience, how to know when the vegetables were just right by their golden-brown hue and tender texture.

    It was in her kitchen that I first discovered the magic of maple syrup in savory dishes. I accidentally spilled some into our roasted vegetables — an unintentional twist that received rave reviews from my family. The sweetness intertwined with the earthy flavors, creating a delightful surprise that quickly became a family classic. Since then, I’ve been on a quest to recreate and elevate those beloved flavors.

    Years later, in my own kitchen, I found myself experimenting with spices and textures, determined to craft a dish that would honor my grandmother’s original while adding my personal flair. After numerous trials and some spicy mishaps, I stumbled upon the perfect combination: a spicy maple glaze paired with a creamy, herbed goat cheese drizzle. This version of maple-roasted autumn vegetables has become a staple at my table, always evoking cherished memories with every bite.

    What Makes This Version Special

    This version of Spicy Maple-Roasted Autumn Vegetables stands out with its unforgettable sweet and spicy contrast. The introduction of a **spicy maple glaze** elevates the classic roasted veggies to a new level of flavor complexity, while the **creamy, herbed goat cheese drizzle** adds a luxurious touch. The result is a dish that’s both comforting and exciting, with each element working in harmony to deliver a taste experience that’s both familiar and refreshingly new. The combination of cayenne pepper with the sweetness of maple syrup creates a caramelized, sticky finish that clings to the vegetables, offering a delightful crunch with every bite. The goat cheese drizzle, infused with fresh thyme and chives, provides an herbaceous, creamy counterpoint that balances the heat, making this dish a must-try for those eager to embrace the flavors of fall.

    Flavor Profile

    The Spicy Maple-Roasted Autumn Vegetables with Herbed Goat Cheese Drizzle is a flavor journey that begins with the initial hit of spicy heat, courtesy of the cayenne pepper, followed by the comforting sweetness of maple syrup. As you savor each bite, the creaminess of the goat cheese drizzle melts into the earthy tones of the roasted vegetables, enhanced by the aromatic notes of fresh thyme and chives. This dish is a delightful dance of sweet, spicy, and creamy, with a peppery, herbaceous finish that lingers on your palate — a true celebration of autumn’s bounty.

    Ingredients

    • 1 medium butternut squash, peeled and cut into bite-sized pieces
    • 3 medium beet roots, peeled and cut into bite-sized pieces
    • 4 medium potatoes, cut into bite-sized pieces (peeling optional)
    • 3 tablespoons olive oil
    • 1 tablespoon paprika
    • 1 teaspoon dried basil
    • Salt and pepper to taste
    • **1/4 cup maple syrup**
    • **1/2 teaspoon cayenne pepper**
    • **1/2 cup crumbled goat cheese**
    • **1 tablespoon fresh thyme, chopped**
    • **1 tablespoon fresh chives, chopped**

    Instructions

    1. Preheat your oven to 200 degrees Celsius (fan: 180 degrees Celsius) to ensure an even roast.
    2. In a large bowl, toss the butternut squash, beet roots, and potatoes with olive oil, paprika, dried basil, salt, and pepper until every piece is well-coated.
    3. Add the maple syrup and cayenne pepper to the bowl, mixing until the vegetables are covered in a sticky, spicy glaze.
    4. Spread the glazed vegetables in a single layer on a large baking tray, ensuring even cooking. Bake in the preheated oven for 30 minutes, or until the vegetables are golden-brown and tender but still have a slight bite.
    5. While the vegetables roast, blend the crumbled goat cheese with fresh thyme and chives in a small bowl until smooth and creamy.
    6. Once the vegetables are done, drizzle the herbed goat cheese over them while still warm. Serve immediately for the best texture and flavor.

    Pro Tips from Meaghan’s Kitchen

    • Always preheat your oven fully before roasting to ensure the vegetables cook evenly and achieve that perfect golden-brown finish.
    • When cutting your vegetables, aim for uniform sizes to guarantee even cooking. Smaller pieces tend to crisp up more, adding a delightful texture contrast.
    • For an extra crispy finish, don’t overcrowd your baking tray. A single layer of vegetables is key to achieving the right texture.
    • Adjust the cayenne pepper to suit your spice preference. A little goes a long way, so start small and increase if you enjoy more heat.
    • Save time by preparing the goat cheese drizzle ahead of time and storing it in the fridge until ready to use. Just give it a good stir before serving.

    Variations & Dietary Swaps

    • **Vegetarian version**: Swap the goat cheese for a plant-based cheese alternative to make this dish suitable for vegans.
    • **Spice-it-up version**: Add a pinch of smoked paprika to the glaze for an extra layer of smoky flavor.
    • **Kids-friendly version**: Reduce the cayenne pepper and serve the goat cheese drizzle on the side, allowing kids to add as much or as little as they like.

    What to Serve With It

    This dish pairs beautifully with a chilled glass of Riesling, whose crispness complements the sweetness of the maple syrup. For a heartier meal, serve it alongside warm rosemary focaccia to sop up every last bit of the creamy goat cheese drizzle. Alternatively, a simple green salad with a light lemon vinaigrette can provide a refreshing counterbalance to the rich flavors.

    Storage & Meal Prep

    Store any leftovers in an airtight container in the fridge for up to three days. To reheat, spread the vegetables on a baking tray and warm in a preheated oven at 180 degrees Celsius for 10-12 minutes. The goat cheese drizzle should be added fresh each time for the best texture. This dish is not suitable for freezing, as the texture of the vegetables can become soggy upon thawing.

    FAQ

    Can I use different vegetables?

    Absolutely! Feel free to substitute or add other root vegetables like sweet potatoes or parsnips for a unique twist.

    How can I make the dish less spicy?

    Simply reduce or omit the cayenne pepper in the glaze. The maple syrup will still provide a lovely sweetness.

    Is there a substitute for goat cheese?

    If you’re not a fan of goat cheese, try using feta or ricotta for a different creamy element.

    Can I prepare this dish in advance?

    The vegetables can be prepped and glazed ahead of time, but for the best taste and texture, roast them just before serving.

    What if I don’t have fresh herbs?

    Dried herbs can be used in a pinch, but remember they are more concentrated, so use about a third of the amount specified for fresh herbs.

    Final Thoughts

    Spicy Maple-Roasted Autumn Vegetables with Herbed Goat Cheese Drizzle is more than just a dish; it’s an invitation to savor the flavors of the season with loved ones. Whether you’re gathering around the table for a family dinner or hosting friends for a festive feast, this recipe is sure to impress and delight. I can’t wait for you to try it out and make it your own. Don’t forget to leave a comment below sharing your experience or any creative variations you came up with. Happy cooking, my friends!

    Related update: Spicy Maple-Roasted Autumn Vegetables with Herbed Goat Cheese Drizzle

    Related update: Ginger-Sesame Baby Bok Choy Stir Fry with Toasted Almonds

  • Spiced Maple Carrot Cake with Ginger Cream Cheese Frosting | Made by Meaghan Moineau

    Spiced Maple Carrot Cake with Ginger Cream Cheese Frosting | Made by Meaghan Moineau

    Spiced Maple Carrot Cake with Ginger Cream Cheese Frosting

    Picture this: the aroma of spices wafting through your kitchen, the comforting sizzle of butter in a hot pan, and the warm embrace of a freshly baked carrot cake as it cools on the counter. This isn’t just any carrot cake; it’s a fall-inspired masterpiece that combines the earthy sweetness of pure maple syrup with the zing of crystallized ginger. Welcome to a dessert experience that wraps you in cozy feelings and whispers, “stay a while.”

    Personal Story

    Carrot cake holds a special place in my heart. Growing up, it was a staple at family gatherings, a dessert that signaled celebration and togetherness. My grandmother, a woman with a knack for transforming simple ingredients into something magical, would always make her version — moist, cinnamon-laden, and topped with rich cream cheese frosting. I remember standing on a stool beside her, eager to lick the frosting bowl clean while she patiently grated carrots, telling stories of her own childhood.

    Years later, when I found myself in my own kitchen, I realized I wanted to honor her tradition while adding a twist that spoke to my personal culinary journey. It was a chilly autumn afternoon, the kind where leaves dance in the wind, and I was craving something that embodied the season. As I reached for the maple syrup and spotted a jar of crystallized ginger in the pantry, inspiration struck.

    My first attempt was a bit of an experiment — would the spices overpower the cake? Would the ginger be too bold? I held my breath as the cake baked, filling my apartment with an intoxicating scent that promised deliciousness. As soon as it cooled, I iced it with a ginger cream cheese frosting, took a bite, and was transported. The flavors melded beautifully, creating a dessert that wasn’t just about nostalgia but also about embracing new traditions.

    Now, this Spiced Maple Carrot Cake with Ginger Cream Cheese Frosting has become a new family favorite. It’s the cake I bring to gatherings, the one that gets requested by friends who dub it “that unforgettable carrot cake.” It’s my homage to both the past and the present, a dish that bridges generations and seasons in one swoon-worthy bite.

    What Makes This Version Special

    What sets this carrot cake apart from the classic version is the addition of pure maple syrup and crystallized ginger. The syrup introduces a deep, aromatic sweetness that complements the natural sugars of the carrots beautifully. At the same time, the crystallized ginger provides a spicy kick, adding an unexpected twist that elevates the cake from an everyday dessert to a fall-inspired delight.

    The magic doesn’t stop there. By blooming the ground cinnamon, nutmeg, and cloves in butter before adding them to the batter, we unlock their full potential, allowing the spices to infuse every bite with warmth and complexity. This technique brings out the best in each spice, creating a symphony of flavors that dance on your tongue.

    Flavor Profile

    Imagine a warm, aromatic cake with a sweet maple undertone that gently cradles your taste buds, followed by a spicy ginger kick that surprises and delights. The toasted pecans add a nutty crunch, while the fresh orange zest subtly brightens the entire flavor profile. With each bite, you’re taken on a journey — from the comforting familiarity of carrot cake to the exciting depths of its spiced maple evolution.

    Ingredients

    • 2 cups white whole wheat flour
    • 2 teaspoons baking powder
    • 1 teaspoon baking soda
    • 1 teaspoon salt
    • 1 cup granulated sugar
    • 1 cup **brown sugar**
    • 3/4 cup canola oil
    • 1/4 cup **pure maple syrup**
    • 4 large eggs
    • 2 cups grated carrots
    • 1/2 cup finely chopped **crystallized ginger**
    • 1/2 cup **toasted pecans**, chopped
    • 1 teaspoon vanilla extract
    • 1 teaspoon ground cinnamon
    • 1/2 teaspoon ground nutmeg
    • 1/4 teaspoon ground cloves
    • 1 tablespoon butter
    • Zest of 1 orange
    • For the frosting:
    • 1/2 cup butter, softened
    • 8 oz **low fat cream cheese**, softened
    • 4 cups icing sugar
    • 1 teaspoon vanilla extract
    • **Crystallized ginger**, for garnish

    Instructions

    1. Preheat your oven to 350°F (180°C). Grease two 9-inch (23cm) cake pans and line the bottoms with parchment paper.
    2. In a small saucepan, melt the butter over medium heat. Add the ground cinnamon, nutmeg, and cloves. Stir continuously for about 2 minutes until spices are fragrant and the mixture is a beautiful golden-brown. Set aside to cool slightly.
    3. In a large mixing bowl, beat the canola oil, granulated sugar, and brown sugar together until well combined and slightly fluffy.
    4. Beat in the maple syrup and vanilla extract.
    5. Add the eggs one at a time, beating well after each addition until the mixture is smooth and glossy.
    6. In another large bowl, whisk together the flour, baking powder, baking soda, and salt.
    7. Slowly add the dry ingredients to the wet ingredients, mixing just until combined. Be careful not to overmix.
    8. Gently fold in the grated carrots, crystallized ginger, toasted pecans, and orange zest, ensuring they are evenly distributed throughout the batter.
    9. Divide the batter evenly between the prepared cake pans, smoothing the tops with a spatula.
    10. Bake in the preheated oven for 25 to 30 minutes, or until a toothpick inserted in the center comes out clean. The tops should be a lovely golden-brown.
    11. Allow the cakes to cool in the pans for about 20 minutes before transferring them to a wire cooling rack to cool completely.
    12. For the frosting, beat the softened butter and cream cheese together in a medium bowl until smooth and creamy.
    13. Gradually add the icing sugar, one cup at a time, beating well after each addition. Add the vanilla extract and continue to beat until the frosting is fluffy and light. If needed, add a little milk to achieve your desired consistency.
    14. Place one cake layer on a serving dish and spread with a generous layer of frosting. Top with the second cake layer and cover the top and sides with the remaining frosting.
    15. Decorate with extra crystallized ginger and toasted pecans for a delightful finish.

    Pro Tips from Meaghan’s Kitchen

    • Grate your carrots fresh for the best texture and moisture. Pre-packaged grated carrots are often too dry.
    • To prevent your cake from sticking, make sure your cake pans are well-greased and lined with parchment paper.
    • For a smoother frosting, ensure both your cream cheese and butter are at room temperature before mixing.
    • If your cake domes in the middle, use a serrated knife to gently level it before frosting for a more professional-looking finish.
    • Let the flavors meld by storing the cake in the fridge overnight before serving. This also makes the cake easier to slice.

    Variations & Dietary Swaps

    • Vegetarian Swap: Use a flax egg (1 tablespoon flaxseed meal + 2.5 tablespoons water) to replace each egg for a vegetarian-friendly cake.
    • Spice-it-up Version: Add a pinch of cayenne pepper to the spice mix for a subtle heat that pairs beautifully with the sweet elements.
    • Kids-Friendly Version: Omit the ginger for a milder cake that’s more appealing to young palates. Add mini chocolate chips for a fun twist!

    What to Serve With It

    This Spiced Maple Carrot Cake shines when paired with a cup of spiced chai tea, which complements its aromatic profile. If you’re in the mood for something a bit more indulgent, a glass of sweet Riesling is a perfect match, enhancing the cake’s sweet and spicy notes with its own fruity undertones.

    Storage & Meal Prep

    Store any leftover cake in an airtight container in the refrigerator for up to 5 days. If you want to save some for later, wrap individual slices in plastic wrap and store in a freezer bag for up to 3 months. To enjoy, defrost slices in the refrigerator overnight, then let sit at room temperature for about 30 minutes before serving for optimal flavor and texture.

    FAQ

    Can I use all-purpose flour instead of white whole wheat flour?

    Yes, you can substitute all-purpose flour for white whole wheat flour in this recipe. The texture will be a bit lighter, but the flavor will remain delicious.

    What can I use instead of crystallized ginger if I don’t have any?

    If you’re out of crystallized ginger, feel free to use fresh grated ginger or ground ginger. Start with a smaller amount and adjust to taste.

    How can I make this cake more moist?

    This cake is already quite moist, thanks to the oil and freshly grated carrots. However, you can add a tablespoon of Greek yogurt or applesauce to the batter for extra moisture.

    Is it necessary to toast the pecans?

    Toasting the pecans enhances their flavor and adds a delightful crunch. While it’s not necessary, it’s highly recommended for the best taste experience.

    Can I make this cake in advance?

    Absolutely! This cake actually tastes even better the next day as the flavors meld together. Just be sure to store it properly in the fridge.

    Final Thoughts

    There you have it — a Spiced Maple Carrot Cake with Ginger Cream Cheese Frosting that’s sure to become a new favorite in your recipe collection. It’s a cake that celebrates tradition while embracing new flavors, making it the perfect dessert for any occasion. I’d love to hear how this recipe turns out for you, so feel free to leave a comment below or share your cake creations with me on social media. Happy baking, and may your kitchen be filled with warmth and joy!

    Related update: Spiced Maple Carrot Cake with Ginger Cream Cheese Frosting

    Related update: Mediterranean Citrus-Infused Semolina Cake with Spiced Honey Nuts

  • Maple-Glazed Bacon Wrapped Gouda-Stuffed Chicken Breast | Made by Meaghan Moineau

    Maple-Glazed Bacon Wrapped Gouda-Stuffed Chicken Breast | Made by Meaghan Moineau

    Maple-Glazed Bacon Wrapped Gouda-Stuffed Chicken Breast

    Imagine the aroma wafting through your kitchen: sizzling bacon intertwined with the sweetness of maple syrup, wrapped around a succulent chicken breast slowly oozing rich, creamy Gouda. This is not just a meal; it’s a culinary experience that turns any ordinary evening into a gourmet delight.

    My love affair with this dish began on a chilly autumn day. I was hosting my first-ever Friendsgiving and wanted to impress without straying too far from classic comforts. The idea of wrapping chicken in bacon was inspired by a family barbecue, where my uncle would always toss bacon-wrapped hot dogs onto the grill. They were a simple hit, but I knew there was a way to elevate that concept into something truly memorable.

    In my tiny, bustling kitchen, I experimented with flavors, textures, and techniques. The kitchen was alive with chatter and laughter, while the smell of maple-glazed bacon filled the air. At that moment, I knew I had stumbled upon something special. The final dish was met with “oohs” and “aahs” as the savory, smoky, and sweet flavors melded together beautifully.

    There was a mishap or two—like the time I tried to cook the bacon-wrapped chicken entirely on the stovetop, only to end up with a smoky kitchen and undercooked chicken. But every mistake was a lesson, bringing me closer to the perfect Maple-Glazed Bacon Wrapped Gouda-Stuffed Chicken Breast recipe that I am proud to share with you today.

    What Makes This Version Special

    This isn’t your everyday bacon-wrapped chicken. What sets this version apart is the addition of creamy Gouda cheese inside the chicken breast, which melts beautifully as it cooks. The Gouda introduces a sophistication with its nutty, slightly sweet profile that perfectly complements the other flavors. The real star, however, is the maple glaze. By brushing the chicken with a mix of maple syrup and Dijon mustard before wrapping it in bacon, we create a sweet and tangy glaze that caramelizes the bacon to golden perfection. This recipe elevates the classic dish to gourmet heights, making it ideal for special occasions or when you simply want to impress.

    Flavor Profile

    Prepare your taste buds for a delightful journey of sweet, smoky, and savory flavors. The creamy, melted Gouda provides a luscious texture, while the bacon offers a crispy, smoky contrast. A hint of herbaceous thyme rounds out the flavors, adding a subtle freshness that ties everything together. Each bite is an explosion of taste, making this dish a standout on any table.

    Ingredients

    • 4 skinless, boneless chicken breasts
    • 8 slices smoked Wright Brand Hickory Bacon
    • 4 slices **Gouda cheese**
    • 2 tablespoons **maple syrup**
    • 1 tablespoon Dijon mustard
    • 1 teaspoon fresh thyme leaves
    • Salt and pepper to taste

    Instructions

    1. Preheat your oven to 375°F (190°C). Clean and thoroughly dry the chicken breasts. Drying the chicken makes slicing easier and helps the bacon crisp up.
    2. Slice each chicken breast lengthwise to create a pocket, being careful not to cut all the way through. Stuff each pocket with a slice of Gouda cheese and a sprinkle of fresh thyme.
    3. Season the outside of the chicken breasts with salt and pepper.
    4. In a small bowl, mix together the maple syrup and Dijon mustard. Brush this mixture generously over each chicken breast.
    5. Carefully wrap each stuffed chicken breast with two slices of bacon, overlapping the edges as you wrap to secure the filling inside.
    6. Heat a large oven-safe skillet over medium-high heat. Sear the wrapped chicken breasts on all sides until the bacon is caramelized and golden-brown, about 3-4 minutes per side.
    7. Transfer the skillet to the preheated oven and bake for 25-30 minutes, or until the chicken is cooked through and reaches an internal temperature of 165°F (74°C).
    8. Remove from the oven and let the chicken rest for 5 minutes before slicing. This ensures the juices redistribute evenly.
    9. Serve warm with your favorite sides.

    Pro Tips from Meaghan’s Kitchen

    • Use a Meat Thermometer: Ensure perfectly cooked chicken by using a meat thermometer to check for a safe internal temperature of 165°F.
    • Let Gouda Shine: Opt for high-quality Gouda for maximum flavor impact. Smoked Gouda can add an extra layer of smokiness if you’re feeling adventurous.
    • Bacon Choice Matters: Thick-cut bacon works best for wrapping as it holds up well during cooking and crisps nicely.
    • Secure with Toothpicks: If your bacon seems to be slipping, use toothpicks to secure it in place during cooking—just remember to remove them before serving!
    • Sauce It Up: For a finishing touch, drizzle a little extra maple-Dijon glaze over the cooked chicken before serving.

    Variations & Dietary Swaps

    • Vegetarian Swap: Replace the chicken with thick slices of portobello mushrooms. Use a plant-based bacon alternative and vegan cheese for a delicious vegetarian option.
    • Spice-It-Up Version: Add a teaspoon of cayenne pepper to the maple-Dijon glaze for a spicy kick that contrasts beautifully with the sweetness.
    • Kids-Friendly Version: Use cheddar cheese instead of Gouda and skip the thyme for a milder, more kid-friendly flavor profile.

    What to Serve With It

    This Maple-Glazed Bacon Wrapped Gouda-Stuffed Chicken Breast pairs beautifully with a chilled glass of Riesling, which balances the sweetness and richness of the dish. For sides, consider roasted sweet potatoes or a fresh, zesty arugula salad to add a refreshing contrast.

    Storage & Meal Prep

    Store any leftover chicken in an airtight container in the refrigerator for up to 3 days. To freeze, wrap each cooked chicken breast tightly in plastic wrap and place in a freezer-safe bag for up to 2 months. Reheat in a 350°F oven until warmed through, about 15-20 minutes, ensuring the bacon remains crispy.

    FAQ

    Can I prepare this dish ahead of time?

    Yes! You can assemble the chicken breasts a day in advance and store them in the fridge. Sear and bake them just before you’re ready to serve.

    What if I don’t have an oven-safe skillet?

    After searing, transfer the wrapped chicken breasts to a baking dish or sheet before placing them in the oven.

    How do I prevent the cheese from leaking out?

    Be sure to seal the edges of the chicken well and secure the bacon tightly. A toothpick can also help hold everything together during cooking.

    What other cheeses can I use?

    If Gouda isn’t your style, you can try cheeses like mozzarella, cheddar, or even a spicy pepper jack for a different flavor profile.

    Can I use turkey bacon instead?

    Absolutely! Turkey bacon is a leaner option and will work well, though it may not crisp up as much as pork bacon.

    Final Thoughts

    Bringing this Maple-Glazed Bacon Wrapped Gouda-Stuffed Chicken Breast to your table is like sharing a piece of my kitchen with you. Whether you’re making this for a special occasion or simply to treat yourself on a Tuesday night, I hope you find as much joy in cooking and serving this dish as I have. Don’t forget to share your experience with me in the comments — I’d love to hear how your culinary adventure turns out!

    Related update: Maple-Glazed Bacon Wrapped Gouda-Stuffed Chicken Breast

    Related update: Sumptuous Mediterranean Moussaka with Pistachio-Crusted Eggplants

  • Spiced Apple Cider Brioche with Maple-Cinnamon Glaze | Made by Meaghan Moineau

    Spiced Apple Cider Brioche with Maple-Cinnamon Glaze | Made by Meaghan Moineau

    Spiced Apple Cider Brioche with Maple-Cinnamon Glaze

    Picture a chilly autumn morning, leaves crunching underfoot, and the air filled with the sweet, spicy aroma of apple cider. Now imagine that fragrance is wafting from your own kitchen as you pull a loaf of Spiced Apple Cider Brioche with Maple-Cinnamon Glaze out of the oven. It’s a sensory delight that wraps you in a warm culinary hug.

    Personal Story

    I still remember the first time I tried to make brioche. My kitchen looked like a flour bomb had gone off, and let’s just say I underestimated the power of yeast. But, like with most of my culinary adventures, it was a learning experience, and eventually, I got the hang of it. That initial attempt, albeit messy, was the springboard for my now beloved Spiced Apple Cider Brioche.

    The inspiration for this recipe came from an autumn visit to an apple orchard. Surrounded by trees heavy with ripe fruit, I sipped on warm cider and knew I needed to capture that essence in a bake. This brioche became my ode to autumn — the perfect blend of cozy spices and the natural sweetness of apples.

    One memorable evening, as the sun set and the kitchen filled with the scent of baking dough and bubbling apples, I knew this recipe was something special. Friends gathered around the table, tearing pieces of the fluffy brioche, still warm from the oven, and dipping them in extra glaze. The room was filled with laughter and full bellies — the true measure of a successful dish.

    From that day on, Spiced Apple Cider Brioche has been a staple in my recipe collection, a reminder of crisp autumn days and the joy of sharing delicious food with loved ones.

    What Makes This Version Special

    What sets this Spiced Apple Cider Brioche apart from your standard brioche recipe is the infusion of warm spices and a touch of autumn. By incorporating ground nutmeg into the dough, you elevate the flavor profile, adding depth and warmth. But the real pièce de résistance is the luxurious maple-cinnamon glaze. Brushed on while the brioche is still warm, it creates a glossy, sweet finish that perfectly complements the spiced dough. This glaze doesn’t just add flavor; it adds a visual allure that makes the brioche look as irresistible as it tastes.

    Flavor Profile

    Biting into this brioche is like a journey through an autumn landscape. The first taste is all about the buttery, tender crumb, laced with the subtle warmth of cinnamon and nutmeg. As you continue, the rich maple sweetness of the glaze comes through, harmonizing beautifully with the soft spiced dough. Each bite offers a hint of tart apple that cuts through the richness, making it a symphony of flavors dancing on your palate.

    Ingredients

    • 3/4 cup warm water
    • 1/4 cup vegetable oil
    • 1/4 cup **runny honey**
    • 2 1/4 teaspoons dried/instant yeast
    • 3 1/2 cups flour
    • 1 teaspoon salt
    • 2 large eggs
    • 1/2 cup **apple cider**
    • 1/2 teaspoon ground nutmeg
    • 1 teaspoon ground cinnamon
    • 1 tablespoon **orange zest**
    • 1 teaspoon vanilla extract
    • 1/2 cup **maple syrup**
    • 2 tablespoons butter, melted
    • 1 cup diced **apples**
    • 1/4 cup sugar
    • 1 cup powdered sugar

    Instructions

    1. Mix the warm (not hot) water with the vegetable oil, runny honey, and yeast. Allow it to foam for 10 minutes.
    2. Meanwhile, bloom the ground cinnamon and nutmeg by melting the butter in a small pan and stirring in the spices. This will deepen their flavor.
    3. Add the foamy yeast mixture, flour, salt, eggs, apple cider, orange zest, and vanilla extract to a large bowl. Stir in the butter-spice mixture.
    4. Mix and knead the dough using a mixer with a bread hook, or by hand, until you have a soft, smooth, and elastic dough (about 8-10 minutes).
    5. Place the dough in an oiled bowl and let it rise, covered, for about 2 hours or until it’s puffy and nearly doubled in size.
    6. While the dough rises, toss the apple chunks with sugar and cinnamon.
    7. Gently deflate the dough, transfer it to a lightly greased work surface, and flatten it into a rough rectangle, about 8 x 10 inches.
    8. Spread half the apple chunks in the center of the dough. Fold a short edge of the dough over the apples, patting firmly to seal them. Spread the remaining apples on top and fold the other side over, sealing well.
    9. Cut the apple-filled dough into 16 pieces, arranging them in a greased 9-inch round cake pan.
    10. Cover the pan with lightly greased plastic wrap or a damp towel and let it rise for about 1-1 1/2 hours, until it’s a generous 2 inches high.
    11. Preheat the oven to 325°F. Bake the brioche in the lower third of the oven for 55 minutes, or until the top is at least light golden brown all over.
    12. Remove from the oven and let cool for 5 minutes. Loosen the edges and carefully transfer to a rack.
    13. Whisk together the maple syrup and powdered sugar. Brush the warm glaze over the brioche, allowing it to drizzle down the sides for a glossy finish.

    Pro Tips from Meaghan’s Kitchen

    • Make sure your yeast is fresh; if it’s not foaming after 10 minutes, start again with a new batch.
    • Blooming spices in butter enhances their natural oils, giving the brioche a more aromatic flavor.
    • Don’t skip the resting period; it’s crucial for developing the dough’s gluten structure.
    • If the top is browning too quickly, tent it with foil during the last 15 minutes of baking.
    • For a slightly sweeter dough, add an extra tablespoon of honey.

    Variations & Dietary Swaps

    Looking to mix things up? Try these variations:

    • Vegetarian Swap: Substitute the honey with agave syrup to make it vegan-friendly.
    • Spice-It-Up Version: Add a pinch of cayenne pepper to the glaze for a subtle kick.
    • Kids-Friendly Version: Leave out the nutmeg and opt for a chocolate glaze instead of maple.

    What to Serve With It

    This brioche is a treat on its own, but if you want to elevate your experience, pair it with a warm mug of chai tea or a creamy vanilla latte. The spices in the chai will complement the brioche beautifully, while the smoothness of a latte will balance the sweetness of the glaze.

    Storage & Meal Prep

    To store, wrap the brioche tightly in plastic wrap and keep it at room temperature for up to 3 days. For longer storage, wrap it in aluminum foil and freeze for up to 2 months. To reheat, thaw at room temperature and warm in a 300°F oven for 10 minutes.

    FAQ

    Can I make this dough ahead of time?

    Yes! You can prepare the dough, let it rise once, then punch it down and refrigerate overnight. Bring it back to room temperature before the second rise.

    What type of apples work best?

    Granny Smith apples are great for their tartness, but you can also use Honeycrisp or Fuji for a sweeter touch.

    How do I know if my dough has risen enough?

    The dough should be puffy and nearly doubled in size. If you gently press it with a finger, the indentation should slowly spring back.

    Why is my glaze not sticking?

    Ensure the brioche is still warm when you brush on the glaze, as this helps it adhere better and creates a glossy finish.

    Can I use whole wheat flour?

    You can replace up to half of the all-purpose flour with whole wheat, but the texture will be denser.

    Final Thoughts

    There you have it — your very own Spiced Apple Cider Brioche with Maple-Cinnamon Glaze, a delightful autumnal treat that’s sure to impress. I hope you enjoy making and sharing this recipe as much as I do. Don’t forget to leave a comment below with your thoughts or share your own variations. Happy baking!

    Related update: Spiced Apple Cider Brioche with Maple-Cinnamon Glaze

    Related update: Meyer Lemon Ricotta Pancakes with Vanilla-Infused Blackberry-Cardamom Compote

  • Spicy Maple Andouille Sausage and Sweet Potato Hash | Made by Meaghan Moineau

    Spicy Maple Andouille Sausage and Sweet Potato Hash | Made by Meaghan Moineau

    Spicy Maple Andouille Sausage and Sweet Potato Hash

    Imagine the sizzle of sausage as it hits a hot pan, mingling with the sweet aroma of caramelized onions and the earthy scent of roasting sweet potatoes. Each bite is a delightful dance of sweet, smoky, and spicy flavors, a cozy culinary hug perfect for any meal of the day. Welcome to Spicy Maple Andouille Sausage and Sweet Potato Hash — a dish that turns any breakfast, brunch, or dinner into a flavor adventure.

    Personal Story

    There’s something about the humble hash that takes me straight back to lazy Sunday mornings in my grandmother’s kitchen. As a child, I remember waking up to the smells of sizzling sausage and sweet onions, drifting into the dining room like an aromatic alarm clock. My grandmother, with her flour-dusted apron and ever-present wooden spoon, would hum to herself as she worked, adding a dash of this or a sprinkle of that, creating magic from simple ingredients.

    One particularly rainy Sunday, the cupboard was bare of regular potatoes, and we were left with only sweet potatoes. My grandmother, never one to be deterred by minor setbacks, decided to improvise. A little spicy, a little sweet, and suddenly our beloved breakfast took on a new life. The sweet potatoes added a depth and warmth to the dish that paired beautifully with the smoky sausage.

    Years later, inspired by her creativity, I decided to take her idea and run with it. I added a spicy maple glaze to the mix, giving the dish a sweet heat that complements the smoky andouille sausage and sweet potatoes. This unique twist has made this hash a go-to favorite in my home — a testament to my grandmother’s legacy of culinary ingenuity and resourcefulness.

    What Makes This Version Special

    This version of the classic hash stands out with its bold use of sweet potatoes instead of the traditional yukon golds, adding natural sweetness and a beautiful color contrast. But the real secret weapon here is the spicy maple glaze. By reducing maple syrup with smoked paprika and cayenne, you get a glaze that envelops the roasted ingredients in a sweet, smoky heat, perfectly balancing the savory andouille sausage.

    The combination of sweet and spicy, with the rich, smoky undertones of the sausage, elevates this dish beyond a simple hash. It’s an unforgettable ensemble of flavors that brings comfort and excitement to the table, making it perfect for both special occasions and everyday meals.

    Flavor Profile

    Biting into this hash is an experience of contrasts and harmony. The sweet potatoes bring a soft, earthy sweetness that is beautifully contrasted by the smoky, robust flavor of the andouille sausage. Meanwhile, the spicy maple glaze adds a layer of complexity, delivering a gentle heat that lingers pleasantly on the palate. The caramelized onions and roasted peppers add a sweetness and aroma that rounds out the dish, while fresh thyme and scallions provide a burst of herbal freshness in every bite.

    Ingredients

    • 1 large Yukon Gold potato, diced
    • 1 large sweet potato, diced
    • 1 red bell pepper, diced
    • 1 yellow bell pepper, diced
    • 1 large red onion, sliced
    • 8 oz smoked pork andouille sausage, sliced
    • 2 teaspoons canola oil
    • 1 teaspoon garlic salt
    • 1/4 teaspoon cayenne pepper
    • 2 tablespoons maple syrup
    • 1 teaspoon smoked paprika
    • 1 tablespoon fresh thyme, chopped
    • 2 scallions, finely chopped, for garnish

    Instructions

    1. Preheat your oven to 425°F (220°C). This high heat is crucial for ensuring the potatoes and peppers develop a lovely golden-brown crispness.
    2. In a large mixing bowl, toss the diced Yukon Gold potato, sweet potato, red bell pepper, yellow bell pepper, and sliced red onion with 1 teaspoon of canola oil. Spread this mixture evenly onto a baking sheet. Sprinkle with garlic salt and a dash of black pepper for seasoning.
    3. Roast in the preheated oven for 10 minutes. This initial roasting helps the vegetables start to caramelize, enhancing their natural sweetness.
    4. While the vegetables are roasting, create the spicy maple glaze. In a small saucepan over medium heat, combine the maple syrup, smoked paprika, and cayenne pepper. Stir frequently, allowing the mixture to reduce slightly, about 5 minutes, until it thickens.
    5. Remove the baking sheet from the oven and add the sliced andouille sausage. Toss everything together, ensuring the sausage is evenly distributed amongst the vegetables. Return to the oven and roast for an additional 10 minutes, or until the sausage is cooked through and the potatoes are fork-tender.
    6. Remove the pan from the oven and drizzle the spicy maple glaze over the roasted hash, tossing to coat all the pieces evenly. This will add a beautiful glossy finish and infuse every bite with flavor.
    7. Sprinkle with fresh thyme and garnish with finely chopped scallions for a pop of green and a touch of freshness. Serve immediately and enjoy the symphony of flavors!

    Pro Tips from Meaghan’s Kitchen

    • Caramelization is Key: Don’t rush the initial roasting. Allowing the vegetables to develop a deep golden-brown color brings out their natural sweetness and adds depth to the hash.
    • Balance the Heat: If you’re sensitive to spice, reduce the cayenne pepper in the glaze. You can always add more to taste after serving.
    • Prep Ahead: Chop all your veggies the night before and store them in airtight containers. This makes the morning prep a breeze!
    • Get Creative with Sausage: If you can’t find andouille, try using chorizo for a similar smoky flavor, or go for a milder sausage if you’re serving a crowd with varied tastes.
    • Use a Heavy Baking Sheet: A sturdy sheet pan ensures even roasting and prevents burning, especially at high temperatures.

    Variations & Dietary Swaps

    • Vegetarian Version: Swap the sausage for a plant-based alternative or roasted chickpeas. The hash remains just as satisfying and flavorful.
    • Spice-It-Up: Add a few dashes of hot sauce right before serving for those who crave extra heat.
    • Kids-Friendly Option: Tone down the spice by omitting the cayenne pepper and smoked paprika, and add a little more maple syrup for sweetness.

    What to Serve With It

    This spicy maple andouille sausage and sweet potato hash pairs beautifully with a crisp apple cider or a cold wheat beer, enhancing the dish’s sweet and smoky notes. For a lighter option, serve with a simple green salad dressed in lemon vinaigrette, or with a side of fluffy scrambled eggs for a complete breakfast spread.

    Storage & Meal Prep

    Store any leftovers in an airtight container in the fridge for up to three days. To reheat, spread the hash on a baking sheet and warm in a preheated oven at 350°F (175°C) until heated through, about 10-15 minutes. To freeze, portion the hash into freezer-safe bags, removing as much air as possible, and freeze for up to two months. Thaw in the refrigerator overnight before reheating.

    FAQ

    Can I make this dish ahead of time?

    Absolutely! You can prepare the vegetables and sausage a day in advance and store them separately in the fridge. Then, assemble and roast on the day you’re serving it. The glaze can also be made ahead and stored in the refrigerator.

    Is there a vegetarian substitute for andouille sausage?

    Yes, there are many plant-based sausages available that mimic the smoky flavor of andouille. Alternatively, roasted chickpeas can add a nice texture and protein to the dish.

    What’s the best way to get the potatoes crispy?

    Ensure your oven is fully preheated before roasting, and don’t overcrowd the baking sheet. This allows the potatoes to roast rather than steam, leading to a crisper texture.

    Can I use different types of peppers?

    Definitely! Feel free to use any combination of bell peppers you have on hand. Green bell peppers will add a slightly more bitter note, while orange or yellow ones will keep the dish sweet.

    How do I adjust the spice level?

    To make it less spicy, reduce or omit the cayenne pepper in the glaze. If you want to increase the heat, add more cayenne or even a pinch of red pepper flakes.

    Final Thoughts

    This Spicy Maple Andouille Sausage and Sweet Potato Hash is more than just a meal — it’s a celebration of flavors that come together in perfect harmony. Whether you’re making it for a weekend brunch or a cozy dinner, this dish is sure to impress and satisfy. I’d love to hear how it turned out for you! Feel free to leave a comment below or share your version on social media. Remember, the best meals are the ones shared with those we love. Happy cooking!

    Related update: Spicy Maple Andouille Sausage and Sweet Potato Hash

    Related update: Truffle-Infused Macaroni and Cheese with Crispy Pancetta Crumble

    Related update: Spiced Apple Cider Brioche with Maple-Cinnamon Glaze

  • Maple Pecan Honey Cornbread with Orange Zest | Made by Meaghan Moineau

    Maple Pecan Honey Cornbread with Orange Zest | Made by Meaghan Moineau

    Maple Pecan Honey Cornbread with Orange Zest

    Imagine this: the golden crust of a freshly baked cornbread, still warm from the oven, with a sweet aroma that dances through your kitchen. A slice reveals a moist, sun-kissed interior dotted with crunchy pecans and hints of bright orange zest. This is not your grandmother’s cornbread — it’s something a little more magical.

    My Love Affair with Cornbread

    Growing up in the South, cornbread was more than just a side dish; it was a family staple, gracing our table during Sunday dinners, holiday feasts, and even simple weekday suppers. My earliest memory of this comforting dish is watching my grandmother expertly mix cornmeal and buttermilk in her old ceramic bowl, a routine she had perfected over decades. I vividly remember the scent of it baking, mingling with the savory tang of collard greens or the rich aroma of a beef stew.

    However, my journey to crafting the perfect cornbread was not without its hiccups. I recall a particularly chaotic Thanksgiving where, in my excitement to impress the family with my own take on the classic, I inadvertently forgot the baking powder. The result was a flat, sad disk that my family graciously ate with polite smiles. That little mishap taught me a valuable lesson about the science of baking and the importance of precision.

    Determined to redeem myself, I spent months experimenting with different ingredients and techniques, seeking to elevate the traditional recipe without losing its comforting soul. It was during a trip to a local farmer’s market that I stumbled upon fresh pecans and a basket of fragrant oranges, sparking an idea. What if I could infuse my cornbread with these vibrant flavors? Hence, the Maple Pecan Honey Cornbread with Orange Zest was born, a creation that has since become a beloved staple in my home.

    What Makes This Version Special

    This isn’t just any cornbread recipe, and here’s why: by infusing the batter with aromatic **orange zest** and crunchy **pecans**, I’ve added layers of texture and flavor that transform this humble side into a standout dish. The warm, earthy notes of **maple syrup** replace the usual vanilla, giving it a subtle sweetness that’s both comforting and sophisticated. Each element plays its part in creating a cornbread that is vibrant, complex, and utterly satisfying.

    Flavor Profile

    The Maple Pecan Honey Cornbread with Orange Zest bursts with a sweet and nutty profile, where each bite reveals a bright citrus aroma and a warm maple undertone. The cornmeal provides a heartiness, while the pecans add a delightful crunch. The orange zest weaves a thread of freshness throughout, ensuring a balanced bite that is both familiar and refreshingly new.

    Ingredients

    • 1 cup corn meal
    • 1 cup flour
    • 1 tablespoon baking powder
    • 1/2 cup white sugar
    • 1/2 teaspoon salt
    • 1/4 cup **honey**
    • 1/4 cup **maple syrup**
    • 1 large egg
    • 1 cup milk
    • 1/2 cup melted butter
    • 1 tablespoon grated **orange zest**
    • 1/2 cup chopped **pecans**

    Instructions

    1. Preheat your oven to 350°F (175°C) and grease a 9×9 inch baking pan.
    2. In a large bowl, combine the corn meal, flour, baking powder, sugar, and salt. Whisk these dry ingredients together until well mixed.
    3. In a separate bowl, whisk together the honey, maple syrup, egg, and milk. Ensure the mixture is smooth and the honey is fully integrated.
    4. Pour the wet ingredients into the dry ingredients and stir until just combined. Avoid over-mixing as this can lead to a dense cornbread.
    5. Gently fold in the melted butter, followed by the grated orange zest. Be careful to preserve the citrus aroma by folding lightly.
    6. Heat a dry skillet over medium heat and toast the pecans until they are fragrant and slightly golden, about 3-4 minutes. This step enhances their flavor and crunch.
    7. Fold the toasted pecans into the batter, distributing evenly.
    8. Pour the batter into the prepared pan and smooth the top with a spatula. Bake in the preheated oven for 25-30 minutes, or until the top is golden-brown and a toothpick inserted into the center comes out clean.
    9. Allow the cornbread to cool in the pan for at least 10 minutes before slicing. Serve warm.

    Pro Tips from Meaghan’s Kitchen

    • Use fresh orange zest for maximum flavor. Store-bought zest can sometimes be dry and lack vibrancy.
    • To ensure even mixing, bring your egg and milk to room temperature before combining with other ingredients.
    • If you prefer a slightly sweeter cornbread, try drizzling a bit of maple syrup over the top before serving.
    • For a more robust flavor, use dark maple syrup instead of the regular one.
    • Letting the cornbread cool slightly before cutting will make it easier to get clean slices.

    Variations & Dietary Swaps

    • Vegetarian Swap: Substitute the butter with a plant-based alternative like coconut oil or vegan butter for a vegetarian-friendly version.
    • Spice-It-Up Version: Add a teaspoon of cinnamon or nutmeg to the dry ingredients for a warm, spiced version.
    • Kids-Friendly Version: Reduce the orange zest to a teaspoon and add in a handful of mini chocolate chips for a sweeter, kid-approved treat.

    What to Serve With It

    Pair this Maple Pecan Honey Cornbread with a refreshing glass of iced green tea or a light citrus salad to complement its flavors. It’s also a fantastic side for hearty soups or chili, where its sweet nuttiness can shine against savory, spicy notes.

    Storage & Meal Prep

    Store any leftover cornbread in an airtight container at room temperature for up to 3 days. For longer storage, wrap individual slices in plastic wrap and place them in a zip-top freezer bag. Freeze for up to 3 months. To reheat, simply thaw at room temperature and warm in a 350°F oven for about 10 minutes.

    FAQ

    Can I use whole wheat flour instead of all-purpose flour?

    Yes, you can substitute whole wheat flour, but it may result in a denser texture. Consider using half whole wheat and half all-purpose to maintain a lighter crumb.

    How can I make this cornbread gluten-free?

    To make it gluten-free, you can use a 1:1 gluten-free baking flour blend in place of the all-purpose flour. Ensure your cornmeal is also certified gluten-free.

    What if I don’t have fresh oranges?

    If fresh oranges aren’t available, you can use store-bought orange juice and a teaspoon of orange extract as a substitute. However, fresh zest is recommended for the best flavor.

    Can I add other nuts or seeds?

    Absolutely! Feel free to swap the pecans for walnuts or even add sunflower seeds for extra crunch.

    How do I know when the cornbread is done?

    The cornbread is done when the top is golden-brown and a toothpick inserted into the center comes out clean. If the top browns too quickly, cover it with foil and continue baking.

    Final Thoughts

    There you have it, my dear kitchen adventurers, a Maple Pecan Honey Cornbread with Orange Zest that is sure to become a favorite in your baking repertoire. I hope this recipe brings warmth and joy to your table, just as it has to mine. Please feel free to leave comments about how your cornbread turned out or any tweaks you made. Sharing is caring, after all — let’s spread the cornbread love!

    Related update: Maple Pecan Honey Cornbread with Orange Zest

    Related update: Spicy Maple-Roasted Autumn Vegetables with Herbed Goat Cheese Drizzle