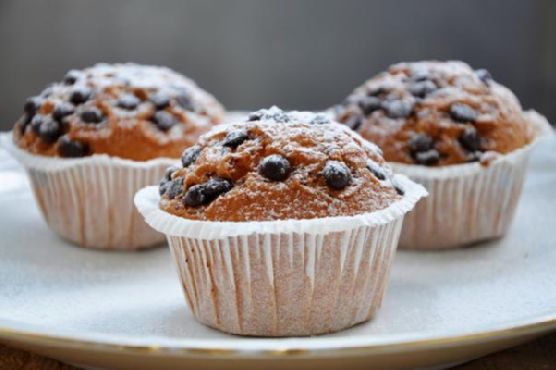
Chocolate Chip Coconut Muffins
There’s something utterly magical about the combination of chocolate and coconut. It takes me back to my childhood, where weekend mornings meant waking up to the smell of freshly baked goods. My mom would often whip up a batch of her famous muffins, the aroma wafting through the house and luring sleepy-eyed kids to the kitchen. These Chocolate Chip Coconut Muffins capture that essence perfectly, offering a delightful blend of flavors that are both comforting and indulgent.
Why You’ll Love It
These muffins are designed to be loved by everyone, from kids to adults. The combination of dark chocolate chips and coconut flakes provides a rich and decadent taste, while the coconut butter adds a moistness that can’t be beaten. They’re gluten-free, using almond milk and a delicate blend of gluten-free flour, making them suitable for those with dietary restrictions without sacrificing flavor or texture. Plus, they are surprisingly easy to whip up, making them perfect for a quick morning treat or an afternoon snack.
Ingredients
- Coconut butter
- Eggs
- Almond milk
- Vanilla extract
- Gluten-free flour
- Sucanat
- Baking powder
- Sea salt
- Dark chocolate chips
- Coconut flakes
Instructions
- Preheat your oven to 350°F (175°C) and line a muffin tin with paper liners.
- In a large bowl, mix coconut butter and sucanat until smooth.
- Add eggs, almond milk, and vanilla extract, and beat until well combined.
- In another bowl, whisk gluten-free flour, baking powder, and sea salt.
- Gradually add the dry ingredients to the wet mixture, stirring until just combined.
- Fold in the dark chocolate chips and coconut flakes.
- Spoon the batter into the prepared muffin tin, filling each cup about two-thirds full.
- Bake for 18-22 minutes or until a toothpick inserted into the center of a muffin comes out clean.
- Let the muffins cool in the tin for a few minutes, then transfer to a wire rack to cool completely.
For detailed step-by-step instructions, visit my blog.
Tips
For the best results, make sure your coconut butter is at room temperature. This will help it blend more easily with the other ingredients. If you want a more intense coconut flavor, lightly toast the coconut flakes before folding them into the batter. Additionally, using high-quality dark chocolate chips will enhance the overall flavor of the muffins.
Variations & Substitutions
If you’re looking to mix things up, try adding a handful of chopped nuts, like almonds or pecans, for added crunch. For a lower sugar option, you can replace sucanat with your preferred sugar alternative, such as coconut sugar or a sugar-free sweetener. If you don’t have almond milk, any other plant-based milk will work just as well.
Storage
These muffins are best enjoyed fresh, but they can be stored in an airtight container at room temperature for up to three days. For longer storage, you can freeze them for up to three months. To defrost, simply leave them at room temperature or warm them up in the oven for a few minutes.
FAQ
Can I use regular flour instead of gluten-free flour?
Yes, you can substitute all-purpose flour for gluten-free flour in this recipe if gluten is not a concern for you. The muffins will still turn out delicious!
Is there an egg substitute for this recipe?
If you’re looking for an egg-free version, you can try using flax eggs. Mix one tablespoon of ground flaxseed with three tablespoons of water for each egg, let it sit until it becomes gelatinous, and use it as a direct substitute for the eggs in the recipe.
Can I use sweetened coconut flakes?
While you can use sweetened coconut flakes, it will make the muffins sweeter. If you prefer a less sweet muffin, stick with unsweetened coconut flakes or adjust the amount of sucanat used in the batter.
Nutrition
These muffins are a delightful treat with a healthy twist. They are packed with healthy fats from the coconut butter and almond milk, and they provide a good dose of fiber and antioxidants from the dark chocolate. Each muffin offers a balance of carbohydrates, protein, and fat, making it a satisfying snack or breakfast option.
Final Thoughts
Chocolate Chip Coconut Muffins are a testament to how simple ingredients can create something truly special. Whether you’re making them for a family gathering, a casual brunch, or just because, these muffins are sure to bring smiles and a bit of nostalgia to your table. I hope this recipe brings you as much joy as it has brought me and my family. Happy baking!
Related update: Chocolate Chip Coconut Muffins
Related update: Bourbon-Infused Mini Cherry Pies with Pecan Streusel
Related update: Banana Blueberry Pancakes with Lemon Ricotta and Almond Crunch