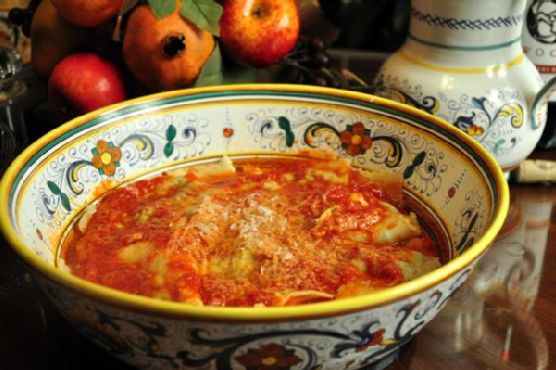
Tag: Homemade

  • Smoky Jalapeno Cheddar Cornbread with Honey Butter | Made by Meaghan Moineau

    Smoky Jalapeno Cheddar Cornbread with Honey Butter | Made by Meaghan Moineau

    Smoky Jalapeno Cheddar Cornbread with Honey Butter

    Imagine the aroma of freshly baked cornbread wafting through your kitchen, the air punctuated with the smoky warmth of paprika and the gentle sweetness of roasted corn. This is the kind of bread that demands to be shared, torn apart with friends over a boisterous dinner, or savored quietly with a good book and a cup of tea.

    There’s something magical about the combination of spicy jalapenos and creamy cheddar cheese, a dance of flavors that both excites and comforts in every bite. This is no ordinary cornbread; it’s a symphony of tastes and textures, enhanced by a luscious drizzle of honey butter that melts into every nook and cranny.

    Personal Story

    I remember the first time I discovered the joy of homemade cornbread. It was a chilly autumn day, the kind where the leaves rustle like whispers and the sky hangs heavy with the promise of rain. I was in my grandmother’s cozy kitchen, her worn recipe book open on the counter, pages yellowed with age and splattered with batter from years of use. She was a woman who cooked with her heart, her hands moving deftly as she mixed ingredients with a grace that only comes from years of practice.

    As a young girl, I watched in awe as she effortlessly turned simple, everyday ingredients into something extraordinary. On that particular day, it was cornbread—warm, golden, and enticingly fragrant. I was hooked after the first bite, the cornbread’s buttery crumb melting on my tongue, leaving a playful hint of sweetness.

    Fast forward a few years, and I found myself craving that same comforting flavor but with my personal twist. I wanted more depth, more complexity, and perhaps a bit of heat. That’s when I stumbled upon the idea of adding smoked paprika and roasted corn to the mix. It was an epiphany—a revelation that transformed a beloved classic into something new and exciting.

    This Smoky Jalapeno Cheddar Cornbread with Honey Butter became a staple in my home, a dish that brings together family and friends, evoking memories of warmth, laughter, and timeless tradition. And today, I’m thrilled to share this special recipe with you, hoping it brings the same joy to your table as it does to mine.

    What Makes This Version Special

    This isn’t your run-of-the-mill cornbread. Adding smoked paprika creates a smoky depth that tantalizes the taste buds, while the roasted corn kernels introduce a subtle sweetness and delightful texture. The diced pickled jalapenos provide a gentle kick, making each bite as exciting as the last. Finally, a drizzle of homemade honey butter elevates this dish to pure bliss, adding a touch of luxurious sweetness that balances the heat and smoke.

    Flavor Profile

    With each bite of this Smoky Jalapeno Cheddar Cornbread with Honey Butter, you’ll experience a complex flavor symphony. The initial bite is smoky and cheesy, thanks to the smoked paprika and cheddar. The warmth of the jalapenos follows, providing a subtle kick that awakens the senses. As you chew, the sweetness of the roasted corn and honey butter emerges, creating a perfect harmony that keeps you reaching for more. It’s a dish that dances on your palate, leaving you both satisfied and yearning for the next bite.

    Ingredients

    • 1 cup unbleached all-purpose flour
    • 1 cup whole-wheat flour
    • 1 tablespoon baking powder
    • 1 teaspoon salt
    • 1/4 cup light olive oil
    • 1 large egg
    • 1 cup non-fat milk
    • 1 cup light cheddar cheese, shredded
    • 1/2 cup diced pickled jalapenos
    • 1 teaspoon smoked paprika
    • 1 cup roasted corn kernels
    • 2 tablespoons honey
    • 1/4 cup unsalted butter

    Instructions

    1. Preheat your oven to 350°F (175°C). Lightly grease a 9x5x3-inch loaf pan or two mini muffin pans with cooking spray.
    2. In a small saucepan over low heat, warm the olive oil slightly, then add the smoked paprika. Bloom it gently for about 2 minutes to enhance its smoky flavor. Set aside to cool.
    3. In a medium bowl, whisk together the all-purpose flour, whole-wheat flour, baking powder, and salt.
    4. In a separate bowl, whisk the egg and milk until well combined. Stir in the cooled olive oil mixture.
    5. Pour the wet ingredients into the dry, stirring gently until just combined. Avoid over-mixing to keep the bread tender.
    6. Fold in the light cheddar cheese, roasted corn kernels, and diced pickled jalapenos, ensuring they are evenly distributed throughout the batter.
    7. Pour the batter into the prepared pan(s), smoothing the top with a spatula.
    8. Bake for 30 to 45 minutes, or until the top is golden-brown and a toothpick inserted into the center comes out clean.
    9. Let the cornbread cool in the pan for 5 minutes. Run a knife around the edges to loosen, then transfer to a wire rack to cool for at least 30 minutes before slicing.
    10. While the cornbread cools, make the honey butter by combining the honey and unsalted butter in a small bowl, stirring until smooth.
    11. Serve the cornbread warm, with a generous drizzle of honey butter over each slice. Enjoy!

    Pro Tips from Meaghan’s Kitchen

    • For an extra kick, substitute half of the light cheddar with pepper jack cheese.
    • If your jalapenos are particularly spicy, rinse them briefly under cold water to tone down the heat without losing flavor.
    • Use fresh corn kernels roasted in the oven or on a skillet for the best flavor and texture.
    • Letting the batter rest for 10 minutes before baking helps develop the flavors and results in a more tender crumb.
    • For a crispier crust, sprinkle a little coarse sea salt on top of the batter before baking.

    Variations & Dietary Swaps

    • Vegetarian Swap: Substitute the cheese with a plant-based alternative and use almond milk instead of non-fat milk for a delicious vegetarian version.
    • Spice-It-Up Version: Add a pinch of cayenne pepper to the batter for those who love extra heat.
    • Kids-Friendly Version: Skip the jalapenos and add a hint of vanilla extract for a sweeter, more kid-friendly cornbread.

    What to Serve With It

    This Smoky Jalapeno Cheddar Cornbread pairs beautifully with a chilled glass of sweet iced tea, offering a refreshing contrast to the bread’s earthy flavors. For a side, consider serving a creamy avocado salad, which complements the cornbread’s rich texture with its smooth, buttery goodness. Alternatively, enjoy it with a hearty bowl of chili for a cozy, satisfying meal.

    Storage & Meal Prep

    To store, wrap the cooled cornbread tightly in plastic wrap or aluminum foil. It will keep at room temperature for up to 2 days or in the refrigerator for up to a week. For longer storage, slice the cornbread and place it in a freezer-safe bag. It can be frozen for up to 3 months. To reheat, thaw overnight in the fridge if frozen, then warm in a 350°F oven for 10-15 minutes or until heated through. For a quick snack, microwave individual slices for 20-30 seconds.

    FAQ

    Can I use canned corn instead of roasted corn kernels?

    Yes, you can use canned corn, but make sure to drain and pat it dry before adding to the batter to avoid extra moisture. Roasting it briefly in a skillet can enhance its sweetness and flavor.

    What if I don’t have smoked paprika?

    If you’re out of smoked paprika, you can substitute regular paprika and add a dash of liquid smoke for a similar effect.

    How do I make the cornbread less spicy?

    To reduce the heat, use fewer jalapenos or opt for a milder pepper like Anaheim. You can also rinse the jalapenos under cold water to remove some of the heat.

    Can I make this cornbread gluten-free?

    Yes, simply substitute the all-purpose and whole-wheat flours with a gluten-free flour blend that includes xanthan gum for structure.

    What’s the best way to reheat leftover cornbread?

    For the best texture, reheat leftover cornbread in a 350°F oven until warm. Microwaving can make it soggy, but if you’re in a hurry, a quick 20-30 seconds on a low power setting can work.

    Final Thoughts

    I hope this Smoky Jalapeno Cheddar Cornbread with Honey Butter becomes as cherished in your home as it is in mine. It’s a dish that’s both nostalgic and novel, perfect for sharing with those you love. I’d love to hear how it turns out for you, so feel free to leave a comment, share your own twists, or simply enjoy this recipe with a smile. Happy cooking, dear friends!

  • Chocolate Spelt Cake | Made by Meaghan Moineau

    Chocolate Spelt Cake | Made by Meaghan Moineau

    Chocolate Spelt Cake: A Nostalgic Delight

    There’s something truly magical about baking a cake that fills your home with warmth and the tantalizing aroma of chocolate. This Chocolate Spelt Cake is more than just a dessert; it’s a heartfelt journey back to simpler times, where every bite brings a flood of cherished memories. I remember my grandmother baking this delightful cake for family gatherings, her kitchen brimming with laughter and the irresistible scent of cocoa. Today, I’m thrilled to share this beloved recipe with you, so you too can create beautiful memories with your loved ones.

    Why You’ll Love It

    This Chocolate Spelt Cake is a must-try for several reasons. First, it offers a healthier twist on a classic chocolate cake by using spelt flour, which is rich in nutrients and adds a slightly nutty flavor. The combination of rich cocoa and warm coffee creates a depth of flavor that is both indulgent and comforting. Plus, the addition of currants provides a delightful burst of sweetness in every bite. Whether you’re a seasoned baker or a novice, this cake is simple to make and guaranteed to impress your family and friends.

    Ingredients

    • 1 1/2 cups spelt flour
    • 1 cup unsalted butter, room temperature
    • 1 cup warm coffee
    • 1 tablespoon instant coffee
    • 1 teaspoon vanilla extract
    • 1 teaspoon baking soda
    • 1/2 teaspoon salt
    • 1 cup brown sugar
    • 1/2 cup white sugar
    • 2 large eggs
    • 3/4 cup cocoa powder
    • 1/2 cup sour cream
    • 1/2 cup currants

    Instructions

    1. Preheat your oven to 350°F (175°C).
    2. Add the tablespoon of instant coffee to the warm coffee along with the vanilla, baking soda, and currants. Stir until frothy.
    3. In a medium bowl, combine the spelt flour, cocoa powder, and salt.
    4. In a mix-master, beat the butter, brown sugar, and white sugar until smooth and creamy.
    5. Add the eggs, one at a time, mixing well after each addition.
    6. Slowly add the coffee mixture to the butter mixture, continuing to mix until well combined.
    7. While mixing on low speed, gradually add the spelt flour mixture and mix until just combined.
    8. Prepare a bundt pan by greasing it with butter and dusting with cocoa powder.
    9. Pour the batter into the prepared bundt pan and smooth the top.
    10. Bake for 50-55 minutes, or until a toothpick inserted into the center comes out clean.
    11. Let the cake cool slightly before removing it from the pan.

    Tips

    • Ensure all ingredients are at room temperature before you start mixing. This helps the batter to mix evenly and results in a perfectly textured cake.
    • For a more intense chocolate flavor, consider using a high-quality cocoa powder.
    • Be cautious not to overmix the batter once the flour is added, as this can result in a dense cake.

    Variations & Substitutions

    Feel free to get creative with this recipe:

    • Flour: If you don’t have spelt flour, you can substitute with whole wheat flour or all-purpose flour, though the texture and flavor will slightly differ.
    • Sugar: For a deeper flavor, replace white sugar with coconut sugar or muscovado sugar.
    • Add-ins: Try adding chopped nuts like walnuts or pecans for extra crunch.
    • Frosting: This cake pairs beautifully with a simple chocolate ganache or a dusting of powdered sugar.

    Storage

    Store the Chocolate Spelt Cake in an airtight container at room temperature for up to three days. For longer storage, you can refrigerate it for up to a week. To enjoy it warm, simply microwave a slice for a few seconds before serving.

    FAQ

    Can I use regular flour instead of spelt flour?

    Yes, you can substitute spelt flour with all-purpose flour. However, keep in mind that spelt flour provides a unique nutty flavor and a slightly different texture.

    How can I make this cake dairy-free?

    To make this cake dairy-free, substitute the butter with a plant-based butter and use a dairy-free sour cream alternative or yogurt.

    Can I freeze this cake?

    Absolutely! Wrap the cooled cake tightly in plastic wrap and then in aluminum foil before placing it in the freezer. It can be frozen for up to three months. Thaw overnight in the refrigerator before serving.

    Nutrition

    This Chocolate Spelt Cake offers a balanced indulgence. Each slice (assuming 12 slices per cake) provides approximately:

    • Calories: 280
    • Fat: 14g
    • Carbohydrates: 38g
    • Protein: 4g
    • Fiber: 3g
    • Sugar: 22g

    Final Thoughts

    This Chocolate Spelt Cake is more than just a dessert; it’s a way to create lasting memories with your loved ones. Whether you’re enjoying it as a cozy treat on a rainy afternoon or serving it at a festive gathering, this cake is sure to bring joy and warmth to any occasion. So, gather your ingredients, preheat your oven, and embrace the simple pleasure of baking. I hope this recipe becomes a cherished favorite in your home, just as it has been in mine.

    Related update: Chocolate Spelt Cake

    Related update: Mangolicious Upside Down Cake

  • Sweet and Spicy Country-Style Ribs | Made by Meaghan Moineau

    Sweet and Spicy Country-Style Ribs | Made by Meaghan Moineau

    Sweet and Spicy Country-Style Ribs

    There’s something incredibly comforting about the aroma of ribs slowly cooking in a rich, spicy sauce. This recipe for Sweet and Spicy Country-Style Ribs brings back memories of long summer evenings spent with family in the backyard, the air filled with laughter and the tantalizing smell of barbecue wafting through the air. When I was a child, my grandfather would often prepare ribs for our family gatherings, and I remember watching him patiently tend to the grill, basting the ribs with a secret sauce he had perfected over the years. This recipe is inspired by those cherished memories, with a modern twist that adds a little extra kick.

    Why You’ll Love It

    These Sweet and Spicy Country-Style Ribs are a perfect blend of flavors that will satisfy both your sweet and savory cravings. The rich tomato sauce is balanced with the sweetness of honey and the tang of apple cider vinegar, while a touch of cayenne pepper and hot sauce adds just the right amount of heat. This dish is perfect for any occasion, whether you’re hosting a barbecue, enjoying a Sunday family dinner, or simply looking to treat yourself to a delicious homemade meal.

    Ingredients

    • 2 lbs beef short ribs
    • 2 tablespoons vegetable oil
    • 1 large yellow onion, diced
    • 2 cloves garlic, minced
    • 2 tablespoons unsalted butter
    • 1 cup tomato sauce
    • 1/4 cup apple cider vinegar
    • 3 tablespoons honey
    • 2 tablespoons hot sauce
    • 1/2 teaspoon cayenne pepper
    • 1 tablespoon ancho chili powder
    • 1 teaspoon salt
    • 1 teaspoon dry mustard
    • Vegetable scraps – carrot, celery, etc.
    • 3 cups beef stock
    • Water, as needed

    Instructions

    1. Heat the vegetable oil in a 6-quart enameled Dutch oven over medium-high heat. Brown the ribs on all sides.
    2. Pour in the beef stock; add water to cover if necessary. Add the vegetable scraps and bring to a boil. Lower the heat to a simmer, cover, and cook for 45 minutes to an hour, or until the ribs are tender.
    3. While the ribs are braising, melt the unsalted butter in a large cast-iron skillet over medium-low heat. Sauté the onions until soft, then add the garlic and sauté for another minute more.
    4. Stir in the tomato sauce, apple cider vinegar, honey, hot sauce, cayenne pepper, ancho chili powder, salt, and dry mustard. Bring the mixture to a boil, then reduce the heat and simmer uncovered for 25 minutes, stirring occasionally.
    5. When the ribs are tender, remove them from the braising liquid and add them to the spicy tomato sauce in the skillet.
    6. Raise the heat and cook, stirring frequently, until the sauce has glazed the ribs, about 10 minutes.
    7. Serve the ribs with the remaining sauce on the side, if desired.

    Tips

    To ensure the ribs are perfectly tender, make sure to simmer them gently and check for doneness by inserting a fork; it should slide in easily. If you find the ribs are tough, allow them to simmer a bit longer. Also, don’t rush the sauce; letting it simmer slowly allows the flavors to meld beautifully.

    Variations & Substitutions

    If you prefer a milder flavor, you can reduce the amount of cayenne pepper or omit the hot sauce altogether. For a different twist, try using maple syrup instead of honey for a deeper sweetness, or substitute red wine vinegar for apple cider vinegar for a more robust flavor. If you don’t have beef short ribs, pork ribs can be an excellent alternative.

    Storage

    Leftover ribs can be stored in an airtight container in the refrigerator for up to 3 days. To reheat, place the ribs in a baking dish, cover with foil, and warm them in a preheated oven at 350°F (175°C) until heated through. You can also freeze the ribs for up to 2 months; just make sure to thaw them in the refrigerator before reheating.

    FAQ

    Can I make these ribs in advance?

    Absolutely! You can prepare the ribs and sauce a day ahead, then store them separately in the refrigerator. When you’re ready to serve, simply reheat the ribs, combine them with the sauce, and let them cook together until the sauce is perfectly glazed.

    What side dishes go well with these ribs?

    These Sweet and Spicy Country-Style Ribs pair wonderfully with classic barbecue sides like coleslaw, cornbread, or baked beans. For a lighter option, a simple green salad or roasted vegetables would also complement the flavors nicely.

    Nutrition

    While specific nutritional values can vary based on the exact ingredients and serving sizes, a general serving of these ribs provides a hearty amount of protein, along with essential vitamins and minerals from the vegetables and spices. If you’re watching your sodium intake, you may wish to reduce the added salt or choose a low-sodium beef stock.

    Final Thoughts

    These Sweet and Spicy Country-Style Ribs are more than just a meal; they’re a way to bring people together. Whether you’re reminiscing about family gatherings or creating new memories, this dish offers a delightful blend of flavors that are sure to impress. So gather your loved ones, roll up your sleeves, and dive into these delicious ribs. Enjoy every sticky, savory-sweet bite!

    Related update: Sweet and Spicy Country-Style Ribs

  • Homemade Oatmeal Cream Pies | Made by Meaghan Moineau

    Homemade Oatmeal Cream Pies | Made by Meaghan Moineau

    Homemade Oatmeal Cream Pies

    There’s something truly magical about recreating childhood favorites in your own kitchen. For me, oatmeal cream pies bring back memories of school lunchboxes, family picnics, and that delightful anticipation of opening a sweet treat after a long day. These homemade oatmeal cream pies offer all the nostalgic flavors with the added benefit of fresh, quality ingredients. Let’s dive into the process of making these delightful treats that are sure to become a family favorite in your home.

    Why You’ll Love It

    These homemade oatmeal cream pies are a revelation. They offer the perfect balance of chewy oatmeal cookies and sweet, fluffy filling. When you make them at home, you can control the quality of ingredients, ensuring a wholesome treat. Plus, the nostalgia factor makes them a delightful dessert option for both kids and adults. They are perfect for lunchboxes, after-school snacks, or a comforting dessert with your evening tea.

    Ingredients

    • 1 teaspoon baking powder
    • 1/2 teaspoon baking soda
    • 1 cup brown sugar
    • 1/2 cup butter, softened
    • 1/2 teaspoon cinnamon
    • 1 tablespoon cocoa powder
    • 1 egg
    • 1 1/2 cups flour
    • 1 cup marshmallow fluff
    • 1 cup powdered sugar
    • 2 cups rolled oats
    • 1/4 teaspoon salt
    • 1 teaspoon vanilla extract
    • 1/2 cup vegetable shortening

    Instructions

    1. Preheat the oven to 350 degrees F. Line cookie sheets with parchment paper to prevent sticking.
    2. Sift the baking powder, baking soda, cinnamon, cocoa powder, flour, and salt into a medium bowl and set aside.
    3. In a large bowl, use an electric mixer to cream together the brown sugar, butter, egg, and vanilla until smooth and creamy.
    4. Gradually add the dry mixture to the wet ingredients, mixing until well combined.
    5. Stir in the rolled oats until evenly distributed throughout the dough.
    6. Using a tablespoon-sized scoop, form equal-sized dough balls and place them on the prepared cookie sheets, allowing plenty of space for spreading.
    7. Bake in the preheated oven for 7-9 minutes, or until the edges are golden brown. Allow the cookies to cool completely on the parchment paper.
    8. For the filling, cream the shortening, powdered sugar, and vanilla together in a bowl until smooth. Then mix in the marshmallow fluff until well combined.
    9. To assemble, match up two cookies of equal size and shape. Turn the bottom cookies over and use a piping bag (or a zip-bag with a corner cut off) to pipe the filling onto the bottom cookie. Add the top cookie and press down gently.

    Tips

    The key to perfect oatmeal cream pies is in the baking time. Keep a close eye on the cookies as they bake to prevent over-browning. For the filling, I find using a piping bag makes the process much easier and results in a cleaner look. If you prefer a thicker layer of cream, feel free to be generous with the filling.

    Variations & Substitutions

    Feel free to tweak this recipe to suit your taste or dietary needs. For a nutty twist, consider adding chopped walnuts or pecans to the dough. If you’re looking for a gluten-free option, substitute the flour with a gluten-free baking blend. You can also experiment with different flavored extracts in the filling, such as almond or maple, to give these pies a unique twist.

    Storage

    These oatmeal cream pies are best enjoyed fresh, but they can be stored in an airtight container at room temperature for up to three days. For longer storage, consider wrapping each pie individually in plastic wrap and freezing them. They can be thawed at room temperature when you’re ready to enjoy them again.

    FAQ

    Can I use quick oats instead of rolled oats?

    While quick oats can be used in a pinch, rolled oats are preferable as they give the cookies a better texture and chewiness. Quick oats tend to make the cookies more cake-like.

    What can I use instead of vegetable shortening?

    If you prefer not to use vegetable shortening, you can substitute it with an equal amount of butter. Keep in mind that the filling may have a slightly different texture but will still be delicious.

    Nutrition

    Each oatmeal cream pie contains approximately 320 calories, 16g of fat, 42g of carbohydrates, and 3g of protein. These values may vary depending on the specific brands of ingredients used.

    Final Thoughts

    Homemade oatmeal cream pies are a delightful, nostalgic treat that brings the comfort of childhood memories to your kitchen. With their chewy texture and sweet, creamy filling, these pies are sure to become a beloved staple in your baking repertoire. Whether enjoyed with a glass of milk or shared with loved ones, they are a testament to the joy of homemade goodness. So go ahead, bake a batch, and relish in the simple pleasures of life.

    Related update: Homemade Oatmeal Cream Pies

    Related update: Authentic Kentucky Bourbon Balls

    Related update: Creamsicle Cookies

  • Flax, Quinoa, and Almond Meal Bread | Made by Meaghan Moineau

    Flax, Quinoa, and Almond Meal Bread | Made by Meaghan Moineau

    Flax, Quinoa, and Almond Meal Bread

    Why You’ll Love It

    There’s something incredibly heartwarming about the aroma of freshly baked bread wafting through your home. This Flax, Quinoa, and Almond Meal Bread is a perfect blend of wholesome ingredients that not only fills your kitchen with a delightful scent but also fills your heart with nostalgia. I remember my grandmother’s kitchen, where baking was a weekend ritual. The sound of her soft humming and the flour dust that seemed to settle everywhere in the room bring back memories each time I bake this bread. Not only is this recipe gluten-free and nutritious, but it also captures the essence of family traditions and warmth.

    You’ll love this bread because it’s incredibly versatile and can be paired with both sweet and savory toppings. Its nutty flavor and slightly crumbly texture make it a delightful companion for your morning coffee or your evening tea. Plus, with its simple preparation, you don’t need to be a seasoned baker to pull this off beautifully.

    Ingredients

    • 1 cup milled flax seed
    • 1 cup blanched almond meal
    • 1 cup quinoa flour
    • 2 teaspoons baking powder
    • 1/2 teaspoon salt
    • 1/2 teaspoon baking soda
    • 1/4 cup olive oil
    • 3 large eggs
    • Water, as needed for desired texture

    Instructions

    1. Preheat your oven to 375°F (190°C).
    2. In a large mixing bowl, combine the milled flax seed, almond meal, quinoa flour, baking powder, salt, and baking soda.
    3. In a separate bowl, gently beat the eggs together. This will make it easier to incorporate them into the dry mixture.
    4. Gradually add the beaten eggs to the dry ingredients, stirring continuously to form a cohesive mixture.
    5. Add the olive oil to the mixture. Be cautious if your eggs are cold, as it may cause the oil to solidify. If this happens, gently warm the mixture until the oil liquefies.
    6. Slowly add water to the mixture, a little at a time, until you achieve a thick batter consistency that can be poured into a loaf pan.
    7. Line a Pyrex bread pan with parchment paper and pour the batter in. Smooth the top with a spatula.
    8. Bake in the preheated oven for 40 minutes. If using a metal pan, you may need to adjust the baking time slightly.
    9. Once baked, remove from the oven and let the bread cool in the pan for about 10 minutes before transferring it to a wire rack to cool completely.

    Tips

    For best results, ensure all your ingredients are at room temperature before you begin mixing. This helps in achieving a smoother batter. If you find that the batter is too thick, add water a teaspoon at a time to avoid making it too runny. Also, lining your loaf pan with parchment paper ensures that the bread doesn’t stick and makes cleanup a breeze.

    Variations & Substitutions

    This bread is a canvas for your creativity. You can substitute the quinoa flour with oat flour for a different flavor profile. To add some sweetness, consider incorporating a tablespoon of honey or maple syrup into the batter. For an extra crunch, toss in a handful of your favorite nuts or seeds like sunflower seeds or chopped walnuts.

    Storage

    Once completely cooled, store your flax, quinoa, and almond meal bread in an airtight container. It will keep well at room temperature for up to three days. For longer storage, wrap the loaf tightly in plastic wrap and freeze for up to a month. To enjoy, simply thaw at room temperature or warm it up in the oven for a fresh-baked taste.

    FAQ

    Can I make this bread vegan?

    Yes, you can make this recipe vegan by replacing the eggs with flax eggs. To make flax eggs, mix 3 tablespoons of milled flax seed with 9 tablespoons of water and let it sit for a few minutes until it forms a gel-like consistency.

    What can I use instead of almond meal?

    If you have a nut allergy or simply prefer a different flavor, sunflower seed flour or coconut flour can be used as a substitute. Keep in mind that coconut flour is highly absorbent, so you may need to adjust the amount of liquid in the recipe.

    Can I add spices to this bread?

    Absolutely! Adding spices can elevate the flavor of your bread. Try incorporating a teaspoon of cinnamon or nutmeg for a warm, aromatic touch. For a savory twist, consider adding herbs like rosemary or thyme.

    Nutrition

    This bread is a nutrient-dense option, rich in fiber and healthy fats from the flax seed and almond meal. It’s a great source of plant-based protein thanks to the quinoa flour, making it an excellent choice for those looking to maintain a balanced diet.

    Final Thoughts

    Baking this Flax, Quinoa, and Almond Meal Bread is more than just a culinary endeavor—it’s a journey into the comforting world of homemade goodness. Whether you’re embracing a gluten-free lifestyle or simply looking for a wholesome, delicious bread to enjoy, this recipe is sure to become a staple in your home. Remember, the best part about baking is making it your own, so don’t hesitate to experiment with flavors and ingredients. Happy baking!

    Related update: Flax, Quinoa, and Almond Meal Bread

  • Ginger Snap and Pumpkin Ice Cream Sandwiches | Made by Meaghan Moineau

    Ginger Snap and Pumpkin Ice Cream Sandwiches

    There’s something enchantingly nostalgic about ice cream sandwiches. They remind me of warm summer evenings spent on my grandmother’s porch, where the world seemed to pause for a moment. With a gentle breeze and the laughter of family in the background, we would savor every bite, letting the creamy goodness melt away the day’s worries. As autumn rolls in, I find myself craving that same delightful treat, reimagined with the rich, spicy flavors of the season. Enter Ginger Snap and Pumpkin Ice Cream Sandwiches—a perfect fusion of summer nostalgia and autumn warmth.

    Why You’ll Love It

    This recipe is the epitome of seasonal indulgence, combining the creamy richness of homemade pumpkin ice cream with the spicy crunch of ginger snap cookies. It’s the best of both worlds: a cool treat for those sunny fall days and a comforting spice for the crisp evenings. Each bite is a sensory delight, offering a harmonious blend of flavors and textures that will leave you and your loved ones reaching for seconds.

    Ingredients

    • Whole milk
    • Heavy cream
    • Granulated sugar
    • Ground cinnamon
    • Nutmeg
    • Ground ginger
    • Whole cinnamon stick
    • Kosher salt
    • Egg yolks
    • Canned pumpkin puree
    • Vanilla
    • All-purpose flour
    • Baking soda
    • Ground pepper
    • Unsalted butter
    • Molasses
    • Egg

    Instructions

    1. In a medium saucepan over medium heat, combine the milk, cream, granulated sugar, ginger, ground cinnamon, cinnamon stick, nutmeg, and salt. Heat the mixture until steaming and it begins to foam. Remove from the heat.
    2. In a small bowl, whisk the egg yolks until pale yellow. Gradually whisk in one cup of the warm cream mixture, whisking constantly.
    3. Pour the yolks and cream mixture back into the saucepan and cook over low heat, stirring constantly. Continue cooking until the mixture thickens and coats the back of a spoon.
    4. Place some ice and water into a large bowl and place a smaller bowl inside. Pour the cream mixture through a mesh strainer into the bowl. Stir in the pumpkin and vanilla, add the cinnamon stick back to the mixture. Chill thoroughly, preferably overnight.
    5. Pour the mixture into the freezer can of an electric ice cream maker and freeze according to the manufacturer’s instructions.
    6. In a small bowl, whisk together the dry ingredients for the cookies.
    7. In the bowl of an electric mixer, beat the butter until soft. Add the sugar and continue beating until smooth and creamy, occasionally scraping down the sides of the bowl.
    8. Stir in the vanilla, molasses, and egg; combine thoroughly. Mix in the dry ingredients gradually until the dough is smooth.
    9. Turn the dough out onto a lightly floured surface and divide in half. Roll each half into a log about 2 inches around. Wrap each log in plastic wrap and roll them lightly to smooth them out. Refrigerate or freeze until firm.
    10. Preheat the oven to 350 degrees and line two baking sheets with parchment.
    11. Slice the dough into 1/4 inch rounds with a serrated knife, being careful to keep their shape. Place the rounds on the baking sheet and sprinkle with granulated or coarse sugar.
    12. Bake for 10-13 minutes, rotating the pans halfway through. Let the cookies cool in the pan for about 2 minutes and then transfer to a wire cooling rack. Dough can be refrigerated for up to five days or frozen for up to three months. Baked cookies can be stored in an air-tight container for approximately a week.

    Tips

    For best results, make sure all your ingredients are at room temperature before starting. This helps everything blend smoothly and evenly. If you’re short on time, the cookies can be prepared ahead and stored, as mentioned, which will make assembling the sandwiches a breeze when your ice cream is ready!

    Variations & Substitutions

    If you’re not a fan of ginger, you can substitute the ginger snap cookies with chocolate chip cookies for a different but equally delightful flavor combination. For a dairy-free version, substitute coconut milk and cream for the whole milk and heavy cream, and use a dairy-free butter alternative for the cookies.

    Storage

    Store any leftover ice cream sandwiches in an airtight container in the freezer. If you want to avoid them sticking together, place a small piece of parchment paper between each sandwich. They should keep well for up to a month, though they’re so delicious they probably won’t last that long!

    FAQ

    Can I make the ice cream without an ice cream maker?

    Yes, you can! Simply pour the chilled mixture into a shallow dish and freeze. Stir the mixture every 30 minutes to break up ice crystals until it’s fully frozen. This method might result in a slightly less creamy texture, but it’s still delicious!

    What can I use instead of canned pumpkin puree?

    If you prefer fresh, you can roast and puree your own pumpkin. Make sure it’s well-drained to avoid excess moisture, which can affect the texture of the ice cream.

    Nutrition

    While these indulgent treats are meant to be enjoyed without too much concern for calories, it’s good to know that they contain wholesome ingredients. Each sandwich offers a balanced mix of carbohydrates, fats, and proteins, along with a dose of dietary fiber from the pumpkin. Plus, the spices bring antioxidants, aiding in overall health. Enjoy them as an occasional treat and savor each delightful bite!

    Final Thoughts

    Ginger Snap and Pumpkin Ice Cream Sandwiches are more than just a dessert; they’re a tribute to cherished memories and the comforting flavors of fall. Whether you’re sharing them with family on a cozy evening or surprising guests at a festive gathering, these sandwiches are sure to bring smiles and spark joy. So, gather your ingredients, embrace the process, and enjoy the delicious rewards of your labor. Happy indulging!

    Related update: Ginger Snap and Pumpkin Ice Cream Sandwiches

    Related update: Apple Dumplings In Fanta Sauce

  • Wild Salmon Cakes | Made by Meaghan Moineau

    Wild Salmon Cakes | Made by Meaghan Moineau

    Wild Salmon Cakes: A Delicious and Nutritious Treat

    Welcome to our cozy kitchen corner, where today we’re diving into the delightful world of Wild Salmon Cakes. These savory patties are a celebration of simplicity and flavor, perfect for any occasion from a quick weeknight dinner to a lavish brunch gathering. Let me take you on a journey of taste and nostalgia, sharing not just a recipe but a piece of my culinary heart.

    Why You’ll Love It

    There’s something magical about the way these Wild Salmon Cakes come together. The fusion of fresh, wild-caught salmon with the crunch of panko and the tang of capers creates a symphony of flavors that dance on your palate. Whether you’re a seafood aficionado or a curious cook looking to expand your culinary repertoire, this dish will not disappoint.

    Growing up, seafood was a staple at our family table. I vividly remember summer evenings spent by the coast, where my grandmother would serve her famous salmon cakes. The recipe was a guarded secret, a treasured heirloom passed down through generations. Each bite was a reminder of home, of laughter shared around the table, and of the love that binds a family together. Today, I share with you a modern twist on that cherished recipe, hoping it brings as much joy to your home as it has to mine.

    Ingredients

    • 1 pound skinless, boneless wild salmon fillet
    • 1/2 cup red onion, finely diced
    • 2 tablespoons capers, drained
    • 1 large egg
    • 1 cup panko bread crumbs

    Instructions

    1. Mince the salmon fillet into fine pieces, ensuring that each piece is uniform in size for even cooking.
    2. In a medium-sized bowl, gently whip the egg until frothy. This will act as the binding agent for your salmon mixture.
    3. Add the finely diced red onion and capers to the egg, stirring until the ingredients are well incorporated.
    4. Fold in the minced salmon, mixing gently to maintain the texture of the fish.
    5. Gradually add the panko bread crumbs, mixing until the mixture holds together but is not overly dry.
    6. Form the mixture into 4 equal-sized patties, pressing gently to ensure they hold their shape.
    7. Place the patties on a preheated grill, cooking for about 2-3 minutes on each side until golden brown and cooked through. Alternatively, bake in a 350-degree oven for 15-20 minutes.
    8. Serve hot, garnished with fresh herbs or a squeeze of lemon for an extra zing.

    Tips

    For the best results, ensure that your salmon is as fresh as possible. Fresh salmon not only enhances the flavor but also improves the texture of the cakes. If your mixture seems too wet, add a little more panko to achieve the right consistency. Remember, the key to perfect salmon cakes is balance—too much panko can overpower the delicate flavor of the fish.

    Variations & Substitutions

    Feel free to get creative with this recipe! You can substitute the wild salmon with canned salmon in a pinch, though fresh is always preferred for the best flavor. If you’re looking to add a bit of spice, consider incorporating a finely chopped jalapeño or a dash of cayenne pepper. For a gluten-free version, replace panko with gluten-free bread crumbs or crushed cornflakes.

    Storage

    Store any leftover salmon cakes in an airtight container in the refrigerator for up to 3 days. To reheat, place them in a preheated oven at 350 degrees for about 10 minutes or until warmed through. Avoid microwaving as it can make them soggy. These cakes also freeze well; simply wrap them individually in plastic wrap and store them in a freezer-safe bag for up to 3 months.

    FAQ

    Can I use smoked salmon for this recipe?

    While smoked salmon adds a unique flavor, it might overpower the other ingredients in this recipe. If you love the taste of smoked salmon, consider using a mix of fresh and smoked salmon for a balanced flavor profile.

    What can I serve with salmon cakes?

    Salmon cakes pair beautifully with a fresh green salad, roasted vegetables, or a light yogurt dill sauce. For a more hearty meal, serve them alongside quinoa or couscous.

    Nutrition

    Wild salmon is packed with Omega-3 fatty acids, which are essential for heart health. Each serving of these salmon cakes is not only a source of lean protein but also provides essential vitamins and minerals, making it a nutritious choice for you and your family.

    Final Thoughts

    These Wild Salmon Cakes are more than just a meal; they’re a testament to the power of simple ingredients coming together to create something truly special. Whether you’re sharing them with loved ones or enjoying a quiet meal by yourself, I hope these salmon cakes bring a touch of warmth and nostalgia to your table.

    Thank you for joining me on this culinary journey. I look forward to hearing how this recipe finds its place in your home, creating new memories and traditions for years to come. Bon appétit!

    Related update: Wild Salmon Cakes

    Related update: Chicken Adobo & Coconut Ginger Rice