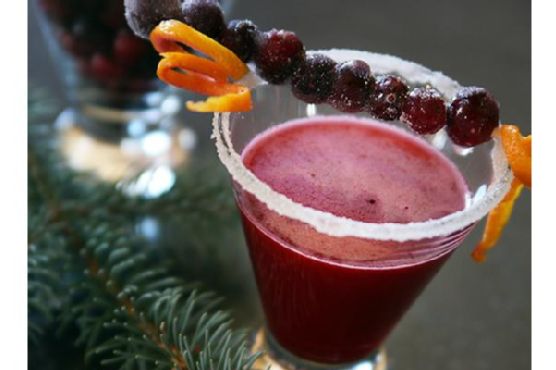
Tag: Holiday

  • Guinness Braised Corned Beef with Whiskey-Maple Glaze and Roasted Root Vegetables | Made by Meaghan Moineau

    Guinness Braised Corned Beef with Whiskey-Maple Glaze and Roasted Root Vegetables | Made by Meaghan Moineau

    Guinness Braised Corned Beef with Whiskey-Maple Glaze and Roasted Root Vegetables

    Picture this: a chilly evening, the kitchen warm and inviting, with the tantalizing aroma of rich beef mingling with smoky whiskey and sweet maple syrup. As you lift the lid of your oven-safe pot, the steam releases, carrying with it the earthy scent of roasted garlic and thyme, mingling with the rich, malty essence of Guinness. Welcome to a dinner experience that combines tradition and innovation in every mouthful.

    Personal Story

    Growing up in an Irish-American household, corned beef was more than just a St. Patrick’s Day treat; it was a family tradition woven into the fabric of our kitchen. My earliest memories involve watching my grandmother, her hands deftly working to season and sear the brisket, while I sat perched on a stool, taking in the magic happening before me. Her version was classic, simple—just corned beef, potatoes, and cabbage. It was comforting, but I always had a hankering for something that danced a little more on the palate.

    Fast forward a few years to when I had my own kitchen to play in. I was determined to honor my family’s tradition while adding my own twist. After several experiments (some more successful than others), I discovered my secret weapons: a whiskey-maple glaze and roasted garlic. It was a revelation! The glaze added a sweet, smoky finish that balanced the savory, salty corned beef perfectly. And the roasted garlic? It brought a depth of flavor that was nothing short of transformative.

    One memorable evening, I invited my family over, nervous yet excited to unveil my creation. As they took their first bites, I watched their expressions shift from skepticism to delight. My grandmother, with a twinkle in her eye, declared it “a keeper.” From that moment on, Guinness Braised Corned Beef with Whiskey-Maple Glaze became a new family favorite, gracing our table not just on holidays, but whenever we craved something special.

    What Makes This Version Special

    This version of corned beef takes the classic and elevates it with a whiskey-maple glaze that adds a sweet and smoky finish, complemented by the aroma of roasted garlic and thyme. Unlike the standard recipe, which can sometimes feel heavy or one-dimensional, this dish balances the rich, salty notes of the corned beef with the sweetness of maple syrup and the complexity of whiskey. The addition of roasted root vegetables not only adds color and texture but also a comforting, earthy flavor profile that rounds out the dish beautifully.

    Flavor Profile

    When you take your first bite of this Guinness Braised Corned Beef, expect a symphony of flavors to unfold. The meat is rich, tender, and infused with the malty essence of Guinness, creating a warmth that is both comforting and indulgent. The whiskey-maple glaze introduces a smoky sweetness that dances on your tongue, while the roasted garlic and thyme provide a subtle earthiness, grounding the dish. The roasted root vegetables add a sweet, caramelized depth, each bite a perfect harmony of flavors and textures.

    Ingredients

    • Corned beef brisket
    • 2 tablespoons maple syrup
    • 1/4 cup whiskey
    • Carrots
    • Parsnips
    • Potatoes
    • 1 head of roasted garlic
    • 1 tablespoon fresh thyme
    • Guinness
    • Beef broth
    • Pickling spice
    • Brown sugar
    • Bay leaf
    • Spicy honey mustard

    Instructions

    1. Preheat your oven to 325°F (163°C). Begin by seasoning both sides of the corned beef liberally with pepper. The corning process makes the beef salty enough, so additional salt is unnecessary.
    2. Heat 1 tablespoon of oil in a large, shallow, oven-safe pot over medium-high heat. Add the beef and sear each side for about 3 minutes, just to develop a nice brown crust. This seals in the beef’s juices, ensuring a moist and flavorful result.
    3. Remove the beef from the pot and set it aside on a plate. Pour the Guinness into the pot to deglaze it, scraping up any browned bits from the bottom. This step infuses the sauce with a rich, malty base.
    4. Add beef broth, pickling spice, brown sugar, bay leaf, and minced garlic to the pot. Bring the mixture to a simmer, then return the beef to the pot along with any juices that have accumulated on the plate.
    5. Cover the pot and place it on the bottom rack of your oven. Bake for 2 1/2 to 3 hours, or until a fork can easily be inserted into the meat. Baste the meat with the surrounding juices every 30 minutes to keep it moist.
    6. After 2 hours, add the carrots, parsnips, and potatoes to the pot. They will only need about 25-30 minutes of simmering to cook through and absorb the flavors.
    7. While the vegetables cook, prepare your whiskey-maple glaze. In a small saucepan, combine whiskey and maple syrup. Simmer until reduced by half, creating a thick, glossy glaze.
    8. Remove the pot from the oven. Transfer the beef to a cutting board and let it rest for 15 minutes before carving into thin slices against the grain.
    9. Remove the vegetables and arrange them on a serving platter, covering them with foil to keep warm. Place the pot on the burner and bring the sauce to a boil. Add cabbage if desired and cook for about 7 minutes until softened.
    10. Strain the sauce in the pot and stir in 2-3 tablespoons of spicy honey mustard until dissolved. Serve in a small dish or gravy boat alongside the beef.
    11. After slicing the beef and arranging it on the serving platter, brush it with the whiskey-maple glaze and ladle the Guinness mustard sauce over the top to rehydrate and enhance the beef and vegetables.

    Pro Tips from Meaghan’s Kitchen

    • Roast that garlic: For deeper flavor, roast a whole head of garlic until caramelized, then squeeze the cloves into the sauce or mix them with the glaze.
    • Choose your whiskey wisely: A smooth Irish whiskey works best for the glaze, adding complexity without overwhelming the other flavors.
    • Timing is everything: Be patient and let the beef rest after cooking. This allows the juices to redistribute, ensuring each slice is tender and flavorful.
    • Keep it moist: Baste the beef every 30 minutes while it cooks. This not only adds flavor but keeps the meat juicy.
    • Glaze last: Apply the whiskey-maple glaze just before serving to maintain its glossy finish and aromatic punch.

    Variations & Dietary Swaps

    • Vegetarian Swap: Replace the beef with a hearty mix of mushrooms and lentils, and use vegetable broth instead of beef broth for a rich, umami-packed dish.
    • Spice-It-Up Version: Add a pinch of cayenne pepper to the glaze and sauce for a little heat that complements the sweetness and smoke.
    • Kids-Friendly Version: Skip the whiskey in the glaze. Instead, use a tablespoon of apple juice coupled with the maple syrup for a sweet, kid-approved finish.

    What to Serve With It

    This Guinness Braised Corned Beef pairs beautifully with a smooth Irish whiskey, enhancing the dish’s subtle smokiness. For sides, consider buttery mashed potatoes, which complement the rich flavors, or a light, tangy coleslaw to add a refreshing contrast. A crisp, cold pint of Guinness on the side wouldn’t go amiss either, bringing the meal full circle.

    Storage & Meal Prep

    Store any leftover corned beef and vegetables in airtight containers in the refrigerator for up to 3 days. To reheat, place the beef and vegetables in a covered dish with a splash of beef broth and warm in the oven at 325°F (163°C) until heated through. For longer storage, freeze sliced beef and vegetables in a sealed container for up to 3 months. Thaw overnight in the refrigerator before reheating.

    FAQ

    Can I use a different type of beer?

    Absolutely! While Guinness adds a rich, malty flavor perfect for this dish, you can experiment with other stouts or dark ales to suit your taste.

    How do I know when the beef is done?

    The beef is done when a fork can easily be inserted and twisted in the meat. It should be tender and slice easily against the grain.

    What if I don’t have an oven-safe pot?

    If you don’t have an oven-safe pot, you can sear the beef and prepare the sauce on the stovetop, then transfer everything to a roasting pan and cover tightly with foil before placing it in the oven.

    Can I make this dish ahead of time?

    Yes, this dish can be made a day in advance. Simply reheat gently in the oven before serving and finish with the glaze just before serving.

    What can I do with leftovers?

    Leftover corned beef makes an excellent addition to sandwiches, hash, or corned beef and cabbage rolls. The flavors deepen as they sit, making the leftovers just as delicious!

    Final Thoughts

    There you have it, my friends — a Guinness Braised Corned Beef with Whiskey-Maple Glaze that not only pays homage to tradition but also brings a deliciously modern twist to your table. This dish is perfect for impressing guests at a dinner party or simply savoring with family on a cozy night in. I hope you enjoy making it as much as I do, and I’d love to hear how it turns out for you. Feel free to drop a comment below or share your creations on social media. Happy cooking!

    Related update: Guinness Braised Corned Beef with Whiskey-Maple Glaze and Roasted Root Vegetables

    Related update: Tropical Coconut-Lime Chicken Tenders with Spicy Mango Salsa

  • Luscious Almond Ricotta Cake with Lavender-Honey Glaze | Made by Meaghan Moineau

    Luscious Almond Ricotta Cake with Lavender-Honey Glaze | Made by Meaghan Moineau

    Luscious Almond Ricotta Cake with Lavender-Honey Glaze

    Picture this: The intoxicating aroma of almonds toasting in your oven, mingling with the warm sweetness of honey and the gentle floral notes of lavender. Now imagine slicing into a cake that’s as tender as a whisper, with a glossy glaze that catches the light just so. Let me take you on a culinary journey to Italy with my Luscious Almond Ricotta Cake, uniquely elevated with a Lavender-Honey Glaze.

    My Italian Kitchen Adventure

    It was a sun-drenched afternoon in Tuscany, where my love affair with almond ricotta cake truly began. I was on a cooking retreat, nestled amidst rolling vineyards and olive groves. Our instructor, a spirited Nonna with a penchant for storytelling, shared her family’s cherished recipes. But it was her almond ricotta cake that captivated my senses. The cake was simple yet divine, a perfect marriage of flavors and textures.

    Back home, I couldn’t shake the memory of that cake. It beckoned me to experiment in my own kitchen, to create a version that not only paid homage to Nonna’s artistry but also infused a touch of my own culinary flair. My first attempt was a classic rendition, but my heart yearned for something more exciting — something that danced on the palate.

    After several trials (and a few hilarious mishaps involving overly ambitious experiments with local wildflowers), I stumbled upon the magic of lavender-honey. The idea came to me during a quiet moment in my garden, where the lavender bushes swayed gently in the breeze. I imagined their subtle aroma blending seamlessly into the cake’s glaze, adding a whisper of elegance.

    With each iteration, I inched closer to perfection. As I combined the ingredients, the kitchen came alive with the heady scent of lavender intertwining with honey, transporting me back to Tuscany with every whiff. This version, I knew, was ready to be shared.

    What Makes This Version Special

    What truly sets this Almond Ricotta Cake apart is the infusion of aromatic lavender and luscious honey into the glaze. This addition introduces a floral sweetness that harmonizes beautifully with the nutty, creamy base of the cake. While traditional almond ricotta cakes are deliciously satisfying, the lavender-honey glaze elevates this dessert to a new level of sophistication and intrigue.

    The glaze is not merely an afterthought; it’s an integral part of the experience. Each bite offers a delicate balance, the kind that makes you pause, close your eyes, and savor the moment. This version captures the essence of a classic Italian dessert while adding a delightful twist that surprises and delights.

    Flavor Profile

    The flavor profile of this Luscious Almond Ricotta Cake is an ode to subtlety and richness. As you take your first bite, the delicate floral notes of lavender gently unfold, bringing a hint of springtime fields to your palate. This is followed by a mellow, sweet embrace from the honey, which complements the cake’s natural sweetness without overpowering it.

    The cake itself is a symphony of textures and tastes. Its base is creamy and nutty, thanks to the rich ricotta and ground almonds. The citrusy whispers of lemon zest add brightness, while the vanilla and almond extracts weave a comforting familiarity throughout each bite. Paired with the glaze, every mouthful is an experience — a testament to the harmony of flavors crafted with care.

    Ingredients

    • 1 cup **all-purpose flour**
    • 1 teaspoon baking powder
    • 1/4 teaspoon salt
    • 3/4 cup sugar
    • 3 large eggs
    • 1/2 cup canola oil
    • 1 cup **2% ricotta cheese**
    • 2 tablespoons lemon juice
    • 1 tablespoon lemon zest
    • 1 teaspoon vanilla extract
    • 1/2 teaspoon **almond extract**
    • 2 tablespoons **orange liqueur**
    • 1 tablespoon rum
    • 1/2 cup ground almonds
    • 1/4 cup **milk**
    • 1/4 cup apricot jam
    • 1/4 cup sliced almonds
    • 1/4 cup **honey**
    • 1 tablespoon **dried lavender**
    • 1 teaspoon **fresh thyme**
    • 1 tablespoon sugar (for thyme)

    Instructions

    1. Preheat your oven to 350°F (175°C) and prepare a 10-inch springform pan by buttering it and lining the bottom with parchment paper.
    2. In a large mixing bowl, beat the eggs, sugar, and canola oil on high speed until the mixture becomes thick and pale, about 8 minutes.
    3. Add the ricotta cheese, lemon juice, lemon zest, vanilla extract, almond extract, orange liqueur, and rum to the egg mixture. Mix until well blended.
    4. In a separate bowl, sift together the ground almonds, flour, baking powder, and salt. Gradually whisk this dry mixture into the ricotta mixture in three additions, ensuring each incorporation is smooth.
    5. Pour the batter into the prepared springform pan. Bake in the preheated oven for 45-50 minutes, or until a wooden skewer inserted into the center comes out clean.
    6. While the cake is baking, prepare the glaze by gently heating the honey and dried lavender in a small saucepan. Allow it to infuse for a few minutes before straining out the lavender.
    7. Once the cake is done, increase the oven temperature to 375°F (190°C).
    8. Heat the milk and stir in 2 tablespoons of sugar. Toss in the sliced almonds, ensuring they are well coated.
    9. In another bowl, blend together 3/4 cup ricotta, 1 egg, 1/4 cup sugar, lemon zest, and vanilla extract. Spread this ricotta mixture over the baked cake and sprinkle with the sugared almonds.
    10. Return the cake to the oven and bake for an additional 15 minutes, until the almonds are a golden brown.
    11. Remove from the oven and brush the strained lavender-honey glaze gently over the almonds.
    12. Allow the cake to cool before removing it from the springform pan.

    Pro Tips from Meaghan’s Kitchen

    • For a more intense lavender flavor, let the lavender steep in the honey for a longer period, but avoid overheating which can turn it bitter.
    • Use a mortar and pestle to crush fresh thyme with sugar for the batter, releasing aromatic oils that infuse the cake with subtle herbal notes.
    • Ensure your eggs are at room temperature for better volume and a lighter cake texture.
    • Toasting the almonds before adding them as a topping enhances their nuttiness and adds a delightful crunch.
    • For a clean release, lightly grease your parchment paper lining in the pan.

    Variations & Dietary Swaps

    • Gluten-Free Version: Substitute the all-purpose flour with almond flour for a completely gluten-free delight.
    • Extra Citrus Zest: For a zingier profile, add an extra tablespoon of orange zest to the batter.
    • Nut-Free Option: Omit the almonds and use a nut-free crumb topping for those with nut allergies.

    What to Serve With It

    This Luscious Almond Ricotta Cake pairs beautifully with a glass of chilled Moscato, its sweetness complementing the cake’s subtle floral notes. For a cozy pairing, enjoy a hot cup of chamomile tea, which echoes the gentle herbal undertones of the lavender. Either choice will elevate your cake experience to a new level of enjoyment.

    Storage & Meal Prep

    To store, wrap the cake tightly in plastic wrap and keep it in the refrigerator for up to 4 days. For longer storage, freeze individual slices wrapped in parchment paper and placed in a freezer-safe container. Thaw overnight in the fridge. To reheat, warm slices in the oven at 300°F (150°C) for about 10 minutes, or until just heated through.

    FAQ

    Can I use fresh lavender instead of dried?

    Yes, you can, but use about double the amount of fresh lavender, as dried lavender is more concentrated in flavor.

    What if I don’t have a springform pan?

    You can use a regular 10-inch cake pan, but line it well with parchment paper for easy removal.

    Is there an alternative to orange liqueur?

    Feel free to substitute with extra lemon juice or a splash of amaretto for a different twist.

    Can I make this cake ahead of time?

    Absolutely! This cake actually tastes even better the next day as the flavors have more time to meld.

    How do I prevent the cake from getting too brown on top?

    If you notice the top browning too quickly, cover it loosely with aluminum foil halfway through baking.

    Final Thoughts

    Creating this Luscious Almond Ricotta Cake with Lavender-Honey Glaze has been a journey of culinary exploration and love. I hope you feel the same joy and satisfaction in your kitchen as I do in mine when baking this delightful dessert. I would love to hear about your own baking adventures, so please leave a comment or share your creation with me on social media. Happy baking, dear friends!

    Related update: Luscious Almond Ricotta Cake with Lavender-Honey Glaze

    Related update: Pumpkin Spice Cookie Ice Cream with Spiced Caramel Swirl

  • Gourmet Truffle Onion Cheese Bites with Herb-Infused Drizzle | Made by Meaghan Moineau

    Gourmet Truffle Onion Cheese Bites with Herb-Infused Drizzle | Made by Meaghan Moineau

    Gourmet Truffle Onion Cheese Bites with Herb-Infused Drizzle

    Imagine the aroma of sweet onions caramelizing in your kitchen, mingling with the heady scent of truffle oil. It’s the kind of fragrance that draws everyone to the kitchen, sparking intrigue and appetites. Today, we’re diving into a dish that takes a classic appetizer and elevates it to gourmet status: the irresistible Gourmet Truffle Onion Cheese Bites with Herb-Infused Drizzle.

    Personal Story

    These delightful bites have a special place in my heart. I first encountered a version of them at a holiday soiree thrown by a dear friend. I remember standing by the appetizer table, tasting each bite slowly, savoring the rich combination of cheese and onion. It was love at first bite. I knew I had to recreate them at home, but with my own twist.

    The first time I attempted to make these, it was a bit of a kitchen mishap. I underestimated the potency of truffle oil and ended up with something that could only be described as a truffle explosion. It was a valuable lesson in restraint. Since then, I’ve fine-tuned the balance, creating a harmonious blend that highlights the earthy truffle without overwhelming the palate.

    Through trial, error, and a healthy dose of taste testing, I discovered that infusing the mayonnaise with truffle oil before mixing it into the onion mixture added a deeper, more nuanced flavor. And as a fresh pop that elevates the whole experience, a delicate herb-infused drizzle was born.

    This recipe has now become a staple at my own gatherings, often requested by friends and family. It’s a joy to watch people’s faces light up with that first taste, just as mine did years ago.

    What Makes This Version Special

    What sets this version of the Truffle Onion Cheese Bites apart is the infusion process. By infusing the onion mixture with truffle oil, the dish gains an earthy depth that you simply don’t get with the basic recipe. The truffle oil is infused into the mayonnaise, allowing it to permeate every bite with its luxurious aroma. The pièce de résistance is the herb-infused olive oil drizzle, which adds a fresh, vibrant finish that perfectly complements the richness of the truffle and cheese.

    Flavor Profile

    Each bite of these Gourmet Truffle Onion Cheese Bites is a journey of flavors. The richness of the parmigiano-reggiano cheese melds seamlessly with the sweet onions, creating a savory base that is elevated by the earthy, aromatic notes of truffle oil. The herb-infused drizzle adds an unexpected burst of freshness, with hints of garlic, thyme, and basil dancing on your taste buds. Imagine a savory, creamy bite that ends with a light, herbaceous lift — it’s a flavor experience that keeps you coming back for more.

    Ingredients

    • 1 large yellow sweet onion, finely chopped
    • 2 tablespoons mayonnaise
    • 1 cup grated **parmigiano-reggiano cheese**, plus extra for sprinkling
    • 1 tablespoon chopped fresh parsley
    • Sea salt and freshly ground pepper to taste
    • 8 slices of white bread
    • 1 tablespoon **truffle oil**
    • 2 sprigs fresh thyme
    • 2 sprigs fresh basil
    • 1 clove garlic, smashed
    • 4 tablespoons **extra virgin olive oil**

    Instructions

    1. Preheat your oven to 350°F (175°C) and line a cookie sheet with parchment paper.
    2. In a small bowl, infuse the mayonnaise with the **truffle oil**. Mix and let it sit for at least 30 minutes to allow the flavors to meld.
    3. In a medium bowl, combine the sweet onion, infused mayonnaise, 1 cup of grated **parmigiano-reggiano**, and parsley. Season generously with sea salt and freshly ground pepper.
    4. Remove the crusts from the white bread. Using a 1-inch round cookie cutter, cut each slice into four rounds, resulting in 32 pieces. Place them on the prepared cookie sheet.
    5. Bake the bread rounds in the preheated oven, without turning, until golden-brown, approximately 10-15 minutes. Keep an eye on them to avoid over-browning.
    6. While the bread rounds are baking, create the herb-infused olive oil drizzle. Gently warm the extra virgin olive oil in a small saucepan over low heat. Add the smashed garlic, fresh thyme, and basil. Let it simmer for 5 minutes, then remove from heat and set aside to steep.
    7. Preheat your broiler. Spread about 1 teaspoon of the onion mixture onto each baked bread round. Sprinkle with additional grated **parmigiano-reggiano**.
    8. Broil the topped rounds for 1-2 minutes, just until the cheese is melted and bubbly. Watch closely to prevent burning.
    9. Drizzle the herb-infused olive oil over the bites just before serving. Serve immediately to enjoy them at their peak flavor.

    Pro Tips from Meaghan’s Kitchen

    • For the best flavor, use high-quality truffle oil. A little goes a long way, so invest in a good bottle.
    • Allowing the truffle oil to infuse in the mayonnaise is crucial. Don’t rush this step if you want that deep, earthy flavor.
    • If you prefer a stronger garlic flavor, let the garlic steep in the olive oil overnight. The longer it infuses, the more pronounced the garlic taste.
    • To save time, you can prepare the onion mixture and herb-infused olive oil drizzle a day ahead. Just store them in the fridge and assemble the bites when ready to serve.
    • Uniformly cut bread rounds ensure even toasting and a consistent look for your appetizer platter.

    Variations & Dietary Swaps

    • Vegetarian Swap: This dish is naturally vegetarian, but ensure your cheese is vegetarian-friendly by checking for non-animal rennet.
    • Spice-It-Up Version: Add a pinch of red pepper flakes to the onion mixture for a little heat. You can also sprinkle some on top before broiling.
    • Kids-Friendly Version: Replace the truffle oil with a mild olive oil and reduce the amount of onion. This results in a milder flavor that kids might enjoy more.

    What to Serve With It

    These Gourmet Truffle Onion Cheese Bites are a versatile appetizer, perfect for both casual gatherings and elegant affairs. They pair beautifully with a chilled glass of Prosecco, the bubbles complementing the richness of the bites. For a balanced meal, serve them alongside a light arugula salad dressed in lemon vinaigrette. The peppery greens and citrusy dressing cut through the richness, creating a harmonious balance.

    Storage & Meal Prep

    If you happen to have leftovers (though I doubt you will!), store them in an airtight container in the fridge for up to 3 days. To reheat, place them in a preheated oven at 350°F (175°C) for about 5 minutes, just until warmed through. Avoid microwaving as it can make the bread soggy.

    For meal prep, you can make the onion mixture and herb-infused olive oil drizzle ahead of time. Store them separately in the fridge and assemble the bites right before serving for the best texture and flavor.

    FAQ

    Can I use a different type of bread for this recipe?

    Yes, you can use any bread you prefer, though white bread ensures a neutral, soft base. French baguette slices would also work well for a heartier texture.

    Is there a substitute for truffle oil if I can’t find it?

    If truffle oil is unavailable, you can skip it, though it will change the flavor profile. Consider adding a touch of mushroom powder to mimic some earthiness.

    What if I don’t like raw onions?

    The onions are finely chopped and mixed with other ingredients, softening their bite. For a milder onion flavor, you can lightly sauté them before mixing.

    Can I make this recipe vegan?

    To make this recipe vegan, substitute the mayonnaise with a vegan version and use nutritional yeast in place of parmigiano-reggiano. Ensure the bread is also vegan-friendly.

    How do I store the herb-infused olive oil?

    Store any leftover herb-infused olive oil in a sealed container in the fridge for up to a week. Use it to add flavor to salads or roasted vegetables.

    Final Thoughts

    There you have it — a recipe that transforms humble ingredients into a gourmet experience. These Gourmet Truffle Onion Cheese Bites with Herb-Infused Drizzle are sure to be the star of any gathering, leaving guests talking about them long after the plates are cleared. I hope you enjoy making and sharing this dish as much as I do. If you give it a try, I’d love to hear how it turns out! Leave a comment below or share your photos on social media. Happy cooking!

    Related update: Gourmet Truffle Onion Cheese Bites with Herb-Infused Drizzle

  • Orange Blossom Amaretto Almond Cookies with Dark Chocolate Drizzle | Made by Meaghan Moineau

    Orange Blossom Amaretto Almond Cookies with Dark Chocolate Drizzle | Made by Meaghan Moineau

    Orange Blossom Amaretto Almond Cookies with Dark Chocolate Drizzle

    The moment the cookies hit the oven, the kitchen fills with a warm, nutty aroma, hinting at the rich, complex flavors to come. Imagine biting into a delicate almond cookie, its soft center revealing a whisper of citrus and the bold embrace of dark chocolate.

    These Orange Blossom Amaretto Almond Cookies with Dark Chocolate Drizzle are not just a treat — they’re an experience.

    Personal Story

    There’s something about the combination of almonds and amaretto that instantly transports me back to my grandmother’s sunlit kitchen in Tuscany. I remember being a little girl, watching her expertly toss ingredients together, turning the mundane into the magical. Her hands moved with rhythmic precision, each motion a testament to years of practice and love.

    On one particularly memorable afternoon, I stood at her side, flour dusted on my cheek, my small fingers attempting to mimic her grace. She caught my eye and handed me a spoon, “Try this,” she urged, as she slid a bowl of her famous almond cookie dough my way. The taste was sublime — nutty, sweet, with a hint of something floral I couldn’t quite place. It was a moment that marked the beginning of my love affair with baking.

    Years later, while flipping through her recipes, I found a scribbled note at the corner of the page, suggesting the addition of orange blossom water. Curiosity piqued, I set out to recreate and elevate her classic cookie. Thus, these Orange Blossom Amaretto Almond Cookies with Dark Chocolate Drizzle were born, a tribute to her timeless recipe with a modern twist that I hope she would’ve loved.

    And as for the dark chocolate drizzle? That was an accident, a kitchen mishap that turned into a stroke of genius. One day, while reaching for the amaretto, I accidentally knocked over a bar of dark chocolate into the cookie dough. Fate, it seems, had a delicious plan in mind.

    What Makes This Version Special

    These cookies are enhanced with the delicate aroma of orange blossom water and topped with a decadent dark chocolate drizzle, offering a sophisticated twist on a classic treat. The orange blossom water infuses the cookies with a subtle floral note that elevates the traditional almond flavor profile. The addition of dark chocolate adds a luxurious, bittersweet contrast that complements the sweetness of the cookies perfectly. This version is a refined take on the standard recipe, offering a complexity and depth of flavor that’s sure to impress.

    Flavor Profile

    Prepare your taste buds for a journey through layers of flavor. The first bite reveals a nutty, aromatic base, thanks to the ground almonds and almond extract. As you savor the cookie, hints of citrus from the orange blossom water and lemon rind begin to unfold, adding a refreshing brightness to the rich, buttery dough. Finally, the dark chocolate drizzle finishes the experience with its silky, bittersweet touch. It’s a symphony of flavors that dance on your palate with every bite.

    Ingredients

    • 1 cup unsalted butter
    • 1/2 cup molasses
    • 2 large eggs
    • 2 cups ground almonds
    • 1 teaspoon almond extract
    • Zest of 1 lemon
    • 1/4 cup Amaretto
    • 2 cups whole wheat pastry flour
    • **2 teaspoons orange blossom water**
    • **1/2 cup dark chocolate, melted**

    Instructions

    1. Preheat your oven to 350°F (175°C). Line your cookie sheets, although these cookies won’t stick, it’s always safer to use parchment paper.
    2. In a small saucepan, gently warm the butter and **orange blossom water** together over low heat until just combined. This infusion step will allow the floral notes to meld beautifully with the butter. Remove from heat and cool slightly.
    3. In a large mixing bowl, cream together the infused butter and molasses until light and fluffy. This should take about 3-4 minutes. The mixture should be smooth with a rich, caramel hue.
    4. Add the eggs, one at a time, mixing well after each addition. Then, incorporate the ground almonds, lemon rind, and almond extract, stirring until just combined.
    5. Slowly add the **Amaretto**, alternating with the whole wheat pastry flour. Mix until the dough is smooth and holds together, but be careful not to overmix.
    6. Drop the dough by teaspoonsful onto the prepared cookie sheets, leaving about 2 inches between each cookie to allow for spreading.
    7. Bake in the preheated oven for 12-15 minutes, or until the edges are golden brown. Your kitchen will smell divine, a sure sign they’re nearly done.
    8. Once baked, let the cookies cool on the sheets for 5 minutes before transferring them to a wire rack to cool completely.
    9. Once cooled, drizzle the **melted dark chocolate** over the cookies. Use a spoon or a piping bag with a fine tip for an elegant finish. Allow the chocolate to set before serving.

    Pro Tips from Meaghan’s Kitchen

    • If you don’t have a piping bag, a zip-top bag with a small corner cut off works perfectly for drizzling the chocolate.
    • For an enhanced citrus punch, you can add a little extra lemon zest to the dough.
    • Want a chewier cookie? Slightly underbake them, removing from the oven when the centers are just set.
    • Use a quality **dark chocolate** with at least 70% cocoa for a rich, flavorful drizzle.
    • Store your orange blossom water in the fridge to extend its shelf life and keep its aroma vibrant.

    Variations & Dietary Swaps

    • Gluten-Free Version: Replace the whole wheat pastry flour with a gluten-free all-purpose flour blend. The texture will remain wonderfully chewy.
    • Nut-Free Alternative: Swap the ground almonds for sunflower seed flour and use vanilla extract instead of almond extract. The flavor will differ but still be delightful.
    • Spice-It-Up Version: Add a teaspoon of cinnamon and a pinch of nutmeg to the dough for a warm, spiced twist.

    What to Serve With It

    These cookies pair beautifully with a glass of sparkling Prosecco, the bubbles perfectly complementing the cookie’s texture and flavors. For a non-alcoholic option, a cup of Earl Grey tea, with its own subtle notes of citrus and bergamot, makes for a calming match.

    Storage & Meal Prep

    To keep your cookies fresh, store them in an airtight container at room temperature for up to a week. For longer storage, you can freeze the cookies in a freezer-safe bag or container for up to three months. When you’re ready to enjoy them, let them come to room temperature or warm them in a 300°F (150°C) oven for about 5 minutes. The drizzled chocolate will hold up beautifully even after freezing.

    FAQ

    Can I substitute orange blossom water with something else?

    Yes, if you can’t find orange blossom water, you can use a teaspoon of vanilla extract for a different, yet still delicious, flavor.

    What type of molasses should I use?

    For a milder flavor, use light molasses. If you prefer a stronger, more robust flavor, dark molasses is the way to go.

    Can I make these cookies without alcohol?

    Absolutely! Simply omit the Amaretto or replace it with a non-alcoholic almond syrup for a similar flavor without the alcohol.

    Why are my cookies spreading too much?

    Ensure your butter isn’t too warm when mixing the dough, and chill the dough for 30 minutes before baking if your kitchen is particularly warm.

    How do I know when the cookies are done?

    The cookies should be golden brown around the edges and slightly soft in the center. They will continue to firm up as they cool.

    Final Thoughts

    Baking these Orange Blossom Amaretto Almond Cookies with Dark Chocolate Drizzle is like giving a warm hug to your taste buds. Each batch is a small celebration of flavor, nostalgia, and a touch of culinary adventure. I hope you find as much joy in baking and sharing these cookies as I have. I’d love to hear about your experience, so please leave a comment or share your thoughts on social media. Happy baking, my friends!

    Related update: Orange Blossom Amaretto Almond Cookies with Dark Chocolate Drizzle

    Related update: Decadent Chai Rice Pudding with Rosewater and Pistachio Crunch

  • Zesty Lemon Poppy Seed Lava Cakes with Spiced Chocolate Ganache | Made by Meaghan Moineau

    Zesty Lemon Poppy Seed Lava Cakes with Spiced Chocolate Ganache | Made by Meaghan Moineau

    Zesty Lemon Poppy Seed Lava Cakes with Spiced Chocolate Ganache

    Imagine this: a warm, golden-brown cake with a delicate crust, cradling a pool of molten chocolate that spills onto your plate with the first forkful. The aroma of fresh lemon zest mingles with the warm, spiced scent of cardamom and ginger, creating a sensory symphony that dances around your kitchen. Welcome to the world of Zesty Lemon Poppy Seed Lava Cakes with Spiced Chocolate Ganache — a dessert that tantalizes both your taste buds and your imagination.

    Personal Story

    When I was a little girl, my grandmother would often bake her famous lemon poppy seed cake. It was a simple yet decadent treat, and I can still recall the scent wafting through the house, mingling with the laughter of family gatherings. That cake was a staple at our family celebrations, a beloved tradition that brought everyone together around the dining table.

    Fast forward to a few years ago when I found myself in Paris, walking through a bustling market. I stumbled upon a quaint patisserie where I experienced my first taste of molten chocolate lava cake. The intense richness of the chocolate was perfectly balanced by a hint of spice, an unexpected twist that left me dreaming of recreating the experience back home.

    Inspired by those memories, I embarked on a culinary journey to merge these two beloved desserts into one perfect fusion. The result? Zesty Lemon Poppy Seed Lava Cakes with Spiced Chocolate Ganache. Each bite is a nostalgic nod to my past, while the rich, spiced ganache adds a bold and contemporary twist.

    Not only does this recipe marry two beloved flavors, but it also embodies the essence of my culinary philosophy: to honor tradition while embracing innovation. This dish is a testament to the joys of experimentation and the magic that happens when you bring together unexpected ingredients.

    What Makes This Version Special

    This isn’t just any lemon poppy seed cake or molten chocolate lava cake — it’s a delightful fusion that brings together the best of both worlds. By incorporating a hint of cardamom and ginger into the chocolate ganache, this version creates a warm, spiced flavor that perfectly complements the zesty lemon cake. The result is a harmonious blend that elevates the traditional dessert to new heights, offering a sophisticated twist that’s both surprising and satisfying.

    Why settle for a standard recipe when you can indulge in a dessert that tantalizes the senses and surprises the palate? This version is not only a feast for your taste buds but also an experience that your guests will remember and rave about.

    Flavor Profile

    Imagine a bite that begins with the fresh, zingy pop of lemon and the nutty crunch of poppy seeds. As you reach the center, the warm, spiced chocolate ganache spills out in a silky cascade, enveloping your senses in a rich and aromatic embrace. The balance of sweetness and spice is delicate yet pronounced, creating a flavor experience that lingers beautifully on the palate.

    Every element of this dish works in harmony: the zesty brightness of the lemon cake, the subtle warmth of the spices, and the deep, rich chocolate — all coming together in a symphony of flavors that feels both nostalgic and novel.

    Ingredients

    • 1 cup all-purpose flour
    • 1 tablespoon grated lemon rind
    • 2 tablespoons poppy seeds
    • 3 large egg yolks
    • 3/4 cup granulated sugar
    • 1/2 cup unsalted butter, melted
    • 3 large egg whites
    • 6 ounces bittersweet chocolate, chopped
    • 1 teaspoon ground cardamom
    • 1/2 teaspoon ground ginger
    • 1 teaspoon vanilla extract
    • Pinch of salt

    Instructions

    1. Position a rack in the center of the oven and preheat to 400 degrees F. Lightly butter six 6-ounce ramekins, dust with sugar, and place on a baking sheet.
    2. In a small bowl, whisk together the flour, lemon rind, and poppy seeds; set aside.
    3. In the 4-1/2 quart bowl of a heavy-duty electric mixer using the wire whip attachment, whip the egg yolks and sugar until the mixture is pale and forms a ribbon when the whip is lifted. Add the vanilla extract and a pinch of salt for enhanced depth of flavor.
    4. Place the egg whites in a medium grease-free bowl and using a hand-held electric mixer, whip the whites to soft peaks.
    5. Fold the flour mixture into the yolk/sugar mixture, then add the melted butter and gently mix until combined. Fold in the egg whites until combined.
    6. In a small saucepan, melt the chocolate over low heat. Once melted, remove from heat and stir in the ground cardamom and ground ginger for a spiced kick.
    7. Fill each of the prepared ramekins 3/4 full with the cake batter and place a 1-ounce piece of the spiced chocolate ganache in the center of the batter.
    8. Bake for 15 minutes or until the cakes are firm yet have a slight jiggle in the center. Allow to cool on a wire rack for 5 minutes.
    9. Gently invert each cake onto a dessert plate and serve warm, letting the spiced chocolate ganache ooze out enticingly.

    Pro Tips from Meaghan’s Kitchen

    • For a more intense lemon flavor, consider adding a bit of freshly squeezed lemon juice to the batter.
    • Ensure your egg whites are at room temperature before whipping for maximum volume.
    • Gently fold the egg whites into the batter to maintain airiness — overmixing can result in dense cakes.
    • If you’re short on time, you can prepare the spiced chocolate ganache in advance and refrigerate it until needed.
    • Use a serrated knife to chop the chocolate; it will prevent the chocolate from flying everywhere.

    Variations & Dietary Swaps

    • For a gluten-free version, substitute the all-purpose flour with a gluten-free flour blend.
    • Spice it up by adding a pinch of cayenne pepper to the ganache for an extra kick.
    • Make it kid-friendly by omitting the spices and using milk chocolate instead of bittersweet chocolate.

    What to Serve With It

    These Zesty Lemon Poppy Seed Lava Cakes with Spiced Chocolate Ganache are a show-stopping dessert on their own, but for a truly indulgent experience, pair them with a chilled glass of sparkling Moscato. The effervescence and sweetness of the wine complement the rich flavors perfectly. Alternatively, a scoop of vanilla bean ice cream adds a creamy contrast to the warm, gooey center.

    Storage & Meal Prep

    These lava cakes are best enjoyed fresh from the oven, but if you have leftovers, you can store them in an airtight container in the refrigerator for up to 2 days. To reheat, place them in a preheated oven at 350 degrees F for about 5-7 minutes or until warmed through. If freezing, wrap each cake tightly in plastic wrap and then aluminum foil. They can be frozen for up to 1 month. Thaw in the refrigerator overnight before reheating.

    FAQ

    Can I use milk chocolate instead of bittersweet chocolate?

    Yes, you can substitute milk chocolate for a sweeter, creamier ganache. Keep in mind that it will be less intense than bittersweet chocolate.

    What if I don’t have cardamom at home?

    No worries! You can substitute with cinnamon, though the flavor profile will be slightly different. The warmth of cinnamon pairs well with ginger and chocolate.

    How do I know when the cakes are done baking?

    The cakes should be firm around the edges but have a slight jiggle in the center. This indicates that the chocolate core remains gooey.

    Can I make the batter ahead of time?

    It’s best to prepare and bake the batter immediately for optimal texture. However, you can prepare the dry and wet ingredients separately a day in advance and combine them right before baking.

    What if I don’t have ramekins?

    If you don’t have ramekins, you can use muffin tins as an alternative. Just be sure to adjust the baking time slightly as they may cook faster.

    Final Thoughts

    Thank you for joining me on this delicious journey of creating Zesty Lemon Poppy Seed Lava Cakes with Spiced Chocolate Ganache. I hope this recipe brings as much joy and warmth to your kitchen as it does to mine. I encourage you to experiment and adapt as you see fit — after all, cooking is as much about personal expression as it is about flavor. Don’t hesitate to share your culinary creations and experiences in the comments below. Happy baking, my dear friends!

    Related update: Zesty Lemon Poppy Seed Lava Cakes with Spiced Chocolate Ganache

    Related update: Decadent Honey-Roasted Peanut Butter Ice Cream with Dark Chocolate Shards

  • Maple-Glazed Bacon Wrapped Pork Tenderloin with Smoked Paprika | Made by Meaghan Moineau

    Maple-Glazed Bacon Wrapped Pork Tenderloin with Smoked Paprika | Made by Meaghan Moineau

    Maple-Glazed Bacon Wrapped Pork Tenderloin with Smoked Paprika

    Imagine the sizzle of bacon meeting the gentle caramelization of maple syrup, enveloping a perfectly seasoned pork tenderloin. This culinary delight tantalizes the senses with its sweet, smoky, and savory symphony, making it an irresistible centerpiece for any meal.

    Personal Story

    Every family has that one dish that always steals the show during gatherings. For mine, it’s always been the classic pork tenderloin. I remember the first time I tried to cook it solo; I was determined to elevate the dish beyond my grandmother’s simple yet delicious recipe. I wanted something that would leave everyone talking, something unforgettable. That’s when I stumbled upon the idea of wrapping it in bacon. But, not just any bacon-wrapped tenderloin — it needed a twist.

    One autumn afternoon, while watching the leaves cascade from the trees in a flurry of reds and golds, inspiration struck. The answer was in the sweet, smoky allure of maple syrup; it was the missing puzzle piece that would elevate the dish from ordinary to extraordinary. Combining it with a hint of smoky paprika and the earthiness of fresh sage seemed like a symphonic blend of flavors destined to come together.

    However, my first attempt was a kitchen disaster. I forgot to preheat the oven and ended up with a chewy mess instead of a tender masterpiece. But with every misstep, I learned. I perfected the maple glaze, discovered the right bacon crispness, and honed my timing to a science. And every time I prepare this dish now, it’s a beautiful reminder of those early culinary adventures.

    Today, the Maple-Glazed Bacon Wrapped Pork Tenderloin with Smoked Paprika has become a signature favorite at our gatherings, always leaving family and friends asking for more. The journey from kitchen mishap to mouthwatering success is a testament to the power of creativity and persistence in the kitchen.

    What Makes This Version Special

    The beauty of this Maple-Glazed Bacon Wrapped Pork Tenderloin with Smoked Paprika lies in its complex layering of flavors. The sweet and smoky maple glaze adds depth to the dish, while the hint of smoked paprika enhances the savory punch from the bacon wrap. This version of the classic pork tenderloin transcends the mundane by infusing a rich tapestry of flavors that awaken the palate. Unlike the standard bacon-wrapped tenderloin, this recipe transforms it into a gourmet experience with its sophisticated glaze and aromatic accompaniments.

    Flavor Profile

    Imagine biting into a succulent piece of pork tenderloin, perfectly cooked and enveloped in crispy bacon. The first taste is a delightful mix of sweetness and smokiness, with the maple syrup providing a caramelized glaze that dances on the taste buds. The smoked paprika adds an earthy depth, while the fresh sage leaves impart a subtle herbaceous note. Together, these flavors create a harmonious balance that’s both comforting and exciting, a true testament to culinary craftsmanship.

    Ingredients

    • Pork tenderloin – 2 pieces
    • **Bacon** – enough slices to wrap tenderloins
    • Black pepper – to taste
    • Coarse salt – to taste
    • **Fresh sage** – about 9-10 leaves
    • Garlic powder – a pinch
    • **2 tablespoons maple syrup**
    • **1 teaspoon smoked paprika**
    • **1 teaspoon Dijon mustard**

    Instructions

    1. Preheat your oven to 425°F (220°C). This step is crucial for achieving that perfect golden-brown crust on your tenderloin.
    2. Remove about an inch off the tapered end of each tenderloin to make a perfect cylinder. This ensures even cooking throughout.
    3. Season the tenderloins generously with coarse salt, black pepper, and a pinch of garlic powder. This foundational seasoning sets the stage for the bold flavors to come.
    4. In a small bowl, mix the maple syrup and Dijon mustard until well combined. Brush this glaze over the surface of the tenderloins, ensuring every nook and cranny is covered.
    5. On a sheet of cling wrap, lay out the bacon strips in an overlapping line. This will form the crispy exterior of your dish.
    6. Sprinkle the smoked paprika over the bacon, embedding a deep smoky flavor into the wrap.
    7. Place the sage leaves all over the bacon, about 9-10 leaves in total, to add a fragrant earthy note.
    8. Position one piece of tenderloin across the short ends of the bacon and roll to cover it completely with the bacon. Repeat for the other tenderloin segment.
    9. Transfer the bacon-wrapped tenderloins to a non-stick pan and sear on all sides over medium-high heat. This step is key to achieving a crispy, golden-brown exterior.
    10. Once seared, transfer the pan to the preheated oven. Cook for 8-10 minutes, turning the pieces after 5 minutes to ensure even cooking. You’re aiming for an internal temperature of 145°F (63°C).
    11. Remove from the oven and let it rest for at least 5 minutes before slicing. This allows the juices to redistribute, ensuring every bite is juicy and flavorful.

    Pro Tips from Meaghan’s Kitchen

    • When brushing the glaze, let it sit for a few minutes to slightly absorb into the meat before wrapping it with bacon.
    • Use a meat thermometer to ensure the tenderloin reaches the perfect internal temperature without overcooking.
    • For a beautiful presentation, slice the tenderloin into 1-inch medallions and serve fanned out on a platter.
    • If you prefer a spicier kick, add a sprinkling of crushed red pepper flakes to the glaze mixture.
    • Wrapping the tenderloins tightly in bacon helps maintain their shape and ensures an even cook.

    Variations & Dietary Swaps

    • Vegetarian Swap: Replace the pork with a thick, firm tofu. Follow the same steps for seasoning and wrapping with vegetarian bacon.
    • Spice-It-Up Version: Add a tablespoon of sriracha or hot sauce to the maple-Dijon glaze for an extra spicy kick.
    • Kids-Friendly Version: Use a honey glaze instead of maple syrup for a sweeter, milder flavor that kids will love.

    What to Serve With It

    This Maple-Glazed Bacon Wrapped Pork Tenderloin pairs beautifully with a glass of medium-bodied Pinot Noir, its acidity balancing the dish’s richness. For sides, roasted Brussels sprouts with a touch of balsamic vinegar or a creamy garlic mashed potato will complement the savory-sweet profile perfectly.

    Storage & Meal Prep

    If you find yourself with leftovers (a rare occurrence with this dish), store them in an airtight container in the fridge for up to three days. To reheat, place in a preheated oven at 350°F (175°C) for about 15 minutes, or until warmed through. This dish also freezes well; wrap the cooked tenderloin in aluminum foil and store it in a freezer-safe bag for up to 2 months. Thaw overnight in the fridge before reheating.

    FAQ

    Can I use turkey bacon instead of regular bacon?

    Absolutely! Turkey bacon will work just as well, though it may not crisp up quite the same way. Keep an eye on it during the searing process.

    What if I don’t have smoked paprika?

    If smoked paprika is unavailable, you can use regular paprika and add a dash of liquid smoke to the glaze for a similar effect.

    How do I know when the pork tenderloin is done?

    The best way to ensure doneness is by using a meat thermometer. The internal temperature should reach 145°F (63°C) for perfectly cooked pork.

    Can I prepare this dish ahead of time?

    Yes, you can prepare the tenderloin up to the searing step and refrigerate it overnight. Allow it to come to room temperature before continuing with the oven cooking process.

    What other herbs can I use instead of sage?

    Rosemary or thyme can be excellent substitutes if sage is not to your liking. They will provide a different but equally aromatic flavor profile.

    Final Thoughts

    Cooking is an adventure, and this Maple-Glazed Bacon Wrapped Pork Tenderloin with Smoked Paprika is a testament to how a little creativity can transform a classic into a show-stopping masterpiece. I’d love to hear how your dish turned out, so feel free to leave a comment or share your own twists on the recipe. Until next time, happy cooking from my kitchen to yours!

    Related update: Maple-Glazed Bacon Wrapped Pork Tenderloin with Smoked Paprika

    Related update: Zesty Citrus-Herb Pork Carnitas Tacos with Pineapple Salsa

  • Gourmet Candy Cane Cookies with Dark Chocolate Drizzle | Made by Meaghan Moineau

    Gourmet Candy Cane Cookies with Dark Chocolate Drizzle | Made by Meaghan Moineau

    Gourmet Candy Cane Cookies with Dark Chocolate Drizzle

    Imagine the smell of freshly baked cookies wafting through your kitchen, the gentle warmth of the oven creating an irresistible invitation to linger. These aren’t just any cookies — they’re Gourmet Candy Cane Cookies with a Dark Chocolate Drizzle, capturing the spirit of the holidays in every buttery, minty bite.

    The first time I attempted to make candy cane cookies, I was a starry-eyed teen in my grandmother’s bustling kitchen. She had this way of turning simple ingredients into creations that felt both magical and memorable. I can still recall the tactile joy of twisting vibrant red and snowy white dough into those whimsical candy cane shapes, the peppermint scent mingling with the rich, comforting aroma of baking. It was our little tradition, and those afternoons spent in the kitchen were filled with laughter, flour dusted over our noses, and the joy of creating something beautiful together.

    Of course, not every baking session was perfect. There was the time I forgot to chill the dough, and my candy canes looked more like abstract art. Or the year I discovered the importance of using just the right amount of peppermint extract — a mere drop too much and the cookies went from delightfully minty to overpoweringly medicinal. But with each batch, I learned a bit more, and my love for these cookies only grew.

    This particular version of the candy cane cookies has become a staple in my kitchen — and for good reason. The addition of a dark chocolate drizzle and a sprinkle of sea salt elevates these cookies to a new level of indulgence. The chocolate adds a rich, decadent layer that beautifully complements the peppermint, while the sea salt offers just the right contrast, enhancing each flavor note. It’s a combination that pays homage to my grandmother’s traditional recipe while adding my own signature twist.

    What Makes This Version Special

    These Gourmet Candy Cane Cookies aren’t your average festive treat. What sets them apart is the luxurious interplay of flavors — think classic candy cane cookies, but with a sophisticated upgrade. The deep, melt-in-your-mouth dark chocolate drizzle is applied with an artistic flair, using a fork to create delicate swirls and lines over the cooled cookies. This touch not only makes them visually stunning but also introduces a velvety richness. And then there’s the sea salt — just a whisper of it, sprinkled with care before the chocolate sets, creating a flavor profile that dances between sweet, salty, and minty.

    This version is not just a celebration of flavors but also a nod to the artistry of baking. Each cookie is a mini canvas, a testament to the joy of holiday baking with a gourmet twist that makes them unforgettable.

    Flavor Profile

    The taste experience of these cookies is nothing short of delightful. The initial bite is a playful mix of buttery sweetness and cool mint, reminiscent of a winter wonderland. As you savor the cookie, the dark chocolate drizzle melts with a luxurious creaminess, introducing a deep, rich cocoa flavor. Just when you think you’ve captured all the flavors, the sea salt makes its entry, cutting through the sweetness with a subtle yet profound pop. It’s a symphony of flavors that leaves you reaching for just one more.

    Ingredients

    • 1 cup all-purpose flour
    • **1 egg yolk**
    • Red food coloring
    • 1/2 teaspoon peppermint extract
    • 1/2 cup powdered sugar
    • 1/2 cup unsalted butter, softened
    • 1/2 teaspoon vanilla extract
    • **4 ounces dark chocolate, melted**
    • **Sea salt flakes**

    Instructions

    1. Preheat your oven to 180°C (350°F) and line a baking sheet with parchment paper.
    2. Cream the unsalted butter in a large mixing bowl until smooth. Add the powdered sugar gradually, beating well after each addition until the mixture is light and fluffy.
    3. Incorporate the egg yolk into the creamed mixture, followed by the vanilla extract and peppermint extract. Stir just until combined.
    4. Gradually add the all-purpose flour in two additions, mixing well after each addition until a firm and smooth dough forms.
    5. Divide the dough into two equal portions. Add a few drops of red food coloring to one portion and knead gently until the color is evenly distributed.
    6. Wrap each dough ball in plastic wrap and refrigerate for about 30 minutes to firm up.
    7. Once chilled, remove the dough from the fridge. Roll a walnut-sized piece of red dough and a walnut-sized piece of white dough into 10-12 cm long ropes on a lightly floured surface.
    8. Place the two ropes side by side and twist them together gently, pressing slightly to form a spiral. Shape the twisted rope into a candy cane by bending one end to create the hook.
    9. Arrange the cookies on the prepared baking sheet, about 2 cm apart. Bake in the preheated oven for about 10 minutes or until the edges start to turn golden brown.
    10. Allow the cookies to cool completely on a wire rack.
    11. Once cooled, drape the cookies with the melted dark chocolate using a fork to create an artistic drizzle.
    12. Sprinkle a pinch of sea salt flakes over the chocolate before it sets for an unexpected flavor pop.

    Pro Tips from Meaghan’s Kitchen

    • Chilling the dough is crucial for maintaining the shape of the candy canes during baking. Don’t skip this step!
    • When adding food coloring, start with just a drop, then gradually add more to reach your desired shade. Too much can alter the dough’s texture.
    • Use a high-quality dark chocolate for the drizzle — it makes all the difference in flavor.
    • If your dough becomes too soft while working, pop it back in the fridge for a few minutes to firm up.
    • Instead of rolling each rope individually, try rolling the red and white dough together to create a more seamless twist.

    Variations & Dietary Swaps

    • Vegetarian Swap: Use a plant-based butter and a flax egg (1 tablespoon flaxseed meal + 3 tablespoons water) to make these cookies vegan-friendly.
    • Spice-It-Up Version: Add a sprinkle of cinnamon or nutmeg to the dough for a warm, spicy twist.
    • Kids-Friendly Version: Skip the dark chocolate drizzle and let kids decorate the cookies with colorful sprinkles or edible glitter.

    What to Serve With It

    These Gourmet Candy Cane Cookies are a delightful treat on their own, but they pair exceptionally well with a warm beverage. I highly recommend serving them with a mug of hot cocoa topped with whipped cream and a peppermint stick. The creamy cocoa enhances the minty notes of the cookies, creating a cozy, indulgent experience perfect for a wintry afternoon.

    Storage & Meal Prep

    Store your candy cane cookies in an airtight container at room temperature for up to a week. For longer storage, place them in a freezer-safe container and freeze for up to three months. To enjoy, simply thaw at room temperature for a few hours. If you prefer your cookies warm, you can reheat them in a preheated oven at 150°C (300°F) for about 5 minutes or until just warmed through.

    FAQ

    Can I make the dough ahead of time?

    Absolutely! You can prepare the dough up to 2 days in advance. Just wrap it tightly in plastic wrap and store it in the refrigerator until you’re ready to bake.

    What if I don’t have peppermint extract?

    If you’re in a pinch, you can substitute with vanilla extract, though the cookies will lose their signature minty flavor. Another option is to finely crush peppermint candies and incorporate them into the dough for a minty kick.

    Can I use white chocolate instead of dark chocolate?

    Yes, white chocolate can be a delicious alternative. It will offer a sweeter contrast to the minty cookies, so adjust the sea salt to taste.

    Why is my dough too sticky?

    If your dough feels too sticky, it may be due to overly softened butter or warm kitchen conditions. Chill the dough for an additional 15-20 minutes to firm it up.

    How can I ensure my cookies are the same size?

    Use a small cookie scoop or measure each dough piece to ensure consistency. This helps the cookies bake evenly and look uniform.

    Final Thoughts

    These Gourmet Candy Cane Cookies with Dark Chocolate Drizzle are more than just a sweet treat; they’re a celebration of the holiday spirit, a fusion of tradition and innovation. Whether you’re making them for a festive gathering or as a heartfelt gift, I hope these cookies bring as much joy to your kitchen as they do to mine. I can’t wait to hear how they turn out for you — feel free to share your baking adventures in the comments below. Happy baking, my friends!

    Related update: Gourmet Candy Cane Cookies with Dark Chocolate Drizzle

    Related update: Luscious Vegan Strawberry-Rose Shortcake with Coconut Cream

  • Decadent Spiced Chocolate Mousse in Hazelnut Chocolate Shells | Made by Meaghan Moineau

    Decadent Spiced Chocolate Mousse in Hazelnut Chocolate Shells | Made by Meaghan Moineau

    Decadent Spiced Chocolate Mousse in Hazelnut Chocolate Shells

    Imagine the moment you break through a perfectly crisp chocolate shell, revealing a velvety, spiced chocolate mousse that caresses your taste buds with warmth and richness. The nutty aroma of toasted hazelnuts mingles with the sweet scent of cinnamon and cardamom, creating an unforgettable dessert experience. This is not just any chocolate mousse — it’s an indulgence that elevates the classic French dessert to new heights.

    Personal Story

    My first encounter with chocolate mousse was a revelation. I was a teenager on a family trip to Paris, where I experienced the magic of French pâtisserie for the first time. The mousse was served in a quaint café tucked away in a cobblestone alley, and it was love at first bite. The lightness, the richness — it was a delicate balance I had never tasted before. Fast forward a few years, and my love for this dessert led me to experiment in my own kitchen, determined to recreate that Parisian magic.

    But, as many of us know, not all kitchen experiments go according to plan. My first attempt was more of a chocolate soup than a mousse. Undeterred, I delved into research, learning about the chemistry of chocolate and the art of creating that perfect airy texture. It was during one of these trials that I accidentally added a pinch of cinnamon and cardamom into the mix. What might have been a mishap turned into a serendipitous discovery.

    Infused with warming spices and encased in a delightful hazelnut chocolate shell, my version of the chocolate mousse was born. It was a hit at family gatherings and quickly became a requested favorite. The spices added warmth and depth, while the hazelnut shell provided a delightful crunch — a combination that was both nostalgic and refreshingly new.

    What Makes This Version Special

    This isn’t your typical chocolate mousse. Infused with warming spices and encased in a delightful hazelnut chocolate shell, this mousse elevates the classic dessert with a nutty and aromatic touch. By blooming spices in melted butter, we release their essential oils, enhancing the depth of flavor. The crunchy hazelnut shell provides a delightful contrast to the rich, creamy mousse inside. It’s a dessert that’s both sophisticated and approachable — a tribute to the beloved classic with a modern twist.

    Flavor Profile

    The first thing you’ll notice with this decadent spiced chocolate mousse is the aroma — the hazelnuts toasted to perfection, mingling with the sweet, exotic scents of cinnamon and cardamom. Upon tasting, the mousse reveals its rich, chocolatey core, elevated by the subtle warmth of the spices. The nutty crunch of the hazelnut shell adds texture, while the chocolate melts luxuriously on the tongue. It’s a symphony of flavors and textures, each bite more indulgent than the last.

    Ingredients

    • 1 3/4 cups whipping cream, divided
    • 8 oz quality semi-sweet chocolate chips
    • 1/4 cup strong coffee
    • 2 tbsp dark rum
    • 2 tbsp butter
    • 1 tsp gelatin
    • 1/2 tsp ground cinnamon
    • 1/4 tsp ground cardamom
    • 1 tsp vanilla extract
    • 1/2 cup hazelnuts
    • 6 oz extra semi-sweet chocolate chips for shell

    Instructions

    1. Chill 1 1/2 cups of whipping cream in the refrigerator while placing a metal mixing bowl and mixer beaters in the freezer.
    2. In a dry skillet, toast the hazelnuts over medium heat until aromatic, about 5-7 minutes. Allow them to cool slightly before grinding them finely in a food processor.
    3. In a double boiler, combine the 8 oz of chocolate chips, coffee, rum, and butter. Melt over barely simmering water, stirring constantly, until smooth. Remove from heat while a couple of chunks are still visible to prevent scorching.
    4. Bloom the spices by melting butter in a small pan over low heat. Add the ground cinnamon and cardamom, stirring until fragrant, then mix this into the melted chocolate. Allow the mixture to cool to just above body temperature, stirring occasionally.
    5. Pour the remaining 1/4 cup of whipping cream into a metal measuring cup and sprinkle in the gelatin. Let it bloom for 10 minutes, then carefully heat by swirling the cup over a low flame until the gelatin dissolves. Avoid boiling.
    6. Stir the gelatin mixture into the cooled chocolate, then set aside.
    7. Beat the chilled cream in the prepared mixing bowl to medium peaks. Stir 1/4 of the whipped cream into the chocolate mixture to lighten it, then fold in the remaining whipped cream in two additions. It’s okay if there are streaks of whipped cream; do not overwork the mousse.
    8. For the chocolate shells, melt the extra semi-sweet chocolate chips over a double boiler, then stir in the finely ground hazelnuts. Use this mixture to coat the inside of molds or bowls, creating a shell. Allow to set.
    9. Spoon the mousse into the prepared chocolate shells and chill for at least 1 hour before serving. Garnish with fruit if desired.

    Pro Tips from Meaghan’s Kitchen

    • For ultra-smooth mousse, ensure your chocolate mixture is just above body temperature before adding the gelatin. If it’s too hot, it can deflate the whipped cream.
    • Toasting the hazelnuts is key. It intensifies their flavor and adds a wonderful depth to the chocolate shell.
    • When folding the whipped cream into the chocolate, use a gentle hand. This step requires patience to maintain the mousse’s airy texture.
    • If you don’t have a double boiler, a heatproof bowl over a pot of simmering water works just as well. Just make sure the bottom of the bowl doesn’t touch the water.
    • For a glossy finish on your chocolate shells, temper the chocolate by cooling it to 82°F after melting, then gently reheating it to 88°F before forming the shells.

    Variations & Dietary Swaps

    • Vegetarian Version: Substitute the gelatin with agar-agar in equal amounts to make this dessert vegetarian-friendly.
    • Spice-it-Up: For an extra kick, add a pinch of cayenne pepper to the spice mix for a chocolate mousse with a hint of heat.
    • Kids-Friendly Version: Omit the dark rum and substitute the coffee with milk or a milk alternative for a non-caffeinated version.

    What to Serve With It

    This decadent spiced chocolate mousse shines on its own, but it becomes an elevated experience when paired with a glass of tawny port or a shot of espresso. The port’s sweet, nutty flavors complement the mousse perfectly, while the espresso provides a delightful contrast to the dessert’s richness.

    Storage & Meal Prep

    Store any leftover mousse in the refrigerator, covered with plastic wrap to prevent the surface from drying out. It will keep for up to three days. If you wish to freeze it, transfer the mousse into an airtight container and freeze for up to a month. To enjoy, let the mousse thaw in the refrigerator overnight. When reheating the chocolate shells, do so gently over a double boiler to maintain their structure.

    FAQ

    Can I use milk chocolate instead of semi-sweet chocolate?

    Yes, but keep in mind that milk chocolate is sweeter and will alter the flavor profile of the mousse. You might want to reduce the amount of added sugar in other components to balance the sweetness.

    How can I tell if the mousse is properly set?

    When properly set, the mousse should hold its shape when scooped and have a light, airy texture. If it feels too liquid, it may need more chilling time.

    What if my chocolate seizes while melting?

    If your chocolate seizes, add a teaspoon of warm water at a time and stir gently until it becomes smooth again. Ensure that your equipment is completely dry before starting to avoid this issue.

    Can I make this mousse without alcohol?

    Absolutely! Simply omit the dark rum and replace it with additional coffee or a coffee-flavored syrup for added depth without the alcohol content.

    Are there alternatives to hazelnuts for the shell?

    Yes, you can use almonds or pecans as a substitute, though each will impart a slightly different flavor and texture to the shell.

    Final Thoughts

    As you savor this decadent spiced chocolate mousse encased in a hazelnut chocolate shell, I hope it brings you a moment of pure indulgence and joy. Whether you’re crafting it for a special occasion or enjoying it as a luxurious treat for yourself, this mousse is all about the experience. I invite you to share your creations and stories in the comments below — let’s keep the conversation (and the chocolate) flowing!

    Related update: Decadent Spiced Chocolate Mousse in Hazelnut Chocolate Shells

    Related update: Gourmet Candy Cane Cookies with Dark Chocolate Drizzle

  • Mediterranean Citrus-Infused Semolina Cake with Spiced Honey Nuts | Made by Meaghan Moineau

    Mediterranean Citrus-Infused Semolina Cake with Spiced Honey Nuts | Made by Meaghan Moineau

    Mediterranean Citrus-Infused Semolina Cake with Spiced Honey Nuts

    Picture this: A sunlit kitchen filled with the intoxicating aroma of citrus and spices, where a golden-brown cake cools on the counter, glistening with a glossy syrup that catches the light just so. This isn’t just any cake; it’s a Mediterranean Citrus-Infused Semolina Cake with Spiced Honey Nuts, a dessert that promises to transport your taste buds straight to a sun-drenched Mediterranean coast.

    Personal Story

    My love affair with semolina cake began on a spontaneous trip to a small Mediterranean village. I was wandering through a bustling food market, where the air was thick with the scent of fresh spices and citrus. A local vendor, with a warm smile and hands that moved with the grace of a seasoned cook, offered me a slice of what I’d later come to know as basbousa—a semolina cake soaked in syrup. It was love at first bite.

    The texture was unlike anything I’d ever tasted — dense yet tender, with a syrup that was both sweet and subtly spiced. I knew then that I had to bring a piece of this culinary magic back home. Of course, my first few attempts in my kitchen were far from perfect. There was a memorable mishap where I mistook salt for sugar, resulting in a cake that was, let’s say, uniquely inedible.

    But with each attempt, I learned something new. I started experimenting with flavors, wanting to incorporate my own twist on the classic. After many trials, I finally landed on a version that felt like me. My Mediterranean Citrus-Infused Semolina Cake with Spiced Honey Nuts was born, and with it, a little piece of my heart.

    Now, whenever I make this cake, I remember that sunlit market and the taste of adventure. It’s a reminder of how food can connect us to places and moments, and how a single slice of cake can hold a world of memories.

    What Makes This Version Special

    This is not your average semolina cake. The magic starts with the cake itself, which is infused with a fragrant blend of cardamom and rose water. These ingredients add a luxurious, aromatic depth that elevates the entire dessert. But the true star? The spiced honey nut syrup. Featuring a hint of cinnamon, it provides a warm, aromatic finish that complements the citrus-forward flavors perfectly.

    Unlike traditional versions, which can be overly sweet, this cake achieves a harmonious balance of flavors. The syrup is not just a sweetener but a complex layer of taste that brings out the best in the semolina’s nutty notes. Trust me, once you’ve had a taste of this version, there’s no going back to the standard recipe.

    Flavor Profile

    The flavor journey begins with a burst of citrus — a vibrant combination of lemon and orange zest that dances on your palate. As you savor each bite, the subtle floral notes of rose water emerge, adding an ethereal quality to the cake. Finally, the warm, spiced finish from the honey nut syrup, infused with a hint of cinnamon, wraps everything in a comforting embrace. It’s a taste experience that’s both refreshing and indulgent.

    Ingredients

    • 1 cup sugar
    • 4 eggs
    • 1 cup yoghurt
    • Zest of 1 lemon
    • Zest of 1 orange
    • 1 cup almond meal
    • 1 cup semolina
    • 2 teaspoons baking powder
    • 1/2 cup **olive oil**
    • 1 teaspoon **cardamom**
    • 1 teaspoon **rose water**
    • 1/2 cup almonds
    • 1/2 cup raisins
    • 1/2 cup dry cranberries
    • 1 cup **honey**
    • Juice of 1 orange
    • 1 **cinnamon stick**
    • 1/4 cup pistachios

    Instructions

    1. Preheat your oven to 180°C (160°C fan). Prepare a 20-23cm round baking tin by lining it with baking paper or using a silicone mold.
    2. In a small pan, heat the olive oil over low heat. Add the **cardamom** and allow it to bloom for about 2 minutes, stirring gently to release its aroma. Set aside to cool slightly.
    3. In a mixer, whisk the eggs and sugar until the mixture is thick and pale in color, about 5 minutes.
    4. Add the yoghurt, lemon zest, and orange zest to the egg mixture. Mix until well combined.
    5. Gradually add the almond meal, semolina, and baking powder. Mix on low speed until just combined.
    6. Incorporate the cardamom-infused olive oil and rose water into the batter. Mix until smooth.
    7. Pour the mixture into the prepared baking tin. Bake for 35 minutes or until the top is golden-brown and a skewer inserted into the center comes out clean.
    8. While the cake bakes, prepare the syrup: In a pot, combine the honey, orange juice, almonds, raisins, cranberries, and the **cinnamon stick**. Bring to a boil, then reduce to a simmer for 1-2 minutes to enhance the aroma.
    9. Remove the cake from the oven and pierce all over with a skewer. Pour the warm syrup evenly over the cake. Allow it to soak and cool slightly before serving.
    10. Garnish with pistachios just before serving for a touch of color and crunch.

    Pro Tips from Meaghan’s Kitchen

    • Use fresh citrus for zesting — it makes all the difference in flavor and aroma.
    • Blooming spices in oil intensifies their flavor, so don’t skip this step!
    • If your syrup is too thick, thin it with a tablespoon of water while simmering.
    • For a moist cake, ensure your yoghurt is at room temperature before mixing.
    • Don’t overmix the batter once dry ingredients are added, to keep the cake tender.

    Variations & Dietary Swaps

    • Gluten-free version: Substitute semolina with gluten-free flour blend and ensure all other ingredients are certified gluten-free.
    • Vegan option: Replace eggs with a flaxseed mixture (1 tablespoon flaxseed meal + 2.5 tablespoons water per egg) and yoghurt with coconut yoghurt.
    • Spice-it-up version: Add a pinch of saffron to the syrup for an extra layer of flavor complexity.

    What to Serve With It

    This Mediterranean Citrus-Infused Semolina Cake pairs beautifully with a cup of freshly brewed mint tea, enhancing the cake’s aromatic notes. If you’re feeling a bit more indulgent, a glass of sweet dessert wine like Moscato complements the citrus and honey flavors exquisitely. For a complete Mediterranean experience, consider serving it alongside a platter of fresh fruits and nuts.

    Storage & Meal Prep

    To store, wrap the cake tightly in plastic wrap and keep it in the fridge for up to 5 days. For longer storage, slice the cake and freeze the pieces in an airtight container for up to 2 months. To reheat, thaw the slices in the fridge overnight and warm in a low oven for a few minutes or enjoy at room temperature.

    FAQ

    Can I make the cake ahead of time?

    Absolutely! This cake actually tastes better the next day as the flavors meld together. Make it a day ahead and store it in the fridge.

    What other nuts can I use?

    If you don’t have almonds or pistachios, walnuts or pecans are great alternatives. They add a wonderful texture and flavor.

    Can I use bottled lemon and orange juice?

    Fresh is best for zest and juice in this recipe, as it provides the most vibrant flavor. But in a pinch, bottled can work for the syrup component.

    How do I know when the syrup is ready?

    You’ll know it’s ready when it has thickened slightly and coats the back of a spoon. The aroma should also be warm and spiced from the cinnamon.

    What if my cake turns out dry?

    If the cake seems dry, it might have been overbaked. Ensure it’s only baked until a skewer comes out clean. Adding more syrup can help salvage moisture.

    Final Thoughts

    There you have it, my dear baking companions — a cake that’s not just a dessert but a journey through flavors and memories. I hope you enjoy making and eating this Mediterranean Citrus-Infused Semolina Cake with Spiced Honey Nuts as much as I do. If you give it a try, I’d love to hear how it turns out or any personal twists you add. Please share your thoughts in the comments, or better yet, snap a picture and tag me in your delicious creations. Happy baking!

    Related update: Mediterranean Citrus-Infused Semolina Cake with Spiced Honey Nuts

    Related update: Decadent Dark Chocolate Raspberry S’mores Bars with Salted Caramel Drizzle

  • Spiced Maple Carrot Cake with Ginger Cream Cheese Frosting | Made by Meaghan Moineau

    Spiced Maple Carrot Cake with Ginger Cream Cheese Frosting | Made by Meaghan Moineau

    Spiced Maple Carrot Cake with Ginger Cream Cheese Frosting

    Picture this: the aroma of spices wafting through your kitchen, the comforting sizzle of butter in a hot pan, and the warm embrace of a freshly baked carrot cake as it cools on the counter. This isn’t just any carrot cake; it’s a fall-inspired masterpiece that combines the earthy sweetness of pure maple syrup with the zing of crystallized ginger. Welcome to a dessert experience that wraps you in cozy feelings and whispers, “stay a while.”

    Personal Story

    Carrot cake holds a special place in my heart. Growing up, it was a staple at family gatherings, a dessert that signaled celebration and togetherness. My grandmother, a woman with a knack for transforming simple ingredients into something magical, would always make her version — moist, cinnamon-laden, and topped with rich cream cheese frosting. I remember standing on a stool beside her, eager to lick the frosting bowl clean while she patiently grated carrots, telling stories of her own childhood.

    Years later, when I found myself in my own kitchen, I realized I wanted to honor her tradition while adding a twist that spoke to my personal culinary journey. It was a chilly autumn afternoon, the kind where leaves dance in the wind, and I was craving something that embodied the season. As I reached for the maple syrup and spotted a jar of crystallized ginger in the pantry, inspiration struck.

    My first attempt was a bit of an experiment — would the spices overpower the cake? Would the ginger be too bold? I held my breath as the cake baked, filling my apartment with an intoxicating scent that promised deliciousness. As soon as it cooled, I iced it with a ginger cream cheese frosting, took a bite, and was transported. The flavors melded beautifully, creating a dessert that wasn’t just about nostalgia but also about embracing new traditions.

    Now, this Spiced Maple Carrot Cake with Ginger Cream Cheese Frosting has become a new family favorite. It’s the cake I bring to gatherings, the one that gets requested by friends who dub it “that unforgettable carrot cake.” It’s my homage to both the past and the present, a dish that bridges generations and seasons in one swoon-worthy bite.

    What Makes This Version Special

    What sets this carrot cake apart from the classic version is the addition of pure maple syrup and crystallized ginger. The syrup introduces a deep, aromatic sweetness that complements the natural sugars of the carrots beautifully. At the same time, the crystallized ginger provides a spicy kick, adding an unexpected twist that elevates the cake from an everyday dessert to a fall-inspired delight.

    The magic doesn’t stop there. By blooming the ground cinnamon, nutmeg, and cloves in butter before adding them to the batter, we unlock their full potential, allowing the spices to infuse every bite with warmth and complexity. This technique brings out the best in each spice, creating a symphony of flavors that dance on your tongue.

    Flavor Profile

    Imagine a warm, aromatic cake with a sweet maple undertone that gently cradles your taste buds, followed by a spicy ginger kick that surprises and delights. The toasted pecans add a nutty crunch, while the fresh orange zest subtly brightens the entire flavor profile. With each bite, you’re taken on a journey — from the comforting familiarity of carrot cake to the exciting depths of its spiced maple evolution.

    Ingredients

    • 2 cups white whole wheat flour
    • 2 teaspoons baking powder
    • 1 teaspoon baking soda
    • 1 teaspoon salt
    • 1 cup granulated sugar
    • 1 cup **brown sugar**
    • 3/4 cup canola oil
    • 1/4 cup **pure maple syrup**
    • 4 large eggs
    • 2 cups grated carrots
    • 1/2 cup finely chopped **crystallized ginger**
    • 1/2 cup **toasted pecans**, chopped
    • 1 teaspoon vanilla extract
    • 1 teaspoon ground cinnamon
    • 1/2 teaspoon ground nutmeg
    • 1/4 teaspoon ground cloves
    • 1 tablespoon butter
    • Zest of 1 orange
    • For the frosting:
    • 1/2 cup butter, softened
    • 8 oz **low fat cream cheese**, softened
    • 4 cups icing sugar
    • 1 teaspoon vanilla extract
    • **Crystallized ginger**, for garnish

    Instructions

    1. Preheat your oven to 350°F (180°C). Grease two 9-inch (23cm) cake pans and line the bottoms with parchment paper.
    2. In a small saucepan, melt the butter over medium heat. Add the ground cinnamon, nutmeg, and cloves. Stir continuously for about 2 minutes until spices are fragrant and the mixture is a beautiful golden-brown. Set aside to cool slightly.
    3. In a large mixing bowl, beat the canola oil, granulated sugar, and brown sugar together until well combined and slightly fluffy.
    4. Beat in the maple syrup and vanilla extract.
    5. Add the eggs one at a time, beating well after each addition until the mixture is smooth and glossy.
    6. In another large bowl, whisk together the flour, baking powder, baking soda, and salt.
    7. Slowly add the dry ingredients to the wet ingredients, mixing just until combined. Be careful not to overmix.
    8. Gently fold in the grated carrots, crystallized ginger, toasted pecans, and orange zest, ensuring they are evenly distributed throughout the batter.
    9. Divide the batter evenly between the prepared cake pans, smoothing the tops with a spatula.
    10. Bake in the preheated oven for 25 to 30 minutes, or until a toothpick inserted in the center comes out clean. The tops should be a lovely golden-brown.
    11. Allow the cakes to cool in the pans for about 20 minutes before transferring them to a wire cooling rack to cool completely.
    12. For the frosting, beat the softened butter and cream cheese together in a medium bowl until smooth and creamy.
    13. Gradually add the icing sugar, one cup at a time, beating well after each addition. Add the vanilla extract and continue to beat until the frosting is fluffy and light. If needed, add a little milk to achieve your desired consistency.
    14. Place one cake layer on a serving dish and spread with a generous layer of frosting. Top with the second cake layer and cover the top and sides with the remaining frosting.
    15. Decorate with extra crystallized ginger and toasted pecans for a delightful finish.

    Pro Tips from Meaghan’s Kitchen

    • Grate your carrots fresh for the best texture and moisture. Pre-packaged grated carrots are often too dry.
    • To prevent your cake from sticking, make sure your cake pans are well-greased and lined with parchment paper.
    • For a smoother frosting, ensure both your cream cheese and butter are at room temperature before mixing.
    • If your cake domes in the middle, use a serrated knife to gently level it before frosting for a more professional-looking finish.
    • Let the flavors meld by storing the cake in the fridge overnight before serving. This also makes the cake easier to slice.

    Variations & Dietary Swaps

    • Vegetarian Swap: Use a flax egg (1 tablespoon flaxseed meal + 2.5 tablespoons water) to replace each egg for a vegetarian-friendly cake.
    • Spice-it-up Version: Add a pinch of cayenne pepper to the spice mix for a subtle heat that pairs beautifully with the sweet elements.
    • Kids-Friendly Version: Omit the ginger for a milder cake that’s more appealing to young palates. Add mini chocolate chips for a fun twist!

    What to Serve With It

    This Spiced Maple Carrot Cake shines when paired with a cup of spiced chai tea, which complements its aromatic profile. If you’re in the mood for something a bit more indulgent, a glass of sweet Riesling is a perfect match, enhancing the cake’s sweet and spicy notes with its own fruity undertones.

    Storage & Meal Prep

    Store any leftover cake in an airtight container in the refrigerator for up to 5 days. If you want to save some for later, wrap individual slices in plastic wrap and store in a freezer bag for up to 3 months. To enjoy, defrost slices in the refrigerator overnight, then let sit at room temperature for about 30 minutes before serving for optimal flavor and texture.

    FAQ

    Can I use all-purpose flour instead of white whole wheat flour?

    Yes, you can substitute all-purpose flour for white whole wheat flour in this recipe. The texture will be a bit lighter, but the flavor will remain delicious.

    What can I use instead of crystallized ginger if I don’t have any?

    If you’re out of crystallized ginger, feel free to use fresh grated ginger or ground ginger. Start with a smaller amount and adjust to taste.

    How can I make this cake more moist?

    This cake is already quite moist, thanks to the oil and freshly grated carrots. However, you can add a tablespoon of Greek yogurt or applesauce to the batter for extra moisture.

    Is it necessary to toast the pecans?

    Toasting the pecans enhances their flavor and adds a delightful crunch. While it’s not necessary, it’s highly recommended for the best taste experience.

    Can I make this cake in advance?

    Absolutely! This cake actually tastes even better the next day as the flavors meld together. Just be sure to store it properly in the fridge.

    Final Thoughts

    There you have it — a Spiced Maple Carrot Cake with Ginger Cream Cheese Frosting that’s sure to become a new favorite in your recipe collection. It’s a cake that celebrates tradition while embracing new flavors, making it the perfect dessert for any occasion. I’d love to hear how this recipe turns out for you, so feel free to leave a comment below or share your cake creations with me on social media. Happy baking, and may your kitchen be filled with warmth and joy!

    Related update: Spiced Maple Carrot Cake with Ginger Cream Cheese Frosting

    Related update: Mediterranean Citrus-Infused Semolina Cake with Spiced Honey Nuts