Tag: Hearty

  • Chicken Liver Salad | Made by Meaghan Moineau

    Chicken Liver Salad | Made by Meaghan Moineau

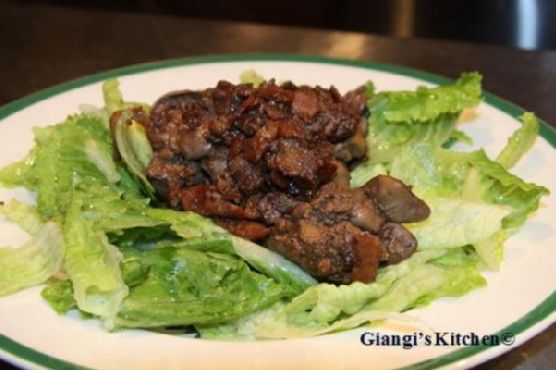
    Chicken Liver Salad: A Warm and Hearty Delight

    There’s something inherently comforting about the aromas wafting through the kitchen as chicken livers sizzle with onions and bacon. This Chicken Liver Salad takes me back to Sunday afternoons at my grandmother’s house. She would whip up a batch of this savory salad while recounting stories from her childhood. The combination of rich, tender chicken livers with the crisp freshness of Boston lettuce was, and still is, my favorite part of those cherished family gatherings.

    Why You’ll Love It

    This Chicken Liver Salad is more than just a dish; it’s a sensory experience. The savory, slightly tangy flavor of the chicken livers, when combined with crispy bacon and balsamic vinegar, creates a taste explosion. Besides its delightful flavors, this salad is also packed with nutrients, making it a wholesome option for those who want to enjoy a hearty meal without compromising on health. It’s simple to make, requiring only a handful of ingredients and minimal preparation time, yet it never fails to impress both family and guests alike.

    Ingredients

    • Bacon
    • Balsamic vinegar
    • Boston lettuce
    • Chicken livers
    • Olive oil
    • Onion
    • Salt and pepper

    Instructions

    1. In a large skillet, heat the olive oil over medium-high heat.
    2. Add the sliced onion and bacon to the skillet, sautéing until the bacon is slightly crisp and the onions are soft.
    3. Add the chicken livers to the skillet, stirring well to combine with the bacon and onions.
    4. Pour in the balsamic vinegar, allowing the livers to simmer slowly. Stir occasionally, and add more vinegar if necessary to keep the mixture moist.
    5. Once the livers are cooked through and tender, season with salt and pepper to taste.
    6. Arrange a bed of Boston lettuce on a serving platter, and spoon the warm liver mixture over the top.
    7. Serve immediately, ensuring each plate has a generous portion of both liver mixture and lettuce.

    Tips

    For the best results, use fresh chicken livers and make sure to clean them thoroughly before cooking. If you’re not a fan of balsamic vinegar, you can substitute it with red wine vinegar for a slightly different flavor profile. Make sure to taste as you go, adjusting the seasoning according to your preference. To add an extra layer of texture, consider topping the salad with toasted nuts, such as walnuts or pine nuts.

    Variations & Substitutions

    There are numerous ways to tweak this recipe to better suit your palate or dietary needs:

    • Vegetarian Option: Replace chicken livers with grilled portobello mushrooms for a vegetarian-friendly version.
    • Different Greens: Swap Boston lettuce for arugula or spinach for a peppery or more robust flavor.
    • Additional Vegetables: Incorporate roasted red peppers or cherry tomatoes for a burst of color and sweetness.
    • Herbs: Add fresh herbs like thyme or rosemary to enhance the aromatic profile of the dish.

    Storage

    If you have leftovers, store the chicken liver mixture separately from the lettuce to prevent it from becoming soggy. Place the liver mixture in an airtight container and refrigerate for up to two days. Reheat gently in a skillet before serving over fresh lettuce. Note that the texture of the liver might change slightly upon reheating, but the flavors will remain delightful.

    FAQ

    Can I prepare this dish in advance?

    While you can prepare the liver mixture a day ahead, it’s best to serve the salad fresh to retain the crispness of the lettuce. Reheat the liver mixture just before serving.

    Is chicken liver healthy?

    Yes, chicken liver is a rich source of protein, iron, and various vitamins, including vitamin A and B12. It can be a nutritious addition to your diet when consumed in moderation.

    Nutrition

    Chicken Liver Salad is a nutrient-dense dish, offering a substantial amount of protein and essential vitamins. A serving provides approximately:

    • Calories: 250
    • Protein: 20g
    • Fat: 15g
    • Carbohydrates: 8g
    • Iron: 10mg

    Please note that these values are estimates and can vary based on specific brands and preparation methods.

    Final Thoughts

    This Chicken Liver Salad is more than just a meal; it’s a journey back to simpler times filled with love, laughter, and delicious food. It’s a testament to how traditional recipes can still hold a special place in our modern lives. Whether you’re a fan of chicken livers or looking to try something new, this salad is a delightful way to enjoy a nutritious and flavorful meal. Gather your loved ones, share stories, and enjoy this comforting dish together.

    Related update: Chicken Liver Salad

    Related update: Crab Cakes Rockefeller

    Related update: Easy Tabouleh

  • Beef Cottage Pie | Made by Meaghan Moineau

    Beef Cottage Pie | Made by Meaghan Moineau

    Beef Cottage Pie: A Comforting Classic

    Why You’ll Love It

    There’s something heartwarming about digging into a Beef Cottage Pie. It’s a dish that wraps you in warmth, much like a cozy blanket on a chilly evening. Growing up, the aroma of this pie baking in the oven meant family time was near. My grandmother, with her loving hands, would prepare it for our Sunday dinners. The rich flavors of beef, vegetables, and creamy mashed potatoes create a harmony that’s simply irresistible. Whether you’re making it for a family gathering or a comforting solo dinner, this dish promises to deliver satisfaction with every bite.

    Ingredients

    • 1 lb lean ground beef
    • 1 cup yellow diced onions
    • 1/2 cup diced celery
    • 3 cloves garlic, minced
    • 2 teaspoons fresh thyme, chopped
    • 2 tablespoons Worcestershire sauce
    • 2 tablespoons vegetable oil
    • 1 cup frozen vegetables (peas, carrots, corn mix)
    • 1 cup beef gravy
    • 4 cups mashed potatoes
    • 1/4 cup parmesan cheese, grated
    • Salt and pepper to taste

    Instructions

    1. Preheat your oven to 375 degrees Fahrenheit.
    2. In a large skillet, heat the vegetable oil over medium heat. Add the onions, celery, and garlic, and cook until they are translucent but not browned, approximately 5-6 minutes. Remove the mixture to a clean dish.
    3. In the same skillet, add the ground beef. Cook until browned, breaking up any large pieces. Using a large spoon, discard any excess fat/grease.
    4. Add the onions, celery, and garlic mixture back to the skillet and stir well. Add the Worcestershire sauce and thyme, and cook for an additional minute.
    5. Mix in the frozen vegetables and gravy. Cook for an additional 2-3 minutes. Season with salt and pepper to taste.
    6. Coat a large casserole dish with cooking spray. Pour the ground beef and vegetable mixture into the dish and spread evenly.
    7. Spoon the mashed potatoes on top of the beef mixture and carefully spread to create an even layer.
    8. Sprinkle parmesan cheese over the top and place the dish in the preheated oven. Bake for 25-30 minutes.
    9. Turn the oven broiler on and brown the top of the cottage pie until it turns an even golden brown color.
    10. Remove from the oven and let the pie set for 5-10 minutes before serving. Enjoy!

    Tips

    For the best results, use freshly mashed potatoes, which are easier to spread and maintain their creamy texture. If you’re short on time, high-quality store-bought mashed potatoes can work in a pinch. Also, for a deeper flavor, consider using a mix of ground beef and ground lamb.

    Variations & Substitutions

    Feel free to get creative with your Beef Cottage Pie. Swap out the ground beef for turkey or chicken if you prefer a lighter version. Vegetarians can use lentils or a plant-based meat substitute. You can also add different herbs like rosemary or basil for a unique twist. For a cheesy delight, mix some cheddar into the mashed potatoes before spreading them over the beef mixture.

    Storage

    Leftovers can be stored in an airtight container in the refrigerator for up to 3 days. For longer storage, freeze individual portions for up to 2 months. Reheat in the oven at 350 degrees Fahrenheit until warmed through.

    FAQ

    Can I make Beef Cottage Pie in advance?

    Absolutely! You can prepare the pie up to the point of baking, cover it tightly, and refrigerate for up to 24 hours. When you’re ready to serve, simply bake it as directed, adding a few extra minutes to the baking time if it’s still cold from the fridge.

    What side dishes go well with Beef Cottage Pie?

    While this dish is a meal on its own, it pairs beautifully with a fresh green salad or steamed vegetables like broccoli or green beans. For a heartier option, serve it alongside a crusty loaf of bread.

    Can I use sweet potatoes instead of regular potatoes?

    Yes, using sweet potatoes can add a delightful sweetness that complements the savory filling. Just prepare them as you would regular mashed potatoes and proceed with the recipe.

    Nutrition

    This Beef Cottage Pie is packed with protein and essential nutrients. Lean ground beef provides iron and B vitamins, while the vegetables add fiber and vitamins. Opting for low-sodium gravy and controlling cheese portions can make it a healthier option without sacrificing flavor.

    Final Thoughts

    Beef Cottage Pie is more than just a meal; it’s a celebration of comfort and tradition. Whether you’re indulging in it for a special occasion or a simple weeknight dinner, it brings a touch of warmth and nostalgia to the table. I hope this recipe becomes a beloved staple in your home, just as it has in mine. Happy cooking!

    Related update: Beef Cottage Pie

  • Classic Greek Moussaka | Made by Meaghan Moineau

    Classic Greek Moussaka

    There’s something inherently comforting about a dish that has been passed down through generations, and Classic Greek Moussaka is no exception. I still remember the first time I tasted my grandmother’s moussaka as a child during a family reunion in her sunlit kitchen overlooking the Aegean Sea. The aroma of cinnamon and nutmeg filled the room, and the flavors were like nothing I had experienced before. Now, every time I prepare this dish, it brings back those cherished memories, and I’m delighted to share this recipe with you.

    Why You’ll Love It

    This Classic Greek Moussaka is a hearty and satisfying meal that combines layers of savory eggplants, rich meat sauce, and creamy béchamel topping. It’s perfect for family gatherings or a special dinner. The combination of flavors and textures will transport you to a sun-drenched Greek island, even if just for a meal. Whether you’re a fan of Greek cuisine or trying it for the first time, this dish is sure to become a beloved favorite.

    Ingredients

    • Eggplants
    • Sea salt
    • Olive oil
    • Onions
    • Lean beef
    • Canned tomatoes
    • Garlic
    • Ground cinnamon
    • Ground allspice
    • White salt and ground pepper
    • Tomato paste
    • Butter
    • Flour
    • Warm milk
    • Ground nutmeg
    • Egg yolks
    • Feta cheese
    • Bread crumbs

    Instructions

    1. Sprinkle the eggplant slices with sea salt and let them stand for 45 minutes to draw out the bitterness. Then rinse thoroughly to remove excess salt.
    2. Thinly brush each slice with olive oil and bake in a preheated grill pan for several minutes on each side. Set aside. Repeat until all slices are grilled.
    3. For the meat sauce, lightly sauté the onions in olive oil until tender. Add the ground beef and sauté, stirring frequently to break up the clumps of meat, until the meat is no longer pink.
    4. Stir in canned tomatoes, garlic, cinnamon, allspice, salt, and pepper and simmer briefly on low heat. Add in tomato paste and a little water if the sauce is too thick. Remove from heat and set aside.
    5. For the béchamel sauce, add flour to the melted butter, stirring constantly. When the mixture is evenly thick, gradually whisk in warm milk. Gently bring to a boil, then remove from heat, season with pepper and nutmeg. Whisk in the egg yolks vigorously. Set aside.
    6. Thinly coat with olive oil a suitable ovenproof baking dish, sprinkle the bottom with homemade bread crumbs. Place a layer of eggplant, cover with some meat sauce and feta cheese, and repeat this until the pan is almost full. Finish with a layer of feta cheese.
    7. Top with béchamel sauce. Cover with tin foil and bake in a preheated oven at 180°C for 1 hour.
    8. Remove moussaka from the oven and let it set at room temperature for 45 minutes before serving.

    Tips

    To achieve the perfect moussaka, make sure to let the eggplant slices sit with salt for the full 45 minutes to remove any bitterness. When preparing the béchamel sauce, stir continuously to avoid lumps and ensure a smooth consistency. Lastly, giving the moussaka time to set before serving helps the layers hold together better when sliced.

    Variations & Substitutions

    If you prefer a vegetarian version, you can replace the ground beef with lentils or a plant-based meat substitute. For a slightly different flavor profile, try using ground lamb instead of beef. You can also experiment with different cheeses, such as Parmesan or Ricotta, to suit your taste preferences.

    Storage

    Leftover moussaka can be stored in an airtight container in the refrigerator for up to three days. For longer storage, freeze individual portions in airtight containers for up to three months. To reheat, thaw overnight in the refrigerator and bake in a preheated oven at 175°C until heated through.

    FAQ

    Can I prepare Moussaka ahead of time?

    Yes, you can assemble the moussaka a day in advance and store it in the refrigerator. When ready to bake, allow it to come to room temperature before placing it in the oven.

    What should I serve with Moussaka?

    Moussaka pairs beautifully with a fresh Greek salad and some crusty bread. A glass of red wine complements the flavors wonderfully.

    Nutrition

    Moussaka is a rich and hearty dish, so it is best enjoyed as an occasional treat. It provides a good source of protein from the beef and egg yolks, as well as essential vitamins and minerals from the eggplants and tomatoes. For a lighter option, consider serving with a side of steamed vegetables.

    Final Thoughts

    Classic Greek Moussaka is more than just a dish; it’s a culinary journey that tells a story with every bite. Whether you’re sharing it with family or savoring it on a quiet evening at home, its warmth and richness are sure to bring comfort and joy. I hope this recipe becomes as beloved in your home as it is in mine. Happy cooking!

    Related update: Classic Greek Moussaka

    Related update: How Sweet It Is Sweet Potato Lasagne

  • Make Olive Garden’s Delicious Pasta Fagioli At Home | Made by Meaghan Moineau

    Make Olive Garden’s Delicious Pasta Fagioli At Home | Made by Meaghan Moineau

    Make Olive Garden’s Delicious Pasta Fagioli At Home

    There’s something incredibly comforting about a steaming bowl of soup, especially when it’s inspired by a beloved restaurant favorite. Olive Garden’s Pasta Fagioli has always been a dish that evokes warmth and a sense of home. I remember the first time I tasted it; I was dining out with my family, and the rich, hearty flavors made me feel like I was wrapped in a cozy blanket. It’s been a staple in my kitchen ever since, and today, I’m excited to share how you can recreate this delicious soup at home.

    Why You’ll Love It

    This homemade version of Olive Garden’s Pasta Fagioli is not only delicious and hearty but also incredibly easy to make. It brings together healthy ingredients in a way that feels indulgent without being heavy. Here’s why you’ll fall in love with making this soup at home:

    • Hearty and Filling: Packed with protein-rich beans and lean ground turkey, this soup is a meal in itself.
    • Nutritious: Loaded with vegetables like carrots, celery, and zucchini, it’s a great way to get your daily dose of veggies.
    • Easy to Prepare: With simple steps and common ingredients, it’s a dish that fits into any busy schedule.
    • Family Favorite: It’s a crowd-pleaser that’s perfect for family dinners or gatherings with friends.
    • Customizable: Easily tweak the recipe to suit your dietary preferences or what you have on hand.

    Ingredients

    • 1 pound lean ground turkey
    • 2 tablespoons olive oil
    • 1 cup chopped onions
    • 1 cup chopped carrots
    • 1 cup chopped celery stalks
    • 3 garlic cloves, minced
    • 2 cans (14.5 oz each) diced tomatoes, undrained
    • 1 can (15 oz) red kidney beans, drained and rinsed
    • 1 can (15 oz) white kidney beans, drained and rinsed
    • 1 can (15 oz) great northern beans, drained and rinsed
    • 4 cups canned beef broth
    • 1 jar (24 oz) pasta sauce
    • 1 medium zucchini, chopped
    • 2 teaspoons Italian seasoning blend
    • Fresh ground pepper to taste
    • 1 cup whole wheat penne pasta
    • Grated Parmesan cheese (optional, for serving)

    Instructions

    1. In a large soup pot, brown the ground turkey over medium heat. Once cooked, drain the turkey in a colander and set aside.
    2. In the same pot, heat the olive oil over medium heat. Add the onions, carrots, celery, and garlic, and cook for about 2 minutes, stirring often to prevent sticking.
    3. Return the drained turkey to the pot. Add the canned tomatoes, red kidney beans, white kidney beans, great northern beans, beef broth, pasta sauce, chopped zucchini, Italian seasoning, and fresh ground pepper. Stir well to combine.
    4. Bring the soup to a boil. Then, reduce the heat to a simmer, cover the pot, and let it cook for 50 minutes, allowing the flavors to meld together.
    5. Add the whole wheat penne pasta to the soup. Cover the pot again and cook for about 10 minutes or until the pasta is tender.
    6. Ladle the soup into bowls and top with grated Parmesan cheese if desired. Serve hot and enjoy!

    Tips

    • For a richer flavor, consider browning the turkey with a little garlic and onion powder.
    • Ensure you stir the soup occasionally as it simmers to prevent the ingredients from sticking to the bottom of the pot.
    • If you prefer a thicker soup, reduce the amount of broth or simmer uncovered for the last 10 minutes of cooking.

    Variations & Substitutions

    • Meat Substitutes: Replace ground turkey with ground beef, chicken, or even a plant-based meat alternative for a vegetarian version.
    • Bean Choices: If you don’t have the specified beans, feel free to use any combination of beans you have on hand.
    • Gluten-Free Option: Use gluten-free pasta to make this dish suitable for those with gluten sensitivities.
    • Spice it Up: Add a pinch of red pepper flakes for some heat, or use spicy Italian sausage instead of turkey.

    Storage

    This Pasta Fagioli soup stores well, making it perfect for meal prep. Here’s how to store it:

    • Refrigerator: Store leftovers in an airtight container in the refrigerator for up to 4 days. Reheat on the stove or in the microwave.
    • Freezer: This soup freezes beautifully. Allow it to cool completely, then transfer to freezer-safe containers. It will keep for up to 3 months. Thaw overnight in the refrigerator before reheating.

    FAQ

    Can I use fresh tomatoes instead of canned?

    Yes, you can use fresh tomatoes if desired. Use about 4 cups of chopped fresh tomatoes. You may need to add an extra cup of broth to maintain the soup’s consistency.

    Is it necessary to use beef broth?

    While beef broth adds depth to the soup, you can substitute chicken broth or vegetable broth if preferred. Each will slightly alter the flavor profile, but the soup will still be delicious.

    How can I make this soup vegetarian?

    To make a vegetarian version, simply omit the ground turkey and use vegetable broth instead of beef broth. You can also add extra beans or vegetables for additional texture and flavor.

    Nutrition

    This soup is a hearty meal that provides an excellent balance of protein, fiber, and essential nutrients. Here’s a rough estimate of the nutritional information per serving (without Parmesan cheese):

    • Calories: 250
    • Protein: 18g
    • Carbohydrates: 35g
    • Fat: 6g
    • Fiber: 8g
    • Sodium: 600mg

    Final Thoughts

    Making Olive Garden’s Pasta Fagioli at home is not just about recreating a favorite restaurant dish; it’s about bringing a bit of comfort and warmth to your table. This recipe is straightforward, adaptable, and sure to become a staple in your meal rotation. Whether you’re enjoying it on a chilly evening or sharing it with family and friends, it’s a dish that brings people together. I hope you enjoy making and eating it as much as I do!

    Related update: Make Olive Garden’s Delicious Pasta Fagioli At Home

    Related update: Curried Chicken Roll-Ups

    Related update: Truffle-Infused Mushroom Soup with Parmesan Crisps & Tarragon Creme Fraiche

  • Delicious Sausage & Peppers | Made by Meaghan Moineau

    Delicious Sausage & Peppers | Made by Meaghan Moineau

    Delicious Sausage & Peppers

    Why You’ll Love It

    There’s something magical about the combination of savory sausages and vibrant bell peppers, a dish that has been a beloved part of my family’s culinary tradition for generations. I remember waking up on Sunday mornings to the enticing aroma of sausages sizzling in the kitchen, mingling with the sweet scent of sautéed peppers and onions. This dish was a staple at our family gatherings, and it never failed to bring smiles to our faces. It’s a simple yet flavorful meal that warms the heart and satisfies the soul, and I’m thrilled to share it with you.

    You’ll love this recipe because it’s easy to make, requiring just a few simple ingredients that come together to create a symphony of flavors. Whether you’re looking for a quick weeknight dinner or a dish to impress your guests, this Sausage & Peppers recipe is a surefire hit. It’s hearty, comforting, and versatile, allowing you to customize it to your taste. Plus, the leftovers (if there are any!) are just as delightful the next day.

    Ingredients

    • 4 bell peppers, sliced
    • 2 cloves garlic, crushed
    • Black fresh ground pepper, to taste
    • 4 Italian sausages
    • 4 Italian sweet sausages
    • 1 jalapeño, sliced
    • 2 tablespoons olive oil
    • 2 tablespoons Italian fresh parsley, chopped
    • 2 tablespoons salsa
    • Sea salt, to taste
    • 1 sweet onion, sliced

    Instructions

    1. Preheat your oven to 375°F (190°C). Place the sausages on a baking sheet and bake for 20-25 minutes or until they are fully cooked. Once done, remove them from the oven and set aside.
    2. In a large frying pan, heat a drizzle of olive oil over medium heat. Add the bell peppers and jalapeño to the pan and sauté for about 5 minutes, or until they begin to soften.
    3. Add the sweet onion, crushed garlic, and chopped parsley to the pan. Continue to sauté for another 3-4 minutes, allowing the flavors to meld together.
    4. Slice the cooked sausages lengthwise and add them to the pan with the pepper mixture.
    5. Add the salsa to the pan and toss everything together to ensure the sausages and vegetables are evenly coated.
    6. Season with sea salt and black fresh ground pepper to taste. Let the mixture cook for another 2-3 minutes until heated through.
    7. Serve hot and enjoy your delicious Sausage & Peppers!

    Tips

    • For a bolder flavor, consider using spicy Italian sausages in place of sweet ones.
    • Ensure the sausages are cooked thoroughly by checking that they reach an internal temperature of 160°F (71°C).
    • If you prefer a milder dish, you can omit the jalapeño or use a milder pepper variety.

    Variations & Substitutions

    If you’re looking to switch things up, here are a few variations and substitutions you can try:

    • Vegetarian Option: Replace the sausages with plant-based sausage alternatives.
    • Different Peppers: Use a mix of red, yellow, and orange bell peppers for a colorful dish.
    • Cheesy Twist: Top the finished dish with grated Parmesan or mozzarella cheese.
    • Extra Heat: Add a pinch of red pepper flakes for an extra kick.

    Storage

    This Sausage & Peppers dish stores beautifully. Simply place any leftovers in an airtight container and refrigerate for up to 3 days. To reheat, warm in a frying pan over medium heat until the sausages and peppers are heated through. You can also freeze the dish for up to 2 months. Thaw it in the refrigerator overnight before reheating.

    FAQ

    Can I use different types of sausages?

    Absolutely! Feel free to experiment with different types of sausages such as turkey, chicken, or even chorizo. Each will add its own unique flavor to the dish.

    Is this dish spicy?

    The heat level depends on the type of sausages and peppers you use. Sweet Italian sausages and bell peppers make for a milder dish, while adding jalapeños and spicy sausages will increase the heat. Adjust the ingredients to suit your spice preference.

    Can I make this dish ahead of time?

    Yes, you can prepare the sausages and pepper mixture in advance and store it in the refrigerator. Reheat it in a pan before serving to maintain the best texture and flavor.

    Nutrition

    While the nutritional content will vary based on the specific brands and quantities used, a typical serving of Sausage & Peppers contains:

    • Calories: 400
    • Protein: 20g
    • Carbohydrates: 15g
    • Fat: 30g
    • Fiber: 3g

    Final Thoughts

    This Delicious Sausage & Peppers recipe is a celebration of simple ingredients coming together to create a hearty and flavorful meal. It’s a dish that brings people together, evokes cherished memories, and makes new ones. Whether you’re enjoying it with family, friends, or savoring a quiet dinner at home, this recipe is sure to become a cherished favorite. I hope you enjoy making and sharing this dish as much as I do. Happy cooking!

    Related update: Delicious Sausage & Peppers

    Related update: Thai Savory Brown Fried Rice

  • Venison Stew | Made by Meaghan Moineau

    Venison Stew | Made by Meaghan Moineau

    Hearty Venison Stew

    Welcome to a journey of flavor and warmth with this classic Venison Stew recipe. As the weather turns crisp and the leaves begin to fall, there’s nothing quite like a stew simmering on the stove to bring comfort and joy. This recipe is not just a dish; it’s a memory. I remember, as a child, visiting my grandparents’ cabin nestled in the woods. My grandfather would often return from a morning hunt with venison, and my grandmother would transform it into the most delicious stew. The aroma would fill the cabin, mingling with the scent of pine and the crackling wood fire. It’s a memory that has stayed with me, and I’m thrilled to share this special recipe with you.

    Why You’ll Love It

    This venison stew is a celebration of rich, earthy flavors and tender meat. Here’s why you’ll fall head over heels for it:

    • Flavorful and Hearty: Each bite is packed with the robust flavors of venison and vegetables, simmered to perfection.
    • Nutritious: Venison is a lean protein source that’s rich in vitamins and minerals.
    • Perfect for Any Occasion: Whether it’s a family dinner or a cozy night in, this stew is a crowd-pleaser.
    • Memorable: It’s a dish that brings people together, creating cherished memories around the table.

    Ingredients

    • 2 pounds venison stew meat
    • 1 cup flour, plus 3 tablespoons for thickening
    • 2 tablespoons vegetable oil
    • 4 cups water
    • 2 beef bouillon cubes
    • 4 large potatoes, peeled and diced
    • 1 large onion, chopped
    • 1 cup baby carrots, sliced
    • 4 stalks celery, sliced
    • 1 can mushrooms, drained
    • 1 green bell pepper, chopped
    • Salt and pepper to taste

    Instructions

    1. Cut the venison, potatoes, onion, baby carrots, celery, mushrooms, and green bell pepper into 1-inch pieces.
    2. In a large bowl, mix the venison with 1 cup of flour, salt, and pepper to coat evenly.
    3. In a large pot, heat the vegetable oil over medium-high heat. Brown the venison on all sides.
    4. Add the water and beef bouillon cubes to the pot. Bring to a boil, then reduce the heat and let it simmer for 2 hours.
    5. After 2 hours, add the potatoes, onion, carrots, celery, mushrooms, and green bell pepper to the pot. Simmer for an additional 30 minutes.
    6. In a small bowl, mix the remaining 3 tablespoons of flour with 1 cup of cold water. Stir this mixture into the stew to thicken.
    7. Continue to simmer for another 5-10 minutes until the stew has thickened to your desired consistency. Adjust seasoning with salt and pepper if needed.

    Tips

    • Be Patient: Allowing the venison to slowly cook over a couple of hours ensures it becomes tender and flavorful.
    • Consistent Cuts: Cutting the vegetables and meat into uniform sizes ensures even cooking.
    • Thickening Tips: If you prefer a thicker stew, add an additional tablespoon of flour to the thickening mixture.

    Variations & Substitutions

    • Meat Alternatives: If venison is not available, you can substitute it with beef or lamb for a different but equally delicious experience.
    • Vegetables: Feel free to add or substitute other vegetables such as parsnips or turnips for added depth and flavor.
    • Spices: Enhance the flavor with herbs like thyme, rosemary, or bay leaves.

    Storage

    Leftover venison stew can be stored in an airtight container in the refrigerator for up to 3 days. It also freezes well; simply place it in a freezer-safe container, where it can be stored for up to 3 months. To reheat, thaw overnight in the refrigerator and warm on the stove over medium heat until heated through.

    FAQ

    Can I use a slow cooker for this recipe?

    Absolutely! After browning the venison, transfer it along with all the other ingredients into a slow cooker. Cook on low for 6-8 hours or until the meat is tender.

    What can I serve with venison stew?

    This stew pairs wonderfully with crusty bread or a side of mashed potatoes. A fresh green salad also complements the hearty flavors beautifully.

    Nutrition

    Venison is a lean protein source that’s low in fat and calories, making this stew a nutritious option. It provides essential nutrients such as iron, zinc, and B vitamins. Combined with a medley of vegetables, this dish is both satisfying and wholesome.

    Final Thoughts

    This venison stew is more than just a meal; it’s an experience of warmth, nostalgia, and community. Whether you’re reminiscing about family gatherings or creating new memories, this stew is sure to become a treasured recipe in your collection. I hope you enjoy making and sharing it as much as I do. Bon appétit!

    Related update: Venison Stew

    Related update: Cavatappi pasta with salmon crab surimi

  • Pasta with Peas and Italian Sausage | Made by Meaghan Moineau

    Pasta with Peas and Italian Sausage

    Intro

    There are few things more comforting than a bowl of pasta, and this recipe for Pasta with Peas and Italian Sausage holds a special place in my heart. Growing up, Sunday dinners were a cherished tradition in my family. My grandmother would spend the afternoon bustling around the kitchen, filling the house with the aroma of fresh herbs, garlic, and tomatoes. One of her signature dishes was this simple yet flavorful pasta recipe. It’s a dish that brings back memories of laughter and love shared around the dinner table, and I’m thrilled to share it with you today.

    Why You’ll Love It

    This Pasta with Peas and Italian Sausage recipe is a delightful blend of flavors and textures that come together in perfect harmony. You’ll love how the sweet and savory Italian sausage complements the freshness of the peas, all enveloped in a rich, tomato-based sauce. It’s a hearty meal that’s incredibly easy to prepare, making it perfect for busy weeknights or a cozy weekend dinner. Plus, it’s a one-pot wonder that minimizes cleanup, allowing you more time to relax and savor your meal.

    Ingredients

    • 1 lb farfalle pasta
    • 2 tablespoons olive oil
    • 4 Italian sweet sausages, casings removed
    • 1 cup frozen peas
    • 1 can (14 oz) canned tomatoes
    • 1 cup Pomi strained tomato sauce
    • 2 tablespoons butter
    • Salt and pepper to taste

    Instructions

    1. Cook the pasta following the package directions until al dente. Drain and set aside.
    2. In a very large skillet over medium heat, add the olive oil.
    3. Add the Italian sausage meat to the skillet and sauté until slightly brown all over.
    4. Stir in the frozen peas and canned tomatoes.
    5. Season with salt and pepper to taste.
    6. Lower the heat to medium and cook for another 10 to 15 minutes, allowing the flavors to meld together.
    7. Return the drained pasta to the pan and add the butter.
    8. Pour in the tomato sauce with sausage and mix well until everything is combined.
    9. Serve hot, garnished with grated Parmesan cheese if desired.

    Tips

    Here are some tips to ensure your Pasta with Peas and Italian Sausage turns out perfectly every time:

    • Use high-quality Italian sausage for the best flavor. You can choose between sweet or spicy depending on your preference.
    • If you have fresh peas on hand, feel free to use them instead of frozen peas.
    • Be sure to cook the pasta to al dente, as it will continue to cook slightly when mixed with the sauce.
    • For an extra touch of flavor, add a pinch of red pepper flakes to the sauce.

    Variations & Substitutions

    This recipe is wonderfully versatile. Here are some variations and substitutions you can try:

    • Vegetarian Version: Omit the sausage and add more vegetables like bell peppers or mushrooms.
    • Different Pasta: Feel free to swap the farfalle for another type of pasta like penne or fusilli.
    • Gluten-Free: Use your favorite gluten-free pasta to make this dish suitable for those with gluten sensitivities.

    Storage

    Leftovers can be stored in an airtight container in the refrigerator for up to 3 days. To reheat, warm gently in a skillet over medium heat, adding a splash of water if needed to loosen the sauce. This dish can also be frozen for up to 2 months. Thaw in the refrigerator overnight before reheating.

    FAQ

    Can I use fresh tomatoes instead of canned?

    Yes, fresh tomatoes can be substituted for canned. Simply chop them and cook until they break down and form a sauce. You may need to adjust the cooking time slightly to achieve the desired consistency.

    How can I make this dish spicier?

    If you prefer a spicier dish, use hot Italian sausage instead of sweet, or add a pinch of red pepper flakes to the sauce.

    What can I serve with this pasta?

    This pasta is a meal in itself, but it pairs beautifully with a simple green salad and crusty garlic bread for a complete dinner.

    Nutrition

    This dish is a hearty meal that provides a good balance of protein, carbohydrates, and fats. The peas add a nice dose of fiber and vitamins, while the sausage contributes protein and flavor. Adjustments can be made based on dietary needs or preferences, such as using turkey sausage for a leaner option.

    Conclusion

    There you have it, a heartwarming recipe for Pasta with Peas and Italian Sausage that’s sure to become a family favorite. It’s easy to see why this dish has been a staple in my family for generations. Not only is it delicious and satisfying, but it’s also a breeze to prepare, making it perfect for any occasion. I hope this recipe brings as much joy to your table as it has to mine. Enjoy!

    Related update: Pasta with Peas and Italian Sausage

    Related update: Salmon In Banana Leaf