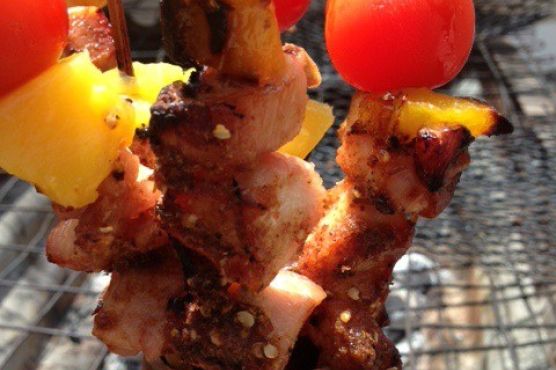
Tag: Healthy

  • Kale and Chickpea Soup with Lemon | Made by Meaghan Moineau

    Kale and Chickpea Soup with Lemon | Made by Meaghan Moineau

    Kale and Chickpea Soup with Lemon

    As the weather turns colder, there’s nothing more comforting than a bowl of homemade soup. This Kale and Chickpea Soup with Lemon is one of my favorites, reminding me of the cozy evenings spent in my grandmother’s kitchen. The aroma of the soup simmering on the stove, mingling with the scent of crusty bread toasting in the oven, transports me back to those cherished moments. This recipe is not only delicious but also packed with nutritious ingredients that make it a hearty and healthy option for any meal.

    Why You’ll Love It

    This soup is a delightful blend of flavors and textures that will warm your soul and nourish your body. The combination of kale and chickpeas provides a hearty base, while the lemon adds a refreshing zing. It’s an easy recipe to make, perfect for both weeknight dinners and special occasions. Whether you’re a seasoned chef or a kitchen novice, you’ll appreciate the simplicity and depth of flavor in this dish.

    Ingredients

    • 2 banana shallots, finely diced
    • 1 bay leaf
    • 1 can of chickpeas, drained and rinsed
    • 2 celery stalks, diced
    • 1/2 teaspoon chili flakes
    • Crusty bread, for serving
    • 1 garlic clove, peeled and crushed
    • Juice of 1 lemon
    • 2 cups of chopped kale
    • 1 lemon, sliced for garnish
    • 2 tablespoons olive oil
    • Parmesan cheese, for serving
    • 1 sprig of rosemary, finely chopped
    • Salt, to taste
    • 4 cups of vegetable or chicken stock

    Instructions

    1. Set a dutch oven or large saucepan over medium heat; pour in the olive oil.
    2. Add the finely diced shallots to the pan, stirring to coat with the oil.
    3. Make 4 or 5 long horizontal slices in the celery stalk and dice. Add this to the pan and stir.
    4. Finely chop the rosemary leaves and stir into the pan together with the bay leaf and the chili flakes.
    5. Peel the garlic clove and using the flat of your knife and the heel of your hand, crush so that it is still whole and add to the pan.
    6. Add the chickpeas and the kale and stir.
    7. Pour in the hot stock, let it come to a boil, and then turn down the heat. Let it simmer for 20 minutes until the kale is tender.
    8. Squeeze in the juice of half a lemon. Check the seasoning and adjust to taste. You might want more lemon or salt, depending on your stock.
    9. Working in batches or in the pan itself if you have a stick blender, blitz until you have the texture you like. I like mine to still have a few chickpeas and pieces of kale through it, so I set aside a couple of ladlefuls and used a stick blender to blitz the rest.
    10. Serve hot, floating a couple of slices of lemon on top of each serving and pass around the parmesan cheese for everyone to help themselves. Lovely with toasted crusty bread.

    Tips

    For the best results, use fresh kale and high-quality stock. If you prefer a thicker soup, reduce the amount of stock or simmer the soup longer. If you like a bit more heat, feel free to increase the amount of chili flakes.

    Variations & Substitutions

    If you’re looking to switch things up, you can substitute spinach or Swiss chard for kale. For a vegan version, skip the parmesan cheese or use a plant-based alternative. You can also add a handful of cooked quinoa or rice for added texture and nutrition.

    Storage

    This soup can be stored in an airtight container in the refrigerator for up to three days. It can also be frozen for up to three months. To reheat, simply thaw in the refrigerator overnight and warm on the stovetop over medium heat until hot.

    FAQ

    Can I make this soup in advance?

    Absolutely! This soup is perfect for meal prep and tastes even better the next day as the flavors meld together. Simply store it in the refrigerator and reheat before serving.

    What can I serve with this soup?

    This soup pairs wonderfully with a slice of crusty bread or a side salad. For a heartier meal, consider serving it alongside a grilled cheese sandwich.

    Nutrition

    This soup is a nutritious option, rich in fiber and vitamins A and C from the kale, as well as protein from the chickpeas. It’s a wholesome meal that will keep you full and satisfied.

    Final Thoughts

    This Kale and Chickpea Soup with Lemon is a comforting and healthy dish that’s perfect for any occasion. Whether you’re looking to warm up on a chilly day or enjoy a light and refreshing meal, this soup is sure to hit the spot. I hope you enjoy making and sharing this recipe with your loved ones, creating your own cherished memories around the table.

    Related update: Kale and Chickpea Soup with Lemon

    Related update: Make Olive Garden’s Delicious Pasta Fagioli At Home

  • Masala-Tofu Burger | Made by Meaghan Moineau

    Masala-Tofu Burger | Made by Meaghan Moineau

    Masala-Tofu Burger

    Introduction

    Imagine a family gathering on a warm summer evening, the aroma of spices wafting through the air as laughter echoes in the backyard. This memory always takes me back to the first time I tasted a Masala-Tofu Burger, a delightful fusion of Indian spices and a beloved Western classic. Growing up in a multicultural family, food was always a bridge that connected us, blending flavors and traditions into something special. Today, I’m excited to share this delicious recipe with you, hoping it brings warmth and joy to your own family gatherings.

    Why You’ll Love It

    This Masala-Tofu Burger is a game-changer for anyone looking to add a flavorful twist to their burger repertoire. The combination of aromatic spices, crunchy veggies, and creamy tofu creates a mouthwatering experience that’s both satisfying and healthy. Whether you’re a vegetarian or simply exploring new flavors, this burger is a fantastic option. It’s easy to make, customizable, and perfect for any occasion.

    Ingredients

    • 1 white onion, diced
    • 1 red, orange, or green bell pepper, diced
    • 1 cup frozen peas-carrots mix
    • 2 green chillies, chopped
    • 1 block of tofu, cubed
    • 1 potato, boiled and diced
    • 3 cloves garlic, minced
    • 1 teaspoon black mustard seeds
    • 1 sprig curry leaves
    • A pinch of hing (asafoetida)
    • 1 teaspoon cumin powder
    • 1/2 teaspoon turmeric
    • 1 lemon, juiced
    • Salt to taste
    • 1/4 cup cilantro, finely chopped
    • 1/2 cup Indian breadcrumbs
    • Vegetable oil
    • PAM Original Flavor Spray
    • 1 red or white onion, thickly sliced
    • 2 beefsteak tomatoes, sliced
    • Mint-cilantro chutney spread
    • 4 Portuguese rolls

    Instructions

    1. In a large skillet over medium-high heat, spray a generous amount of PAM and add some oil. Add mustard seeds and saute for 30 seconds until you hear popping noises.
    2. Add the curry leaves carefully as they may pop in hot oil. Then add the onions and peppers, and sweat for about 30 seconds.
    3. Stir in the minced garlic, chopped chilies, and turmeric. Saute for 5-7 minutes until the onions and peppers are soft.
    4. Add the peas-carrots mix, cumin powder, and salt. Continue to saute for 7-10 minutes until all the veggies are cooked through.
    5. In a small bowl, mix cubed tofu with a pinch of turmeric, cumin powder, coarse black pepper, and optional cayenne pepper. Set aside to marinate briefly.
    6. Add the marinated tofu to the skillet and saute until it is slightly browned and crumbly.
    7. Add juice from half a lemon and half of the chopped cilantro. Mix well, then add the diced, boiled potato and toss until everything is coated. Adjust salt and spices to taste.
    8. Mash the mixture with a masher until mushy and the veggies are small. Set aside to cool.
    9. Once cooled, mix in some breadcrumbs with your hands. Form the mixture into four thick patties. Add more breadcrumbs if needed.
    10. Place the patties on a plate, cover with plastic wrap, and refrigerate until ready to cook.
    11. In a small skillet sprayed with PAM over medium-high heat, cook each patty for about 2 minutes on each side until browned and crispy.
    12. Simultaneously, saute the thick onion slices until charred and slightly soft.
    13. Spread a generous amount of mint-cilantro chutney on each side of the Portuguese rolls, then assemble the burger with the patty, onions, tomatoes, and cilantro leaves.
    14. Serve with a slice of lemon and reduced-fat chips on the side.

    Tips

    • Make sure to press the tofu well before marinating to remove excess moisture for a better texture.
    • If you like it spicy, feel free to add more green chilies or cayenne pepper to the mix.
    • For a gluten-free option, use gluten-free breadcrumbs or crushed cornflakes.

    Variations & Substitutions

    Feel free to get creative with this recipe by adding your favorite veggies to the mix, such as mushrooms or spinach. You can also swap tofu for paneer or chickpeas for a different protein source. If you prefer a different type of bread, whole-grain buns or lettuce wraps are excellent alternatives.

    Storage

    These Masala-Tofu Patties can be made ahead of time and stored in the refrigerator for up to 3 days. Alternatively, you can freeze them for up to a month. When ready to enjoy, simply thaw and reheat them in a skillet or oven.

    FAQ

    Can I make these burgers vegan?

    Absolutely! This recipe is already vegan as it uses tofu as the main protein source and skips any dairy or eggs. Just ensure your chutney spread is also vegan-friendly.

    Can I grill these patties instead of pan-frying?

    Yes, you can grill the patties for a smokier flavor. Just make sure to brush them with some oil to prevent sticking and handle them carefully as they can be more delicate than regular meat patties.

    What can I serve with these burgers?

    A fresh green salad, sweet potato fries, or roasted vegetables make excellent sides. You can also pair it with a refreshing yogurt dip or mango chutney for an extra burst of flavor.

    Nutrition

    While I don’t have exact nutritional information for this recipe, it’s packed with healthy ingredients. Tofu provides protein, while the variety of vegetables offers vitamins and minerals. Using a whole-grain bun can increase the fiber content, making this meal as nutritious as it is delicious.

    Final Thoughts

    The Masala-Tofu Burger is a wonderful way to explore new flavors while enjoying a comforting classic. It’s a tribute to the fusion of cultures and the joy of shared meals. I hope this recipe becomes a favorite in your home, bringing smiles and satisfaction to your table. Happy cooking!

    Related update: Masala-Tofu Burger

    Related update: Indian Butter Chicken

  • Salsa Verde By Mommie Cooks | Made by Meaghan Moineau

    Salsa Verde By Mommie Cooks | Made by Meaghan Moineau

    Salsa Verde By Mommie Cooks

    Why You’ll Love It

    There’s something magical about the zesty taste of homemade salsa verde. This recipe, handed down from my dear mother, has been a family favorite for as long as I can remember. Growing up, I would watch her expertly blend the ingredients, filling our kitchen with the fresh, invigorating aroma of tomatillos and cilantro. Each time I make it, I’m transported back to those sun-drenched afternoons in the kitchen, eagerly awaiting a taste of the vibrant green salsa. This is more than just a condiment; it’s a cherished memory, and I’m delighted to share it with you.

    You’ll love this salsa because it’s incredibly versatile, bursting with flavor, and simple to prepare. Whether you’re a seasoned cook or a kitchen novice, this recipe will quickly become a staple in your culinary repertoire. Perfect for dipping, drizzling over tacos, or topping grilled meats, this salsa verde is a refreshing addition to any meal.

    Ingredients

    • 1 pound of tomatillos, husked
    • 1/2 cup vegetable broth
    • 1 teaspoon cumin
    • 1 teaspoon coriander
    • Juice of one lime
    • 2 garlic cloves
    • 1 can of green diced chiles
    • 1 small onion, chopped
    • 1/2 cup fresh cilantro
    • 1/2 teaspoon pepper
    • Salt to taste

    Instructions

    1. Remove the husks from the tomatillos and rinse them under warm water to remove any sticky residue.
    2. Place the tomatillos in a pot of boiling water and cook for about 5-7 minutes until they are tender.
    3. Carefully remove the tomatillos from the pot and transfer them to a blender.
    4. To the blender, add the vegetable broth, cumin, coriander, lime juice, garlic cloves, green diced chiles, chopped onion, fresh cilantro, and pepper.
    5. Blend the ingredients until smooth and well combined.
    6. Taste the salsa and add salt as needed.
    7. Transfer the salsa to a bowl and chill in the fridge until you’re ready to serve.

    Tips

    For the best flavor, use fresh tomatillos that are firm and vibrant green. When selecting cilantro, look for bright, unwilted leaves. If you like your salsa with a bit more heat, consider adding a jalapeño or two to the mix. Be sure to taste your salsa as you go and adjust the seasonings to fit your preference. Remember, the key to a great salsa is balancing the acidity, heat, and saltiness to create a harmonious blend of flavors.

    Variations & Substitutions

    If you’re looking to switch things up, here are a few variations you might enjoy:

    • Roasted Tomatillos: For a deeper, smokier flavor, try roasting the tomatillos under a broiler until they are charred before blending.
    • Avocado Salsa Verde: Add a ripe avocado to the blender for a creamy twist that pairs beautifully with the tangy tomatillos.
    • Herb Substitutions: If cilantro isn’t your favorite, you can substitute with parsley or a mix of parsley and mint for a different herbal note.

    Storage

    This salsa verde can be stored in an airtight container in the refrigerator for up to a week. If you find yourself with extra, you can also freeze it. Pour the salsa into a freezer-safe container, leaving a bit of space at the top to allow for expansion, and freeze for up to three months. Thaw in the refrigerator before serving.

    FAQ

    Can I use canned tomatillos?

    While fresh tomatillos yield the best flavor and texture, you can use canned tomatillos in a pinch. Be sure to drain them well before blending.

    Is salsa verde spicy?

    This salsa verde has a mild heat thanks to the green chiles. If you prefer a spicier salsa, feel free to add more chiles or include a jalapeño or serrano pepper.

    What dishes pair well with salsa verde?

    Salsa verde is incredibly versatile and pairs well with a variety of dishes. Try it over grilled chicken, fish, or pork. It’s also delicious as a topping for tacos, enchiladas, or nachos.

    Nutrition

    This recipe is not only delicious but also a healthy choice. Packed with vitamins from the tomatillos and cilantro, and low in calories, it’s a guilt-free addition to any meal. Each serving is rich in antioxidants and offers a good dose of vitamin C, making it a nutritious and flavorful option.

    Final Thoughts

    There’s a certain joy in crafting a recipe that has been passed down through generations. This salsa verde is more than just a condiment; it’s a connection to the past, a reminder of family gatherings, and a celebration of fresh, vibrant flavors. I hope you enjoy making and sharing this recipe as much as I do. Whether you’re scooping it with a crispy tortilla chip or drizzling it over your favorite dish, may it bring you as much joy and satisfaction as it has brought to my family for years. Bon appétit!

    Related update: Salsa Verde By Mommie Cooks

  • Minestrone | Made by Meaghan Moineau

    Minestrone | Made by Meaghan Moineau

    Minestrone: A Comforting Bowl of Italian Tradition

    There’s something magical about a steaming bowl of minestrone soup that’s hard to put into words. It’s more than just a meal; it’s a nostalgic embrace on a chilly evening, a celebration of fresh vegetables in every spoonful, and a testament to the simplicity of good cooking. I remember my grandmother simmering this hearty soup on the stove, her kitchen filled with the rich aroma of herbs and simmering tomatoes. Those memories of gathering around her table, slurping the warm broth alongside chunks of crusty bread, are treasured moments of comfort and joy.

    Why You’ll Love It

    Minestrone is a versatile and comforting dish that warms the soul. It’s packed with nutritious vegetables, making it not only delicious but also healthy. This recipe is perfect for those who love to experiment with flavors and textures, as it is easily adaptable to whatever ingredients you have on hand. Whether you’re a veteran cook or a kitchen novice, you’ll appreciate how straightforward and rewarding this dish is to make.

    • Nutritious and Filling: Packed with a variety of vegetables, it’s a nutrient-dense meal.
    • Comfort in a Bowl: Perfect for chilly days or when you need a comforting meal.
    • Customizable: You can easily adjust the ingredients to suit your taste or dietary needs.
    • Easy to Make: Simple steps lead to a delicious result, making it perfect for weeknight dinners.

    Ingredients

    • 2 tablespoons butter
    • 2 cups carrots, diced
    • 2 cups celery, diced
    • 2 cups onions, chopped
    • 4 cloves garlic, minced
    • 2 cups cabbage, shredded
    • 1 can (28 ounces) canned tomatoes
    • 6 cups water
    • 1 cup brown rice
    • 2 teaspoons salt
    • 1 teaspoon Worcestershire sauce
    • 1 tablespoon Italian mixed seasoning
    • 1/2 teaspoon pepper
    • 2 cups potatoes, diced
    • 2 beef bouillon cubes
    • 2 cups zucchini, sliced
    • 1 can (15 ounces) canned kidney beans, drained and rinsed
    • 1 cup frozen spinach
    • 1/2 cup Parmesan cheese, grated

    Instructions

    1. Melt butter in a large soup kettle over medium heat.
    2. Add carrots, celery, onions, garlic, and cabbage. Sauté for about 20 minutes, stirring often, until the vegetables are tender.
    3. Stir in canned tomatoes, water, brown rice, salt, Worcestershire sauce, Italian seasoning, pepper, potatoes, bouillon cubes, and zucchini.
    4. Bring the mixture to a boil, then reduce the heat and simmer covered for at least 30 minutes.
    5. Add the kidney beans and frozen spinach. Return the soup to a boil and cook over medium heat until the spinach is cooked through. Add more water if needed to reach your desired consistency.
    6. Serve hot, garnished with grated Parmesan cheese. Enjoy!

    Tips

    • Prep Ahead: Chop your vegetables in advance to make the cooking process quicker and smoother.
    • Consistent Size: Dice your vegetables to a similar size to ensure even cooking.
    • Stir Often: Stir the pot frequently, especially during the initial sauté step, to prevent sticking.

    Variations & Substitutions

    This minestrone soup is highly adaptable. Here are a few ideas to make it your own:

    • Vegetable Substitutions: Feel free to swap in other vegetables such as green beans, peas, or bell peppers.
    • Grain Alternatives: If you’re not a fan of brown rice, try using pasta, quinoa, or barley.
    • Protein Boost: Add cooked chicken or sausage for extra protein.
    • Vegan Version: Use vegetable bouillon cubes and omit the Parmesan cheese.

    Storage

    Minestrone soup stores exceptionally well, making it perfect for meal prep:

    • Refrigerator: Store in an airtight container for up to 5 days.
    • Freezer: Freeze in portioned containers for up to 3 months. Thaw overnight in the refrigerator before reheating.
    • Reheating: Gently reheat on the stovetop over medium heat, adding a splash of water if the soup has thickened too much.

    FAQ

    Can I make this soup in a slow cooker?

    Yes, you can! Simply add all the ingredients except for the kidney beans, spinach, and Parmesan cheese to your slow cooker. Cook on low for 6-8 hours or on high for 3-4 hours. Stir in the beans and spinach in the last 30 minutes of cooking, and garnish with Parmesan before serving.

    What can I serve with minestrone?

    Minestrone is delightful on its own but pairs beautifully with a side of crusty bread, a fresh green salad, or even a cheesy garlic bread for a bit of indulgence.

    Nutrition

    This minestrone soup is not only tasty but also nutritious, packed with vitamins, minerals, and fiber from a variety of vegetables. Each serving (without Parmesan cheese) contains approximately:

    • Calories: 150
    • Protein: 6g
    • Carbohydrates: 30g
    • Fat: 3g
    • Fiber: 7g

    Final Thoughts

    Minestrone is more than just a soup; it’s a warm hug in a bowl. Whether you’re cooking for family, friends, or just yourself, this recipe is sure to bring comfort and satisfaction. Its adaptability and ease of preparation make it a staple in any kitchen, and its rich flavors are bound to make it a favorite in your household. So, gather around the table and enjoy the simple pleasure of a homemade meal that speaks to the heart and soul.

    Related update: Minestrone

    Related update: Kale and Chickpea Soup with Lemon

  • Green Monster Ice Pops | Made by Meaghan Moineau

    Green Monster Ice Pops | Made by Meaghan Moineau

    Green Monster Ice Pops

    There’s something magical about the refreshing taste of a homemade ice pop on a warm summer day. Growing up, I fondly remember the excitement of racing to the freezer, eagerly anticipating the moment when the ice pops would be ready. Those childhood memories inspired this recipe for Green Monster Ice Pops—a healthy twist on a classic treat that the whole family can enjoy. Packed with wholesome ingredients, these ice pops are not only delicious but also nutrient-rich, perfect for a guilt-free indulgence.

    Why You’ll Love It

    These Green Monster Ice Pops are the perfect blend of creamy and refreshing. You’ll love them because:

    • They’re incredibly easy to make, requiring just a few simple steps.
    • The combination of avocado and banana provides a natural creaminess without the need for dairy.
    • They’re packed with nutrients from spinach and mango, making them a healthy snack option.
    • They’re naturally sweetened with banana and honey, with the option to add more sweetness if desired.
    • Kids love the fun green color and delicious taste!

    Ingredients

    • 1 cup unsweetened almond milk
    • 1 ripe avocado
    • 1 cup baby spinach
    • 1 ripe banana
    • 2 tablespoons honey
    • 1 cup fresh mango, chopped

    Instructions

    1. Place all ingredients into a blender and mix well until smooth.
    2. Taste the smoothie. If it’s not sweet enough, add 1 to 2 tablespoons of maple syrup or additional honey and blend again.
    3. Pour the smoothie mixture into ice pop molds.
    4. Insert a wooden popsicle stick into each mold, leaving about a quarter of the stick above the mold.
    5. Place the molds into the freezer for 2-3 hours until fully frozen.
    6. Once frozen, remove the ice pops from the molds and enjoy!

    Tips

    • Ensure the avocado is ripe to achieve the best creamy texture.
    • For easier removal, run the molds under warm water for a few seconds to loosen the ice pops.
    • Use silicone molds for easy removal and less mess.

    Variations & Substitutions

    One of the best things about this recipe is its versatility. Here are some ideas to mix it up:

    • Substitute the almond milk: Use coconut milk for a tropical twist or regular milk if you prefer dairy.
    • Add-ins: Try adding chia seeds or flaxseeds for an extra nutritional boost.
    • Fruit swaps: Swap mango for pineapple or berries for a different flavor profile.

    Storage

    Once the ice pops are fully frozen, you can store them in the molds or remove them and place them in a freezer-safe bag or container. They will keep well for up to 1 month in the freezer. Just be sure to keep them well-sealed to prevent freezer burn.

    FAQ

    Can I make these ice pops without a blender?

    While a blender is recommended for achieving a smooth consistency, you could use a food processor or mash the ingredients by hand. However, the texture might not be as creamy.

    Are these ice pops suitable for children?

    Absolutely! These ice pops are packed with fruits and spinach, making them a fun and healthy treat for kids. The sweet taste of banana and mango masks the spinach, so it’s a clever way to sneak in some greens.

    Can I use frozen fruits instead of fresh ones?

    Yes, frozen fruits can be used in place of fresh ones. Just ensure they’re fully thawed before blending to achieve a smooth mixture.

    Nutrition

    These Green Monster Ice Pops are not only delicious but also provide a good source of vitamins and minerals:

    • Avocado: Rich in healthy fats and fiber.
    • Spinach: A powerful source of iron, calcium, and vitamins A and C.
    • Mango: High in vitamin C and antioxidants.
    • Banana: Provides potassium and natural sweetness.

    Final Thoughts

    Green Monster Ice Pops are a delightful way to enjoy a healthy treat that’s both satisfying and nourishing. Whether you’re looking to cool down on a hot day or simply want a nutritious snack, these ice pops are a fantastic choice. Try them out, and don’t be afraid to experiment with different variations to find your perfect flavor combination. Enjoy the vibrant taste and the joy of a homemade treat that brings back those cherished childhood memories.

    Related update: Green Monster Ice Pops

    Related update: Ginger Snap and Pumpkin Ice Cream Sandwiches

  • Dairy Free Chicken Salad | Made by Meaghan Moineau

    Dairy Free Chicken Salad | Made by Meaghan Moineau

    Dairy Free Chicken Salad

    Welcome to a delightful culinary journey with our Dairy Free Chicken Salad! This dish is a nostalgic nod to family picnics in the park. I remember those sunny days when my mom would whip up this comforting salad, and we’d enjoy it under the sprawling oak tree in our local park. The savory aroma of seasoned chicken mixed with the tangy zest of pickles and lemon would tantalize our senses, making each bite a moment to cherish. Now, I’m excited to share this recipe with you, hoping it brings as much joy to your table as it did to ours.

    Why You’ll Love It

    This Dairy Free Chicken Salad is a perfect blend of flavors and textures, making it a crowd-pleaser for any occasion. Whether you’re looking for a quick lunch, a picnic staple, or a dish for a potluck, this recipe has got you covered. It’s not only delicious and satisfying but also healthy, as it’s dairy-free and packed with protein. The combination of tender chicken with crunchy pickles and creamy Veganaise creates a perfect harmony that will leave your taste buds dancing. Plus, it’s incredibly easy to make, requiring minimal prep time so you can spend more time enjoying the company of your loved ones.

    Ingredients

    • 2 tablespoons olive oil
    • 1 pound skinless boneless chicken tenderloins
    • 1 teaspoon pepper
    • 1 teaspoon salt
    • 1 teaspoon paprika
    • 3 cooked whole eggs
    • 1/2 cup chopped dill pickles
    • 1/2 cup Veganaise
    • 1 tablespoon lemon juice
    • 1 teaspoon seasoned salt

    Instructions

    1. Thaw the chicken if needed.
    2. Add the olive oil to a large skillet and bring to medium heat.
    3. Add the chicken to the skillet and season with paprika, salt, and pepper.
    4. Turn every few minutes and cook until chicken is cooked through and juices run clear.
    5. Remove the chicken and place on a large cutting board.
    6. Using two forks, shred the chicken and place in a large bowl.
    7. If you haven’t already, boil the eggs. Cover the eggs with cold water in a large pot. Place pot over medium-high heat. As soon as it starts boiling, set your timer for 7 minutes. Done!
    8. Peel and chop up your eggs, then place them in the bowl with your shredded chicken.
    9. Chop up your dill pickles and add them to the bowl.
    10. Add the Veganaise, lemon juice, and seasoned salt.
    11. Toss to combine. Serve with your favorite bread.

    Tips

    For the best results, use fresh chicken tenderloins and cook them just until done to ensure they stay juicy. When shredding the chicken, don’t worry about making the pieces too small, as a bit of texture adds to the salad’s appeal. If you’re in a hurry, you can use pre-cooked rotisserie chicken as a time-saving alternative. And remember, the key to a perfect salad is tasting as you go, so feel free to adjust the seasoning to your liking.

    Variations & Substitutions

    This recipe is wonderfully adaptable. If you prefer a bit of sweetness, try adding a handful of dried cranberries or grapes. For a touch of crunch, toss in some chopped celery or nuts such as almonds or walnuts. If you don’t have Veganaise, regular mayonnaise or Greek yogurt can be used as substitutes, keeping in mind the latter will add dairy. For a spicier kick, a dash of hot sauce or a sprinkle of cayenne pepper works wonders.

    Storage

    Store any leftover chicken salad in an airtight container in the refrigerator. It will keep well for up to three days, making it a convenient option for meal prep. When ready to eat, give it a good stir and adjust the seasoning if necessary. Unfortunately, this dish doesn’t freeze well due to the mayonnaise-based dressing, so it’s best enjoyed fresh.

    FAQ

    Can I make this salad in advance?

    Absolutely! In fact, making it a day ahead allows the flavors to meld together beautifully. Just store it in the fridge and give it a good stir before serving.

    Is this recipe gluten-free?

    Yes, the salad itself is gluten-free. However, if you’re serving it with bread, make sure to choose a gluten-free variety if needed.

    Can I add fruits to this salad?

    Yes, adding fruits like grapes or diced apples can add a nice sweetness and additional texture to the salad. Just be sure to add them right before serving to maintain their freshness.

    Nutrition

    This Dairy Free Chicken Salad is a nutritious choice, packed with protein from the chicken and eggs. It’s also a good source of healthy fats from the olive oil and Veganaise. While exact nutritional values will vary based on portion sizes, you can rest assured that this dish is both satisfying and nourishing.

    Final thoughts

    Our Dairy Free Chicken Salad is a versatile dish that fits seamlessly into any meal plan. Its delightful combination of flavors and textures is sure to please even the pickiest eaters. Whether you’re making it for a family gathering, a picnic, or just a quick meal, it’s bound to become a household favorite. So gather your ingredients, follow the simple steps, and enjoy a taste of nostalgia with every bite. Happy cooking!

    Related update: Dairy Free Chicken Salad

    Related update: Lentil Salad With Vegetables

  • Salmon In Banana Leaf | Made by Meaghan Moineau

    Salmon In Banana Leaf: A Flavorful Island Experience

    Intro

    Salmon in banana leaf is a dish that transports me back to my childhood summers spent on the tropical islands of Southeast Asia. I remember the vibrant markets filled with the aroma of freshly caught fish and the earthy scent of banana leaves. My grandmother would lovingly prepare this dish, infusing each bite with flavors that spoke of her heritage and our family’s history. Today, I’m thrilled to share this recipe with you, so you can create your own flavorful memories around the dinner table.

    Why You’ll Love It

    This dish is a culinary adventure wrapped in the simplicity of banana leaves. The salmon is marinated to perfection, absorbing the savory, sweet, and slightly spicy flavors of the marinade. Steaming in banana leaves adds an earthy aroma and keeps the fish perfectly moist. It’s a healthy, gluten-free meal that’s also visually stunning, perfect for impressing guests or treating yourself to an exotic dinner at home.

    Ingredients

    • Banana leaves
    • 1 teaspoon cinnamon
    • 1 teaspoon fennel seed
    • 2 tablespoons fish sauce
    • 2 cloves garlic, minced
    • 1 tablespoon ginger, minced
    • 3 tablespoons peach preserves
    • 2 red chiles, sliced
    • 1 cup rice
    • 1/4 cup rice wine vinegar
    • 2 salmon steaks
    • 2 scallions, chopped
    • 1 tablespoon sesame oil
    • 2 tablespoons soy sauce
    • 1 star anise
    • 2 tablespoons tahini
    • 2 tablespoons vegetable oil

    Instructions

    1. Mix all marinade ingredients: fish sauce, garlic, ginger, peach preserves, red chiles, rice wine vinegar, sesame oil, soy sauce, and tahini in a bowl.
    2. Place salmon steaks in a large resealable bag or container and pour the marinade over them. Seal and refrigerate for at least 30 minutes, up to 2 hours.
    3. Meanwhile, prepare your scented rice powder by grinding rice, cinnamon, fennel seed, and star anise in a spice grinder until coarsely ground. Leave some larger crumbles for texture.
    4. Remove salmon from the marinade (discard any leftover marinade) and coat each fillet with the scented rice powder. Reserve some powder for future use.
    5. Lay banana leaves flat. Place one salmon fillet in the center of each leaf. Fold one side over the salmon, then the opposite side, followed by folding both ends to create a package.
    6. Place the salmon packets in a steamer basket over boiling water. Steam for about 10-13 minutes until the salmon is cooked through.
    7. For the dipping sauce, heat the remaining marinade ingredients in a small saucepot or microwave-safe dish. Whisk together until warm and blended.
    8. To serve, make a slit in the banana leaves to reveal the salmon. Serve with steamed rice or noodles, corn, and the dipping sauce on the side.

    Tips

    Ensure your banana leaves are pliable by briefly passing them over an open flame or soaking them in hot water. This prevents them from cracking when folding. If you can’t find fresh banana leaves, parchment paper can be a substitute, though it won’t provide the same aromatic quality.

    Variations & Substitutions

    If you prefer a milder flavor, omit the red chiles or reduce the amount. For a different twist, substitute the salmon with your favorite fish, such as tilapia or cod. Vegetarians can replace the fish with thick slices of tofu, adjusting the marinating time to allow the flavors to penetrate fully. For a nutty flavor, add a sprinkle of ground peanuts to the marinade.

    Storage

    Leftover salmon can be stored in the refrigerator for up to 2 days. Keep it wrapped in the banana leaf to retain moisture and flavor. Reheat gently in a steamer or microwave to prevent drying out. The scented rice powder can be stored in an airtight container for up to a month, ready to use for your next culinary creation.

    FAQ

    Can I use frozen salmon for this recipe?

    Yes, frozen salmon can be used, but make sure it is fully thawed before marinating to ensure the flavors are absorbed properly.

    Where can I find banana leaves?

    Banana leaves are often available at Asian grocery stores or specialty markets. They are typically sold fresh or frozen. If using frozen, allow them to thaw before use.

    How can I tell when the salmon is fully cooked?

    The salmon is done when it flakes easily with a fork and has a light pink color throughout. Cooking times may vary slightly depending on the thickness of the fillets.

    Nutrition

    This dish is rich in omega-3 fatty acids, thanks to the salmon, and it offers a balanced profile of protein and healthy fats. The aromatic spices add flavor without the need for excessive salt or sugars, making it a heart-healthy choice. Adjust the oil and soy sauce quantities if you are monitoring your sodium or fat intake.

    Conclusion

    Salmon in banana leaf is more than just a meal—it’s an experience. With its rich flavors and aromatic presentation, it brings a touch of tropical paradise to your dining table. Whether you’re reminiscing about past travels or dreaming of future adventures, this dish is sure to delight your senses and warm your heart. Enjoy preparing and savoring this special recipe, and don’t forget to share it with those you love, creating new memories one delicious bite at a time.

    Related update: Salmon In Banana Leaf

    Related update: Wild Salmon Cakes

  • Amaranth and Roast Veggie Salad | Made by Meaghan Moineau

    Amaranth and Roast Veggie Salad | Made by Meaghan Moineau

    Amaranth and Roast Veggie Salad

    Intro

    There’s something magical about the aroma of vegetables roasting in the oven, the warmth of the kitchen embracing you as you anticipate the delightful meal ahead. I remember my grandmother’s kitchen, where every Sunday, she would prepare a hearty roast that filled the house with comforting scents. Her kitchen was a haven, a place where the worries of the world would melt away with each delicious bite. Inspired by those cherished moments, I’ve created a dish that combines the wholesome goodness of roasted vegetables with the unique texture of amaranth. This Amaranth and Roast Veggie Salad is my homage to those Sundays, and I’m thrilled to share it with you.

    Why You’ll Love It

    This Amaranth and Roast Veggie Salad is a delightful blend of flavors and textures. The nutty, slightly crunchy amaranth pairs perfectly with the tender, caramelized roasted vegetables. The basil-infused olive oil adds a fragrant touch, while the herbal salt enhances the natural sweetness of the vegetables. It’s a dish that’s not only delicious but also packed with nutrients, making it a perfect addition to any meal. Whether you’re a seasoned cook or a kitchen novice, you’ll find this salad both easy to prepare and deeply satisfying.

    Ingredients

    • 1 cup amaranth
    • 2 tablespoons basil-infused olive oil
    • 1 bell pepper, sliced
    • 1 cup diced pumpkin
    • 1 red onion, roughly chopped
    • A handful of rocket leaves
    • Herbal salt, to taste
    • 1 punnet baby tomatoes

    Instructions

    1. Cook the amaranth with about a cup of water. Bring it to a boil, then reduce the heat and simmer until it reaches a sticky consistency. This should take around 15-20 minutes.
    2. While the amaranth is cooking, preheat your oven to 400°F (200°C).
    3. Cut the red onion roughly into chunks and dice the pumpkin into bite-sized pieces.
    4. Add the onion and diced pumpkin to a tinfoil-lined baking tray.
    5. Drizzle the vegetables with basil-infused olive oil and sprinkle with herbal salt and pepper.
    6. Place the tray in the hot oven and roast for about 25-30 minutes, or until the edges of the pumpkin become crispy.
    7. Just before the veggies are done roasting, add the baby tomatoes to the tray and return to the oven for an additional 5 minutes.
    8. Once the vegetables are roasted, remove them from the oven and coat them with the cooked amaranth.
    9. Tear a few rocket leaves and add them to the mixture.
    10. Toss everything together gently, serve warm, and enjoy your unusual roast veggie salad!

    Tips

    For the best results, use fresh, seasonal vegetables. If you’re in a hurry, you can prepare the amaranth in advance and simply reheat it when you’re ready to assemble the salad. Don’t hesitate to adjust the seasoning to your taste—more herbal salt can bring out the flavors even more.

    Variations & Substitutions

    If you can’t find amaranth, quinoa is a great substitute that will give you a similar texture. For a bit of heat, consider adding a pinch of chili flakes to the roasted vegetables. You can also vary the veggies based on what you have on hand; zucchini or sweet potatoes would be excellent additions.

    Storage

    This salad is best enjoyed fresh, but any leftovers can be stored in an airtight container in the refrigerator for up to 2 days. When reheating, try to do so gently to maintain the texture of the vegetables.

    FAQ

    Can I make this salad in advance?

    Yes, you can prepare the components of the salad ahead of time. Cook the amaranth and roast the vegetables, then store them separately in the refrigerator. When you’re ready to serve, warm them slightly and toss everything together with the rocket leaves.

    Is this salad gluten-free?

    Absolutely! Amaranth is a naturally gluten-free grain, making this salad a perfect option for those with gluten sensitivities.

    What can I serve with this salad?

    This salad is versatile and pairs well with grilled chicken, fish, or even a simple lentil soup for a complete meal. It’s also an excellent side dish for a larger dinner spread.

    Nutrition

    This Amaranth and Roast Veggie Salad is not only flavorful but also nutritious. Amaranth is a great source of protein and fiber, while the roasted vegetables provide essential vitamins and minerals. The addition of olive oil offers healthy fats, making this a well-rounded, wholesome dish.

    Conclusion

    Creating this Amaranth and Roast Veggie Salad is like taking a comforting journey back to simpler times, where the kitchen was filled with warmth and love. It’s a dish that brings together the best of both worlds: a touch of nostalgia and a healthy, modern twist. I hope this salad finds a cherished place at your table, just as it has in mine. Enjoy every bite!

    Related update: Amaranth and Roast Veggie Salad

    Related update: Pasta with Peas and Italian Sausage

    Related update: Dairy Free Chicken Salad