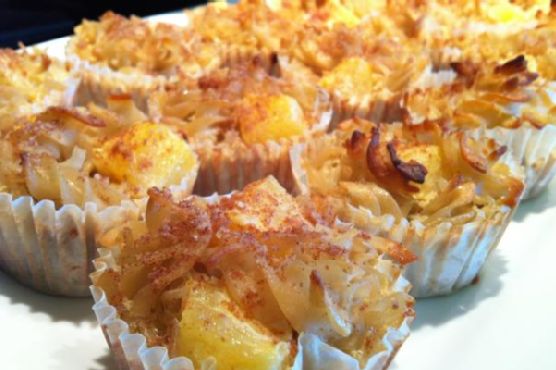
Tag: Gluten-Free

  • Green Monster Ice Pops | Made by Meaghan Moineau

    Green Monster Ice Pops | Made by Meaghan Moineau

    Green Monster Ice Pops

    There’s something magical about the refreshing taste of a homemade ice pop on a warm summer day. Growing up, I fondly remember the excitement of racing to the freezer, eagerly anticipating the moment when the ice pops would be ready. Those childhood memories inspired this recipe for Green Monster Ice Pops—a healthy twist on a classic treat that the whole family can enjoy. Packed with wholesome ingredients, these ice pops are not only delicious but also nutrient-rich, perfect for a guilt-free indulgence.

    Why You’ll Love It

    These Green Monster Ice Pops are the perfect blend of creamy and refreshing. You’ll love them because:

    • They’re incredibly easy to make, requiring just a few simple steps.
    • The combination of avocado and banana provides a natural creaminess without the need for dairy.
    • They’re packed with nutrients from spinach and mango, making them a healthy snack option.
    • They’re naturally sweetened with banana and honey, with the option to add more sweetness if desired.
    • Kids love the fun green color and delicious taste!

    Ingredients

    • 1 cup unsweetened almond milk
    • 1 ripe avocado
    • 1 cup baby spinach
    • 1 ripe banana
    • 2 tablespoons honey
    • 1 cup fresh mango, chopped

    Instructions

    1. Place all ingredients into a blender and mix well until smooth.
    2. Taste the smoothie. If it’s not sweet enough, add 1 to 2 tablespoons of maple syrup or additional honey and blend again.
    3. Pour the smoothie mixture into ice pop molds.
    4. Insert a wooden popsicle stick into each mold, leaving about a quarter of the stick above the mold.
    5. Place the molds into the freezer for 2-3 hours until fully frozen.
    6. Once frozen, remove the ice pops from the molds and enjoy!

    Tips

    • Ensure the avocado is ripe to achieve the best creamy texture.
    • For easier removal, run the molds under warm water for a few seconds to loosen the ice pops.
    • Use silicone molds for easy removal and less mess.

    Variations & Substitutions

    One of the best things about this recipe is its versatility. Here are some ideas to mix it up:

    • Substitute the almond milk: Use coconut milk for a tropical twist or regular milk if you prefer dairy.
    • Add-ins: Try adding chia seeds or flaxseeds for an extra nutritional boost.
    • Fruit swaps: Swap mango for pineapple or berries for a different flavor profile.

    Storage

    Once the ice pops are fully frozen, you can store them in the molds or remove them and place them in a freezer-safe bag or container. They will keep well for up to 1 month in the freezer. Just be sure to keep them well-sealed to prevent freezer burn.

    FAQ

    Can I make these ice pops without a blender?

    While a blender is recommended for achieving a smooth consistency, you could use a food processor or mash the ingredients by hand. However, the texture might not be as creamy.

    Are these ice pops suitable for children?

    Absolutely! These ice pops are packed with fruits and spinach, making them a fun and healthy treat for kids. The sweet taste of banana and mango masks the spinach, so it’s a clever way to sneak in some greens.

    Can I use frozen fruits instead of fresh ones?

    Yes, frozen fruits can be used in place of fresh ones. Just ensure they’re fully thawed before blending to achieve a smooth mixture.

    Nutrition

    These Green Monster Ice Pops are not only delicious but also provide a good source of vitamins and minerals:

    • Avocado: Rich in healthy fats and fiber.
    • Spinach: A powerful source of iron, calcium, and vitamins A and C.
    • Mango: High in vitamin C and antioxidants.
    • Banana: Provides potassium and natural sweetness.

    Final Thoughts

    Green Monster Ice Pops are a delightful way to enjoy a healthy treat that’s both satisfying and nourishing. Whether you’re looking to cool down on a hot day or simply want a nutritious snack, these ice pops are a fantastic choice. Try them out, and don’t be afraid to experiment with different variations to find your perfect flavor combination. Enjoy the vibrant taste and the joy of a homemade treat that brings back those cherished childhood memories.

    Related update: Green Monster Ice Pops

    Related update: Ginger Snap and Pumpkin Ice Cream Sandwiches

  • Salmon In Banana Leaf | Made by Meaghan Moineau

    Salmon In Banana Leaf: A Flavorful Island Experience

    Intro

    Salmon in banana leaf is a dish that transports me back to my childhood summers spent on the tropical islands of Southeast Asia. I remember the vibrant markets filled with the aroma of freshly caught fish and the earthy scent of banana leaves. My grandmother would lovingly prepare this dish, infusing each bite with flavors that spoke of her heritage and our family’s history. Today, I’m thrilled to share this recipe with you, so you can create your own flavorful memories around the dinner table.

    Why You’ll Love It

    This dish is a culinary adventure wrapped in the simplicity of banana leaves. The salmon is marinated to perfection, absorbing the savory, sweet, and slightly spicy flavors of the marinade. Steaming in banana leaves adds an earthy aroma and keeps the fish perfectly moist. It’s a healthy, gluten-free meal that’s also visually stunning, perfect for impressing guests or treating yourself to an exotic dinner at home.

    Ingredients

    • Banana leaves
    • 1 teaspoon cinnamon
    • 1 teaspoon fennel seed
    • 2 tablespoons fish sauce
    • 2 cloves garlic, minced
    • 1 tablespoon ginger, minced
    • 3 tablespoons peach preserves
    • 2 red chiles, sliced
    • 1 cup rice
    • 1/4 cup rice wine vinegar
    • 2 salmon steaks
    • 2 scallions, chopped
    • 1 tablespoon sesame oil
    • 2 tablespoons soy sauce
    • 1 star anise
    • 2 tablespoons tahini
    • 2 tablespoons vegetable oil

    Instructions

    1. Mix all marinade ingredients: fish sauce, garlic, ginger, peach preserves, red chiles, rice wine vinegar, sesame oil, soy sauce, and tahini in a bowl.
    2. Place salmon steaks in a large resealable bag or container and pour the marinade over them. Seal and refrigerate for at least 30 minutes, up to 2 hours.
    3. Meanwhile, prepare your scented rice powder by grinding rice, cinnamon, fennel seed, and star anise in a spice grinder until coarsely ground. Leave some larger crumbles for texture.
    4. Remove salmon from the marinade (discard any leftover marinade) and coat each fillet with the scented rice powder. Reserve some powder for future use.
    5. Lay banana leaves flat. Place one salmon fillet in the center of each leaf. Fold one side over the salmon, then the opposite side, followed by folding both ends to create a package.
    6. Place the salmon packets in a steamer basket over boiling water. Steam for about 10-13 minutes until the salmon is cooked through.
    7. For the dipping sauce, heat the remaining marinade ingredients in a small saucepot or microwave-safe dish. Whisk together until warm and blended.
    8. To serve, make a slit in the banana leaves to reveal the salmon. Serve with steamed rice or noodles, corn, and the dipping sauce on the side.

    Tips

    Ensure your banana leaves are pliable by briefly passing them over an open flame or soaking them in hot water. This prevents them from cracking when folding. If you can’t find fresh banana leaves, parchment paper can be a substitute, though it won’t provide the same aromatic quality.

    Variations & Substitutions

    If you prefer a milder flavor, omit the red chiles or reduce the amount. For a different twist, substitute the salmon with your favorite fish, such as tilapia or cod. Vegetarians can replace the fish with thick slices of tofu, adjusting the marinating time to allow the flavors to penetrate fully. For a nutty flavor, add a sprinkle of ground peanuts to the marinade.

    Storage

    Leftover salmon can be stored in the refrigerator for up to 2 days. Keep it wrapped in the banana leaf to retain moisture and flavor. Reheat gently in a steamer or microwave to prevent drying out. The scented rice powder can be stored in an airtight container for up to a month, ready to use for your next culinary creation.

    FAQ

    Can I use frozen salmon for this recipe?

    Yes, frozen salmon can be used, but make sure it is fully thawed before marinating to ensure the flavors are absorbed properly.

    Where can I find banana leaves?

    Banana leaves are often available at Asian grocery stores or specialty markets. They are typically sold fresh or frozen. If using frozen, allow them to thaw before use.

    How can I tell when the salmon is fully cooked?

    The salmon is done when it flakes easily with a fork and has a light pink color throughout. Cooking times may vary slightly depending on the thickness of the fillets.

    Nutrition

    This dish is rich in omega-3 fatty acids, thanks to the salmon, and it offers a balanced profile of protein and healthy fats. The aromatic spices add flavor without the need for excessive salt or sugars, making it a heart-healthy choice. Adjust the oil and soy sauce quantities if you are monitoring your sodium or fat intake.

    Conclusion

    Salmon in banana leaf is more than just a meal—it’s an experience. With its rich flavors and aromatic presentation, it brings a touch of tropical paradise to your dining table. Whether you’re reminiscing about past travels or dreaming of future adventures, this dish is sure to delight your senses and warm your heart. Enjoy preparing and savoring this special recipe, and don’t forget to share it with those you love, creating new memories one delicious bite at a time.

    Related update: Salmon In Banana Leaf

    Related update: Wild Salmon Cakes

  • Amaranth and Roast Veggie Salad | Made by Meaghan Moineau

    Amaranth and Roast Veggie Salad | Made by Meaghan Moineau

    Amaranth and Roast Veggie Salad

    Intro

    There’s something magical about the aroma of vegetables roasting in the oven, the warmth of the kitchen embracing you as you anticipate the delightful meal ahead. I remember my grandmother’s kitchen, where every Sunday, she would prepare a hearty roast that filled the house with comforting scents. Her kitchen was a haven, a place where the worries of the world would melt away with each delicious bite. Inspired by those cherished moments, I’ve created a dish that combines the wholesome goodness of roasted vegetables with the unique texture of amaranth. This Amaranth and Roast Veggie Salad is my homage to those Sundays, and I’m thrilled to share it with you.

    Why You’ll Love It

    This Amaranth and Roast Veggie Salad is a delightful blend of flavors and textures. The nutty, slightly crunchy amaranth pairs perfectly with the tender, caramelized roasted vegetables. The basil-infused olive oil adds a fragrant touch, while the herbal salt enhances the natural sweetness of the vegetables. It’s a dish that’s not only delicious but also packed with nutrients, making it a perfect addition to any meal. Whether you’re a seasoned cook or a kitchen novice, you’ll find this salad both easy to prepare and deeply satisfying.

    Ingredients

    • 1 cup amaranth
    • 2 tablespoons basil-infused olive oil
    • 1 bell pepper, sliced
    • 1 cup diced pumpkin
    • 1 red onion, roughly chopped
    • A handful of rocket leaves
    • Herbal salt, to taste
    • 1 punnet baby tomatoes

    Instructions

    1. Cook the amaranth with about a cup of water. Bring it to a boil, then reduce the heat and simmer until it reaches a sticky consistency. This should take around 15-20 minutes.
    2. While the amaranth is cooking, preheat your oven to 400°F (200°C).
    3. Cut the red onion roughly into chunks and dice the pumpkin into bite-sized pieces.
    4. Add the onion and diced pumpkin to a tinfoil-lined baking tray.
    5. Drizzle the vegetables with basil-infused olive oil and sprinkle with herbal salt and pepper.
    6. Place the tray in the hot oven and roast for about 25-30 minutes, or until the edges of the pumpkin become crispy.
    7. Just before the veggies are done roasting, add the baby tomatoes to the tray and return to the oven for an additional 5 minutes.
    8. Once the vegetables are roasted, remove them from the oven and coat them with the cooked amaranth.
    9. Tear a few rocket leaves and add them to the mixture.
    10. Toss everything together gently, serve warm, and enjoy your unusual roast veggie salad!

    Tips

    For the best results, use fresh, seasonal vegetables. If you’re in a hurry, you can prepare the amaranth in advance and simply reheat it when you’re ready to assemble the salad. Don’t hesitate to adjust the seasoning to your taste—more herbal salt can bring out the flavors even more.

    Variations & Substitutions

    If you can’t find amaranth, quinoa is a great substitute that will give you a similar texture. For a bit of heat, consider adding a pinch of chili flakes to the roasted vegetables. You can also vary the veggies based on what you have on hand; zucchini or sweet potatoes would be excellent additions.

    Storage

    This salad is best enjoyed fresh, but any leftovers can be stored in an airtight container in the refrigerator for up to 2 days. When reheating, try to do so gently to maintain the texture of the vegetables.

    FAQ

    Can I make this salad in advance?

    Yes, you can prepare the components of the salad ahead of time. Cook the amaranth and roast the vegetables, then store them separately in the refrigerator. When you’re ready to serve, warm them slightly and toss everything together with the rocket leaves.

    Is this salad gluten-free?

    Absolutely! Amaranth is a naturally gluten-free grain, making this salad a perfect option for those with gluten sensitivities.

    What can I serve with this salad?

    This salad is versatile and pairs well with grilled chicken, fish, or even a simple lentil soup for a complete meal. It’s also an excellent side dish for a larger dinner spread.

    Nutrition

    This Amaranth and Roast Veggie Salad is not only flavorful but also nutritious. Amaranth is a great source of protein and fiber, while the roasted vegetables provide essential vitamins and minerals. The addition of olive oil offers healthy fats, making this a well-rounded, wholesome dish.

    Conclusion

    Creating this Amaranth and Roast Veggie Salad is like taking a comforting journey back to simpler times, where the kitchen was filled with warmth and love. It’s a dish that brings together the best of both worlds: a touch of nostalgia and a healthy, modern twist. I hope this salad finds a cherished place at your table, just as it has in mine. Enjoy every bite!

    Related update: Amaranth and Roast Veggie Salad

    Related update: Pasta with Peas and Italian Sausage

    Related update: Dairy Free Chicken Salad