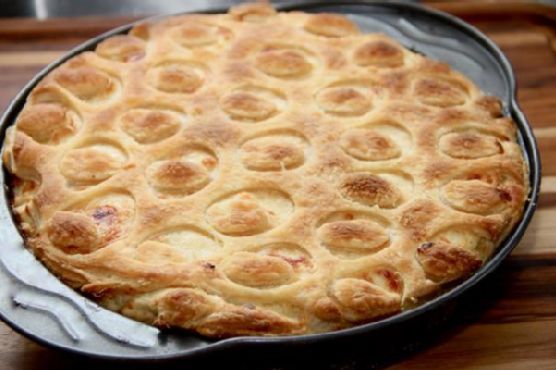
Tag: French

  • Decadent Spiced Chocolate Mousse in Hazelnut Chocolate Shells | Made by Meaghan Moineau

    Decadent Spiced Chocolate Mousse in Hazelnut Chocolate Shells | Made by Meaghan Moineau

    Decadent Spiced Chocolate Mousse in Hazelnut Chocolate Shells

    Imagine the moment you break through a perfectly crisp chocolate shell, revealing a velvety, spiced chocolate mousse that caresses your taste buds with warmth and richness. The nutty aroma of toasted hazelnuts mingles with the sweet scent of cinnamon and cardamom, creating an unforgettable dessert experience. This is not just any chocolate mousse — it’s an indulgence that elevates the classic French dessert to new heights.

    Personal Story

    My first encounter with chocolate mousse was a revelation. I was a teenager on a family trip to Paris, where I experienced the magic of French pâtisserie for the first time. The mousse was served in a quaint café tucked away in a cobblestone alley, and it was love at first bite. The lightness, the richness — it was a delicate balance I had never tasted before. Fast forward a few years, and my love for this dessert led me to experiment in my own kitchen, determined to recreate that Parisian magic.

    But, as many of us know, not all kitchen experiments go according to plan. My first attempt was more of a chocolate soup than a mousse. Undeterred, I delved into research, learning about the chemistry of chocolate and the art of creating that perfect airy texture. It was during one of these trials that I accidentally added a pinch of cinnamon and cardamom into the mix. What might have been a mishap turned into a serendipitous discovery.

    Infused with warming spices and encased in a delightful hazelnut chocolate shell, my version of the chocolate mousse was born. It was a hit at family gatherings and quickly became a requested favorite. The spices added warmth and depth, while the hazelnut shell provided a delightful crunch — a combination that was both nostalgic and refreshingly new.

    What Makes This Version Special

    This isn’t your typical chocolate mousse. Infused with warming spices and encased in a delightful hazelnut chocolate shell, this mousse elevates the classic dessert with a nutty and aromatic touch. By blooming spices in melted butter, we release their essential oils, enhancing the depth of flavor. The crunchy hazelnut shell provides a delightful contrast to the rich, creamy mousse inside. It’s a dessert that’s both sophisticated and approachable — a tribute to the beloved classic with a modern twist.

    Flavor Profile

    The first thing you’ll notice with this decadent spiced chocolate mousse is the aroma — the hazelnuts toasted to perfection, mingling with the sweet, exotic scents of cinnamon and cardamom. Upon tasting, the mousse reveals its rich, chocolatey core, elevated by the subtle warmth of the spices. The nutty crunch of the hazelnut shell adds texture, while the chocolate melts luxuriously on the tongue. It’s a symphony of flavors and textures, each bite more indulgent than the last.

    Ingredients

    • 1 3/4 cups whipping cream, divided
    • 8 oz quality semi-sweet chocolate chips
    • 1/4 cup strong coffee
    • 2 tbsp dark rum
    • 2 tbsp butter
    • 1 tsp gelatin
    • 1/2 tsp ground cinnamon
    • 1/4 tsp ground cardamom
    • 1 tsp vanilla extract
    • 1/2 cup hazelnuts
    • 6 oz extra semi-sweet chocolate chips for shell

    Instructions

    1. Chill 1 1/2 cups of whipping cream in the refrigerator while placing a metal mixing bowl and mixer beaters in the freezer.
    2. In a dry skillet, toast the hazelnuts over medium heat until aromatic, about 5-7 minutes. Allow them to cool slightly before grinding them finely in a food processor.
    3. In a double boiler, combine the 8 oz of chocolate chips, coffee, rum, and butter. Melt over barely simmering water, stirring constantly, until smooth. Remove from heat while a couple of chunks are still visible to prevent scorching.
    4. Bloom the spices by melting butter in a small pan over low heat. Add the ground cinnamon and cardamom, stirring until fragrant, then mix this into the melted chocolate. Allow the mixture to cool to just above body temperature, stirring occasionally.
    5. Pour the remaining 1/4 cup of whipping cream into a metal measuring cup and sprinkle in the gelatin. Let it bloom for 10 minutes, then carefully heat by swirling the cup over a low flame until the gelatin dissolves. Avoid boiling.
    6. Stir the gelatin mixture into the cooled chocolate, then set aside.
    7. Beat the chilled cream in the prepared mixing bowl to medium peaks. Stir 1/4 of the whipped cream into the chocolate mixture to lighten it, then fold in the remaining whipped cream in two additions. It’s okay if there are streaks of whipped cream; do not overwork the mousse.
    8. For the chocolate shells, melt the extra semi-sweet chocolate chips over a double boiler, then stir in the finely ground hazelnuts. Use this mixture to coat the inside of molds or bowls, creating a shell. Allow to set.
    9. Spoon the mousse into the prepared chocolate shells and chill for at least 1 hour before serving. Garnish with fruit if desired.

    Pro Tips from Meaghan’s Kitchen

    • For ultra-smooth mousse, ensure your chocolate mixture is just above body temperature before adding the gelatin. If it’s too hot, it can deflate the whipped cream.
    • Toasting the hazelnuts is key. It intensifies their flavor and adds a wonderful depth to the chocolate shell.
    • When folding the whipped cream into the chocolate, use a gentle hand. This step requires patience to maintain the mousse’s airy texture.
    • If you don’t have a double boiler, a heatproof bowl over a pot of simmering water works just as well. Just make sure the bottom of the bowl doesn’t touch the water.
    • For a glossy finish on your chocolate shells, temper the chocolate by cooling it to 82°F after melting, then gently reheating it to 88°F before forming the shells.

    Variations & Dietary Swaps

    • Vegetarian Version: Substitute the gelatin with agar-agar in equal amounts to make this dessert vegetarian-friendly.
    • Spice-it-Up: For an extra kick, add a pinch of cayenne pepper to the spice mix for a chocolate mousse with a hint of heat.
    • Kids-Friendly Version: Omit the dark rum and substitute the coffee with milk or a milk alternative for a non-caffeinated version.

    What to Serve With It

    This decadent spiced chocolate mousse shines on its own, but it becomes an elevated experience when paired with a glass of tawny port or a shot of espresso. The port’s sweet, nutty flavors complement the mousse perfectly, while the espresso provides a delightful contrast to the dessert’s richness.

    Storage & Meal Prep

    Store any leftover mousse in the refrigerator, covered with plastic wrap to prevent the surface from drying out. It will keep for up to three days. If you wish to freeze it, transfer the mousse into an airtight container and freeze for up to a month. To enjoy, let the mousse thaw in the refrigerator overnight. When reheating the chocolate shells, do so gently over a double boiler to maintain their structure.

    FAQ

    Can I use milk chocolate instead of semi-sweet chocolate?

    Yes, but keep in mind that milk chocolate is sweeter and will alter the flavor profile of the mousse. You might want to reduce the amount of added sugar in other components to balance the sweetness.

    How can I tell if the mousse is properly set?

    When properly set, the mousse should hold its shape when scooped and have a light, airy texture. If it feels too liquid, it may need more chilling time.

    What if my chocolate seizes while melting?

    If your chocolate seizes, add a teaspoon of warm water at a time and stir gently until it becomes smooth again. Ensure that your equipment is completely dry before starting to avoid this issue.

    Can I make this mousse without alcohol?

    Absolutely! Simply omit the dark rum and replace it with additional coffee or a coffee-flavored syrup for added depth without the alcohol content.

    Are there alternatives to hazelnuts for the shell?

    Yes, you can use almonds or pecans as a substitute, though each will impart a slightly different flavor and texture to the shell.

    Final Thoughts

    As you savor this decadent spiced chocolate mousse encased in a hazelnut chocolate shell, I hope it brings you a moment of pure indulgence and joy. Whether you’re crafting it for a special occasion or enjoying it as a luxurious treat for yourself, this mousse is all about the experience. I invite you to share your creations and stories in the comments below — let’s keep the conversation (and the chocolate) flowing!

    Related update: Decadent Spiced Chocolate Mousse in Hazelnut Chocolate Shells

    Related update: Gourmet Candy Cane Cookies with Dark Chocolate Drizzle

  • Gourmet Blue Cheese Tartlets with Lavender-Infused Fig Jam and Candied Walnuts | Made by Meaghan Moineau

    Gourmet Blue Cheese Tartlets with Lavender-Infused Fig Jam and Candied Walnuts | Made by Meaghan Moineau

    Gourmet Blue Cheese Tartlets with Lavender-Infused Fig Jam and Candied Walnuts

    Picture this: a golden-brown tartlet shell, warm and flaky, cradling a dollop of creamy blue cheese, topped with lavender-infused fig jam that dances on your tongue like the promise of spring. Now, imagine a crunch from candied walnuts, sweet and nutty, adding the perfect finish. That’s what awaits you — a French-inspired culinary adventure in every bite.

    Personal Story

    The first time I tasted a tartlet, I was walking down the charming cobblestone streets of a small French village, the air filled with the inviting aroma of fresh pastries. It was a fleeting summer trip, but the memory lingered, much like the taste of that perfect tartlet. While I stood there, nibbling on this delicate creation, I understood the French’s deep love for balancing flavors — the creamy, the sweet, the savory.

    Back home in my kitchen, I couldn’t shake off the desire to recreate that exquisite experience. With a little experimentation, I found myself drawn to the idea of blending the bold character of blue cheese with the subtle sweetness of fig jam, and an idea sparked. What if I could elevate this classic by infusing the jam with the floral aroma of lavender? It seemed daring but exciting.

    Of course, not every attempt was a success. I remember one time I was too heavy-handed with the lavender, and my kitchen smelled more like a bouquet than a bakery. But every misstep taught me something new, leading me closer to the balance I was yearning for. The result? A tartlet that feels like a nostalgic embrace and a new discovery all at once.

    These Gourmet Blue Cheese Tartlets with Lavender-Infused Fig Jam and Candied Walnuts have become a staple at my gatherings, always met with curious glances and satisfied smiles. They’re more than just a recipe; they’re a story, a journey from a French patisserie to my own cozy kitchen.

    What Makes This Version Special

    What sets this version apart is the infusion of lavender into the fig jam, creating a sophisticated floral note that perfectly complements the sharp, creamy blue cheese. This isn’t your average tartlet. The lavender adds an unexpected layer of depth, making each bite a little voyage of flavors. Topped with candied walnuts, they provide not just texture but a subtle sweetness and a hint of saltiness that ties everything together beautifully. This isn’t just a recipe; it’s an elevated experience, a dance of flavors that transforms a humble tartlet into a gourmet delight.

    Flavor Profile

    Imagine biting into a tartlet where creamy blue cheese meets the floral elegance of lavender-infused fig jam. The cheese provides a rich, tangy base, while the fig jam offers a sweet, nectar-like quality with floral undertones. The crunch of candied walnuts brings a nutty, caramelized finish, and a hint of orange zest adds a citrusy brightness that lingers. It’s a symphony of creamy, floral, sweet, and nutty — a full sensory experience that beckons you for another bite.

    Ingredients

    • 4 oz blue cheese, softened
    • 1/2 cup unsalted butter, softened
    • 1 cup all-purpose flour
    • 1/2 cup fig jam
    • 1 tsp dried lavender buds
    • 1/2 cup walnuts
    • 1/4 cup sugar
    • Pinch of salt
    • 1 tsp orange zest
    • Fresh thyme leaves, for garnish

    Instructions

    1. Preheat the oven to 350°F. Lightly grease the cups of the mini muffin pans, unless you’re using non-stick pans.
    2. In a medium bowl, cream together the blue cheese and butter until smooth. Add the flour and use your hands to bring the dough together in the bowl.
    3. Divide the dough into 30 pieces and roll each into a ball. For a more delicate shell, divide the dough into 36 pieces.
    4. Using lightly floured fingers, evenly press the dough against the sides of the mini tart pan until the dough rises slightly above the rim of the muffin cup. Bake for 15 minutes, until golden brown. Cool in pans for 5 minutes, then transfer to a wire rack to finish cooling.
    5. To infuse the fig jam, gently heat the jam with the dried lavender buds in a small saucepan over low heat. Let it steep for 10 minutes, then strain out the lavender buds.
    6. For the candied walnuts, coat the walnuts with sugar and a pinch of salt. Spread them on a baking sheet and bake until golden, about 8 minutes.
    7. Spoon the lavender-infused fig jam into the cooled tartlet shells. Top with candied walnuts, a sprinkle of orange zest, and fresh thyme leaves if using.

    Pro Tips from Meaghan’s Kitchen

    • For the best flavor, use a high-quality blue cheese. Its bold taste is key to balancing the sweetness of the fig jam.
    • Let the lavender infuse in the jam for the right amount of time — too long, and it can become overpowering.
    • Ensure your butter and blue cheese are at room temperature for a smooth, cohesive dough.
    • When candying the walnuts, keep a close eye to prevent burning — they can go from golden to burnt quickly!
    • For an extra pop of freshness, add a small pinch of orange zest on top right before serving.

    Variations & Dietary Swaps

    • Vegetarian Swap: This recipe is already vegetarian, but ensure your blue cheese is free from animal rennet for strict vegetarians.
    • Spice-It-Up Version: Add a pinch of cayenne pepper to the dough for a subtle heat that pairs beautifully with the sweet and floral elements.
    • Kids-Friendly Version: Replace blue cheese with a milder cheese like mozzarella and use strawberry jam instead of fig for a sweeter, kid-approved treat.

    What to Serve With It

    These tartlets are perfect as an appetizer or a sophisticated snack. Pair them with a crisp, chilled glass of Sauvignon Blanc to enhance the floral and citrus notes. A fresh green salad with a light vinaigrette is also an ideal accompaniment, providing a refreshing contrast to the rich flavors of the tartlets.

    Storage & Meal Prep

    Store cooled tartlet shells in an airtight container at room temperature for up to three days. They freeze well too; bake the frozen shells at 325°F for 8 minutes before filling. The lavender-infused fig jam can be refrigerated for up to a week. Assemble the tartlets just before serving for the best texture.

    FAQ

    Can I make the dough in advance?

    Yes, you can prepare the dough up to two days in advance. Wrap it tightly in plastic wrap and store it in the refrigerator. Let it come to room temperature before rolling and baking.

    What can I use instead of lavender?

    If you’re not fond of lavender, you can infuse the fig jam with a vanilla bean or a hint of rosemary for a different flavor profile.

    How can I prevent the tartlet shells from getting soggy?

    Ensure the tartlet shells are completely cooled before filling them. You can also brush the insides with a bit of beaten egg white before baking to create a moisture barrier.

    Is there a substitute for blue cheese?

    If blue cheese isn’t your favorite, try using goat cheese or gorgonzola, which also provides a creamy texture with a milder flavor.

    Final Thoughts

    These Gourmet Blue Cheese Tartlets with Lavender-Infused Fig Jam and Candied Walnuts are more than just a recipe — they’re an invitation to explore and savor the beauty of combining unexpected flavors. I hope they bring a touch of French elegance to your table and inspire you to share your own culinary adventures. Please leave a comment below with your thoughts and any variations you try. Sharing is caring, so don’t forget to spread the love with fellow food enthusiasts!

    Related update: Gourmet Blue Cheese Tartlets with Lavender-Infused Fig Jam and Candied Walnuts

    Related update: Epic Smoky Pulled Pork Nachos with Chipotle Lime Crema

    Related update: Gourmet Truffle Onion Cheese Bites with Herb-Infused Drizzle

  • Decadent Mocha Raspberry Chiffon Cake with Hazelnut Praline Crunch | Made by Meaghan Moineau

    Decadent Mocha Raspberry Chiffon Cake with Hazelnut Praline Crunch | Made by Meaghan Moineau

    Decadent Mocha Raspberry Chiffon Cake with Hazelnut Praline Crunch

    Imagine slicing through a cloud-like layer of chiffon cake, infused with the rich aroma of espresso, and revealing a tantalizing crunch of hazelnut praline. Each bite is a dance of textures and flavors: silky ganache enveloping tart raspberries, all coming together in a symphony of chocolatey goodness. Welcome to your new favorite cake adventure.

    Personal Story

    I’ve always had a soft spot for French desserts, especially those that allow a bit of creativity and indulgence. Years ago, during a trip to Paris, I stumbled upon a quaint patisserie tucked away in a quiet corner of Montmartre. The air was thick with the smell of freshly baked pastry and dark chocolate. It was there I tasted a cake that changed my life. The combination of chocolate and raspberries had always intrigued me, but this particular creation was unlike anything I’d ever tasted.

    Back in my own kitchen, I endeavored to recreate that experience, allowing the memory to guide my hands. Many attempts later, I stumbled into an unexpected twist — a leftover espresso shot from my morning routine. What began as a quick addition to the batter evolved into a full-blown espresso infusion, giving depth to the cake’s chocolatey base.

    Then came a revelation: texture. My initial trials, though delicious, lacked that essential crunch that elevates a dessert from good to unforgettable. Enter the hazelnut praline, a delightful accident born from a caramel mishap. The praline’s nutty crunch added the missing piece to my cake puzzle, offering a satisfying contrast to the chiffon’s softness.

    Now, every time I bake this decadent mocha raspberry chiffon cake, I’m transported back to the cobblestone streets of Paris. It’s more than just a cake; it’s a slice of memory, a testament to the beautiful unpredictability of culinary exploration.

    What Makes This Version Special

    This version of the classic French chiffon cake stands out with its aromatic espresso infusion, giving it a unique and sophisticated twist. The rich chocolate flavor is deepened by blooming the espresso powder in hot water before adding it to the batter, ensuring every bite has that subtle coffee note. The addition of a crunchy hazelnut praline layer adds texture and complexity, creating a delightful contrast to the soft, airy cake and the fresh, tart raspberries. This cake isn’t just a dessert; it’s an experience.

    Flavor Profile

    Prepare yourself for a taste journey where decadence meets elegance. The cake’s rich chocolate flavor is bolstered by the aromatic notes of espresso, providing a warm, comforting background. The tartness of fresh raspberries cuts through the richness, adding a refreshing burst with each bite. And then there’s the hazelnut praline — a delightful crunch that surprises and delights, offering a nutty, caramelized counterpoint. It’s a dessert that keeps your taste buds guessing, yet satisfies at every turn.

    Ingredients

    • 1 cup all purpose flour
    • 1 cup sugar
    • 1/3 cup sugar (for egg whites)
    • 1 1/2 tsp baking powder
    • 1/2 tsp salt
    • 1/4 cup **vegetable oil**
    • 6 egg yolks
    • 6 egg whites
    • 1/2 tsp cream of tartar
    • 1 tsp vanilla extract
    • 3 tbsp **dark Dutch cocoa**
    • 3 tbsp **boiling water**
    • 1 tbsp **espresso powder**
    • 4 oz **dark 70% Belgium chocolate**
    • 1/2 cup **5% cream**
    • 1/2 cup butter
    • 1 cup icing sugar
    • 1 tsp vanilla extract
    • 1 cup **hazelnuts**
    • 1/3 cup sugar (for praline)
    • 2 tbsp **maple syrup**
    • 1/4 cup **raspberry liqueur**
    • 1 cup **fresh raspberries**

    Instructions

    1. Preheat your oven to 350°F (175°C). Prepare two 8-inch cake pans by greasing them lightly and lining with parchment paper.
    2. Bloom the espresso by dissolving the espresso powder in 3 tablespoons of boiling water. Set aside to cool slightly.
    3. In a large mixing bowl, combine the flour, 1 cup sugar, baking powder, and salt. Stir to blend.
    4. In a separate bowl, beat the egg whites and cream of tartar with an electric mixer until soft peaks form. Gradually add 1/3 cup sugar and continue to beat until firm peaks are achieved, but ensure they are not dry.
    5. Make a well in the dry ingredients. Pour in the vegetable oil, egg yolks, vanilla, bloomed espresso, and the cocoa mixture. Beat until smooth. Then gently fold in about a quarter of the beaten egg whites to loosen the batter. Carefully fold in the remaining egg whites, maintaining as much air as possible.
    6. Divide the batter evenly between the prepared pans. Bake for 30-35 minutes or until a wooden skewer inserted in the center of the cakes comes out clean.
    7. While the cakes bake, prepare the hazelnut praline. Toast the hazelnuts on a baking sheet for 8-10 minutes or until fragrant. In a saucepan, combine sugar and maple syrup, heating until the sugar dissolves and caramelizes to a light amber color. Stir in the toasted hazelnuts, then spread onto a parchment-lined tray to cool. Once hardened, crush into coarse pieces.
    8. For the filling, use an electric mixer to blend icing sugar, cocoa, butter, vanilla, and cream. Adjust cream quantity to achieve desired texture, aiming for a smooth, spreadable consistency.
    9. Prepare the ganache topping by heating the cream until just below boiling. Remove from heat, add chopped dark chocolate and butter, stirring until smooth. Allow to cool and thicken slightly before using.
    10. Once the cakes are cooled, slice each in half horizontally to create four layers in total. Begin assembly by sprinkling raspberry liqueur over the first cake layer. Spread a thin layer of filling, followed by a generous scattering of fresh raspberries and a sprinkle of hazelnut praline.
    11. Repeat with remaining layers, finishing with the top layer spread with thick ganache. Garnish with additional raspberries and praline pieces if desired.

    Pro Tips from Meaghan’s Kitchen

    • Always let the espresso and cocoa mixtures cool before adding to the batter. This prevents them from cooking the egg yolks.
    • When folding the egg whites into the batter, use a large spatula and a gentle hand to prevent deflating the batter, which ensures a light and airy cake.
    • For a more intense coffee flavor, consider using a coffee liqueur instead of raspberry liqueur.
    • Toast hazelnuts in batches to ensure even browning and enhanced flavor.
    • Prepare the praline ahead of time, as it needs to cool completely before being crushed and used in the cake layers.

    Variations & Dietary Swaps

    • Vegetarian Swap: This recipe is already vegetarian-friendly but ensure the chocolate is free from animal derivatives if serving to strict vegetarians.
    • Make it Gluten-Free: Substitute all-purpose flour with a 1:1 gluten-free baking flour blend.
    • Kid-Friendly Version: Omit the espresso powder and use vanilla extract instead for a light vanilla-chocolate flavor profile that kids will love.

    What to Serve With It

    This decadent mocha raspberry chiffon cake pairs beautifully with a glass of chilled raspberry Moscato, enhancing the tart raspberry notes in the cake. Alternatively, a robust espresso compliments the cake’s coffee undertones and makes for a sophisticated pairing. If you’re feeling indulgent, a scoop of vanilla bean ice cream provides a creamy contrast to the cake’s textures.

    Storage & Meal Prep

    Store any leftover cake in an airtight container in the refrigerator for up to three days. For longer storage, wrap individual slices in plastic wrap and place in a freezer-safe bag or container to freeze for up to one month. To enjoy, thaw at room temperature or warm slightly in the oven to refresh.

    FAQ

    Can I make the cake layers ahead of time?

    Absolutely! Bake the cake layers a day in advance. Once cooled, wrap them tightly in plastic wrap and store at room temperature. This can actually enhance the flavor as the cake has time to settle.

    What if I don’t have hazelnuts?

    If hazelnuts aren’t available, almonds or pecans are a great substitute. Each will bring a slightly different flavor profile but will still provide that necessary crunch.

    How can I prevent the cake from sticking to the pans?

    Grease your pans well and line the bottoms with parchment paper. This ensures easy release of the cake once baked and cooled.

    Can I use instant coffee instead of espresso powder?

    Yes, but the flavor won’t be as intense. If using instant coffee, consider doubling the amount to get closer to the desired espresso taste.

    Is there a non-alcoholic substitute for the raspberry liqueur?

    Yes, you can use raspberry syrup or a mixture of raspberry jam and water as a non-alcoholic alternative. It will still provide that lovely raspberry flavor without the alcohol content.

    Final Thoughts

    Whether you’re crafting this decadent mocha raspberry chiffon cake for a special occasion or simply treating yourself on a cozy weekend, know that each step is a labor of love. As you whip, fold, and assemble, feel free to experiment and make this cake your very own. I’d love to hear how it turns out for you, so please leave a comment or share your photos. Let’s keep the joy of baking alive, one delicious bite at a time!

    Related update: Decadent Mocha Raspberry Chiffon Cake with Hazelnut Praline Crunch

    Related update: Spiced Maple Carrot Cake with Ginger Cream Cheese Frosting

  • Truffle-Infused Mushroom Soup with Parmesan Crisps & Tarragon Creme Fraiche | Made by Meaghan Moineau

    Truffle-Infused Mushroom Soup with Parmesan Crisps & Tarragon Creme Fraiche | Made by Meaghan Moineau

    Truffle-Infused Mushroom Soup with Parmesan Crisps & Tarragon Crème Fraîche

    The earthy aroma of mushrooms sizzling in a pot is pure magic, especially when that pot contains a soon-to-be masterpiece — Truffle-Infused Mushroom Soup with Parmesan Crisps & Tarragon Crème Fraîche. Imagine yourself wrapped in a cozy sweater, with a warm bowl in hand, the steam mingling with the luxurious scent of truffle oil and the cheesy crunch of homemade Parmesan crisps. Welcome to culinary heaven.

    Personal Story

    My love affair with mushroom soup began in a tiny bistro nestled in the heart of Paris. It was during a trip meant to rekindle my sense of adventure, and every bite of that classic French cuisine was a revelation. The soup was a simple cream of mushroom, yet it was transcendent. I remember thinking, “How could something so humble be so utterly luxurious?” Just like that, I was hooked.

    When I returned home, I set out to recreate that experience. My first few attempts were clumsy — my mushrooms were soggy, and my soup was more gray than golden. But with each mishap, I honed my technique, learning the nuances of heat and timing. The dish became a canvas for creativity, and soon, I was adding my own twists — enter, the truffle oil and Parmesan crisps.

    One particularly chilly autumn afternoon, I invited my closest friends over for lunch. As the soup simmered on the stove, the kitchen filled with an intoxicating aroma. We gathered around the table, bowls in hand, and as we dipped our spoons into the velvety soup, the room fell silent. It was a moment of shared joy, a culinary revelation that I knew I had to share with the world.

    Since then, my Truffle-Infused Mushroom Soup with Parmesan Crisps & Tarragon Crème Fraîche has become a staple in my home. It’s not just a dish; it’s a story, a memory, and a promise of warmth and comfort, one that’s meant to be shared with others.

    What Makes This Version Special

    This isn’t just any mushroom soup — it’s an elevated experience. By introducing the luxurious aroma of truffle oil and the crunchy, cheesy goodness of homemade Parmesan crisps, this version transforms the classic cream of mushroom soup into something truly special. Truffle oil is the secret ingredient that adds a sophisticated depth, catching you off guard with its intoxicating scent and flavor. Paired with the savory crunch of Parmesan crisps, every spoonful becomes a delightful exploration of textures and tastes. This version is not just better than the standard recipe; it’s in a league of its own, bringing gourmet flair to your table.

    Flavor Profile

    Prepare your taste buds for an indulgent journey — this soup is earthy and umami-rich, with a delicate hint of truffle that lingers with each bite. The mushrooms provide a deep, woodsy flavor, while the tarragon crème fraîche adds a slight herbal note, cutting through the richness with refreshing brightness. As you bite into the crispy Parmesan, you’ll experience a cheesy, savory crunch that perfectly complements the velvety soup. It’s an orchestration of flavors that dances on your palate and keeps you coming back for more.

    Ingredients

    • 2 tablespoons olive oil, divided
    • 2 tablespoons butter
    • **1 pound cremini mushrooms**, sliced
    • 2 shallots, sliced thin
    • 3 cloves garlic, minced
    • 1 teaspoon fresh dried thyme
    • 2 tablespoons flour
    • 1 tablespoon tomato paste
    • 4 cups chicken stock
    • 1 cup half and half
    • **Truffle oil** (for drizzling)
    • **1/2 cup crème fraîche**
    • 1 tablespoon fresh tarragon, chopped
    • **1 cup Parmesan cheese**, grated
    • Kosher salt and black pepper to taste

    Instructions

    1. Preheat your oven to 350°F (175°C) and line a baking sheet with parchment paper.
    2. To make the Parmesan crisps, place thinly grated Parmesan cheese in small mounds on the prepared baking sheet. Flatten slightly and bake for about 5-7 minutes, until golden and crispy. Set aside to cool.
    3. In a Dutch oven, heat 1 tablespoon of olive oil and the butter over medium heat. Add the mushrooms and cook for 3-5 minutes, until golden. Remove and set aside.
    4. In the same pot, add the remaining olive oil. Sauté the sliced shallots until tender, about 3 minutes. Add minced garlic and cook for an additional minute.
    5. Season with kosher salt, black pepper, and fresh dried thyme. Sprinkle in the flour, stir, and cook for about one minute to remove the raw flour taste.
    6. Return the mushrooms to the pot and mix in the tomato paste. Pour in 1 cup of chicken stock, stirring to combine.
    7. Add the remaining chicken stock and bring the mixture to a simmer. Cook for about 10 minutes, allowing the flavors to meld.
    8. Using an immersion blender, carefully puree the soup directly in the pot until smooth, but with some small chunks of mushrooms remaining for texture. If you prefer, you can use a blender to process the soup in batches.
    9. Add the half and half and stir to incorporate. Taste and adjust the seasoning as needed.
    10. For serving, ladle the soup into bowls, drizzle with truffle oil, and top with a dollop of crème fraîche mixed with fresh tarragon. Garnish with the crispy Parmesan crisps and serve immediately.

    Pro Tips from Meaghan’s Kitchen

    • Choose mushrooms that are fresh and firm. Avoid any with slimy spots as they won’t brown nicely.
    • Don’t rush the mushroom browning process. Let them sit undisturbed in the pan to develop a deep, golden color.
    • For an extra kick, add a splash of white wine to deglaze the pot after sautéing the garlic.
    • Truffle oil is potent, so a little goes a long way. Start with a small drizzle, and adjust to taste.
    • Parmesan crisps can be made ahead of time and stored in an airtight container, staying crisp for days.

    Variations & Dietary Swaps

    • Vegetarian Swap: Use vegetable stock in place of chicken stock for a meat-free version.
    • Spice-It-Up Version: Add a pinch of red pepper flakes when sautéing the shallots for a subtle heat.
    • Kids-Friendly Version: Omit the truffle oil and replace with a small pat of butter for a milder flavor.

    What to Serve With It

    This Truffle-Infused Mushroom Soup pairs beautifully with a chilled glass of Chardonnay, which complements the earthy flavors and truffle aroma. On the side, a crusty baguette provides the perfect vessel to soak up every last drop of the rich broth. For a complete meal, consider serving alongside a light, refreshing salad dressed in a simple vinaigrette.

    Storage & Meal Prep

    Store any leftover soup in an airtight container in the refrigerator for up to 3 days. For longer storage, freeze the soup for up to 3 months. When reheating, gently warm the soup on the stove over low heat, stirring occasionally until heated through. Avoid boiling to prevent curdling of the cream. The Parmesan crisps are best enjoyed fresh, but they can be stored at room temperature for up to 5 days in an airtight container.

    FAQ

    Can I use a different type of mushroom?

    Absolutely! While cremini mushrooms are my go-to, you can experiment with shiitake, portobello, or a mix of wild mushrooms for a different flavor profile.

    What can I substitute for crème fraîche?

    If crème fraîche is unavailable, sour cream or Greek yogurt can be used as a substitute, but remember to adjust the seasoning as these have different flavor profiles.

    How do I prevent the soup from curdling?

    To prevent curdling, avoid bringing the soup to a rapid boil after adding the half and half. Keep the heat low and stir gently while reheating.

    Is truffle oil essential for this recipe?

    Truffle oil adds a luxurious aroma and flavor that truly elevates the dish, but if you don’t have it on hand, the soup will still be delicious without it.

    Can I make this soup in advance?

    Yes, the soup can be made a day ahead. In fact, the flavors often deepen and improve after resting overnight in the fridge.

    Final Thoughts

    Creating this Truffle-Infused Mushroom Soup with Parmesan Crisps & Tarragon Crème Fraîche is more than just cooking; it’s an opportunity to bring a little bit of French culinary magic into your home. I hope this recipe not only fills your kitchen with delightful aromas but also creates memories with those you share it with. I’d love to hear your thoughts and see your creations — feel free to leave a comment or share your soup adventures with me on social media. Bon appétit!

    Related update: Truffle-Infused Mushroom Soup with Parmesan Crisps & Tarragon Creme Fraiche

  • Creme Brulee | Made by Meaghan Moineau

    Creme Brulee | Made by Meaghan Moineau

    Creme Brulee: A Classic Dessert to Savor

    There’s something truly magical about cracking through the burnt sugar crust of a perfectly made creme brulee. This quintessential French dessert, with its silky custard and tantalizing caramelized top, has been a staple in gourmet kitchens around the world. I remember my first encounter with creme brulee at a quaint Parisian cafe; the rich vanilla aroma and the satisfying crack of the sugar captivated my senses. Today, I’m excited to share this timeless recipe with you, so you can recreate that enchanting experience at home.

    Why You’ll Love It

    Creme brulee is more than just a dessert; it’s an experience. Here are a few reasons why you’ll fall in love with this classic treat:

    • Elegant Simplicity: With just a handful of ingredients, creme brulee is a testament to simple, refined flavors.
    • Textural Delight: The contrast between the creamy custard and the crisp, caramelized sugar is a textural masterpiece.
    • Versatile: Perfect for any occasion, creme brulee can be served as a romantic dessert for two or the centerpiece of a dinner party.
    • Make-Ahead Friendly: Prepare it in advance and caramelize the top just before serving, making it both convenient and impressive.

    Ingredients

    • 1 whole egg
    • 5 egg yolks
    • 500ml fresh milk
    • 150g caster sugar, plus extra for topping
    • 1 vanilla bean pod
    • 250ml whipping cream

    Instructions

    1. Preheat your oven to 150°C (300°F).
    2. Pour the fresh milk and whipping cream into a saucepan.
    3. Slice the vanilla bean pod lengthwise and scrape the seeds into the cream mixture. Chop the empty pod into small pieces and add them to the cream as well.
    4. Bring the cream mixture to a boiling point, then reduce the heat and simmer gently for 3 minutes, allowing the flavors to meld.
    5. In a large bowl, lightly beat the sugar and eggs together until the mixture is pale and smooth.
    6. Strain the cream mixture through a fine sieve and return it to the heat, bringing it back to a boil.
    7. Gradually add the hot cream to the egg mixture, whisking vigorously to temper the eggs and prevent curdling.
    8. After incorporating all the cream, strain the mixture again for a smooth texture.
    9. Pour the custard into 7-8 ramekins, depending on their size.
    10. Place the ramekins in a large cake pan or roasting pan. Pour enough hot water into the pan to come halfway up the sides of the ramekins.
    11. Bake in the center of the oven for 30-40 minutes, or until the custards are just set but still slightly wobbly in the middle.
    12. Remove the ramekins from the water bath and allow them to cool to room temperature. Refrigerate for at least 3 hours or overnight.
    13. Just before serving, sprinkle an even layer of caster sugar over the top of each custard. Use a kitchen blowtorch to caramelize the sugar until golden and crisp.

    Tips

    • Quality Ingredients: Use fresh and high-quality ingredients, especially the vanilla, to ensure the best flavor.
    • Water Bath: The water bath is crucial for even cooking. Ensure the water level is consistent and avoid splashing water into the custard.
    • Sugar Layer: For a perfect sugar crust, use fine caster sugar and ensure an even layer before caramelizing.

    Variations & Substitutions

    While the classic creme brulee is made with vanilla, there are plenty of ways to add your own twist:

    • Flavored Creme Brulee: Infuse the cream with coffee beans, citrus zest, or spices like cinnamon or cardamom for a different flavor profile.
    • Non-Dairy Option: Substitute the milk and cream with coconut milk for a dairy-free version that adds a tropical flair.
    • Liqueur Addition: Add a splash of your favorite liqueur, like Grand Marnier or Amaretto, into the custard for an adult twist.

    Storage

    Creme brulee can be stored in the refrigerator, covered with plastic wrap, for up to 3 days. Caramelize the sugar topping just before serving to maintain the crisp texture.

    FAQ

    Can I make creme brulee without a blowtorch?

    Yes! If you don’t have a blowtorch, you can caramelize the sugar under a hot grill (broiler) for a few minutes. Keep a close watch to prevent burning and rotate the ramekins if necessary for even caramelization.

    Why did my creme brulee curdle?

    Curdling usually occurs when the eggs cook too quickly. To prevent this, make sure to gradually add the hot cream to the eggs while whisking constantly. Also, baking in a water bath helps regulate the temperature and prevent overcooking.

    Nutrition

    Each serving of creme brulee (based on 8 servings) provides approximately:

    • Calories: 320
    • Protein: 5g
    • Fat: 22g
    • Carbohydrates: 25g
    • Sugar: 24g

    Final Thoughts

    Creme brulee is a testament to the beauty of simplicity and elegance in the culinary world. Its rich flavor and delightful texture make it a cherished dessert, perfect for impressing guests or indulging yourself. Whether you’re making it for the first time or the hundredth, this classic recipe is sure to leave a lasting impression. Enjoy the process, savor the flavors, and revel in the joy of creating something truly special in your kitchen.

    Related update: Creme Brulee