Tag: Family Friendly

  • Guacamole | Made by Meaghan Moineau

    Guacamole | Made by Meaghan Moineau

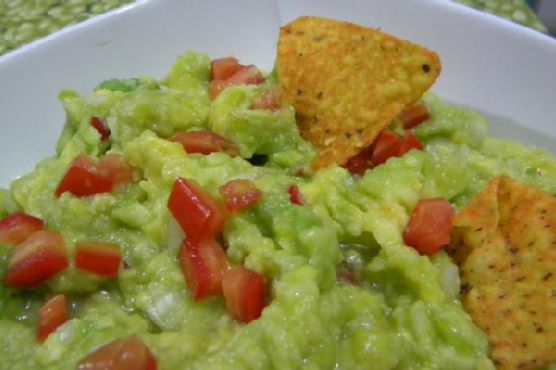
    Deliciously Fresh Guacamole Recipe

    Growing up, guacamole was a staple at our family gatherings. I vividly remember those sun-drenched afternoons where laughter filled the air, and everyone was gathered around the table, eagerly scooping fresh guacamole onto their plates. My grandmother would always say that the secret to the best guacamole is not just about the freshest ingredients but also the love and care you put into making it. Now, I’m excited to share this cherished recipe with you, so you can create your own delicious memories.

    Why You’ll Love It

    This guacamole recipe is a crowd-pleaser for several reasons:

    • Simple and Fresh: With just a few fresh ingredients, this guacamole comes together quickly and packs a punch of flavor.
    • Customizable: You can easily tweak the recipe to suit your taste, making it as mild or as spicy as you like.
    • Healthy and Nutritious: Avocados are rich in healthy fats, fiber, and a variety of vitamins, making this a guilt-free snack or appetizer.

    Ingredients

    • 3 ripe Haas avocados
    • 1/4 cup finely chopped onion
    • 1 jalapeño pepper, seeded and finely chopped
    • 2 tablespoons chopped fresh cilantro
    • Salt to taste
    • Black pepper to taste
    • Juice of 1 fresh lime
    • 1 tablespoon chopped fresh basil
    • 1 tablespoon chopped fresh oregano

    Instructions

    1. Cut the avocados in half lengthwise. Carefully drive a chef’s knife into the large pit, twist to remove, and discard the pit.
    2. Scoop the avocado flesh out from the skin into a mixing bowl.
    3. Using a fork, mash the avocado to your desired consistency—smooth or chunky.
    4. Add the finely chopped onion, jalapeño, cilantro, basil, and oregano to the mashed avocados. Mix to combine.
    5. Season the mix to taste with salt, black pepper, and fresh lime juice.
    6. Serve immediately for the freshest flavor or chill in the refrigerator if serving later.
    7. If storing, press plastic film wrap directly onto the surface of the guacamole to prevent browning and refrigerate.

    Tips

    • Ensure your avocados are ripe by giving them a gentle squeeze; they should yield slightly under pressure.
    • For a spicier kick, leave some of the jalapeño seeds in the mix.
    • To prevent browning, keep the avocado pits in the guacamole when storing, in addition to using plastic film wrap.

    Variations & Substitutions

    • Tomato Addition: Add diced tomatoes for extra flavor and color. Be sure to remove the seeds to keep the guacamole from becoming watery.
    • Garlic Twist: Add a clove of minced garlic for an extra layer of flavor.
    • Mango Mix: For a sweet touch, add diced mango, which pairs beautifully with the creamy avocado.

    Storage

    To keep your guacamole fresh, store it in an airtight container with plastic film wrap pressed directly onto the surface to minimize exposure to air. It will keep in the refrigerator for up to two days. However, for the best taste and texture, it’s recommended to enjoy it as fresh as possible.

    FAQ

    Can I make guacamole ahead of time?

    Yes, you can make guacamole a few hours in advance. Just be sure to store it properly with plastic wrap pressed directly onto the surface to prevent browning.

    How can I make my guacamole spicier?

    To increase the heat level, you can add more jalapeño peppers or include some of the seeds. Alternatively, try adding a pinch of cayenne pepper for an extra kick.

    What can I serve with guacamole?

    Guacamole pairs well with tortilla chips, veggie sticks, tacos, burritos, or as a topping for grilled meats. It’s a versatile dip that complements many dishes.

    Nutrition

    This guacamole recipe is not only delicious but also packed with nutritional benefits. Avocados are high in heart-healthy monounsaturated fats, fiber, and various vitamins and minerals. The added herbs and lime juice provide extra antioxidants and a boost of vitamin C. Enjoy this guacamole as part of a balanced diet.

    Final Thoughts

    Guacamole is more than just a dip; it’s a dish that brings people together and creates lasting memories. Whether you’re hosting a party, having a quiet family dinner, or simply enjoying a snack, this guacamole recipe is sure to delight. With its fresh ingredients and customizable nature, it’s easy to see why this classic dish is loved by so many. So gather your ingredients, and let’s make some guacamole that’s as rich in flavor as it is in tradition.

    Related update: Guacamole

    Related update: Gourmet Blue Cheese Tartlets with Lavender-Infused Fig Jam and Candied Walnuts

  • Mixed Paella | Made by Meaghan Moineau

    Mixed Paella | Made by Meaghan Moineau

    Delicious Mixed Paella: A Taste of Spain in Your Kitchen

    Remember those long summer evenings when the family would gather around a large, vibrant dish, the aroma of saffron filling the air? Mixed Paella has always been a dish of celebration for me. Growing up, my family would often host get-togethers, and my mother would prepare this dish with love and enthusiasm. The sizzle of chorizo in the pan and the vibrant colors of fresh vegetables and seafood always created a symphony of flavors that we couldn’t resist. Today, I’m excited to share this cherished recipe with you, hoping it will bring as much joy to your table as it has to mine.

    Why You’ll Love It

    This Mixed Paella recipe is an ideal blend of land and sea, bringing together a rich tapestry of flavors and textures. The rice soaks up the robust taste of saffron and broth, while the seafood adds a delightful freshness. The crispy chorizo introduces a smoky depth that ties the dish together perfectly. Whether you’re a novice cook or a seasoned chef, this dish is both accessible and impressive, making it perfect for family dinners and special occasions alike.

    Ingredients

    • Bay leaf
    • Chicken broth
    • Chorizo sausage
    • Extra virgin olive oil
    • White fish
    • Garlic
    • Lemon
    • Lemon zest
    • Mussels
    • Spanish onion
    • Parsley
    • Peas
    • Red bell pepper
    • Crushed red pepper flakes
    • Dry rice
    • Saffron threads
    • Shrimp
    • Thyme

    Instructions

    1. In a very large non-stick skillet or paella pan preheated over medium-high heat, add 2 teaspoons of your olive oil (you will need more oil if you’re not using non-stick), garlic, red pepper flakes, and rice. Sauté for about 3 minutes.
    2. Add saffron, thyme, bay leaf, and chicken broth and bring to a boil. Cover and reduce the heat to a simmer. Leave covered, do not stir.
    3. In another non-stick skillet, heat to medium-high. Add chorizo and crumble as you sauté. When the sausage is cooked through, add red pepper and onion. Salt and pepper to taste if needed. Sauté until the onion is tender, then remove from heat and set aside.
    4. When the rice is nearly done (about 15 minutes), add fish and shrimp and press into the rice. Add mussels, peas, and sprinkle with lemon zest. Cover and continue to simmer until the rice is done and the mussels have opened. Discard any that do not open.
    5. Top with the chorizo mixture and parsley. Serve with lemon wedges and crusty bread.

    Tips

    For the best results, use a paella pan if you have one, as its wide and shallow shape allows the rice to cook evenly. Remember not to stir the rice once the liquid has been added; this ensures the classic paella texture. Use fresh seafood for the best flavor, and don’t skimp on the saffron—it truly is the soul of this dish.

    Variations & Substitutions

    If you’re looking to customize your paella, consider these variations:

    • Vegetarian Option: Replace the seafood and chorizo with a variety of mushrooms and artichokes for a hearty vegetarian version.
    • Meat Lovers: Add some diced chicken thighs or rabbit for a more traditional take on paella Valenciana.
    • Spice It Up: If you enjoy a kick of heat, increase the amount of crushed red pepper flakes or add a splash of hot sauce.

    Storage

    Leftover paella can be stored in an airtight container in the refrigerator for up to 3 days. To reheat, add a splash of water or broth and warm slowly over low heat to maintain the dish’s moist texture. Avoid using the microwave as it can dry out the rice.

    FAQ

    Can I make paella in advance?

    Yes, you can prepare the components in advance, such as cooking the chorizo and chopping the vegetables. However, for the best flavor and texture, it’s recommended to cook the rice and assemble the dish just before serving.

    What type of rice should I use for paella?

    Short-grain rice, such as Bomba or Arborio, is ideal for paella as it absorbs the liquid well without becoming mushy. Avoid using long-grain rice as it doesn’t provide the traditional paella texture.

    Can I use frozen seafood?

    While fresh seafood is preferred for the best flavor, you can use frozen seafood in a pinch. Just ensure it is fully thawed and drained before adding to the paella to avoid excess moisture.

    Nutrition

    This Mixed Paella is a balanced dish, providing a good source of protein from the seafood and chorizo, and plenty of vitamins and minerals from the vegetables. Saffron is known for its antioxidant properties, and the olive oil adds heart-healthy fats.

    Final Thoughts

    Mixed Paella is more than just a dish; it’s a celebration of flavors and cultures, a reminder of family gatherings and joyous occasions. With its vibrant colors and rich flavors, it’s sure to become a favorite in your household. I hope this recipe brings warmth and happiness to your table, just as it has to mine. Bon appétit!

    Related update: Mixed Paella

    Related update: Sweet and Spicy Country-Style Ribs

  • Sausage & Pepperoni Stromboli | Made by Meaghan Moineau

    Sausage & Pepperoni Stromboli | Made by Meaghan Moineau

    Sausage & Pepperoni Stromboli

    Welcome to our cozy kitchen, where today we’re going to dive into a classic, mouthwatering recipe: Sausage & Pepperoni Stromboli. This dish brings back fond memories of family gatherings at my grandmother’s house, where the rich aromas of freshly baked bread and sizzling sausage would fill the air. As a child, I remember eagerly waiting for the moment we could slice into the golden crust to reveal the cheesy, savory filling inside. Now, I’m excited to share this beloved recipe with you!

    Why You’ll Love It

    This Sausage & Pepperoni Stromboli is a delightful twist on traditional pizza, featuring a flaky, golden crust wrapped around a hearty, cheesy filling. It’s perfect for a cozy dinner, a game day snack, or even a potluck dish. Here are a few reasons why you’ll fall in love with this recipe:

    • Simple and Satisfying: With just a few ingredients, this stromboli is easy to assemble yet incredibly satisfying.
    • Versatile: Perfect as an appetizer, main dish, or even a lunchbox treat.
    • Family-Friendly: Kids and adults alike will enjoy customizing their slices with extra pizza sauce or toppings.
    • Make-Ahead: Prepare it in advance and pop it in the oven when you’re ready to enjoy!

    Ingredients

    • 1 egg
    • 1/2 pound Italian sausage
    • 1 cup shredded Parmesan cheese
    • 1/2 cup pepperoni slices
    • 1 roll of pizza dough
    • 1/2 cup pizza sauce, plus more for serving
    • 1 cup shredded mozzarella cheese

    Instructions

    1. Preheat your oven to 450 degrees F. Cook the Italian sausage in a medium skillet over medium heat until browned. Drain on paper towels and crumble into small pieces.
    2. Line a baking pan with parchment paper and lightly flour the surface. Roll out the pizza dough to form a large rectangle.
    3. Brush a thin layer of pizza sauce over the dough, leaving a small border around the edges.
    4. Evenly spread the crumbled sausage over the sauce, followed by the shredded mozzarella cheese.
    5. Layer the pepperoni slices on top of the cheese, then sprinkle 3/4 cup of the Parmesan cheese over the top.
    6. Gently fold in the short sides of the dough to form a seal around the filling.
    7. Starting from one long side, carefully roll the dough into about one third of the stromboli. Using the parchment paper to assist, continue rolling until you reach the opposite end. Pinch the seam to seal and place the stromboli seam-side down on the baking pan.
    8. In a small bowl, mix the egg with 1 tablespoon of water. Brush the egg mixture over the stromboli and sprinkle with the remaining 1/4 cup of Parmesan cheese.
    9. Place in the oven and immediately turn the temperature down to 350 degrees F. Bake for approximately 18 minutes.
    10. Remove from the oven and let the stromboli rest for 10 minutes. Check the center to ensure the dough is fully cooked. If needed, slice the stromboli in half and bake for an additional 5-8 minutes.
    11. Slice and serve with warm pizza sauce for dipping.

    Tips

    • Ensure your dough is at room temperature before rolling it out to prevent it from shrinking back.
    • For a crispier crust, use a pizza stone preheated in the oven.
    • Let the stromboli rest before slicing to allow the cheese to set slightly, making it easier to cut.

    Variations & Substitutions

    Feel free to get creative with your stromboli filling! Here are some ideas to customize your dish:

    • Vegetarian: Swap the sausage and pepperoni for mushrooms, bell peppers, and spinach.
    • Extra Spicy: Add sliced jalapeños or a sprinkle of red pepper flakes for a kick.
    • Different Cheeses: Experiment with provolone or cheddar cheese for a different flavor profile.

    Storage

    Store any leftover stromboli in an airtight container in the refrigerator for up to 3 days. To reheat, place slices in a preheated oven at 350 degrees F for about 10 minutes or until heated through. You can also freeze the baked stromboli for up to 3 months. Thaw overnight in the refrigerator before reheating.

    FAQ

    Can I use store-bought dough?

    Absolutely! Store-bought pizza dough works wonderfully for this recipe and saves time. Just ensure it’s at room temperature before rolling it out.

    How can I prevent the filling from leaking?

    Be sure to seal the edges of the dough well and avoid overfilling. Gently pinching the seams and tucking the ends will help contain the delicious filling.

    Nutrition

    This stromboli is a hearty dish that provides protein from the sausage and cheese, along with carbohydrates from the dough. While it’s a treat best enjoyed occasionally, you can balance it with a side salad or roasted vegetables for a well-rounded meal.

    Final Thoughts

    This Sausage & Pepperoni Stromboli is a delightful way to enjoy the flavors of pizza in a new, exciting form. Whether you’re serving it for a family dinner or a casual get-together, it’s sure to be a hit. I hope this recipe brings as much joy to your table as it has to mine. Happy cooking!

    Related update: Sausage & Pepperoni Stromboli

    Related update: North Carolina-Style BBQ Pulled Pork

  • Make Olive Garden’s Delicious Pasta Fagioli At Home | Made by Meaghan Moineau

    Make Olive Garden’s Delicious Pasta Fagioli At Home | Made by Meaghan Moineau

    Make Olive Garden’s Delicious Pasta Fagioli At Home

    There’s something incredibly comforting about a steaming bowl of soup, especially when it’s inspired by a beloved restaurant favorite. Olive Garden’s Pasta Fagioli has always been a dish that evokes warmth and a sense of home. I remember the first time I tasted it; I was dining out with my family, and the rich, hearty flavors made me feel like I was wrapped in a cozy blanket. It’s been a staple in my kitchen ever since, and today, I’m excited to share how you can recreate this delicious soup at home.

    Why You’ll Love It

    This homemade version of Olive Garden’s Pasta Fagioli is not only delicious and hearty but also incredibly easy to make. It brings together healthy ingredients in a way that feels indulgent without being heavy. Here’s why you’ll fall in love with making this soup at home:

    • Hearty and Filling: Packed with protein-rich beans and lean ground turkey, this soup is a meal in itself.
    • Nutritious: Loaded with vegetables like carrots, celery, and zucchini, it’s a great way to get your daily dose of veggies.
    • Easy to Prepare: With simple steps and common ingredients, it’s a dish that fits into any busy schedule.
    • Family Favorite: It’s a crowd-pleaser that’s perfect for family dinners or gatherings with friends.
    • Customizable: Easily tweak the recipe to suit your dietary preferences or what you have on hand.

    Ingredients

    • 1 pound lean ground turkey
    • 2 tablespoons olive oil
    • 1 cup chopped onions
    • 1 cup chopped carrots
    • 1 cup chopped celery stalks
    • 3 garlic cloves, minced
    • 2 cans (14.5 oz each) diced tomatoes, undrained
    • 1 can (15 oz) red kidney beans, drained and rinsed
    • 1 can (15 oz) white kidney beans, drained and rinsed
    • 1 can (15 oz) great northern beans, drained and rinsed
    • 4 cups canned beef broth
    • 1 jar (24 oz) pasta sauce
    • 1 medium zucchini, chopped
    • 2 teaspoons Italian seasoning blend
    • Fresh ground pepper to taste
    • 1 cup whole wheat penne pasta
    • Grated Parmesan cheese (optional, for serving)

    Instructions

    1. In a large soup pot, brown the ground turkey over medium heat. Once cooked, drain the turkey in a colander and set aside.
    2. In the same pot, heat the olive oil over medium heat. Add the onions, carrots, celery, and garlic, and cook for about 2 minutes, stirring often to prevent sticking.
    3. Return the drained turkey to the pot. Add the canned tomatoes, red kidney beans, white kidney beans, great northern beans, beef broth, pasta sauce, chopped zucchini, Italian seasoning, and fresh ground pepper. Stir well to combine.
    4. Bring the soup to a boil. Then, reduce the heat to a simmer, cover the pot, and let it cook for 50 minutes, allowing the flavors to meld together.
    5. Add the whole wheat penne pasta to the soup. Cover the pot again and cook for about 10 minutes or until the pasta is tender.
    6. Ladle the soup into bowls and top with grated Parmesan cheese if desired. Serve hot and enjoy!

    Tips

    • For a richer flavor, consider browning the turkey with a little garlic and onion powder.
    • Ensure you stir the soup occasionally as it simmers to prevent the ingredients from sticking to the bottom of the pot.
    • If you prefer a thicker soup, reduce the amount of broth or simmer uncovered for the last 10 minutes of cooking.

    Variations & Substitutions

    • Meat Substitutes: Replace ground turkey with ground beef, chicken, or even a plant-based meat alternative for a vegetarian version.
    • Bean Choices: If you don’t have the specified beans, feel free to use any combination of beans you have on hand.
    • Gluten-Free Option: Use gluten-free pasta to make this dish suitable for those with gluten sensitivities.
    • Spice it Up: Add a pinch of red pepper flakes for some heat, or use spicy Italian sausage instead of turkey.

    Storage

    This Pasta Fagioli soup stores well, making it perfect for meal prep. Here’s how to store it:

    • Refrigerator: Store leftovers in an airtight container in the refrigerator for up to 4 days. Reheat on the stove or in the microwave.
    • Freezer: This soup freezes beautifully. Allow it to cool completely, then transfer to freezer-safe containers. It will keep for up to 3 months. Thaw overnight in the refrigerator before reheating.

    FAQ

    Can I use fresh tomatoes instead of canned?

    Yes, you can use fresh tomatoes if desired. Use about 4 cups of chopped fresh tomatoes. You may need to add an extra cup of broth to maintain the soup’s consistency.

    Is it necessary to use beef broth?

    While beef broth adds depth to the soup, you can substitute chicken broth or vegetable broth if preferred. Each will slightly alter the flavor profile, but the soup will still be delicious.

    How can I make this soup vegetarian?

    To make a vegetarian version, simply omit the ground turkey and use vegetable broth instead of beef broth. You can also add extra beans or vegetables for additional texture and flavor.

    Nutrition

    This soup is a hearty meal that provides an excellent balance of protein, fiber, and essential nutrients. Here’s a rough estimate of the nutritional information per serving (without Parmesan cheese):

    • Calories: 250
    • Protein: 18g
    • Carbohydrates: 35g
    • Fat: 6g
    • Fiber: 8g
    • Sodium: 600mg

    Final Thoughts

    Making Olive Garden’s Pasta Fagioli at home is not just about recreating a favorite restaurant dish; it’s about bringing a bit of comfort and warmth to your table. This recipe is straightforward, adaptable, and sure to become a staple in your meal rotation. Whether you’re enjoying it on a chilly evening or sharing it with family and friends, it’s a dish that brings people together. I hope you enjoy making and eating it as much as I do!

    Related update: Make Olive Garden’s Delicious Pasta Fagioli At Home

    Related update: Curried Chicken Roll-Ups

    Related update: Truffle-Infused Mushroom Soup with Parmesan Crisps & Tarragon Creme Fraiche

  • Apple Dumplings In Fanta Sauce | Made by Meaghan Moineau

    Apple Dumplings In Fanta Sauce | Made by Meaghan Moineau

    Apple Dumplings In Fanta Sauce

    There’s something about the smell of apples and cinnamon baking in the oven that can transport you back to a simpler time. Growing up, my grandmother would make apple dumplings every autumn. The warm, sweet aroma would fill the kitchen, drawing everyone in for a taste. She had a secret ingredient that made her dumplings truly special—Fanta. Today, I’m excited to share a modern twist on her classic recipe: Apple Dumplings in Fanta Sauce.

    Why You’ll Love It

    This recipe is a delightful blend of sweet and tangy flavors, with a touch of nostalgia. The flaky puff pastry envelops tender apple crescents, while the Fanta sauce adds a unique citrusy sweetness that perfectly complements the apples. It’s a fun and easy recipe that even beginners can tackle with confidence. Whether you’re serving it as a dessert or a special treat, these apple dumplings are sure to become a family favorite.

    Ingredients

    • 2 crusts package puff pastry
    • 4 apples
    • 1 lemon (juice)
    • 1 cup Fanta Lemon
    • 1 cup sugar
    • 1/2 cup butter
    • 1 teaspoon lemon extract
    • Grounded cinnamon (optional)

    Instructions

    1. Preheat your oven to 400°F (about 200°C).
    2. Peel and core the apples, then cut each apple into 8 crescent-shaped pieces. Sprinkle them with lemon juice to prevent browning.
    3. Unroll the puff pastry and cut each crust into 8 equal triangles.
    4. Place an apple crescent on each puff pastry triangle and roll it up towards the top, enclosing the apple.
    5. In a pan, melt the butter. Add sugar and lemon extract, stirring well to combine.
    6. Arrange the dumplings in a baking pan, ensuring they are close enough to touch each other.
    7. Pour the melted butter and sugar mixture generously over each dumpling.
    8. Pour Fanta Lemon over the dumplings, ensuring they are well coated.
    9. Optionally, sprinkle with grounded cinnamon for extra flavor.
    10. Bake in the preheated oven for about 30 minutes. After the first 15-20 minutes, cover with baking paper to prevent burning.

    Tips

    For best results, make sure your puff pastry is cold before working with it. This will make it easier to cut and roll. If you find your dumplings browning too quickly, reduce the oven temperature slightly and cover them with baking paper to prevent burning. Keep an eye on the baking time as ovens can vary.

    Variations & Substitutions

    Feel free to experiment with different types of apples for this recipe. Granny Smith apples offer a tart contrast to the sweet sauce, while Honeycrisp and Fuji apples provide a sweeter profile. If you don’t have Fanta Lemon, you can substitute with another citrus-flavored soda or even a splash of lemon-lime soda mixed with orange juice. For a spicier kick, try adding a pinch of nutmeg or cloves to the sugar mixture.

    Storage

    Store any leftover apple dumplings in an airtight container in the refrigerator for up to 3 days. To reheat, simply pop them in a preheated oven at 350°F (175°C) for about 10 minutes or until heated through. You can also microwave them for a quick warm-up, but the pastry may lose some of its crispiness.

    FAQ

    Can I make these apple dumplings ahead of time?

    Yes, you can prepare the dumplings up to the baking step and refrigerate them for a few hours before baking. This can be a great time-saver if you’re planning to serve them at a gathering. Just ensure that the dumplings are well-covered so they don’t dry out in the fridge.

    What type of apples work best for this recipe?

    While you can use any type of apple, firmer varieties like Granny Smith or Honeycrisp hold their shape well during baking. Their flavor profiles also complement the sweet and tangy sauce beautifully.

    Can I use homemade puff pastry?

    Absolutely! Homemade puff pastry can elevate the dish, offering a richer, buttery flavor. Just ensure it’s rolled out to the same thickness as store-bought pastry for consistent results.

    Nutrition

    The nutritional content will vary depending on the type of apples and soda used. On average, each dumpling contains approximately 200-250 calories. It’s a treat best enjoyed in moderation, but the delicious flavor is well worth it!

    Final Thoughts

    Apple Dumplings in Fanta Sauce is a delightful recipe that combines the warmth and comfort of traditional apple desserts with a modern twist. It’s perfect for any occasion, from a cozy family dinner to a festive holiday gathering. The ease of preparation and the unique flavor make it a standout dish that you’ll return to time and again. Enjoy the sweet nostalgia and happy baking!

    Related update: Apple Dumplings In Fanta Sauce

    Related update: Eggless Blueberry and White Chocolate Baked Cheesecake