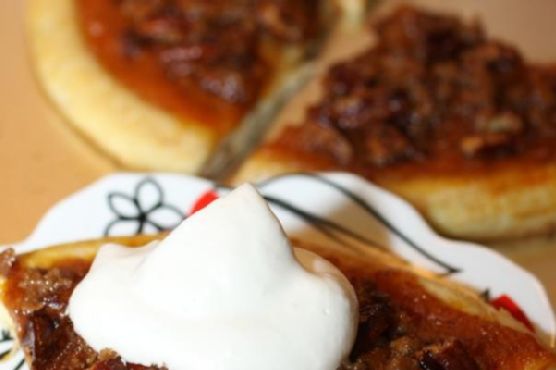
Pecan Pumpkin Pie Dessert Pizza with Maple Whipped Cream
As the crisp autumn air fills our days and the leaves turn vibrant shades of red and gold, there’s nothing more comforting than the warm embrace of a cozy kitchen. This Pecan Pumpkin Pie Dessert Pizza is a delightful twist on traditional fall desserts, and it brings me back to my childhood. I remember gathering around the family table, where the aroma of freshly baked pumpkin pies would fill the air. This recipe is inspired by those cherished memories, with a unique spin that’s sure to become a family favorite.
Why You’ll Love It
This Pecan Pumpkin Pie Dessert Pizza combines the best of both worlds: the beloved flavors of pumpkin pie and the fun of a pizza. It’s an easy-to-make treat that’s perfect for gatherings or a cozy night in. The crunchy pecans and rich pumpkin pie filling create a delicious contrast of textures, while the maple whipped cream adds an extra layer of indulgence. Plus, it’s a great way to use up leftover pumpkin pie filling, making it both economical and scrumptious.
Ingredients
- 2 tablespoons brown sugar, divided
- 1/4 cup butter, divided
- 1/2 cup heavy cream
- 2 tablespoons maple syrup
- 1/2 cup pecans
- 1 Mama Mary’s Original Pizza Crust
- 1 cup canned pumpkin pie filling/mix
- 1 teaspoon pumpkin pie spice
Instructions
- Preheat your oven to 425 degrees Fahrenheit.
- Melt 1/2 of the butter and 1 tablespoon of brown sugar in a small skillet.
- Brush the butter mixture onto one side of the pizza crust.
- Place the crust on a baking sheet and bake for 3 minutes.
- Meanwhile, add the remaining butter and 1 tablespoon of brown sugar to the skillet.
- Once melted, add the pecans and stir. Cook for 2-3 minutes over medium heat until the pecans are toasted and coated in sugar. Remove from heat.
- Take the crust out of the oven and spread the pumpkin pie filling evenly on top.
- Sprinkle with pumpkin pie spice.
- Remove pecans from the butter mixture and sprinkle them evenly over the pizza.
- Bake for an additional 7 minutes.
- For the Maple Whipped Cream: Using a cold bowl and beaters (chill them in the freezer for about 30 minutes before using), beat the heavy cream and maple syrup on high until stiff peaks form.
- Remove the pizza from the oven. Cut into 4 pieces. Top with a dollop or two of whipped cream and serve!
Tips
For the best results, ensure that your heavy cream is very cold before whipping it. This helps it to whip up faster and maintain its texture. You can also toast the pecans ahead of time to save some minutes if you’re making this for a gathering. Finally, always taste your pumpkin pie filling before spreading it on the crust; if you prefer a sweeter filling, consider adding a touch more brown sugar.
Variations & Substitutions
If you’re looking to mix things up, consider adding a sprinkle of chocolate chips or a drizzle of caramel sauce on top of the pizza before baking. You can also swap out the pecans for walnuts or almonds if you prefer. For a healthier twist, use whole wheat pizza crust instead of the traditional one.
Storage
While this dessert pizza is best served fresh, you can store any leftovers in an airtight container in the refrigerator for up to 2 days. To reheat, simply place the pizza in a preheated oven at 350 degrees Fahrenheit for a few minutes until warmed through. The whipped cream is best made fresh, but it can be stored separately in the fridge for up to a day.
FAQ
Can I make this dessert pizza ahead of time?
Yes, you can prepare the components separately. Bake the pizza crust and prepare the pecans ahead of time. When ready to serve, spread the pumpkin pie filling and bake for the final 7 minutes. Whip the cream just before serving.
What if I don’t have maple syrup?
If you’re out of maple syrup, you can substitute honey or agave syrup in the whipped cream. It will slightly alter the flavor but still be delicious.
Nutrition
This is a decadent dessert, so it’s best enjoyed in moderation. Each serving of Pecan Pumpkin Pie Dessert Pizza provides a delightful mix of creamy and crunchy textures, with the indulgent flavors of butter, cream, and maple syrup. Remember, sharing is caring!
Final thoughts
Our Pecan Pumpkin Pie Dessert Pizza with Maple Whipped Cream is a delightful treat that encapsulates the essence of fall. It’s a nostalgic nod to traditional flavors with a modern twist that’s sure to enchant your taste buds. Whether you’re serving it at a holiday gathering or enjoying it on a quiet evening, this dessert is bound to bring warmth and joy to your table. We hope it becomes a beloved recipe in your home as it has in ours. Enjoy!
Related update: Pecan Pumpkin Pie Dessert Pizza with Maple Whipped Cream
Related update: Brownie Cupcakes