Zesty Chana Masala with Charred Lime and Mint Yogurt Drizzle
Picture this: the comforting aroma of spices wafting through your kitchen, mingling with the tantalizing, smoky scent of charred lime. This isn’t just any chana masala; it’s a sensory journey that awakens your taste buds and transports you straight to the bustling streets of India. Are you intrigued yet? Well, read on, because this dish is about to become your new favorite dinnertime staple.
Personal Story
I still remember the first time I tried chana masala. It was a blustery fall evening, and I was huddled around a table with friends at a local Indian restaurant. I hadn’t expected the dish to leave such a lasting impression, but one spoonful of the warmly spiced chickpeas, and I was hooked. The rich, complex flavors felt like a warm hug in a bowl. That night, I became determined to replicate those flavors in my own kitchen.
Things didn’t start off smoothly. My first attempt was, to put it kindly, a bit bland. I hadn’t yet learned about the essential role of blooming spices like cumin seeds and bay leaves in hot oil. It was a rookie mistake. But as with all culinary endeavors, practice makes perfect. Over time, my chana masala began to resemble the dish I had fallen in love with — rich, aromatic, and comforting.
Yet, I wanted more from the dish — a unique twist that would make it truly my own. On a whim one day, I decided to experiment. I charred lime halves in a dry pan, intrigued by the possibilities. The smoky, tangy burst they added was revolutionary, cutting through the richness of the dish and enhancing its flavors. Then, a drizzle of cooling mint yogurt brought it all together, offering a refreshing contrast that made each bite irresistible. My Zesty Chana Masala with Charred Lime and Mint Yogurt Drizzle was born, and my kitchen has never been the same since.
What Makes This Version Special
This isn’t just any chana masala; it’s an elevated experience that brings new dimensions to a classic Indian dish. By introducing the refreshing zest of charred lime, this version takes a bold step beyond the traditional recipe. The lime’s smoky, tangy flavor cuts through the warmth of the spices, adding a surprising layer of complexity. To balance it all, a luxurious drizzle of mint yogurt brings a cool, creamy finish. This Zesty Chana Masala is not just better than the standard recipe; it’s a celebration of flavors that dance together on your palate.
Flavor Profile
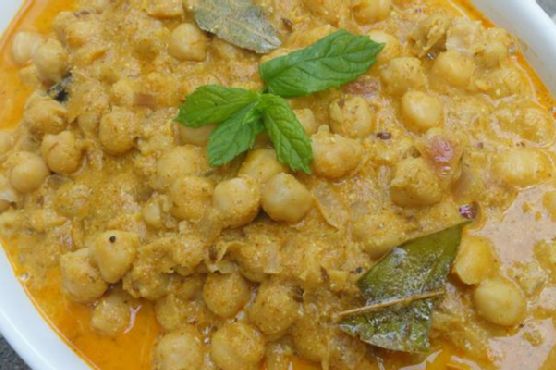
Prepare for a taste sensation that’s smoky, tangy, and utterly refreshing. The chickpeas simmer in a savory, spice-laden sauce, warmed by the gentle heat of red chili powder and the earthy notes of cumin and coriander. As you savor each bite, the charred lime’s citrusy tang emerges, adding a surprising zing that keeps you coming back for more. Finally, the mint yogurt drizzle cools things down, offering a creamy contrast that ties all the flavors together beautifully. It’s a dish that promises to excite and delight your senses.
Ingredients
- 1 bay leaf
- 1 can chickpeas, drained and rinsed
- 1 tablespoon chana masala powder
- 1 tablespoon coriander powder
- 1 teaspoon cumin seeds
- 3 cloves garlic, minced
- 1-inch piece ginger, grated
- 1/4 cup fresh mint leaves
- 2 tablespoons oil
- 1 large onion, chopped
- 1 teaspoon red chili powder
- Salt to taste
- 2 large tomatoes, chopped
- 1/2 teaspoon turmeric powder
- 1/2 cup yogurt
- 1 lime, halved and charred
- Fresh cilantro, chopped, for garnish
- 1/4 teaspoon black salt
Instructions
- Start by blending the tomatoes, ginger, garlic, and mint leaves into a smooth paste. No need to add water — the tomatoes will provide enough moisture.
- Heat the oil in a large pan over medium heat. Once hot, add the cumin seeds and bay leaf. Fry for about 10 seconds until fragrant.
- Add the chopped onion and sauté until it turns soft and translucent, about 5 minutes.
- Sprinkle in the coriander powder, chana masala powder, turmeric powder, and red chili powder. Fry the spices with the onions for 2 minutes to develop their flavors.
- Stir in the blended tomato paste, mixing well. Cook until the oil starts to separate from the paste, about 10 minutes, stirring occasionally.
- Add the drained chickpeas and salt, mixing thoroughly. Let them cook in the sauce for 7-8 minutes, allowing the flavors to meld.
- Lower the heat to a simmer and carefully fold in the yogurt. If the mixture looks too thick, add 1/4 cup of water to loosen it. Let it simmer gently for 5 minutes.
- Meanwhile, in a dry pan, char the lime halves cut-side down over medium-high heat until they are beautifully browned and aromatic.
- Once done, squeeze the charred lime juice into the chickpea mixture, stirring to combine.
- In a small bowl, mix the remaining yogurt with finely chopped mint and a pinch of black salt. Drizzle this over the chana masala just before serving.
- Garnish with fresh cilantro and serve hot with rice, roti, or naan.
Pro Tips from Meaghan’s Kitchen
- For a richer flavor, make the chana masala a day in advance. The spices will have more time to meld together.
- Don’t skip the step of frying the spices; it’s crucial for unlocking their full flavor potential.
- Control the heat level by adjusting the amount of red chili powder to suit your preference.
- Use a cast iron pan to char the lime for the best results and an even char.
- Chill the mint yogurt drizzle before serving for an extra refreshing touch.
Variations & Dietary Swaps
- Vegetarian Swap: This dish is naturally vegetarian. For a vegan version, use coconut yogurt instead of dairy yogurt.
- Spice-It-Up Version: Add finely chopped green chilies along with the spices for an extra kick.
- Kids-Friendly Version: Reduce the amount of chili powder and serve with a dollop of plain yogurt to mellow the heat.
What to Serve With It
This Zesty Chana Masala pairs perfectly with a chilled mango lassi or a refreshing cucumber raita, balancing the spice with cool, creamy flavors. Serve it alongside fluffy basmati rice or warm naan to soak up every last drop of the savory sauce.
Storage & Meal Prep
Store leftover chana masala in an airtight container in the fridge for up to 3 days. To freeze, pack it in a freezer-safe container, leaving some space at the top for expansion, and store for up to 3 months. Reheat gently on the stove, adding a splash of water to loosen the sauce if needed.
FAQ
Can I use fresh chickpeas instead of canned?
Absolutely! Just be sure to soak them overnight and cook until tender before using them in the recipe.
How do I prevent the yogurt from curdling?
Ensure the heat is low when adding the yogurt, and stir continuously to incorporate it smoothly into the sauce.
Can I use lemon instead of lime?
You can, but the charred lime provides a unique smoky flavor that really sets this dish apart.
What if I don’t have chana masala powder?
You can substitute with a mix of garam masala and cumin, though the flavor profile will be slightly different.
Is it okay to skip the mint yogurt drizzle?
You can skip it, but the drizzle adds a refreshing element that really complements the smokiness of the lime. I highly recommend trying it!
Final Thoughts
Cooking this Zesty Chana Masala with Charred Lime and Mint Yogurt Drizzle is not just about making a meal; it’s about creating an experience that’s fun, flavorful, and deeply satisfying. I hope you enjoy making and eating this dish as much as I do. Please share your thoughts, variations, or questions in the comments below. I’d love to hear how your chana masala journey unfolds!
Related update: Zesty Chana Masala with Charred Lime and Mint Yogurt Drizzle
Related update: Truffle-Infused 3 Cheese Ravioli with Sage Brown Butter