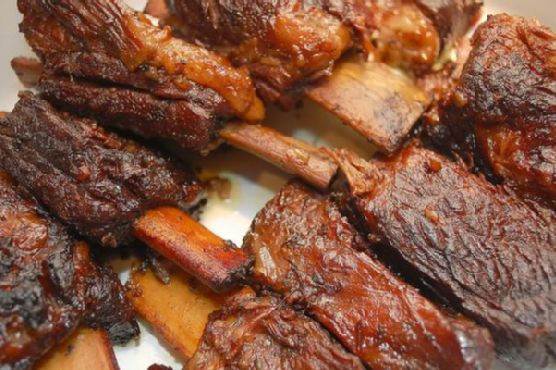
Tag: Beef

  • Guinness Braised Corned Beef with Whiskey-Maple Glaze and Roasted Root Vegetables | Made by Meaghan Moineau

    Guinness Braised Corned Beef with Whiskey-Maple Glaze and Roasted Root Vegetables | Made by Meaghan Moineau

    Guinness Braised Corned Beef with Whiskey-Maple Glaze and Roasted Root Vegetables

    Picture this: a chilly evening, the kitchen warm and inviting, with the tantalizing aroma of rich beef mingling with smoky whiskey and sweet maple syrup. As you lift the lid of your oven-safe pot, the steam releases, carrying with it the earthy scent of roasted garlic and thyme, mingling with the rich, malty essence of Guinness. Welcome to a dinner experience that combines tradition and innovation in every mouthful.

    Personal Story

    Growing up in an Irish-American household, corned beef was more than just a St. Patrick’s Day treat; it was a family tradition woven into the fabric of our kitchen. My earliest memories involve watching my grandmother, her hands deftly working to season and sear the brisket, while I sat perched on a stool, taking in the magic happening before me. Her version was classic, simple—just corned beef, potatoes, and cabbage. It was comforting, but I always had a hankering for something that danced a little more on the palate.

    Fast forward a few years to when I had my own kitchen to play in. I was determined to honor my family’s tradition while adding my own twist. After several experiments (some more successful than others), I discovered my secret weapons: a whiskey-maple glaze and roasted garlic. It was a revelation! The glaze added a sweet, smoky finish that balanced the savory, salty corned beef perfectly. And the roasted garlic? It brought a depth of flavor that was nothing short of transformative.

    One memorable evening, I invited my family over, nervous yet excited to unveil my creation. As they took their first bites, I watched their expressions shift from skepticism to delight. My grandmother, with a twinkle in her eye, declared it “a keeper.” From that moment on, Guinness Braised Corned Beef with Whiskey-Maple Glaze became a new family favorite, gracing our table not just on holidays, but whenever we craved something special.

    What Makes This Version Special

    This version of corned beef takes the classic and elevates it with a whiskey-maple glaze that adds a sweet and smoky finish, complemented by the aroma of roasted garlic and thyme. Unlike the standard recipe, which can sometimes feel heavy or one-dimensional, this dish balances the rich, salty notes of the corned beef with the sweetness of maple syrup and the complexity of whiskey. The addition of roasted root vegetables not only adds color and texture but also a comforting, earthy flavor profile that rounds out the dish beautifully.

    Flavor Profile

    When you take your first bite of this Guinness Braised Corned Beef, expect a symphony of flavors to unfold. The meat is rich, tender, and infused with the malty essence of Guinness, creating a warmth that is both comforting and indulgent. The whiskey-maple glaze introduces a smoky sweetness that dances on your tongue, while the roasted garlic and thyme provide a subtle earthiness, grounding the dish. The roasted root vegetables add a sweet, caramelized depth, each bite a perfect harmony of flavors and textures.

    Ingredients

    • Corned beef brisket
    • 2 tablespoons maple syrup
    • 1/4 cup whiskey
    • Carrots
    • Parsnips
    • Potatoes
    • 1 head of roasted garlic
    • 1 tablespoon fresh thyme
    • Guinness
    • Beef broth
    • Pickling spice
    • Brown sugar
    • Bay leaf
    • Spicy honey mustard

    Instructions

    1. Preheat your oven to 325°F (163°C). Begin by seasoning both sides of the corned beef liberally with pepper. The corning process makes the beef salty enough, so additional salt is unnecessary.
    2. Heat 1 tablespoon of oil in a large, shallow, oven-safe pot over medium-high heat. Add the beef and sear each side for about 3 minutes, just to develop a nice brown crust. This seals in the beef’s juices, ensuring a moist and flavorful result.
    3. Remove the beef from the pot and set it aside on a plate. Pour the Guinness into the pot to deglaze it, scraping up any browned bits from the bottom. This step infuses the sauce with a rich, malty base.
    4. Add beef broth, pickling spice, brown sugar, bay leaf, and minced garlic to the pot. Bring the mixture to a simmer, then return the beef to the pot along with any juices that have accumulated on the plate.
    5. Cover the pot and place it on the bottom rack of your oven. Bake for 2 1/2 to 3 hours, or until a fork can easily be inserted into the meat. Baste the meat with the surrounding juices every 30 minutes to keep it moist.
    6. After 2 hours, add the carrots, parsnips, and potatoes to the pot. They will only need about 25-30 minutes of simmering to cook through and absorb the flavors.
    7. While the vegetables cook, prepare your whiskey-maple glaze. In a small saucepan, combine whiskey and maple syrup. Simmer until reduced by half, creating a thick, glossy glaze.
    8. Remove the pot from the oven. Transfer the beef to a cutting board and let it rest for 15 minutes before carving into thin slices against the grain.
    9. Remove the vegetables and arrange them on a serving platter, covering them with foil to keep warm. Place the pot on the burner and bring the sauce to a boil. Add cabbage if desired and cook for about 7 minutes until softened.
    10. Strain the sauce in the pot and stir in 2-3 tablespoons of spicy honey mustard until dissolved. Serve in a small dish or gravy boat alongside the beef.
    11. After slicing the beef and arranging it on the serving platter, brush it with the whiskey-maple glaze and ladle the Guinness mustard sauce over the top to rehydrate and enhance the beef and vegetables.

    Pro Tips from Meaghan’s Kitchen

    • Roast that garlic: For deeper flavor, roast a whole head of garlic until caramelized, then squeeze the cloves into the sauce or mix them with the glaze.
    • Choose your whiskey wisely: A smooth Irish whiskey works best for the glaze, adding complexity without overwhelming the other flavors.
    • Timing is everything: Be patient and let the beef rest after cooking. This allows the juices to redistribute, ensuring each slice is tender and flavorful.
    • Keep it moist: Baste the beef every 30 minutes while it cooks. This not only adds flavor but keeps the meat juicy.
    • Glaze last: Apply the whiskey-maple glaze just before serving to maintain its glossy finish and aromatic punch.

    Variations & Dietary Swaps

    • Vegetarian Swap: Replace the beef with a hearty mix of mushrooms and lentils, and use vegetable broth instead of beef broth for a rich, umami-packed dish.
    • Spice-It-Up Version: Add a pinch of cayenne pepper to the glaze and sauce for a little heat that complements the sweetness and smoke.
    • Kids-Friendly Version: Skip the whiskey in the glaze. Instead, use a tablespoon of apple juice coupled with the maple syrup for a sweet, kid-approved finish.

    What to Serve With It

    This Guinness Braised Corned Beef pairs beautifully with a smooth Irish whiskey, enhancing the dish’s subtle smokiness. For sides, consider buttery mashed potatoes, which complement the rich flavors, or a light, tangy coleslaw to add a refreshing contrast. A crisp, cold pint of Guinness on the side wouldn’t go amiss either, bringing the meal full circle.

    Storage & Meal Prep

    Store any leftover corned beef and vegetables in airtight containers in the refrigerator for up to 3 days. To reheat, place the beef and vegetables in a covered dish with a splash of beef broth and warm in the oven at 325°F (163°C) until heated through. For longer storage, freeze sliced beef and vegetables in a sealed container for up to 3 months. Thaw overnight in the refrigerator before reheating.

    FAQ

    Can I use a different type of beer?

    Absolutely! While Guinness adds a rich, malty flavor perfect for this dish, you can experiment with other stouts or dark ales to suit your taste.

    How do I know when the beef is done?

    The beef is done when a fork can easily be inserted and twisted in the meat. It should be tender and slice easily against the grain.

    What if I don’t have an oven-safe pot?

    If you don’t have an oven-safe pot, you can sear the beef and prepare the sauce on the stovetop, then transfer everything to a roasting pan and cover tightly with foil before placing it in the oven.

    Can I make this dish ahead of time?

    Yes, this dish can be made a day in advance. Simply reheat gently in the oven before serving and finish with the glaze just before serving.

    What can I do with leftovers?

    Leftover corned beef makes an excellent addition to sandwiches, hash, or corned beef and cabbage rolls. The flavors deepen as they sit, making the leftovers just as delicious!

    Final Thoughts

    There you have it, my friends — a Guinness Braised Corned Beef with Whiskey-Maple Glaze that not only pays homage to tradition but also brings a deliciously modern twist to your table. This dish is perfect for impressing guests at a dinner party or simply savoring with family on a cozy night in. I hope you enjoy making it as much as I do, and I’d love to hear how it turns out for you. Feel free to drop a comment below or share your creations on social media. Happy cooking!

    Related update: Guinness Braised Corned Beef with Whiskey-Maple Glaze and Roasted Root Vegetables

    Related update: Tropical Coconut-Lime Chicken Tenders with Spicy Mango Salsa

  • Guinness-Infused Beef Pot Pies with Truffle Cheddar Crust | Made by Meaghan Moineau

    Guinness-Infused Beef Pot Pies with Truffle Cheddar Crust

    Imagine this: the comforting aroma of beef pot pies wafting through your kitchen, melding with the earthy scent of truffle cheddar and the robust malt of Guinness stout. As you pull these individual pies from the oven, their golden, flaky crusts revealing the savory promise within, you can’t help but feel a sense of anticipation. This isn’t just any pot pie; it’s a culinary adventure that elevates the humble dish to new heights.

    Personal Story

    Every St. Patrick’s Day, my kitchen turns into a bustling hub of Irish flavors and laughter. My love for Irish cuisine started with tales from my grandmother, who used to tell me stories of her time in Dublin. Her stories painted a vivid picture of the city and its vibrant food culture. But it wasn’t until I visited Ireland myself that I truly fell in love with the rich, comforting dishes that define its culinary landscape.

    One particularly rainy afternoon, I found myself in a cozy pub, surrounded by the warmth of a lively crowd and the intoxicating aroma of hearty, home-cooked meals. It was there that I first tasted a pot pie that changed my perspective entirely. The crust was buttery and flaky, the filling, a delightful harmony of beef and stout. The experience was transformative and inspired me to recreate that moment back home in my own kitchen.

    Back in my kitchen, I set out on a mission to craft my version of this classic dish, infusing it with personal touches and a nod to my grandmother’s tales. The result? A Guinness-Infused Beef Pot Pie with Truffle Cheddar Crust that never fails to impress both family and friends. It’s a dish that bridges generations and continents, bringing a bit of Irish magic to my dining table.

    Through trial and error, I discovered that adding truffle cheddar to the crust provided an earthy depth that paired beautifully with the malty undertones of the Guinness-infused filling. It’s more than just food; it’s a memory, a tradition, and a delicious journey all wrapped into one.

    What Makes This Version Special

    This version of beef pot pie stands out due to the rich, earthy flavors that the truffle cheddar crust and Guinness stout bring to the table. By enriching the pie crust with truffle cheese, you’re introducing an unexpected element that elevates the standard pastry to something extraordinary. The truffle infuses the crust with a unique aroma and taste that complements the savory filling perfectly.

    The filling itself is simmered with Guinness, which imparts a deep, malty flavor that traditional beef pot pies often lack. This combination of flavors creates a dish that is not only hearty and comforting but also adventurous and sophisticated. By deglazing the skillet with Guinness before adding the broth, you create a savory gravy that enhances the overall complexity of the dish, making every bite a rich, flavorful experience.

    Flavor Profile

    Prepare for a symphony of flavors with each mouthful of these Guinness-Infused Beef Pot Pies. The first thing you’ll notice is the rich, buttery crust, its truffle cheddar notes hitting your palate with an earthy elegance. As you delve deeper, the filling reveals itself, rich with the robust malty notes of Guinness and the tender, juicy beef that melts in your mouth. Caramelized onions and sweet carrots add subtle sweetness, balanced by the aromatic presence of fresh thyme and marjoram. It’s a creamy, luxurious finish that leaves you craving more.

    Ingredients

    • 1/2 cup unsalted butter, cubed
    • 1/2 cup **truffle cheddar cheese**, shredded
    • 2 cups all-purpose flour
    • 1 tbsp sugar
    • 1 tsp salt
    • 1/4 tsp dry mustard
    • 1/8 tsp cayenne pepper
    • 1/4 cup ice water
    • 4 tsp vegetable oil, divided
    • 1 1/2 lbs beef chuck meat, cut into 1-inch cubes
    • Salt & pepper, to taste
    • 1 large onion, chopped
    • 2 carrots, diced
    • 3 cloves garlic, minced
    • 1 tsp fresh thyme, chopped
    • 1 tsp fresh marjoram, chopped
    • 2 tbsp all-purpose flour
    • 1 cup canned beef broth
    • 1 cup water
    • 1 cup **Guinness stout**
    • 1 tbsp dijon mustard
    • 2 tbsp fresh parsley, chopped
    • 1 egg, beaten
    • 1 tsp truffle oil (optional)

    Instructions

    1. Place the butter and shredded truffle cheddar cheese in the freezer for 15 minutes to chill. This step ensures a stronger flavor infusion in the crust.
    2. In a food processor, combine 2 cups of flour, 1 tablespoon sugar, 1 teaspoon salt, 1/4 teaspoon dry mustard, and 1/8 teaspoon cayenne pepper. Pulse to mix.
    3. Add the chilled butter and cheese to the flour mixture. Pulse about 10 times until the mixture resembles coarse crumbs.
    4. Sprinkle half the ice water over the dough and pulse about 3 times. Repeat with the remaining water, pulsing 3 more times. Check if the dough sticks together; if not, add more ice water, a tablespoon at a time, until it does.
    5. Transfer the dough to a large bowl and press it together to form a cohesive mass. Divide into two halves, shape each into a 4-inch disk, wrap in plastic, and refrigerate for at least an hour.
    6. For the filling, pat the beef dry and season with salt and pepper. Heat 2 teaspoons of oil in a large skillet over medium-high heat until just smoking, then add the beef in a single layer. Cook without stirring for 5-10 minutes until well-browned. Stir and cook for another 2 minutes until no longer pink. Remove and set aside.
    7. Lower the heat to medium and add the remaining 2 teaspoons of oil. Sauté the onions and carrots, stirring occasionally, until they start to brown, about 5 minutes. Add garlic, thyme, and marjoram, cooking until fragrant, about 1 minute.
    8. Sprinkle 2 tablespoons of flour over the vegetables and stir for about a minute. Slowly add the beef broth, water, and then the Guinness stout, deglazing the skillet to create a rich gravy. Stir in the beef and any accumulated juices.
    9. Bring the mixture to a simmer, then reduce the heat to maintain a gentle simmer. Cover and cook, stirring occasionally, until the beef is tender, about 45 minutes. Stir in the Dijon mustard and parsley. Adjust seasoning with salt and pepper. Set aside to cool slightly.
    10. Preheat your oven to 400°F (200°C). Roll out the dough disks on a floured surface to fit your pie dishes. Line the dishes with half of the dough, fill with the beef mixture, and cover with the remaining dough. Seal and crimp the edges, then brush with the beaten egg.
    11. Bake in the preheated oven until the crust is golden-brown and the filling is bubbling, about 25-30 minutes. Let cool for 10 minutes before serving.

    Pro Tips from Meaghan’s Kitchen

    • Always chill your butter and cheese together; it enhances the flavor and texture of the crust.
    • Pati dry your beef thoroughly before browning to ensure a nice crust develops, which adds depth to your filling.
    • Don’t rush the simmering process; giving the beef time to tenderize in the gravy is key to a melt-in-your-mouth experience.
    • Use fresh herbs when possible; they provide a vibrant taste that dried herbs can’t quite match.
    • Add a splash of truffle oil to the filling just before serving for an extra layer of flavor.

    Variations & Dietary Swaps

    • Vegetarian Version: Swap the beef with a hearty mix of mushrooms and lentils, using vegetable broth instead of beef broth and Guinness.
    • Spice-It-Up Version: Add a diced jalapeño or a pinch of red pepper flakes to the filling for a little heat.
    • Kid-Friendly Version: Omit the Guinness and substitute with additional beef broth for a more mild flavor.

    What to Serve With It

    Pair your Guinness-Infused Beef Pot Pies with creamy mashed potatoes for a comforting, hearty meal. For those who enjoy a beverage alongside, a pint of cold Guinness will enhance the dish’s rich flavors. For a lighter touch, a simple arugula salad with lemon vinaigrette balances the savory richness nicely.

    Storage & Meal Prep

    Store any leftover pot pies in the fridge for up to 3 days. To freeze, wrap each pie tightly in aluminum foil and place in a freezer-safe container for up to 3 months. Reheat in a 350°F (175°C) oven until warmed through, about 20-25 minutes if refrigerated, or 40-45 minutes if frozen.

    FAQ

    Can I make the dough ahead of time?

    Yes, you can prepare the dough up to 2 days in advance. Just keep it wrapped in plastic wrap in the refrigerator until you’re ready to use it.

    What if I can’t find truffle cheddar cheese?

    If truffle cheddar is unavailable, substitute with a high-quality sharp cheddar and add a teaspoon of truffle oil to the dough for a similar flavor profile.

    Can I use a different type of beer?

    Absolutely! If you don’t have Guinness, a similar stout or dark ale will work, though it may alter the flavor slightly.

    How do I prevent a soggy bottom crust?

    Blind-baking the bottom crust before adding the filling can help prevent sogginess. You can also ensure your filling is not too liquidy before assembling the pies.

    Can I use pre-made pie crust?

    While homemade crust is recommended for the best flavor, a good quality pre-made pie crust can be used in a pinch. Consider brushing it with truffle oil before baking for a flavor boost.

    Final Thoughts

    This Guinness-Infused Beef Pot Pie with Truffle Cheddar Crust is a celebration of flavors and memories. Whether you’re crafting it for a special occasion or simply to enjoy a comforting meal, I encourage you to make it your own. Try out the variations, share your creations, and let me know how it goes. Let’s bring a bit of Irish magic to kitchens everywhere. Happy cooking!

    Related update: Guinness-Infused Beef Pot Pies with Truffle Cheddar Crust

    Related update: Spicy Chettinad Egg Curry with Smoky Roasted Peppers

  • Smoky Chipotle Filet Mignon Tacos with Avocado Lime Crema | Made by Meaghan Moineau

    Smoky Chipotle Filet Mignon Tacos with Avocado Lime Crema | Made by Meaghan Moineau

    Smoky Chipotle Filet Mignon Tacos with Avocado Lime Crema

    If there ever was a dish that could transport you straight to the bustling beaches of Tulum with just one bite, it’s these Smoky Chipotle Filet Mignon Tacos with Avocado Lime Crema. Picture this: tender slices of smoky, marinated filet mignon nestled in a warm corn tortilla, topped with a zesty avocado lime crema that dances across your taste buds with every bite. It’s a taco experience that promises to be both unforgettable and irresistibly delicious.

    Personal Story

    Growing up, tacos were a staple at our family dinners. My mom had a knack for transforming the simplest ingredients into something magical, and taco night was always a highlight of my week. As a kid, I remember eagerly waiting in the kitchen, watching her deftly flip tortillas and season meats with a flair that seemed almost mystical. Her tacos were always bursting with flavor, but they were never the same twice. She’d improvise with whatever we had on hand, and somehow, it always worked.

    Fast forward a few years, and here I am, a passionate home cook in my own right. I still hold those taco nights dear, and every time I make tacos, I get a rush of nostalgia. But I was itching to take my taco game up a notch, to add a touch of sophistication to the beloved family classic. That’s when I stumbled upon the idea of using filet mignon—a cut of beef that’s as luxurious as it is delicious. The first time I tried marinating it in smoky chipotle and lime, I knew I was onto something special.

    Of course, not every culinary adventure is without its mishaps. I once tried to recreate this dish for a group of friends, and in the midst of an enthusiastic conversation, forgot about the steaks on the grill. Let’s just say those tacos never saw the light of day. But you live and learn, and I’ve since perfected the timing and technique to ensure each filet comes out perfectly cooked, every time.

    Now, every time I make these Smoky Chipotle Filet Mignon Tacos, I’m reminded of my mom’s kitchen and the joy of experimenting with flavors. It’s a dish that’s close to my heart, and I’m thrilled to share it with you.

    What Makes This Version Special

    What sets this version of filet mignon tacos apart is the smoky chipotle marinade and the refreshing kick of the avocado lime crema. By using a marinade of chipotle chili powder, lime juice, and garlic powder, the filet mignon takes on a rich, smoky flavor that elevates the entire taco experience. The bold spices penetrate the meat, ensuring every bite is packed with flavor. But the magic doesn’t stop there!

    Our zesty avocado lime crema adds a creamy, tangy contrast that perfectly complements the smoky steak. It’s the kind of flavor balance that keeps you coming back for more. This isn’t just a taco; it’s a symphony of textures and tastes that are excitingly different from the usual fare. Plus, by using filet mignon, you get a tender, melt-in-your-mouth experience that’s truly luxurious.

    Flavor Profile

    These Smoky Chipotle Filet Mignon Tacos with Avocado Lime Crema are a vibrant celebration of flavors. The smokiness of the chipotle marinade infuses the filet mignon with a deep, rich taste that’s both bold and satisfying. As you take a bite, you’re greeted by the tangy zest of lime, which cuts through the richness and adds a refreshing brightness. The avocado lime crema brings a soothing, creamy element with its silky texture and hints of cilantro and citrus. Together, these components create a taco that’s smoky, tangy, and creamy all at once, with a subtle heat that lingers pleasantly.

    Ingredients

    • 2 filet mignon steaks (about 6 oz each)
    • **2 tablespoons chipotle chili powder**
    • **2 tablespoons lime juice** (freshly squeezed)
    • 1 teaspoon garlic powder
    • **1 ripe avocado**
    • **1/2 cup sour cream**
    • 1 tablespoon fresh cilantro (chopped)
    • **1 tablespoon extra virgin olive oil**
    • 1/2 teaspoon cracked black pepper
    • **8 white corn tortillas**
    • 1/2 cup guacamole
    • 1/2 cup shredded cheddar cheese

    Instructions

    1. In a small bowl, combine the chipotle chili powder, lime juice, and garlic powder to create a marinade. Rub this mixture generously over both sides of the filet mignon steaks. Allow them to marinate for at least 30 minutes to infuse the meat with the smoky flavor.
    2. While the steaks are marinating, make the avocado lime crema. In a blender or food processor, combine the ripe avocado, sour cream, lime juice, and cilantro. Blend until smooth and creamy. Set aside in the refrigerator to keep cool.
    3. Heat a skillet over medium to low heat. Rub the steaks with extra virgin olive oil and season with cracked black pepper. Place them in the skillet and cook slowly, approximately 7 minutes on each side for medium doneness, or until they reach your desired level of doneness. Look for a golden-brown crust forming on the outside.
    4. Once cooked, remove the filets from the heat and let them rest for a few minutes. Slice thinly and lengthwise to maximize tenderness.
    5. In a clean skillet over medium heat, warm the white corn tortillas for about 30 seconds on each side, until they’re soft and pliable.
    6. To assemble the tacos, place a few slices of the filet mignon on each tortilla, followed by a spoonful of guacamole, a drizzle of the avocado lime crema, and a sprinkle of shredded cheddar cheese. Serve immediately to enjoy the full spectrum of flavors!

    Pro Tips from Meaghan’s Kitchen

    • Always let your steak rest for a few minutes after cooking. This allows the juices to redistribute, leading to a more flavorful and juicy bite.
    • If you’re short on time, the filet mignon can marinate in the fridge overnight. The flavors will only deepen and become more robust.
    • For the best crema consistency, use a ripe avocado. It should give slightly when you press it, indicating it’s ready to blend.
    • Warm your tortillas on an open flame for a bit of char and extra flavor complexity.
    • If you prefer less heat, adjust the amount of chipotle chili powder to suit your taste.

    Variations & Dietary Swaps

    • Vegetarian Swap: Replace the filet mignon with grilled portobello mushrooms marinated in the same chipotle mixture for a smoky, satisfying alternative.
    • Spice-It-Up Version: Add sliced jalapeños or a dash of hot sauce to the crema for an extra kick.
    • Kids-Friendly Version: Dial down the chipotle and introduce a honey-lime glaze to sweeten the steak slightly, making it more appealing to younger palates.

    What to Serve With It

    These tacos are a match made in heaven with a chilled margarita on the side. The citrus notes in the drink enhance the lime undertones in the dish. Alternatively, pair them with a vibrant Mexican street corn salad for a complete and satisfying meal. The sweetness of the corn complements the smoky and creamy elements of the tacos beautifully.

    Storage & Meal Prep

    If you have leftovers (though it’s hard to imagine!), store the steak and crema separately in airtight containers. The steak will keep for up to 3 days in the refrigerator, and the crema will stay fresh for about the same time. To reheat the steak, gently warm it in a skillet over low heat to maintain its tenderness. The crema can be served chilled directly from the fridge.

    FAQ

    Can I use a different cut of beef?

    Absolutely! While filet mignon is tender and luxurious, you can also use flank steak or skirt steak for a more budget-friendly option. Just adjust the marinating and cooking times accordingly to ensure tenderness.

    How can I tell when the filet mignon is done?

    Use a meat thermometer for the most accurate results. Medium doneness is achieved at an internal temperature of about 145°F. Alternatively, the touch test is a classic method: the meat should feel springy to the touch rather than squishy or firm.

    Is there a way to make the crema dairy-free?

    Yes! Substitute the sour cream with a plant-based yogurt or sour cream alternative. It will still provide that creamy texture and tangy flavor, just without the dairy.

    Can I make the tortillas from scratch?

    Definitely! Homemade corn tortillas can elevate this dish even further. All you need is masa harina, water, and a pinch of salt. Press them thin and cook on a hot skillet for a fresh, authentic touch.

    What’s the best way to slice the steak?

    Slice against the grain to ensure each piece is tender and easy to chew. This technique breaks down the muscle fibers, resulting in a more enjoyable texture.

    Final Thoughts

    There you have it, friends — Smoky Chipotle Filet Mignon Tacos with Avocado Lime Crema that are sure to take your next taco night to new heights. Whether you’re sharing them with family or impressing friends at your next dinner party, these tacos promise a culinary journey worth embarking on. I can’t wait to hear how they turn out for you, so be sure to leave a comment or snap a picture to share your taco triumphs. Let’s keep cooking, experimenting, and savoring each delicious moment together!

    Related update: Smoky Chipotle Filet Mignon Tacos with Avocado Lime Crema

    Related update: Guinness-Infused Beef Pot Pies with Truffle Cheddar Crust

  • Peruvian Lomo Saltado with Crispy Quinoa Crust and Citrus Avocado Salsa | Made by Meaghan Moineau

    Peruvian Lomo Saltado with Crispy Quinoa Crust and Citrus Avocado Salsa | Made by Meaghan Moineau

    Peruvian Lomo Saltado with Crispy Quinoa Crust and Citrus Avocado Salsa

    Imagine stepping into a bustling kitchen where vibrant aromas of sizzling beef and sautéed vegetables mingle with a hint of citrus. The air practically crackles with excitement as this new twist on a classic Peruvian dish, Lomo Saltado, takes center stage. Are you ready to experience a culinary journey enhanced by a crispy quinoa crust and brightened by a refreshing citrus avocado salsa?

    Personal Story

    When I first encountered Lomo Saltado, it was love at first bite. I still remember the lively family gathering at my best friend’s house, where her grandmother served this Peruvian classic. The savory beef, the tender vegetables, and those irresistible golden fries all served over a bed of fluffy rice – it was comfort on a plate. But what truly captivated me was the way each bite felt like a celebration of flavors dancing together.

    Fast forward a few years, and I’m in my own kitchen, a place where I’ve had my share of triumphs and, let’s be honest, some mishaps too. One such mishap came when I attempted to recreate Lomo Saltado for a dinner party. In my haste, I mistimed the fries, leaving them soggy and disappointing. I realized then that this dish, though seemingly simple, demanded respect and a touch of innovation to truly shine.

    Determined to elevate this beloved dish, I experimented with different techniques and ingredients. Inspiration struck during a trip to the local farmer’s market, where I stumbled upon vibrant avocados and fresh mint. The idea of adding a citrus avocado salsa was born, providing a refreshing counterpoint to the savory beef. Then, as I was preparing quinoa for another meal, it hit me – what if I could add a crispy quinoa crust to the beef? That extra texture was the missing piece of the puzzle.

    After a few tweaks and taste tests, my enhanced Lomo Saltado was ready for prime time. It was a hit, and I knew I had found a way to honor the traditional dish while making it uniquely mine. Now, I’m thrilled to share this recipe with you, inviting you to savor every bite and perhaps make it a cherished part of your own culinary repertoire.

    What Makes This Version Special

    This version of Lomo Saltado stands out with its crispy quinoa crust on the beef, adding an unexpected crunch that takes the texture to a new level. Quinoa, a staple grain in Peruvian cuisine, brings not just texture but also a nutty flavor that complements the savory beef. Paired with the citrus avocado salsa, which adds a refreshing burst of flavor, this dish is a true sensory delight. The salsa’s tangy lime and orange juices, combined with creamy avocado and fresh mint, brighten the entire plate, making each bite a journey of layered tastes.

    Flavor Profile

    Picture this: savory, juicy beef coated in a crispy quinoa and panko breadcrumb crust, sautéed to golden-brown perfection. The cumin and complete seasoning impart a warm, earthy note, while the soy sauce and red wine vinegar add an umami depth. The sautéed onions, bell peppers, and garlic bring a sweet and aromatic base, with a hint of heat from jalapeño. The citrus avocado salsa, with its tangy and fresh profile, balances the richness of the beef, leaving a lingering lightness on your palate. It’s a symphony of flavors that elevates each component into something truly special.

    Ingredients

    • 1 lb beef tenderloin, cut into chunks
    • **1/2 cup cooked quinoa**
    • **1/2 cup panko breadcrumbs**
    • 1 teaspoon cumin
    • 1 teaspoon complete seasoning
    • 1 green bell pepper, sliced
    • 1 red bell pepper, sliced
    • 1 yellow onion, sliced
    • 2 garlic cloves, minced
    • 1 jalapeño pepper, minced
    • 2 tablespoons red wine vinegar
    • 3 tablespoons soy sauce
    • 2 plum tomatoes, cut into wedges
    • 1 lb frozen french fries, prepared according to package instructions
    • 1 avocado, diced
    • **Juice of 1 lime**
    • **Juice of 1 orange**
    • **2 tablespoons freshly chopped mint**
    • **1 tablespoon olive oil**
    • **Sea salt to taste**
    • Cilantro, for garnish

    Instructions

    1. Prepare the frozen french fries according to the package directions. Set aside and keep warm.
    2. In a large bowl, combine the cooked quinoa and panko breadcrumbs. Coat the beef chunks in this mixture, pressing gently to ensure the crumbs adhere.
    3. Heat a large wok or skillet over medium-high heat. Add a tablespoon of olive oil, then sauté the onions and bell peppers until translucent, about 10 minutes.
    4. Add the garlic and jalapeño to the skillet, cooking for an additional minute until aromatic.
    5. Push the vegetables to the side of the skillet and add the crusted beef chunks. Cook until the beef is no longer pink and the crust is golden-brown, about 5 to 7 minutes.
    6. Stir in the cumin, complete seasoning, soy sauce, and red wine vinegar. Mix everything well and let it simmer for a minute.
    7. Add the tomato wedges, cover the skillet, and cook for an additional 5 minutes, allowing the tomatoes to soften and meld with the other ingredients.
    8. In a separate bowl, prepare the citrus avocado salsa by combining the diced avocado, lime juice, orange juice, chopped mint, and a pinch of sea salt. Mix gently.
    9. When ready to serve, add the prepared french fries to the skillet, tossing everything gently to combine.
    10. Serve the Lomo Saltado over a bed of white rice, garnished with freshly chopped cilantro and a generous helping of citrus avocado salsa on top. Enjoy with a side of aji sauce for extra heat, if desired.

    Pro Tips from Meaghan’s Kitchen

    • Ensure your quinoa is well-cooked and dry before mixing with the panko breadcrumbs for the crispiest crust.
    • For even more flavor, marinate the beef in soy sauce and a splash of lime juice for 30 minutes before coating.
    • Use a cast iron skillet for even heat distribution and to achieve that perfect golden-brown crust on the beef.
    • If your salsa is too tangy, add a pinch of sugar to balance the acidity.
    • Reheat the fries in a hot oven for a quick crisp if they start to soften.

    Variations & Dietary Swaps

    • Vegetarian Swap: Replace the beef with thick slices of portobello mushrooms. They soak up flavor beautifully and have a meaty texture.
    • Spice-It-Up Version: Add a pinch of cayenne pepper to the quinoa coating for an extra kick of heat.
    • Kids-Friendly Version: Offer the salsa as a side to let kids try it at their own pace, or swap it for a milder tomato and cucumber salad.

    What to Serve With It

    This Peruvian Lomo Saltado pairs beautifully with a chilled Pisco Sour, a traditional Peruvian cocktail that enhances the dish’s flavors. If you’re keeping it alcohol-free, a lime-infused sparkling water provides a refreshing balance. For a full meal experience, serve with a simple side salad of mixed greens and a light vinaigrette.

    Storage & Meal Prep

    Store any leftovers in an airtight container in the fridge for up to 3 days. For longer storage, place the beef and vegetables in one container and the salsa in another to maintain freshness. To reheat, warm the beef and vegetables on the stove over medium heat until heated through. The salsa is best enjoyed fresh but can be stored separately for a day.

    FAQ

    Can I prepare the quinoa coating in advance?

    Absolutely! You can make the quinoa and breadcrumb mixture up to a day ahead. Store it in an airtight container at room temperature until you’re ready to use it.

    What if I don’t have red wine vinegar?

    If you’re out of red wine vinegar, apple cider vinegar or balsamic vinegar can be used as substitutes. They will alter the flavor slightly but are both delicious alternatives.

    How can I make this dish gluten-free?

    To make this Lomo Saltado gluten-free, simply replace the panko breadcrumbs with gluten-free breadcrumbs and ensure your soy sauce is labeled gluten-free.

    Can I use fresh fries instead of frozen?

    Yes, fresh fries are a fantastic option! Just be sure to slice them evenly and fry or bake them until crispy before adding them to the dish.

    Final Thoughts

    I hope this unique twist on Peruvian Lomo Saltado with a crispy quinoa crust and citrus avocado salsa brings as much joy to your kitchen as it does to mine. Cooking is about exploration and making each recipe your own, so feel free to adjust flavors and ingredients to suit your taste. I’d love to hear how your Lomo Saltado adventure turns out, so leave a comment below or share your creation on social media. Happy cooking!

    Related update: Peruvian Lomo Saltado with Crispy Quinoa Crust and Citrus Avocado Salsa

    Related update: Maple-Glazed Bacon Wrapped Pork Tenderloin with Smoked Paprika

  • Steak with lemon and capers | Made by Meaghan Moineau

    Steak with lemon and capers | Made by Meaghan Moineau

    Steak with Lemon and Capers

    There’s something truly magical about the aroma of sizzling steak mingling with the zesty freshness of lemon and the briny pop of capers. This recipe for Steak with Lemon and Capers not only delivers a mouthwatering dining experience but also carries with it a memory of warm family gatherings, where laughter and delicious food went hand in hand.

    Why You’ll Love It

    Imagine a tender, juicy steak infused with the tang of lemon and the unique flavor of capers. This recipe is a delightful blend of simplicity and sophistication. You’ll love how quickly it comes together, making it perfect for both weekday dinners and special occasions. The ingredients are straightforward, yet they combine to create a dish that feels both luxurious and comforting. Plus, the sauce is absolutely divine when drizzled over the steak—or anything else on your plate!

    Ingredients

    • Beef steak
    • Butter
    • Capers
    • Dry white wine
    • Flour
    • Garlic
    • Black ground pepper
    • Lemon juice
    • Lemon wedges
    • Olive oil
    • Parsley
    • Salt

    Instructions

    1. Flatten the steaks lightly with a meat mallet.
    2. In a shallow dish, combine flour, salt, and pepper. Dip the steaks into the mixture, ensuring both sides are well-coated.
    3. Heat a mixture of butter and olive oil in a pan over medium heat. Sauté the steaks for about 4 minutes on each side until they are browned to your liking. Remove from the pan and set aside.
    4. In the same pan, sauté the garlic for about 1 minute, stirring continuously to avoid burning.
    5. Add the wine and lemon juice to the pan, stir, and let it simmer for 5 minutes to slightly reduce the liquid.
    6. Add the capers and give everything a good stir.
    7. Return the steaks to the pan, cover, and simmer over low heat for 4 minutes to allow the flavors to meld.
    8. Garnish with chopped parsley and serve with lemon wedges on the side.

    Tips

    For the best results, make sure your steaks are at room temperature before cooking. This ensures even cooking throughout. When flattening the steaks, be gentle to maintain their structure. Lastly, don’t skip the resting part after cooking; it allows the juices to redistribute, making each bite as juicy as possible.

    Variations & Substitutions

    If you’re looking to switch things up, consider using chicken or pork cutlets instead of beef. Both proteins work wonderfully with the lemon and capers. For a bit of heat, add a pinch of red pepper flakes to the sauce. You can also substitute white wine with chicken broth if you prefer an alcohol-free version.

    Storage

    Leftovers can be a delightful treat. Store any remaining steak and sauce in an airtight container in the refrigerator for up to three days. To reheat, gently warm the steak in a pan over low heat until it’s heated through. Avoid microwaving as it can toughen the meat.

    FAQ

    What can I serve with Steak with Lemon and Capers?

    This dish pairs beautifully with a variety of sides. Consider serving it with creamy mashed potatoes, steamed asparagus, or a fresh arugula salad. The sauce is also fantastic when soaked up with crusty bread.

    Can I use a different type of steak?

    Absolutely! This recipe is quite versatile. Ribeye, sirloin, or even filet mignon would be excellent choices. Just be mindful of cooking times as they may vary depending on the thickness of the steak.

    Nutrition (if applicable)

    This dish is rich in protein and offers a good balance of flavors from healthy fats like olive oil and butter. If you’re mindful of sodium intake, consider rinsing the capers to reduce their saltiness. Adjusting the amount of butter and oil can also help manage caloric content.

    Final Thoughts

    Steak with Lemon and Capers is more than just a meal; it’s an experience. The bright, bold flavors are sure to impress family and guests alike. Whether it’s a casual dinner or a special celebration, this dish delivers a taste of elegance with every bite. Give it a try, and let it become a new favorite in your culinary repertoire!

    Related update: Steak with lemon and capers